Skip to content
Roasted Flavors
  • Home
  • Appetizers
  • Desserts
  • Salads
  • Breakfast
  • Dinner
  • Privacy Policy
  • Contact
  • About

Chef Remy

Fresh Peach Cobbler Delightful and Easy Recipe

June 22, 2025 by Chef Remy
When choosing peaches, look for ones that feel heavy and firm. The skin should be vibrant and slightly fuzzy. A sweet aroma indicates ripeness. For this recipe, peel and slice four large peaches. This step helps the peaches blend well with the batter and creates a lovely texture. To create a great cobbler base, you need key ingredients. Here’s what you will need: - 4 large fresh peaches, peeled and sliced - 1 cup granulated sugar, divided - 1 teaspoon freshly squeezed lemon juice - 1 tablespoon cornstarch - 1 cup all-purpose flour - 1 tablespoon baking powder - 1/2 teaspoon fine sea salt - 1/2 cup unsalted butter, melted and slightly cooled - 3/4 cup whole milk - 1 teaspoon pure vanilla extract - 1 teaspoon ground cinnamon The combination of these ingredients gives the cobbler its rich taste and fluffy texture. The sugar helps to sweeten the peaches and forms a nice crust. You can take your peach cobbler to the next level with these tasty options. Consider adding: - Ice cream or whipped cream for serving - A sprinkle of nuts for crunch - Extra spices like nutmeg for warmth These toppings add flavor and texture to your cobbler. You can mix and match to find your favorite combination. For the full recipe, check out the Sunny Summer Peach Cobbler . Start by peeling the peaches. This step is key for smooth texture. After peeling, slice them into thin pieces. Aim for about 1/4 inch thick. In a mixing bowl, combine the peach slices with 1/2 cup of sugar. Add the lemon juice and cornstarch. Gently toss to coat the peaches. Let this sit for about 10 minutes. This lets the flavors meld and the juices release. In a large bowl, sift the flour, baking powder, salt, and the rest of the sugar. This helps to break up lumps and mix well. Then, pour in the melted butter, milk, and vanilla extract. Stir gently until just combined. Don't worry about lumps; they will bake out. The batter should be thick and creamy. Grease a 9x13-inch baking dish with butter or non-stick spray. Pour the batter into the dish, spreading it out evenly. Avoid stirring! Next, carefully spoon the peach mixture on top of the batter, including the juices. Again, don’t stir. This layering is what makes it special. Finally, sprinkle the cinnamon over the top. Now, place the dish in the preheated oven. Bake for 40-45 minutes until the top is golden brown. To check if it’s done, use a toothpick. It should come out clean. Once baked, let it cool for 10 minutes before serving. Enjoy your fresh peach cobbler delight! For the complete recipe, check the Full Recipe. To get the best texture in your peach cobbler, do not overmix your batter. When you combine the wet and dry ingredients, stop mixing as soon as you see no dry flour. This will keep the cobbler light and fluffy. The batter should look lumpy, and that's okay! The lumps help create a nice rise while baking. Ripe peaches are key for a great cobbler. Look for peaches that yield slightly when you press them. They should smell sweet, too. Avoid peaches that feel hard or have dark spots. If you can't find ripe peaches, you can let them sit at room temperature for a few days to soften. Always preheat your oven to 350°F (175°C). This ensures even baking. When you pour the batter into the baking dish, do not stir it after adding the peaches. This layering makes the cobbler delicious. Also, check for doneness by inserting a toothpick into the batter. If it comes out clean, your cobbler is ready! {{image_4}} You can swap peaches for other fruits. Try juicy plums, sweet cherries, or ripe blueberries. Each fruit brings its own taste. Mixing fruits can create a fun twist. For example, use peaches and blackberries together. This mix adds depth and color to your cobbler. You can easily make this cobbler gluten-free. Use almond flour or a gluten-free flour blend. For dairy-free, replace milk with almond or oat milk. Use coconut oil instead of butter for a rich flavor. These changes keep the dish tasty and friendly for all diets. Adding spices can boost flavor. Try nutmeg or ginger for a warm touch. A splash of almond extract can deepen the taste, too. You might even consider a pinch of cardamom for a unique twist. These small tweaks can turn a good dish into a great one! For the full recipe, check out the Sunny Summer Peach Cobbler . To keep your peach cobbler fresh, let it cool completely. Then, cover the dish with plastic wrap or aluminum foil. You can also transfer it to an airtight container. Store it in the fridge for up to four days. This way, the flavors stay rich and tasty for later enjoyment. When you’re ready to enjoy your cobbler again, preheat your oven to 350°F (175°C). Place the cobbler in an oven-safe dish. Cover it with foil to keep it from drying out. Heat for about 20 minutes. You can check if it’s warm by inserting a toothpick in the center. If it comes out warm, it’s ready to eat! Freezing peach cobbler is an easy way to save it for later. First, let it cool completely. Then, cut it into portions. Wrap each piece tightly in plastic wrap, then place them in a freezer bag. Remove as much air as possible. You can freeze it for up to three months. When you’re ready to eat, thaw it in the fridge overnight and reheat as mentioned above. Enjoy the taste of summer any time! For the full recipe, check out Sunny Summer Peach Cobbler. Your peach cobbler is done when the top turns golden brown and bubbly. After about 40-45 minutes of baking, check with a toothpick. Insert it into the batter. If it comes out clean, your cobbler is ready. The juices should also be bubbling around the edges. Let it cool for about 10 minutes before serving. This helps the juices set for perfect slices. Yes, you can use canned peaches, but fresh peaches taste better. If using canned, choose peaches in juice, not syrup. Drain them well before mixing them with sugar and cornstarch. Canned peaches may make the dish sweeter. Adjust the sugar in your recipe if needed. Fresh peaches give a firmer texture and brighter taste. Peach cobbler is delightful on its own, but adding toppings makes it special. Serve it warm with a scoop of vanilla ice cream. Whipped cream is another tasty option. You can also add a sprinkle of cinnamon or nutmeg for extra flavor. Try a drizzle of caramel sauce for a sweet touch. Enjoy this treat with friends and family! This blog post covered how to make a delicious peach cobbler, from choosing fresh peaches to baking the perfect dessert. We explored essential ingredients, step-by-step instructions, and helpful tips for great texture. You can also try variations with different fruits and storage methods for leftovers. When you follow these steps, you create a tasty peach cobbler that everyone will love. Enjoy the joy it brings and share it with others!

If you love sweet desserts, you’re in for a treat! This Fresh Peach Cobbler recipe is simple, fun, and bursting with juicy flavor. I’ll guide you through choosing the best …

Read more

Categories Desserts

Grilled Corn-On-The-Cob Flavorful and Simple Recipe

June 22, 2025 by Chef Remy
- 4 ears of fresh corn, husked - 4 tablespoons unsalted butter, softened - Fresh herbs and seasonings to enhance flavor To make your grilled corn shine, start with fresh corn. Choose ears that feel firm and heavy for their size. The husk should be bright green, and the silk should be moist. You will also need unsalted butter to create that rich, creamy flavor. Mixing in fresh herbs is key. I love using parsley, basil, and chives, but feel free to use your favorites. - Chili powder for a spicy kick - Other fresh herbs like cilantro or dill If you want to spice things up, add chili powder to your herb butter. This gives the corn a nice kick. You can also mix in other fresh herbs like cilantro or dill for different tastes. Each herb brings a unique flavor, making your grilled corn special every time. - Grill (gas or charcoal) - Aluminum foil - Mixing bowls and utensils You will need a grill, either gas or charcoal, to cook the corn. Aluminum foil is essential for wrapping the corn. This step helps to steam the corn while it grills, keeping it juicy. Mixing bowls and utensils are also needed for preparing the herb butter. Simple tools make this process smooth and easy. For the full recipe, check the details above. - Husk each ear and rinse under cool water. - Pat dry with a clean kitchen towel. First, you need to husk each ear of corn. Remove all the green leaves and silk. This makes sure the corn cooks evenly. Once husked, rinse the corn under cool water. This step will remove any dirt. After rinsing, pat the corn dry with a clean kitchen towel. This helps the butter stick later. - Combine butter with chopped herbs and spices. - Ensure a smooth, well-blended mixture. Next, let’s make the herb butter. In a small bowl, mix the softened butter with chopped herbs. Use parsley, basil, and chives for a fresh taste. Add garlic powder, lemon juice, salt, and pepper too. If you like spice, sprinkle in chili powder. Stir until everything is well blended. This butter is key for flavor! - Wrap corn in foil to trap steam. - Cook on medium-high heat and turn regularly. Now, it’s time to grill! Take a sheet of aluminum foil. Place one ear of corn in the center and fold the foil over it. Make sure it is tightly sealed. This keeps the steam inside, making the corn juicy. Place the wrapped corn on the grill over medium-high heat. Cook for about 15-20 minutes. Turn the corn every 5 minutes for even cooking. When done, the kernels should be tender with a slight char. Check the corn by unwrapping it carefully. The steam will be hot, so be careful! Once cooked, slather the herb butter over each ear. The heat will melt the butter into the corn. Enjoy your delicious grilled corn-on-the-cob! For the complete process, check the Full Recipe. To know when your corn is done, look for tender kernels. They should be bright yellow and slightly charred. This usually takes 15 to 20 minutes on the grill. Turn the corn every 5 minutes for even cooking. This helps it get that tasty char without burning. You can try many seasonings to boost flavor. Mix in spices like paprika or cayenne for a kick. You can also use different herbs in your butter. For a twist, add dill or cilantro. Experiment with flavors to find what you love best. Always handle hot foil and corn carefully. Use tongs or heat-resistant gloves. When unwrapping the foil, keep your face away. The steam can burn you. To avoid burns, be mindful of where you place your hands on the grill. Stay safe while enjoying your delicious grilled corn! {{image_4}} For a tasty twist, try Mexican street corn. Here’s what you need: - 4 ears of grilled corn - 1/2 cup mayonnaise - 1/2 cup cotija cheese, crumbled - 1 tablespoon chili powder - Fresh cilantro, chopped, for garnish - Lime wedges for serving To make it, grill the corn as usual. Once cooked, brush each ear with mayonnaise. Next, sprinkle on the cotija cheese and chili powder. Finish with fresh cilantro and a squeeze of lime juice. This dish bursts with flavor and is a crowd-pleaser! Cheese adds a rich flavor to your corn. Good choices include feta or cotija. Feta gives a creamy taste, while cotija offers a salty bite. Here’s how to add cheese: 1. Grill the corn as directed in the Full Recipe. 2. Once done, sprinkle your chosen cheese over the hot corn. The heat will melt it slightly, making it stick. 3. For extra flavor, drizzle a bit of olive oil on top. This cheesy option is perfect for cheese lovers! Spice up your herb butter with fun flavors. Try garlic or truffle butter for something unique. Here are some ideas: - Garlic Butter: Mix softened butter with minced garlic and a pinch of salt. - Truffle Butter: Blend butter with truffle oil for a fancy touch. - Citrus Butter: Add lemon or orange zest to your herb butter for a fresh twist. These flavored butters can enhance your grilled corn in new ways. Don’t be afraid to experiment! To keep leftover grilled corn fresh, wrap it tightly in plastic wrap. You can also place it in an airtight container. Store it in the fridge for up to three days. When you want to eat it, reheat the corn on the grill or in the microwave. If using the microwave, cover it with a damp paper towel. This keeps it moist and tasty. To freeze grilled corn, let it cool first. Then, cut the kernels off the cob. Place the kernels in a freezer-safe bag, squeezing out the air. You can also freeze the corn on the cob. Wrap each ear in aluminum foil before placing it in a bag. Thaw frozen corn in the fridge overnight. For cooking, you can add frozen corn directly to soups or stir-fries. In the fridge, grilled corn stays fresh for about three days. If it starts to smell bad or looks slimy, it's time to toss it. Check for any dark spots on the kernels. These signs show that the corn has spoiled. Always trust your senses; if it doesn't look or smell right, do not eat it! You should grill corn-on-the-cob for about 15 to 20 minutes. This time gives the corn a tender texture and nice char. Turn the corn every five minutes to ensure even cooking. I find checking one ear helps me know if they are done. The kernels should look plump and bright. A slight char adds great flavor. Soaking corn is optional, but it has some benefits. Soaking can help keep the corn moist while grilling. It also can reduce the cooking time. If you do soak, aim for about 30 minutes in cold water. If you skip soaking, just keep an eye on the corn as it grills. Both methods can lead to tasty results. Yes, you can grill corn without foil! Grilling without foil gives the corn a nice smoky taste. Simply place the husked corn directly on the grill grates. Make sure to turn it often to avoid burning. Cooking time will be similar, about 15 to 20 minutes. Just remember to check for that tender bite. Grilled corn-on-the-cob is simple and tasty. We covered ingredients, prep steps, and grilling tips. Remember, fresh corn and a few herbs make a big difference. Experiment with spices and toppings for fun flavors. Store leftovers safely for later. With these tips, you'll grill corn like a pro. Enjoy your delicious creations!

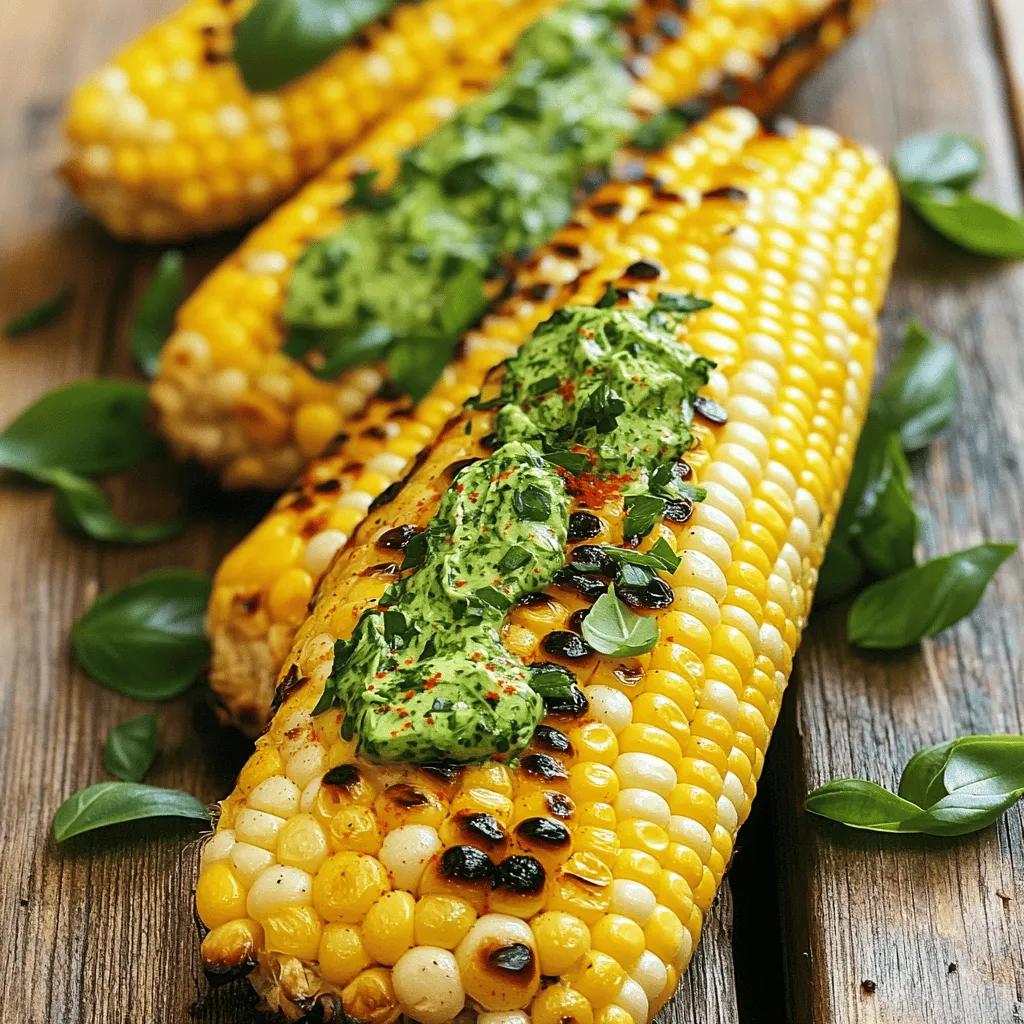
Grilled corn-on-the-cob is a summer favorite that’s both tasty and easy to make. With just a few ingredients, you can create a delicious side dish that pleases everyone. I’ll share …

Read more

Categories Appetizers

Crispy Fried Chicken Irresistible Crunch Every Time

June 22, 2025 by Chef Remy
To make crispy fried chicken, you need a few key ingredients. Here’s what you will need: - 4 chicken thighs - 4 chicken drumsticks - 2 cups buttermilk - 1 tablespoon hot sauce (optional) - 2 cups all-purpose flour These ingredients form the base of your chicken. The buttermilk helps to tenderize the meat. The hot sauce adds a nice kick if you like heat. Seasonings bring the chicken to life. Here’s the list of spices you will need: - 1 tablespoon paprika - 1 tablespoon garlic powder - 1 teaspoon onion powder - 1 teaspoon cayenne pepper - 1 teaspoon salt - 1 teaspoon black pepper Mix these spices into the flour. This blend gives your chicken a rich, deep flavor. You can adjust the spices to suit your taste. Choosing the right oil is key for frying. Here are good options: - Vegetable oil - Canola oil These oils have high smoke points. They help achieve that golden brown crust without burning. Always use enough oil to cover the bottom of your frying pan. This will help cook the chicken evenly. For the full recipe, check out the complete cooking instructions. To make crispy fried chicken, start by marinating the chicken. In a large bowl, mix 2 cups of buttermilk and 1 tablespoon of hot sauce, if you want some heat. Place the chicken thighs and drumsticks in this mix, making sure they are fully covered. Cover the bowl with plastic wrap. Put it in the fridge for at least 2 hours. For the best taste, let it sit overnight. This step adds flavor and makes the chicken tender. Next, prepare the seasoned coating. In a separate bowl, combine 2 cups of all-purpose flour, 1 tablespoon of paprika, 1 tablespoon of garlic powder, 1 teaspoon of onion powder, 1 teaspoon of cayenne pepper, 1 teaspoon of salt, and 1 teaspoon of black pepper. Mix these dry ingredients well. This mix gives the chicken its tasty and crunchy crust. Once the chicken has marinated, it’s time to dredge it. Take each piece of chicken out of the buttermilk, letting the excess drip off. Next, coat the chicken in the seasoned flour. Press the flour onto the chicken so it sticks well. After coating, place the chicken on a clean plate and let it rest for 15 minutes. This resting time helps the coating stay on while frying. For the full recipe, check the earlier section. To get that crunchy outer layer, you need a good coating. Use a mix of flour and spices. I suggest using paprika, garlic powder, and cayenne for flavor. When you coat the chicken, press the flour mix onto each piece. This helps the coating stick well. Let the coated chicken rest for about 15 minutes. This resting time makes a big difference. Keeping the oil at the right heat is key. Heat your oil to about 350°F (175°C). If it's too hot, the outside burns. If it's too cold, the chicken gets soggy. Test the oil by adding a small bit of flour. If it sizzles, it’s ready. Fry in batches to avoid crowding. This keeps the temperature steady. Many people rush the frying process. Take your time! Fry the chicken for about 10-15 minutes on each side. Use a meat thermometer to check the inside. It should reach 165°F (75°C). After frying, place the chicken on a wire rack. This helps keep it crispy. Avoid using paper towels directly on the chicken, as they can trap steam and make it soggy. For the full recipe, check out the Crispy Fried Chicken Delight. {{image_4}} For a zesty twist, add heat to your fried chicken. Mix in hot sauce with the buttermilk. You can also add extra cayenne pepper to the flour mix. This gives the chicken a nice kick. The spicy version is perfect for those who love bold flavors. Pair it with a cooling dip, like ranch or blue cheese. This creates a delightful contrast. Want a healthier take on crispy fried chicken? Try using an air fryer. This method cuts down on oil, making it lighter. Start by marinating the chicken just like in the full recipe. Instead of frying, place the coated chicken in the air fryer basket. Set it to 400°F (200°C) and cook for about 25-30 minutes. Flip halfway for even cooking. You'll still get that crunchy crust but with less fat. If you need a gluten-free option, don’t worry. You can swap all-purpose flour for a gluten-free blend. Look for one that has a good texture for frying. Also, check the buttermilk; some brands may contain gluten. Make sure to read labels carefully. This way, everyone can enjoy crispy fried chicken without any worries! After enjoying your crispy fried chicken, let it cool down. Once it reaches room temperature, place the pieces in an airtight container. You can layer them with parchment paper to keep the crunch. Store the container in the fridge for up to four days. This way, you keep the flavor and texture intact. When you're ready to enjoy the leftovers, reheating is key. Preheat your oven to 375°F (190°C). Place the chicken on a baking sheet. Use a wire rack if you have one. This allows air to circulate around the chicken. Bake for about 15-20 minutes or until it's hot and crispy. Avoid the microwave, as it can make the chicken soggy. If you want to keep your fried chicken longer, freezing is an option. First, let the chicken cool completely. Wrap each piece in plastic wrap or foil. Then, place them in a freezer bag. Squeeze out as much air as possible. You can freeze the chicken for up to three months. To reheat, follow the same steps as before, adding a bit more time for frozen pieces. You should marinate the chicken for at least 2 hours. For the best flavor, I recommend marinating overnight. This helps the chicken soak up all the tasty buttermilk and spices. The ideal frying temperature is 350°F (175°C). You can check the oil by dropping a bit of the flour mixture into it. If it sizzles, you’re ready to fry! Yes, you can use any chicken cut. Thighs and drumsticks are great for frying. Breasts work too, but they can dry out faster. Choose what you like best! Crispy fried chicken goes well with many sides. Here are some tasty options: - Creamy coleslaw - Flavorful cornbread - Mashed potatoes - Baked beans - Fresh garden salad Each side brings out the chicken's crunch and flavor. Enjoy mixing and matching! For the full recipe, check out the Crispy Fried Chicken Delight. Crispy fried chicken is a tasty dish with simple steps. We covered the key ingredients and seasonings that make it shine. I shared how to marinate, coat, and fry the chicken for that perfect crunch. You learned tips for maintaining oil temperature and avoiding common mistakes. Don’t forget the fun variations and storage tips to enjoy your chicken longer. With this guide, you can create delicious fried chicken at home. Now, it’s time to gather your ingredients and start frying! Enjoy every crispy bite.

Crispy fried chicken is a timeless favorite that never disappoints. It offers an incredible crunch that simply calls your name. In this post, I will guide you through each step …

Read more

Categories Dinner

Easy Italian Peach Crumb Cake Simple and Delicious Recipe

June 22, 2025 by Chef Remy
Fresh ingredients bring the best flavor to this cake. Here’s what you need: - 2 ripe peaches, peeled and thinly sliced - 2 large eggs, at room temperature - 1 teaspoon pure vanilla extract Next, let’s look at the dry ingredients. These will create a lovely texture: - 1 cup all-purpose flour - 1/2 cup granulated sugar - 1/2 cup packed brown sugar - 1/2 teaspoon baking powder - 1/4 teaspoon baking soda - 1/4 teaspoon fine sea salt - 1/2 teaspoon ground cinnamon - 1/4 teaspoon ground nutmeg - 1/2 cup rolled oats Lastly, don’t forget the other important ingredient: - 1/2 cup unsalted butter, softened to room temperature By gathering these simple items, you’re one step closer to making a delicious Easy Italian Peach Crumb Cake. Check the [Full Recipe] for more details on how to bring this tasty treat to life! - Preheat your oven to 350°F (175°C). - Grease an 8-inch square baking pan with butter or cooking spray. - In a medium bowl, whisk together: - 1 cup all-purpose flour - 1/2 cup granulated sugar - 1/2 teaspoon baking powder - 1/4 teaspoon baking soda - 1/4 teaspoon fine sea salt This step gets the dry mix ready for the cake. Make sure everything is well-combined. - In a large bowl, cream together: - 1/2 cup unsalted butter, softened - Use an electric mixer until it is light and fluffy. - Add in 2 large eggs, one at a time. Beat well after each. - Stir in 1 teaspoon pure vanilla extract until smooth. Now, gradually mix the dry ingredients into the wet mixture. Stir just until no dry flour shows. Be careful not to overmix. - Gently fold in the 2 ripe peaches, peeled and sliced. Make sure they spread through the batter. - Pour the batter into the prepared pan. Use a spatula to spread it evenly. Next, prepare the crumb topping. In a small bowl, mix together: - 1/2 cup packed brown sugar - 1/2 teaspoon ground cinnamon - 1/4 teaspoon ground nutmeg - 1/2 cup rolled oats - A pinch of fine sea salt Stir until it's well combined. Evenly sprinkle this topping over the peach batter. - Place your cake in the preheated oven. - Bake for 35-40 minutes. - Check for doneness by inserting a toothpick in the center. It should come out clean or with a few moist crumbs. This baking time gives you a nice, warm cake. Let it cool in the pan for at least 15 minutes before slicing. Enjoy your Easy Italian Peach Crumb Cake! For more details, check the Full Recipe. Using ripe peaches is key. They add sweetness and moisture to your cake. Look for peaches that yield slightly to gentle pressure. This means they are juicy and ready to eat. If your peaches are hard, let them sit at room temperature for a few days to ripen. Achieving the perfect butter texture is also important. You want your butter to be soft but not melted. Leave it out for about an hour before you start. When you cream it with sugar, it should look light and fluffy. This step helps your cake rise well. Avoid overmixing the batter. After adding the flour, stir just until you see no dry spots. Overmixing can make your cake tough. It’s better to have a few lumps than a rubbery texture. For even baking, place your cake in the center of the oven. This allows air to flow around it. If your oven has hot spots, consider rotating the cake halfway through baking. This ensures a golden crust and even cooking. Garnishing makes your cake shine. You can dust it with powdered sugar. This adds a nice touch and looks fancy. Fresh mint leaves or a scoop of whipped cream can also elevate the dish. When serving, slice the cake into squares. Each piece should show off the juicy peaches. The crumb topping will add a lovely texture to each bite. {{image_4}} You can swap peaches for other fruits. Blueberries, plums, or even cherries work well. Mixing different fruits adds a fun twist. Try a mix of stone fruits to bring variety to your cake. If you need gluten-free cake, use a gluten-free flour blend. This change keeps the cake tasty and light. For a vegan option, replace eggs with flax eggs. Use coconut or almond butter instead of regular butter. These swaps do not change the cake's great flavor. Adding nuts can boost the cake's flavor and texture. Almonds and walnuts complement the peach taste nicely. You can also play with spices. Ginger and cardamom add warmth and depth to your cake. These small changes make a big difference in taste. For the full recipe, check out the details above. To keep your Easy Italian Peach Crumb Cake fresh, start by storing it at room temperature. Cover the cake with plastic wrap or foil. This will help keep it moist and prevent it from drying out. If you want to store it in the refrigerator, place it in an airtight container. This will keep the cake fresh for a few days. Just remember to let it come to room temperature before serving for the best taste. For long-term storage, you can freeze the cake. First, let it cool completely. Then, wrap it tightly in plastic wrap. After that, place it in a freezer-safe bag. This method helps prevent freezer burn. When you're ready to enjoy it again, remove the cake from the freezer. Let it thaw in the fridge overnight. You can reheat it in the oven at 350°F for about 10-15 minutes. This makes the cake warm and soft again. The cake lasts about 3-4 days at room temperature. If stored in the fridge, it can last up to a week. Watch for signs of spoilage, such as a dry texture or off smell. If you notice these, it’s best to toss the cake. Enjoy every slice while it’s fresh! For the full recipe, check out the delicious Italian Peach Crumb Cake. Yes, you can use canned peaches. However, they will change the texture and flavor. Fresh peaches give a firmer bite and richer taste. Canned peaches are softer and sweeter. Drain them well to avoid too much liquid. This will help keep your cake from becoming soggy. To make the crumb topping crunchier, adjust the ingredient ratios a bit. Increase the rolled oats and use equal parts brown sugar and granulated sugar. This will help create a firmer crust. Bake it a little longer, but watch closely so it doesn’t burn. This cake pairs well with many treats. Serve it with whipped cream for a sweet touch. You could also enjoy it with vanilla ice cream. For drinks, a cup of coffee or sweet tea works great. Yes, you can make this cake ahead of time. Bake it, then let it cool completely. Store it in an airtight container for up to three days. If you want to keep it longer, wrap it well and freeze it. Thaw it overnight before serving. Check out the Full Recipe for more details! You learned how to make an Easy Italian Peach Crumb Cake with fresh ingredients and simple steps. We covered tips for perfecting your cake, including ingredient choices and presentation ideas. I also shared fun variations to try and how to store your cake both short- and long-term. With these insights, you can enjoy delicious moments with your cake. Now, get baking and share your creation!

If you’re craving a sweet, fruity treat that’s simple to make, this Easy Italian Peach Crumb Cake is just for you. With ripe peaches and a crunchy crumb topping, this …

Read more

Categories Desserts

Peaches and Cream Crumble Bars Delicious Dessert Recipe

June 21, 2025 by Chef Remy
- 4 ripe peaches, peeled and sliced - 1 cup heavy cream - 1 cup granulated sugar - 2 cups all-purpose flour - 1 cup old-fashioned oats - 1/2 cup packed brown sugar - 1 teaspoon vanilla extract - 1/2 teaspoon almond extract - 1/2 teaspoon baking powder - 1/4 teaspoon salt - 1/2 cup unsalted butter, melted - 1 tablespoon cornstarch - Zest of 1 lemon The ingredients for Peaches and Cream Crumble Bars are simple yet delicious. Each one plays a key role in creating that wonderful flavor. You can switch out the peaches for berries or apples if you like. This adds new tastes to the dish. If you want a dairy-free option, use coconut cream instead of heavy cream. For those needing gluten-free, almond flour or oat flour can replace all-purpose flour. These swaps let you enjoy this recipe in many ways. They keep the spirit of the dessert alive while catering to your needs. Try different fruits or creams to find your favorite mix! For the full recipe, check out the detailed instructions and tips to guide you through this treat. Error: Error code: 429 - {'error': {'message': 'Rate limit reached for gpt-4o-mini in organization org-zFeAnX8gJvsCtEtJubNX3NN3 on tokens per min (TPM): Limit 200000, Used 200000, Requested 2328. Please try again in 698ms. Visit https://platform.openai.com/account/rate-limits to learn more.', 'type': 'tokens', 'param': None, 'code': 'rate_limit_exceeded'}} To get the right crumble texture, start by mixing the dry ingredients well. Use your fingers to combine the melted butter with the flour, oats, and sugars. Aim for a mix that has small clumps. If it looks too dry, add a bit more butter. Avoid overworking the mixture; clumps give the best texture. Common mistakes to avoid include using cold butter, which won’t blend well. Also, don’t skip the chilling step if you use butter straight from the fridge. A well-mixed crumble will bake evenly and taste great. You can enjoy Peaches and Cream Crumble Bars warm or cold. They taste amazing on their own but pair well with vanilla ice cream. A drizzle of caramel sauce can add sweetness. You could also top it with fresh whipped cream for a richer treat. For a fruity twist, serve with a side of berries. For storage, keep the bars in an airtight container. This keeps them fresh for up to three days. If you want to store them longer, you can freeze them. Wrap them tightly in plastic wrap and then foil. To reheat, place a bar in the microwave for about 15-20 seconds. This brings back that fresh-out-of-the-oven taste. Enjoy them warm for the best flavor! Check out the Full Recipe for more details. {{image_4}} You can change up the flavors in your bars. Add spices like cinnamon or nutmeg for warmth. Vanilla and almond extracts create a lovely taste, but you can also try lemon or orange zest. Mixing in other fruits like berries or apples adds new layers of flavor. Each fruit gives a unique twist to the bars, making them fun and fresh. For vegan options, swap the heavy cream with coconut cream. Use maple syrup instead of sugar for a low-sugar version. You can also use almond or oat milk for a lighter filling. These changes keep the bars tasty while meeting different dietary needs. They let everyone enjoy the dessert without worry. Seasonal fruits can add excitement to your bars. In fall, use chopped apples or pears. In winter, cranberries give a lovely tartness. For summer, try strawberries or blueberries. Each season brings new flavors, keeping your dessert game strong. You can even make themed variations for holidays, like adding pumpkin spice for Thanksgiving or peppermint for Christmas. These twists keep your dessert fresh and fun all year round. To keep your Peaches and Cream Crumble Bars fresh, store them in an airtight container. This helps prevent them from drying out. You can also place parchment paper between layers to keep them intact. They will stay fresh for about 3 to 5 days at room temperature. If you want to keep them longer, consider refrigerating them. You have two options for freezing these bars. You can freeze them before baking or after. If you freeze them before baking, wrap the unbaked mixture tightly in plastic wrap and then foil. When you are ready to bake, thaw them in the fridge overnight and then bake as directed. If you freeze after baking, let the bars cool completely first. Then, cut them into squares and wrap them well. They can be frozen for up to three months. To enjoy them later, thaw the bars in the fridge. You can reheat them in the oven at 350°F for about 10 minutes for the best results. Can I use frozen peaches instead of fresh? Yes, you can use frozen peaches. Just thaw them first. Drain excess liquid before using. This keeps your bars from getting too soggy. Fresh peaches give the best flavor, but frozen works well. How do I know when the bars are done baking? The bars are done when the top is golden brown. You should see peach juices bubbling around the edges. A toothpick inserted in the middle should come out mostly clean. Can I make these ahead of time? Yes, you can make these bars a day ahead. Just cool them completely and store them in the fridge. They taste great cold or warmed up. What to do if the crumble is too dry/wet? If the crumble is too dry, add a bit more melted butter. Mix in small amounts until it holds together. If it’s too wet, add a little more flour or oats. This helps create the right texture. What if the cream doesn’t whip properly? If the cream doesn’t whip, make sure it’s cold. Use chilled bowls and beaters for best results. If it still won’t whip, it may be too old. Start fresh with new cream. Caloric breakdown per serving Each bar has about 200 calories. This depends on the size you cut them. They are a tasty treat, but enjoy in moderation. Information on dietary restrictions These bars contain dairy and gluten. For a dairy-free option, use coconut cream. For gluten-free, substitute the flour with gluten-free flour. Always check labels to ensure your ingredients meet your needs. We covered the key ingredients and steps to make delicious Peaches and Cream Crumble Bars. You learned about substitutions and variations to fit different tastes. We also shared tips for perfecting your crumble and storing your bars. These tips will help you create a great dessert every time. Enjoy exploring new flavors and sharing your tasty treats. Keep these methods in mind, and happy baking!

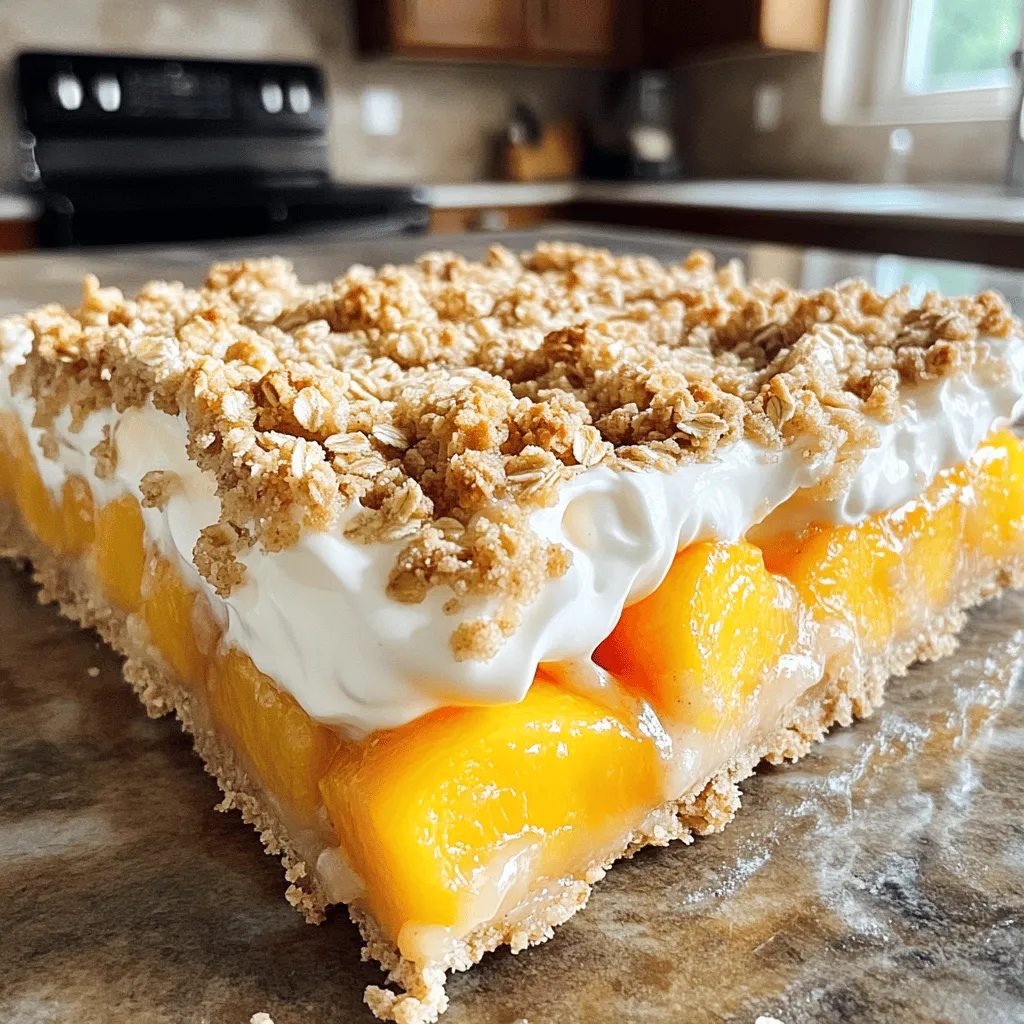
Get ready to indulge in the sweet-and-creamy delight of Peaches and Cream Crumble Bars! This dessert combines juicy peaches with a rich, creamy filling and a crunchy topping. I’ll show …

Read more

Categories Desserts

Crispy Fried Chicken Tenders Easy and Delicious Recipe

June 21, 2025 by Chef Remy
To make crispy fried chicken tenders, you need the following main ingredients: - 1 pound chicken breast, sliced into thin strips - 1 cup buttermilk - 1 tablespoon hot sauce (optional, for a spicy kick) - 1 cup all-purpose flour - 1 cup panko breadcrumbs (for an extra crispy texture) You can add more flavor to your chicken tenders with these optional ingredients: - 1 teaspoon garlic powder - 1 teaspoon onion powder - 1 teaspoon paprika - ½ teaspoon cayenne pepper (optional, adjust according to heat preference) - Salt and pepper to taste Seasonings make a big difference in taste. Use these to enhance your dish: - Garlic powder and onion powder add depth. - Paprika gives a beautiful color and mild flavor. - Cayenne pepper adds heat, but use it wisely! For dipping, I recommend: - Honey mustard for sweetness. - Barbecue sauce for a smoky taste. - Ranch dressing for a creamy finish. You can find the full recipe for crispy fried chicken tenders to explore each step and detail. Start by mixing the buttermilk and hot sauce in a medium bowl. This mixture adds flavor and moisture to the chicken. If you want a spicy touch, include the hot sauce. Next, slice the chicken breast into thin strips. Once you have your chicken, soak the strips in the buttermilk mixture. Make sure all the pieces are coated well. Cover the bowl with plastic wrap and put it in the fridge. Let the chicken marinate for at least one hour. For the best taste, let it sit overnight. Now, let's prepare the breading. In a shallow dish, combine the all-purpose flour and panko breadcrumbs. Add garlic powder, onion powder, paprika, and cayenne pepper. Season with salt and pepper to taste. Mix everything well. This blend gives the tenders their crispy crust. Heat vegetable oil in a deep frying pan or pot over medium heat. Aim for a temperature of 350°F (175°C). To check if the oil is ready, drop a pinch of the breadcrumb mixture into the oil. If it sizzles, you’re good to go! Take the marinated chicken strips out of the buttermilk. Let the excess liquid drip off. Dredge each strip in the flour mixture, then dip it back into the buttermilk. Finally, press it into the breadcrumb mixture. Make sure the crumbs stick well. Carefully lower a few chicken strips into the hot oil. Don’t overcrowd the pan; it can lower the oil temperature. Fry the tenders for about 5 to 7 minutes. Turn them halfway through to ensure even cooking. You want them golden brown and fully cooked. When they're done, use a slotted spoon to lift them out. Place the tenders on a plate lined with paper towels. This absorbs any extra oil. Let them rest for a few moments before serving. This step makes them crispy and delicious. Check out the Full Recipe for more details! To get crispy chicken tenders, oil temperature is key. Heat your vegetable oil to 350°F (175°C). If the oil is too cool, your chicken will absorb more oil and become soggy. If it's too hot, the outside will burn before the inside cooks. Always test the oil with a small breadcrumb. It should sizzle right away. Fry in small batches to keep the temperature steady. Marinating adds flavor and moisture to chicken. I recommend marinating for at least 1 hour. For the best results, try to marinate overnight. The longer the chicken sits in the buttermilk, the more tender and flavorful it becomes. If you add hot sauce, it will give a nice kick. Avoid overcrowding the pan. If you add too many tenders at once, the temperature drops. This makes the chicken greasy and less crispy. Always let excess liquid drip off before breading. This helps the coating stick better. Finally, let the chicken rest on paper towels after frying. This absorbs excess oil and keeps them crispy. For a complete guide, check out the Full Recipe. {{image_4}} You can add a spicy kick to your chicken tenders. Simply mix hot sauce into the buttermilk. I love using a tablespoon or more, depending on how hot you want it. The sauce not only adds heat but also gives flavor. You can serve these spicy tenders with cool ranch dressing to balance the heat. If you want a gluten-free option, swap regular flour with almond flour or gluten-free flour. For the breadcrumbs, use crushed gluten-free cereal or cornmeal. These alternatives still give you that crispy texture you crave. Just make sure to check labels for hidden gluten in other ingredients. You can choose to bake your chicken tenders for a healthier option. Preheat your oven to 425°F (220°C). Place the breaded chicken on a baking sheet lined with parchment paper. Bake for about 15-20 minutes, flipping halfway. This method cuts down on oil but still gives great flavor. You can get crispy chicken without frying, but note the texture will be different. For more details on making these variations, check out the Full Recipe. To keep your chicken tenders fresh, store them in an airtight container. Place parchment paper between layers to prevent sticking. This method helps maintain their crunch. Store them in the fridge for up to three days. If you want them to last longer, consider freezing them. Reheating chicken tenders can be tricky. The best way to keep them crispy is to use an oven. Preheat your oven to 375°F (190°C). Lay the tenders on a baking sheet lined with foil. Heat for about 10-15 minutes, or until they reach your desired crispiness. Avoid using a microwave, as it can make them soggy. Freezing chicken tenders is a great option. Once they are completely cool, place them in a single layer on a baking sheet. Freeze them for about an hour. After that, transfer them to a freezer bag or container. This prevents them from sticking together. You can store them in the freezer for up to three months. When ready to eat, you can bake or fry them straight from the freezer. To make chicken tenders crispy, use panko breadcrumbs. They provide a light, crunchy texture. Coat the chicken well in flour and breadcrumbs. Make sure the oil is hot enough before frying. This helps create that golden crust. The best oils for frying chicken tenders are vegetable oil or canola oil. These oils have high smoke points. This means they can handle high heat without burning. They also have a neutral flavor that won't overpower the chicken. Yes, you can make chicken tenders ahead of time. Prepare the chicken and bread it. Then, store it in the fridge for a few hours or overnight. When ready, just fry them fresh for a crispy finish. Crispy fried chicken tenders pair well with many sides. Think coleslaw, fries, or a fresh salad. Dipping sauces like honey mustard, ranch, or barbecue sauce also enhance the meal. These combinations make for a delicious and fun dining experience. Fry chicken tenders for about 5 to 7 minutes. They should turn golden brown and be fully cooked. To check, cut into one tender. The inside should be white and juices should run clear. In this blog post, we explored how to make crispy fried chicken tenders. We covered key ingredients, including seasonings, and shared step-by-step instructions for frying. I highlighted tips for perfecting crispiness and avoiding common mistakes. You can even try variations like spicy or gluten-free options. Proper storage and reheating methods ensure your leftovers taste great. Remember, the right oil and cooking time make all the difference. Enjoy your tasty chicken tenders with your favorite dipping sauce!

Craving a crunchy, golden bite? Look no further! My crispy fried chicken tenders recipe is simple and so tasty, you’ll want to make it again and again. In this post, …

Read more

Categories Appetizers

Peach Upside-Down Cake Delightful and Simple Recipe

June 21, 2025 by Chef Remy
To make this Peach Upside-Down Cake, gather these fresh and simple ingredients: - 4 ripe peaches, pitted and sliced into thin wedges - 1/2 cup unsalted butter, melted and slightly cooled - 3/4 cup packed brown sugar - 1 teaspoon ground cinnamon - 1 1/2 cups all-purpose flour, sifted - 2 teaspoons baking powder - 1/2 teaspoon sea salt - 1 cup granulated sugar - 2 large eggs, at room temperature - 1 teaspoon pure vanilla extract - 1/2 cup whole milk, at room temperature Measuring your ingredients accurately is key to a great cake. Use dry measuring cups for flour and sugar. For sticky ingredients like brown sugar, pack it down firmly in the cup. Use a liquid measuring cup for milk and melted butter. To get the best results, always level off dry ingredients with a straight edge, like a knife. If you need to make changes, here are some ideas: - Peaches: You can use nectarines or pears if peaches are not in season. - Butter: Coconut oil or margarine can replace unsalted butter for a dairy-free option. - Milk: Almond milk or oat milk works well instead of whole milk. - Sugar: You might swap granulated sugar with coconut sugar for a hint of caramel flavor. These swaps keep the spirit of the recipe while allowing for personal tastes! For the full recipe, check out Peachy Dreams Upside-Down Cake. Start by preheating your oven to 350°F (175°C). This step helps the cake bake evenly. Next, take a 9-inch round cake pan and grease it lightly with softened butter. This will help the cake release easily after baking. In a small bowl, mix together the melted butter, brown sugar, and ground cinnamon. Stir until smooth. Pour this mixture into the bottom of the greased cake pan. Spread it evenly. Now, take the sliced peaches and arrange them over the brown sugar layer. This creates a beautiful topping for the cake. In another bowl, whisk together the sifted flour, baking powder, and sea salt. Make sure there are no lumps. In a large mixing bowl, beat the granulated sugar and the remaining melted butter until light and fluffy. This should take about 3 to 5 minutes. Next, add the eggs one by one, mixing well after each. Stir in the vanilla extract. Gradually mix the flour mixture with the butter mixture and alternately add the whole milk. Start and end with the flour mixture. Carefully pour the cake batter over the arranged peaches in the pan. Use a spatula to spread the batter evenly. Place the pan in your preheated oven and bake for 35-40 minutes. The cake is done when a toothpick comes out clean with a few moist crumbs attached. Once baked, let the cake cool in the pan for about 10 minutes. Then, carefully invert it onto a serving plate. This lets the juicy peaches shine on top. For a nice touch, you can dust the cake with powdered sugar. Serve it warm with a scoop of vanilla ice cream for a delightful treat. You can find the Full Recipe for more details. To make your Peach Upside-Down Cake shine, follow these tips: - Use ripe peaches: They add sweetness and flavor. - Room temperature eggs: They mix better and help the cake rise. - Avoid overmixing: Mix just until combined to keep the cake light. - Grease the pan well: This helps the cake release easily after baking. If your cake doesn’t turn out as planned, here are solutions: - Cake is too dry: Reduce baking time or add more milk next time. - Topping sticks to the pan: Make sure to grease the pan well and let it cool slightly before inverting. - Peaches sink: Use firmer peaches and arrange them tightly to help them stay in place. To elevate the flavors of your cake, consider these ideas: - Add almond extract: It pairs beautifully with peaches. - Use brown butter: This gives a nutty flavor to the cake and topping. - Sprinkle a pinch of sea salt: This enhances sweetness and balances flavors. For more detailed instructions, check the Full Recipe for Peachy Dreams Upside-Down Cake. {{image_4}} You can swap peaches for other fruits. Pineapple slices work well. Apples or pears add a nice crunch. Berries like blueberries or strawberries give a fresh taste. Just remember to adjust the sugar level based on the fruit's sweetness. This keeps your cake balanced and delicious. If you want a healthier twist, try using honey or maple syrup instead of brown sugar. These options add a unique flavor. For the flour, consider almond or coconut flour for a gluten-free cake. Make sure to adjust the liquid in the recipe as these flours absorb moisture differently. To make a gluten-free version, use a gluten-free flour blend. You can find many blends at the store. Follow the same steps in the recipe. The cake may be a bit denser, but it will still be delicious. Enjoy this treat without worry, and share it with everyone! For the detailed recipe, check the Full Recipe for all the steps and tips! To keep your cake fresh, store leftovers in an airtight container. Place the container in the fridge. This will help maintain the cake’s moisture and flavor. Enjoy the cake within three to four days for the best taste. If you want to enjoy warm cake, preheat your oven to 350°F (175°C). Place a slice of cake on a baking sheet. Heat it for about 10 minutes. You can also use the microwave for quick warmth. Heat a slice for 15 to 20 seconds. Just be careful not to overheat it. You can freeze Peach Upside-Down Cake for later enjoyment. Wrap the cooled cake tightly in plastic wrap. Then, place it in a freezer-safe bag or container. It will stay fresh in the freezer for up to three months. To thaw, leave it in the fridge overnight before serving. For the best taste, enjoy it within one month of freezing. For the full recipe, check out the Peachy Dreams Upside-Down Cake recipe. Peach Upside-Down Cake comes from the classic upside-down cake style. This style began in the United States during the 1920s. It became popular because it was easy to make and looked great. The method of cooking fruit under a cake batter made it special. Peaches were often used due to their sweet flavor and juicy texture. Yes, you can use canned peaches. They work well in this recipe. Just make sure to drain them well to avoid extra liquid. Canned peaches will also save you some prep time. However, fresh peaches add a brighter taste and a lovely texture to the cake. To check if the cake is done, use a toothpick. Insert it into the center of the cake. If it comes out clean or with a few moist crumbs, the cake is ready. You can also gently press the top. If it springs back, your cake is done baking. Yes, you can make this cake in advance. It tastes great the next day. Let it cool completely before storing. Keep it in an airtight container at room temperature. You can also refrigerate it if you prefer. Just remember to bring it back to room temperature before serving. Peach Upside-Down Cake pairs well with many tasty options. Here are some ideas: - A scoop of vanilla ice cream - Whipped cream for a light touch - Fresh mint leaves for a pop of color - A drizzle of caramel sauce for extra sweetness These toppings will enhance the flavors and make your dessert even more delightful. You can find the full recipe to get started on your delicious Peach Upside-Down Cake! This blog post covered how to make a delicious peach upside-down cake. We looked at the ingredients, including measuring tips and substitutions. I shared clear steps for prepping, baking, and serving the cake. In addition, I provided key tips to avoid common issues and flavor-enhancing ideas. You can also try tasty variations and learn how to store or reheat leftovers. With these tips, you can bake a delightful cake every time. Enjoy your baking journey!

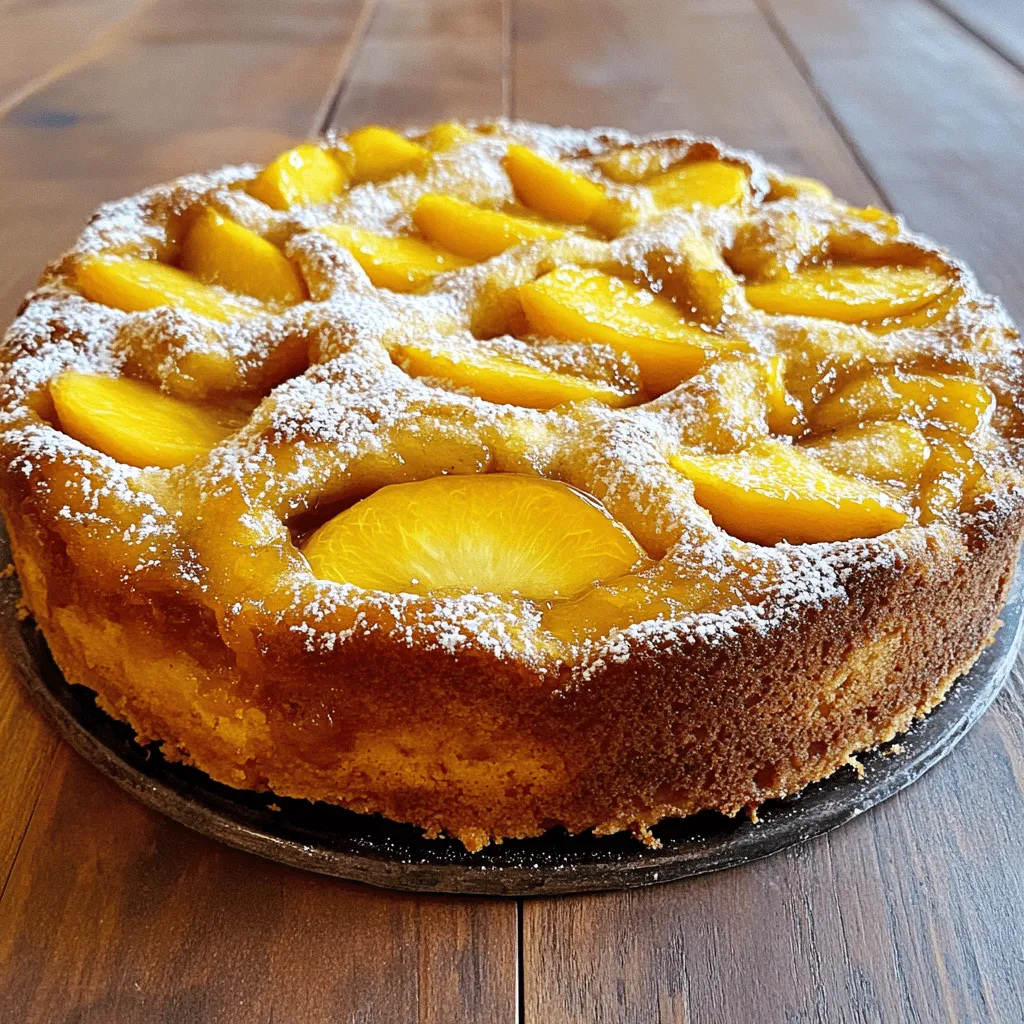
Looking for a delightful dessert that impresses your family and friends? You’ve found it! This Peach Upside-Down Cake is easy to make and bursting with juicy flavors. I’ll guide you …

Read more

Categories Desserts

The Perfect Peach Pie Flavorful and Simple Recipe

June 21, 2025 by Chef Remy
For this pie, you need 6 cups of fresh peaches. Choose ripe peaches for the best flavor. Peel and slice them before use. Ripe peaches should be soft but not mushy. They should smell sweet and fragrant. Sliced peaches will create a juicy filling. You will need 1 cup of granulated sugar for sweetness. Add 1 tablespoon of freshly squeezed lemon juice to brighten the flavor. Use 1 tablespoon of cornstarch to help thicken the filling. This will keep the pie from being runny. For warmth and aroma, mix in 1 teaspoon of ground cinnamon and 1/4 teaspoon of freshly grated nutmeg. You can use a store-bought pie crust or make your own. You will need 1 recipe of unbaked pie crust. For a golden crust, prepare an egg wash with 1 large egg and 1 tablespoon of milk. This will give the crust a lovely shine when baked. For the full recipe, check out The Ultimate Peach Pie Delight. First, preheat your oven to 425°F (220°C). This step is key for a crispy crust. A hot oven ensures that the pie bakes evenly and quickly. Next, grab a big bowl for your filling. Combine 6 cups of fresh, sliced peaches with 1 cup of sugar, 1 tablespoon of lemon juice, 1 tablespoon of cornstarch, 1 teaspoon of cinnamon, and 1/4 teaspoon of nutmeg. Mix gently until the peaches are well coated. Let the mixture sit for about 15 minutes. This helps the peaches release their juices for a sweeter filling. Now, roll out your pie crust on a floured surface. Fit it into a 9-inch pie pan. Trim the edges, leaving some overhang. Pour in your peach filling, spreading it evenly. Dot the filling with small cubes of butter for extra flavor. If you have a second pie crust, you can cover the filling or create a lattice top. Crimp the edges to seal the pie. Whisk together 1 egg and 1 tablespoon of milk to make an egg wash. Brush this mix over the crust for a nice golden color. Place the pie in the oven on a baking sheet to catch drips. Bake for 45-50 minutes until golden brown. Let it cool for at least an hour before slicing. Enjoy your delicious peach pie with a scoop of ice cream! For the full recipe, check The Ultimate Peach Pie Delight. To make the best peach pie, you need ripe peaches. Look for peaches that are slightly soft when you press them gently. They should have a sweet smell and a vibrant color. Avoid any that are hard or have dark spots. If you can, choose local, in-season peaches. They taste better and are fresher. If you have to buy peaches that are not ripe, let them sit at room temperature for a few days. This helps them sweeten and soften. Baking your pie evenly is key to a great result. Start by preheating your oven to 425°F (220°C). Don’t skip this step! A hot oven gives a nice brown crust. Place your pie on a baking sheet. This catches any drips and helps with even heat. Check your pie around the 30-minute mark. If the edges brown too fast, cover them with foil. This way, your pie bakes evenly without burning. A lattice top makes your pie look fancy and lets steam escape. Roll out your second pie crust on a floured surface. Cut it into strips about one inch wide. Lay half of the strips across the pie filling, spaced evenly. Then, fold every other strip back. Add a new strip perpendicularly and fold the strips back down. Repeat this until you cover the pie. Trim the edges and crimp them together. This creates a beautiful, homemade touch to your peach pie. For the full recipe, check out The Ultimate Peach Pie Delight 🥧. {{image_4}} You can mix fresh berries with peaches for a fun twist. Blueberries, raspberries, or strawberries work well. Use about 1 to 2 cups of berries alongside your peach filling. This adds color and a burst of flavor. The sweet and tart notes from berries complement the peaches perfectly. For a crunchy topping, swap the top crust for a crumble. Mix together 1 cup of all-purpose flour, 1/2 cup of brown sugar, and 1/2 cup of cold butter. Use your fingers to create a crumbly texture. Spread this mixture over the peach filling before baking. This gives the pie a delightful crunch and adds rich flavor. You can play with spices to enhance the peach pie. Try adding a pinch of ginger or cardamom for warmth. You can also use vanilla extract for a sweet aroma. Experimenting with spices can create unique flavor profiles. Just remember to keep the balance so the peach flavor shines through. For the full recipe of the perfect peach pie, refer to the section above. To keep your leftover peach pie fresh, cover it tightly. Use plastic wrap or foil. Store it in the fridge for up to three days. This keeps the crust crisp and the filling tasty. If you want to save it longer, freezing works too. You can freeze your peach pie for up to three months. First, let the pie cool completely. Wrap it in plastic wrap, then in foil. This prevents freezer burn. When you’re ready to enjoy it, thaw it in the fridge overnight before reheating. To reheat your pie, preheat your oven to 350°F (175°C). Remove the pie from the fridge. Place it on a baking sheet to catch drips. Heat it for about 20-30 minutes, or until warm. You can also microwave slices for quick warming, but the crust may lose some crunch. Enjoy your warm slice with a scoop of ice cream! To prevent a soggy crust, you can take a few simple steps. First, blind-bake your crust before adding the filling. This means baking the crust alone for a short time. Use pie weights or dried beans to keep the crust flat. Also, sprinkle a thin layer of cornstarch or sugar on the bottom before filling it. This acts as a barrier to the juices. Lastly, avoid overfilling the pie. Too much juice can make the crust soggy. Yes, you can use frozen peaches. They work well in pies. Just make sure to thaw them first. Drain any excess liquid after thawing. This helps prevent a watery filling. You might also want to increase the cornstarch a bit. This helps absorb extra juice from the frozen peaches. Using frozen fruit is a great option when fresh peaches are not in season. The best way to serve peach pie is warm or at room temperature. A scoop of vanilla ice cream on top adds a nice touch. You can also sprinkle powdered sugar for extra sweetness. For an elegant look, add fresh mint leaves as a garnish. This makes each slice pop and enhances the dessert's appeal. Enjoy it with friends and family for a perfect treat. In this blog post, we explored how to make a delicious peach pie. We covered key ingredients like fresh peaches, sugar, and a good pie crust. I provided step-by-step instructions to guide you through making it. We also shared tips for picking peaches and achieving the perfect bake. Don't forget about fun variations and how to store your pie. In conclusion, a homemade peach pie can bring joy to any meal. Enjoy this simple yet tasty dessert with family and friends!

Are you ready to bake the perfect peach pie? This recipe brings the taste of summer into your kitchen with just a few simple steps. Fresh peaches, a flaky crust, …

Read more

Categories Desserts

Mexican Street Corn Pasta Salad Flavorful and Fresh Mix

June 21, 2025 by Chef Remy
To make Mexican Street Corn Pasta Salad, gather these key ingredients: - 8 oz fusilli pasta - 1 cup corn kernels (fresh or frozen) - 1 red bell pepper, diced into small cubes - 1/2 red onion, finely chopped - 1 jalapeño pepper, seeded and minced - 1/2 cup cotija cheese, crumbled - 1/4 cup fresh cilantro, roughly chopped - 1/4 cup mayonnaise - 2 tablespoons sour cream - 2 tablespoons fresh lime juice - 1 teaspoon chili powder - Salt and freshly ground black pepper to taste You can easily swap out some ingredients based on what you like or have on hand: - Pasta: Use any short pasta like rotini or penne. - Corn: Canned corn works well if fresh is not available. - Cheese: Feta cheese can replace cotija for a similar taste. - Herbs: If you dislike cilantro, try parsley or omit it. - Spice Level: If you want it milder, skip the jalapeño or use bell pepper instead. This salad serves about 4 to 6 people. It makes a great dish for picnics, potlucks, or family dinners. You can easily double the recipe if you need more servings. For a lighter side, serve smaller portions alongside grilled chicken or fish. This salad will make your meal colorful and tasty! Enjoy every bite! Start by boiling water in a large pot. Add a pinch of salt to the water. Once it boils, add 8 oz of fusilli pasta. Cook it according to the package instructions until it is al dente. This means it should be firm to the bite. When done, drain the pasta in a colander. Rinse it under cold water to stop the cooking. This makes the pasta cool and ready for the salad. Take out a large skillet and heat it over medium heat. Add 1 cup of corn kernels. You can use fresh or frozen corn. Sauté the corn for about 5-7 minutes. Stir it often until the kernels get a nice char. This step adds a smoky flavor to the corn. Once done, remove the skillet from heat and let the corn cool. In a big mixing bowl, combine the cooled fusilli pasta and the charred corn. Add in 1 diced red bell pepper, 1/2 finely chopped red onion, and 1 minced jalapeño pepper. This mix gives the salad a colorful look and a crunchy texture. Stir gently to combine all the ingredients well. In a small bowl, whisk together the dressing. Use 1/4 cup mayonnaise, 2 tablespoons sour cream, and 2 tablespoons fresh lime juice. Add 1 teaspoon chili powder, salt, and black pepper to taste. Mix until smooth and creamy. This dressing brings a rich taste to the salad, balancing the fresh ingredients. Pour the creamy dressing over the pasta mix. Gently toss everything together until all ingredients are coated. Next, fold in 1/2 cup crumbled cotija cheese and 1/4 cup chopped cilantro. Mix just until combined to keep some texture. Taste the salad and adjust the seasoning if needed. Cover the bowl with plastic wrap and chill in the fridge for at least 30 minutes. This chilling time helps the flavors blend. Serve it cold, and enjoy the deliciousness of this Mexican Street Corn Pasta Salad. For more details, check the Full Recipe. To make this dish shine, use fresh ingredients. Fresh corn has a sweet crunch that frozen corn lacks. If you can, grill or char the corn. This adds a smoky flavor. The red bell pepper gives a nice sweetness. Always taste the salad before serving. Adjust the salt and lime juice to your liking. This boosts the flavors in your salad. Store any leftover salad in an airtight container. It will stay fresh in the fridge for up to three days. If the salad gets too dry, add a bit of lime juice or mayo before serving again. Do not freeze the salad. Freezing will change the texture of the pasta and veggies. Plan to make this salad about 30 minutes before serving. It needs time to chill in the fridge. This allows all the flavors to mix well. If you want to prepare it ahead of time, you can. Just keep the dressing separate until you're ready to serve. This keeps the pasta from getting mushy. For the full recipe, check out the steps above. {{image_4}} You can add many fun ingredients to this pasta salad. Some great options include: - Avocado, diced for creaminess - Black beans for protein - Cherry tomatoes, halved for sweetness - Radishes, sliced for crunch - Green onions, chopped for a fresh bite These additions can give your salad more texture and flavor. Choose what you like best! If you want to spice things up, try these ideas: - Add more jalapeño, keeping some seeds for heat. - Use a dash of hot sauce in the dressing. - Mix in smoked paprika for a smoky flavor. - Try a sprinkle of cayenne pepper for an extra kick. These spicy enhancements will bring your salad to life. Adjust the spice level to suit your taste! This dish can easily fit a vegetarian or vegan diet. Here’s how: - Swap cotija cheese with vegan cheese or nutritional yeast for a cheesy taste. - Use a vegan mayo instead of regular mayonnaise. - Replace sour cream with vegan yogurt. These swaps keep the salad delicious and satisfying without animal products. Enjoy a fresh, vibrant meal that's kind to all diets. For the full recipe, check out the Mexican Street Corn Pasta Salad section! To keep your Mexican street corn pasta salad fresh, place it in an airtight container. Make sure the lid seals well to avoid air exposure. Chill it in the fridge right after serving. The salad tastes best when eaten within three days. If you notice any changes in smell or texture, it's best to toss it out. I do not recommend freezing this salad. The pasta and fresh veggies do not freeze well. They can become mushy when thawed. If you must freeze it, try to separate the dressing from the pasta mix. You can freeze the pasta and veggies for up to one month. When ready to eat, thaw them in the fridge overnight and mix them with fresh dressing. Most ingredients in this salad have a good shelf life. Here’s a quick look: - Fusilli pasta: Lasts for up to 2 years when dry. - Corn kernels: Fresh corn stays good for about a week. Frozen corn lasts for about 8 months. - Red bell pepper: Fresh peppers last for about a week in the fridge. - Red onion: Can last for 1-2 months if stored properly. - Jalapeño pepper: Fresh peppers last for about 1-2 weeks. - Cotija cheese: Stays fresh for about 1-2 weeks after opening. - Fresh cilantro: Keeps for about a week in the fridge. - Mayonnaise and sour cream: Usually good for 1-2 months after opening. - Lime juice: Fresh juice lasts about a week, while bottled lasts longer. - Chili powder: Can last for 2-3 years if stored in a cool, dry place. By paying attention to shelf life, you can enjoy your salad fresh and tasty! Mexican Street Corn Pasta Salad is a fun twist on classic street corn. This dish combines pasta with corn, peppers, and cheese. The creamy dressing gives it a nice, rich flavor. You mix in lime juice and chili powder for zest. It’s colorful and tasty, making it perfect for any meal. Yes, you can make this salad ahead of time. Prepare it a few hours before serving. Chilling it allows the flavors to blend well. Just cover it tightly and keep it in the fridge. It stays fresh for up to two days. Absolutely! You can use gluten-free pasta instead of regular fusilli. This swap keeps the salad tasty and friendly for those with gluten issues. Look for gluten-free pasta in your store. Make sure to check labels for other gluten sources. This salad pairs well with grilled meats or fish. It also works as a side dish for tacos or burritos. You can enjoy it at picnics or barbecues. Serve it next to a fresh green salad for a full meal. You can add ingredients like avocado or black beans for extra flavor. If you like heat, toss in more jalapeños. For a creamier texture, use more mayonnaise or sour cream. Feel free to change the cheese, too. You can use feta or goat cheese instead of cotija. Check out the Full Recipe for more ideas! This blog post shared key ingredients, step-by-step cooking directions, and useful tips for making Mexican Street Corn Pasta Salad. You learned about ingredient swaps and portion sizes while exploring fun variations. Remember, this salad is all about mixing flavors and personalizing it to your taste. With proper storage, leftovers can stay fresh, ensuring you enjoy each bite. Dive into this dish, and let your culinary creativity shine!

Looking for a dish that combines the bold flavors of Mexican street corn with the heartiness of pasta? You’ve found it! This Mexican Street Corn Pasta Salad is not only …

Read more

Categories Salads

Easy Southern Peach Cobbler Delightful and Simple Recipe

June 20, 2025 by Chef Remy
To make this easy Southern peach cobbler, gather these main ingredients: - 4 cups fresh peaches, peeled and sliced - 1 cup granulated sugar, divided - 1 teaspoon pure vanilla extract - 1 teaspoon ground cinnamon - 1 tablespoon freshly squeezed lemon juice - 1 cup all-purpose flour, sifted - 1 tablespoon baking powder - 1/2 teaspoon fine salt - 1 cup whole milk, at room temperature - 1/2 cup unsalted butter, melted and slightly cooled These ingredients combine to create a sweet and comforting dessert that makes everyone smile. You can also add some optional ingredients for extra flavor: - 1 teaspoon ground nutmeg (for a warm spice) - Vanilla ice cream (for serving, highly recommended) Using nutmeg gives a nice aroma to the cobbler. Serving it with ice cream makes it even better! If you don’t have some ingredients, here are some substitutions: - Use frozen peaches instead of fresh ones. Just thaw and drain them well. - Swap granulated sugar for brown sugar for a deeper flavor. - For a dairy-free option, use almond milk or coconut milk instead of whole milk. - You can replace all-purpose flour with gluten-free flour for a gluten-free version. These swaps can help you make the recipe suit your needs. Enjoy this delightful treat with your own twist! For the complete recipe, check out the [Full Recipe]. Start by washing and peeling 4 cups of fresh peaches. Slice them into thin wedges. In a big bowl, mix the peach slices with 1/2 cup of granulated sugar, 1 teaspoon of vanilla extract, 1 teaspoon of ground cinnamon, and 1 tablespoon of lemon juice. Toss gently to coat the peaches well. Let this sit for about 10 minutes. This step lets the peaches soak in the sugar and spices, making them sweeter and tastier. In another bowl, whisk together 1 cup of sifted all-purpose flour, 1 tablespoon of baking powder, 1/2 teaspoon of fine salt, and the remaining 1/2 cup of sugar. This dry mix is the base for your batter. Slowly add 1 cup of whole milk while stirring gently. Mix just until combined; be careful not to overmix. Finally, fold in 1/2 cup of melted and slightly cooled unsalted butter. This will make your batter smooth and rich. Pour the batter into a greased 9x13-inch baking dish. Spread it evenly across the bottom. Next, spoon the marinated peach mixture over the batter. Do not stir; this helps create those lovely layers in the cobbler. If you like, sprinkle some ground nutmeg on top for extra flavor. Place the dish in an oven preheated to 350°F (175°C) and bake for 40-45 minutes. Look for a golden brown top and bubbly surface. Once done, let it cool for a few minutes before serving. This lets the flavors deepen and makes it easier to scoop out. You can find the full recipe [here](#). Pick ripe peaches for the best taste. Look for peaches that are soft but not mushy. They should smell sweet and fragrant. A little give when you press them means they are ready. Avoid peaches with bruises or dark spots. You want to enjoy the fresh, juicy flavor in your cobbler. One mistake is overmixing the batter. This can lead to a tough cobbler. Mix just until combined for a light texture. Another common error is using unripe peaches. This can make your cobbler less sweet and flavorful. Always taste your peaches before adding them. Lastly, don’t stir the peach mixture into the batter. Just layer it on top for that perfect cobbler effect. To get great texture, use cold butter in your batter. This helps create a light, flaky crust. Adding lemon juice brightens the peach flavor. Also, don’t skip the vanilla! It adds warmth and depth to the dish. For extra flavor, sprinkle nutmeg on top before baking. This will enhance the sweet peach taste. Follow these tips for a truly delightful peach cobbler experience. Check the Full Recipe for more details! {{image_4}} You can add other fruits to your peach cobbler for a fun twist. Try using berries, like blueberries or raspberries, alongside the peaches. Apples also work great. Just keep the same amount of fruit. Mix the fruits in with your peaches, and enjoy a burst of flavors. If you need a gluten-free option, swap the all-purpose flour for a gluten-free blend. Many stores sell these blends. Make sure it has a good mix of flours for the best results. Follow the same instructions as the original recipe. You will still get a tasty cobbler! To make this recipe vegan, replace the butter with coconut oil or a vegan butter. You can also use almond milk or soy milk instead of whole milk. For the eggs, you can try using flaxseed meal mixed with water. Just mix one tablespoon of flaxseed meal with three tablespoons of water and let it sit until it thickens. These changes keep the cobbler delicious and plant-based. For the full recipe, check out the earlier section. To keep your leftover peach cobbler fresh, store it in an airtight container. Place it in the fridge. This will help maintain its taste and texture. Try to eat it within three to four days for the best flavor. If you want to save some cobbler for later, freezing is a great option. First, let the cobbler cool completely. Then, cut it into portions. Wrap each piece tightly in plastic wrap, then place them in a freezer-safe bag. You can freeze it for up to three months. To reheat, take a piece out and let it thaw in the fridge overnight. Then, warm it in the oven at 350°F for about 15 minutes. This keeps it soft and tasty. Leftover peach cobbler is delicious on its own, but you can make it even better. Serve it warm with a scoop of vanilla ice cream. The cold ice cream melts into the warm cobbler, creating a tasty mix. You can also top it with whipped cream or a sprinkle of cinnamon for extra flavor. If you're feeling adventurous, add some nuts for crunch. Enjoy the cozy taste of Southern peach cobbler even after the main meal! You can serve peach cobbler with many tasty sides. Here are some ideas: - Vanilla ice cream adds a creamy touch. - Whipped cream gives it a lightness. - Fresh mint leaves add a pop of color and flavor. - A sprinkle of cinnamon enhances the warm spices. These sides make each bite even better. Yes, you can use canned peaches. They save time and are easy to find. Just make sure to drain them well. Here’s how to adapt the recipe: - Use about 3 cups of canned peaches. - Reduce the sugar by a bit since canned peaches are sweet. This way, you still get that delicious cobbler taste. You can tell if the cobbler is done by looking and testing. Here are some signs: - The top should be golden brown. - The edges should be bubbly. - A toothpick inserted into the center should come out clean. If these signs are met, your cobbler is ready to enjoy! This blog post covered all you need to know about making easy Southern peach cobbler. We looked at the key ingredients, from peaches to optional flavors. I shared step-by-step instructions to prep, mix, and bake the cobbler perfectly. You learned tips to pick ripe peaches and avoid common mistakes. We explored fun variations, storage tips, and answered your FAQs. With this knowledge, you can create a delicious peach cobbler, perfect for any occasion. Enjoy your baking!

Are you ready to bring a taste of the South into your kitchen? My Easy Southern Peach Cobbler recipe is both delightful and simple. Fresh peaches combine with a buttery, …

Read more

Categories Desserts
Older posts
Newer posts
← Previous Page1 … Page85 Page86 Page87 … Page130 Next →

ROASTED RECIPES

Where bold flavors meet everyday meals. Warm, vibrant, and made to share. 🔥🥗🍴

PAGES

Home About Contact Privacy Policy Terms & Conditions Cookie Policy GDPR Policy Copyright Policy Disclaimer

CATEGORIES

Appetizers Desserts Salads Breakfast Dinner

Contact

  • Pinterest
  • Mail
Copyright © 2025 Roasted Flavors. All rights reserved.