Skip to content
Roasted Flavors
  • Home
  • Appetizers
  • Desserts
  • Salads
  • Breakfast
  • Dinner
  • Privacy Policy
  • Contact
  • About

Chef Remy

Crispy Parmesan Zucchini Fries Air Fryer Delight

October 20, 2025 by Chef Remy
- 2 medium zucchini - 1 cup Panko breadcrumbs - ½ cup freshly grated Parmesan cheese - 1 teaspoon garlic powder - ½ teaspoon onion powder - 1 teaspoon Italian seasoning - Salt and black pepper - 1 large egg - 1 tablespoon extra-virgin olive oil When making crispy Parmesan zucchini fries, you need fresh, quality ingredients. Start with two medium zucchini. Slice them into fry shapes. This helps them cook evenly and fit in your air fryer. Next, grab a cup of Panko breadcrumbs. These breadcrumbs give your fries an extra crunch. You also need half a cup of freshly grated Parmesan cheese. This cheese adds a rich, salty flavor. For seasoning, gather garlic powder, onion powder, and Italian seasoning. You’ll need one teaspoon of garlic powder, half a teaspoon of onion powder, and one teaspoon of Italian seasoning. Add salt and black pepper to taste. These spices will make your fries pop with flavor. To bind everything together, use one large egg and one tablespoon of extra-virgin olive oil. The egg helps the coating stick to the zucchini. The olive oil adds moisture and richness. With these ingredients ready, you are set to create a snack that is both tasty and fun to make! Start by setting your air fryer to 400°F (200°C). This step warms up the fryer, ensuring crispy fries. Grab two bowls. In the first bowl, mix these dry ingredients: - 1 cup Panko breadcrumbs - ½ cup freshly grated Parmesan cheese - 1 teaspoon garlic powder - ½ teaspoon onion powder - 1 teaspoon Italian seasoning - Salt and freshly ground black pepper to taste Stir them well to combine. In the second bowl, whisk one large egg with 1 tablespoon of extra-virgin olive oil. Mix until smooth. Take a zucchini fry and dip it into the egg mixture. Make sure to coat it fully. Next, transfer it to the breadcrumb mix. Roll it around until it’s evenly coated. Repeat this for all zucchini fries. This method ensures a nice, even coverage. Arrange the coated fries in a single layer in the air fryer basket. Avoid stacking them to help them cook evenly. You might need to fry in batches if your air fryer is small. Set the timer for 10-12 minutes. Halfway, shake the basket to promote even cooking. Look for a golden brown color to know when they're done. The fries should be crispy on the outside. Shaking the basket helps them crisp up evenly. If they need more time, give them another minute or two. Enjoy the crunch! To make your zucchini fries super crispy, always use Panko breadcrumbs. They are lighter and airier than regular breadcrumbs. This helps create that perfect crunch you want. When you coat your zucchini, make sure to press the breadcrumbs well. This step ensures they stick tightly. Cooking in batches is key. If you crowd the air fryer, the fries steam instead of fry. This can lead to sogginess. Frying in smaller groups lets hot air circulate. You get crispy results every time. These crispy fries pair perfectly with dips. Marinara sauce is a classic choice. It adds a nice tang. Garlic aioli also works well. Its creaminess complements the crunch. For presentation, arrange the fries on a bright platter. A splash of color makes them look even more appetizing. You can garnish with fresh parsley or basil leaves. This adds a touch of green and a hint of flavor. You can prepare the ingredients in advance. Slice the zucchini and mix the coatings. Store them in the fridge. This way, you can quickly fry them later. If you want to reheat the fries, do so in the air fryer. This keeps them crispy. Avoid using the microwave, as it makes them soggy. Just a few minutes in the air fryer brings back that crunch. {{image_4}} You can spice up your crispy Parmesan zucchini fries. Try adding smoked paprika for a smoky flavor. If you like heat, sprinkle in some cayenne pepper. Both spices boost the taste and make each bite exciting. You can also switch cheese types. Instead of Parmesan, use Pecorino Romano or even cheddar. Each cheese adds a different twist. Zucchini isn’t the only veggie to fry. Try eggplant for a rich taste. Green beans work well too; they get crispy quickly. Remember to adjust cooking times. Eggplant may need a few extra minutes, while green beans could take less time. Keep an eye on them to avoid burning. Want a gluten-free version? Use gluten-free breadcrumbs instead of Panko. They still give a nice crunch. You can also replace the egg with a mixture of ground flaxseed and water. This swap binds your fries without gluten. These options make the dish friendly for everyone! To store leftover zucchini fries, place them in an airtight container. Make sure they are cool before sealing. For best taste, eat them within 2-3 days. After this time, they may lose their crunch. The air fryer is the best way to reheat zucchini fries. Preheat it to 375°F (190°C). Place the fries in a single layer and heat for 5-7 minutes. This helps them regain their crispy texture. You can also use an oven. Set it to 375°F (190°C) and bake for about 10 minutes. Avoid using the microwave, as it can make them soggy. To freeze zucchini fries, place them on a baking sheet in a single layer. Freeze them for 1-2 hours until firm. Then, transfer them to a freezer bag. They can stay fresh for up to 3 months. When ready to eat, thaw them in the fridge overnight. Reheat in the air fryer or oven as mentioned earlier. This will give you that crispy bite again. To keep your zucchini fries crispy, focus on coating them well. Use Panko breadcrumbs for extra crunch. Make sure to shake off any excess coating after breading. Air frying at 400°F (200°C) helps achieve that ideal crispiness. Avoid overcrowding the basket; this allows hot air to circulate. Fry in batches if needed. Remember to shake the basket halfway through cooking. This ensures even crispness and golden color. Yes, you can use regular breadcrumbs, but the texture will differ. Panko breadcrumbs are coarser and create a crunchier fry. Regular breadcrumbs may yield a denser coating. If you prefer a softer texture, stick with regular breadcrumbs. However, for that delightful crunch, Panko is the way to go! Zucchini fries taste great with a variety of dips. Here are some ideas: - Marinara sauce for a classic touch. - Creamy garlic aioli for a rich flavor. - Ranch dressing for a cool contrast. - Spicy sriracha mayo for a kick. You can easily make aioli by mixing mayo with minced garlic and lemon juice. To adjust the recipe, simply scale the ingredients. For a smaller batch, use one zucchini and halve the other ingredients. For a larger batch, double the amount of zucchini and other ingredients. Just keep your air fryer size in mind. You may need to cook in batches for best results. Yes, you can bake these zucchini fries in the oven. Preheat your oven to 425°F (220°C). Arrange the coated fries on a baking sheet lined with parchment paper. Bake for 20-25 minutes, flipping halfway through. Look for a golden brown color to know they are ready. Baking will give you a different texture but still delicious! Zucchini fries are simple and fun to make. You start with fresh zucchini, mix in Panko breadcrumbs and tasty spices. The air fryer gives them a crispy texture without deep frying. Remember to check doneness for perfect crunch. You can get creative with flavors and choose different veggies too. It's easy to store leftovers and reheat them. Enjoy these delicious fries with your favorite dip. I hope you try this recipe and share your thoughts!

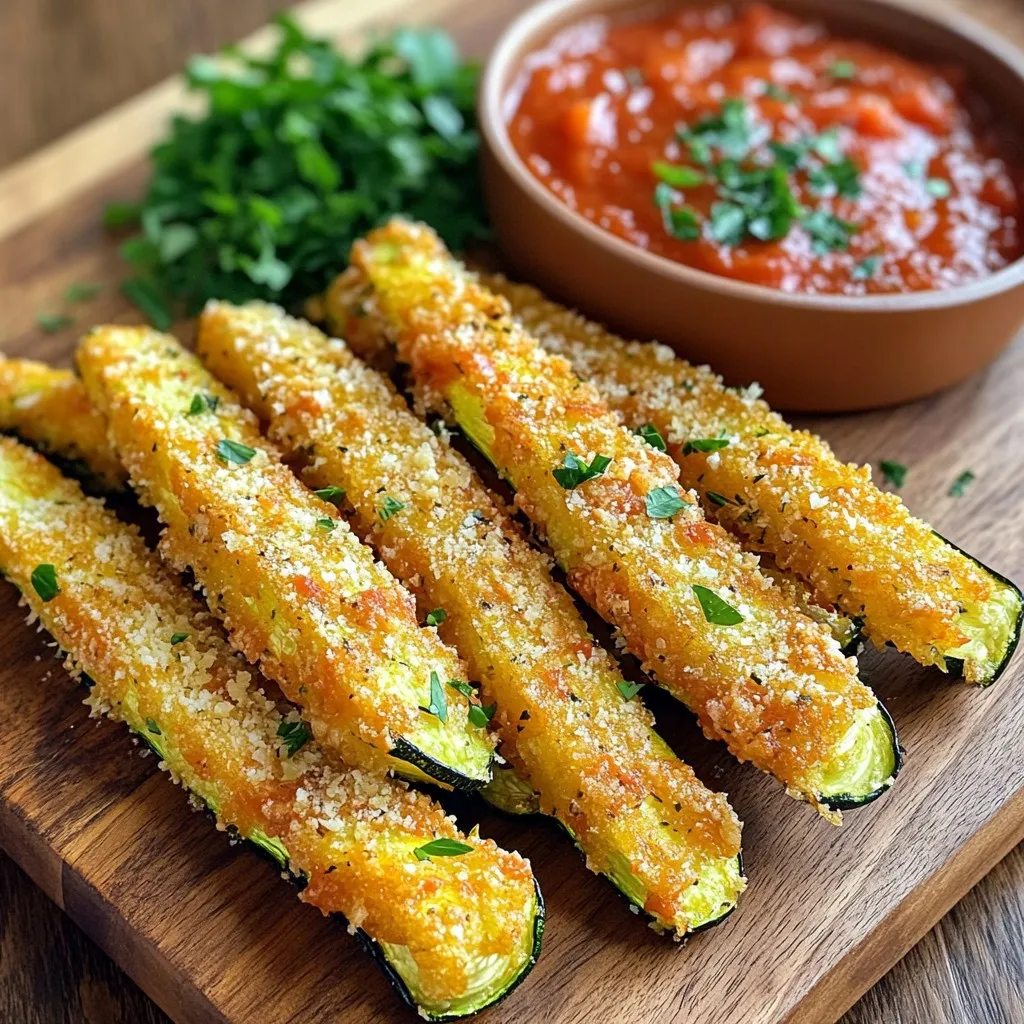
Looking for a tasty snack that’s healthy and satisfying? Try my Crispy Parmesan Zucchini Fries in the air fryer! You’ll love how easy it is to make a golden, crunchy …

Read more

Categories Appetizers

Creamy One-Pot Pesto Chicken Gnocchi Delight

October 20, 2025 by Chef Remy
- 1 lb (450g) chicken breast, diced into bite-sized pieces - 16 oz (450g) potato gnocchi - 1 cup (240ml) heavy cream - 1 cup (240ml) vibrant basil pesto - 1 cup (approximately 150g) ripe cherry tomatoes, halved - 2 cups (approximately 60g) fresh baby spinach - 1 tablespoon extra virgin olive oil - 1 teaspoon garlic powder - Salt and fresh black pepper to taste - Freshly grated Parmesan cheese for serving When I prepare this dish, I focus on using fresh and high-quality ingredients. The chicken breast gives a nice protein base, while the potato gnocchi adds a fun, chewy texture. Heavy cream is key for richness, and the basil pesto brings that herby punch we love. Cherry tomatoes add brightness, and baby spinach not only brings color but also nutrients. A drizzle of extra virgin olive oil enhances flavors. For seasoning, garlic powder, salt, and black pepper create a simple yet delicious taste. Finally, I top it all with freshly grated Parmesan cheese for that cheesy, savory finish. Using these ingredients, you can create a creamy and satisfying meal in no time. To start, heat one tablespoon of extra virgin olive oil in a large pot over medium heat. Once the oil is hot, add 1 pound of diced chicken breast. Season the chicken with salt, black pepper, and 1 teaspoon of garlic powder. Cook the chicken for about 5 to 7 minutes, stirring often. You want it to turn golden brown and be cooked through. Ensure there is no pink left in the center. After your chicken is cooked, it's time to add flavor. Toss in 1 cup of halved cherry tomatoes. Stir and cook for another 2 minutes. This helps the tomatoes soften and release their sweet juices. Next, pour in 1 cup of heavy cream and 1 cup of vibrant basil pesto. Stir until everything is mixed well. Bring this tasty blend to a gentle simmer. Now, add 16 ounces of potato gnocchi to the pot. Make sure each piece is coated in the creamy sauce. Cover the pot and let it simmer for about 3 to 5 minutes. This will cook the gnocchi until they are tender. Finally, fold in 2 cups of fresh baby spinach. Cook for an additional minute until the spinach wilts down. Taste your dish and adjust the seasoning if needed. Enjoy the rich, creamy delight you’ve created! To make your Creamy One-Pot Pesto Chicken Gnocchi shine, focus on seasoning. Taste as you cook. If it needs more flavor, add a pinch of salt or pepper. Garlic powder brings great depth. Adjust based on your preference. Cooking the gnocchi properly is key. Follow the package instructions. They should be tender but not mushy. Watch them closely as they simmer in the sauce. Stir gently to coat them without breaking. Serving this dish can be fun! Use deep bowls to hold the creamy gnocchi. This adds warmth and comfort. For a pop of color, top with fresh basil leaves. A light sprinkle of Parmesan cheese adds a nice touch, too. Pair it with warm crusty bread for a complete meal. The bread soaks up the sauce, making every bite delightful. Use a large pot or deep skillet for this recipe. A heavy-bottomed pan helps cook the chicken evenly. Make sure your pot has a lid for simmering the gnocchi. A wooden spoon or spatula is great for stirring. You might also want a zester for grating Parmesan cheese. Having these tools ready will make cooking easier and more enjoyable. {{image_4}} Alternative proteins You can swap chicken for shrimp or tofu. Shrimp cooks fast and adds a nice flavor. Tofu is a great choice for a plant-based meal. Simply cube the tofu and sauté until golden. Dairy-free options For a dairy-free dish, use coconut cream instead of heavy cream. This keeps the dish creamy without dairy. You can also use nutritional yeast for a cheesy flavor without the cheese. Additional herbs and spices Try adding fresh basil or oregano for extra flavor. A pinch of red pepper flakes adds a nice kick. Experiment with your favorite spices to make it your own. Vegetable options You can add zucchini or bell peppers for more color and nutrition. Simply chop them up and toss them in with the tomatoes. They will cook down and add great taste. Pairing with side dishes This dish pairs well with a simple green salad. You can also serve it with crusty bread to soak up the sauce. Garlic bread is another great choice for added flavor. Incorporating leftovers into new meals Leftovers can be mixed into a frittata for breakfast. You can also use them in wraps for a quick lunch. Just heat them up and enjoy anew! To keep your Creamy One-Pot Pesto Chicken Gnocchi fresh, use airtight containers. Glass or plastic containers work well. Make sure to let the dish cool before sealing. Place the leftovers in the fridge. They will stay fresh for about three days. The best way to reheat this dish is on the stove. Heat a pan over low heat. Add a splash of cream or broth to keep it creamy. Stir often to prevent sticking. You can also use the microwave. Heat in short bursts, stirring in between. This helps to maintain the creaminess. You can freeze this dish, but the texture may change. To freeze, let it cool completely. Place it in freezer-safe bags or containers. Remove as much air as possible before sealing. It will last up to three months in the freezer. To thaw, move it to the fridge overnight. Reheat on the stove or in the microwave. Stir well to combine everything again. It takes about 25 minutes to make this dish. This includes 10 minutes of prep time and 15 minutes of cooking time. You can have a tasty meal ready in no time. Yes, you can use homemade pesto. Fresh basil, garlic, nuts, and cheese create a great flavor. Homemade pesto adds a personal touch to your dish. You can use turkey, tofu, or even shrimp instead of chicken. These options work well and keep the dish tasty. Choose what you like best! Yes, this dish is great for meal prep. Store it in airtight containers in the fridge. You can enjoy it for lunch or dinner throughout the week. Yes, you can make this recipe dairy-free. Use coconut cream instead of heavy cream and skip the Parmesan cheese. This way, everyone can enjoy a creamy meal! This recipe for Creamy One-Pot Pesto Chicken Gnocchi is easy and delicious. We discussed the main ingredients, like chicken, gnocchi, and pesto. You learned how to cook and combine everything in one pot. Remember to adjust the seasoning to your taste and enjoy the visual appeal of your dish. It’s flexible too; feel free to swap proteins or add veggies. With proper storage, you can save leftovers for later. Experiment and make this dish your own!

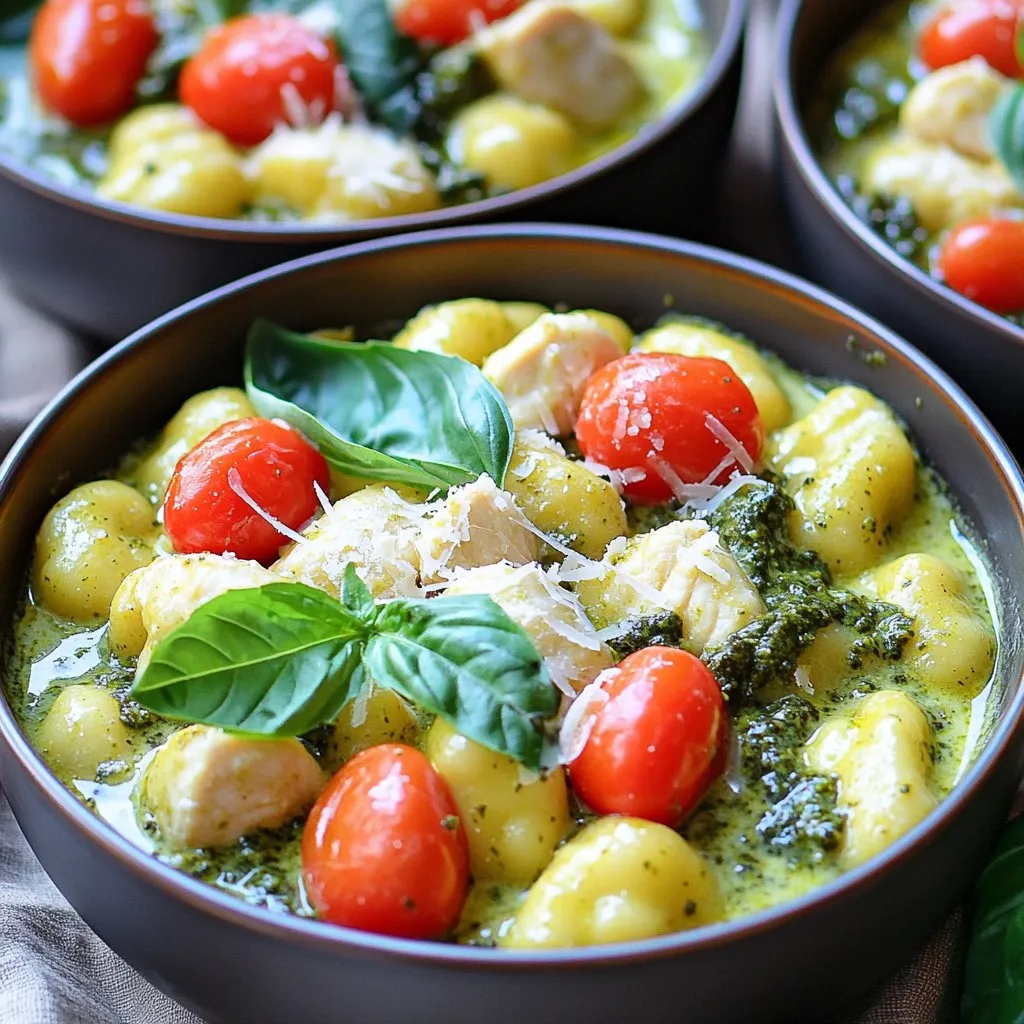
If you crave a quick, tasty meal, look no further than creamy one-pot pesto chicken gnocchi! This dish combines tender chicken, fluffy gnocchi, and vibrant basil pesto into a delightful …

Read more

Categories Dinner

Honey Garlic Butter Roasted Carrots Simple and Tasty

October 20, 2025 by Chef Remy
To make honey garlic butter roasted carrots, you will need: - 1 pound baby carrots (or 2-3 regular carrots, peeled and cut into sticks) - 3 tablespoons unsalted butter, melted - 2 tablespoons honey - 3 cloves garlic, finely minced - 1 teaspoon salt - ½ teaspoon freshly ground black pepper - 1 teaspoon fresh thyme leaves (or ½ teaspoon dried thyme) These ingredients come together to create a sweet and savory glaze that makes the carrots shine. For a fresh touch, you can add: - Fresh parsley leaves, finely chopped This adds a pop of color and bright flavor to your dish. You can easily swap some ingredients if needed: - Use olive oil instead of unsalted butter for a dairy-free option. - Maple syrup can replace honey for a vegan-friendly glaze. - If you don't have thyme, rosemary or oregano can work well too. These substitutions keep the essence of the dish while catering to your needs. First, heat your oven to 400°F (200°C). This step is key for crispy, caramelized carrots. Gather your ingredients: 1 pound of baby carrots, 3 tablespoons of melted unsalted butter, 2 tablespoons of honey, 3 cloves of minced garlic, 1 teaspoon of salt, ½ teaspoon of black pepper, and 1 teaspoon of fresh thyme. If you want, you can also chop some fresh parsley for garnish. In a large bowl, whisk together the melted butter, honey, minced garlic, salt, black pepper, and thyme. Mix until it’s all smooth and blended. This mixture gives the carrots their sweet and savory flavor. It’s simple but oh-so-tasty! Next, add the carrots to the bowl. Toss them well in the honey garlic butter mixture. Make sure every carrot is coated nicely. Line a baking sheet with parchment paper for easy cleanup. Spread the carrots in a single layer on the sheet. Roast them for 25-30 minutes. Halfway through, give them a gentle toss to help them brown evenly. When they are tender and shiny, take them out. Drizzle any leftover sauce over the top. If you like, sprinkle fresh parsley on top before serving. Enjoy these warm and fragrant carrots right away! To get the most flavor, use fresh garlic. Fresh garlic gives a strong taste. Try to use raw honey, too. It adds a nice sweetness. Don’t skip the thyme; it boosts the taste. Fresh thyme works best, but dried thyme works fine, too. You can also add a pinch of chili for a kick. To ensure even cooking, cut the carrots into similar sizes. Baby carrots are great since they are small and cook fast. If you use regular carrots, cut them into sticks. Spread the carrots out on the baking sheet so they have space. This helps them roast, not steam. Toss them halfway through cooking for even browning. Serve these carrots warm for the best taste. They make a great side dish for meats. Try them with chicken or pork. For a fresh touch, sprinkle parsley on top before serving. You can also pair them with rice or quinoa for a full meal. Enjoy your tasty honey garlic butter roasted carrots! {{image_4}} You can use many types of carrots for this dish. Baby carrots are sweet and tender. You can also use regular carrots. Just peel and cut them into sticks. Try rainbow carrots for color and fun. Their sweet taste adds a nice twist. Look for fresh carrots at your local market for the best flavor. Want to shake things up? Add spices like cumin or paprika. They give a warm kick to the dish. For a sweet twist, try a pinch of cinnamon. If you like heat, add red pepper flakes. Fresh herbs like rosemary or dill can also boost the flavor. Mix and match to find what you love best! Carrots pair well with many seasonal ingredients. In spring, add peas for extra sweetness. In fall, try adding roasted squash for richness. You can also mix in some parsnips for a unique flavor. During winter, sprinkle some pomegranate seeds for a pop of color. These additions keep the dish exciting all year long! After enjoying your honey garlic butter roasted carrots, let them cool down. Place them in an airtight container. Store the container in your fridge. Leftovers will stay fresh for up to four days. If you want to keep them longer, freezing is a great option. To reheat your roasted carrots, take them out of the fridge. You can use the microwave for quick warming. Just heat in 30-second intervals until warmed through. For a crispier texture, use the oven. Preheat the oven to 350°F (175°C). Spread the carrots on a baking sheet and heat for about 10 minutes. If you want to freeze your carrots, follow these steps. First, let them cool completely. Then, place them in a freezer-safe bag. Try to remove as much air as possible before sealing. They can last in the freezer for up to three months. When you're ready to eat them, thaw in the fridge overnight before reheating. Yes, you can use regular carrots. Just peel and cut them into sticks. Aim for similar sizes to ensure even cooking. If you use larger carrots, they may take a bit longer to roast. To make this recipe vegan, replace the butter with vegan margarine or coconut oil. Use maple syrup instead of honey for a sweet touch. The garlic and herbs will still give great flavor. These carrots pair well with many dishes. Serve them alongside grilled chicken, fish, or tofu. They also go great with rice or quinoa for a healthy meal. Leftovers can last for about 3 to 5 days in the fridge. Store them in an airtight container to keep them fresh. Reheat them in the oven for the best taste. Yes, you can prep the carrots before roasting. Toss them in the honey garlic butter mix and store them in the fridge for up to 24 hours. Just roast them when you are ready to enjoy. This post covered how to make honey garlic butter roasted carrots. We looked at key ingredients, optional garnishes, and great swaps. I shared step-by-step instructions for oven prep, mixing the sauce, and perfect roasting. You can use tips for flavor, cooking evenness, and serving ideas to wow your family. We also explored fun variations and storage methods. Try this recipe, and bring simple joy to your meals. You’ll love the taste and ease!

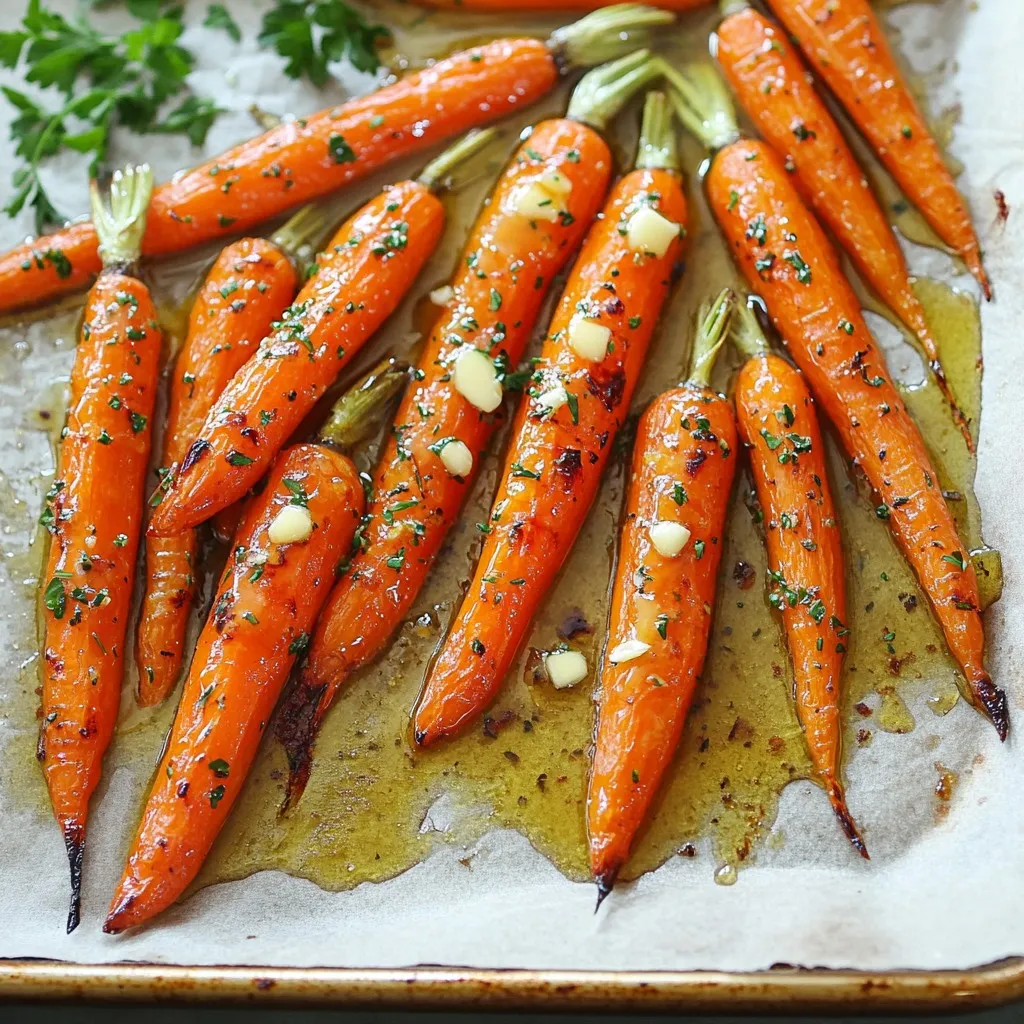
Looking for a simple yet tasty side dish? Honey Garlic Butter Roasted Carrots are here to save your meal! This easy recipe combines sweet honey and savory garlic butter to …

Read more

Categories Dinner

Minute Spicy Miso Ramen with Jammy Egg Delight

October 18, 2025 by Chef Remy
- 2 packets instant ramen noodles - 4 cups vegetable broth - 2 tablespoons red miso paste - 1 tablespoon soy sauce - 1 tablespoon sriracha - 1 teaspoon sesame oil - 2 green onions, thinly sliced - 1 cup baby spinach - 1 medium carrot, julienned - 2 large eggs - Sesame seeds, for garnish - Medium-sized pot - Small pot for boiling eggs - Bowl for ice water - Serving bowls When making Minute Spicy Miso Ramen with Jammy Egg, you need fresh ingredients. The instant ramen noodles cook fast and taste great. The vegetable broth adds depth to the dish. Red miso paste gives the broth its rich, savory flavor. Soy sauce and sriracha bring saltiness and heat. Adjust the sriracha to your taste for spice. Sesame oil adds a wonderful nutty aroma. Fresh green onions offer a crisp bite, while baby spinach adds color and nutrients. The julienned carrot adds a sweet crunch to each spoonful. Finally, the jammy eggs are the star of the dish. Boiling them for the right time gives a soft yolk that pairs well with the ramen. Don’t forget sesame seeds for a nice garnish. For tools, use a medium pot for the broth and noodles. A small pot is needed for the eggs. An ice water bowl cools the eggs after boiling. Lastly, have serving bowls ready for this tasty meal. To make jammy eggs, start with a small pot of water. Bring this water to a rolling boil. Once boiling, carefully lower in your eggs. Boil them for 6 to 7 minutes. This gives you that perfect jammy yolk. After the time is up, move the eggs to a bowl of ice water. Let them cool for about 5 minutes. This cooling step makes them easy to peel. Once cool, gently peel the eggs and set them aside. Next, grab a medium-sized pot. Pour in 4 cups of vegetable broth. Bring the broth to a gentle simmer over medium heat. Once it simmers, add the two packets of ramen noodles. Cook the noodles for 3 to 4 minutes. You want them just tender but still firm. This gives the noodles a nice bite. Now, lower the heat to low. Gradually whisk in 2 tablespoons of red miso paste. Keep whisking until the miso dissolves and becomes smooth. Next, add 1 tablespoon of soy sauce, 1 tablespoon of sriracha, and 1 teaspoon of sesame oil. Stir well to mix all the flavors together. This broth will be rich and spicy. It's time to add some crunch and color. Toss in the julienned carrots and baby spinach into the broth. Cook for an additional 1 to 2 minutes. This will allow the spinach to wilt and the carrots to become tender. Make sure the carrots still have some crunch for great texture. Take two serving bowls and divide the cooked ramen noodles evenly. Pour the rich and spicy miso broth over the noodles in each bowl. Carefully halve the jammy eggs. Place a half on top of each bowl of ramen. Finish with a sprinkle of sliced green onions and sesame seeds. This adds flavor and a nice crunch for each delicious bite. - For the best jammy eggs, boil them for exactly 6-7 minutes. This timing gives you that perfect runny yolk. - After boiling, cool the eggs in ice water for 5 minutes. This stops the cooking and makes peeling easier. - To peel, gently tap the egg on a hard surface. Roll it lightly to crack the shell. This helps to remove the shell smoothly. - Want more spice? Add sriracha based on your heat preference. Start with a little, then taste before adding more. - If you need a broth alternative, try using mushroom broth or homemade broth. Both add a nice depth of flavor. - For a beautiful plate, use brightly colored bowls. They make the dish pop visually. - Arrange your toppings artfully. Place the jammy egg halves on top, then add green onions and sesame seeds. - Add a side of pickled ginger for a touch of flavor and color contrast. {{image_4}} You can easily change up the protein in your ramen. - Tofu for a vegetarian option: Tofu is a great choice for a meatless meal. Cut firm tofu into cubes. Sauté it until golden brown. Add it to your ramen for a nice texture. - Chicken or shrimp: For a heartier meal, add cooked chicken or shrimp. Just toss them in with the broth. They warm up quickly and add flavor. Switching up the veggies can keep your ramen fresh and exciting. - Seasonal veggies to incorporate: Use what’s in season! Try zucchini, bell peppers, or mushrooms. They add color and taste. Simply chop them and add to the broth with the carrots. - Substitute greens for spinach: If you want a different green, use bok choy or kale. Both add great flavor and nutrients. Just chop and stir them in with the broth. The broth is the heart of the ramen. You can make it your own. - Using chicken or beef broth: If you want a richer flavor, use chicken or beef broth. These add depth and warmth. Just swap it for the vegetable broth when cooking. - Gluten-free miso options: If you need a gluten-free option, look for gluten-free miso paste. It works just as well and keeps the dish tasty. Always check labels to be sure! To keep your ramen fresh, store the components separately. This helps maintain texture and flavor. - Noodles: Keep cooked noodles in a small container. Use a bit of oil to prevent sticking. - Broth: Pour broth into a sealable jar or container. This keeps it flavorful. - Eggs: Place jammy eggs in a bowl with some water. Cover this bowl to avoid drying out. - Vegetables: Store any leftover veggies in a separate bag or container. Reheating ramen can be easy with the right methods. Here’s how to do it without losing taste. - Noodles and Broth: Heat your broth in a pot over medium heat. Once hot, add the noodles. Stir gently for even heating. - Jammy Eggs: For the best results, place the eggs in warm water for a few minutes. This warms them without cooking further. Now, you can enjoy your Minute Spicy Miso Ramen with Jammy Egg again! This delicious ramen comes together with simple steps and fresh ingredients. You learned how to make jammy eggs and a rich miso broth. I shared tips on enhancing flavors and storing leftovers. Remember, you can customize your dish with different proteins and veggies. Enjoy your tasty ramen, your way. Cooking can be fun and rewarding, so get creative and make it your own!

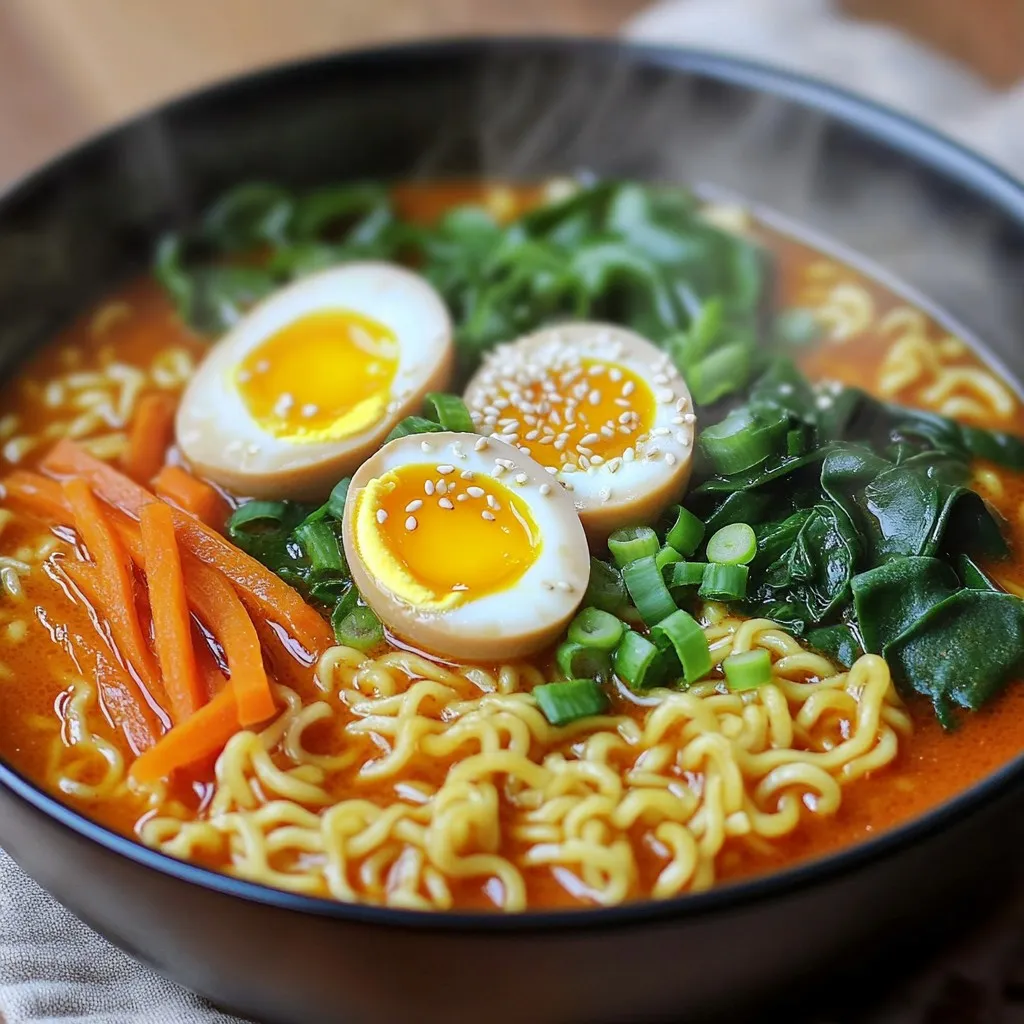
Welcome to a flavor-packed journey with my Minute Spicy Miso Ramen with Jammy Egg Delight! If you crave a quick meal that bursts with taste, this dish is for you. …

Read more

Categories Dinner

Garlic Butter Shrimp Scampi Linguine Flavorful Delight

October 18, 2025 by Chef Remy
To make Garlic Butter Shrimp Scampi Linguine, you will need: - 8 oz linguine pasta - 1 lb large shrimp, peeled and deveined - 4 tablespoons unsalted butter - 4 cloves garlic, minced - 1 teaspoon red pepper flakes (adjust to taste) - Zest and juice of 1 lemon - 1/2 cup chicken broth (or vegetable broth for a lighter option) - 1/4 cup fresh parsley, finely chopped - Salt and pepper to taste - Grated Parmesan cheese for serving (optional) You can easily swap some ingredients to fit your taste or needs. Here are a few options: - Use spaghetti or fettuccine instead of linguine if you prefer. - Frozen shrimp works well if fresh shrimp is hard to find. - Swap chicken broth for vegetable broth for a lighter dish or to keep it vegetarian. - If you want less heat, skip the red pepper flakes. - For a dairy-free option, leave out the butter and cheese and use olive oil. Garnishes add a nice touch to the dish. Consider these options: - Fresh lemon wedges brighten the flavors and add a nice touch. - Extra parsley gives a pop of color and freshness. - Grated Parmesan cheese enhances the umami flavor. - Serve with crusty bread to soak up the delicious garlic butter sauce. - A light salad with vinaigrette pairs well for a complete meal. These ingredients and suggestions will help you create a delightful Garlic Butter Shrimp Scampi Linguine that shines on any table. To start, grab a big pot. Fill it with water and add a good amount of salt. Bring the water to a boil. Once it bubbles, add 8 ounces of linguine pasta. Cook it according to the package instructions. Aim for al dente, which means it should be firm to the bite. After cooking, save half a cup of the water. Drain the pasta and set it aside for later. Next, take a large skillet. Place it on medium heat and add 4 tablespoons of unsalted butter. Wait until the butter melts and starts to bubble. Then, toss in 4 minced garlic cloves. Stir it for 1-2 minutes, but don’t let it brown. You want the garlic to smell great, not burnt. This will create a rich base for your sauce. Now, it’s time for the shrimp. Add 1 pound of peeled and deveined shrimp to the skillet. Season them with salt, black pepper, and 1 teaspoon of red pepper flakes. Cook the shrimp for about 2-3 minutes on each side. They should turn pink and opaque when done. This step is key for getting juicy shrimp. Once cooked, we will move on to adding the broth and lemon. When selecting shrimp, size matters. Look for large shrimp, which are about 16-20 per pound. Fresh shrimp should smell like the ocean. Avoid shrimp with a strong fishy smell. If buying frozen shrimp, choose those that are peeled and deveined for ease. Check the packaging for a “wild-caught” label. This usually means better flavor and quality. One common mistake is overcooking the shrimp. Shrimp cook quickly. They turn pink and opaque in just a few minutes. If you leave them on the heat too long, they become rubbery. Another mistake is not seasoning enough. Salt brings out the shrimp’s natural taste. Lastly, do not skip the lemon. It adds brightness and balances the dish. You can boost flavor in many ways. Consider adding ingredients like capers or sun-dried tomatoes for a twist. Fresh herbs like basil or dill can elevate the dish further. A splash of white wine adds depth, too. For heat lovers, more red pepper flakes can enhance the spice. Just remember to adjust to your taste. {{image_4}} If you want to switch things up, try scallops or chicken. Scallops cook fast. They add a sweet, rich flavor. Use the same cooking method as shrimp. For chicken, cut it into bite-sized pieces. Sauté it until golden brown, then follow the sauce steps. Making this dish vegetarian is simple. Swap shrimp with mushrooms or zucchini. They soak in the garlic butter sauce well. For a vegan version, use olive oil instead of butter. Replace chicken broth with vegetable broth. You can still enjoy a bright lemon flavor. Shrimp scampi has many regional twists. In Italy, you might find it with white wine. This adds depth to the sauce. In New Orleans, chefs mix in spices and andouille sausage. It gives a nice kick. These variations show how versatile shrimp scampi can be! After you enjoy your Garlic Butter Shrimp Scampi Linguine, store any leftovers right away. Place the pasta in an airtight container. It helps keep the flavors fresh. Be sure to let it cool before sealing the container. This way, it won't steam and spoil. You can enjoy the leftovers for up to three days in the fridge. When ready to eat your leftovers, reheating is key. I suggest using a skillet. Heat it over medium-low heat. Add a splash of water or broth to keep the dish moist. Stir gently for a few minutes until warmed through. This method keeps the shrimp tender and the flavors intact. Avoid using the microwave if you want to keep the best texture. Want to save some for later? Freezing is a great option! First, let the dish cool completely. Then, portion it into freezer-safe bags or containers. Squeeze out as much air as possible. This step helps prevent freezer burn. You can freeze it for up to two months. When you're ready to enjoy, thaw it in the fridge overnight. Reheat as mentioned for a delicious meal again! Making Garlic Butter Shrimp Scampi Linguine takes about 30 minutes. You spend 10 minutes prepping the ingredients. Cooking the dish takes around 20 minutes. This quick meal is perfect for busy nights or special occasions. Yes, you can use frozen shrimp. Just make sure to thaw them first. Place them in the fridge overnight or run them under cold water for a quick thaw. Frozen shrimp can taste just as good as fresh when cooked right. You can serve this dish with a simple salad or garlic bread. A fresh green salad adds a nice crunch and balances the meal. Garlic bread complements the dish well, soaking up the tasty sauce. For a lighter option, pair it with steamed vegetables. In this post, we explored how to make Garlic Butter Shrimp Scampi Linguine. You learned about the key ingredients, cooking steps, and tips to perfect your dish. We looked at variations, storage tips, and common questions. Cooking shrimp scampi can be fun and rewarding. With this guide, you can create a meal that impresses. Enjoy the flavors and share this dish with others. Happy cooking!

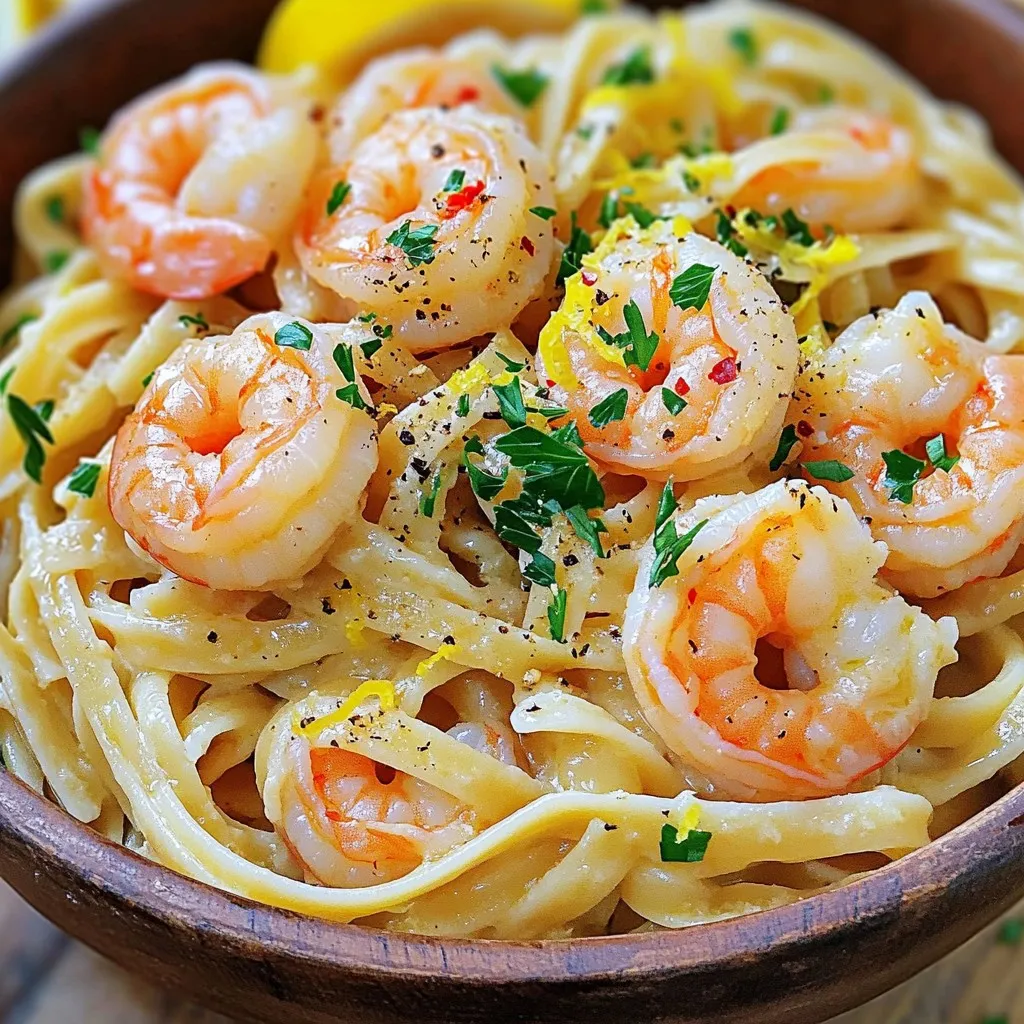
If you crave a dish bursting with flavor, Garlic Butter Shrimp Scampi Linguine is for you. This meal combines juicy shrimp, rich garlic butter, and tender linguine. It’s quick to …

Read more

Categories Dinner

No-Bake Chocolate Peanut Butter Protein Bars Delight

October 18, 2025 by Chef Remy
To make these tasty no-bake chocolate peanut butter protein bars, you need just a few simple ingredients. Here’s the list: - 1 cup rolled oats - 1/2 cup natural peanut butter - 1/4 cup honey or maple syrup - 1/2 cup protein powder - 1/4 cup dark chocolate chips - 1/4 teaspoon sea salt - 1 teaspoon vanilla extract - Optional toppings: extra chocolate chips or chopped nuts Each ingredient plays a role. The rolled oats give a nice chewy base. Natural peanut butter adds creaminess and flavor. Honey or maple syrup brings sweetness and helps the bars stick together. Protein powder boosts the protein content, making these bars a great snack. Dark chocolate chips add a delightful touch of chocolate. Sea salt enhances the taste, and vanilla extract adds a warm flavor. You can also add extra toppings if you want some crunch. Gather these ingredients, and let’s get ready to mix! - Gather a large mixing bowl. Combine the rolled oats and protein powder. - In a microwave-safe bowl, mix the peanut butter and honey. Microwave for 30 seconds. - Stir the warm mixture until it blends well. Add vanilla and sea salt. - Pour the warm peanut butter blend into the oats and protein powder. Mix until coated. - Line an 8x8 inch baking pan with parchment paper. This helps with easy removal. - Transfer the mixture to the pan. Use your hands or a measuring cup to press it down. - If you want, add extra chocolate chips or nuts on top. Press them in gently. - Place the pan in the fridge. Chill for 1-2 hours to firm up the bars. - Once set, lift the bars out using the parchment paper. Cut into squares or rectangles. Choosing between smooth or crunchy peanut butter can change the bar's texture. If you like a creamy feel, go with smooth. If you prefer a bit of crunch, choose crunchy. Both options offer a rich peanut flavor. Selecting the right protein powder is key. I suggest chocolate for a rich taste or vanilla for a milder flavor. Check for one that fits your dietary needs and taste buds. Pressing the mixture is important for a great bar. Use a measuring cup to pack it down firmly. This helps the bars hold together when you cut them. You want them nice and dense! For a quick snack, wrap each bar individually in parchment paper. This makes them easy to grab on busy days. You can also use plastic wrap if that’s easier for you. Pair these bars with a warm cup of tea or coffee. The chocolate and peanut butter flavor works great with these drinks. You can even enjoy them with milk or a smoothie for a fun twist. These bars are high in protein, making them a great snack. Protein helps build muscles and keeps you full. Each bar packs a good punch of energy for your day. The ingredients bring many nutritional perks. Rolled oats provide fiber, which is good for digestion. Peanut butter gives healthy fats, while dark chocolate adds antioxidants. Together, they make a tasty and healthy treat. {{image_4}} You can change the flavor of these bars easily. Try using different nut butters. Almond butter or cashew butter both work well. They add unique tastes and nutrition. You can also explore flavored protein powders. Chocolate mint or cookie dough flavors give a fun twist. Each variation can make the bars feel brand new. If you need vegan options, swap honey for maple syrup. This keeps the bars sweet and tasty without using animal products. For nut-free choices, use sunflower seed butter. It gives a similar texture and flavor without nuts. You can also skip the chocolate chips or use carob chips. These swaps keep the bars safe for everyone. Seasonal fruits and spices can add fun flavors. In summer, mix in chopped strawberries or blueberries. Fall spices like cinnamon or nutmeg can warm up the taste. You can also add pumpkin puree for a creamy texture. These changes let you enjoy the bars year-round. To keep your no-bake chocolate peanut butter protein bars fresh, use an airtight container. Glass or plastic containers work well. Make sure the bars are cool before storing them. In the fridge, these bars last up to one week. If you plan to eat them later, consider freezing them instead. To freeze the bars, cut them into squares first. Then, place them in a single layer on a baking sheet. Freeze them for about an hour. After that, transfer the bars to a freezer-safe bag. Remove as much air as possible before sealing. They can stay fresh in the freezer for up to three months. When you want to enjoy one, take it out and thaw in the fridge for a few hours. For a quick snack, you can eat them straight from the freezer! How to make these protein bars vegan? To make these protein bars vegan, simply replace honey with maple syrup. This keeps the bars sweet and delicious without any animal products. Can I use other types of protein powder? Yes, you can use any protein powder you like. Chocolate or vanilla works best, but feel free to try other flavors. Just be sure to check the ingredients to ensure they fit your diet. What can I substitute for honey? You can use maple syrup instead of honey. Agave syrup is another great option. Both will keep the bars sweet and sticky. How do I know when the bars are set? The bars are set when they feel firm to the touch. After chilling them for 1-2 hours, you can check by gently pressing on the top. If it holds its shape, they are ready. Are these bars gluten-free? Yes, these bars are gluten-free if you use gluten-free oats. Always check the label on your oats to be sure. This makes them a great snack for those with gluten sensitivities. These protein bars are simple and tasty. We covered all key steps, from mixing the ingredients to storage options. You learned about ingredients like oats, peanut butter, and protein powder that boost nutrition. Plus, you saw how to customize flavors and textures. Enjoy experimenting with variations and keeping healthy snacks on hand. With these easy tips and insights, you will make delicious bars that suit your taste. Keep these ideas in mind to fuel your day with energy and satisfaction.

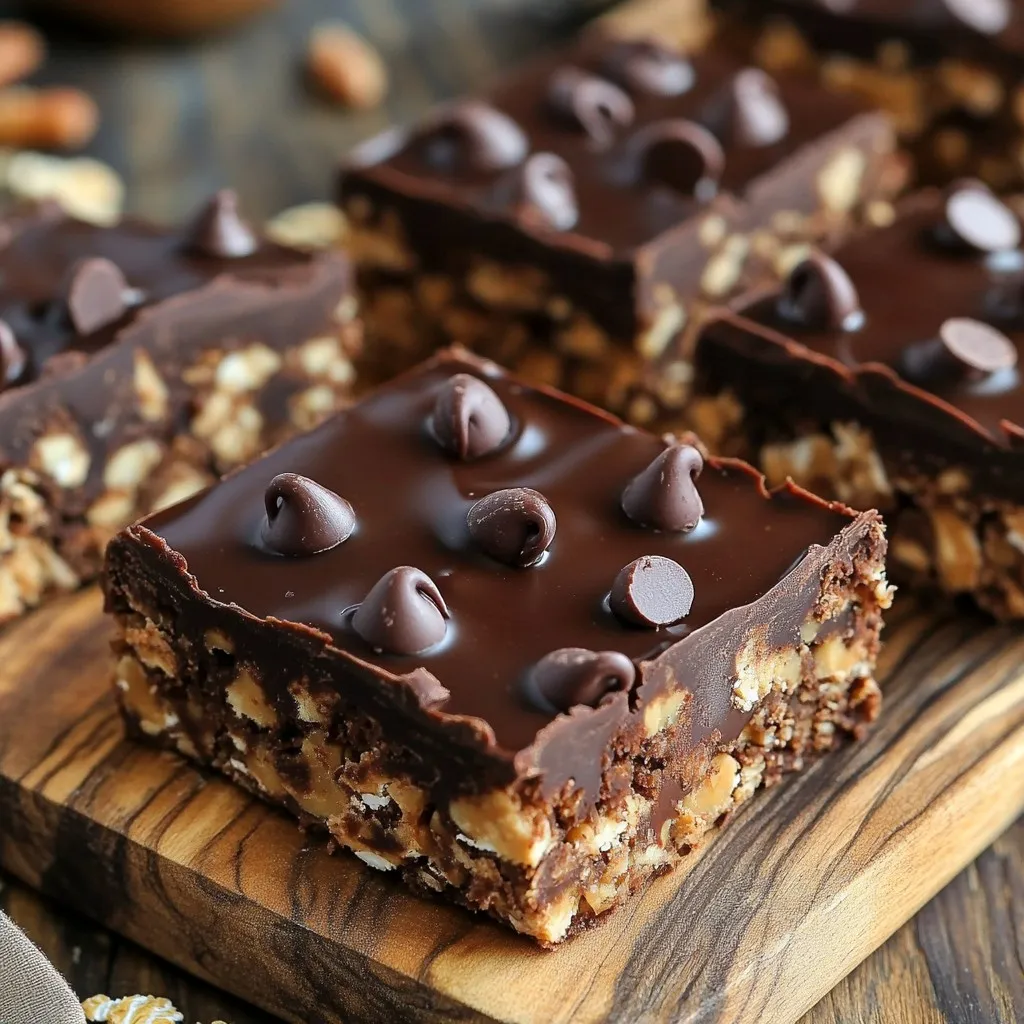
Craving a tasty yet healthy snack? Look no further! These No-Bake Chocolate Peanut Butter Protein Bars are the perfect treat. They are simple to make and packed with protein. I …

Read more

Categories Desserts

Pumpkin Cream Cold Foam Iced Coffee Tasty Refreshment

October 18, 2025 by Chef Remy
- 1 cup brewed coffee, chilled - 1/2 cup milk of your choice (dairy, almond, oat, etc.) - 1/4 cup pumpkin puree - 2 tablespoons maple syrup - 1 teaspoon pumpkin spice blend - 1/4 teaspoon vanilla extract - Ice cubes - Whipped cream (optional) - Extra pumpkin spice for garnish (optional) To make a tasty Pumpkin Cream Cold Foam Iced Coffee, you need simple ingredients. Start with chilled brewed coffee. I love using leftover coffee for this recipe. It saves time and cuts waste. The milk can be any kind you like. Dairy, almond, or oat milk all work well. Pumpkin puree is the star of this drink. You can use canned or homemade puree. Maple syrup adds sweetness. Adjust the amount to fit your taste. The pumpkin spice blend gives that cozy fall flavor. You can buy it or mix your own with cinnamon, nutmeg, and cloves. Finally, vanilla extract rounds out the flavor. Don’t forget the ice cubes! They keep your drink cool and refreshing. Whipped cream on top is optional but adds a fun touch. A sprinkle of extra pumpkin spice makes it look pretty too. To brew the perfect cup of coffee, start with fresh coffee grounds. Use a coffee maker or French press to extract rich flavor. Aim for a medium grind for the best taste. If you have leftover coffee, that works too! Once brewed, let it cool in the fridge for about 20-30 minutes. This cooling step is key for a refreshing drink. While your coffee cools, let’s make the pumpkin cream foam. In a mixing bowl, combine: - 1/4 cup pumpkin puree - 1/2 cup milk of your choice - 2 tablespoons maple syrup - 1 teaspoon pumpkin spice blend - 1/4 teaspoon vanilla extract Mix these ingredients until smooth. Next, use an electric frother, a handheld whisk, or a stand mixer to froth the mixture. Whisk for about 2-3 minutes. You want the foam to be light and airy. It should hold its shape well. Now it’s time to assemble your drink! Grab a tall glass and fill it with ice cubes. Pour your chilled coffee over the ice. Fill the glass to your preferred level. Then, gently spoon the creamy pumpkin foam on top. Watch it float beautifully! For an extra treat, add a dollop of whipped cream on the foam. A sprinkle of extra pumpkin spice adds a festive touch. When you’re ready to enjoy, stir the foam into the coffee for the best flavor blend. To make your pumpkin cream cold foam taste just right, you can adjust the sweetness. I love using maple syrup for a warm flavor. Start with two tablespoons, then taste it. If you want it sweeter, add more syrup slowly. Creating your own pumpkin spice blend is easy and fun. Mix equal parts of cinnamon and nutmeg. Add a pinch of cloves for depth. This blend gives your drink a fresh taste. It is also great for baking! To show off your drink, serve it in clear glassware. This way, everyone can see the pretty layers of coffee and foam. You can add a colorful straw for a festive touch. For fun garnishes, why not sprinkle some extra pumpkin spice on top? A dollop of whipped cream also adds a nice touch. It looks inviting and tastes amazing. If you want to change up the milk, there are many options. Dairy, almond, or oat milk all work well. Each milk adds its own flavor, so pick one you love. You can also add extra flavorings to make your drink unique. A dash of vanilla or a hint of caramel can make it special. Try adding a splash of your favorite syrup for a fun twist! {{image_4}} You can change up your iced coffee base for fun. Cold brew gives a smooth, rich taste. It’s often less acidic. If you love espresso, try it over ice. Espresso adds a bold flavor that pairs well with pumpkin foam. Whichever coffee you choose, make sure it’s chilled before you pour. Need a vegan or dairy-free drink? Use almond, oat, or coconut milk instead of dairy. They froth well and add their unique flavors. For a low-sugar option, swap maple syrup for a sugar-free sweetener. This way, you can enjoy your drink without the extra sugar. Pumpkin spice is great, but you can switch it up! Add cinnamon, nutmeg, or ginger for different flavors. In winter, try peppermint or chocolate for a festive twist. In summer, fresh fruits like strawberries or mango can make a fruity foam. Get creative and make your drink special for every season! To keep your leftover pumpkin puree fresh, store it in an airtight container. Place it in the fridge and use it within a week. If you want to keep it longer, freeze it in small portions. This way, you can pop it out when you need it. For milk, it’s best to store it in its original container. Keep it tightly sealed in the fridge. Most milk lasts for about a week after opening. Always check the expiration date to ensure it's still good. Brewed coffee can be stored in the fridge for up to a week. Just make sure it’s in a sealed container. This keeps it fresh and tasty. When you're ready to use it, give it a quick stir. The foam is best when fresh. If you have leftover foam, store it in the fridge. Just remember, it may lose its fluffy texture. You can re-froth it if needed, but fresh is always best. If you want to reheat brewed coffee, do it gently. Use the microwave or a pot on low heat. Avoid boiling it, as that can change the taste. For making a fresh batch of foam, follow the same steps as before. Mix pumpkin puree, milk, maple syrup, pumpkin spice, and vanilla again. Froth until it’s light and airy. This will give you that wonderful texture and flavor. Pumpkin Cream Cold Foam is a delicious iced coffee drink. It combines chilled brewed coffee with a creamy pumpkin foam. The foam is made from pumpkin puree, milk, and spices. This drink is perfect for fall and offers a sweet, spiced flavor. It feels cozy yet refreshing. You can find Pumpkin Cream Cold Foam Iced Coffee at popular coffee chains. Starbucks is one of the most well-known places to buy it. Many local coffee shops also serve this seasonal drink. Check your favorite café to see if they have their own version. A typical serving of Pumpkin Cream Cold Foam Iced Coffee has around 300-400 calories. This number can change based on the milk and syrup used. If you want to cut calories, choose unsweetened milk and less maple syrup. You can also skip the whipped cream to save more calories. You can create a delicious Pumpkin Cream Cold Foam Iced Coffee at home. Start with chilled coffee, mix in pumpkin puree and spices, and froth to perfection. Customize it with different milks or sweeteners to fit your taste. Remember to store leftover ingredients properly to keep them fresh. This drink is not just tasty; it offers a fun way to enjoy your coffee. Whether you're hosting a gathering or just treating yourself, this recipe brings joy to every cup. Enjoy your new favorite fall drink and share it with friends!

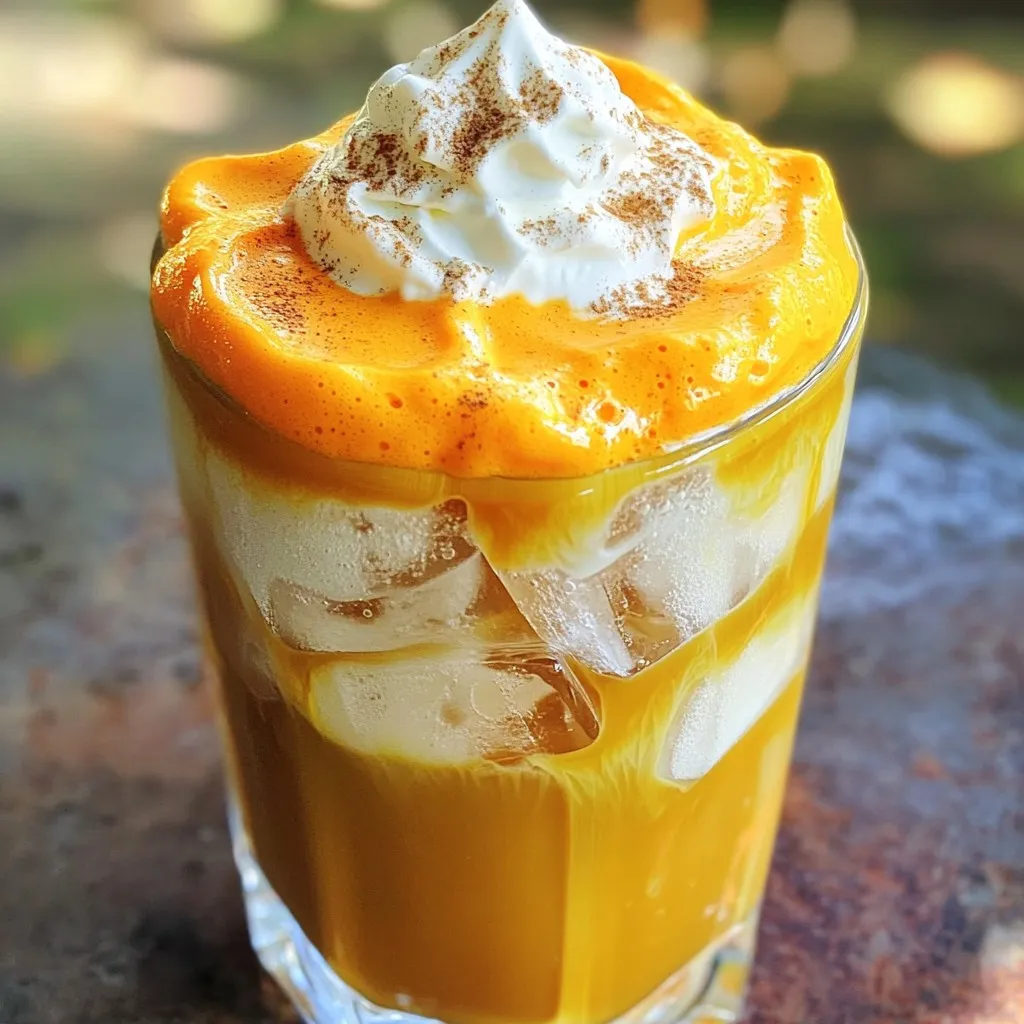
Fall is right around the corner, and there’s no better drink to celebrate than Pumpkin Cream Cold Foam Iced Coffee! This tasty refreshment combines creamy pumpkin flavor with chilled coffee, …

Read more

Categories Breakfast

Sheet-Pan Lemon Herb Salmon & Veggies Delight

October 18, 2025 by Chef Remy
- 4 boneless salmon fillets - 1 large lemon (zested and juiced) - 3 tablespoons extra virgin olive oil - 2 teaspoons dried oregano - 1 teaspoon garlic powder - Sea salt and freshly cracked black pepper - 2 cups fresh broccoli florets - 1 red bell pepper (thinly sliced) - 1 cup cherry tomatoes (halved) - Fresh parsley (finely chopped for garnish) Gathering these ingredients is the first step to making this dish shine. Each item plays a role in flavor and texture. The salmon provides a rich base. The lemon brings brightness and freshness. Olive oil adds depth, while oregano and garlic create warmth. Broccoli adds a nice crunch. The red bell pepper gives color and sweetness. Cherry tomatoes add juiciness and tang. Fresh parsley, chopped finely, not only looks great but also adds a burst of freshness at the end. Make sure to use good quality salmon. This makes a big difference. Fresh vegetables will enhance the dish. Choose bright-colored veggies for the best taste. You can find all these ingredients at your local grocery store. If you want, consider sourcing some from a farmer's market to get the best flavor! Remember, quality ingredients lead to a better meal. Preheating the oven is key. Start by setting it to 400°F (200°C). This ensures your food cooks evenly. A hot oven helps the salmon and veggies roast well. If the oven is not hot, the dish may not cook right. In a small bowl, whisk these items together: - Juice and zest from 1 large lemon - 3 tablespoons of extra virgin olive oil - 2 teaspoons of dried oregano - 1 teaspoon of garlic powder - Sea salt and freshly cracked black pepper to taste This zesty mixture adds flavor to both the salmon and the veggies. The lemon gives a bright taste, while the olive oil keeps everything moist. Place 4 boneless salmon fillets in a shallow dish. Pour half of the marinade over the salmon. Let it sit for about 10 minutes. This time allows the salmon to soak up the flavors. Marinating is essential for a tasty dish. On a large sheet pan, spread out 2 cups of fresh broccoli florets, 1 sliced red bell pepper, and 1 cup of halved cherry tomatoes. Drizzle the rest of the marinade over the veggies. Use your hands or a spatula to toss them well. Make sure every piece is coated. This step makes the veggies flavorful and delicious. Push the veggies to one side of the sheet pan. Lay the marinated salmon fillets on the other side, with the skin side down. Place the pan in the preheated oven. Bake for 15-20 minutes. The salmon is done when it flakes easily with a fork. The veggies should be soft and slightly charred. After baking, remove the sheet pan from the oven. Let it rest for a couple of minutes. This helps the juices settle. Just before serving, sprinkle chopped parsley on top. It adds color and freshness. For an attractive look, transfer everything to a serving platter. You can drizzle any remaining marinade over the top and serve with lemon wedges. This way, guests can add more zesty flavor if they like. To avoid overcooking your salmon, pay attention to the time. Bake for 15 to 20 minutes. The salmon is done when it flakes easily with a fork. You can also check the internal temperature. It should reach 145°F (63°C). If you prefer a softer texture, cook it for less time. Always let the salmon rest for a few minutes after baking. This helps the juices stay inside. You can boost the flavor of your sheet pan meal with a few extra spices. Try adding paprika for a hint of smokiness. A pinch of red pepper flakes brings heat. You might also mix in fresh herbs, like dill or thyme. For a sweet twist, drizzle a bit of honey over the veggies. This will add depth and balance to the dish. Serving your lemon herb salmon and veggies nicely can impress your guests. Transfer everything to a large serving platter. Drizzle any remaining marinade over the top for added flavor. You can also add lemon wedges on the side. This allows guests to squeeze fresh lemon juice on their servings. Finally, sprinkle chopped parsley over the dish for color and freshness. {{image_4}} You can change up the veggies in this dish. Here are some tasty options: - Asparagus: This veggie cooks fast and adds a nice crunch. - Zucchini: Slice it thin for quick cooking and a light flavor. - Carrots: Cut them into sticks for a sweet bite. - Cauliflower: Use small florets for a hearty addition. - Green beans: These add a fresh snap that pairs well with salmon. Feel free to pick what you have on hand or what is in season. Fresh veggies taste the best! Want to switch up the flavor? Here are a few ideas: - Asian-inspired: Use soy sauce, ginger, and sesame oil instead of olive oil. This gives the dish a savory kick. - Mediterranean: Mix in some balsamic vinegar and fresh herbs like thyme or rosemary. This adds depth and aroma. - Spicy: Add some chili flakes or sriracha to your marinade for heat. This will wake up your taste buds! These options let you explore new flavors while keeping the same cooking method. You don’t have to bake this dish if you don’t want to. Here are some other ways to cook it: - Grilling: Preheat your grill and cook the salmon and veggies on a grill pan. This adds a smoky flavor. - Pan-searing: Heat a skillet with oil and cook the salmon skin-side down until crispy. Then add the veggies and sauté until tender. These methods can give you a different texture and taste while staying simple and quick. To store leftovers safely, let your dish cool first. Place the salmon and veggies in an airtight container. Make sure to cover it well to keep moisture in. Store it in the fridge for up to three days. Always check for freshness before eating. Yes, you can freeze this dish! To freeze, make sure the salmon and veggies are fully cooled. Place them in a freezer-safe bag or container. Squeeze out any air to prevent freezer burn. You can freeze it for up to three months. When ready to eat, thaw it in the fridge overnight. To reheat without losing quality, use the oven. Preheat it to 350°F (175°C). Place the salmon and veggies on a baking sheet. Heat for about 10-15 minutes, or until warmed through. You can also use a microwave, but it may not keep the texture as nice. Enjoy your meal! Yes, you can! Try using trout, cod, or tilapia. These fish have a mild taste and cook well. Each of these alternatives brings a unique flavor. If you choose a thicker fish, adjust the cooking time. Adjust the seasoning to match your fish choice. Many sides go well with lemon herb salmon. Here are a few ideas: - Garlic mashed potatoes - Quinoa salad - Roasted asparagus - Couscous with herbs - Mixed green salad These sides add flavor and texture. They also complement the fresh taste of the salmon. Check the salmon for a few signs. Look for flakes when you poke it with a fork. The flesh should look opaque and not shiny. If the salmon is firm but not hard, it's ready. You can also use a food thermometer. The internal temperature should reach 145°F (63°C). This ensures it’s safe and tasty to eat. In this guide, we covered how to prepare a delicious lemon herb salmon dish. You learned the ingredients, step-by-step cooking instructions, and tips to perfect your meal. Remember to marinate the salmon well and choose your favorite veggies. This dish is quick and easy, making it great for any night. Don't hesitate to explore variations like different vegetables or cooking methods. Enjoy your cooking and impress your family or guests with this flavorful meal!

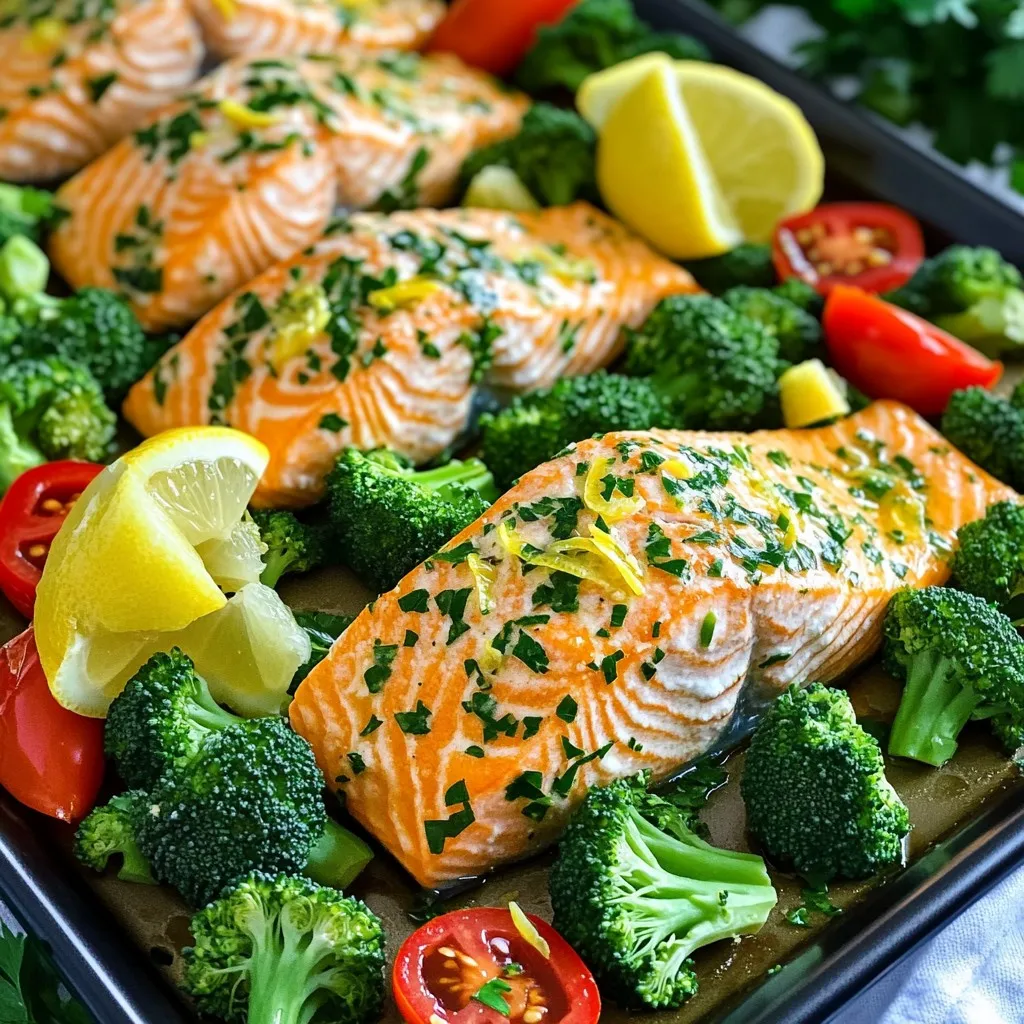
Craving a healthy, quick meal? Try my Sheet-Pan Lemon Herb Salmon & Veggies Delight! This simple dish combines savory salmon with fresh veggies, all roasted together for an easy cleanup. …

Read more

Categories Dinner

Slow Cooker Sweet Chili Pulled Chicken Delight

October 18, 2025 by Chef Remy
- 2 pounds boneless, skinless chicken breasts - 1 cup sweet chili sauce - 1/4 cup soy sauce (or tamari for gluten-free) - 2 tablespoons rice vinegar - 1 tablespoon honey - 1 tablespoon minced garlic - 1 tablespoon minced ginger - 1 teaspoon freshly ground black pepper - 1 teaspoon sea salt - 1/2 teaspoon crushed red pepper flakes (optional) - 1/4 cup finely chopped green onions - 1 tablespoon toasted sesame seeds - Soft slider buns or steamed rice, for serving Gather these ingredients before you start cooking. The chicken is the star, soaking up sweet chili sauce for great flavor. The soy sauce adds depth, while rice vinegar balances the sweetness. Honey gives a nice touch, and garlic plus ginger bring zest. Seasonings like black pepper and salt enhance everything. If you like heat, add crushed red pepper flakes. For garnish, green onions and sesame seeds add crunch and color. You can serve the pulled chicken on slider buns or over rice. Each option is tasty and fun! In the slow cooker, lay the boneless, skinless chicken breasts flat at the bottom. This helps the chicken cook evenly. Each piece will soak up the sauce and get tender. In a bowl, mix the sweet chili sauce, soy sauce, rice vinegar, honey, minced garlic, and minced ginger. Add black pepper and sea salt. If you like heat, toss in crushed red pepper flakes. Whisk until the sauce blends well. Pour the sauce over the chicken. Make sure each breast is coated. This step is key to getting great flavor in every bite. Cover the slow cooker with the lid. Set it to LOW for 6 to 8 hours or HIGH for 3 to 4 hours. The chicken is done when it easily shreds with a fork. After cooking, use two forks to shred the chicken right in the slow cooker. Mix the shredded chicken with the sauce. This helps the chicken soak up all the tasty flavors. Spoon the pulled chicken onto soft slider buns or serve it over fluffy steamed rice. It makes for a fun meal. Just before you serve, sprinkle chopped green onions and toasted sesame seeds on top. This adds color and a nice crunch. Enjoy your delicious creation! Different slow cooker models can change the cooking time. If you have a newer model, it may cook faster. Check your chicken after 5 hours on LOW or 2.5 hours on HIGH. If you use an older model, stick to the full cooking times. Always ensure the chicken shreds easily when done. You might need alternatives for some ingredients. For a gluten-free version, use tamari instead of soy sauce. You can also swap honey with maple syrup for a vegan option. If you want a milder sauce, skip the crushed red pepper flakes or reduce the amount. You can make this dish more personal by adding veggies or spices. Consider tossing in bell peppers or carrots for extra nutrition. Add a dash of cumin or smoked paprika for depth. Experimenting with these can create a unique flavor just for you. {{image_4}} Want to turn up the heat? Simply add more crushed red pepper flakes to your sauce. Start with one teaspoon and adjust to your taste. This small change can boost your dish’s spice. Make sure to mix it well with the other sauce ingredients. The heat balances perfectly with the sweetness of the chili sauce. Your taste buds will thank you for this fiery twist! Take your pulled chicken to the next level by making tacos. Grab some soft tortillas and fill each with the sweet chili pulled chicken. Add toppings like avocado, cilantro, or diced tomatoes for extra flavor. You can even drizzle some extra sweet chili sauce on top. This dish becomes a fun, hands-on meal that everyone will enjoy. It's great for parties or taco nights! For a smoky twist, swap the sweet chili sauce with your favorite BBQ sauce. This change gives the chicken a rich, tangy flavor. You can use store-bought or homemade BBQ sauce. Just pour it over the chicken like you would with the chili sauce. The cooking time stays the same, but the end result? A delightful BBQ pulled chicken that pairs well with coleslaw or baked beans. Perfect for summer gatherings! Store your pulled chicken in an airtight container. This keeps the chicken fresh and flavorful. Place the chicken in the fridge within two hours of cooking. It can last for 3 to 4 days. Make sure to check for any odd smells before eating. You can freeze pulled chicken for longer storage. Divide it into small portions for easy use. Place the chicken in freezer bags. Squeeze out as much air as possible to prevent freezer burn. Label the bags with the date. Use the frozen chicken within 3 months for the best taste. To thaw, move it to the fridge overnight before reheating. Reheat pulled chicken gently to keep it juicy. You can use the microwave, stovetop, or oven. For the microwave, place the chicken in a safe dish and cover it. Heat in 1-minute intervals until warm. On the stovetop, use a pan over low heat. Add a splash of water or broth to keep it moist. For the oven, preheat to 350°F. Cover the chicken with foil and heat for about 15-20 minutes. You can keep the pulled chicken in the fridge for up to four days. Make sure to place it in an airtight container. If you want to save it longer, you can freeze it for up to three months. Just let it cool completely before you freeze it. This way, it stays fresh and tasty. Yes, you can use frozen chicken for this recipe! Just place the frozen chicken directly into the slow cooker. You may need to add an hour to the cooking time. Always check that the chicken is cooked to at least 165°F (75°C). This ensures it is safe to eat. This pulled chicken pairs well with many sides. Here are some options: - Soft slider buns - Steamed rice - Coleslaw - Pickled veggies - Corn on the cob These sides add color and flavor to your meal. The recipe has a mild spice level. It includes crushed red pepper flakes, but these are optional. If you want it spicier, feel free to add more flakes. If you prefer less heat, you can skip them altogether. Yes, you can easily make this in an Instant Pot! Here's how: 1. Place the chicken in the pot. 2. Mix the sauce in a bowl and pour it over the chicken. 3. Close the lid and set it to cook on high pressure for 10-12 minutes. 4. Allow natural release for 10 minutes, then quick release the rest. 5. Shred the chicken and mix it with the sauce before serving. This method saves time and still gives you tender, flavorful chicken. This blog post covered making sweet chili pulled chicken in a slow cooker. We went through the main ingredients, including chicken breasts and sweet chili sauce. You learned how to prepare, cook, and serve the dish. I also shared tips on variations like tacos and BBQ styles. Remember, this recipe is flexible; feel free to adjust flavors. Whether you enjoy it in sliders or on rice, it’s a tasty choice. Keep these ideas in mind for your next meal; you'll impress everyone at the table.

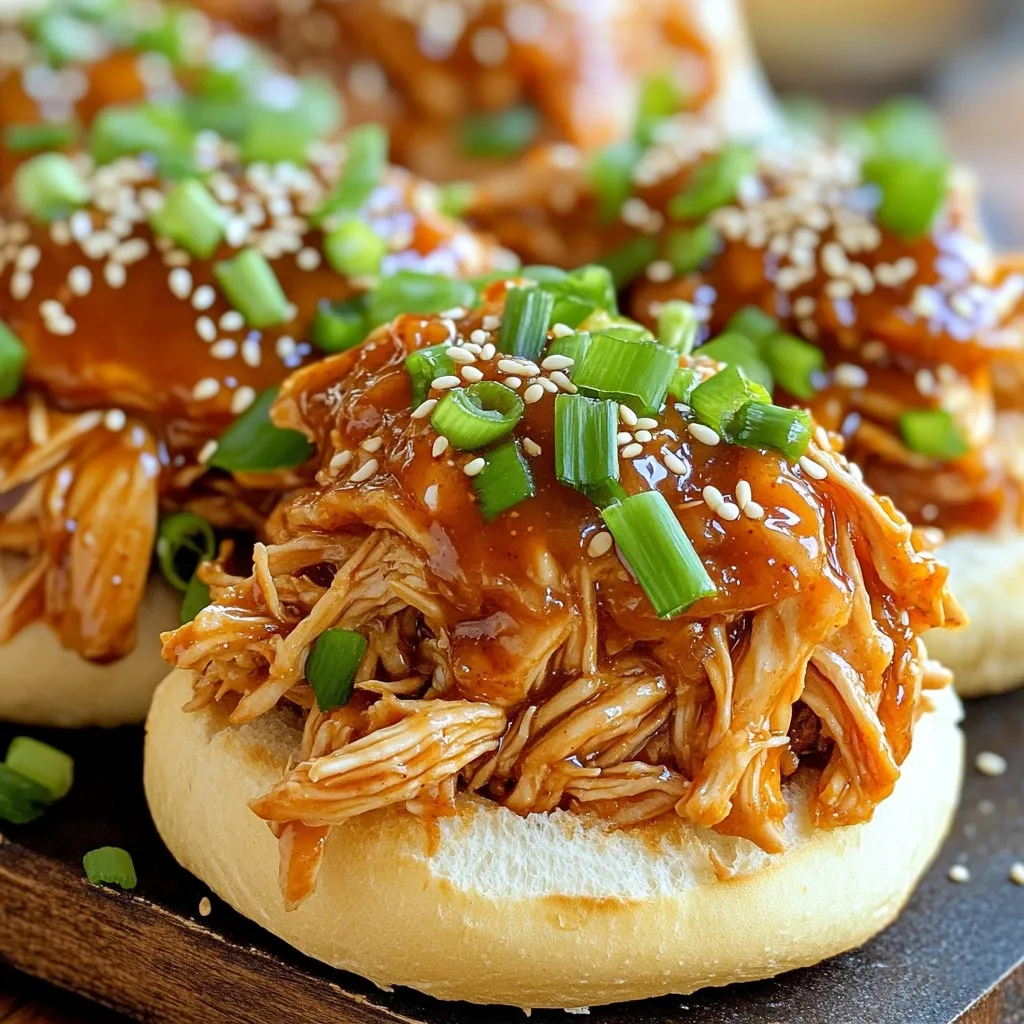
Are you ready to make a dish that will impress your family and friends? In this blog post, I’ll share my recipe for Slow Cooker Sweet Chili Pulled Chicken. It’s …

Read more

Categories Dinner

Protein Cottage Cheese Pancake Bites Easy and Tasty

October 18, 2025 by Chef Remy
- 1 cup cottage cheese - 1/2 cup oats, blended into a fine flour - 2 large eggs - 1 tablespoon honey or maple syrup - 1 teaspoon baking powder - 1/2 teaspoon vanilla extract - A pinch of salt - Cooking spray or coconut oil for frying - Optional toppings: fresh berries, Greek yogurt, nut butter These ingredients come together to create a tasty and protein-packed breakfast. Cottage cheese is a star here. It gives these pancake bites their creamy texture and boosts protein. The oats, when blended, make a healthy flour. I love using oats since they add fiber. Large eggs act as a binder and add even more protein. Honey or maple syrup sweetens the batter just right. Baking powder helps the bites rise, making them fluffy. Vanilla extract and salt enhance the flavors, making each bite delicious. For cooking, I recommend cooking spray or coconut oil. This keeps your pancake bites from sticking. You can top your bites with fresh berries, Greek yogurt, or nut butter for added flavor. Each topping adds a fun twist! To start, gather your ingredients. In a large mixing bowl, combine: - 1 cup cottage cheese - 1/2 cup oats, blended into a fine flour - 2 large eggs - 1 tablespoon honey or maple syrup - 1 teaspoon baking powder - 1/2 teaspoon vanilla extract - A pinch of salt Mix everything well. I like to use a whisk or a mixer. This helps to make the batter smooth. You want no lumps for the best texture. Next, it's time to cook. Preheat a non-stick skillet over medium heat. Grease it lightly with cooking spray or coconut oil. This step helps the pancake bites not to stick. Now, using a spoon or ice cream scoop, pour small amounts of batter onto the skillet. Each scoop should be about 2 tablespoons. Leave some space between each scoop. Cook the pancake bites for about 2-3 minutes. Watch for the edges to firm up. Look for small bubbles to form on the surface. This shows they are ready to flip. Carefully flip each pancake bite. Cook them for another 2-3 minutes. The other side should turn a lovely golden brown. Once cooked, remove them from the skillet. Keep them warm on a plate while you finish the rest of the batter. Enjoy your tasty protein cottage cheese pancake bites warm! To avoid lumps in the batter, mix the cottage cheese first. Blend it until smooth. Then, add the oats, eggs, honey, baking powder, vanilla, and salt. Use a whisk or a hand mixer for best results. This method gives you a creamy batter without lumps. For sweetness, you can choose between honey and maple syrup. Honey gives a rich taste, while maple syrup adds a unique flavor. Adjust the amount based on your preference. Start with one tablespoon and taste. This step helps you find the perfect balance for your pancake bites. The ideal skillet temperature is medium heat. If it’s too hot, your pancake bites can burn. If it’s too cool, they won’t cook well. A hot skillet helps achieve a golden-brown color. For cooking oil, use cooking spray or coconut oil. Coconut oil adds a slight flavor and is great for frying. Make sure to grease the skillet lightly before pouring in the batter. This step prevents sticking and makes flipping easier. For toppings, fresh berries are a must. They add sweetness and color. Greek yogurt gives a creamy texture. You can also drizzle nut butter for a rich taste. Get creative with how you serve these pancake bites. Stack them high on a plate for a fun presentation. You can even turn them into a breakfast parfait, layering them with yogurt and berries. {{image_4}} You can make these pancake bites even better with some tasty tweaks. Adding fruits like bananas or blueberries gives a fresh twist. Just mash a banana and mix it in, or fold in some blueberries before cooking. This adds flavor and natural sweetness. Spices also help enhance the taste. Sprinkle in a bit of cinnamon or nutmeg for warmth. These spices pair well with the creamy cottage cheese. You can even experiment with combinations for unique flavors. If you need gluten-free options, use almond flour or coconut flour instead of oats. Both flours work well and keep the bites light. Just remember, you might need to adjust the liquid amount for the right texture. For those who prefer vegan options, replace the eggs with flaxseed meal. Mix one tablespoon of flaxseed meal with three tablespoons of water. Let it sit for a few minutes to thicken. This works great and keeps the bites fluffy. Meal prepping these pancake bites is simple. Once cooked, store them in an airtight container in the fridge. They’ll stay fresh for about three days. When you want a quick meal, just pop them in the microwave for 30 seconds. You can also mix these bites with other healthy breakfast ideas. Pair them with yogurt or a smoothie for a balanced meal. They make a great snack, too. You’ll have a tasty treat ready whenever you need a boost! Store your protein cottage cheese pancake bites in the fridge. Place them in an airtight container. This keeps them fresh and moist. You can stack them, but separate layers with parchment paper to avoid sticking. They taste best when fresh, but you can enjoy them for a few days. To freeze pancake bites, let them cool completely first. Arrange them in a single layer on a baking sheet. Freeze them for a couple of hours. Once frozen, transfer them to a freezer-safe bag or container. This way, they won’t stick together. To reheat from frozen, place them in a microwave for about 1-2 minutes. You can also use a skillet over low heat for a crispy texture. These pancake bites stay fresh in the fridge for about 3-4 days. If you freeze them, they can last up to 2 months. Look for signs of spoilage, such as an off smell or changes in texture. If they feel slimy or smell bad, it’s best to toss them. Enjoy them while they are at their best! Cottage cheese is a protein powerhouse. It has low fat and high protein content, making it great for your diet. One cup of cottage cheese packs about 28 grams of protein. This helps you feel full and satisfied. It also provides calcium, which is good for your bones. When you use cottage cheese in pancakes, it gives them a fluffy texture and a creamy taste. Plus, it adds a nice boost of nutrients without extra calories. Yes! You can make pancake bites without eggs. Some good substitutes include mashed bananas or unsweetened applesauce. Both options add moisture and help bind the batter. You can also use ground flaxseed or chia seeds mixed with water. Just mix one tablespoon of seeds with three tablespoons of water. Let it sit for a few minutes until it thickens. This will work well in place of one egg. To lower the calories in your pancake bites, you can swap some ingredients. Use a sugar-free sweetener instead of honey or syrup. You could also use low-fat cottage cheese. Instead of regular oats, try using a lighter flour, like almond flour. Adding more fruits, like mashed bananas, can also reduce calories while keeping them tasty. These tips will help you enjoy your pancake bites without feeling guilty. This blog post covered how to make tasty pancake bites using simple ingredients. We looked at mixing the batter, cooking techniques, and ways to perfect your dish. I also shared creative variations, serving suggestions, and important storage tips. These pancake bites are not only fun to make but also healthy and customizable. You can experiment with flavors and toppings that fit your taste. Now, it’s time to enjoy these easy, nutritious bites for breakfast or a snack!

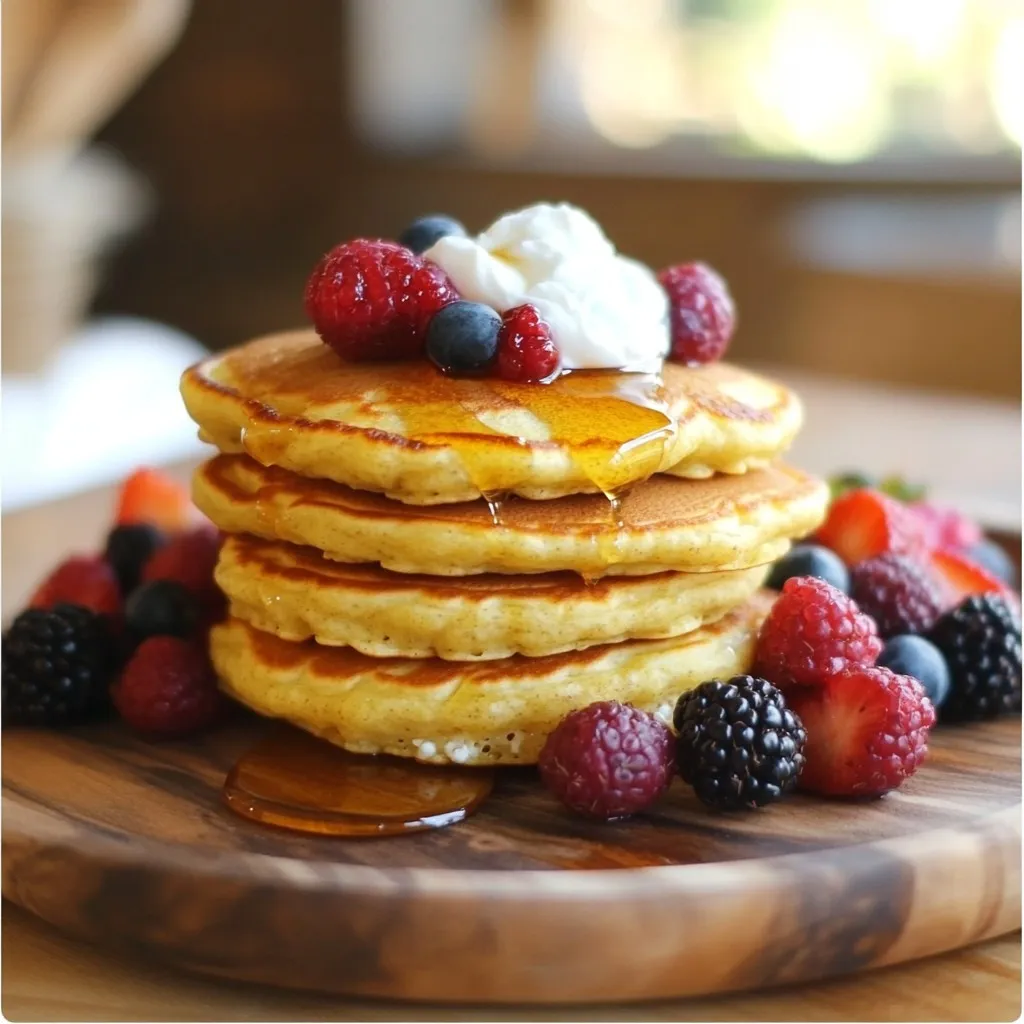
Are you ready to elevate your breakfast game? Protein Cottage Cheese Pancake Bites are the perfect blend of flavor and nutrition. These easy-to-make bites pack a protein punch, making them …

Read more

Categories Breakfast
Older posts
Newer posts
← Previous Page1 … Page7 Page8 Page9 … Page130 Next →

ROASTED RECIPES

Where bold flavors meet everyday meals. Warm, vibrant, and made to share. 🔥🥗🍴

PAGES

Home About Contact Privacy Policy Terms & Conditions Cookie Policy GDPR Policy Copyright Policy Disclaimer

CATEGORIES

Appetizers Desserts Salads Breakfast Dinner

Contact

  • Pinterest
  • Mail
Copyright © 2025 Roasted Flavors. All rights reserved.