Grilled Zucchini with Balsamic Glaze Flavorful Treat
![To make grilled zucchini with balsamic glaze, you need fresh ingredients. Here’s what you will need: - 3 medium zucchinis, sliced into ½ inch thick rounds - 3 tablespoons extra virgin olive oil - Sea salt and freshly cracked black pepper, to taste - ½ teaspoon garlic powder - ½ teaspoon Italian seasoning blend - ½ cup balsamic glaze (can be store-bought or homemade) - Fresh basil leaves, for garnish These ingredients come together to create a tasty dish that shines on any table. The zucchinis offer a satisfying crunch, while the balsamic glaze adds a sweet tang. The olive oil helps the flavors mix, making each bite delicious. The salt and pepper bring out the natural taste of the zucchini. Garlic powder and Italian seasoning give a warm, comforting flavor. Fresh basil not only looks great but smells wonderful too! For the full experience, check the [Full Recipe]. It guides you step-by-step to create this flavorful treat. Preheat your grill to medium-high heat. This step is key for great results. A hot grill helps the zucchini cook evenly and get those nice grill marks. Take three medium zucchinis and slice them into ½ inch thick rounds. In a big bowl, combine these slices with three tablespoons of extra virgin olive oil. Make sure every slice gets a good coat of oil. Next, add sea salt, freshly cracked black pepper, half a teaspoon of garlic powder, and half a teaspoon of Italian seasoning blend. Toss everything together gently until the zucchini is well coated. This mix brings out the best flavors in your grilled zucchini. Now, it’s time to grill! Place the seasoned zucchini slices on the hot grill. Grill them for about 4-5 minutes on one side. Look for nice grill marks and a tender texture. During the last minute of grilling, drizzle half a cup of balsamic glaze over the zucchini. This glaze caramelizes and adds a sweet touch. Once done, carefully take the grilled zucchini off the grill and put them on a serving platter. You can arrange them in an attractive way. Finally, add fresh basil leaves for a pop of color and aroma. For the full recipe, you can check the earlier section. Enjoy your grilled zucchini with balsamic glaze! To grill zucchini well, heat your grill to medium-high. Aim for a temperature of about 400°F. This heat ensures even cooking and nice grill marks. Grill the zucchini for 4-5 minutes on one side. Flip them once you see the grill marks and they feel tender. To achieve perfect grill marks, place the zucchini at a 45-degree angle. After a few minutes, turn them 90 degrees to create a crosshatch pattern. This technique adds flair to your dish and enhances the visual appeal. For extra flavor, try adding herbs or spices. A sprinkle of smoked paprika or chili flakes can bring a kick. Fresh herbs like thyme or oregano also work great. You can even swap out the balsamic glaze. Try a lemon vinaigrette or a garlic-infused olive oil for a fresh twist. These options can elevate your grilled zucchini experience. Mix and match to create your own flavor profile. For the full recipe, refer to the earlier section. Enjoy cooking! {{image_4}} You can cook grilled zucchini in different ways. If you don't have a grill, use your oven. Preheat the oven to 400°F. Place the zucchini on a baking sheet, drizzle with olive oil, and season. Bake for about 20 minutes until tender. You can also use a stovetop grill pan. Heat the pan over medium heat. Add the zucchini slices and cook for about 4-5 minutes on each side. You can mix it up by adding other veggies. Try bell peppers, asparagus, or eggplant. Each vegetable brings its own taste. You can create a colorful veggie medley. Grilled zucchini pairs well with many dishes. It makes a great side for grilled chicken or steak. Serve it alongside a fresh salad for a light meal. For sauces, you can try a yogurt dip or a lemon vinaigrette. Both add a nice zing that complements the sweetness of the zucchini. You can also use marinara or pesto for more flavor. For a full recipe, check out the complete details to bring this dish to life! After enjoying your grilled zucchini, store leftovers in a safe way. First, let the zucchini cool to room temperature. Then, place it in an airtight container. This keeps the zucchini fresh and tasty. Grilled zucchini lasts about 3 to 4 days in the fridge. You can enjoy it as a side dish or in salads later. To reheat grilled zucchini, use a skillet or microwave. If you use a skillet, heat it on medium. Add the zucchini and warm it for a few minutes. This method helps keep the flavor and texture nice. If you use a microwave, heat it on medium power for about 30 seconds. Check if it’s warm enough and stir if needed. Avoid overheating to keep the zucchini from getting mushy. Yes, you can prepare grilled zucchini ahead of time. To do this, grill the zucchini as directed in the full recipe. After grilling, let them cool completely. Store the zucchini in an airtight container in the fridge. They will stay fresh for about 2-3 days. When you want to serve them, just reheat them on the grill or in a pan for a few minutes. This quick reheating brings back some of that lovely charred flavor. If you don’t have balsamic glaze, you can try other sauces. A simple mix of balsamic vinegar and honey works well. Just combine 1 part vinegar with 1 part honey and warm it slightly to blend. You can also use teriyaki sauce or a lemon vinaigrette. Each option brings a unique twist to the dish. Experiment to find what suits your taste best. To keep zucchini firm, slice it evenly. Aim for ½ inch thick rounds, as this helps them cook evenly. Make sure your grill is hot before adding the zucchini. This quick sear keeps the moisture inside. Grill for about 4-5 minutes per side. Avoid overcooking, as that leads to mushy zucchini. Following these tips helps ensure you get delicious, tender, yet firm grilled zucchini every time. Grilling zucchini is simple and tasty. You learned the right ingredients and steps for success. Zucchini's different cooking methods and flavor tips add variety. Proper storage keeps leftovers fresh, while reheating maintains taste. By exploring balsamic alternatives and seasoning options, you can customize your dish. Enjoy your grilled zucchini with various sides, making every meal delightful. Remember, cooking is fun, and experimenting will only improve your skills. Dive in and make this dish your own!](https://roastedflavors.com/wp-content/uploads/2025/07/d3eba0a6-220c-4443-a32a-15239400a04f.webp)
Looking for a vibrant side dish that bursts with flavor? My Grilled Zucchini with Balsamic Glaze is perfect for you! With simple ingredients and easy steps, this tasty treat is …
Looking for a vibrant side dish that bursts with flavor? My Grilled Zucchini with Balsamic Glaze is perfect for you! With simple ingredients and easy steps, this tasty treat is …

Welcome to the world of dessert magic! Today, I’ll share how to make a Roasted Strawberry Mousse Cake, a treat that’s as divine as it is delightful. Imagine luscious roasted …

If you’re craving a show-stopping dessert, the Neapolitan Rose Cake is for you! This delightful treat combines the flavors of chocolate, vanilla, and strawberry in a stunning rose design. It’s …
![To make this tasty dressing, gather these simple ingredients: - 1/2 cup balsamic vinegar - 1/2 cup extra virgin olive oil - 1 tablespoon Dijon mustard - 1 tablespoon honey (or maple syrup for a vegan option) - 1 teaspoon garlic powder - 1 teaspoon onion powder - 1/2 teaspoon sea salt - 1/4 teaspoon freshly ground black pepper - 1 tablespoon fresh herbs (like chopped basil or oregano) Choosing high-quality balsamic vinegar and olive oil makes a big difference. Look for balsamic vinegar that is thick and rich. This adds depth to your dressing. A good olive oil should be extra virgin for the best flavor. You want it to taste fresh and fruity. Check the label for quality, as this will enhance your dish. If you don't have honey, you can use maple syrup. This is a great vegan choice. If you want a different flavor, try agave syrup. For the herbs, fresh is best, but dried herbs work too. Just use less, as dried herbs are stronger. Start by gathering all your ingredients. You will need balsamic vinegar, olive oil, Dijon mustard, honey, garlic powder, onion powder, sea salt, black pepper, and fresh herbs. Measure out each one before you start. This will help you move quickly and avoid mistakes. I always find it easier to have everything ready. In a medium bowl or a sturdy jar, pour in 1/2 cup of balsamic vinegar. Then, add 1 tablespoon of Dijon mustard and 1 tablespoon of honey. Use a whisk or a fork to mix these until smooth. Next, slowly add 1/2 cup of extra virgin olive oil while whisking. This step is key to getting a nice, thick dressing. If you use a jar, just add the olive oil, seal it, and shake well. Now, it’s time to add the spices. Sprinkle in 1 teaspoon of garlic powder, 1 teaspoon of onion powder, 1/2 teaspoon of sea salt, and 1/4 teaspoon of black pepper. For a fresh twist, mix in 1 tablespoon of chopped herbs. Whisk or shake again until everything is well combined. Taste your dressing. If you want it sweeter, add a bit more honey. If you like it tangier, pour in a touch more balsamic vinegar. Adjust it until it feels just right for you. Store it in a jar, and remember to shake before serving. Enjoy your zesty balsamic bliss dressing! For the full recipe, check [Full Recipe]. To keep your dressing fresh, store it in an airtight jar. Make sure to seal it well. The dressing lasts up to one week in the fridge. Always label the jar with the date. This way, you know when to use it. Before each use, shake the jar to mix the ingredients again. Some parts may settle, so this step is key. Emulsifying is how you mix oil and vinegar. Start by whisking the vinegar with mustard and honey. This creates a base. Slowly add the olive oil while whisking. If you use a jar, add oil, then shake it. This helps blend the dressing. An emulsified dressing is creamy and smooth. If it separates, just shake it again before serving. Fresh herbs can make your dressing pop! Try basil or oregano for a burst of flavor. Chop them finely and add them in. Fresh herbs give a bright taste that dried herbs can't match. You can also experiment with different herbs. Chives or parsley can add a new twist. Just remember to adjust the amount based on your taste. {{image_4}} You can make this balsamic vinaigrette your own by adding new flavors. A splash of fresh citrus juice brightens the taste. Try lemon or orange juice for a zesty twist. Just add about one tablespoon to your dressing mix. You can also use fresh citrus zest for a stronger flavor. Garlic is another great option. Add one minced garlic clove for a bold taste. If you want a vegan version, it's easy! Just replace honey with maple syrup. This swap keeps the sweetness without using animal products. You can also omit the Dijon mustard if you need a mustard-free option. This vinaigrette isn’t just for salads. Use it as a marinade for chicken or tofu before grilling. The acidity helps tenderize the meat. You can also use it as a dipping sauce for bread or fresh veggies. Drizzle it on roasted vegetables for added flavor. This dressing is not just a side; it's a star in many dishes! For the full recipe, check out the Zesty Balsamic Bliss Dressing. Homemade balsamic vinaigrette lasts about one week in the fridge. After seven days, it may lose flavor. I always suggest tasting it before using. If it still tastes great, go ahead and enjoy! The best way to store this dressing is in an airtight jar. A glass jar works well since it does not absorb flavors. Ensure the lid is tight to keep air out. Store it in the fridge for the best taste. Avoid storing it at room temperature; heat can spoil the flavors. Look for changes in color or smell. If the dressing smells sour or off, it’s best to throw it out. Check for any mold or separation that seems unusual. If you notice any of these signs, do not use the dressing. Safety first! Yes, you can make this balsamic vinaigrette dressing ahead of time. In fact, it tastes better after sitting a bit. The flavors blend well together, making it even more delicious. Just store it in a clean jar in the fridge. It will stay fresh for up to one week. Before using, give it a good shake to mix everything back together. You can use this dressing on many foods. It’s great on salads, adding a fresh and bold flavor. You can also use it as a marinade for chicken, fish, or vegetables. Drizzle it over roasted veggies for an extra kick. You can even use it as a dipping sauce for bread or fresh veggies. The options are endless! If your dressing is too thick, just add a little water or extra balsamic vinegar. Mix it in slowly until it reaches the right consistency. If it’s too thin, adding more olive oil can help thicken it up. Whisk or shake again to blend everything well. Adjusting is easy, so don’t worry if it’s not perfect at first! Making homemade balsamic vinaigrette dressing is simple and fun. You learned the key ingredients, like balsamic vinegar and olive oil, and how to choose the best quality. The step-by-step guide helped you mix and adjust flavors to suit your taste. With tips for storage and fresh herbs, you now have everything to keep your dressing tasty. Remember, you can create variations with citrus or garlic to keep it exciting. This dressing lasts for weeks if stored right. Enjoy your culinary journey and elevate your meals with this easy-to-make dressing!](https://roastedflavors.com/wp-content/uploads/2025/07/0711ec85-199c-415a-b5d5-dd396a9a8750.webp)
Looking to elevate your salads and sandwiches? This Homemade Balsamic Vinaigrette Dressing is your answer! It’s quick, simple, and totally customizable. I’ll guide you through making this fresh dressing from …

Are you craving a delicious, wholesome snack? These Vegan Zucchini Muffins are your answer! Packed with simple ingredients like zucchini, whole wheat flour, and maple syrup, this recipe is easy …

If you love baking cakes that pack a flavor punch, this Zucchini Cake with Cinnamon Cream Cheese Frosting is for you! Imagine a moist, spiced cake topped with velvety frosting …

Are you ready to indulge in a rich and decadent treat that won’t ruin your keto diet? These fudgy KETO zucchini brownies blend the perfect balance of sweetness and texture, …

If you’re looking for a tasty treat that packs a nutritious punch, you’ve found it! My Zucchini Chocolate Chip Muffins are delicious, easy to make, and the perfect way to …
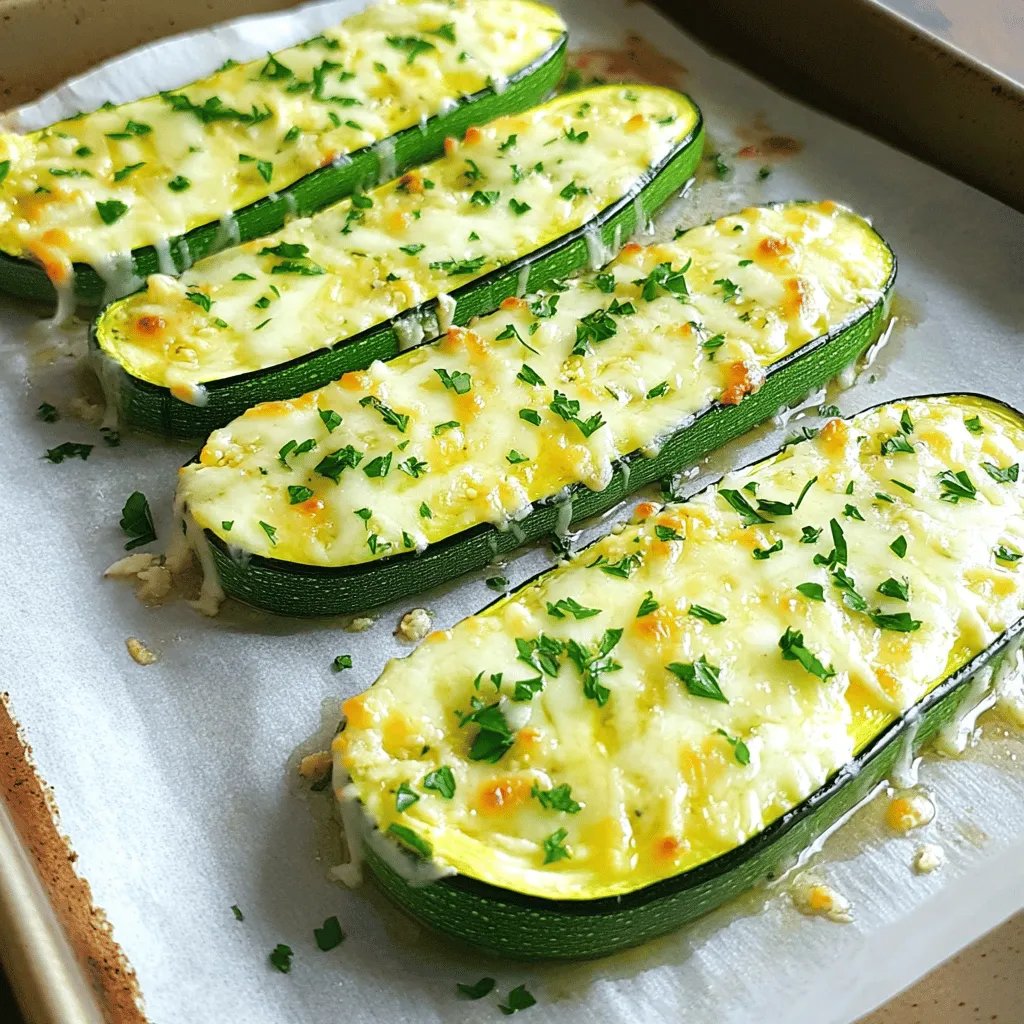
If you’re looking for a fun and tasty dish, cheesy garlic zucchini steaks are here to impress! This simple recipe brings bold flavors right to your kitchen with just a …
![- 2 medium acorn squashes - 2 tablespoons extra-virgin olive oil - 1 teaspoon smoked paprika - 1 teaspoon garlic powder - ½ teaspoon ground cumin - ½ teaspoon ground cinnamon - Salt and black pepper - Fresh parsley for garnish - Optional: cayenne pepper If you can’t find acorn squash, use butternut or delicata squash instead. These squashes also roast well and have a lovely flavor. For oils, you can use avocado oil or grapeseed oil. Both will work great for roasting. Spice it up with different seasonings. Try curry powder or Italian herbs for a twist. When selecting acorn squashes, look for ones that feel heavy and firm. The skin should have a rich green color with some orange streaks. Fresh spices make a big difference in flavor. Use whole spices when you can and grind them for better taste. Always choose high-quality olive oil. It adds richness and depth to your dish. Start by preheating your oven to 425°F (220°C). This high temperature helps achieve a crispy finish. Next, take your acorn squashes and place them on a cutting board. Carefully halve the squashes and scoop out the seeds with a spoon or melon baller. Make sure to remove any stringy fibers inside. This step creates a smoother texture for your dish. In a small bowl, combine the following ingredients for the spice mixture: - 2 tablespoons extra-virgin olive oil - 1 teaspoon smoked paprika - 1 teaspoon garlic powder - ½ teaspoon ground cumin - ½ teaspoon ground cinnamon - Salt and freshly ground black pepper to taste - Optional: A pinch of cayenne pepper for some heat Stir the mixture well to create a cohesive blend. For even coating, generously brush the cut side of each squash half with this spice mixture. Ensure every surface absorbs the flavors. Place the squash halves, cut side down, on a baking sheet lined with parchment paper. This prevents sticking and makes cleanup easier. Roast the squashes in your preheated oven for about 25-30 minutes. You want them tender with beautifully caramelized skin. After that, use tongs to flip the squash halves so the cut sides face up. Return them to the oven for an additional 10-15 minutes. This step boosts crispiness around the edges and enhances the natural sweetness. To get that perfect crispy texture, you must use a high temperature. Preheat your oven to 425°F (220°C). This heat helps the squash caramelize and become golden. Flipping the squashes halfway through cooking is key. It ensures they cook evenly and get crispy on all sides. Adding a splash of acidity really boosts the flavor. A squeeze of lemon juice can brighten each bite. Creaminess also adds depth. Try topping with Greek yogurt or a drizzle of tahini for a rich twist. For a touch of flair, garnish with fresh herbs. Chopped parsley or cilantro looks great and adds freshness. One big mistake is overcrowding the baking sheet. Leave space between each squash half. This allows hot air to circulate and helps achieve that crispy finish. Another misstep is not letting the squash cool before serving. If you serve them too hot, they can lose their crispness. Allow them to rest for a few minutes after roasting for the best experience. {{image_4}} You can use different squashes for variety. Butternut squash is sweet and smooth. It roasts well and gets golden brown. Spaghetti squash has a unique texture. It shreds into strands, making it fun. You can even mix different squashes for a colorful dish. Just remember to adjust cooking times if needed. You can change the flavor easily. For a sweet taste, try cinnamon and brown sugar. This mix brings out the natural sugars in the squash. For a savory option, use garlic powder and herbs. You can also explore international spice blends. Try curry powder for a warm twist. Or use za'atar for a Middle Eastern flair. Each spice can make the squash shine in a new way. Roasted squash pairs well with dips and sauces. Try it with a creamy yogurt dip. A sprinkle of feta cheese adds a nice touch too. For sides, serve it with a fresh salad. A crisp green salad with lemon dressing works great. You can also add roasted veggies for a hearty meal. These pairings make the squash a delightful main or side dish. For more tips, check the Full Recipe for creative ideas. To store leftover crispy roasted squash, place it in the fridge. Use an airtight container to keep it fresh. Make sure the squash is cool before sealing it. This helps avoid moisture buildup, which can make it soggy. Keep the leftovers for up to four days. If you want to keep it longer, consider freezing it. For the best results, reheat the squash in the oven. Preheat your oven to 350°F (175°C). Place the squash on a baking sheet and cover it loosely with foil. This keeps it from drying out. Heat for about 10-15 minutes. For crispiness, remove the foil for the last few minutes. You can also reheat in a skillet over medium heat. Just add a little oil to help restore the crunch. Yes, you can freeze roasted squash! Cut the squash into smaller pieces for easier storage. Allow it to cool completely before you freeze it. Place the pieces in a freezer bag, pressing out as much air as possible. Frozen roasted squash can last up to three months. When you’re ready to use it, thaw the squash in the fridge overnight. To reheat, follow the same instructions as above for the best flavor and texture. For the complete recipe, check the Full Recipe section. You can tell roasted squash is done when it is tender and has a nice golden color. The skin should look slightly crispy, and a fork should easily pierce the flesh. If you notice a caramelized edge, that’s a good sign too. This adds flavor and texture, making your dish even more enjoyable. Yes, you can prepare roasted squash ahead of time. Roast the squash and let it cool completely. Store it in an airtight container in the fridge for up to three days. When ready to serve, reheat it in a hot oven for about 10 minutes to regain crispiness. This makes meal prep easy and saves you time. Roasted squash pairs well with many sides. Here are some tasty options: - Quinoa salad with herbs and lemon - Maple-glazed Brussels sprouts - Creamy mashed potatoes - Spinach and feta salad These dishes complement the sweet and savory notes of the squash, creating a balanced meal. For a lovely presentation, place each half of the squash on a platter. Drizzle with olive oil and sprinkle with fresh parsley. You can also add toppings like feta or yogurt to enhance the flavors. This makes your dish not just tasty, but also visually appealing for gatherings. To make roasted squash healthier, you can use less oil. Try using a spray bottle to lightly coat the squash. You can also skip the salt or use a low-sodium option. Adding more herbs, like rosemary or thyme, boosts flavor without extra calories. These simple changes keep the dish delicious and light. For the full recipe, visit [Full Recipe]. In this post, we explored how to make delicious roasted acorn squash. You learned about the key ingredients, preparation steps, and tricks for optimal crispiness. We also discussed variations and storage tips to keep your squash fresh. Roasting acorn squash is easy and tasty. With a few simple steps, you can create a dish that impresses. Enjoy being creative with flavors and serve it as a side or main dish! Happy cooking!](https://roastedflavors.com/wp-content/uploads/2025/07/8588f761-f079-44dd-b32a-19f985ed52e6.webp)
Are you ready to transform your meals with the ultimate crispy roasted squash? This tasty and flavorful delight will elevate your kitchen game and wow your guests. With just a …