Skip to content
Roasted Flavors
  • Home
  • Appetizers
  • Desserts
  • Salads
  • Breakfast
  • Dinner
  • Privacy Policy
  • Contact
  • About

Chef Remy

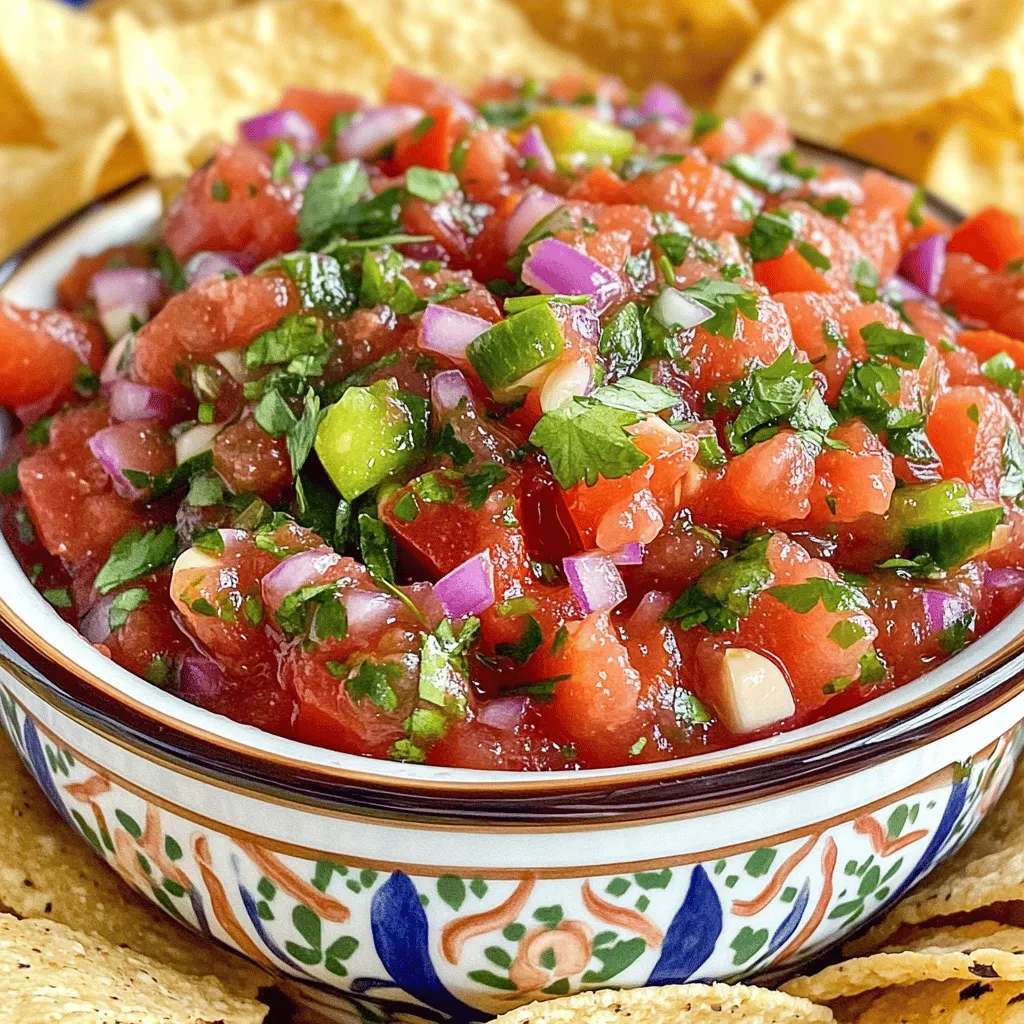
The Best Homemade Salsa Ranchera Flavorful Delight

July 21, 2025 by Chef Remy
- 4 medium ripe tomatoes - 1 small yellow onion - 2 cloves garlic - 2 jalapeños - 1/4 cup fresh cilantro - 1 teaspoon ground cumin - 1 tablespoon fresh lime juice - Salt to taste For a great salsa ranchera, I use simple, fresh ingredients. The tomatoes are key. Choose ripe ones for the best taste. A small yellow onion adds sweetness. Garlic gives it a nice kick. If you can't find fresh tomatoes, you can use canned tomatoes. They work well in a pinch. You can also swap yellow onion for red onion. It adds a different flavor but still tastes great. If you want less heat, remove the seeds from the jalapeños. For more spice, add more jalapeños or use a hotter pepper. Adjust these ingredients to fit your taste buds. Remember, your salsa should reflect what you love. Experiment with these substitutions to find your perfect mix. For the full recipe, check out the detailed instructions. Preheating the skillet Start by preheating your skillet over medium-high heat. The heat needs to be just right to char the veggies. You want a nice sizzle when you add them. Charring the vegetables Next, add your chopped tomatoes, quartered onion, jalapeños, and peeled garlic to the hot skillet. Let them cook for about 8 to 10 minutes. Turn the vegetables every few minutes. Look for softening and slight blistering on the tomato skins. This charring gives the salsa great flavor. Transferring ingredients to the blender Once the veggies are nicely charred, take them off the heat. Let them cool for a few minutes; this makes blending easier. Now, transfer the charred tomatoes, onion, jalapeños, and garlic into a blender. Achieving desired salsa consistency Add in the chopped cilantro, ground cumin, fresh lime juice, and a pinch of salt. Blend this mixture until you reach your preferred consistency. If you want a smooth salsa, blend longer. For a chunkier salsa, blend less. Adjusting seasoning Now, taste your salsa. If it needs more flavor, add more salt or lime juice. Make it just right for your taste buds. Allowing flavors to meld For the best flavor, let your salsa sit at room temperature for about 30 minutes. This resting time helps all the flavors meld together. It’s worth the wait! For the complete recipe, check the Full Recipe section. Enjoy your homemade Salsa Ranchera with tortilla chips or your favorite tacos! Using fresh ingredients is key to great Salsa Ranchera. Fresh tomatoes, onions, and cilantro bring out the best taste. Try to get ripe, in-season tomatoes for the sweetest flavor. The herbs should be bright and fragrant. They make a big difference. Resting time also helps the flavors blend. After you mix your salsa, let it sit for about 30 minutes. This allows the spices and herbs to mingle. You’ll taste a deeper, richer flavor when you do this. One mistake is over-blending or under-blending your salsa. If you blend too much, it turns into a puree. Salsa should have some texture. Aim for a mix that is chunky, not smooth. On the other hand, if you don’t blend enough, you'll have large pieces that are hard to enjoy. Another common mistake is ignoring seasoning adjustments. Always taste your salsa before serving. You may need to add more salt or lime juice. Each ingredient can change the flavor, so adjust as needed. Serve your Salsa Ranchera in a bright, appealing dish. A colorful bowl makes the salsa look even tastier. You can also add garnishes for a nice touch. Fresh cilantro on top adds a pop of color. Lime wedges on the side look great and provide extra zing. These simple steps help make your dish inviting. Enjoy it with crispy tortilla chips or on your favorite tacos. For the full recipe, check out The Best Homemade Salsa Ranchera. {{image_4}} To make your salsa ranchera spicy, add more jalapeños or other hot peppers. You can also try incorporating hot sauce. Start with a small amount and taste as you go. This way, you control the heat. Some prefer a fiery kick, while others like a milder flavor. You can mix it up with different kinds of peppers too, like serranos or habaneros. Adding fruits like mango or pineapple gives your salsa a sweet twist. Chop them finely and mix them in. This adds brightness and a fun texture. You can also include black beans or corn for more bite. These ingredients make the salsa heartier and more filling. They also add color, making your dish even more appealing. If you want to make it vegan-friendly, skip any animal products. Luckily, the base ingredients are already plant-based! For those watching their salt, try low-sodium options. Use fresh herbs and spices for flavor instead. This keeps your salsa tasty without extra salt. Many people enjoy these modifications, making salsa ranchera fit various diets. To keep your salsa fresh, use an airtight container. Glass jars work well. Make sure the lid is tight. Place it in the fridge right after making it. This way, it stays cool and tasty. Avoid leaving it out too long. Salsa Ranchera lasts about 4 to 5 days in the fridge. Keep an eye on the smell and look for any changes. If you want to save it longer, freezing is a good option. Use a freezer-safe container and it can last up to 3 months. Just remember to leave some space in the container. Salsa expands when it freezes. When you want to enjoy leftovers, use your stovetop or microwave. For the stovetop, heat it gently over low heat. Stir it well to keep it smooth. If using a microwave, heat in short bursts. Stir in between to avoid hot spots. This keeps the flavor and texture just right. Enjoy your Salsa Ranchera warm or cold, as it tastes great either way! Salsa Ranchera is a flavorful dip and a great topping. You can use it with: - Tortilla chips for a tasty snack. - Tacos to add a burst of flavor. - Grilled meats for a zesty kick. - Eggs for a spicy breakfast twist. This salsa pairs well with many dishes and can elevate any meal. Yes, making Salsa Ranchera ahead of time is a smart move. Here are some tips: - Make it up to two days before serving. This gives the flavors time to blend. - Store it in a tight container in the fridge. This keeps it fresh and tasty. - Stir well before serving, as some separation may occur. Meal prep makes it easy to enjoy this dish anytime. You can easily change the spice level in Salsa Ranchera. Here’s how: - Use fewer jalapeños for a milder salsa. - Add a pinch of cayenne pepper for extra heat. - Experiment with different peppers, like serrano or habanero. Adjusting spice makes the salsa perfect for your taste. Salsa Ranchera differs from other salsas in flavor and texture. Here are some key points: - It often has roasted ingredients, giving it a smoky taste. - Many salsas use raw ingredients, which can be fresher but less complex. - Salsa Verde is made with tomatillos and has a tangy flavor. Each salsa brings unique tastes to the table, so explore them all! To make Salsa Ranchera, you need fresh tomatoes, onions, garlic, and jalapeños. I shared tips to improve flavor and avoid common mistakes. You can also customize the salsa by adjusting spice levels or adding fruits. In conclusion, making Salsa Ranchera is easy and fun. With fresh ingredients and a few tips, you can create a tasty dish that fits your taste. Enjoy experimenting with flavors and serving it at your next meal. Your friends and family will love it!

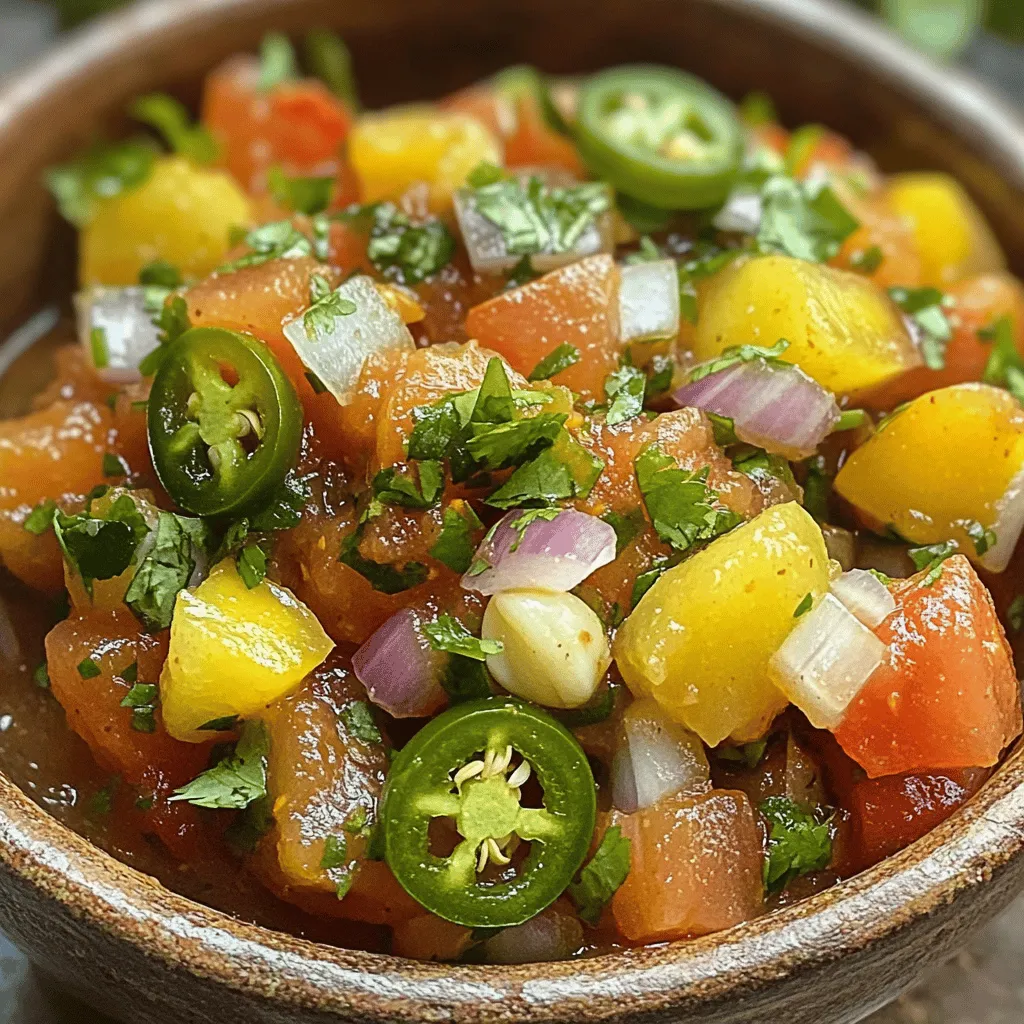
Ready to elevate your next meal? With The Best Homemade Salsa Ranchera, you’ll discover a vibrant mix of fresh ingredients that bursts with flavor. This simple salsa brings life to …

Read more

Categories Appetizers

Harvest Bowls with Fig Balsamic Vinaigrette Delight

July 20, 2025 by Chef Remy
- 2 cups cooked quinoa - 1 cup roasted sweet potatoes, diced - 1 cup chopped kale - 1/2 cup dried figs, roughly chopped - 1/2 cup goat cheese, crumbled - 1/4 cup toasted walnuts, roughly chopped - 1 medium apple, thinly sliced - 1/4 cup balsamic vinegar - 3 tablespoons olive oil - 2 tablespoons fig preserves - 1 teaspoon Dijon mustard - Salt and pepper to taste - 1 tablespoon olive oil for roasting - Salt and pepper to taste The ingredients in Harvest Bowls with Fig Balsamic Vinaigrette offer a great mix of flavors and textures. Each element plays a key role. For instance, quinoa serves as a hearty base. It’s full of protein and fills you up. Roasted sweet potatoes add warmth and natural sweetness. They contrast nicely with the fresh, crunchy apple slices. The dried figs bring a chewy texture and fruity flavor. They work well with the creamy goat cheese, which adds a tangy taste. Walnuts lend a satisfying crunch, making each bite delightful. For the vinaigrette, the balsamic vinegar gives a tangy kick. Fig preserves add depth and sweetness. The olive oil rounds it all out, making it smooth and rich. Dijon mustard adds a hint of spice that brightens the dressing. This recipe is not just tasty, but it also keeps well. It makes a great meal prep option. You can enjoy the bowls throughout the week. For the full recipe, check the details provided. - Cook the quinoa and let it cool: Start by rinsing the quinoa well. This step helps remove any bitterness. Cook it based on the package instructions. Once it's ready, let it cool in a bowl. - Roast the sweet potatoes until caramelized: Preheat your oven to 400°F. Toss diced sweet potatoes in one tablespoon of olive oil. Season with salt and pepper, then spread them on a baking sheet. Roast for about 25 minutes until they are tender and caramelized. - Sauté the kale until wilted: In a skillet, add a drizzle of olive oil over medium heat. Add chopped kale and sauté for 3-4 minutes. You want it wilted but still bright green. Season with a pinch of salt. - Whisk together vinaigrette ingredients until blended: In a small bowl, combine balsamic vinegar, olive oil, fig preserves, and Dijon mustard. Whisk until everything is mixed well. - Adjust seasoning to taste: Taste the vinaigrette and add salt and pepper as needed. This step is key to getting the right balance of flavors. - Layer quinoa as the base: Start by putting the cooled quinoa at the bottom of each bowl. This forms a hearty base. - Add roasted sweet potatoes, sautéed kale, figs, apple slices, walnuts, and goat cheese: Carefully layer the roasted sweet potatoes, sautéed kale, chopped figs, apple slices, toasted walnuts, and crumbled goat cheese on top of the quinoa. Make it look nice! - Drizzle with vinaigrette and mix if desired: Generously drizzle your fig balsamic vinaigrette over the top. You can mix it all together if you like, or leave it layered for a pretty display. For the full recipe, check the previous section. Enjoy crafting your beautiful harvest bowls! - Rinse quinoa thoroughly to remove bitterness. - Preheat the oven adequately for roasting. Rinsing quinoa helps wash away the saponins, which can make it taste bitter. I always rinse it under cold water for about a minute. This simple step makes a big difference. Preheating your oven means your sweet potatoes will roast evenly. I set my oven to 400°F (200°C) at least 10 minutes before I put in the sweet potatoes. - Use large, shallow dishes for distinctive presentation. - Arrange toppings in a color-coordinated manner. Serving in large, shallow dishes makes your harvest bowls look great. You can see all the colors and textures this way. Use greens, oranges, and browns for a feast for the eyes. Color coordination adds fun to your meal. Try placing roasted sweet potatoes next to bright apple slices. It draws the eye and makes for a tasty bite. - Consider adding additional herbs. - Experiment with different nut toppings. Fresh herbs like parsley or basil can lift your dish. They add a pop of flavor that complements the fig balsamic vinaigrette well. Nuts add crunch and depth. Try using pecans or almonds for a new twist. They can change the whole vibe of your harvest bowl. For the full recipe, don’t forget to check out the section earlier! {{image_4}} You can easily boost your harvest bowl with protein. Grilled chicken or turkey adds a savory touch. If you prefer plant-based options, try adding chickpeas or beans. Both options give you good protein and add great texture. Feel free to customize your bowl! You can swap kale for spinach or arugula. They bring a different taste and are just as nutritious. For cheese lovers, feta works great if you want a change from goat cheese. Want to switch up your vinaigrette? Use maple syrup instead of fig preserves for a sweeter taste. If you crave more flavor, add minced garlic to the mix. It gives the vinaigrette a nice kick that pairs well with fresh ingredients. To keep your harvest bowls fresh, store them in an airtight container in the refrigerator. This ensures the flavors stay intact. Enjoy them within 3-4 days for the best quality. After that, the taste and texture may start to decline. Freezing is not recommended for harvest bowls, as it can change the texture. If you must freeze, store the individual components separately. This way, you can enjoy them later without losing the fresh taste. When you’re ready to eat, gently reheat the quinoa and sweet potatoes on the stovetop or in the microwave. This keeps them warm without overcooking. When serving, toss all ingredients with a bit more vinaigrette. This adds flavor and moisture back into the dish. Yes, you can make this recipe vegan. Simply substitute the goat cheese with a vegan alternative. Also, skip the honey in the vinaigrette. This keeps the flavors bright and fresh without animal products. To make quinoa fluffy, rinse it thoroughly before cooking. This removes any bitterness. After cooking, let the quinoa rest for a few minutes. This allows steam to escape and keeps the texture light. You can pair these harvest bowls with a light soup. They also shine as a standalone meal, packed with nutrients and flavor. Total time is about 50 minutes. Prep time is around 20 minutes. This makes it a great option for a weeknight meal or a cozy weekend gathering. This blog post showed you how to create tasty harvest bowls. We covered key ingredients like quinoa, sweet potatoes, and figs. You learned to make a fig balsamic vinaigrette, assemble the bowl, and add your favorite proteins. Use my tips for cooking and presenting your dish nicely. Remember, you can get creative with swaps and extras. Enjoy experimenting with flavors and colors in your meals!

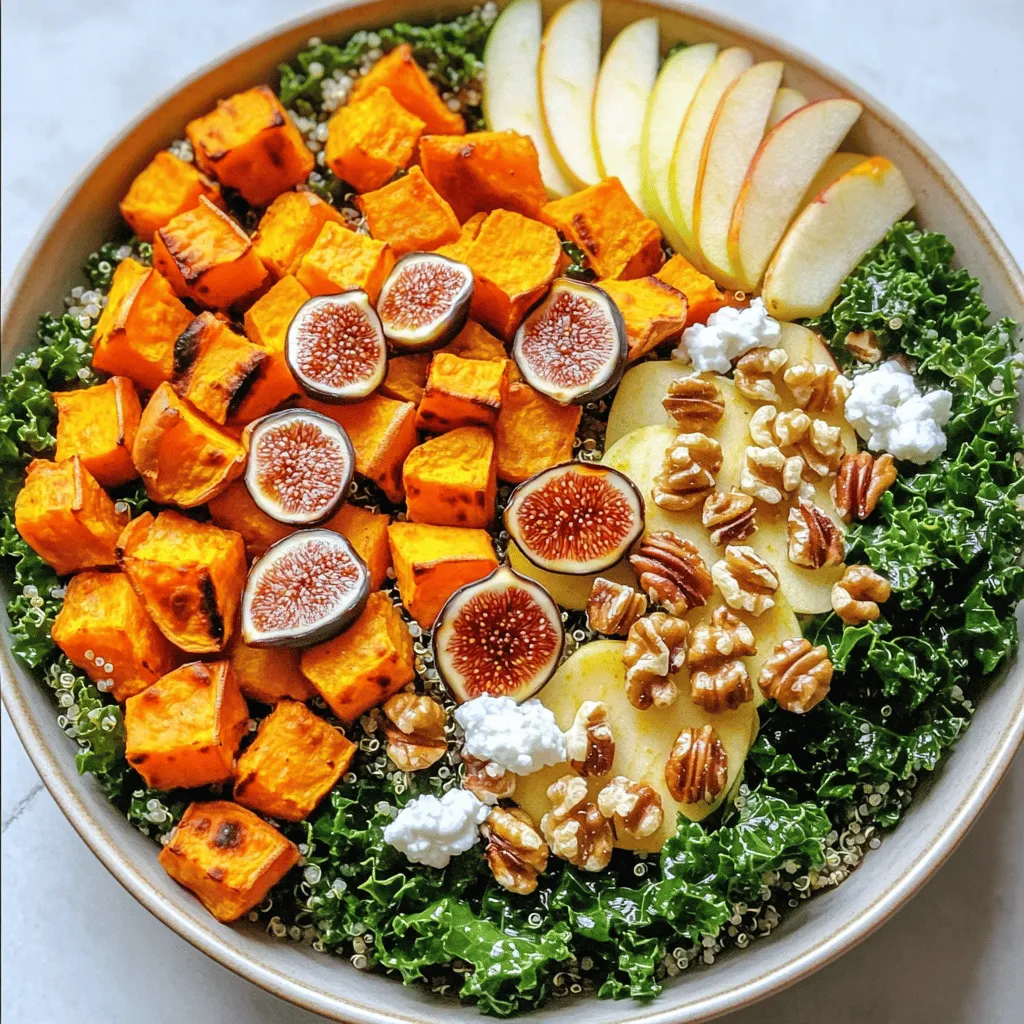
Ready to elevate your mealtime? These Harvest Bowls with Fig Balsamic Vinaigrette are a tasty treat! Packed with flavors from roasted sweet potatoes, fresh kale, and figs, they make a …

Read more

Categories Salads

Homemade Lunchable Delightful and Easy Recipe Guide

July 20, 2025 by Chef Remy
When making a Homemade Lunchable, I focus on fresh and fun ingredients. Here’s what you need: - Whole grain crackers - Cheddar cheese - Turkey or chicken breast - Hummus - Carrot sticks - Cucumber sticks - Grape tomatoes - Olives - Sweet dip options These ingredients make a tasty and balanced meal. Whole grain crackers provide crunch and fiber. Cheddar cheese gives a rich flavor. Turkey or chicken breast adds protein, while hummus offers a creamy dip. Carrot sticks and cucumber sticks bring crunch and vitamins. Grape tomatoes add sweetness and color. Olives give a briny taste that complements the other flavors. Sweet dip options, like honey, make it a fun treat. You can mix and match these ingredients. It allows for creativity. This way, you can cater to different tastes and preferences. Plus, the colors and textures make it appealing. Using fresh ingredients makes this lunchable healthy and delightful. You can find the full recipe to guide you through the process. Enjoy making your own delicious lunchable! Start by getting all your ingredients ready. Slice the cheddar cheese into small, bite-sized pieces. This makes it easy to eat with the crackers. Next, slice the turkey or chicken breast in the same way. Keep the meat and cheese separate to avoid mixing flavors. Now, wash the carrot and cucumber sticks thoroughly. Cut them into manageable sizes. You want them easy to grab and dip. Finally, rinse the grape tomatoes and set them aside. Grab a lunchbox or a container with sections. Begin by placing the whole grain crackers in one area. Leave enough space so you can pair them easily with cheese and meat. In another section, add the sliced cheddar cheese. Next, place the turkey or chicken slices in a different compartment to keep the flavors distinct. This makes it fun to mix and match. Scoop a generous amount of hummus into a compartment. This will be a tasty dip for your crackers, veggies, and meats. In another small cup, add the olives to keep them separate. This helps maintain their flavor and texture. If you want to add a little sweetness, drizzle a tablespoon of honey in a small container. This is optional but makes a fun treat! Finally, garnish your Lunchable with fresh herbs. They add a nice burst of color and flavor. Now, secure the lunchbox with its lid. You can refrigerate it until you're ready to eat. Enjoy your homemade Lunchable! For more ideas, check out the Full Recipe. When making your Homemade Lunchable, pick the best meats and cheeses. Choose lean turkey or chicken breast for protein. Cheddar cheese adds a rich taste. Look for fresh, high-quality options. For veggies, select fresh carrots, cucumbers, and grape tomatoes. Crunchy veggies make your lunch fun. They also add color and nutrients. Visit local markets for the best produce. Serving sizes matter for kids and adults. Aim for about 4 ounces of protein. This amount works well for a balanced snack. Use about 1 cup of veggies. This keeps the meal healthy and fresh. Balance is key. Include protein, carbs, and veggies in each Lunchable. Whole grain crackers give energy. They pair well with meats and dips. Make your Lunchable look appealing. Arrange ingredients in fun shapes or colors. Use small cups for dips and olives. This keeps flavors separate and neat. Try stacking cheese and meat for a fun look. Kids love colors, so mix red, green, and orange. Use fresh herbs for garnish. They add a pop of color and flavor. With these tips, you can make a Homemade Lunchable that is not only tasty but also visually exciting. For the complete guide, see the Full Recipe. {{image_4}} You can easily swap ingredients in your Homemade Lunchable. For protein, try using ham or tofu. Both options add great flavor. For dips, think about using guacamole or tzatziki. These dips bring new tastes and textures to your meal. If you need gluten-free options, choose gluten-free crackers. Many brands offer tasty choices that fit your needs. For a vegan Lunchable, skip the meat and cheese. Instead, use hummus and add more veggies. This way, you still enjoy a filling meal without animal products. Get creative with themed Lunchables! For Halloween, use spooky cookie cutters for cheese shapes. You can add orange and black foods like carrots and olives for fun. During Christmas, make it festive with red and green veggies. Swap in seasonal ingredients to keep it fresh and exciting all year long. To keep your homemade Lunchables fresh, refrigeration is key. First, place your packed lunchbox in the fridge right after you prepare it. This helps keep all the ingredients crisp and safe to eat. Aim to eat your lunchable within three days for the best taste. The veggies and dips stay fresh, while the meats and cheese hold up well for this time. If you have a busy week ahead, meal prep is a great idea. You can make several Lunchables at once. Store each in its own lunchbox to grab and go. For longer storage, you can freeze certain ingredients. For instance, freeze hummus in small containers. You can add it to your lunchable when ready to eat. Just remember to thaw it in the fridge overnight. Choosing the right container matters. Use containers that seal tightly to keep everything fresh. Compartmentalized lunchboxes work best. They allow you to keep meats, veggies, and dips separate. This way, you maintain the flavors and textures. Look for boxes that are easy to clean and safe for the dishwasher. You can use several tasty options instead of crackers. Here are some great choices: - Rice cakes for a light crunch - Pita chips for a thicker bite - Popcorn for a fun snack - Tortilla chips for a classic crunch - Sliced veggies like bell peppers or celery These alternatives can add fun textures and flavors to your meal. Homemade Lunchables can stay fresh in the fridge for about three days. Keep them in an airtight container. This helps maintain the taste and texture of the ingredients. Use your senses to check for freshness. If anything looks or smells off, it's best to toss it. Definitely! Fruits are a great addition to your Lunchable. Here are some ideas: - Apple slices for sweetness - Grapes for a juicy burst - Strawberries for a fresh taste - Orange segments for a zesty flavor - Dried fruits like apricots or raisins for a chewy treat Adding fruits not only boosts nutrition but also makes your Lunchable more colorful and fun. For more details, refer to the Full Recipe. Homemade Lunchables give you a fun and healthy option for meals. We discussed great ingredients like whole grain crackers, cheese, and fresh veggies. I shared tips for prep and assembly. You can even swap ingredients based on your tastes and dietary needs. Storing them right helps keep everything fresh longer. Don’t forget to get creative with theme ideas! With these steps, you can make tasty Lunchables that kids will love. Enjoy turning lunch into a fun experience!

Want a quick and fun lunch idea? Let’s make a Homemade Lunchable! My easy recipe guide shows you how to fill a lunchbox with tasty treats like whole grain crackers, …

Read more

Categories Appetizers

Easy Honey Dijon Vinaigrette Dressing Recipe Delight

July 20, 2025 by Chef Remy
To make this Easy Honey Dijon Vinaigrette, you will need a few simple ingredients. Each one adds its own special touch to the dressing. Here’s a list of what you will need: - Honey - Dijon Mustard - Apple Cider Vinegar - Extra Virgin Olive Oil - Seasonings (Salt and Pepper) - Optional Ingredient (Garlic) Using these ingredients, I create a dressing that is both sweet and tangy. Honey gives it a nice sweetness, while Dijon mustard adds a kick. Apple cider vinegar adds brightness, and olive oil provides richness. You can also add garlic for extra flavor. This vinaigrette works well on salads, veggies, or even as a marinade. Each ingredient plays a role in making this dressing delicious. I love how easy it is to whip up, and it only takes a few minutes. Trust me, once you try it, you’ll want to have it on hand all the time. For the full recipe, check out the details above. To make the Easy Honey Dijon Vinaigrette, follow these simple steps. Each step is quick and easy, so let’s get started! - Combine Honey and Dijon Mustard In a medium bowl, add 3 tablespoons of raw honey and 2 tablespoons of Dijon mustard. Use a whisk to blend them well. You want a smooth mixture. - Add Apple Cider Vinegar Next, pour in 1/4 cup of organic apple cider vinegar. Whisk slowly while you add it. This helps mix the ingredients better. - Whisk in Extra Virgin Olive Oil Now, slowly drizzle in 1/2 cup of high-quality extra virgin olive oil. Keep whisking as you add the oil. This will make your vinaigrette glossy. - Incorporate Optional Garlic If you like garlic, add 1 teaspoon of finely minced garlic now. Whisk it in to mix the flavor throughout. - Season to Taste Sprinkle in salt and freshly cracked black pepper. Start with a little and add more if you want. Taste it to see if you like the flavor. - Taste Test and Adjust Do a quick taste test. If you want it sweeter, add more honey. If you want it tangier, add more apple cider vinegar. - Chill the Vinaigrette Pour the vinaigrette into a jar and seal it tightly. Chill it in the fridge for at least 15 minutes. This helps the flavors blend well. Now you have a delicious honey Dijon vinaigrette ready to enjoy! Try it on salads, veggies, or even as a marinade. For the full recipe, check out the details above. Enjoy! - Emulsifying Tips: Start with honey and Dijon mustard in a bowl. Whisk these two together well. This creates a good base. Add the apple cider vinegar slowly while whisking. This helps mix the oils and vinegar together. Slowly add olive oil while whisking. This keeps the dressing from separating. - Texture and Smoothness: For a smooth dressing, whisk well. If the dressing feels thick, add a bit of water or more vinegar. Keep whisking until it is creamy and lump-free. A good whisking technique gives you a bright and lovely vinaigrette. - Flavor Balancing Tips: Taste the vinaigrette as you go. If you want it sweeter, add more honey. If you want it tangier, add more apple cider vinegar. Adjust until it’s just right for your taste buds. - Pairing with Salads: This vinaigrette is perfect on salads. It goes well with mixed greens, spinach, or even pasta salads. Drizzle it on right before serving for the best flavor. - Use in Marinades: You can use this vinaigrette to marinate chicken or tofu. Let them soak in the flavors for at least 30 minutes. This makes your proteins tasty and moist. - Drizzling on Vegetables: Try drizzling the vinaigrette on roasted or grilled vegetables. It adds a nice kick and enhances their flavor. This dressing can bring simple veggies to life! By following these tips, you can create a vinaigrette that shines in any dish. For the full recipe, check out the Simply Sweet Honey Dijon Vinaigrette. {{image_4}} You can easily change the taste of your vinaigrette. Here are some fun ideas: - Herbs and Spices: Fresh herbs like basil, parsley, or dill can add great flavor. You can also try spices like paprika or cayenne for a little kick. - Citrus Zest: Adding zest from lemons or limes can brighten the dressing. Just a little zest goes a long way in making it lively. - Sweetener Alternatives: If you want to swap honey, try maple syrup or agave nectar. Each will give a different sweet twist. Switching up the vinegar can change your vinaigrette's flavor profile: - Balsamic Vinegar: This adds a rich sweetness and depth. It goes well with salads that have fruit or cheese. - Red Wine Vinegar: This vinegar gives a sharp and tangy taste. It works great with hearty salads and grilled meats. - Rice Vinegar: A milder option, rice vinegar offers a light taste. It’s perfect for Asian-inspired salads or dishes. Feel free to mix and match these ideas to create your perfect dressing! Check out the Full Recipe for more tips. To keep your easy honey Dijon vinaigrette fresh, choose a good container. A glass jar with a tight lid works well. You can also use any airtight container. This helps stop air from getting in and keeps the dressing tasty. When you store the vinaigrette, always put it in the fridge. The cold helps the flavors blend and stay fresh. Make sure to shake or whisk it before using. This helps mix the ingredients again since they may separate over time. How long does the vinaigrette last? If stored properly, it can stay good for about one week. After that, it may lose its flavor or freshness. Look for signs of spoilage. If you see any mold or strange smells, it’s best to throw it away. Also, if the texture changes or it becomes too thick, it may not be safe to eat. Always trust your senses when checking for freshness. Yes, you can! If you prefer a milder taste, use yellow mustard. For a spicier kick, try whole grain mustard. Each type will give your vinaigrette a unique flavor. To make more vinaigrette, simply multiply each ingredient by the number of servings you need. This recipe makes about 1 cup. If you want 2 cups, double all the ingredients. It’s that easy! I do not recommend freezing this vinaigrette. Freezing can change its texture. The oils may separate when thawed, making it less appealing. It’s best enjoyed fresh or stored in the fridge. If you want a sweeter vinaigrette, add more honey. Start with one teaspoon and mix well. Taste it each time until it’s just right for you. You can also add a little maple syrup for a different twist. In this blog post, you learned how to make a tasty vinaigrette. We covered key ingredients like honey, Dijon mustard, and olive oil. Each step helps you mix these flavors well. You now have tips for perfect texture and balancing flavors. With variations like herbs and different vinegars, you can make it your own. Remember to store your vinaigrette properly for the best taste. Enjoy creating and sharing your unique dressings!

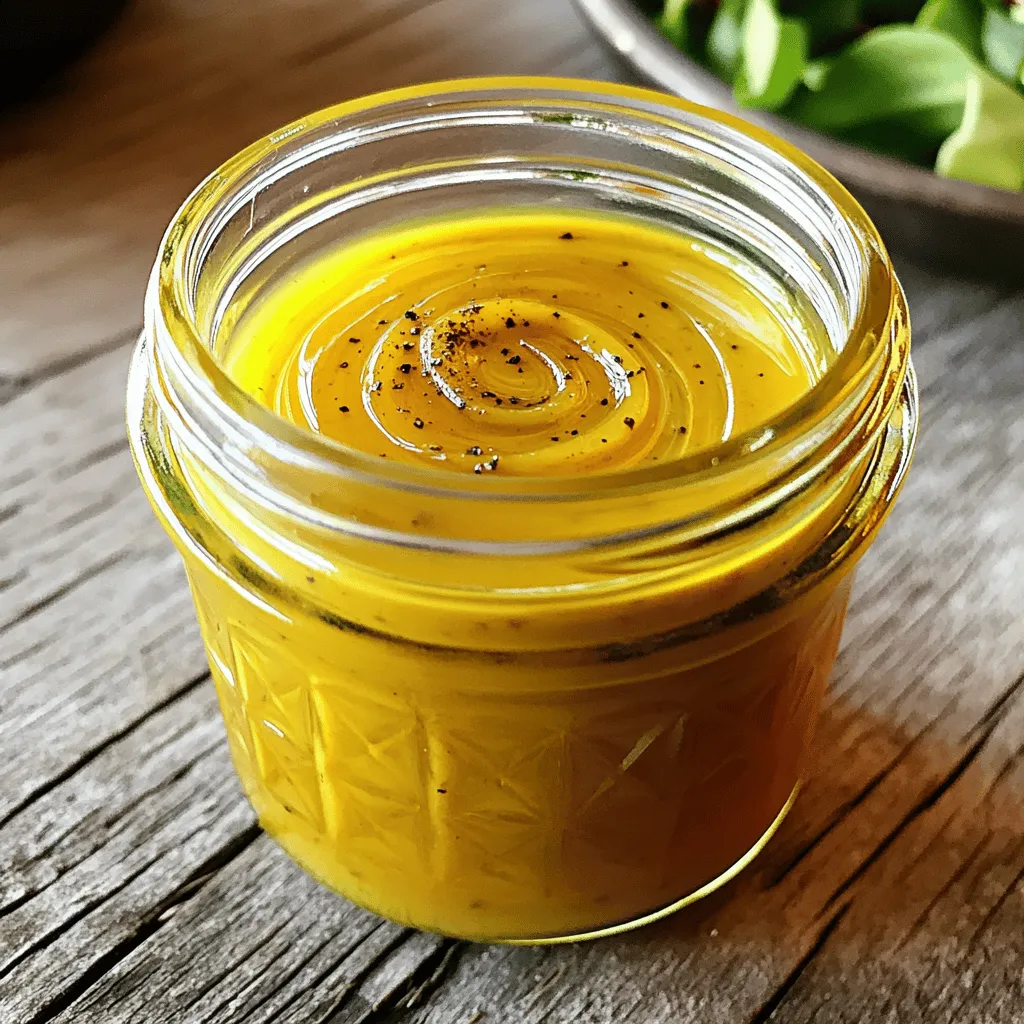
Looking for a quick and tasty dressing? My Easy Honey Dijon Vinaigrette will elevate your meals in minutes! With just a few simple ingredients like honey, Dijon mustard, and apple …

Read more

Categories Salads

Cinnamon Apples Simple Sweet and Spicy Delight

July 20, 2025 by Chef Remy
- Apples: I love using Granny Smith or Honeycrisp apples for this dish. They have a nice balance of tartness and sweetness. Their firm texture holds up well when cooked. You can also try Fuji or Gala apples for a sweeter option. Each type gives a unique flavor to the dish. - Sweetener and spices: Brown sugar is my go-to for a rich, caramel-like flavor. Pair it with ground cinnamon for warmth and a hint of nutmeg for depth. These spices truly make the apples pop. You can also adjust the amount of sugar based on your taste. - Optional ingredients: I often add chopped walnuts for a nutty crunch. They complement the soft apples perfectly. A splash of fresh lemon juice brightens the flavors, too. For a treat, serve with vanilla ice cream or whipped cream on top. It makes the dish feel special. The full recipe combines these ingredients to create a simple yet delightful treat. Start with fresh apples. I like using Granny Smith or Honeycrisp for their crispness. First, peel the apples with a knife or peeler. Cut them in half, then remove the core. Slice the apples into even wedges. This size helps them cook evenly. After slicing, sprinkle lemon juice over the apples. This step is key. The lemon juice prevents browning and adds a bright flavor to the apples. Next, take a small bowl. Mix brown sugar, ground cinnamon, and nutmeg together. This blend creates a warm, sweet spice mix. Evenly sprinkle the mixture over the apple slices. Toss them gently until every piece is coated. This ensures that every bite has a burst of flavor. Now, heat a large skillet over medium heat. Add unsalted butter and let it melt completely. Once melted, add the apple slices to the skillet. Sauté the apples for about 5-7 minutes. Stir them occasionally. You want them to soften but still hold their shape. This timing gives the best texture. If you want to add walnuts, chop them up. Stir them in during the last 1-2 minutes of cooking. This toasts the nuts and adds a nice crunch. Once done, serve the warm apples in bowls. You can top them with vanilla ice cream or whipped cream for a treat. For a pretty touch, garnish with extra walnuts or a sprinkle of cinnamon. For the full recipe, check out the detailed steps above. To make your cinnamon apples just right, play with the sweetness and spice. If you like it sweeter, add more brown sugar. For a spicier kick, increase the cinnamon. You can also try different spices. Ginger gives a nice warmth, while allspice adds a unique twist. Use what you enjoy! Cooking time is key for apple firmness. If you want them soft, cook for about 7 minutes. For a bit of crunch, aim for 5 minutes. If you add walnuts, do it towards the end. This keeps them crunchy and adds a great texture contrast to the soft apples. Apples and cinnamon pack a nutritional punch. Apples are full of fiber and vitamins. Cinnamon has antioxidants and may help with blood sugar. Keep in mind that toppings, like ice cream, add calories. If you're watching your intake, consider a lighter topping like whipped cream. Enjoy your treat, but balance is key! {{image_4}} You can swap out brown sugar for other sweeteners. Honey, maple syrup, and agave all work well. Each sweetener brings a unique flavor. - Honey: It adds a floral note. However, it can be too sweet for some. - Maple Syrup: It gives a warm, earthy flavor. It can make the dish a bit runny. - Agave: This is milder and low on the glycemic index. It might not add enough depth. When you choose a sweetener, think about the flavor you want. Each option can change the taste of your cinnamon apples. Adding more spices can create a new taste. Ginger and allspice pair well with cinnamon. They give a warm, spicy kick. - Ginger: Fresh or ground ginger adds a zesty flavor. Use it in small amounts. - Allspice: This spice has a taste similar to cloves and nutmeg. It deepens the flavor. You can also try different apple types. Granny Smith is tart, while Honeycrisp is sweet and crisp. Mixing varieties can enhance the taste and texture of your dish. Cinnamon apples are great for many meals. Serve them at breakfast, as a snack, or even as dessert. - Breakfast: Pair with oatmeal or pancakes for a warm start. - Dessert: They shine with vanilla ice cream or whipped cream. - Snacks: Enjoy them on their own or with yogurt. For drinks, consider hot cider or a nice cup of tea. These beverages complement the sweet and spicy flavors of your cinnamon apples. For the full recipe, check out the Cinnamon-Spiced Apple Delight. To keep your cinnamon apples fresh, store them in an airtight container. Place the container in the fridge. They can last for about 3 to 5 days. The lemon juice helps slow down browning. If you want to keep them even fresher, avoid mixing with ice cream or whipped cream before storing. You can reheat cinnamon apples in two ways: the microwave or on the stovetop. For the microwave, put the apples in a bowl and cover it. Heat in 30-second bursts until warm. Stir between each burst. If you choose the stovetop, warm them over low heat. Stir gently to avoid breaking the apples. This keeps them soft but still firm. Freezing cinnamon apples is easy! First, let them cool completely. Then, pack them in a freezer-safe bag or container. Be sure to remove as much air as possible to prevent freezer burn. They can last up to 3 months in the freezer. When ready to use, thaw them overnight in the fridge. Reheat as needed for a warm treat. Enjoy your cinnamon apples any time! For the full recipe, check the details above. For cinnamon apple recipes, I recommend using Granny Smith or Honeycrisp apples. Granny Smith apples are tart, firm, and hold their shape well during cooking. Honeycrisp apples have a sweet flavor and a juicy crunch. Both types work great with cinnamon, adding balance to the dish. Yes, you can make cinnamon apples ahead of time. Prepare the apples and cook them as directed in the recipe. Once cooked, let them cool and store them in an airtight container in the fridge. They will stay fresh for up to three days. When ready to serve, simply reheat them on the stove or in the microwave. If you don’t have brown sugar, you can use white sugar mixed with molasses. For each cup of brown sugar, use one cup of white sugar and add one tablespoon of molasses. Honey or maple syrup can also work, but adjust the amount since they are liquid sweeteners. To prevent apples from browning, coat them with lemon juice right after slicing. The acid in lemon juice slows down the oxidation process. You can also soak the apple slices in a mix of water and lemon juice for about five minutes before using them in your recipe. Cinnamon apples taste great both warm and cold. Serving them warm with a scoop of vanilla ice cream makes for a cozy dessert. If you prefer a refreshing snack, let them cool in the fridge and enjoy them cold. You can even add them to yogurt or salads for a delightful twist. Cinnamon apples are a delicious treat that anyone can make. We covered the best types of apples, sweeteners, and spices to use. I explained how to prepare, cook, and serve them perfectly. Remember to adjust sweetness and spice to fit your taste. You can also try new flavors and pairings. Proper storage helps keep leftovers fresh. Enjoy trying these ideas with your cinnamon apples. They make a great snack or dessert for any occasion.

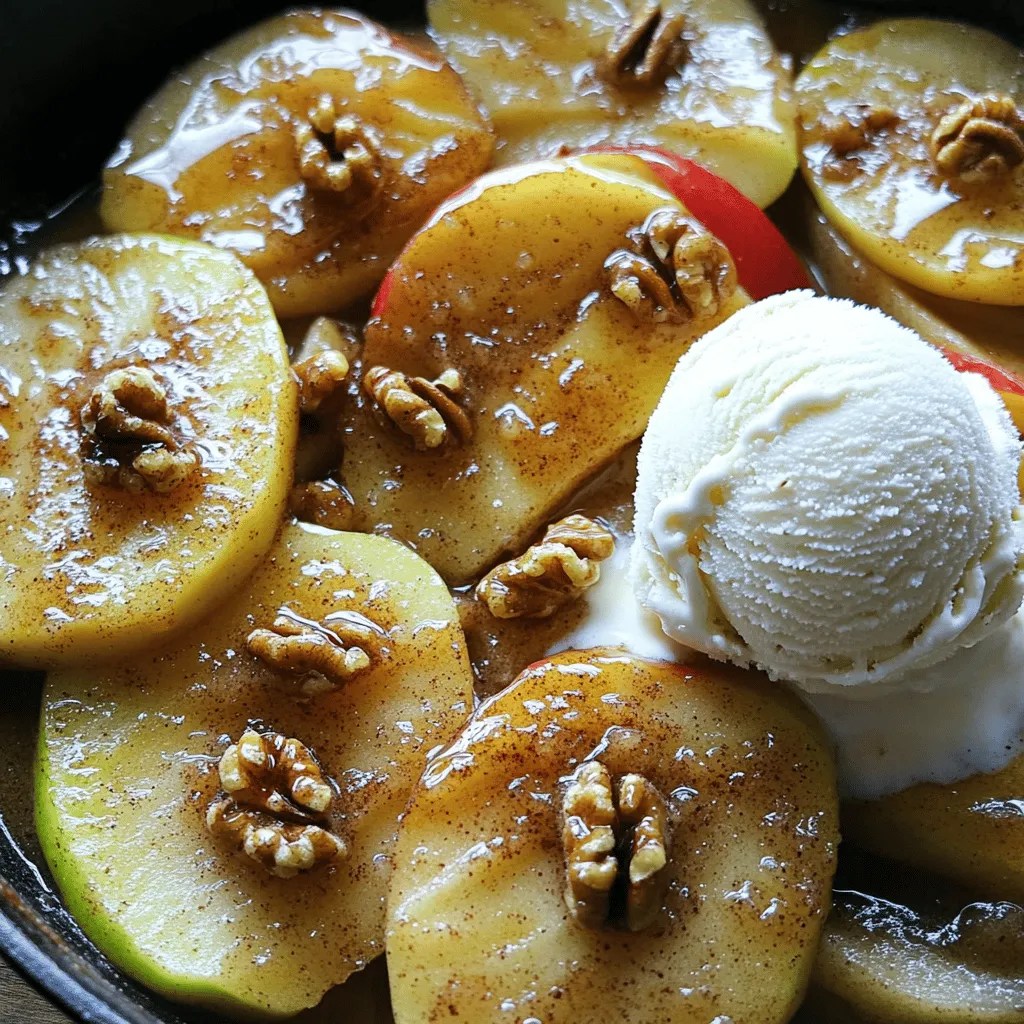
Warm, sweet, and slightly spicy, cinnamon apples are a simple treat anyone can enjoy. In this article, I will guide you through selecting the right apples, mixing flavors, and cooking …

Read more

Categories Desserts

Easy Buffalo Chicken Wrap Flavorful and Quick Meal

July 20, 2025 by Chef Remy
- Mixing the buffalo chicken: Start by placing 2 cups of shredded chicken in a bowl. Add 1/2 cup of spicy buffalo sauce. Stir well until the chicken is fully coated in the sauce. This mix gives your wrap that bold flavor everyone loves. - Preparing the cream cheese: In another bowl, take 1/2 cup of softened cream cheese. Use a fork to smooth it out. Add a pinch of salt and some cracked pepper. Mix until it’s creamy and well blended. This adds a nice, rich layer to your wrap. - Spreading cream cheese on tortillas: Lay out 4 large flour tortillas on a clean surface. Use a spoon to spread a generous tablespoon of the cream cheese mixture in the center of each tortilla. Leave some space at the edges for easy rolling. - Adding buffalo chicken and toppings: Spoon the buffalo chicken mixture over the cream cheese on each tortilla. Make sure to divide it evenly. Top it with a handful of shredded lettuce, some diced tomatoes, and a sprinkle of shredded cheddar cheese for extra flavor. - Rolling the wrap securely: Now, fold the sides of the tortilla inward. Then, roll it tightly from the bottom up. Keep it snug to hold all the tasty filling inside. - Heating the skillet: Heat 1 tablespoon of extra virgin olive oil in a skillet over medium heat. Wait until it’s hot before adding the wraps. - Cooking instructions for crispiness: Place the wraps seam-side down in the pan. Cook for about 2-3 minutes on each side. You want them to turn golden brown and crispy. Once done, take them out of the skillet. Let them cool for a minute before slicing them in half. This makes them easy to eat. For the full recipe, check out the detailed instructions. Enjoy your tasty buffalo chicken wraps! - Ensuring even cooking: Preheat your skillet before adding the wraps. This step helps them get crispy all over. Flip them gently to avoid tearing. Cook each side for about 2-3 minutes until golden brown. - Adjusting spice levels: If you prefer less heat, mix in a little cream cheese with the buffalo sauce. This will tone down the spice. You can also use mild buffalo sauce for a gentler flavor. - Serving suggestions: Serve your wraps with extra buffalo sauce for dipping. A side salad with fresh greens adds a nice crunch. You might even try pairing it with carrot and celery sticks for a classic touch. - Best practices for storage: Place any leftovers in an airtight container. Keep them in the fridge for up to three days. Make sure to separate the sauce to keep the wraps from getting soggy. - Reheating tips for optimal taste: Reheat in a skillet over medium heat for a few minutes. This method keeps the wraps crisp. You can also use a microwave but be careful; it may make them soft. {{image_4}} You can change the flavor of your wrap by switching the sauce. One tasty option is BBQ sauce. It gives a sweet and smoky flavor. You can mix it with the buffalo sauce for a fun twist. This combo makes the chicken even more exciting. Another option is to use ranch dressing. It adds a creamy, herby taste. Just spread it over the cream cheese for a great layer of flavor. You can also mix ranch with buffalo sauce. This gives you a nice blend of spicy and cool. If you want a healthier wrap, try using whole wheat tortillas. They are full of fiber and nutrients. This change makes your meal more filling and good for you. You can also swap cream cheese for Greek yogurt. Greek yogurt has less fat and more protein. It adds a nice tangy flavor while keeping the wrap creamy. You can mix it with some spices to add more taste. Explore these variations to make your easy buffalo chicken wrap fit your taste and health goals. For the full recipe, check out the Buffalo Bliss Chicken Wraps! Each serving of your Easy Buffalo Chicken Wrap has about 350 calories. The macro breakdown is as follows: - Protein: 28 grams - Carbohydrates: 28 grams - Fat: 16 grams This wrap packs a punch with protein from the chicken and cream cheese. The carbohydrates come mainly from the tortillas, making this a filling meal. Common allergens in this recipe include: - Chicken - Dairy (cream cheese and cheese) - Wheat (tortillas) If you need substitutions, consider using: - Dairy-free cream cheese for a lactose-free option - Gluten-free tortillas for a wheat-free meal - Lean turkey or tofu instead of chicken These swaps can help you enjoy the wrap while avoiding allergens. To add heat to your buffalo chicken wrap, use these tips: - Add extra buffalo sauce. - Mix in some diced jalapeños. - Use a spicier sauce, like habanero. - Sprinkle cayenne pepper into the chicken mix. These options will make your wrap fiery and full of flavor. You can adjust the heat level to your taste. Always start with a little and add more if needed. Yes, rotisserie chicken is a great choice! Here are some benefits: - It saves time since it’s already cooked. - It adds rich flavor without extra work. - You can use any leftover chicken for this wrap. Using rotisserie chicken makes this meal quick and easy. Just shred the chicken and mix it with buffalo sauce. It’s a smart shortcut! Pair these wraps with tasty sides for a complete meal: - Celery sticks with ranch dressing. - A fresh green salad. - Sweet potato fries. - Chips and salsa. These sides complement the spicy wrap well. They add crunch and freshness, making your meal even better. For a fuller experience, try the full recipe! You learned how to make a tasty buffalo chicken wrap. We covered simple steps from mixing the chicken to cooking the wrap until crispy. You can adjust spice levels and try different sauces too. Storing leftovers is easy, and reheating keeps the taste fresh. With these tips and tricks, you can enjoy wraps any time. Make it your own with fun add-ins and variations. Happy cooking!

Looking for a meal that’s both quick and bursting with flavor? This Easy Buffalo Chicken Wrap is your answer! With just a few simple ingredients and straightforward steps, you can …

Read more

Categories Appetizers

Best Homemade Salsa Ever Simple and Fresh Recipe

July 20, 2025 by Chef Remy
The key ingredients for great salsa are simple yet fresh. Here’s what you need: - 4 juicy ripe tomatoes, finely diced - 1 small red onion, finely minced - 1 jalapeño pepper, deseeded and minced for heat - 1/4 cup fresh cilantro leaves, chopped - 2 cloves of garlic, minced - 2 tablespoons freshly squeezed lime juice - 1 teaspoon ground cumin - Sea salt and freshly cracked black pepper Fresh produce is vital for flavor. Ripe tomatoes add sweetness, while cilantro gives a bright note. The jalapeño pepper adds heat, which you can adjust. Each ingredient brings its own taste to the mix. You can customize your salsa with optional add-ins. Some popular choices are: - Diced bell peppers for crunch - Corn for sweetness - Black beans for protein - Avocado for creaminess Adding these can change the texture and taste. Feel free to experiment. Personalizing your salsa makes it unique and caters to your taste buds. You don’t need fancy tools, but a few will help. Use: - A sharp knife for chopping - A cutting board for safety - A mixing bowl for blending Proper chopping techniques matter. Dice your tomatoes and onion evenly for the best texture. This way, every bite tastes balanced. A good mix of ingredients ensures your salsa is both tasty and visually appealing. To make the best homemade salsa, start with fresh tomatoes. Choose juicy, ripe ones. Cut them into small pieces. Place them in a bowl. Next, take a red onion. Peel it and slice it in half. Then, finely chop it into tiny pieces. This adds a nice crunch and flavor. For the jalapeño, cut off the stem. Slice it in half and remove the seeds. You can use a small spoon for this. This step helps reduce heat. If you like spice, leave some seeds in. Mince the jalapeño into small bits. Now, combine all the diced ingredients in a medium mixing bowl. Add the minced garlic and cilantro. Pour in the lime juice and sprinkle the cumin. Use a wooden spoon to mix everything gently. Make sure the flavors blend well. You want a nice, even mix of all the ingredients. Check the consistency of your salsa. If it feels too chunky, you can chop the tomatoes or onion smaller. If it is too watery, let it sit for a bit. Letting the salsa rest is key. Cover the bowl with plastic wrap. Place it in the fridge for at least 30 minutes. This allows the flavors to come together. After resting, taste the salsa. Add sea salt and black pepper as needed. Adjust the seasoning to your liking. You can always add more, but you can’t take it away! For the full recipe, check out the Zesty Homemade Salsa Delight. Enjoy this fresh and vibrant salsa with your favorite dishes! Salsa shines best when paired with the right foods. Here are some great choices: - Tacos - Grilled chicken - Fish or shrimp dishes - Quesadillas - Nachos Complementary dips and sides also boost your meal: - Guacamole - Sour cream - Cheese dips - Fresh vegetables You can make your salsa perfect for your taste. Want more heat? Add more jalapeño or a dash of cayenne. Prefer it mild? Skip the jalapeño or use a sweet pepper instead. For those who want vegan or gluten-free options, this salsa is already safe! Just focus on fresh ingredients. You can try adding fruits like mango or pineapple for a unique twist. Serving salsa can be fun and creative. Here are some ideas: - Use small cups for individual servings. - Serve with colorful tortilla chips for a vibrant look. - Top grilled meats with salsa for added flavor. For presentation, use a bright bowl. Place tortilla chips around it for easy access. A sprig of cilantro on top adds a nice touch. Enjoy your salsa with your favorite tacos or grilled meats. For the full recipe, check out the details above! {{image_4}} You can add fruits to salsa for a sweet twist. Fruits like mango, peach, or pineapple work great. They bring a nice balance to the tangy tomatoes. I love using seasonal fruit combinations. In summer, try fresh peaches. In fall, diced apples add a nice crunch. These fruity variations keep your salsa exciting and fresh. Adjusting spice levels is easy with different peppers. If you want a hot salsa, use serrano peppers. For a milder version, use sweet bell peppers. You can also remove the seeds and membranes from jalapeños. This lowers the heat without losing flavor. To make a mild salsa, I recommend using just a bit of jalapeño or even a pinch of crushed red pepper. Incorporating beans or corn can make your salsa unique. Black beans add protein and texture. Corn gives a sweet crunch that contrasts with the tomatoes. You can also experiment with herbs and spices. Try adding fresh basil or oregano for a twist. These unique ingredients will create a salsa that stands out. For more ideas, check the Full Recipe for inspiration. To keep your salsa fresh, use glass or plastic containers with tight lids. These containers help keep air out and flavors in. Avoid using metal containers, as they can change the taste. Always let the salsa cool before sealing it. This helps prevent condensation, which can make your salsa soggy. Store the salsa in your fridge for the best taste. You can freeze homemade salsa if you want it to last longer. Pour the salsa into freezer bags or containers. Leave some space at the top for the salsa to expand. Label the bags with the date. When you want to use it, thaw the salsa in the fridge overnight. To enjoy it, stir it well after thawing. The texture may change, but the flavor will still be great. Homemade salsa lasts about 4 to 5 days in the fridge. If you freeze it, it can last up to 6 months. Always check for signs of spoilage before eating. Look for mold, off smells, or changes in color. If you see any of these, throw the salsa away. Enjoy your fresh salsa while it’s at its best! For salsa, I recommend using ripe Roma tomatoes. They have fewer seeds and thicker flesh. Their rich flavor shines in salsa. Other good choices are vine-ripened tomatoes or heirloom varieties. These tomatoes provide a fresh taste and vibrant color. Always pick firm and juicy tomatoes for the best results. Yes, you can make salsa in advance! I often prepare it a day before a party. This allows the flavors to blend well together. Store your salsa in an airtight container. Keep it in the fridge to maintain freshness. Just remember to stir it before serving to mix the flavors again. To thicken your salsa, start with the right tomatoes. Roma tomatoes are great for this. If your salsa is still runny, try these tips: - Drain excess liquid from the tomatoes before mixing. - Add diced bell peppers or onions to absorb some moisture. - You can also mix in a small amount of tomato paste for thickness. These tricks will help you achieve a perfect salsa consistency. In this blog post, we explored how to create delicious homemade salsa. We covered key ingredients like fresh tomatoes and onions that make your salsa shine. You learned how to customize your recipe and the tools needed for perfect chopping. We also discussed the mixing process, flavor enhancement, and various ways to serve salsa. Remember, your salsa reflects your taste. Experiment with flavors, storage tips, and unique ingredients. With practice, you’ll make salsa that impresses anyone. Dive in and enjoy the process!

Are you ready to elevate your snack game? This Best Homemade Salsa Ever Simple and Fresh Recipe is your ultimate go-to for a bright, zesty dip. Using fresh ingredients, you’ll …

Read more

Categories Appetizers

Caramel Apple Pretzel Bites Delightful Treat Recipe

July 20, 2025 by Chef Remy
- 2 cups mini pretzels - 1 large tart apple, diced (such as Granny Smith) - 1 cup caramel sauce (store-bought or homemade) - 1/2 teaspoon ground cinnamon - 1/4 cup chopped nuts (pecans or walnuts preferred) - 1/4 cup chocolate chips (optional) - Sea salt for finishing When I make caramel apple pretzel bites, I focus on quality ingredients. The mini pretzels give a great crunch. You want a tart apple, like Granny Smith. It balances the sweet caramel well. Using homemade caramel sauce adds a personal touch. However, store-bought also works well if you are short on time. Ground cinnamon adds warmth and depth to the flavor. Chopped nuts bring a nice texture. Pecans or walnuts add a rich, nutty taste. If you want extra sweetness, chocolate chips are a fun option. Finally, a sprinkle of sea salt at the end enhances all the flavors. These ingredients come together for a delightful treat. They create a mix of sweet, salty, and crunchy. Just gather them, and you're ready to make a great snack! For the complete cooking instructions, check out the Full Recipe. 1. Preheat your oven to 350°F (175°C). Line a baking sheet with parchment paper. This helps the bites not stick. 2. In a bowl, toss the diced apple with ground cinnamon. Make sure each piece is covered well. Set this aside for a bit. 3. Arrange the mini pretzels in a single layer on your baking sheet. This helps them bake evenly. 1. Drizzle caramel sauce over each pretzel. Make sure to cover them well. Every bite deserves sweetness! 2. Add a spoonful of the cinnamon-coated apples on top of each pretzel. Let the apples sit nicely in the caramel. 3. If you want, sprinkle chopped nuts over the apples. This adds a nice crunch. You can also add chocolate chips for extra sweetness. 1. Place the baking sheet in the oven. Bake for 10-12 minutes. The pretzels should be warm, and the caramel bubbly. 2. Once out of the oven, sprinkle a pinch of sea salt on top. This brings out the sweet and salty flavors. Now, you have a delightful treat ready to enjoy! For the complete experience, check out the Full Recipe. To make your Caramel Apple Pretzel Bites shine, focus on even caramel distribution. Pour the caramel sauce slowly over each pretzel. This way, every bite will have that sweet taste. Use a spoon to help spread the caramel if needed. To avoid soggy pretzels, bake them right after topping. Don't let them sit too long. The longer they sit, the more moisture they soak up. Bake them until the caramel bubbles and the pretzels warm up. When serving these bites, use a fun platter. Arrange them in a circle or a line. For a nice touch, add apple slices around them. A light sprinkle of cinnamon on top can also make them look fancy. Pair these bites with warm cider or sweet tea. The flavors go well together and create a cozy vibe. For kids, consider serving with milk or hot chocolate. If you need nut-free options, skip the nuts. You can still enjoy the bites with just caramel and apples. For gluten-free pretzels, look for brands that use gluten-free ingredients. Many stores sell these now. This way, everyone can enjoy the treat without worry. You can find the full recipe to guide you through making these tasty bites! {{image_4}} You can switch up flavors to make these bites even more fun. Try adding other fruits like diced pears or bananas. These fruits add a sweet twist and boost the flavor. You can also use flavored caramel sauces. Look for options like sea salt caramel or chocolate caramel for a different taste. If you want to mix it up, try adding cheese toppings. A sprinkle of sharp cheddar can give a tasty twist. You can also incorporate spices other than cinnamon. Try nutmeg or even chili powder for a unique kick. This adds depth and makes your bites stand out. Making these bites smaller is fun for kids. Use cookie cutters to shape mini pretzels. They will love the little sizes and fun shapes. Involving kids in assembly makes it a family activity. Let them drizzle caramel or sprinkle nuts. This way, they learn and have fun! For the full recipe, check out the details above. To keep your caramel apple pretzel bites fresh, place them in an airtight container. You can use a glass or plastic container with a tight lid. Make sure they cool down before sealing. This will help prevent moisture build-up. Store them in the fridge for up to three days. To reheat, use an oven or air fryer. Preheat your oven to 350°F (175°C). Place the pretzel bites on a baking sheet. Heat for about 5-8 minutes until warm. This method keeps the pretzels crisp and the caramel gooey. Avoid using the microwave, as it can make them soggy. You can freeze these treats either before or after baking. If freezing before baking, arrange the pretzel bites on a tray. Freeze them for about an hour, then transfer to a freezer bag. To bake from frozen, add a few extra minutes to the cooking time. If freezing after baking, let them cool first. Use the same method as before for storing in a bag. When ready to eat, thaw them in the fridge overnight and reheat as mentioned. Caramel Apple Pretzel Bites can last about 2-3 days if stored right. Keep them in an airtight container at room temperature. Avoid putting them in the fridge, as the pretzels can get soggy. If you want to keep them longer, consider freezing them. Yes, you can prepare these bites ahead of time. Assemble the pretzel bites and cover them with plastic wrap. Store them in the fridge for up to a day. Just bake them right before serving for the best taste. For the best taste, use tart apples like Granny Smith. Their crispness and tanginess balance the sweetness of caramel. Other good options are Honeycrisp or Fuji apples if you prefer a bit more sweetness. Yes, you can make this recipe vegan. Use dairy-free caramel sauce and vegan chocolate chips. Many brands offer great plant-based options that work well in this recipe. Just check the labels for any animal products. Remember, making caramel apple pretzel bites is simple and fun. You blend sweet apples, salty pretzels, and smooth caramel. Follow the steps to bake them to perfection. Use tips to store your treats well. Don’t forget to try different flavors and make kid-friendly versions. Keep sharing your delicious creations with friends. With this recipe, you’ll enjoy a tasty snack perfect for gatherings! Enjoy every crunch and sweet bite you make. Your kitchen is now a treat-making zone!

Craving a sweet and salty snack? Let me introduce you to Caramel Apple Pretzel Bites! This delightful treat combines crunchy pretzels, tart apples, and rich caramel. It’s easy to make …

Read more

Categories Desserts

Pumpkin Coffee Cake Cookies Deliciously Simple Recipe

July 20, 2025 by Chef Remy
To make tasty pumpkin coffee cake cookies, you need a few key items. Here’s the list: - 1 cup pumpkin puree - 1/2 cup granulated sugar - 1/2 cup packed brown sugar - 1/2 cup unsalted butter, softened - 1 large egg - 1 teaspoon pure vanilla extract - 2 cups all-purpose flour - 1 teaspoon baking soda - 1 teaspoon baking powder - 1 teaspoon ground cinnamon - 1/2 teaspoon ground nutmeg - 1/4 teaspoon ground ginger - 1/2 teaspoon salt - 1/2 cup chopped pecans (optional) - 1/2 cup chocolate chips (optional) - 1/4 cup powdered sugar (for dusting) These ingredients create a rich, moist cookie with pumpkin flavor. You will love how easy they come together. Want to boost the taste of your cookies? Consider adding mix-ins. Here are some great options: - Chopped pecans add a nice crunch and nutty flavor. - Chocolate chips bring sweetness and a fun texture. - Raisins or dried cranberries add a chewy bite and tartness. Feel free to mix and match, or use what you have at home. Each option can change the cookie’s flavor in a delightful way. If you need to change any ingredients, I have some great swaps for you. Here are a few ideas: - Use applesauce instead of butter for a lighter cookie. - Swap granulated sugar for coconut sugar for a different taste. - Use gluten-free flour if you want to make these cookies gluten-free. These substitutions keep the cookies delicious while catering to your needs. Enjoy experimenting with flavors and textures! Start by gathering all your tools and ingredients. You need: - 1 cup pumpkin puree - 1/2 cup granulated sugar - 1/2 cup packed brown sugar - 1/2 cup unsalted butter, softened - 1 large egg - 1 teaspoon pure vanilla extract - 2 cups all-purpose flour - 1 teaspoon baking soda - 1 teaspoon baking powder - 1 teaspoon ground cinnamon - 1/2 teaspoon ground nutmeg - 1/4 teaspoon ground ginger - 1/2 teaspoon salt - 1/2 cup chopped pecans (optional) - 1/2 cup chocolate chips (optional) - 1/4 cup powdered sugar (for dusting) Preheat your oven to 350°F (175°C). Line a baking sheet with parchment paper. This prevents sticking and makes cleanup easier. In a large bowl, mix the softened butter, granulated sugar, and brown sugar. Use a hand mixer or a whisk to blend them. Aim for a light and fluffy texture, which takes about 2-3 minutes. Next, add the pumpkin puree, egg, and vanilla extract. Stir well until everything is smooth and mixed together. In another bowl, whisk together the flour, baking soda, baking powder, cinnamon, nutmeg, ginger, and salt. This ensures even flavor throughout your cookies. Gradually add the dry mix to the wet mix. Stir gently until combined, but don’t overmix. This keeps your cookies soft and tender. If you want, fold in the chopped pecans and chocolate chips for extra flavor. Scoop tablespoons of dough onto the prepared baking sheet. Space them out, as they will spread while baking. Place the baking sheet in the oven and bake for 12-15 minutes. You’ll know they are ready when the edges are lightly golden. After baking, let the cookies cool on the sheet for about 5 minutes. Then, move them to a wire rack to cool completely. Once cool, dust them lightly with powdered sugar for a sweet touch. This is where the cookies get their charm! For the Full Recipe, refer to the earlier section. Enjoy your delicious pumpkin coffee cake cookies! To make your cookies soft and chewy, follow these steps: - Use room-temperature butter. This helps create a fluffy texture. - Don’t overmix the dough. Stir just until combined to keep cookies tender. - Chill the dough for at least 30 minutes. This slows spreading during baking. - Bake until edges are golden but centers are soft. This gives the right texture. Here are common mistakes that can ruin your cookies: - Using cold butter. Cold butter makes cookies spread too much. - Overbaking. Check cookies a minute early to avoid dryness. - Not measuring flour correctly. Too much flour makes cookies dense. - Ignoring the cooling time. Let cookies rest to firm up before serving. Adding spices can really boost the flavor of your cookies: - Increase cinnamon for warmth. It pairs well with pumpkin. - Add a pinch of nutmeg for a nutty taste. - Try a bit of ginger for a zesty kick. - You can also mix in cloves for a deeper flavor profile. For the full recipe, check the details about making these delightful cookies. Enjoy baking! {{image_4}} You can easily make these cookies gluten-free. Just swap the all-purpose flour for a gluten-free blend. Look for a mix that includes xanthan gum. This gum helps mimic the texture of regular flour. Follow the same steps in the recipe. Your cookies will still be soft and tasty! Want to make these cookies vegan? Replace the egg with a flax egg. To make a flax egg, mix one tablespoon of ground flaxseed with three tablespoons of water. Let it sit for five minutes. For the butter, use a vegan butter substitute. These changes will keep the cookies moist and delicious. You can switch up the flavor by using different nuts or chips. Try walnuts or almonds instead of pecans. You can also use white chocolate chips or butterscotch chips. Each option brings a new twist to the cookies. Feel free to mix and match to create your favorite flavor combination. For the full recipe, check out the details above! To keep your pumpkin coffee cake cookies fresh, store them in an airtight container. This helps retain moisture and flavor. Place parchment paper between layers to avoid sticking. Keep the container at room temperature for up to one week. This way, you can enjoy a soft cookie every time. If you want to save some cookies for later, freezing works great. First, let the cookies cool completely. Then, place them in a single layer on a baking sheet. Freeze until solid, about one hour. After that, transfer the cookies to a freezer-safe bag or container. They can last up to three months. Remember to label the container with the date. If your cookies go stale, don’t worry! You can easily bring them back to life. Preheat your oven to 300°F (150°C). Place the cookies on a baking sheet. Bake for about 5 to 10 minutes. This will warm them and restore some moisture. Enjoy your revived cookies with a warm cup of coffee! You can tell when the cookies are done by looking at their edges. They should be lightly golden. If the tops look set and no longer shiny, they are ready. Use a toothpick to test the center; it should come out clean or with just a few crumbs. Yes, you can make the dough ahead of time. After mixing the dough, wrap it in plastic wrap. Store it in the fridge for up to two days. When you are ready to bake, scoop the dough onto a baking sheet and bake as directed. These cookies pair nicely with coffee or tea. A warm chai latte works great too. For a fun twist, try them with a pumpkin spice latte. The flavors will match perfectly. These cookies stay fresh for about five days when stored in an airtight container. Keep them at room temperature for best taste. If you want them to last longer, consider freezing them. The Full Recipe includes ingredients like pumpkin puree, sugars, flour, and spices. For the complete list, check the ingredients section. Happy baking! In this post, we explored how to make Pumpkin Coffee Cake Cookies. We looked at key ingredients, tips for baking, and storage methods. You learned about substitutions and ways to enhance flavor. We also covered gluten-free and vegan options, giving you plenty of choices. Remember, the right mix-ins and spices can transform these cookies. Enjoy the baking process, avoid common mistakes, and share your cookies with friends. With practice, you'll bake soft, chewy cookies that everyone loves. Now, it’s time to gather your ingredients and start baking!

Craving a cozy treat? Let’s make Pumpkin Coffee Cake Cookies! This easy recipe combines the warmth of pumpkin spice with the tenderness of a cake, all in a delightful cookie. …

Read more

Categories Desserts

Apple Toffee Dip Rich and Creamy Party Delight

July 20, 2025 by Chef Remy
To make this dip, you need a few key ingredients: - 2 large apples (such as Fuji or Granny Smith), cored and sliced into wedges - 1 cup cream cheese, brought to room temperature for easy mixing - 1/2 cup packed brown sugar for a rich sweetness - 1/4 cup powdered sugar to achieve the perfect creamy texture - 1 teaspoon pure vanilla extract for a hint of warmth - 1/2 cup toffee bits (and a little extra for topping) to add crunch and flavor These ingredients work together to create a rich and creamy dip that you will love. The apples add crispness, while the toffee bits give a sweet crunch. You can make your dip even better with some nice garnishes: - 1/4 cup crushed pecans or walnuts (optional, for garnish and added crunch) - Extra toffee bits for a sweet touch Adding these garnishes makes your dip look more inviting and adds more flavor. Before you start, gather these tools: - A medium mixing bowl - A hand mixer for easy blending - A spatula for folding and serving - A pretty serving dish to display your dip Having the right tools will make your dip-making process smooth and fun. You can find the full recipe for more details! Start by taking your cream cheese out of the fridge. Let it sit until it is room temperature. This makes it easier to mix. In a medium bowl, use a hand mixer to blend the cream cheese. Mix until it is smooth and creamy. You want to avoid any lumps. A good base is key for your dip. Next, it’s time to sweeten up the mix. Gradually add in the brown sugar and powdered sugar. Keep the mixer on low speed as you mix. This helps everything blend evenly. You want a sweet and creamy base that tastes just right. Now, let’s add some flavor! Carefully fold in the vanilla extract and toffee bits. Use a spatula for this step. Mixing gently ensures the toffee bits spread throughout. This adds great crunch and flavor in every bite. Once you mix it all together, it’s ready to serve. For the full recipe, check the earlier section. Enjoy your rich and creamy Apple Toffee Dip! To get a smooth and creamy dip, start with room-temperature cream cheese. Cold cream cheese can create lumps. Use a hand mixer to blend it well until it’s soft. Gradually add the sugars. Mixing on low speed helps keep the texture light. Make sure to scrape the sides of the bowl while mixing. This ensures that no lumps remain. For a great look, serve the dip in a beautiful bowl. You can arrange apple slices in a circle around the dip. It makes the dish inviting. Add small spoons next to the dip for easy serving. You can also include graham crackers or pretzels for variety. These add fun textures and flavors to the mix. If you have leftovers, store them in an airtight container. This keeps the dip fresh for up to three days. When ready to enjoy again, you can mix it lightly. This helps restore its creamy texture. If it looks a bit thick, you can add a splash of milk to loosen it up. Enjoy your dip again without losing quality! {{image_4}} You can use many kinds of apples in this dip. Fuji apples are sweet and crisp. Granny Smith apples add a nice tartness that works well with the dip's creaminess. Honeycrisp apples offer a juicy and sweet bite. If you want a softer texture, try Red Delicious. Each apple type brings its own taste to the party. Mix and match for fun flavors! While apple slices are classic, there are other tasty options. Graham crackers provide a sweet crunch that pairs well with the dip. Pretzels add a salty twist, which is a great contrast to the sweet dip. You can also use sliced pears or bananas for a different fruit flavor. Even mini cookies can make a fun addition. Get creative and let your guests choose! Enhancing your dip can take it to the next level. Try adding a pinch of cinnamon for warmth. A bit of nutmeg also gives it a nice fall flavor. If you love chocolate, mix in some mini chocolate chips or drizzle melted chocolate on top. For a nutty flavor, add chopped pecans or walnuts into the mix. These small changes can make a big difference in taste. For the complete recipe, check out the Full Recipe. To keep your Apple Toffee Dip fresh, store it in an airtight container. This helps avoid drying out and keeps flavors intact. Make sure the container is clean and dry before adding the dip. Avoid using metal containers, as they can react with the sugars. When stored properly, Apple Toffee Dip lasts about 3 to 5 days in the fridge. Be sure to check for any changes in smell or texture before serving. If it looks or smells off, it’s best to toss it. You can freeze Apple Toffee Dip, but the texture may change once thawed. To freeze, place the dip in a freezer-safe container, leaving some space at the top. This allows for expansion. It lasts up to 2 months in the freezer. To use, thaw it in the fridge overnight, then stir well before serving. For the best taste, use the dip fresh whenever possible. For the full recipe, check out the earlier section. You can dip many yummy things in Apple Toffee Dip. Fresh apple slices work best. They add a nice crunch and sweet flavor. You can also try graham crackers for a different taste. Pretzels give a salty twist that pairs well too. For a fun surprise, consider dipping bananas or strawberries. Each option offers a new flavor, making your party even better! Yes, you can prepare Apple Toffee Dip ahead of time. Make it a day before your event for ease. Just store it in the fridge in an airtight container. When ready to serve, take it out and let it sit for a few minutes. This helps bring back its creamy texture. If needed, stir it gently before serving for a smooth finish. You can make Apple Toffee Dip a bit healthier with easy swaps. Use low-fat cream cheese for a lighter option. You can also try using honey instead of brown sugar to cut down on refined sugar. Another idea is to add more nuts for healthy fats. Just remember, these changes might alter the taste slightly. Enjoy experimenting until you find your favorite version! Apple toffee dip is a fun and tasty treat. We covered key ingredients, easy steps, and handy tips. You learned how to make it creamy and delicious. Explore variations and storage options to keep it fresh. This dip suits many occasions, from parties to snacks. Now, you can enjoy it with different fruits and flavors. It's simple to whip up and will impress your friends. Give it a try, and have fun!

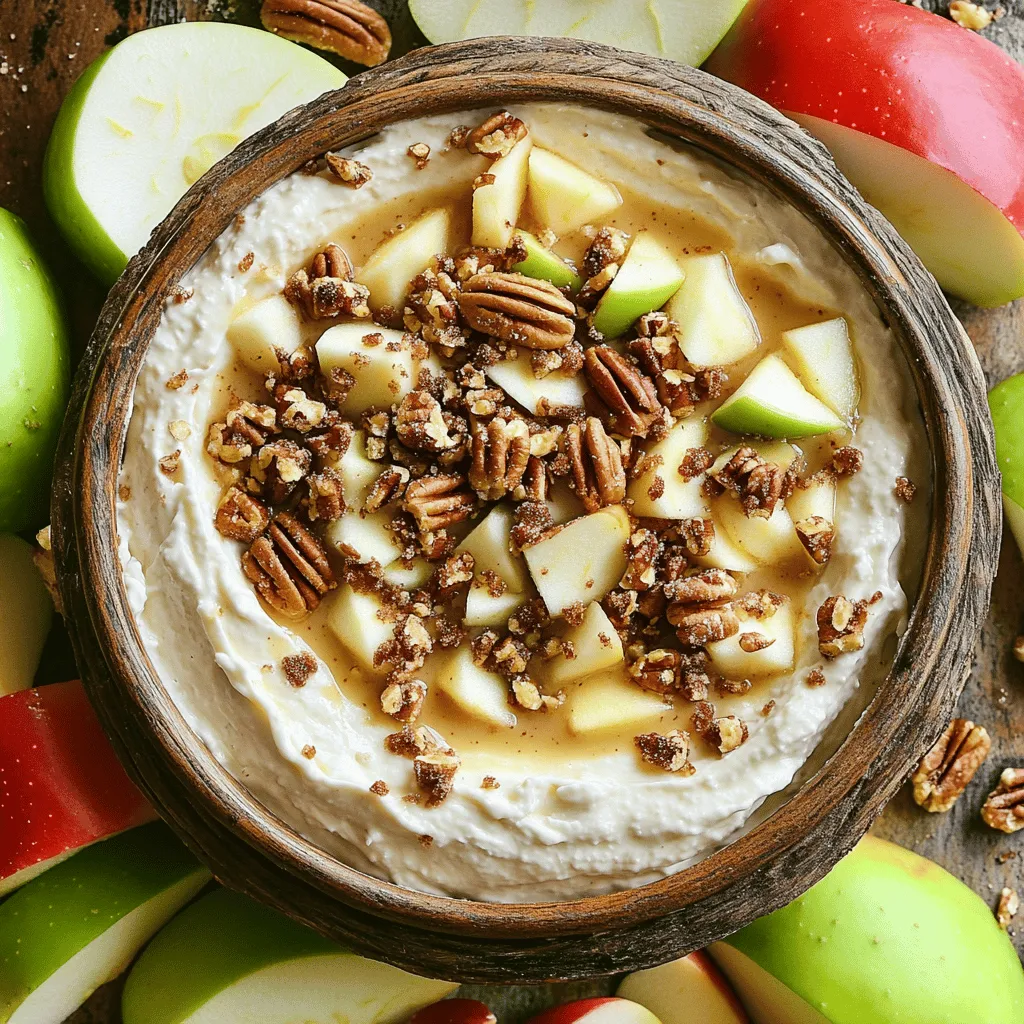
Looking for a sweet treat that impresses at gatherings? You’ve come to the right place! This Apple Toffee Dip is a rich and creamy delight that your guests will love. …

Read more

Categories Desserts
Older posts
Newer posts
← Previous Page1 … Page63 Page64 Page65 … Page130 Next →

ROASTED RECIPES

Where bold flavors meet everyday meals. Warm, vibrant, and made to share. 🔥🥗🍴

PAGES

Home About Contact Privacy Policy Terms & Conditions Cookie Policy GDPR Policy Copyright Policy Disclaimer

CATEGORIES

Appetizers Desserts Salads Breakfast Dinner

Contact

  • Pinterest
  • Mail
Copyright © 2025 Roasted Flavors. All rights reserved.