Mini Apple Pies In The Shape Of Pumpkins Delightful Treat

Get ready to impress your friends and family with Mini Apple Pies in the Shape of Pumpkins! These adorable treats not only taste amazing but also add a fun twist …
Get ready to impress your friends and family with Mini Apple Pies in the Shape of Pumpkins! These adorable treats not only taste amazing but also add a fun twist …
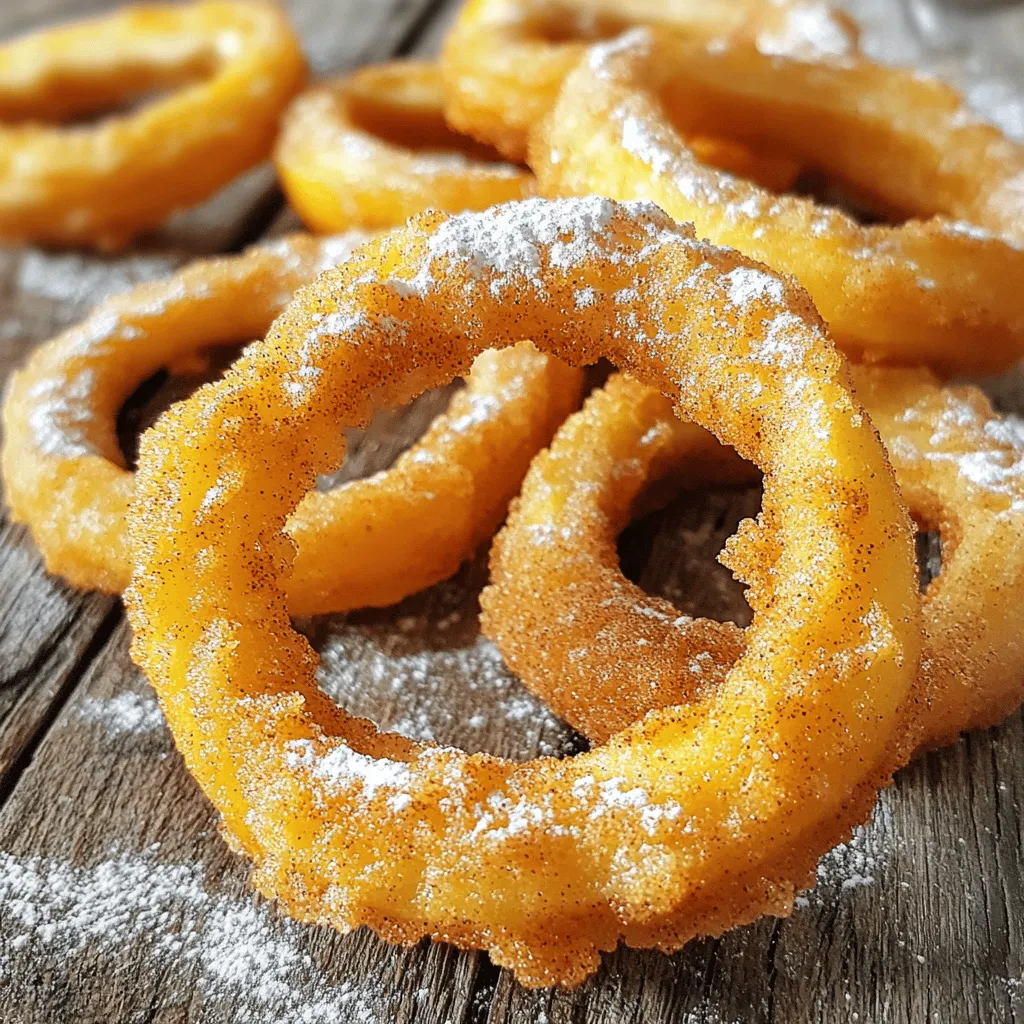
Craving a delicious, sweet treat? Say hello to Fried Cinnamon Apple Rings! This recipe combines crisp apple slices, a warm cinnamon batter, and golden frying for pure delight. Whether for …
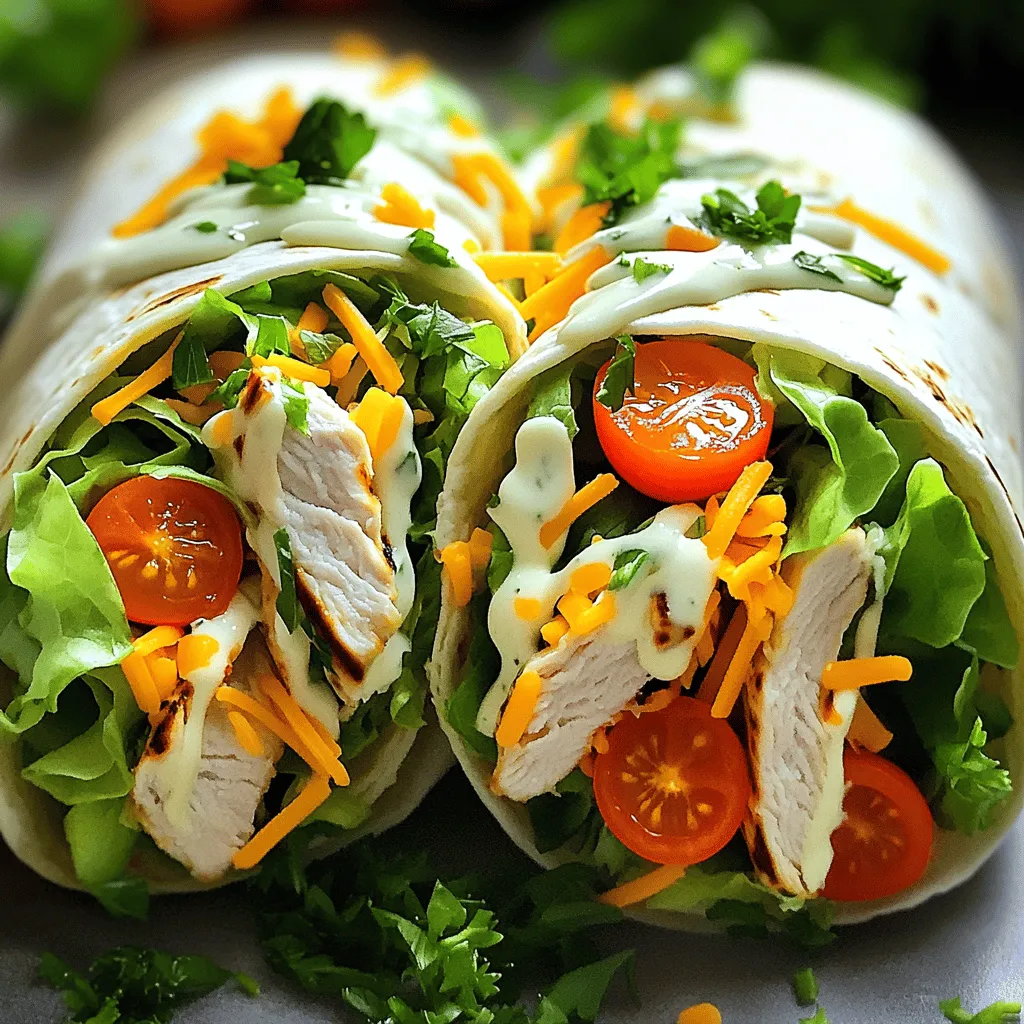
![To make a tasty Chicken Caesar Wrap, gather the following ingredients: - 2 large flour tortillas - 1 cup cooked chicken breast, shredded or sliced - 1 cup romaine lettuce, roughly chopped - ½ cup cherry tomatoes, halved - ¼ cup freshly grated Parmesan cheese - ¼ cup Caesar dressing (store-bought or homemade) - Freshly cracked black pepper, to taste - Optional: a handful of croutons for added crunch These ingredients combine for a delightful meal. The key is to use fresh, high-quality items. The chicken should be juicy and tender. Romaine lettuce adds a nice crunch. The cherry tomatoes offer a burst of flavor. You can choose to make your own Caesar dressing or use store-bought for convenience. Either way, the creamy dressing is a must for that classic taste. Adding croutons gives your wrap extra texture. For the full recipe, check out the Chicken Caesar Wrap Delight. Enjoy making this easy and delicious meal! To prep the chicken for the wrap, start by seasoning it. Sprinkle salt and pepper on the chicken breast. Grill or bake the chicken until it is fully cooked. Let it cool, then shred or slice it into bite-sized pieces. Next, chop the vegetables. Take your romaine lettuce and cut it into small pieces. Halve the cherry tomatoes for easy mixing. This step adds crunch and color to your wrap. Now, let’s mix the filling ingredients. In a large bowl, combine the shredded chicken, chopped romaine, halved tomatoes, and grated Parmesan cheese. Drizzle the Caesar dressing over this mixture. Gently toss it all together until everything is well coated. As for wrapping the tortillas, lay each one flat on a clean surface. Spoon half of the chicken Caesar mixture onto the center of each tortilla. Leave about an inch empty along the edges. This space helps you wrap easily. To wrap it up, fold the sides of the tortilla inward. Start rolling from one end to the other. Tuck in the filling as you roll. This keeps everything neat and secure. Repeat with the second tortilla. If you want extra flavor, you can toast or grill the wrap. Heat a non-stick skillet over medium heat. Place the wraps seam-side down in the skillet. Cook for about 2-3 minutes on each side until golden brown and slightly crispy. This step adds a nice texture to your meal. Enjoy the deliciousness of your Chicken Caesar Wrap! For the complete recipe, check [Full Recipe]. To make your Chicken Caesar Wrap shine, focus on seasoning. I like to use salt, pepper, and a bit of garlic powder on the chicken. This adds depth to the flavors. Cook the chicken until it’s juicy and tender. Shredded chicken works best as it mixes well with the other ingredients. For a great texture, don’t skip the romaine lettuce. It should be crispy and fresh. You can choose between homemade and store-bought Caesar dressing. Homemade dressing often tastes fresher and lets you control the flavors. Mix Greek yogurt, lemon juice, Dijon mustard, and minced garlic for a simple version. For store-bought, look for a brand with fewer preservatives. If you want to change things up, add herbs or spices to your dressing. A dash of hot sauce can give it a nice kick! When serving your wrap, slice it diagonally. This makes it look more appealing. Arrange the slices on a bright plate or a wooden board for a rustic touch. Add a sprinkle of Parmesan and a few halved cherry tomatoes around the wraps. This adds color and invites people to dig in. For an extra treat, serve with a small bowl of Caesar dressing on the side for dipping. {{image_4}} You can swap chicken for turkey, shrimp, or even a vegetarian option. Each protein brings a unique taste. If you choose turkey, cook it just like chicken. Shrimp cooks faster, so sauté it for only 2 to 3 minutes. If you want a vegetarian wrap, use grilled tofu or chickpeas for protein. Make sure to adjust the cooking times based on what you choose. This way, you keep the wrap juicy and delicious. While flour tortillas are great, you can try whole wheat or spinach tortillas. Whole wheat adds a nutty flavor, and spinach gives a nice color. If you need gluten-free options, use corn tortillas or gluten-free wraps. These alternatives still hold the filling well and taste amazing. Want to spice things up? Add jalapeños or crushed red pepper for heat. You can also toss in extra veggies like bell peppers or avocados for crunch. For cheese lovers, try feta or mozzarella instead of Parmesan. Each option changes the wrap’s flavor and makes it special. To keep your Chicken Caesar Wrap fresh, follow these tips: - Refrigeration: Wrap each wrap in plastic wrap or foil. Place them in an airtight container. This keeps them from drying out. - Freezing: You can freeze the wraps for later. Wrap each one tightly in plastic wrap. Then, place them in a freezer-safe bag. Label them with the date. - Rewarming: To reheat, take the wrap from the fridge or freezer. If frozen, let it thaw in the fridge overnight. Then, heat it in a skillet over medium heat. Cook for about 3-4 minutes on each side until warm. Each component of your Chicken Caesar Wrap has a different shelf life: - Cooked Chicken: Lasts 3-4 days in the fridge. If frozen, it can last up to 4 months. - Tortillas: Store in a cool, dry place. They last about 1-2 weeks in the pantry. - Romaine Lettuce: Use within 3-7 days for best freshness. - Cherry Tomatoes: Last about a week when stored at room temperature. - Parmesan Cheese: When stored properly, it can last 1-2 months in the fridge. - Caesar Dressing: Check the label for expiration. Homemade dressing lasts about 1 week in the fridge. - Signs of Spoilage: Look for changes in color, smell, or texture in chicken or dressing. If it smells off or looks moldy, throw it away. Preparing your wraps ahead can save time. Here’s how: - Prep the Chicken: Cook and shred the chicken in advance. Store it in the fridge for up to 4 days. - Chop Veggies: Wash and chop romaine and tomatoes ahead of time. Keep them in airtight containers. - Make Dressing: If making homemade dressing, prepare it in advance and store it in the fridge. - Portioning: Assemble wraps in pairs. Wrap them tightly and store for quick meals. This way, you can grab and go anytime! For the full recipe, check out the Chicken Caesar Wrap Delight. Enjoy your tasty meal! To make a Chicken Caesar Wrap from scratch, follow these steps: 1. Prep the Ingredients: Gather all your ingredients. If your chicken is raw, cook it well. Season it with salt and pepper, then grill or bake it. Once cooled, shred or slice the chicken. Chop the romaine lettuce and halve the cherry tomatoes. 2. Make the Caesar Dressing: If you're making your own dressing, whisk together Greek yogurt, lemon juice, Dijon mustard, minced garlic, salt, and pepper in a bowl. Adjust the taste to your liking. 3. Combine Filling: In a large bowl, mix the shredded chicken, chopped romaine, halved tomatoes, and grated Parmesan cheese. Add the Caesar dressing and toss until everything is coated. 4. Assemble the Wrap: Place each tortilla flat. Spoon half of the chicken mixture onto the center of each tortilla, leaving space on the edges. 5. Wrap It Up: Fold the sides of the tortilla in, then roll from one end to the other. Tuck in the filling as you roll. 6. Heat the Wraps (optional): For a warm wrap, cook them seam-side down in a skillet over medium heat. Cook for 2-3 minutes on each side until golden. 7. Slice and Serve: Remove the wraps, slice them, and serve with extra dressing for dipping. Add croutons inside for a crunch! Yes, you can customize your Chicken Caesar Wrap in many ways: - Different Proteins: Swap chicken for turkey, shrimp, or a veggie option like grilled tofu. - Add Veggies: Include spinach, bell peppers, or cucumbers for more flavor and crunch. - Change the Cheese: Try blue cheese or feta for a different taste. - Dress It Up: Use different dressings like ranch or a spicy garlic sauce for a twist. Feel free to mix and match ingredients based on what you love! You can find Chicken Caesar Wraps at many popular restaurants: - Fast Food Chains: Many sandwich shops and fast food places offer them. - Casual Dining: Look for wraps on the menu at casual dining spots like Applebee's or Chili's. - Local Cafes: Many local cafes and bistros have unique takes on this classic wrap. Check your favorite places to see if they have this tasty option! For a full recipe to make at home, check out the Chicken Caesar Wrap Delight. In this post, we covered how to make a tasty Chicken Caesar Wrap. We looked at the essential ingredients, steps to prepare, and ways to customize your wrap. Plus, we explored storage tips and answered common questions. With these simple instructions and ideas, you can create your own wraps at home. Enjoy the flavor, nutrition, and ease they bring to your meals. Now, grab your ingredients and get started!](https://roastedflavors.com/wp-content/uploads/2025/08/8a32acea-4c70-42cc-b4e3-e4c1e0f6f4d2.webp)
Are you craving a quick, tasty meal that hits the spot? The Chicken Caesar Wrap is your answer! With its tender chicken, crisp romaine, and creamy Caesar dressing, this wrap …
![To make a delicious Apple Pecan Cake with Caramel Glaze, gather these ingredients: - 2 cups all-purpose flour - 1 ½ teaspoons baking powder - 1 teaspoon baking soda - ½ teaspoon salt - 1 teaspoon ground cinnamon - 1 cup unsalted butter, softened - 1 cup granulated sugar - ½ cup brown sugar, packed - 4 large eggs - 1 teaspoon pure vanilla extract - 2 cups peeled and diced apples (about 2 medium apples) - 1 cup pecans, roughly chopped - ½ cup sour cream - ½ cup caramel sauce (store-bought or homemade) For the best flavor, use firm apples like Honeycrisp or Granny Smith. These apples add sweetness and a bit of tartness. As for pecans, fresh nuts give the best crunch and taste. You can also enhance the flavor with these optional ingredients: - A pinch of nutmeg for warmth - A splash of apple cider for extra moisture Using high-quality ingredients makes a big difference in your cake’s flavor and texture. 1. Oven and Pan Preparation: First, preheat your oven to 350°F (175°C). Grease and flour a 9x13 inch baking pan. You can also line it with parchment paper. This makes it easy to remove the cake later. 2. Mixing Dry Ingredients: In a medium bowl, combine 2 cups of all-purpose flour, 1 ½ teaspoons of baking powder, 1 teaspoon of baking soda, ½ teaspoon of salt, and 1 teaspoon of ground cinnamon. Whisk these together until they blend well. Set this mixture aside for later. 3. Creaming Butter and Sugars: In a larger bowl, use a mixer to beat 1 cup of softened butter, 1 cup of granulated sugar, and ½ cup of packed brown sugar. Beat this mixture on medium speed until it becomes light and fluffy. This step takes about 3 to 4 minutes. 1. Incorporating Eggs and Vanilla: Add 4 large eggs into the butter and sugar mix, one at a time. Make sure to mix well after each egg. Then, stir in 1 teaspoon of pure vanilla extract until well combined. 2. Mixing Wet and Dry Components: Slowly add the dry mixture to the wet mix. Alternate this with ½ cup of sour cream. Start and end with the dry mix. Stir until just combined. Be careful to not overmix, as this can make the cake tough. 3. Folding in Apples and Pecans: Gently fold in 2 cups of peeled and diced apples and 1 cup of roughly chopped pecans. Use a spatula to make sure they spread evenly in the batter. 1. Transferring Batter to the Pan: Pour the batter into your prepared baking pan. Use a spatula to smooth the top, creating an even layer. 2. Recommended Baking Time and Temperature: Place the pan in the preheated oven. Bake for 35 to 40 minutes. 3. Checking for Doneness and Cooling Tips: To check if the cake is done, insert a toothpick into the center. It should come out clean. After baking, let the cake cool in the pan for about 10 minutes. Then, transfer the cake to a wire rack to cool completely. For more details, refer to the Full Recipe. - How to avoid common mistakes: Always measure your flour correctly. Use a spoon to scoop it into a measuring cup, then level it off with a knife. This prevents a dry cake. - Importance of ingredient temperature: Use room temperature butter and eggs. This helps them mix well and creates a fluffy texture. - Ensuring even baking: Rotate your cake in the oven halfway through baking. This ensures it bakes evenly and prevents any hot spots. - Suggestions for spices and flavor additives: Try adding nutmeg or ginger for a warm spice kick. These flavors pair well with apples and pecans. - Ways to customize with other nuts or fruits: Swap pecans for walnuts or almonds if you prefer. You can also mix in dried cranberries or raisins for added sweetness. For the full recipe, check out the Apple Pecan Bliss Cake. {{image_4}} For those needing gluten-free options, using a gluten-free flour blend works well. Look for blends that include xanthan gum for the best texture. You can also swap dairy ingredients easily. Use almond milk or coconut milk instead of sour cream. For butter, try using coconut oil or vegan butter. These changes keep the cake tasty and enjoyable. You can add chocolate or caramel chips for a fun twist. Stir in about a cup of chips before baking. This gives the cake a rich, sweet touch. If you want to explore different nuts, try walnuts or hazelnuts. Chop them roughly and mix in the batter. Each nut adds a unique flavor and texture. You can find the full recipe for more ideas. To keep your apple pecan cake fresh, store it in the fridge. Wrap the cake tightly in plastic wrap or place it in an airtight container. This will help keep the moisture in and prevent it from drying out. If you want to freeze the cake, slice it first. Wrap each slice individually in plastic wrap. Then place them in a freezer-safe bag. This way, you can enjoy a piece anytime. When stored correctly, the cake lasts about a week in the fridge. For frozen slices, they stay good for about three months. Check for signs of spoilage before eating. If the cake smells sour or has mold, it's best to throw it away. A dry texture or off taste is also a sign to discard it. Keeping your cake fresh is key to enjoying its delicious flavor. How to make a homemade caramel glaze? To make a simple homemade caramel glaze, you need sugar, butter, and cream. Start by melting one cup of sugar in a saucepan over medium heat. Stir until it turns golden brown. Next, add 6 tablespoons of butter and mix well. Slowly pour in ½ cup of heavy cream while stirring constantly. Let it simmer for about five minutes. Finally, let it cool before drizzling over your cake. This glaze adds a rich taste and a beautiful shine. Can I use different baking pans? Yes, you can use different baking pans. If you want to use a round pan, adjust the baking time. A 9-inch round pan usually takes about 30-35 minutes to bake. Always check for doneness with a toothpick. If it comes out clean, the cake is ready. Just make sure your pan is greased well to prevent sticking. What type of apples are best for baking? The best apples for baking are Granny Smith, Honeycrisp, or Fuji. Granny Smith apples give a nice tartness that balances sweetness. Honeycrisp apples are sweet and hold their shape well. Fuji apples add a juicy sweetness. Feel free to mix different types for a unique flavor in your cake! What to do if the cake is too dry? If your cake turns out too dry, consider adding more moisture. You can brush the top with a simple syrup made from equal parts sugar and water. This will help add moisture back into the cake. Another option is to serve it with whipped cream or a scoop of ice cream. These will help balance the dryness. How to ensure there's enough flavor? To boost the flavor of your cake, use fresh spices. Adding a little more cinnamon or nutmeg can enhance the taste. You can also add a splash of lemon juice to the batter for brightness. Don’t forget to use high-quality vanilla extract; it makes a big difference in flavor. Can I make this cake ahead of time? Yes, you can make this cake ahead of time. Bake it a day or two in advance and store it in an airtight container. Just add the caramel glaze right before serving. This will keep the glaze fresh and prevent the cake from getting soggy. Best accompaniments for the cake This apple pecan cake pairs well with vanilla ice cream or whipped cream. A scoop of vanilla ice cream adds a creamy contrast to the warm cake. Whipped cream can enhance the flavors without overpowering them. You can also serve it with a cup of coffee or tea for a cozy touch. Creative serving ideas for gatherings For gatherings, cut the cake into small squares for easy serving. You can place them on a decorative platter. Drizzle extra caramel sauce over the top and sprinkle with chopped pecans for a lovely display. This will impress your guests and make for a delightful treat. For an extra touch, add a few apple slices on the side. For the complete recipe, check out the [Full Recipe]. This article covered everything you need to make a delicious cake. We discussed the key ingredients, preparation steps, and baking process. I shared useful tips to help you avoid mistakes and enhance flavors. You can also explore variations to meet dietary needs and preferences. Lastly, you learned about proper storage to keep your cake fresh. With these insights, you can confidently bake and enjoy a tasty treat. Your cake-making journey can be fun and rewarding!](https://roastedflavors.com/wp-content/uploads/2025/08/254df40f-7da9-451a-9386-c0883ece5c7f.webp)
Looking for a sweet treat that combines the warm flavors of apple and pecan? You’re in the right place! My Apple Pecan Cake with Caramel Glaze is both delightful and …
![To make Pumpkin Spice Gooey Cake, you need a few simple ingredients. Each one plays a key role in creating that rich and gooey texture. Here’s what you’ll need: - 1 box yellow cake mix - 1/2 cup unsalted butter, melted - 1 large egg, lightly beaten - 1 can pumpkin puree - 3 large eggs (for the gooey layer) - 8 oz cream cheese, softened - 2 cups powdered sugar - 1 teaspoon vanilla extract - 1 tablespoon pumpkin spice blend - 1/2 teaspoon salt - Optional garnish: whipped cream and a sprinkle of ground cinnamon Using these ingredients, you create a delicious blend of flavors that scream fall. The yellow cake mix forms the base, while the pumpkin and cream cheese add that gooey goodness. The pumpkin spice blend gives it that warm, cozy taste we all love. For the full recipe, check the instructions I provided. - Preheat your oven to 350°F (175°C). Grease a 9x13 inch baking dish with butter or cooking spray. This step helps the cake come out easily. - In a large bowl, combine the yellow cake mix, melted butter, and one beaten egg. Stir until you form a crumbly dough. Press this mixture firmly into the bottom of the prepared baking dish to make the crust. - In a separate bowl, mix the pumpkin puree, softened cream cheese, and the remaining three eggs. Add the powdered sugar, vanilla extract, pumpkin spice, and salt. Whisk until the mixture is smooth and creamy. Make sure there are no lumps left from the cream cheese. A smooth mix ensures even baking. - Carefully pour the pumpkin mixture over the crust in the baking dish. Use a spatula to spread it evenly. - Bake in the preheated oven for about 40-45 minutes. The edges should look set, while the center stays slightly gooey. This contrast makes every bite special. - After baking, take the cake out of the oven and let it cool for about 10-15 minutes. Once cooled, cut it into squares for serving. - Enjoy the cake warm or at room temperature. Top with whipped cream and a sprinkle of ground cinnamon for a delightful touch. For the full recipe, you can refer to the instructions above. To make your pumpkin spice gooey cake perfect, follow these tips: - Oven Settings: Preheat your oven to 350°F (175°C). This helps the cake bake evenly. - Pan Recommendations: Use a 9x13 inch baking dish for the best results. Grease it well to prevent sticking. - Ingredient Temperature: Make sure your cream cheese is at room temperature. This helps it mix smoothly with other ingredients. Serving your cake well enhances its flavor. Here are some ideas: - Best Ways to Serve: I love serving this cake warm. It adds to the gooey texture. - Enhancements and Pairings: Top with whipped cream and a sprinkle of cinnamon. You can also add a cinnamon stick for a fun touch. Sometimes, things may not go as planned. Here are solutions to common problems: - Avoiding Overbaking: Keep an eye on your cake while it bakes. The edges should look set, but the center should stay gooey. - Fixes for a Less Gooey Texture: If your cake turns out too firm, try reducing the baking time next time. A gooey texture is key to a great pumpkin spice cake. For the full recipe and detailed instructions, check out the [Full Recipe]. {{image_4}} You can easily make this cake a bit healthier. For a lower sugar version, try using a sugar substitute. Some great options include stevia or monk fruit sweetener. They work well in most recipes. If you want to make it gluten-free, use a gluten-free cake mix. Many brands offer good substitutes that taste great. For those who need dairy-free options, swap cream cheese for a dairy-free version. Brands like Tofutti or Kite Hill offer good alternatives. You can also use coconut cream instead of whipped cream. This will keep the cake creamy without dairy. Adding chocolate chips or nuts can really boost the flavor. I love using semi-sweet chocolate chips. They add a nice contrast to the pumpkin spice flavor. If you want a crunch, add chopped walnuts or pecans. They pair perfectly with the gooey texture. You can also switch up the spices for a unique twist. Try adding a pinch of nutmeg or allspice to the mix. This will give your cake a different but delightful taste. Another idea is to use chai spice instead of pumpkin spice. It will give your cake an exciting new flavor profile. For the full recipe, check out the details above. To keep your Pumpkin Spice Gooey Cake fresh, store it in the fridge. Place the cake in an airtight container. If you do not have one, cover the cake tightly with plastic wrap. This helps to keep it moist and prevents it from absorbing other smells in the fridge. The cake will stay fresh for about 4 to 5 days. If you want to enjoy it warm, just pop a piece in the microwave for a few seconds. Freezing is a great option for long-term storage. To freeze the cake, first, let it cool completely. Cut the cake into squares and wrap each piece tightly in plastic wrap. Then, place the wrapped pieces in a freezer-safe bag or container. This way, they won’t stick together. The cake can last up to 3 months in the freezer. To thaw, simply take out a piece and leave it in the fridge overnight or let it sit at room temperature for a few hours. Enjoy the gooey goodness whenever you crave it! For the full recipe, check out the detailed instructions above. Look for a few signs. The edges should feel firm. The center will be a bit soft but not wet. Use a toothpick to test; it should come out with a few moist crumbs. If it’s too wet, bake a bit longer. This cake needs to stay gooey in the middle, so don’t overbake! Yes, you can use fresh pumpkin! Just be careful. Fresh pumpkin has less water than canned. This can change the cake's texture. If you use fresh, make sure to cook and puree it well. Canned pumpkin is easy and consistent, but fresh can taste better. You get to choose based on what you like! Serve it warm with whipped cream on top. A sprinkle of cinnamon adds a nice touch. You can also add a scoop of vanilla ice cream. For a twist, try serving with caramel sauce. Each of these adds flavor and makes this dessert even more special. Enjoy the full recipe to discover how to make this treat! This blog post covered how to make a Pumpkin Spice Gooey Cake. You learned about essential ingredients and each step of the process. We discussed helpful tips, storage methods, and exciting variations. Baking can be fun and rewarding. With this recipe, you can impress family and friends. Don't hesitate to try your own twists. Enjoy the sweet, warm flavors of autumn! Happy baking!](https://roastedflavors.com/wp-content/uploads/2025/08/f2dbe7b2-85bd-43be-b0f8-fdd0642d0092.webp)
Fall is here, and nothing says cozy like a slice of Pumpkin Spice Gooey Cake. This treat combines warm spices, creamy textures, and a hint of sweetness that will have …
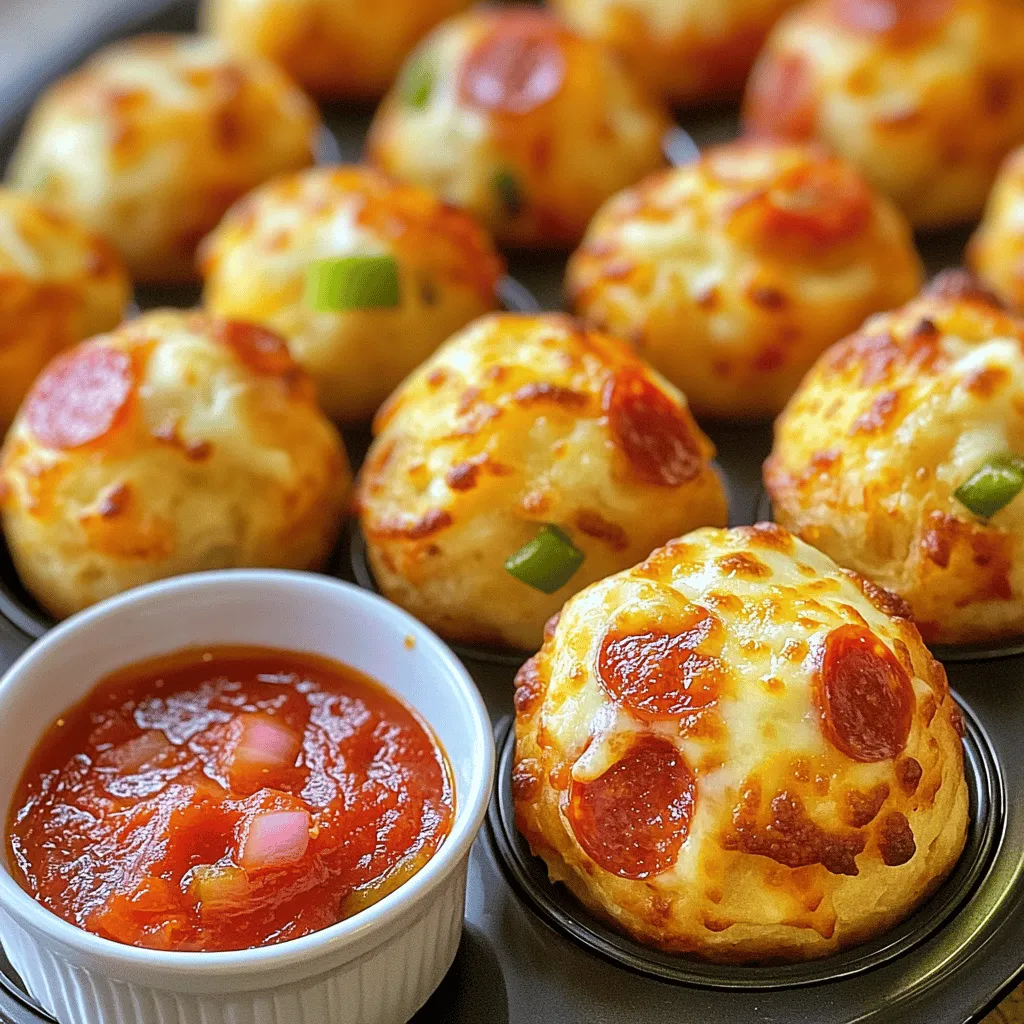
Looking for a fun and tasty snack? Muffin Tin Pizza Bombs are your answer! These bite-sized pizza pockets combine your favorite toppings into pockets of golden dough. They’re easy to …
. Enjoy your tasty treats with coffee or tea! When making baked pumpkin spice donuts, avoid overmixing the batter. Overmixing can make donuts tough. Just mix until you see no dry flour. Also, be careful not to fill the donut pan too full. Aim for two-thirds full to let them rise nicely. Finally, don't skip cooling. Letting them cool on a wire rack keeps them from getting soggy. For the best flavor, use real pumpkin puree. It brings a rich taste to your donuts. Fresh pumpkin pie spice is also key. If you don’t have it, you can mix cinnamon, nutmeg, and ginger. This combo adds warmth and depth. Always check your oven's temperature too. An oven thermometer helps ensure your donuts bake evenly. These donuts shine at breakfast or as a snack. Serve them with coffee or spiced tea for a cozy vibe. For an extra touch, drizzle them with maple syrup or a glaze. You can even top them with chopped nuts for crunch. Arrange them on a festive plate for gatherings to impress your guests. {{image_4}} You can easily switch up the flavors in these donuts. Try adding chocolate chips for a rich twist. You can also mix in maple syrup instead of sugar for a sweet, earthy taste. For a spicy kick, add a pinch of cayenne pepper. Adjust the pumpkin pie spice to create your unique blend. Consider adding a splash of almond extract for a nutty flavor that pairs well with pumpkin. To make gluten-free donuts, substitute all-purpose flour with a gluten-free flour blend. Look for one that contains xanthan gum for the best texture. For a vegan version, swap the eggs for flax eggs. Mix one tablespoon of ground flaxseed with three tablespoons of water. Let it sit for five minutes to thicken. Use a plant-based oil instead of vegetable oil for a fully vegan treat. Toppings can enhance your baked donuts. Try a simple glaze made with powdered sugar and milk for a sweet finish. For a more fall-inspired touch, use chopped pecans or walnuts on top. Drizzle melted chocolate or a maple glaze for extra flavor. You can also roll the donuts in cinnamon and sugar for a classic touch. Get creative with toppings to suit your mood and the season! Check out the Full Recipe for more ideas. To keep your easy baked pumpkin spice donuts fresh, store them at room temperature. Use an airtight container to prevent them from drying out. They will stay good for about 2-3 days. If you want them to last longer, consider refrigeration. Just note that refrigeration can change the texture slightly. Freezing is a great option if you want to save some donuts for later. Here’s how to do it: - Let the donuts cool completely after baking. - Wrap each donut in plastic wrap. - Place the wrapped donuts in a freezer-safe bag or container. - Label with the date and store them in the freezer for up to 3 months. When you are ready to eat, you can thaw them at room temperature or pop them in the microwave for a few seconds. To enjoy your donuts warm, follow these steps: - If thawed, place them on a microwave-safe plate. - Heat for about 10-15 seconds. - For a crispier texture, you can also reheat them in the oven. Preheat the oven to 350°F (175°C) and warm them for about 5-7 minutes. This will bring back their fluffy goodness! Enjoy them fresh again. For the full recipe, check out the complete instructions earlier. Making pumpkin puree is easy. Start with a small pumpkin, often called a sugar pumpkin. Cut it in half and scoop out the seeds. Place the halves cut-side down on a baking sheet. Bake at 350°F (175°C) for about 45 minutes. When the flesh is soft, scoop it out and blend until smooth. This puree works great in our Easy Baked Pumpkin Spice Donuts recipe. Yes, you can use other sweeteners. Options include honey, maple syrup, or coconut sugar. Keep in mind that these may change the taste and texture slightly. If using a liquid sweetener like honey, reduce the liquid in your recipe. You can use leftover pumpkin puree in many ways. Stir it into oatmeal or yogurt for a fall twist. Add it to smoothies for extra creaminess. You can also use it in soups or sauces for added flavor. Don't forget to make more donuts! Baked donuts last about 3-5 days when stored in an airtight container. For longer freshness, refrigerate them. You can also freeze them for up to 3 months. Just thaw and enjoy when you're ready! To sum up, we covered the essential ingredients and their functions for baking donuts. We also shared step-by-step instructions, helpful tips, and some fun variations. Finally, I provided storage tips to keep your donuts fresh. With these insights, you can bake delicious treats with ease. Enjoy your donut-making journey!](https://roastedflavors.com/wp-content/uploads/2025/08/8a5f450e-1664-4798-8041-8e7a974fdf6f.webp)
Fall is the perfect time for warm, comforting treats. These Easy Baked Pumpkin Spice Donuts are not just simple to make, but they pack all the cozy flavors of the …

Fall is here, and it’s time to warm up with a Healthy Pumpkin Spiced Latte! This cozy drink not only satisfies your pumpkin cravings but also offers a nourishing twist. …
. {{image_4}} If you want sweeter apple fries, try adding a tablespoon of sugar to the flour mix. This small change can make a big difference! You can also use flavored syrups in the buttermilk. Think of maple or vanilla. These flavors give a fun twist to the classic apple fry. For a savory taste, swap out some spices in the recipe. You might try garlic powder or paprika. These spices will give your apple fries a unique flavor that is different from the sweet version. It’s an exciting way to enjoy apples! Want a different texture? Instead of using panko breadcrumbs, try crushed nuts or coconut flakes. They add a crunchy bite that pairs well with the softness of the apple. You can mix and match these ideas to create your perfect apple fries! For the full recipe, check the earlier sections. You can store leftover apple fries in an airtight container. Keep them in the fridge for up to 2 days. This helps maintain their taste and texture. Make sure to let them cool before storing. If you put them in warm, they may get soggy. To bring back the crispiness, reheat the apple fries in the air fryer. Set your air fryer to 350°F (175°C). Heat for 3 to 5 minutes. This will make them crunchy again. Keep an eye on them to avoid overcooking. If you want to save some for later, freeze the uncooked apple fries. Place them in a zip-lock bag. Make sure to label the bag with the date. They can be cooked directly from frozen when you’re ready to enjoy them. This way, you can have a tasty snack anytime! Granny Smith or Fuji apples are recommended for their firmness and flavor. These apples hold their shape well when cooked. They also give a nice balance of sweet and tart. This makes them perfect for apple fries. Yes, you can substitute all-purpose flour with a gluten-free alternative. Many options work well, such as almond flour or a store-bought blend. This makes the recipe friendly for those with gluten sensitivities. You can reduce sugar in the recipe or serve with yogurt instead of caramel or honey. Using plain yogurt adds creaminess without extra sugar. Also, consider baking instead of frying for a lighter option. Yes, you can prep them and store them in the fridge before air frying. Just keep the apple fries in an airtight container. This makes it easy to cook them when you want a quick snack. You can bake them in a conventional oven at a similar temperature, adjusting the cooking time as necessary. Aim for 375°F (190°C) and check them after about 15-20 minutes. This way, you still enjoy crispy apple fries without an air fryer. In this blog post, I shared how to make crispy air fryer apple fries using simple ingredients. We covered everything from preparing the apples to coating them and air frying for a perfect crunch. Remember, you can adjust flavors and techniques to suit your taste. Whether you enjoy sweet or savory options, this recipe is versatile. Experiment with spices and sauces to find your favorite. Now it's time for you to take these tips and make your own delicious apple fries!](https://roastedflavors.com/wp-content/uploads/2025/08/674748c5-a302-4e80-8f3b-dff231271295.webp)
Are you ready to enjoy a crispy, sweet treat without the guilt? My Crispy Air Fryer Apple Fries recipe combines fresh, tart apples with a crunchy coating. It’s easy to …
Craving a tasty yet simple meal? Look no further! This Chick-fil-A Cool Wrap recipe combines tender chicken, fresh veggies, and creamy ranch dressing, all wrapped up in a soft tortilla. …