Skip to content
Roasted Flavors
  • Home
  • Appetizers
  • Desserts
  • Salads
  • Breakfast
  • Dinner
  • Privacy Policy
  • Contact
  • About

Chef Remy

Chocolate Chip Salted Caramel Tart Irresistible Treat

August 6, 2025 by Chef Remy
For the Chocolate Chip Salted Caramel Tart, you will need: - 1 ½ cups all-purpose flour - ½ cup unsweetened cocoa powder - ½ cup powdered sugar - ¾ cup cold unsalted butter, cut into cubes - 1 large egg yolk - 2 tablespoons ice-cold water - 1 cup chocolate chips (choose semisweet or dark for your preference) - 1 cup granulated sugar - ½ cup heavy cream - 1 teaspoon flaky sea salt - 2 tablespoons unsalted butter (for finishing the caramel) When selecting ingredients, go for high-quality options. Fresh chocolate chips can enhance the flavor. Choose a good cocoa powder for a rich taste. Use unsalted butter for better control over saltiness in your tart. Fresh eggs are key for a great crust. If you have dietary restrictions, here are some substitutes: - Use gluten-free flour instead of all-purpose flour for a gluten-free tart. - Replace butter with coconut oil for a dairy-free option. - Use almond or oat milk in place of heavy cream for a lighter version. - Choose dairy-free chocolate chips for a vegan-friendly tart. These alternatives will keep the essence of the tart while catering to your needs. To start, make the tart crust. Combine 1 ½ cups of all-purpose flour, ½ cup of unsweetened cocoa powder, and ½ cup of powdered sugar in a food processor. Add ¾ cup of cold, unsalted butter cut into cubes. Pulse until the mix looks like coarse crumbs. This will form your base. Next, add 1 large egg yolk and 2 tablespoons of ice-cold water. Pulse again until the dough begins to form. Avoid over-mixing. Shape the dough into a disk and wrap it in plastic. Chill it in the fridge for at least 30 minutes. This step helps keep the crust from losing its shape. Preheat your oven to 350°F (175°C). Roll out the chilled dough on a floured surface. Fit it into a tart pan, pressing into the edges. Trim any extra dough. Use a fork to poke holes in the bottom to prevent puffing. Bake for 15-20 minutes until the crust is firm. Let it cool completely before adding the filling. Now, let’s make the salted caramel. In a medium saucepan, add 1 cup of granulated sugar over medium heat. Stir constantly with a wooden spoon. Keep stirring until the sugar dissolves and turns a rich amber color. This usually takes about 8-10 minutes. Once the caramel is ready, carefully add ½ cup of heavy cream. Expect some bubbling! Stir until smooth. Remove it from heat and mix in 1 teaspoon of flaky sea salt and 2 tablespoons of unsalted butter. Make sure everything is well combined. Assemble your tart by sprinkling 1 cup of chocolate chips evenly over the cooled crust. Pour the warm salted caramel over the chocolate chips. Ensure that every chip gets covered. This step adds to that delightful melt-in-your-mouth texture. Once assembled, place the tart in the refrigerator. Let it chill for at least 2 hours. This allows the caramel to set properly. For a finishing touch, sprinkle a pinch of flaky sea salt on top before slicing. Each bite will be a perfect mix of sweet and salty. To get the best tart crust, keep a few things in mind. First, always chill your dough. This helps it hold its shape. After mixing, wrap the dough and chill it for at least 30 minutes. When you roll it out, use a light touch. Avoid stretching the dough. If you notice it shrinking while baking, it may be too warm. Poke holes in the bottom of the crust with a fork. This helps steam escape and prevents puffing. Finally, bake until firm, but not too dark. Making smooth caramel takes some care. The biggest mistake is rushing the sugar. Heat it slowly over medium heat. Stir constantly to help it melt evenly. Watch for a rich amber color; this shows it is ready. When you add cream, do it slowly. Expect bubbling as the cream hits the hot sugar. Stir until the mix is smooth. If it looks grainy, it may have cooked too long. In that case, start over. Always add a pinch of flaky sea salt to enhance flavor. For a beautiful presentation, consider a few ideas. Once your tart is chilled, slice it with a sharp knife. Before serving, sprinkle a bit of flaky sea salt on top. This adds a nice contrast to the sweet caramel. You can also add fresh berries or a dollop of whipped cream on the side. For a touch of elegance, serve the tart on a fancy plate. You could even drizzle some melted chocolate over the top. Each of these ideas can make your tart look and taste amazing. For the full recipe, check out the Chocolate Chip Salted Caramel Tart recipe. {{image_4}} You can take your chocolate chip salted caramel tart to the next level. Adding nuts can add a nice crunch. I love using chopped pecans or walnuts. Toast them lightly for even more flavor. A sprinkle of cinnamon or a dash of espresso powder can boost the taste too. Try adding a bit of vanilla extract to the caramel for a warm twist. These simple tweaks can make your tart unique and exciting. If you need a gluten-free version, it's easy to adapt. Replace the all-purpose flour with almond flour or a gluten-free blend. Make sure the cocoa powder is also gluten-free. This way, you can still enjoy the same rich taste without gluten. Just keep in mind that the texture may change a bit, but it will still be delicious! You can make this tart in various sizes. For mini tarts, use a muffin tin instead of a tart pan. Divide the dough and caramel equally among the cups. Baking time may be shorter, so check them early. If you want a larger tart for a crowd, simply double the recipe. Adjust the baking time as needed, ensuring the crust is firm and the caramel is set. This tart is fun to share in any size! To keep your Chocolate Chip Salted Caramel Tart fresh, store it in the fridge. Use an airtight container to prevent it from absorbing other smells. If you don't have a container, cover it with plastic wrap. This method keeps the tart moist and tasty. It can stay in the fridge for up to five days. Always check for any signs of spoilage before serving. You can freeze the tart for longer storage. First, make sure it is completely cool. Then, wrap it tightly in plastic wrap. After that, place it in a freezer-safe bag or container. This helps to prevent freezer burn. The tart can stay frozen for up to three months. To thaw, simply move it to the fridge for several hours or overnight. Avoid thawing at room temperature to maintain texture and flavor. Enjoy your delicious treat whenever you want! To know when your caramel is done, watch for color and bubbling. The sugar should melt and turn a deep amber color. This usually takes about 8-10 minutes. If it looks too light, keep cooking. Be careful not to burn it. The perfect caramel will have a smooth, glossy look. When you pour in the heavy cream, expect it to bubble up vigorously. This is normal. Stir it gently until mixed and smooth. If it clumps, keep stirring. The caramel should feel thick and coat the back of a spoon. Yes, you can use milk chocolate instead of dark chocolate. However, the flavor will change. Milk chocolate is sweeter and creamier. It will make your tart taste more like a candy bar. Dark chocolate has a bolder flavor that balances the sweetness of the caramel. If you want a richer taste, stick with dark chocolate. If you prefer a sweet treat, go for milk chocolate. You can also mix both for a fun twist. The tart will last up to five days in the fridge. Make sure to cover it well with plastic wrap or store it in an airtight container. This keeps it fresh and prevents it from drying out. If you notice any changes in texture or smell, it's best to toss it. Always check before enjoying leftovers. For the best taste, eat it within the first few days. For the full recipe, you can check out the detailed instructions above. This blog post provided a guide to making a delicious chocolate chip salted caramel tart. We covered the key ingredients and how to choose the best ones. You learned how to make the crust and caramel from scratch. I shared tips for perfecting both processes and offered variations to suit your needs. In conclusion, with the right approach, you can create a tasty tart. Try the tips and enjoy this treat with friends and family. Happy baking!

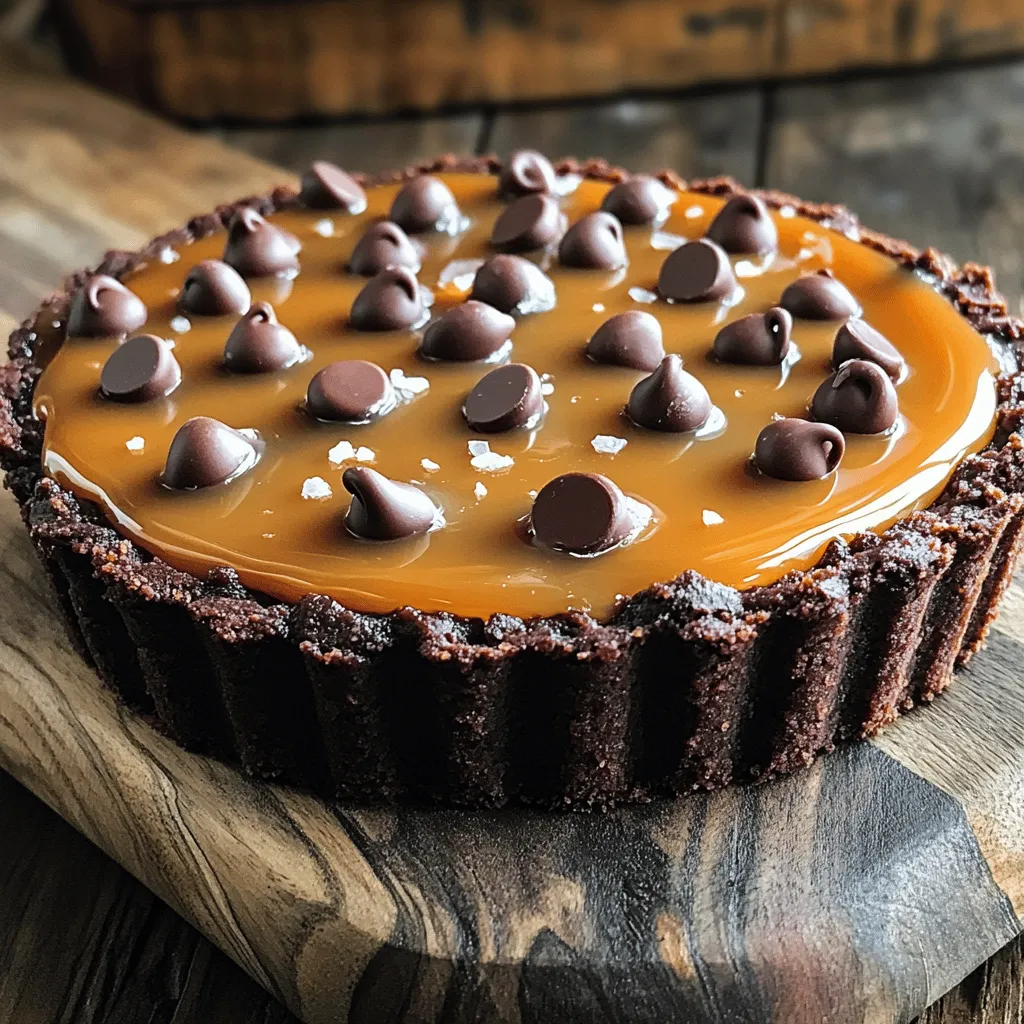
Indulge your sweet tooth with my Chocolate Chip Salted Caramel Tart! This dessert combines rich chocolate with gooey caramel, creating a flavor explosion that will wow your taste buds. I’m …

Read more

Categories Desserts

Pumpkin Streusel Muffins Irresistible Homemade Treat

August 6, 2025 by Chef Remy
Let’s dive into what makes these Pumpkin Streusel Muffins so special. Here’s the full list of ingredients you will need: - 1 cup canned pumpkin puree - 1/2 cup vegetable oil - 1 cup granulated sugar - 1/2 cup packed brown sugar - 3 large eggs - 1 teaspoon vanilla extract - 2 cups all-purpose flour - 1 teaspoon baking soda - 1 teaspoon baking powder - 1 teaspoon ground cinnamon - 1/2 teaspoon ground nutmeg - 1/2 teaspoon salt - 1/4 teaspoon ground ginger For the delicious streusel topping, gather these ingredients: - 1/2 cup all-purpose flour - 1/3 cup packed brown sugar - 1/4 cup cold butter, cut into small cubes - 1 teaspoon ground cinnamon - 1/4 cup chopped pecans (optional) Measurements Matter Getting the right measurements is key. Use standard measuring cups and spoons to ensure your muffins turn out perfect. I always find that weighing ingredients can help too, especially flour, which can vary in density. Customization Options Feel free to play around with the recipe. You can swap in different nuts, like walnuts or almonds, for the streusel. You could even add chocolate chips for a sweet twist. Think about adding cranberries or raisins for a fruity touch. Now that you have all your ingredients lined up, you're ready to create something truly delightful! Check out the Full Recipe for a step-by-step guide on making these tasty treats. First, gather your wet ingredients. In a large bowl, whisk together the pumpkin puree, vegetable oil, granulated sugar, brown sugar, eggs, and vanilla extract. Mix until smooth. This step is key for a rich flavor. Next, in another bowl, combine the dry ingredients. Whisk together the flour, baking soda, baking powder, cinnamon, nutmeg, salt, and ginger. Mixing these well ensures an even rise in your muffins. Now, gently fold the dry mixture into the wet ingredients. Be careful not to overmix. A few lumps are fine. Overmixing can lead to tough muffins, and we want them light and fluffy. In a medium bowl, mix the flour, brown sugar, and cinnamon for the streusel. This combination gives a lovely sweetness and spice. Add the cold butter cut into small cubes. Use a fork or your fingers to work the butter into the mixture until it looks like coarse crumbs. If you want a nutty flavor, consider adding chopped pecans. This step is optional, but it adds a nice crunch. Preheat your oven to 350°F (175°C). Line your muffin pan with paper liners or spray it lightly with cooking spray. Fill each muffin cup about two-thirds full with batter. This allows room for rising. Generously sprinkle the streusel topping over each muffin. Bake your muffins for 18-22 minutes. To check for doneness, insert a toothpick into the center of a muffin. If it comes out clean, your muffins are ready. After baking, let the muffins cool in the pan for about 5 minutes. Then, transfer them to a wire rack to cool completely. Enjoy your delicious homemade pumpkin streusel muffins! For the full recipe, refer to the earlier section. To make your pumpkin streusel muffins even better, try adding spices like cloves or allspice. These will give your muffins a warm, cozy taste. If you want a bit of heat, a pinch of cayenne can add a nice kick. For pairing ideas, these muffins go great with a cup of coffee or tea. The rich flavors of pumpkin blend well with a warm drink, making it a perfect snack. Keeping your muffins moist is key to a great texture. Be careful not to overmix the batter. It’s okay if you see some lumps in the mix. Another tip is to check your oven temperature; an oven that is too hot can dry out your muffins. Also, use fresh ingredients. Old baking powder or flour can lead to dry muffins too. Always remember to fill your muffin cups about two-thirds full. This helps them rise nicely without overflowing. {{image_4}} You can make these muffins healthier without losing flavor. Start by using whole wheat flour. It adds fiber and a nutty taste. You may also try alternative sweeteners, like honey or maple syrup. They can lower the sugar content while keeping the sweetness. If you want vegan muffins, it’s easy to swap ingredients. Replace eggs with flaxseed meal or applesauce. Use almond milk instead of regular milk. These changes keep muffins moist and tasty. Enhance your muffins with fun add-ins. Chopped nuts, like walnuts or pecans, add a nice crunch. Dried fruits, like cranberries or raisins, bring a sweet surprise. You can even mix in chocolate chips for a rich twist. To enjoy seasonal flavors, try adding spices. In winter, add a pinch of cloves. For spring, include lemon zest for a fresh burst. These variations keep your muffins exciting all year round. Don't forget to check the Full Recipe for more ideas! To keep your Pumpkin Streusel Muffins fresh, store them at room temperature. Place them in an airtight container. This helps keep them moist for up to three days. You can also wrap each muffin in plastic wrap for extra protection. If you want to refrigerate them, keep them in the same airtight container. Just know that refrigeration can make them a bit dry. If you want to enjoy these muffins later, freezing is a great option. Wrap each muffin tightly in plastic wrap, then place them in a freezer-safe bag. They stay good for up to three months. When you are ready to eat them, thaw the muffins overnight in the fridge. For best results, reheat them in the oven at 350°F (175°C) for about 10 minutes. This helps bring back their soft texture. Avoid using the microwave, as it can make them rubbery after thawing. What can I substitute for pumpkin puree? You can use mashed sweet potatoes or butternut squash. Both options give a similar taste and texture. If you choose this, ensure the squash is cooked and smooth. How do I know when my muffins are done baking? Insert a toothpick into the center of a muffin. If it comes out clean, your muffins are done. You can also lightly press the top; it should spring back. Can I make mini muffins using this recipe? Yes! Just adjust the baking time. For mini muffins, bake for about 10-12 minutes. Keep an eye on them to avoid overbaking. Is it necessary to use both granulated and brown sugar? Yes, both sugars add different flavors. Granulated sugar makes muffins sweet, while brown sugar adds moisture and a hint of caramel. Can I omit the streusel topping? Yes, you can skip the streusel. Your muffins will still taste great. They will just lack that crunchy topping. What can I use instead of pecans in the topping? You can use walnuts, almonds, or even skip nuts entirely. If you want crunch, try using oats for a different texture. What to do if muffins are too dry? If your muffins turn out dry, try adding more wet ingredients next time. You can also reduce baking time slightly. How can I prevent muffins from sticking to the pan? Line the muffin pan with paper liners or spray it with cooking oil. This will help release the muffins easily after baking. In this post, I covered how to make delicious muffins. We explored essential ingredients, step-by-step mixing, and tips for perfecting your batter. I shared ways to enhance flavors and variations for healthier options. You learned how to store muffins to keep them fresh. By following these instructions, you will bake amazing muffins every time. Enjoy experimenting with flavors and sharing your tasty results with others! Happy baking!

If you’re craving a warm, cozy treat, my Pumpkin Streusel Muffins will hit the spot! With a perfect balance of pumpkin flavor and a crunchy topping, these muffins are a …

Read more

Categories Breakfast

Mexican Street Corn on the Cob Joyful Flavor Delight

August 6, 2025 by Chef Remy
To create this tasty dish, you need just a few key items. Here’s the list: - 4 fresh ears of corn, husked - 1/2 cup creamy mayonnaise - 1/2 cup crumbled cotija cheese (or feta cheese for a milder option) - 1 teaspoon chili powder - 1 lime, zested and juiced - 1/4 cup freshly chopped cilantro - Salt, to taste - Optional: 1/4 teaspoon smoked paprika for an extra depth of flavor These ingredients work together to bring out bright, bold flavors. The corn shines with its natural sweetness. The creamy mayonnaise adds richness, while cheese and spices boost the taste. You can personalize your street corn with some fun extras. Consider these options: - Add a sprinkle of garlic powder for more flavor. - Use jalapeños or hot sauce for heat. - Try different cheeses like queso fresco or parmesan. - Swap lime for lemon for a different twist. These variations let you adjust the dish to your taste. Have fun experimenting! Gather these tools to make your cooking easier: - Large pot for boiling corn - Mixing bowl for the sauce - Basting brush or spoon for coating - Serving plate for presentation Having the right tools helps make the process smooth. It’s all about enjoying the cooking experience! First, fill a large pot with water. Bring it to a rolling boil. Once boiling, carefully add the husked corn. Cook the corn for 5 to 7 minutes. You want it tender but still crisp. After cooking, take the corn out and let it cool. This makes it safe to handle. While the corn cools, grab a mixing bowl. In this bowl, add creamy mayonnaise. Then, squeeze in the lime juice and add the zest. Next, mix in the chili powder and chopped cilantro. If you like smoky flavor, add smoked paprika. Stir everything until it is smooth and creamy. Now, take the cooled corn. Use a basting brush or a spoon. Generously coat the corn with the mayo sauce. Make sure every part is covered. Next, sprinkle crumbled cotija cheese over each ear. Press lightly to help it stick. Finally, add salt to taste. For extra spice, sprinkle more chili powder. Serve the corn on sticks or on a plate. Garnish with extra cilantro and lime wedges. Enjoy! For the full recipe, check out the details above. To make great Mexican street corn, start with fresh corn. Look for ears with bright green husks. The silk should be light brown and sticky. Press the kernels with your thumb; they should feel firm and juicy. Fresh corn tastes sweeter and gives you the best flavor. Always pick corn that feels heavy for its size. Many people overcook the corn. Cook it for just 5-7 minutes. This keeps it crisp and sweet. Another mistake is not seasoning enough. Salt enhances flavor, so don’t skip it. Also, remember to coat every side with the mayo mix. This ensures a burst of flavor in every bite. Lastly, don't rush when adding cheese. Press it gently for a better stick. To make your corn even tastier, try these ideas: - Add lime zest: This gives a bright flavor. - Use smoked paprika: It adds a nice depth. - Spice it up: Add more chili powder for heat. - Try different cheeses: You can use feta for a milder taste. - Extra toppings: Consider adding diced jalapeños or hot sauce for a kick. These simple tweaks can turn your Mexican street corn into a gourmet treat. For the full recipe, refer to the earlier section. {{image_4}} You can switch up the cheese for Mexican street corn. Cotija cheese is the classic choice. It adds a nice salty bite. If you want something milder, feta cheese works well too. You can even try queso fresco for a lighter texture. Each cheese gives a unique flavor. Get creative and find your favorite! Love heat? Add some spice to your corn! A dash of cayenne pepper can kick it up. You can also mix in some chopped jalapeños for a fresh taste. Another great option is to drizzle hot sauce over the mayo mix. It adds both heat and flavor. Don't forget to sprinkle additional chili powder for that extra zing! While boiling corn is easy, there are other fun ways to cook it. Grilling gives the corn a smoky flavor. Simply husk and soak the corn before grilling for the best results. You can also roast it in the oven. Just wrap the corn in foil and bake for about 20 minutes. Both methods add a unique twist to your dish. Try them out for a new experience! For the full recipe, check out the complete guide on making Mexican Street Corn on the Cob. To keep leftover corn fresh, wrap it tightly in plastic wrap or foil. You can also place it in an airtight container. Make sure to store it in the fridge. Properly stored, it lasts for about 3 to 4 days. Reheating corn is simple. You can use a microwave for quick warmth. Place the corn on a plate, cover it with a damp paper towel, and heat for 30 to 60 seconds. If you prefer a grilled taste, place it on a grill for a few minutes. This adds a nice char and flavor. If you want to save your corn for later, freezing is a great option. First, let the corn cool completely. Wrap each ear in plastic wrap. Then, place them in a freezer-safe bag. Be sure to label the bag with the date. Frozen corn can last for about 6 months. When you're ready to use it, thaw it in the fridge overnight before reheating or cooking. Enjoy your Mexican street corn on the cob anytime with this method! For the full recipe, check out the details. Mexican street corn, or elote, comes from Mexico. Vendors sell it on street corners. The corn is grilled and covered in tasty toppings. People love it for its rich flavors. It has roots in ancient Aztec culture, where corn was a vital food. Today, you can find it at fairs and markets. Yes, you can make Mexican street corn vegetarian. The main ingredients are already plant-based. Use mayonnaise, cheese, lime, and spices. If you want a vegan version, try making a sauce with avocado or cashew cream. This keeps the flavor rich without using dairy. Mexican street corn pairs well with many dishes. Here are some ideas: - Grilled chicken or steak - Tacos with your favorite filling - A fresh green salad - Rice and beans for a filling meal - Spicy salsa to kick it up a notch Feel free to explore these options to create a fun and tasty meal. For more details on how to prepare this dish, check out the Full Recipe. Mexican street corn is a delightful dish rich in flavor and culture. We covered the key ingredients needed, how to prepare the corn, and made a tasty sauce. I shared tips for choosing the best corn and avoiding common mistakes. Explore variations, like different cheeses or spicy toppings, to customize it. Finally, I explained how to store leftovers and answered common questions. Enjoying this treat is simple and fun, perfect for any gathering. Try it, and let your taste buds savor the bold flavors!

Are you ready to savor the vibrant flavors of Mexican Street Corn on the Cob? This delicious snack bursts with joy and spice, making it a perfect treat for any …

Read more

Categories Appetizers

Grilled Steak Tacos Flavorful and Simple Recipe

August 6, 2025 by Chef Remy
- 1 lb flank steak, trimmed - 2 tablespoons extra virgin olive oil - 2 tablespoons fresh lime juice - 2 cloves garlic, finely minced - 1 teaspoon ground cumin - 1 teaspoon smoked paprika - 1 teaspoon chili powder - Sea salt and freshly ground black pepper to taste - 8 small corn tortillas - 1 cup fresh cilantro leaves, chopped - 1 cup diced onions (use white or red based on preference) - 1 ripe avocado, sliced - 1 cup pico de gallo or your favorite salsa for serving To make great grilled steak tacos, you need a few key ingredients. Start with the flank steak. It is a lean cut that cooks well on the grill. For the marinade, you will mix olive oil, lime juice, garlic, cumin, smoked paprika, and chili powder. This mix adds a lot of flavor. Don’t forget to add salt and pepper to taste. You will also need corn tortillas to hold your tasty filling. Fresh cilantro and diced onions make great toppings. Avocado adds creaminess, while pico de gallo or your favorite salsa gives a fresh kick. Using fresh and high-quality ingredients makes a big difference in your tacos. You can find many of these at your local market. If you want the full recipe, check out the detailed instructions above. Marinating the steak Start by making a flavorful marinade. In a bowl, mix 2 tablespoons of olive oil, 2 tablespoons of lime juice, 2 cloves of minced garlic, and your spices: 1 teaspoon each of cumin, smoked paprika, and chili powder. Add salt and pepper to taste. This mixture adds great taste to the steak. Next, place the flank steak in a resealable bag or shallow dish. Pour the marinade over the steak, making sure it’s well coated. Seal the bag tightly or cover the dish, then refrigerate for at least 30 minutes. If you have more time, let it marinate for up to 2 hours for even better flavor. Preheating the grill Once your steak is ready, it’s time to heat your grill. Turn it on to medium-high heat. You want it hot enough to sear the steak well. A good sear locks in juices and gives a nice crust. Grilling techniques Remove the steak from the marinade and throw away the marinade. Place the steak on the hot grill. Grill it for about 5-7 minutes on each side. Check for your preferred doneness. I suggest aiming for medium-rare for the best texture. After grilling, take the steak off the grill and let it rest for about 5 minutes. This step is key. It keeps the juices inside the meat. Assembling the tacos While the steak rests, warm your corn tortillas on the grill. Heat them for about 30 seconds on each side until they are soft and pliable. Slice the rested steak thinly against the grain. This way, each bite is tender and easy to chew. Now, grab a warm tortilla and add a few slices of steak to the center. Top with fresh cilantro, diced onions, and slices of avocado. Add a spoonful of pico de gallo or your favorite salsa to finish. Serve these tacos warm and enjoy the burst of flavors! For the full recipe, check out the detailed instructions above. Choosing the right steak cut For steak tacos, flank steak is my top choice. It’s tender and packed with flavor. You can also use skirt steak or ribeye. These cuts work well because they grill nicely and slice easily. Tips for marinating Marinating adds great taste. I recommend a mix of olive oil, lime juice, garlic, and spices. Let the steak marinate for at least 30 minutes. For more flavor, try to marinate it for up to 2 hours. This will soak in the flavors and keep the meat juicy. Achieving the desired doneness Cooking steak just right is key. I aim for medium-rare, around 130°F. Use a meat thermometer for accuracy. Grill the steak for 5-7 minutes on each side. After grilling, let it rest for 5 minutes. This helps keep the juices inside. Following these tips will help you create tasty grilled steak tacos. Check the Full Recipe for more details! {{image_4}} You can change up your grilled steak tacos with different ingredients. Here are some ideas: - Different cuts of steak: You don’t have to stick with flank steak. Try skirt steak, sirloin, or ribeye. Each cut gives a different taste and texture. Skirt steak is more beefy, while ribeye has more fat and flavor. - Vegetarian options: If you want a meat-free taco, use grilled zucchini, portobello mushrooms, or marinated tempeh. These options soak up flavor well. They make a tasty and filling meal. - Unique marinades or sauces: Spice things up with different marinades. Try adding soy sauce, honey, or chipotle for a twist. You can also make sauces like chimichurri or garlic aioli to drizzle on top. These sauces will elevate your tacos to a new level. For the full recipe, check out the instructions provided earlier. Enjoy experimenting with these variations! To keep your grilled steak tacos fresh, follow these steps: - Proper storage methods: Place leftover tacos in an airtight container. If you have extra steak, store it separately. Wrap it tightly in plastic wrap or foil. - Reheating instructions: You can reheat steak in a skillet over medium heat. Heat it for about 3-5 minutes. You may add a splash of water to keep it moist. For the tortillas, warm them briefly on the grill or in a dry pan. - Recommended shelf life: Leftover grilled steak can last in the fridge for up to 3 days. Tacos with toppings should be eaten within 1-2 days for the best taste. If you freeze the steak, it can last up to 3 months. Just remember to thaw it in the fridge before reheating. Making the most of your grilled steak tacos means less waste and more delicious meals later! For the full recipe, check out the complete steps and ingredients list. To spice up your steak tacos, add fresh chopped jalapeños or hot sauce. You can also use spicy salsa instead of pico de gallo. Another great tip is to mix in some cayenne pepper or crushed red pepper flakes into your marinade. The best toppings for grilled steak tacos include: - Chopped cilantro - Diced onions (white or red) - Sliced avocado - Pico de gallo or your favorite salsa - Crumbled queso fresco These toppings add fresh flavors and textures. Yes, a grill pan works great! Just heat it over medium-high heat. Make sure to oil the pan lightly to prevent sticking. Your steak will still get those lovely grill marks and taste fantastic. Always slice the steak against the grain. This means cutting across the fibers of the meat. This method keeps each bite tender and easy to chew. Use a meat thermometer for the best results. Aim for: - 130°F for medium-rare - 140°F for medium - 150°F for medium-well If you don’t have a thermometer, press the steak with your finger. A firm feel means it’s likely well done, while a soft feel indicates it’s rare. For a perfect grilled steak, check the Full Recipe for more tips! To make tasty steak tacos, you need the right ingredients, techniques, and tips. We explored key ingredients like flank steak, flavors from marinades, and tasty toppings. I shared quick steps for marinating, grilling, and assembling. You can use alternative cuts or even go vegetarian. Remember proper storage for leftovers to keep them fresh. With answers to your FAQs, you're ready to impress! Enjoy the process and make tasty meals you love.

If you love simple and delicious meals, you’ll enjoy grilled steak tacos. This recipe is easy and packed with flavor. You only need a few ingredients and some basic steps. …

Read more

Categories Dinner

How to Make Crockpot Meatloaf with Flavorful Tips

August 6, 2025 by Chef Remy
To start, gather these key items for your meatloaf: - 1 lb ground beef - 1/2 lb ground turkey - 1 cup seasoned breadcrumbs These ingredients form the base of your meatloaf. The ground beef gives richness, while ground turkey lightens the dish. Next, let’s add some flavor boosters: - 1/2 cup freshly grated Parmesan cheese - 1/2 cup finely chopped onion - 1/4 cup finely chopped bell pepper (red or green) - 2 cloves garlic, minced Parmesan adds a salty tang. Onions and bell peppers add sweetness and crunch. Garlic gives a warm, aromatic kick. Now, we need to bind our meatloaf and give it more taste: - 1/4 cup ketchup - 2 large eggs, lightly beaten - 2 tablespoons Worcestershire sauce - 1 teaspoon dried oregano - 1/2 teaspoon salt - 1/4 teaspoon freshly ground black pepper Ketchup and Worcestershire sauce keep the meatloaf moist. Eggs hold everything together, while dried herbs and spices enhance flavor. For the full recipe, check out the complete details to make this savory dish. Enjoy cooking! Start by mixing your meats. I use 1 lb of ground beef and 1/2 lb of ground turkey. This blend gives great taste and texture. In a large bowl, combine the meats well. Next, add 1 cup of seasoned breadcrumbs. This helps bind the loaf. Then, add 1/2 cup of freshly grated Parmesan cheese. It adds a rich flavor. Now, chop 1/2 cup of onion and 1/4 cup of bell pepper. I like to use red or green. These veggies bring moisture and taste. Lastly, add 2 cloves of minced garlic. It boosts the flavor even more. In a separate small bowl, whisk together 1/4 cup of ketchup and 2 tablespoons of Worcestershire sauce. This mix creates a tangy flavor. Then, add 1 teaspoon of dried oregano, 1/2 teaspoon of salt, and 1/4 teaspoon of black pepper. Whisk until it’s smooth. Pour this sauce over your meat mixture. It adds moisture and flavor. Mix everything gently with your hands. Be careful not to overmix. This keeps your meatloaf tender. Now it’s time to shape your meatloaf. Form the mixture into a loaf shape. Place it carefully in the crockpot. I like to brush the top with 1/2 cup of barbecue sauce. This gives a sweet and smoky finish. Cover the crockpot and cook the meatloaf. You can set it on low for 6-7 hours or high for 3-4 hours. Make sure the internal temperature reaches 160°F (70°C) to be safe. Once done, let it rest for 10 minutes. This helps it hold together when you slice it. Enjoy your savory dish! Check out the Full Recipe for more details. - Avoiding overmixing: When you mix the meat, be gentle. Overmixing breaks down the fibers. This can lead to a tough meatloaf. Just mix until everything is combined. Your meatloaf will be soft and tasty. - Using lean meats: Lean meats help keep the meatloaf moist. I use a mix of ground beef and turkey. This combo adds flavor while keeping the dish light. You can also experiment with different lean meats for a unique taste. - Monitoring internal temperature: Always check the internal temperature. It should reach 160°F (70°C) for safety. Use a meat thermometer for best results. This ensures your meatloaf is cooked through without drying out. - Cooking time variations: Cooking time can change based on your crockpot. If you set it on low, it can take 6-7 hours. On high, it will take around 3-4 hours. Check often to avoid overcooking. - Serving suggestions: Once cooked, slice the meatloaf carefully. Arrange the slices on a platter. Serve with creamy mashed potatoes or colorful veggies. It makes a lovely meal for family or friends. - Garnishing ideas: For a fun touch, add fresh herbs. Chopped parsley or chives can brighten your dish. Drizzle extra barbecue sauce on top for added flavor. These small details make your meal pop! For the complete process, refer to the Full Recipe. {{image_4}} You can switch up the meat in your meatloaf. Using ground chicken or pork gives a lighter taste. Ground chicken keeps it lean, while pork adds a bit of sweetness. If you want a vegetarian option, try lentils or quinoa. Both pack protein and flavor! Adding different flavors can make your meatloaf shine. Try using different types of cheese, like cheddar or feta. Herbs, such as parsley or basil, can brighten the dish. For spices, add a pinch of paprika or cumin for warmth. You can also mix in sauces like sriracha or soy sauce for a kick! If you need a smaller meatloaf, cut the recipe in half. You can use just 1/2 pound of ground beef and turkey. For larger groups, double the ingredients. Make a big meatloaf and cook it the same way. Just keep an eye on the cooking time. Always check that the center reaches 160°F (70°C). For the Full Recipe, visit the main article. After cooking, let the meatloaf cool to room temperature. Wrap it tightly in plastic wrap or foil. Place it in an airtight container. This helps keep it fresh. Your meatloaf will last about 3 to 4 days in the fridge. Check for any signs of spoilage before eating. For longer storage, freeze your meatloaf. Slice it into portions for easy use. Wrap each piece in plastic wrap, then in foil. This helps prevent freezer burn. You can freeze meatloaf for up to 3 months. When ready to eat, thaw it in the fridge overnight. Reheat in the oven at 350°F (175°C) for about 20 minutes, or until warm. Make your week easier by portioning the meatloaf. Cut it into slices before storing. You can pair it with sides like mashed potatoes or green beans. This way, you have quick meals ready to go. Consider making a meatloaf sandwich for lunch. You can add lettuce, tomato, and mayonnaise for a tasty twist. Cooking meatloaf in a crockpot usually takes 6-7 hours on low. If you’re short on time, you can cook it on high for 3-4 hours. Always check the internal temp. It should reach 160°F (70°C) for safety. Yes, you can mix it up! Ground turkey, chicken, or pork work well. Each meat adds its own flavor. Just keep the ratio similar to keep it moist. Leftover meatloaf tastes great in a sandwich. Just slice it and add some ketchup or BBQ sauce. You can also heat it up with a side of mashed potatoes or veggies. It's a comforting meal! Absolutely! Use gluten-free breadcrumbs instead of regular ones. There are many brands available, so pick one you like. This way, you can enjoy meatloaf without worry. The best way to check is with a food thermometer. Insert it into the center of the meatloaf. It should read 160°F (70°C). Also, the meatloaf should be firm and not jiggly. If it looks done, check the temp to be sure! Crockpot meatloaf is simple and fun to make. You need ground meat, breadcrumbs, and some veggies. Mix them up with sauces and seasonings, then shape the loaf. Slow cooking keeps it juicy and tasty. Use lean meats and watch the cook time for the best result. You can change meats or add different flavors to suit your taste. Leftovers are easy to store or freeze, making meals quick later. Now you're ready to enjoy a delicious meatloaf anytime!

Want to make a tasty crockpot meatloaf that everyone will love? You’re in the right place! In this guide, I’ll share my best tips and secrets for creating a moist, …

Read more

Categories Dinner

Easiest Crockpot White Chicken Chili Delicious Recipe

August 6, 2025 by Chef Remy
- 1 pound boneless, skinless chicken breasts - 2 cans (15 oz each) white beans, drained and rinsed - 1 can (15 oz) corn, drained - 1 can (4 oz) diced green chiles - 1 medium onion, finely diced - 3 cloves garlic, minced - 2 cups low-sodium chicken broth - 1 teaspoon ground cumin - 1 teaspoon chili powder - ½ teaspoon smoked paprika - Salt and freshly cracked black pepper to taste - 1 cup sour cream - 1 cup shredded Monterey Jack cheese - Fresh cilantro, finely chopped, for garnish I love how simple this recipe is! You only need a few easy-to-find items. Start with one pound of boneless, skinless chicken breasts. This is the base of your chili. The chicken gets tender and juicy as it cooks. Next, use two cans of white beans. They add creaminess and protein. Make sure to drain and rinse them well. You’ll also need one can of corn. This gives a sweet crunch to your dish. Don't forget the diced green chiles! They add a mild kick and flavor. One medium onion and three cloves of garlic bring in that aromatic goodness. Now for the liquids: two cups of low-sodium chicken broth keep everything moist and flavorful. For spices, you'll need ground cumin, chili powder, and smoked paprika. These spices build the chili's rich taste. Finally, add salt and freshly cracked black pepper to your liking. To finish, stir in one cup of sour cream and one cup of shredded Monterey Jack cheese. These make your chili creamy and delicious. Garnish with fresh cilantro for that pop of color and freshness. With these ingredients, you can create a warm and comforting dish. For the complete cooking instructions, check out the Full Recipe. 1. Start by laying the chicken breasts at the bottom of your crockpot. Make sure they form a single layer. 2. Next, layer the white beans, corn, diced green chiles, onion, and garlic on top of the chicken. 3. Carefully pour in the low-sodium chicken broth. This will help cook the ingredients. 4. Now, sprinkle the ground cumin, chili powder, smoked paprika, and season with salt and pepper. Gently stir to mix, but be careful not to disturb the chicken. 1. Secure the lid on the crockpot. Choose your cooking setting: cook on low for 6-8 hours or on high for 4 hours. Cook until the chicken is tender and fully cooked. 2. When the cooking time is up, remove the chicken breasts from the pot. Use two forks to shred the chicken into bite-sized pieces. 3. Return the shredded chicken back into the pot. Stir it into the chili. 4. Add the sour cream and shredded Monterey Jack cheese. Stir until they melt and combine well into the chili. 1. Taste the chili and adjust the seasonings. Add more salt or pepper if needed. 2. Allow the chili to cook on low for an additional 10-15 minutes. This will let the flavors meld together beautifully. For the full recipe, refer to the earlier sections. Enjoy your delicious Easiest Crockpot White Chicken Chili! For the best results, I suggest cooking on low for 6-8 hours. If time is tight, cooking on high for 4 hours works too. Always taste your chili near the end of cooking. Adjust the seasoning to your liking. A pinch of salt or a dash of pepper can transform the dish. When serving, use deep bowls to hold all the creamy goodness. I love garnishing with fresh cilantro and an extra sprinkle of cheese. A slice of lime or some avocado on the side adds a nice touch. Serve with tortilla chips or warm bread for a full meal. One common mistake is overcrowding the crockpot. This can lead to uneven cooking. Always layer your ingredients properly. Place the chicken at the bottom, then add the beans and other items on top. Following this layering technique helps the flavors blend well. {{image_4}} You can make this chili your own by swapping ingredients. Use different beans, like black beans or pinto beans. They can add a new taste and texture. For proteins, try turkey or even tofu for a twist. If you want a lighter version, consider swapping sour cream with Greek yogurt. It still gives creaminess but with less fat. You can also use low-fat cheese or omit it entirely. Want to spice things up? Add diced jalapeños or some red pepper flakes. This boost can really awaken the flavors. You might also explore fresh herbs, like thyme or oregano, for a different twist. These can enhance the chili's taste and aroma. Consider adding a splash of lime juice before serving. It can brighten each bite and balance the creaminess. If you prefer a plant-based meal, you can replace chicken with chickpeas or lentils. These options are packed with protein and add heartiness. For a vegan version, you can use cashew cream in place of sour cream. Also, ensure you use dairy-free cheese. This way, you keep the creamy texture without any animal products. These swaps make the dish healthy while keeping it delicious. To store your leftover chili, let it cool first. This keeps the steam from building up in the container. Use airtight containers made of glass or BPA-free plastic. These types help keep your chili fresh. Label the containers with the date. This way, you know how long they have been stored. To reheat your chili, use the stovetop or microwave. If using the stovetop, heat it in a pot over medium heat. Stir often to prevent burning. If using the microwave, place it in a microwave-safe bowl. Heat it for 2-3 minutes, stirring halfway through. Always check that it reaches 165°F for safe eating. Your white chicken chili lasts about 3-4 days in the fridge. If you freeze it, it will last for about 3-6 months. Check for signs that it has spoiled. These signs include an off smell, discoloration, or mold. If you see any of these, it’s best to throw it away. You can store this chili in the fridge for up to four days. Make sure to keep it in an airtight container. This keeps the chili fresh and tasty. When you want to eat it again, just reheat it on the stove or in the microwave. Yes, you can use frozen chicken in this recipe. Just make sure not to thaw it first. Place the frozen chicken at the bottom of the crockpot. This helps keep the meat juicy as it cooks. Add the other ingredients on top and cook for 6 to 8 hours on low. You have many great options for sides. Here are some tasty ideas: - Cornbread - Tortilla chips - Fresh avocado slices - Lime wedges - A simple green salad These sides add color and flavor, making your meal even better. The chili is mild, but you can adjust the spice level. If you want more heat, add jalapeños or extra chili powder. Taste as you go, so you can find the right heat for you. Yes, you can make this chili ahead of time. It tastes great even after a day or two in the fridge. Just follow the cooking steps, let it cool, and store it. When you’re ready, simply reheat it and enjoy. For a big meal prep, you can also freeze it, and it holds its flavor well. Check out the Full Recipe for more details on making it ahead! This blog covered the ingredients, steps, and tips for making white chicken chili. You learned how to layer the ingredients in a crockpot and adjust seasonings. We also discussed storage tips and how to reheat the chili properly. In the end, this dish offers comfort and can be customized to your taste. Enjoy making this chili with friends or family for warm gatherings. Don’t forget to share your tasty results!

Are you ready for a warm, hearty meal that practically makes itself? This Easiest Crockpot White Chicken Chili is a crowd-pleaser and comfort food at its best. With just a …

Read more

Categories Dinner

Vegan Pumpkin Spice Cake Perfectly Cozy Fall Treat

August 6, 2025 by Chef Remy
To make your vegan pumpkin spice cake, gather these ingredients: - 1 ½ cups all-purpose flour - 1 cup canned pumpkin puree - ¾ cup coconut sugar - ½ cup almond milk (or any preferred plant-based milk) - ¼ cup vegetable oil (or melted coconut oil for a richer flavor) - 1 teaspoon vanilla extract - 1 teaspoon baking powder - 1 teaspoon baking soda - 2 teaspoons pumpkin pie spice (or a mix of cinnamon, nutmeg, and ginger) - ½ teaspoon salt - ½ cup chopped walnuts or pecans (optional for added crunch) - Optional Frosting: 1 cup powdered sugar, 2 tablespoons maple syrup, 1 tablespoon almond milk You can change this recipe to match your taste. Here are some ideas: - Add chocolate chips for a sweet twist. - Use different nuts like almonds or hazelnuts. - Swap in a different milk, like oat or soy. - Try adding dried fruit, like cranberries or raisins. If you have allergies, here are some easy swaps: - Use gluten-free flour if you need a gluten-free option. - Replace almond milk with oat or soy milk for nut allergies. - Use applesauce instead of oil for lower fat. - Substitute coconut sugar with brown sugar for a similar taste. These options help you make a cake that fits your needs. Get creative! You can make this vegan pumpkin spice cake your own. If you want to see the full recipe, check out the details above. Start by preheating your oven to 350°F (175°C). This step is crucial for a perfect bake. While the oven heats, prepare your 8-inch round cake pan. Grease it well and dust it with flour. You can also line the bottom with parchment paper. This makes it easier to remove the cake later. In a medium bowl, whisk together your dry ingredients. Combine 1 ½ cups of all-purpose flour, 1 teaspoon of baking powder, 1 teaspoon of baking soda, 2 teaspoons of pumpkin pie spice, and ½ teaspoon of salt. Mix these well to ensure they blend evenly. This mix gives your cake its warm spice flavor. In a larger bowl, add the wet ingredients. Start with 1 cup of canned pumpkin puree. Next, add ¾ cup of coconut sugar, ½ cup of almond milk, ¼ cup of vegetable oil, and 1 teaspoon of vanilla extract. Stir this mixture until smooth. A well-mixed base is key to a fluffy cake. Now, combine the dry and wet mixes. Gradually add the dry ingredients to the wet mixture. Use a spatula to gently stir until just combined. Be careful not to overmix. This step helps keep your cake light and airy. Pour the batter into your prepared pan. Smooth the top with a spatula. Place it in the preheated oven and bake for 25-30 minutes. To check if it's done, insert a toothpick into the center. It should come out clean or with a few moist crumbs. Once baked, take the cake out and let it cool for about 10 minutes in the pan. After that, transfer it to a wire rack to cool completely. If you want to frost it, mix 1 cup of powdered sugar, 2 tablespoons of maple syrup, and 1 tablespoon of almond milk in a small bowl. Drizzle this frosting over the top of your cooled cake. Enjoy your cozy fall treat! To keep your vegan pumpkin spice cake moist, use canned pumpkin puree. It adds richness and helps lock in moisture. Don't overmix the batter; mix just until combined. This keeps the cake light and fluffy. Also, avoid opening the oven door while baking. This prevents temperature drops that can affect the cake's rise. When mixing your cake, start with the dry ingredients. Whisk them together to ensure even flavor. Next, mix the wet ingredients in a separate bowl. Combine them slowly, adding dry to wet. Use a spatula to fold, not stir. This gentle method helps avoid a tough texture. Preheat your oven to 350°F (175°C) to ensure even baking. Grease your cake pan well or use parchment paper for easy removal. Always check for doneness by inserting a toothpick. If it comes out clean, your cake is ready. Let the cake cool for at least 10 minutes before transferring it to a wire rack. This step helps it set and prevents breakage. These tips will help you create a delicious and moist vegan pumpkin spice cake. For the complete recipe, check out the Full Recipe. {{image_4}} To make a gluten-free version, swap all-purpose flour for a gluten-free blend. Look for one that works well in baking. A mix of almond flour and coconut flour can add great texture. Use the same amounts as listed in the full recipe. This change will give you a tasty cake without gluten. You can add different spices for unique flavors. Try adding a pinch of cardamom or allspice for warmth. A teaspoon of orange zest can brighten the cake. If you want a richer taste, add a tablespoon of maple syrup to the wet mix. For chocolate lovers, fold in some dairy-free chocolate chips. They pair well with pumpkin spice. For frosting, keep it simple or get creative. A basic maple glaze works well. Just mix powdered sugar, maple syrup, and almond milk until smooth. For a creamier option, try vegan cream cheese frosting. Just blend vegan cream cheese with powdered sugar and vanilla. If you like a chocolate touch, add cocoa powder to your frosting. To keep your vegan pumpkin spice cake fresh, store it in an airtight container. This helps lock in moisture and flavor. You can place it at room temperature for up to three days. If you want to keep it longer, move it to the fridge. In the fridge, it can last up to a week. Just remember to let it come to room temperature before serving for the best taste. Freezing the cake is a great way to save it for later! First, let the cake cool completely. Then, slice it into pieces if you prefer. Wrap each piece in plastic wrap. After that, place them in a freezer-safe bag or container. This way, you can enjoy a slice whenever you crave it. The cake can stay fresh in the freezer for up to three months. When you're ready to enjoy your frozen cake, take it out of the freezer. Let it thaw in the fridge overnight, or you can leave it on the counter for a few hours. To reheat, you can use the microwave. Heat it for about 20-30 seconds until warm. If you prefer a crispier texture, pop it in the oven at 350°F (175°C) for about 10 minutes. Enjoy your cozy cake warm, paired with a hot drink! Yes, you can use fresh pumpkin! Just roast or steam it first. After cooking, mash the pumpkin until smooth. Use the same amount as canned pumpkin puree in the recipe. Fresh pumpkin gives a vibrant taste. No, this recipe is not nut-free. It uses almond milk and optional nuts. To make it nut-free, you can swap almond milk for oat or soy milk. Leave out the nuts too. This way, everyone can enjoy it. To make this cake sugar-free, replace coconut sugar with a sugar-free sweetener. You can use stevia or erythritol. Adjust the amount based on the sweetener's strength. Just remember to check the conversion ratio for best results. This cake pairs well with many treats. You can serve it with vegan whipped cream or a scoop of dairy-free ice cream. A hot cup of spiced tea or coffee also complements the flavors perfectly. The cake lasts about 3-4 days when stored properly. Keep it in an airtight container at room temperature. If you want it to last longer, freeze it. Wrap it well and store it in the freezer for up to three months. For a sweet treat, enjoy your Vegan Pumpkin Spice Cake with friends and family! This blog post covered how to make a delicious vegan pumpkin spice cake. You learned about the key ingredients, step-by-step instructions, and tips to ensure your cake is moist and flavorful. We also explored variations and storage methods. Baking can be fun and rewarding. Use these guidelines to create your special cake. Enjoy every bite and share it with others. Happy baking!

Get ready to embrace fall with a warm slice of Vegan Pumpkin Spice Cake! This cozy treat is not only delicious but also easy to make. I’ll guide you through …

Read more

Categories Desserts

Chewy Maple Pumpkin Cookies Easy and Flavorful Treat

August 6, 2025 by Chef Remy
To make chewy maple pumpkin cookies, gather these ingredients: - 1 cup pumpkin puree (canned or homemade) - 1/2 cup unsalted butter, softened to room temperature - 1/2 cup packed brown sugar - 1/4 cup granulated sugar - 1/4 cup pure maple syrup - 1 large egg, at room temperature - 1 teaspoon vanilla extract - 2 cups all-purpose flour - 1 teaspoon baking soda - 1 teaspoon baking powder - 1 teaspoon ground cinnamon - 1/2 teaspoon ground nutmeg - 1/2 teaspoon ground ginger - 1/2 teaspoon salt - 1/2 cup chocolate chips (optional) - 1/2 cup chopped pecans or walnuts (optional) Choosing the right ingredients is key. Use fresh pumpkin puree for a richer taste. Opt for pure maple syrup, not imitation. This syrup adds depth and flavor. Use high-quality butter for a creamy texture. Fresh spices give your cookies a warm aroma and taste. For nuts and chocolate, select options that are fresh and flavorful. You can easily swap some ingredients based on what you have. For example: - Use coconut oil instead of butter for a dairy-free option. - Substitute brown sugar with coconut sugar for a lower glycemic index. - Try almond flour or gluten-free flour blends for a gluten-free version. - If you don't have pumpkin, mashed banana or applesauce can work. - Leave out the chocolate chips or nuts if you prefer a simpler cookie. These substitutions keep the spirit of the cookies while letting you customize them to your taste. For the full recipe, check it out. 1. Preheat your oven to 350°F (175°C). This will help cookies bake evenly. 2. Line a baking sheet with parchment paper. This keeps the cookies from sticking. 3. In a large bowl, cream together the softened butter, brown sugar, and granulated sugar. Use a hand mixer or stand mixer. Mix until smooth and fluffy, about 2-3 minutes. 4. Add the pumpkin puree, pure maple syrup, egg, and vanilla extract to the bowl. Beat until combined and smooth. 5. In a separate bowl, whisk together the all-purpose flour, baking soda, baking powder, ground cinnamon, ground nutmeg, ground ginger, and salt. This ensures even flavor throughout. 6. Gradually add the dry ingredients to the wet mixture. Stir gently until just combined. It's okay if there are lumps; this keeps the cookies chewy. 7. If you want, fold in chocolate chips and nuts for extra flavor and crunch. This step adds great texture. 8. Use a cookie scoop or tablespoon to drop dough mounds onto the baking sheet. Leave about 2 inches of space between each mound. 9. Bake in the preheated oven for 12-15 minutes. The edges should be firm, while the tops remain soft and slightly cracked. 10. Remember, the cookies will continue to bake after you take them out. 11. Let the cookies cool on the baking sheet for about 5 minutes. Then, transfer them to a wire rack to cool completely. 12. Store the cookies in an airtight container. They will stay fresh for up to a week. For longer storage, check the Full Recipe for freezing tips. To get chewy cookies, you need the right balance of wet and dry ingredients. Here are my tips: - Use more pumpkin puree. This keeps the cookies moist. - Don't overmix the dough. Mix until just combined for a softer bite. - Chill the dough. Letting it sit in the fridge for 30 minutes helps the flavors blend and improves texture. - Bake until just set. Pull them out when they are slightly underbaked. They will firm up as they cool. Want to make your cookies even better? Here’s how: - Add chocolate chips. They melt and add a rich flavor. - Use chopped nuts. Walnuts or pecans add a nice crunch. - Try spices. A pinch of allspice or cloves gives extra warmth and depth. - Drizzle with maple syrup. It adds sweetness and a lovely shine. Baking can be tricky. Here are common mistakes to steer clear of: - Not measuring ingredients accurately. Use a scale or measuring cups for best results. - Ignoring oven temperature. Always preheat your oven to ensure even baking. - Overbaking the cookies. Check them a few minutes early to keep them soft. - Skipping parchment paper. This helps prevent sticking and burning. These tips will help you create the best chewy maple pumpkin cookies. For the full recipe, check out the detailed instructions provided! {{image_4}} You can make gluten-free chewy maple pumpkin cookies easily. Just swap the all-purpose flour with a gluten-free blend. Look for a blend that includes xanthan gum. This helps bind the cookies, giving them the right texture. You may need to adjust the baking time slightly, so keep an eye on them while they bake. For a vegan take, replace the butter with coconut oil or a vegan butter substitute. Use a flax egg instead of a regular egg by mixing one tablespoon of ground flaxseed with three tablespoons of water. Let it sit for five minutes to thicken. This keeps the cookies soft and chewy without dairy. You can add fun flavors to your cookies. Try mixing in dried cranberries for a tart twist. Chopped pecans or walnuts add crunch and richness. Add spices like allspice or cloves for warmth. These small changes can give your cookies a unique touch, making them perfect for fall gatherings. The full recipe allows you to explore these variations and create something special. Enjoy experimenting! To keep your chewy maple pumpkin cookies fresh, store them in an airtight container. Line the bottom with parchment paper to absorb moisture. This helps maintain the chewy texture. Place a piece of bread in the container. The bread will keep the cookies soft for longer. Store them at room temperature for up to one week. If you want to keep them longer, consider freezing. Freezing cookies is easy and effective. First, allow the cookies to cool completely. Then, place them in a single layer on a baking sheet. Freeze them for about two hours. Once frozen, transfer the cookies to a freezer-safe bag. Seal the bag tightly, removing as much air as possible. Label the bag with the date. You can freeze them for up to three months. When you’re ready, thaw them at room temperature. To enjoy your cookies warm, reheat them in the oven. Preheat your oven to 350°F (175°C). Place the cookies on a baking sheet lined with parchment paper. Heat for about 5-10 minutes. Keep an eye on them to avoid overbaking. You can also microwave them for about 10-15 seconds. This will make them warm and soft, just like fresh-baked cookies. Enjoy them with a cup of tea or coffee! You will know the cookies are done when the edges look firm. The tops will also be slightly cracked but still soft. The cookies continue to cook a little after you take them out. Let them cool on the baking sheet for five minutes. This will help them firm up and keep that chewy texture. Yes, you can use fresh pumpkin. Just make sure to cook and puree it first. Drain any excess water to keep the dough from being too wet. Fresh pumpkin has a great flavor. It can make your cookies taste even better! These cookies are great on their own but pairing them with warm drinks is perfect. Serve them with hot cocoa, coffee, or spiced chai. You can also add a small bowl of maple syrup for extra sweetness. This makes a cozy treat that everyone will love. Check out the Full Recipe for more serving ideas! You learned how to make chewy maple pumpkin cookies. We covered key ingredients, steps, and tips to get them just right. Remember to choose high-quality ingredients for the best flavor. Experiment with different variations to suit your tastes. Store cookies properly to keep them fresh and tasty. With practice, you’ll avoid common mistakes and create delightful treats. Enjoy sharing these cookies with friends and family. They will love your baking skills!

If you’re craving a sweet treat that captures autumn’s essence, you’ve found it! These chewy maple pumpkin cookies are easy to make and bursting with flavor. I’ll guide you through …

Read more

Categories Desserts

Irresistible Apple Butter Cheesecake Delight Recipe

August 6, 2025 by Chef Remy
- 1 ½ cups graham cracker crumbs - ½ cup unsalted butter, melted - 1 tablespoon brown sugar - 3 (8-ounce) packages cream cheese, softened at room temperature - 1 cup granulated sugar - 3 large eggs, at room temperature - 1 cup apple butter - 1 teaspoon vanilla extract - 1 teaspoon ground cinnamon - ¼ teaspoon ground nutmeg - 2 tablespoons all-purpose flour To create the best apple butter cheesecake, you need fresh ingredients. Start with graham cracker crumbs for a tasty crust. Melt the unsalted butter and mix in brown sugar to add sweetness. Cream cheese gives the cheesecake its rich flavor. Use eggs at room temperature for a smooth batter. The star here is apple butter, which brings in a fruity twist. Add vanilla extract for a warm note, and ground cinnamon and nutmeg for spice. Finally, a little all-purpose flour helps bind everything together. With these ingredients, you will craft a delightful dessert. For the full process to make this cheesecake, check out the Full Recipe. 1. Preheat the oven to 325°F (160°C). This step warms the oven for even baking. 2. Prepare a 9-inch springform pan. Lightly grease it or line the bottom with parchment paper. 3. Mix the crust ingredients. In a medium bowl, combine: - 1 ½ cups graham cracker crumbs - ½ cup unsalted butter, melted - 1 tablespoon brown sugar 4. Stir until it looks like wet sand. The crumbs should be moistened. 5. Press the mixture into the pan. Create a compact layer at the bottom. 6. Bake the crust for 10 minutes. Remove it from the oven and let it cool. 1. Beat the cream cheese. In a large bowl, use an electric mixer to beat: - 3 (8-ounce) packages cream cheese, softened Beat on medium speed until smooth, about 2-3 minutes. 2. Add the sugars. Gradually mix in: - 1 cup granulated sugar Continue to beat until smooth. 3. Add the eggs. Mix in: - 3 large eggs, one at a time Use low speed after each addition. This keeps the cheesecake light. 4. Incorporate the apple butter and spices. Gently fold in: - 1 cup apple butter - 1 teaspoon vanilla extract - 1 teaspoon ground cinnamon - ¼ teaspoon ground nutmeg - 2 tablespoons all-purpose flour Mix until just combined. 1. Pour the filling over the crust. Use a spatula to smooth the top evenly. 2. Bake for 50-60 minutes. Look for edges set and a slight jiggle in the center. 3. Cool in the oven. Turn off the oven and leave the cheesecake inside for an hour. This helps prevent cracks. 4. Remove and cool to room temperature. After that, chill in the refrigerator for at least 4 hours or overnight. For the full recipe, check out the section above. Enjoy making this delightful dessert! To make your cheesecake light and fluffy, use room temperature cream cheese. It mixes easier and creates a smooth batter. When you mix, start at a low speed. This helps to blend without adding too much air. Add the sugar slowly to the cream cheese. This keeps the texture creamy. Be careful not to overmix once you add the eggs. Mix just enough to combine. Overmixing can make your cheesecake dense. You want it to be airy and soft. For a lovely presentation, slice your cheesecake neatly. Serve each slice with a dollop of whipped cream. Sprinkle a little cinnamon on top for extra flavor. Thin slices of fresh apple also make great garnishes. They add color and a crunchy texture. You can also drizzle caramel sauce on each slice. This adds a sweet touch that pairs well with apple butter. If you like nuts, sprinkle chopped pecans or walnuts for added crunch and flavor. To avoid cracks in your cheesecake, do not open the oven door while it bakes. The sudden change in temperature can cause cracks. After baking, let the cheesecake cool in the oven. This helps it set and reduces cracking. Always check that your ingredients are at room temperature. Cold eggs or cream cheese can lead to lumps. Lumps make it hard to get a smooth filling. So, plan ahead and take them out early. For more details on making this delicious dessert, check out the Full Recipe for Apple Butter Cheesecake. {{image_4}} You can switch things up with flavor. Try adding other fruit butters like peach or pumpkin. You can also sprinkle in spices like ginger or cloves for a fun twist. If you want a different crust, swap graham crackers for crushed cookies or nuts. A chocolate cookie crust adds a nice touch. For those who need gluten-free options, use gluten-free graham crackers or almond flour. You can also make this cheesecake vegan! Replace cream cheese with cashew cream or a vegan cream cheese. Use flax eggs instead of regular eggs. This way, everyone can enjoy it. This cheesecake shines during holidays. Add festive spices like nutmeg or allspice for a cozy taste. For Thanksgiving, top it with caramel sauce and pecans. You can also use seasonal fruits. Fresh cranberries or pomegranate seeds make great toppings. These changes keep the recipe fun and fresh all year! To keep your cheesecake fresh, store it in the fridge. Wrap it tightly in plastic wrap or place it in an airtight container. This will help maintain its flavor and texture. If stored correctly, your cheesecake lasts about 5 to 7 days in the fridge. If you want to save some cheesecake for later, freezing is a great option. First, let the cheesecake cool completely. Then, slice it into individual pieces. Wrap each slice in plastic wrap and place them in a freezer-safe bag or container. This way, they stay fresh for up to three months. When you're ready to enjoy a slice, take it out and thaw it in the fridge overnight. For a quick option, you can thaw it at room temperature for about 1 to 2 hours. Leftover cheesecake can be fun to use in other treats! You can crumble it over ice cream for a tasty sundae. Or, mix it into a smoothie for a creamy twist. You can also layer it with fruit and granola for a delicious parfait. The options are endless! Get creative and enjoy every last bite of your apple butter cheesecake. For the full recipe, check out the full recipe link. Apple butter is a smooth spread made from cooked apples. It has a rich flavor and sweet notes. You can use apple butter in many recipes. It adds depth to baked goods, like muffins and breads. You can also swirl it into yogurt or oatmeal. It works great in sauces or marinades, too. Its versatility makes it a fun ingredient in both sweet and savory dishes. Yes, you can make apple butter cheesecake ahead of time. This makes it perfect for parties or gatherings. Prepare the cheesecake a day before serving. Chill it in the fridge overnight. This helps the flavors blend well. Just remember to cover it tightly to keep it fresh. You can also make the crust and filling separately. Then combine them just before baking. This saves time and effort on busy days. Apple butter cheesecake pairs well with many side dishes and drinks. Here are some great options: - Fresh whipped cream for a creamy touch. - Thin apple slices for a crunchy contrast. - Caramel sauce for added sweetness. - A scoop of vanilla ice cream for a classic combo. - Hot coffee or spiced cider to enhance the flavors. These sides will make your dessert even more delightful. You can find the Full Recipe for this tasty treat and more tips on serving. You now know how to make a delicious apple butter cheesecake. We covered the key ingredients, step-by-step instructions, and helpful tips for the best texture. Remember to avoid common mistakes like overmixing and check ingredient temperatures. You can also try different flavors, dietary needs, and festive touches to make it your own. Store any leftovers with care and enjoy them in new ways. This cheesecake will impress at any gathering and satisfy every sweet tooth. Enjoy your baking adventure!

Craving a dessert that combines cozy fall flavors with creamy decadence? Let me introduce you to my Irresistible Apple Butter Cheesecake Delight Recipe! This cheesecake is rich and smooth, packed …

Read more

Categories Desserts

Creamy Corn Dip Irresistible Crowd-Pleaser Recipe

November 13, 2025August 4, 2025 by Chef Remy
- Sweet corn: You can use fresh, frozen, or canned corn. Each has its own charm. Fresh corn brings a sweet crunch. Frozen corn is easy and retains flavor. Canned corn is quick and ready to use. Choose what you like best! - Cream cheese: Use one cup of cream cheese. Make sure it is softened. This helps it blend easily. Cream cheese gives a rich, creamy base. - Sour cream: Add half a cup of sour cream. This adds tang and creaminess. It balances the flavors well. - Cheddar cheese: Use one cup of shredded cheddar cheese. Sharp cheddar adds depth. You can also try Monterey Jack for a milder taste. - Garlic powder: One teaspoon of garlic powder adds a strong flavor. It makes the dip more savory. - Smoked paprika: One teaspoon of smoked paprika gives a subtle smokiness. This adds complexity to the dip. - Seasoning: Use salt and pepper to taste. Seasoning is key for great flavor. Always taste and adjust as needed. - Optional heat: For extra spice, add a pinch of cayenne pepper or diced jalapeños. This is great if you like a kick. Adjust the heat to your liking. These ingredients combine to create a creamy, flavorful dip that everyone will love. {{ingredient_image_2}} Start by placing the cream cheese and sour cream in a large bowl. Make sure the cream cheese is soft. This helps it blend easily. Using a hand mixer or a whisk, mix until smooth and creamy. The goal is a nice, even texture. This creamy base is key to a great dip. Now, gently fold in the shredded cheddar cheese. Use a spatula to mix it but be careful not to overmix. You want the cheese spread throughout the dip. Next, add the sweet corn, diced red bell pepper, and chopped green onions. Again, fold these in slowly. Make sure they are mixed well without breaking them down. After mixing in all the ingredients, sprinkle in the garlic powder, smoked paprika, salt, and pepper. Stir until everything is combined. Taste the dip and adjust the flavors as you like. If you want some heat, add a pinch of cayenne pepper or some chopped jalapeños. Once you're happy with the taste, transfer the dip to a serving bowl. Cover it with plastic wrap and chill in the fridge for at least 30 minutes. This chilling time helps the flavors blend together nicely. Serve with crunchy tortilla chips or fresh veggie sticks for dipping. To avoid lumps in your dip, make sure your cream cheese is soft. Let it sit at room temperature for about 30 minutes before mixing. You can use a hand mixer or whisk to blend the cream cheese and sour cream until smooth. If you find lumps, keep mixing until it is fully combined. For a creamier dip, try adding an extra 1/4 cup of sour cream. You can also use full-fat cream cheese for a richer texture. If you want a touch of tanginess, consider adding a splash of lemon juice. You can prepare this dip a day in advance. Just follow the recipe and chill it in the fridge. This allows the flavors to blend well. When you are ready to serve, take it out of the fridge about 15 minutes before. This way, it will be easier to scoop. Store any leftover dip in an airtight container. It will last about three to four days in the fridge. If you want to keep it longer, you can freeze it. Just make sure to use a freezer-safe container. This dip pairs perfectly with tortilla chips, but don’t stop there! Fresh vegetable sticks like carrots or celery work great too. You can also use pita chips for a different crunch. For a fun presentation, serve it in a colorful bowl. Garnish the top with extra green onions or whole corn kernels for added flair. A sprinkle of smoked paprika can also enhance the look and flavor. Pro Tips Use Fresh Corn: For the best flavor, opt for fresh sweet corn when in season. It adds a delightful crunch and sweetness to the dip. Chill for Flavor: Allowing the dip to chill for at least 30 minutes enhances the flavors. The longer it sits, the better the taste! Customize Your Cheese: Experiment with different types of cheese, like pepper jack or mozzarella, to create unique flavor combinations. Add a Zesty Kick: For those who enjoy heat, mix in diced jalapeños or a splash of hot sauce to elevate the flavor profile. {{image_4}} You can spice up your corn dip easily. Adding jalapeños gives it a nice kick. Just chop them fine and mix them in. You can also use other peppers, like serrano or poblano, for a unique twist. If you want more heat, add a few dashes of hot sauce. This can really make the dip sing! If you want a lighter dip, swap sour cream for Greek yogurt. It gives a creamy texture with fewer calories. You can also choose lower-fat cheese options. Look for reduced-fat cheddar or even a mix of other cheeses. This way, you keep the flavor but cut down on fat. Don’t be afraid to get creative! Adding fresh herbs can change the game. Try mixing in cilantro or parsley for a fresh taste. You can also toss in diced tomatoes for extra color and flavor. These additions can make your dip stand out and surprise your guests. For short-term storage, keep your creamy corn dip in the fridge. Use an airtight container to keep it fresh. Make sure to cover it well to avoid any odors from other foods. This dip will stay good for about 3 to 5 days in the fridge. Always check for any changes in smell or texture before serving. You can freeze creamy corn dip if you have leftovers. To freeze, place the dip in a freezer-safe container. Leave some space at the top for expansion. When you are ready to use it, thaw it overnight in the fridge. The texture may change a bit after freezing, becoming less creamy. Stir it well after thawing to help restore its consistency. To avoid waste, use leftover dip in different ways. Spread it on a sandwich for a tasty twist. Mix it into scrambled eggs for a creamy breakfast. You can even use it as a topping for baked potatoes. Be creative! There are many ways to repurpose your creamy corn dip and reduce waste in the kitchen. Creamy corn dip lasts up to five days in the fridge. Store it in a sealed container to keep it fresh. Always check for any signs of spoilage before eating. If it smells off or looks strange, it’s best to toss it. Keeping food safety in mind is key for enjoying your dip. Yes, you can make creamy corn dip without cream cheese. Use silken tofu or a dairy-free cream cheese instead. These options maintain a creamy texture and flavor. They work well in this recipe, keeping it smooth and tasty. This makes the dip suitable for those with dairy allergies or for those who prefer a vegan option. Absolutely! Using frozen corn in creamy corn dip is a great choice. Frozen corn retains its sweetness and crunch. It also saves time since you won't need to cook it first. Just let it thaw and drain any excess water before mixing. This makes your dip quick and easy to prepare, while still delicious! This blog post covered the key ingredients, preparation steps, and tips for a creamy corn dip. You learned how to achieve the best texture and flavor while keeping it fresh. Remember to customize with spices and toppings that suit your taste. Make it ahead for easy serving and enjoy it with your favorite snacks. Whether you stick to the classic recipe or try new variations, this creamy corn dip is sure to impress at any gathering. Dive in and make your next snack a hit!

Looking for a dip that will wow your guests? This Creamy Corn Dip is an easy crowd-pleaser that combines sweet corn, creamy cheese, and bold spices. Perfect for parties, game …

Read more

Categories Appetizers
Older posts
Newer posts
← Previous Page1 … Page51 Page52 Page53 … Page130 Next →

ROASTED RECIPES

Where bold flavors meet everyday meals. Warm, vibrant, and made to share. 🔥🥗🍴

PAGES

Home About Contact Privacy Policy Terms & Conditions Cookie Policy GDPR Policy Copyright Policy Disclaimer

CATEGORIES

Appetizers Desserts Salads Breakfast Dinner

Contact

  • Pinterest
  • Mail
Copyright © 2025 Roasted Flavors. All rights reserved.