Skip to content
Roasted Flavors
  • Home
  • Appetizers
  • Desserts
  • Salads
  • Breakfast
  • Dinner
  • Privacy Policy
  • Contact
  • About

Chef Remy

Air Fryer Garlic Butter Steak Bites Tasty and Quick Meal

November 3, 2025 by Chef Remy
- 1 lb sirloin steak, cut into 1-inch cubes - 3 tablespoons unsalted butter, melted - 4 cloves garlic, finely minced - 1 teaspoon fresh rosemary, finely chopped - 1 teaspoon fresh thyme, finely chopped - Salt and freshly cracked black pepper, to taste - 2 tablespoons olive oil - 1 tablespoon Worcestershire sauce To make Air Fryer Garlic Butter Steak Bites, you need fresh and quality ingredients. First, I use sirloin steak. Cut it into 1-inch cubes for even cooking. The steak provides a nice flavor and tenderness. Next, I add unsalted butter. Melt it and mix in minced garlic. This combo gives a rich and savory taste. Fresh herbs like rosemary and thyme add depth. I chop them finely for better flavor release. Seasoning is key! I use salt and cracked black pepper. Adjust to your taste. I also add Worcestershire sauce for a unique kick. It brings everything together and enhances the meat's flavor. Lastly, I add olive oil. It helps keep the steak bites from sticking in the air fryer. With these ingredients, you are ready to create a tasty and quick meal! Start by melting 3 tablespoons of unsalted butter in a bowl. Add 4 finely minced cloves of garlic. Next, mix in 1 teaspoon of finely chopped fresh rosemary and 1 teaspoon of finely chopped fresh thyme. Stir everything well. You want a fragrant blend that's rich and flavorful. This garlic butter will coat your steak bites perfectly. Take 1 pound of sirloin steak, cut into 1-inch cubes. Add the steak to the bowl with garlic butter. Season with salt and freshly cracked black pepper to taste. Pour in 1 tablespoon of Worcestershire sauce. Gently toss the steak until each piece is fully coated in the garlic butter mixture. Let it sit for a few minutes to soak up the flavors. Preheat your air fryer to 400°F (200°C) for about 5 minutes. This step ensures even cooking. While it heats, lightly spray or brush the air fryer basket with 2 tablespoons of olive oil. This helps prevent sticking. Place the marinated steak bites in a single layer in the basket. Do not overcrowd them; this allows hot air to circulate freely. Air fry the steak bites for 8-10 minutes, shaking the basket halfway through. This promotes even browning. Aim for medium-rare to medium doneness. After cooking, let them rest for a few minutes. Drizzle any leftover garlic butter over the steak bites before serving. Enjoy the tender, flavorful bites! To get the best flavor, aim for medium-rare to medium doneness. This gives you juicy, tender bites. Cook the steak bites for about 8-10 minutes in the air fryer. Check them halfway through to see how they’re doing. If you like your steak more done, add a minute or two. Using a meat thermometer can help. Aim for around 130°F (54°C) for medium-rare and 140°F (60°C) for medium. To keep your steak bites from sticking, use olive oil. Lightly spray or brush the air fryer basket with it before adding the meat. You can also use parchment paper that’s safe for air fryers. This makes cleanup easier and keeps your bites intact. Resting the steak bites is key for amazing flavor. After cooking, let them sit for about 5 minutes. This time allows the juices to spread throughout the meat, making each bite more tasty. If you skip this step, the juices might run out when you cut into them. Enjoy the full flavor by taking this simple step! {{image_4}} You can change the herbs for fun flavors. Try using fresh parsley or basil. These herbs add a light taste that pairs well with steak. You could also use oregano for a Mediterranean twist. For a bolder flavor, add some dill. Each herb brings a new taste to the dish. Experiment with your favorites and see what you like best! If you enjoy spicy food, add red pepper flakes. Just a pinch can make a big difference. Mix them into the garlic butter for warmth. You can also try cayenne pepper for a stronger kick. This extra heat will balance well with the rich butter and garlic. Adjust the amount to suit your taste. Serve your steak bites with tasty sides. Crispy roasted veggies or a fresh salad work great. You can also pair them with mashed potatoes for comfort. For dipping, try a creamy garlic sauce or a spicy aioli. Using toothpicks makes these bites easy to share. Presentation matters, so garnish with herbs for a nice touch! To keep your steak bites fresh, store them in an airtight container. This helps prevent moisture loss and keeps them tasty. Place the container in your fridge. They will stay good for about 3 days. If you want to keep them longer, consider freezing. To reheat your steak bites, use the air fryer for the best results. Preheat the air fryer to 350°F (175°C). Place the steak bites in the basket and heat for about 5 minutes. This keeps them juicy and warm. You can also use a microwave, but they may lose some crispness. Yes, you can freeze steak bites! After cooking, let them cool completely. Then, place them in a freezer-safe bag. Squeeze out the air and seal it tightly. They can last up to 3 months in the freezer. When ready to eat, thaw them overnight in the fridge and reheat as mentioned above. To make steak bites tender, start with the right cut of meat. Sirloin is a great choice. Look for cuts with some marbling, as the fat helps keep the meat juicy. Trim any extra fat, but don’t remove all of it. Before cooking, let your steak come to room temperature. This helps it cook evenly. You can also marinate the steak. In this recipe, the garlic butter mixture adds flavor and moisture, making the bites tender. When cooking, avoid overcooking. Aim for medium-rare or medium. Use a meat thermometer for the best results. Let the steak rest after cooking. This step keeps the juices inside, making each bite more flavorful. Yes, you can use other cuts for this recipe. Ribeye, tenderloin, or flank steak are good options. - Ribeye: Rich flavor and fat, cook for 8-10 minutes. - Tenderloin: Very tender, cook for 6-8 minutes. - Flank Steak: Lean and flavorful, cook for 10-12 minutes. Adjust cooking times based on the cut and thickness of the pieces. Always check for doneness with a meat thermometer. To get the best results when air frying steak, follow these tips: - Preheat your air fryer. This ensures even cooking. - Don’t overcrowd the basket. Give the steak space for proper air flow. - Shake the basket halfway. This promotes even browning. - Use a meat thermometer. Check for your desired doneness. - Experiment with time. Adjust based on the thickness of your steak. If your steak bites stick, try using more olive oil on the basket. Always let the steak rest after cooking for the best flavor. This blog post covered how to cook delicious steak bites in an air fryer. You learned about the main ingredients, including sirloin steak, butter, and garlic. The step-by-step guide helped you prepare, marinate, and cook the steak bites to perfection. We also discussed tips to prevent sticking and variations to suit your taste. Finally, you found valuable storage and reheating advice. With these tips, you can enjoy flavorful steak bites anytime. Happy cooking!

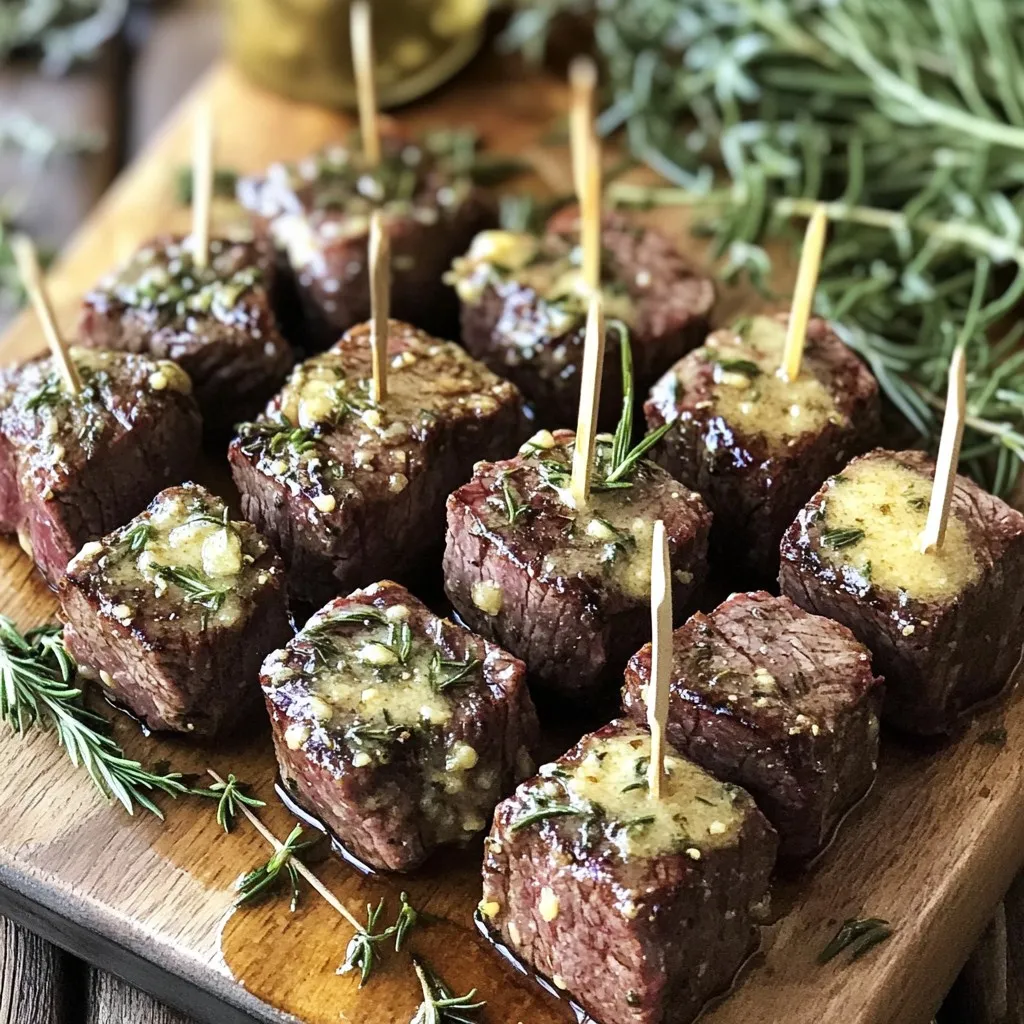
Are you craving a quick, tasty meal that’s packed with flavor? Look no further than these Air Fryer Garlic Butter Steak Bites! With tender sirloin steak, rich garlic butter, and …

Read more

Categories Dinner

One-Pan Creamy Lemon Herb Chicken & Rice Delight

October 29, 2025 by Chef Remy
- 4 boneless, skinless chicken thighs - 1 cup long-grain white rice - 2 cups chicken broth - 1 cup heavy cream - 1 medium onion, finely chopped - 3 cloves garlic, minced - 1 lemon (zested and juiced) - 1 teaspoon dried thyme - 1 teaspoon dried oregano - Salt and pepper to taste When I create One-Pan Creamy Lemon Herb Chicken & Rice, I focus on fresh, simple ingredients. The chicken thighs bring a juicy, tender bite. I prefer them over chicken breasts for their rich flavor. Long-grain white rice acts as the perfect base, soaking up all the creamy goodness. Chicken broth adds depth and warmth, making each bite satisfying. To elevate the dish, I use heavy cream. It gives a silky texture that pairs well with the rice. Onions and garlic add aromatic layers, creating a lovely fragrance as they cook. The lemon zest and juice brighten the dish, cutting through the creaminess with a sharp, fresh note. Herbs like thyme and oregano provide an earthy touch. They blend perfectly with the lemon, creating a balanced flavor. I always season with salt and pepper to enhance every element. This combination of ingredients truly makes this dish a delight. - Start by seasoning the chicken thighs. Use salt, pepper, and half of the lemon zest. Make sure to coat all sides well. - Next, heat olive oil in a large skillet over medium-high heat. When the oil shimmers, add the seasoned chicken. Sear each side for about 5-6 minutes until golden brown. Once done, remove the chicken and set it aside on a plate. - In the same skillet, add the finely chopped onion. Sauté it for 2-3 minutes until soft and clear. - After that, add the minced garlic. Cook it for about 1 minute. Stir until the garlic smells fragrant. - Now, stir in the long-grain white rice. Make sure the rice gets coated in the onion and garlic mix. - Toast the rice for 1-2 minutes. This step helps boost the rice's flavor. - Gradually pour in the chicken broth and heavy cream. Then, add the dried thyme, oregano, lemon juice, and the rest of the lemon zest. Mix everything well. - Place the seared chicken thighs back into the pan. Nestle them into the rice mixture. - Bring the dish to a gentle simmer. Cover the pan and lower the heat. Cook it for 20-25 minutes. This allows the rice to become tender and the chicken to cook through. - After cooking, let it sit covered for 5 minutes. This resting time helps blend the flavors. Finally, fluff the rice with a fork and sprinkle chopped parsley on top before serving. To get the best sear on your chicken, start with a hot pan. Heat the olive oil until it shimmers. This helps form a nice crust. Cook the chicken thighs for 5-6 minutes on each side. Look for a golden brown color to know they are ready. To check for doneness, use a meat thermometer. The chicken should reach 165°F (75°C). This keeps the meat safe and juicy. If you don’t have a thermometer, cut into the thickest part. The juices should run clear, not pink. You can adjust the creaminess level by how much heavy cream you use. For a lighter sauce, use less cream. If you love richness, add a bit more. Balancing flavors is key. The lemon juice adds brightness. Adjust it to your taste. If it's too tart, add a pinch of sugar to balance. Taste as you go, and find that perfect mix! For a rustic look, serve the dish straight from the pan. It feels cozy and inviting. Garnish with fresh parsley for color. Adding lemon wedges around the pan makes it pop. Pair the dish with a simple salad or crusty bread. A light white wine or sparkling water also works well. These options enhance the meal without overpowering it. {{image_4}} You can switch the chicken thighs for chicken breasts. Breasts cook faster but stay juicy if you don't overcook them. For a heartier meal, try using beef or pork. If you want to play with grains, swap long-grain white rice for brown rice. Brown rice has more fiber and a nutty taste. Just remember, brown rice takes longer to cook, so adjust your time. Adding veggies can really boost this dish. Spinach adds color and nutrients. Peas bring sweetness and texture. Toss them in during the last few minutes of cooking. Want a fresh twist? Use fresh herbs like dill or basil. They brighten the dish and add layers of flavor. Just chop them finely and stir them in at the end. For a dairy-free version, swap heavy cream with coconut milk. It will add a subtle sweetness. To keep it gluten-free, ensure your chicken broth is gluten-free. You can also use cauliflower rice instead of regular rice for a lighter dish. It cooks quickly and soaks up the flavors beautifully. To keep your One-Pan Creamy Lemon Herb Chicken & Rice fresh, store it in an airtight container. Make sure the dish cools down first. This way, it won’t steam and get soggy. You can keep it in the fridge for up to three days. If it lasts longer, you will lose some flavors and texture. If you want to save some for later, you can freeze it too. First, let it cool completely. Then, pack it in a freezer-safe container. This dish can stay good in the freezer for up to three months. When you’re ready to eat, take it out and thaw it overnight in the fridge. To reheat, use a saucepan over low heat. Add a splash of chicken broth or cream to keep it moist. Stir it gently until it’s warm throughout. Enjoy your meal just as it was made! You can store this dish in the fridge for up to 3 days. Place it in an airtight container for best results. For longer storage, freeze the dish for up to 3 months. When ready to eat, simply thaw in the fridge overnight and reheat on the stovetop. Yes, you can use boneless skinless chicken breast. However, cooking times may vary. Chicken breasts usually cook faster than thighs. Check for doneness at 165°F (75°C). The texture may also differ, as thighs stay juicier. This dish pairs well with many sides. Consider a fresh green salad or steamed vegetables. Garlic bread is a great choice too. For drinks, a chilled white wine or sparkling water with lemon works well. Absolutely! This recipe is great for meal prep. Cook it ahead and portion it out for easy lunches or dinners. Store each serving in separate containers for quick access throughout the week. Just reheat and enjoy! This blog post covered how to make One-Pan Creamy Lemon Herb Chicken & Rice. We explored the main ingredients and added flavor enhancers. You learned the step-by-step process, along with tips to perfect your dish. We shared variations, storage methods, and answered common questions. In closing, this meal is simple and tasty. It’s great for busy days or shared dinners. Enjoy trying out different flavors and ingredients to make it your own!

Are you ready for a dish that’s easy, creamy, and full of flavor? This One-Pan Creamy Lemon Herb Chicken & Rice Delight is perfect for any night. In just one …

Read more

Categories Dinner

Spicy Chili Crisp Udon Noodles Delightful Dinner Treat

October 29, 2025 by Chef Remy
- 200g udon noodles - 2 tablespoons spicy chili crisp - 2 tablespoons soy sauce - 2 cloves garlic, finely minced - 1 teaspoon fresh ginger, grated - 1 red bell pepper, thinly sliced - 1 cup baby spinach - 2 scallions, finely chopped - 1 tablespoon sesame seeds - Fresh cilantro leaves (optional) The main ingredients for Spicy Chili Crisp Udon Noodles include udon noodles, spicy chili crisp, and soy sauce. Udon noodles are thick, chewy, and perfect for soaking up flavors. The spicy chili crisp adds a kick. Soy sauce brings a salty depth that balances the heat. For aromatics and vegetables, we use garlic, ginger, red bell pepper, and baby spinach. Garlic and ginger give a fragrant base. Red bell pepper adds sweetness and color, while baby spinach offers freshness and nutrition. Finally, the garnishes of scallions, sesame seeds, and fresh cilantro elevate the dish. Scallions add a mild onion taste. Sesame seeds provide crunch. Cilantro gives a fresh finish, but it’s optional for those who may not enjoy it. Use these ingredients to create a delightful dinner that excites your taste buds! - Boiling and Draining Start by filling a large pot with water. Add salt and bring it to a boil. Once boiling, add 200g of udon noodles. Cook them for about 8-10 minutes or until they are tender. When done, drain the noodles in a colander. - Rinsing to Halt Cooking Rinse the drained noodles under cold water. This stops them from cooking further and helps prevent sticking. Set the noodles aside to drain fully. - Whisking Sauce Ingredients In a small bowl, combine 2 tablespoons of spicy chili crisp, 2 tablespoons of soy sauce, and 1 tablespoon of sesame oil. Use a whisk to mix until smooth and well combined. - Adjusting Spice Level Taste the sauce. If you want more heat, add extra chili crisp. Remember, you can always add more, but you can’t take it out! - Cooking Garlic and Ginger Heat 1 tablespoon of vegetable oil in a large pan over medium heat. Add 2 cloves of minced garlic and 1 teaspoon of grated ginger. Cook for about 30 seconds, stirring constantly. The garlic and ginger should be fragrant and golden. - Adding Bell Pepper and Spinach Toss in 1 red bell pepper, sliced thin. Cook for 2-3 minutes until it starts to soften. Then, add 1 cup of baby spinach. Stir until the spinach wilts, which takes about a minute. - Tossing Ingredients Together Add the drained udon noodles to the pan with the veggies. Pour the sauce over the noodles. Use tongs to gently toss everything until the noodles are coated. - Heating Thoroughly Continue to heat the mixture for 2-3 minutes. This ensures the noodles are hot and the flavors meld together. - Presentation Tips Remove the pan from the heat. Serve the noodles in individual bowls. Top with chopped scallions, sesame seeds, and optional fresh cilantro. This adds color and freshness. - Suggested Serving Ware Use deep, wide bowls for a great presentation. Drizzle a little extra chili crisp on top for flair. Serve with chopsticks and lime wedges for a zesty touch! - To stop noodles from sticking, rinse them after draining. - Stir noodles often while boiling to keep them separated. - For perfect texture, follow the package cooking time closely. - If you prefer softer noodles, cook a minute longer. - Add soy sauce or hoisin for more depth. - Mix in chili oil for extra heat. - Include proteins like chicken, tofu, or shrimp for a hearty meal. - For a vegetarian option, add chickpeas or edamame. - Pair with steamed dumplings or a fresh salad. - Serve with a side of pickled vegetables for crunch. - Enjoy with a light beer or green tea for balance. - A cold sparkling water enhances the spicy notes. {{image_4}} Gluten-Free Alternatives If you want a gluten-free meal, use rice noodles instead of udon noodles. They cook fast and soak up sauce well. You can also try gluten-free soy sauce. Look for brands that are certified gluten-free. Vegan Options To make this dish vegan, use tamari instead of soy sauce. You can replace the spicy chili crisp with a vegan version or make your own at home. Just blend oil, garlic, and your favorite spices for heat. Spicy vs. Mild You can change the spice level to match your taste. For a mild dish, use less chili crisp. Add a splash of lime juice for freshness without too much heat. If you like it hot, feel free to add more chili crisp or even some chili flakes. Cold Udon Noodle Salad Try this recipe as a cold noodle salad. After cooking the udon, cool it completely. Toss the noodles with the sauce and vegetables, then chill in the fridge. It’s perfect for hot days and adds a refreshing twist. Japanese Style vs. Fusion Stick to a classic Japanese style by keeping the ingredients simple. Use only udon, soy sauce, and a few veggies. For a fusion approach, add ingredients like avocado or even mango for a sweet touch. Adding Unique Ingredients Feel free to mix in other veggies like carrots, or snap peas. You can also add proteins like tofu or shrimp. These additions make the dish richer and more filling. Experiment to find your favorite combination! - Refrigeration Tips: Let the noodles cool down. Store them in an airtight container. They stay fresh for up to three days in the fridge. - Freezing Instructions: Place the noodles in a freezer bag. Squeeze out the air before sealing. They can last in the freezer for about a month. - Methods for Best Texture: Use a microwave or stovetop. If using a microwave, cover the noodles to keep moisture. Stir every minute. For stovetop, add a splash of water and heat gently. - Avoiding Sogginess: Don’t overcook when reheating. Heat just until warm to keep the noodles firm. - How Long It Lasts in Fridge: Properly stored, the noodles can last three days in the fridge. - Signs of Spoilage: Check for any off smell or slimy texture. If you see mold, discard them immediately. Spicy chili crisp is a spicy oil-based condiment. It has crunchy bits of garlic, onion, and spices. Some popular brands are Lao Gan Ma and Fly By Jing. You can find it in many grocery stores or Asian markets. Look in the Asian food aisle or online for the best options. Yes, you can easily make spicy chili crisp at home! Here’s a simple recipe: - Essential Ingredients Required: - 1 cup vegetable oil - 1/4 cup dried chili flakes - 1/4 cup chopped garlic - 2 tablespoons chopped onion - Salt to taste 1. Heat the oil in a pan until warm. 2. Add garlic and onion; cook until golden. 3. Stir in chili flakes and salt. 4. Let it cool and store in a jar. To make udon noodles vegan, check the package for egg. Many brands offer egg-free options. If you find egg, choose a brand that uses only wheat and water. Adjust the recipe by omitting any meat or animal products. Udon noodles are made from wheat flour. They are low in fat and provide energy. Here’s some nutritional info: - Nutritional Info: - 200g serving has about 200 calories - Good source of carbs for energy - Low in fat Dietary considerations include gluten, so those with gluten allergies should avoid them. Udon noodles can fit well in a balanced diet when paired with veggies and proteins. You’ve learned how to make a tasty udon noodle dish. We explored the key ingredients, from udon noodles to spicy chili crisp. I shared simple steps for cooking and tips for flavor. Variations let you adjust to your taste, whether vegan or spicy. Remember, leftovers are easy to store and reheat. Enjoy this dish any day, and share it with friends. Cooking can bring joy and great meals to your table. Now, grab your ingredients and get started!

Are you ready to spice up dinner with a bowl of deliciousness? This Spicy Chili Crisp Udon Noodles recipe combines chewy udon noodles with a kick of heat from chili …

Read more

Categories Dinner

Apple Cinnamon Protein Overnight Oats Delicious Recipe

October 29, 2025 by Chef Remy
- 1 cup rolled oats - 1 cup unsweetened almond milk - 1 scoop vanilla protein powder Rolled oats are the base of this dish. They soak well and give a nice texture. I use unsweetened almond milk, but you can choose any milk you like. The vanilla protein powder adds a boost of flavor and nutrition. - 1 teaspoon ground cinnamon - 1 tablespoon maple syrup (optional) Ground cinnamon gives a warm, cozy taste. It pairs perfectly with apples. The maple syrup is optional but adds a nice sweetness. You can skip it if you want to keep it lighter. - Chopped walnuts or pecans - Extra apple slices for garnish I love adding chopped walnuts or pecans for a crunch. They also add healthy fats. Extra apple slices make a great garnish. They look pretty and taste great on top of your oats. 1. Start with a large bowl. Add 1 cup of rolled oats, 1 scoop of vanilla protein powder, 1 teaspoon of ground cinnamon, and 1 tablespoon of chia seeds. Mix these dry ingredients well. 2. Next, add 1 cup of unsweetened almond milk. If you want it sweeter, add 1 tablespoon of maple syrup. Sprinkle a pinch of salt in for flavor. Stir everything together until smooth. 1. Now, take 1 medium apple, core it, and cut it into small pieces. Gently fold the diced apple into the oat mixture. This adds texture and freshness. 2. Spoon the mixture into jars or containers. Make sure to divide it evenly. Seal them tightly to keep the goodness in. 1. Place the containers in the refrigerator. Let them soak overnight or for at least 4 hours. This allows the oats to soak up the milk. 2. For a creamier texture, stir the oats when you take them out. If they seem thick, add a splash of milk to reach your preferred consistency. These simple steps ensure you have a delicious breakfast waiting for you! Getting the right ingredient ratios is key. I always use 1 cup of oats and 1 cup of almond milk. This ratio gives the oats a great texture. If you want a sweeter taste, add 1 tablespoon of maple syrup. You can adjust sweetness to your liking. If you want it creamier, add more almond milk. Use any milk you like. Almond milk works well, but oat or soy milk is great too. If you want more protein, try adding Greek yogurt. You can also use more protein powder. This will keep you full longer and add flavor. These oats are perfect for breakfast. Pair them with yogurt or a smoothie for a balanced meal. You can make them ahead of time, too. Store them in jars for easy grab-and-go meals. This way, your mornings stay stress-free. {{image_4}} You can make your apple cinnamon protein overnight oats even better by adding more fruit. Try slicing up a banana and mixing it in. Bananas add natural sweetness and creaminess. You can also use berries like strawberries or blueberries. They bring bright flavor and color. If you like dried fruit, consider adding raisins or cranberries. They give a chewy texture and extra sweetness. You can mix dried fruits with fresh ones for a fun mix. Want to change the taste? You can use different spices, like nutmeg or ginger. They add warmth and depth. Just a pinch can make a big difference. Swapping protein powders is another way to switch things up. Try chocolate protein powder for a richer taste. You can even use plant-based protein if you prefer. To make your oats vegan, ensure you use plant-based milk. Almond milk works great, but feel free to try oat or soy milk. Check that your protein powder is vegan too. For gluten-free oats, choose certified gluten-free rolled oats. They ensure you avoid any gluten cross-contamination. This way, everyone can enjoy your delicious overnight oats! You can keep overnight oats in the fridge for up to five days. Store them in airtight containers to keep them fresh. After five days, check for any off smells or signs of spoilage. If they seem fine, they should still be good to eat. Yes, you can freeze overnight oats. It’s a great way to save time. When freezing, use freezer-safe containers. Leave some space at the top for expansion. You can freeze oats for up to three months. Just remember to label your containers with the date. To enjoy chilled oats, just stir them and add a splash of milk if needed. If you want to heat them, microwave on low for 30 seconds. Stir again and heat in short bursts until warm. Avoid overheating, as this can make them dry out. Enjoy your oats warm or cold, whichever you prefer! Rolled oats are the best choice for overnight oats. They soak up liquid well and give a great texture. Quick oats can turn mushy and lose their shape. If you want a chewy bite, stick with rolled oats. They maintain their form and flavor, making your dish more enjoyable. Yes, you can make overnight oats without protein powder. Here are some great alternatives: - Greek yogurt adds creaminess and protein. - Nut butter, like almond or peanut, boosts flavor and nutrition. - Chia seeds are a great source of protein and fiber. Experiment with these options to find what you enjoy most. To achieve creamier overnight oats, try these tips: - Use more liquid. Adding extra almond milk or yogurt helps. - Blend your oats before mixing. This creates a smoother texture. - Add mashed banana or avocado for creaminess. - If it’s too thick after soaking, stir in a bit of milk before serving. Following these suggestions will give you the perfect creamy consistency every time. Overnight oats are simple, tasty, and nutritious. We covered the main ingredients like rolled oats and almond milk, flavor enhancers, and optional toppings. I shared step-by-step instructions, tips for the perfect texture, and exciting variations. Don't shy away from customizations to fit your taste. Experiment with fruits, spices, and even protein sources. With easy storage tips, you can enjoy these oats fresh or frozen. Make them your own and enjoy a healthy breakfast that fuels your day.

Looking for a quick and tasty breakfast? Try my Apple Cinnamon Protein Overnight Oats! This easy recipe combines rolled oats, almond milk, and protein powder for a nutritious meal. With …

Read more

Categories Breakfast

Slow Cooker Creamy Garlic Mashed Potatoes Delight

October 29, 2025 by Chef Remy
To create Slow Cooker Creamy Garlic Mashed Potatoes, you need a few key items: - 3 pounds Yukon Gold potatoes, peeled and cut into uniform cubes - 5 cloves garlic, finely minced - 1 cup chicken or vegetable broth (low sodium recommended) - 1 cup heavy cream - 1 stick (1/2 cup) unsalted butter, cut into small cubes - 1 teaspoon salt (adjust to taste) - 1/2 teaspoon freshly ground black pepper - 1/4 cup sour cream - 2 tablespoons fresh chives, finely chopped (for garnish) These ingredients work together to create a rich and creamy texture, with garlic adding a lovely depth of flavor. If you want to switch things up, there are some good alternatives: - You can use Russet potatoes for a fluffier texture. - For a lighter option, swap heavy cream with half-and-half or milk. - If you prefer a vegan dish, replace butter with olive oil and use plant-based cream. - Use roasted garlic instead of raw for a sweeter, milder taste. Feel free to mix and match these options to suit your taste or dietary needs. The quality of your ingredients makes a big difference. Here’s why: - Potatoes: Yukon Gold potatoes are creamy and buttery. They mash beautifully. - Garlic: Fresh garlic gives the best flavor. Avoid pre-minced options. - Broth: Low-sodium broth lets you control the salt level in your dish. - Cream and Butter: Use high-quality dairy for the richest taste. Investing in good ingredients leads to better results. You’ll notice the difference in flavor and texture. Start by peeling 3 pounds of Yukon Gold potatoes. Cut them into 1-inch cubes. This size helps them cook evenly. Next, finely mince 5 cloves of garlic. The garlic adds a rich flavor to the potatoes. Place the cubed potatoes in the slow cooker. Spread the minced garlic evenly over the potatoes. Pour in 1 cup of chicken or vegetable broth. This keeps the potatoes moist while cooking. Add 1 stick of unsalted butter, cut into small cubes. Sprinkle in 1 teaspoon of salt and 1/2 teaspoon of black pepper. Stir gently to combine everything. Cover the slow cooker and set it to low for 6-7 hours or high for 3-4 hours. The potatoes should be fork-tender when done. Once the potatoes are soft, it’s time to mash. Use a potato masher or an electric hand mixer. Mash until you reach your desired smoothness. Slowly add 1 cup of heavy cream and 1/4 cup of sour cream. Stir continuously to make the mixture creamy. Taste and adjust the seasoning with more salt or pepper as needed. For an extra kick, mix in more minced garlic or chopped chives. Serve warm and enjoy! To get that creamy texture, use Yukon Gold potatoes. Their starch content gives a smooth finish. Cut the potatoes into even cubes, around one inch. This ensures they cook evenly. After cooking, mash them well. Then, slowly mix in the heavy cream and sour cream. This step is key for creaminess. A good potato masher or an electric hand mixer works best for mashing. I prefer the hand mixer for a super smooth consistency. A slow cooker is essential to keep everything cooking gently. Use a sturdy cutting board and a sharp knife for chopping the potatoes. These tools make prep quick and easy. Avoid using high-starch potatoes like Russets. They can make the mash gluey. Don’t skip the broth; it adds flavor and moisture. Also, be careful not to overmix after adding the cream. Overmixing can lead to a gummy texture. Lastly, taste before serving. Adjust the salt and pepper to your liking for the best flavor. {{image_4}} You can make these mashed potatoes extra special. Try adding cheese for a rich flavor. Creamy cheddar or tangy goat cheese works well. Just mix in about one cup after mashing. Fresh herbs can also add a bright taste. Chives, rosemary, or thyme are great choices. Chop them finely and stir them in. This will make your dish pop with flavor. Want to make this dish vegan? No problem! Swap the heavy cream for coconut milk. It keeps the creaminess but adds a nice twist. Use vegan butter in place of regular butter. You can also skip the sour cream. Instead, try adding a little lemon juice for tang. This keeps the dish light and fresh. When serving, think about presentation. A rustic bowl makes the dish look inviting. Garnish with fresh chives or a drizzle of olive oil. For a festive touch, add some crispy bacon bits. You can pair these mashed potatoes with roast chicken or grilled veggies. They make a perfect side for any meal. To store leftover mashed potatoes, let them cool first. Transfer the potatoes to an airtight container. I recommend using glass or plastic containers with tight lids. Make sure to cover them well to avoid drying out. Stored this way, they last in the fridge for up to three days. When reheating, you want to keep them creamy. Place the mashed potatoes in a pot over low heat. Add a splash of milk or cream to help with creaminess. Stir often to avoid sticking. Heat until warm and creamy, about 5-10 minutes. You can also use the microwave, but stir every minute to heat evenly. You can freeze creamy mashed potatoes for longer storage. First, let them cool completely. Then, spoon them into freezer-safe bags or containers. Remove as much air as possible before sealing. They can be frozen for up to a month. To thaw, place them in the fridge overnight. Reheat as described above for best results. Yes, you can use other potatoes. Russet potatoes are great for a fluffy texture. Red potatoes are waxy and creamy but may result in a denser mash. Each type brings a unique flavor and feel. Experiment to find your favorite! To speed up the cooking time, cut the potatoes into smaller cubes. Use the high setting on your slow cooker for 3-4 hours. Alternatively, you can boil the potatoes on the stove until fork-tender, then mash and mix with the other ingredients. This method saves time without losing flavor. You can add many things to enhance the taste. Try mixing in more garlic for a stronger flavor. Cheese, like cheddar or Parmesan, adds richness. Fresh herbs, such as rosemary or thyme, give a fresh twist. You can also use smoked paprika for a subtle heat. Get creative and make it your own! In this blog post, we explored how to make creamy garlic mashed potatoes in a slow cooker. We covered key ingredients, their quality, and how they impact flavor. You learned step-by-step instructions for prepping, cooking, and mashing. Tips and tricks helped you avoid common mistakes and achieve the best texture. We also discussed variations for different tastes and dietary needs, along with storage and reheating tips. With these insights, you can enjoy perfect mashed potatoes every time. Happy cooking!

Are you ready to elevate your dinner with rich and creamy mashed potatoes? My Slow Cooker Creamy Garlic Mashed Potatoes Delight is the perfect side dish for any meal. This …

Read more

Categories Dinner

Sheet-Pan Balsamic Chicken & Veggies Easy Dinner

October 29, 2025 by Chef Remy
- 4 boneless, skinless chicken thighs - 2 cups baby potatoes, halved - 1 cup assorted bell peppers, sliced - 1 cup zucchini, sliced - 1 cup cherry tomatoes - 1/4 cup balsamic vinegar - 3 tablespoons olive oil - 2 tablespoons Dijon mustard - 2 teaspoons garlic powder - 1 teaspoon dried oregano - Salt and pepper to taste For this dish, chicken thighs work best. They stay juicy and tender. Baby potatoes provide a hearty base, while bell peppers, zucchini, and cherry tomatoes add vibrant colors and flavors. The balsamic vinegar, olive oil, and Dijon mustard create a rich marinade that infuses every bite with taste. - Fresh basil leaves - Additional seasonings Fresh basil leaves add a pop of color and flavor. You can sprinkle extra salt, pepper, or even some crushed red pepper for heat. These optional garnishes help elevate your dish, making it not only tasty but also visually appealing. Preheating the Oven Preheat your oven to 425°F (220°C). A hot oven helps the chicken and veggies roast well. Preparing the Marinade In a large bowl, combine 1/4 cup balsamic vinegar, 3 tablespoons olive oil, and 2 tablespoons Dijon mustard. Add 2 teaspoons garlic powder, 1 teaspoon dried oregano, and salt and pepper to taste. Whisk it all together until mixed well. Marinating the Chicken Add 4 boneless, skinless chicken thighs to the marinade. Toss the chicken gently until it's fully coated. Let it marinate for about 15 minutes. This time allows the chicken to soak up the flavors. Arranging Ingredients on the Sheet Pan On a large sheet pan, spread out 2 cups of halved baby potatoes, 1 cup of sliced bell peppers, 1 cup of sliced zucchini, and 1 cup of cherry tomatoes. Drizzle a little olive oil over the veggies and sprinkle with salt and pepper. Toss them to coat evenly. Baking Time and Temperature Make a space in the center of the pan and place the marinated chicken thighs there. Pour any leftover marinade over everything. Bake in the preheated oven for 25-30 minutes. The chicken should reach an internal temperature of 165°F (74°C). The veggies will become tender and caramelized. Enjoy the great smells while it cooks! Recommended Cooking Times Cook the chicken and veggies for 25 to 30 minutes. You want the chicken thighs to be fully cooked. They should reach an internal temperature of 165°F (74°C). The veggies should be tender and slightly caramelized. Use a meat thermometer for best results. Ensuring Chicken is Cooked Properly Always check the thickest part of the chicken. If it’s no longer pink and the juices run clear, it’s done. If not, put it back in the oven for a few more minutes. This step ensures you serve safe, tasty food. Adding Extra Seasonings Feel free to boost the flavor! Add more garlic powder or a pinch of red pepper flakes for heat. You can also sprinkle some smoked paprika or fresh herbs like thyme or rosemary. These small changes can make a big difference. Using Fresh Ingredients Always choose fresh veggies. Fresh bell peppers, zucchini, and tomatoes give the best taste and texture. Organic ingredients can add even more flavor. If you can, use fresh herbs like basil for garnish. They add a pop of color and freshness. {{image_4}} You can easily change the veggies in this dish. Try using broccoli, carrots, or asparagus. These will give a nice crunch and taste. For a twist, add sweet potatoes or squash. Remember, the key is to keep the colors bright and the textures varied. If you want to switch the chicken, consider using boneless thighs or breast. You could also use turkey or pork. For a plant-based option, try chickpeas or firm tofu. Just make sure to adjust the cooking time for these proteins. In spring, consider adding peas or fresh asparagus. These veggies are bright and sweet. They pair well with the balsamic flavor. For summer, try using corn, green beans, or eggplant. These add a nice seasonal flair. When fall arrives, think about using root vegetables. Carrots, parsnips, and sweet potatoes work well. They bring warmth and heartiness to the dish. In winter, Brussels sprouts and cauliflower are great choices. They hold up well in the oven and taste fantastic. - Refrigeration Tips: Allow your chicken and veggies to cool before storing. Use an airtight container to keep them fresh. Store in the fridge for up to three days. - Freezing Instructions: If you want to freeze leftovers, place them in a freezer-safe container. They last for about three months in the freezer. Thaw in the fridge overnight before reheating. - Best Methods for Reheating: The oven is best for reheating this dish. Preheat to 350°F (175°C). You can also use a microwave, but the oven keeps it crispy. - Recommended Times and Temperatures: Heat in the oven for about 15-20 minutes until warm. If using a microwave, heat in 1-minute bursts until hot. Ensure the chicken reaches 165°F (74°C) for safe eating. How long can I marinate the chicken? You can marinate the chicken for about 15 to 30 minutes. This time lets the flavors soak in well. If you have more time, you can marinate it longer, even overnight, in the fridge for deeper flavor. Can I use chicken breasts instead of thighs? Yes, you can use chicken breasts. They will cook faster than thighs. Just ensure they reach the right temperature to stay juicy. What temperature should the chicken reach? The chicken should reach an internal temperature of 165°F (74°C). Use a meat thermometer to check for safety. This ensures your chicken is cooked through and safe to eat. Can I make this dish ahead of time? Yes, you can prepare this dish ahead of time. You can marinate the chicken and chop the veggies. Store them in the fridge for up to a day. When you are ready, just bake them together for a quick meal. This article covered the main ingredients for a tasty chicken and vegetable dish. We talked about key components like the marinade and fresh garnishes. I shared step-by-step instructions to help you prepare and cook easily. Tips for perfecting the dish and flavor ideas were included too. In the end, this meal is simple and adaptable. Use seasonal ingredients and leftovers wisely. Enjoy cooking and impressing others with your skills!

Looking for a simple yet tasty dinner? You’ll love this Sheet-Pan Balsamic Chicken and Veggies recipe! With just a few ingredients and minimal prep time, you can create a wholesome …

Read more

Categories Dinner

No-Bake Chocolate Chip Cheesecake Bars Delightful Treat

October 29, 2025 by Chef Remy
To create your No-Bake Chocolate Chip Cheesecake Bars, gather these simple ingredients: - 1 ½ cups graham cracker crumbs - ½ cup unsalted butter, melted - 2 tablespoons granulated sugar - 16 oz cream cheese, softened at room temperature - ½ cup powdered sugar - 1 teaspoon pure vanilla extract - 1 cup heavy whipping cream, chilled - ½ cup mini chocolate chips - Additional mini chocolate chips for garnish Each ingredient plays a key role in building flavor and texture. The graham cracker crumbs give a buttery base. The unsalted butter binds the crumbs together. Granulated sugar adds a touch of sweetness to the crust. Cream cheese is the star of this recipe, providing a rich and creamy filling. Powdered sugar sweetens the filling without any graininess. Pure vanilla extract brings warmth to the flavor. Heavy whipping cream is crucial. When whipped, it adds lightness to the cheesecake. Mini chocolate chips offer delightful bursts of chocolate throughout the bars. Use extra chocolate chips on top for decoration and added taste. With these ingredients, you can create a sweet and creamy treat that everyone will love. Enjoy the simple pleasure of making these no-bake bars! 1. Mixing graham cracker crumbs and butter: Start by taking a medium bowl. Add 1 ½ cups of graham cracker crumbs, ½ cup of melted unsalted butter, and 2 tablespoons of granulated sugar. Stir this mixture until it looks like wet sand. This mix will be your crust. 2. Pressing crust into the pan: Next, grab a 9x9 inch baking pan. Pour the crumb mixture into the pan. Use the back of a measuring cup or your fingers to press it down firmly. Make sure the crust is even and solid. 1. Beating cream cheese: In a large bowl, take 16 oz of softened cream cheese. Beat it with an electric mixer on medium speed until it is smooth. Make sure there are no lumps. Gradually add ½ cup of powdered sugar and 1 teaspoon of pure vanilla extract. Mix well until combined. 2. Whipping heavy cream: In another bowl, pour in 1 cup of chilled heavy whipping cream. Use the electric mixer on high speed to whip it until stiff peaks form. This adds a light texture to your filling. 3. Folding mixtures together: Now, take the whipped cream and gently fold it into the cream cheese mixture. Use a spatula and be gentle to keep the airiness. The mix should be fluffy and smooth. Then, fold in ½ cup of mini chocolate chips evenly. 1. Pouring filling over the crust: Pour the cheesecake filling over your pressed crust. Use a spatula to spread it evenly. 2. Garnishing with chocolate chips: Sprinkle additional mini chocolate chips on top. Press them lightly into the filling for a nice look and added flavor. 3. Refrigerating to set: Cover the pan with plastic wrap. Place it in the fridge for at least 4 hours. This helps it to set and become firm. After chilling, lift the cheesecake out of the pan. Cut into bars and serve! To whip cream to stiff peaks, start with chilled heavy cream. Use a clean bowl and beaters. Beat on high speed until you see firm peaks. This step makes your filling light and fluffy. To avoid lumps in cream cheese, ensure it is softened first. Leave it at room temperature for about 30 minutes. Mix it well with an electric mixer on medium speed. This helps create a smooth base. Serve your cheesecake bars chilled for the best taste. Place each bar on a pretty dessert plate. For a fancy touch, drizzle with chocolate sauce. You can also dust with cocoa powder for added flair. Add extra mini chocolate chips on top. Press them lightly into the filling. This makes the bars look even more inviting. If your filling is runny, try chilling it longer. Sometimes, a bit more time in the fridge helps it set properly. You can also add more whipped cream to thicken it. For a firm crust, press the graham cracker mixture down well. Use a measuring cup or your fingers. Make sure it is packed tightly in the pan. This helps hold everything together when you cut the bars. {{image_4}} You can spice up your no-bake chocolate chip cheesecake bars in fun ways. Adding fruit flavors makes a big difference. For example, you can fold in pureed strawberries or raspberries. This gives your bars a fresh twist and a pop of color. The tartness of berries pairs well with the sweet filling. Swapping chocolate chip types is another great option. Instead of regular mini chocolate chips, you can try dark chocolate or white chocolate chips. Dark chocolate adds a rich, deep flavor. White chocolate gives a creamy sweetness. Experimenting with these flavors can lead to surprising and tasty results. If you need gluten-free options, you can easily switch the crust. Use gluten-free graham cracker crumbs instead of regular ones. This way, everyone can enjoy your bars without worry. For a vegan version, you can replace cream cheese with a plant-based alternative. Brands like Tofutti or Daiya offer great vegan cream cheeses. You can also use coconut cream in place of heavy whipping cream. This creates a creamy texture while keeping it dairy-free. These swaps help you cater to different dietary needs while keeping the taste delicious. To keep your No-Bake Chocolate Chip Cheesecake Bars fresh, store them in the refrigerator. Place the bars in an airtight container. This helps maintain their creamy texture. If you don’t have a container, cover the pan tightly with plastic wrap. This also works well. If you want to save some for later, you can freeze the cheesecake bars. Cut the bars into pieces first. Wrap each piece in plastic wrap and then place them in a freezer-safe bag. This keeps them from getting freezer burn. These cheesecake bars can last up to five days in the fridge. Check for a firm texture and fresh smell to ensure they’re still good. If you freeze them, they can last up to two months. Just remember to thaw them in the fridge before eating. Watch for signs of spoilage, such as a change in color or a sour smell. If you notice these signs, it’s best to throw them out. Enjoy your cheesecake bars while they are fresh! Yes, you can use ricotta or mascarpone. Both create a rich and creamy texture. Ricotta gives a slightly lighter taste, while mascarpone adds a luxurious mouthfeel. If you swap cream cheese for either, the overall flavor changes. You may need to adjust sugar amounts based on the cheese's sweetness. Experiment to find your favorite! The bars need at least 4 hours to chill. This time helps them set properly. For best results, I suggest chilling overnight. This allows the flavors to blend well. If you want quicker results, make sure your cheesecake mix is smooth and your heavy cream is whipped to stiff peaks. You can check if they’re ready by gently pressing the top. If it feels firm, they are set. Yes! You can prepare these bars up to two days in advance. Just keep them covered in the fridge. This makes them perfect for parties or gatherings. If you want to serve them later, slice them before serving. This way, everyone gets a piece easily. Enjoy your tasty treat whenever you like! These cheesecake bars are easy and fun to make. You learned how to create a great crust, mix a smooth filling, and assemble everything perfectly. Remember to use my tips for the best texture and presentation. Feel free to explore fun variations, like fruit flavors or gluten-free options. Store the bars well for tasty treats later. Enjoy making and sharing these cheesecake bars! You'll impress everyone with your skills and creativity. Make this recipe your own and have fun!

Looking for a sweet treat that’s easy to make? You’ll love these No-Bake Chocolate Chip Cheesecake Bars! With creamy filling and a crunchy crust, they’re perfect for any occasion. In …

Read more

Categories Desserts

Creamy Pumpkin Spinach Alfredo Penne Delightful Dish

October 29, 2025 by Chef Remy
To make this dish, gather these main ingredients: - 12 oz penne pasta - 1 cup pumpkin puree - 1 cup fresh spinach, roughly chopped - 1 cup heavy cream - 1/2 cup grated Parmesan cheese - 2 tablespoons unsalted butter - 2 cloves garlic, finely minced - 1/2 teaspoon ground nutmeg - Salt and freshly cracked pepper to taste - Fresh parsley, chopped for garnish These ingredients create a rich and creamy sauce, perfect for coating the pasta. Check your pantry for these staples: - Unsalted butter: Adds richness to your sauce. - Ground nutmeg: Gives warmth and depth to the flavor. - Salt: Enhances all the flavors in the dish. - Pepper: Adds a bit of heat to balance the creaminess. These items are key to making the sauce flavorful and well-seasoned. Using fresh ingredients makes a big difference. - Fresh spinach: Offers a vibrant color and nutrition. - Pumpkin puree: Choose either canned or freshly made for best taste. - Fresh parsley: Brightens the dish when added as a garnish. Fresh ingredients ensure that your creamy pumpkin spinach Alfredo penne tastes its best. First, fill a large pot with water. Add a generous amount of salt to the water. Bring the water to a rolling boil. Once boiling, add 12 oz of penne pasta. Cook the pasta according to the package directions until it is al dente. This usually takes about 8 to 10 minutes. Drain the pasta in a colander and set it aside to keep warm. Grab a spacious skillet and place it on medium heat. Add 2 tablespoons of unsalted butter and let it melt. When the butter is melted, add 2 cloves of finely minced garlic. Sauté the garlic for 1 to 2 minutes until it smells great and turns light golden. Be careful not to let it burn! Now, add 1 cup of pumpkin puree and 1 cup of heavy cream to the skillet. Stir everything well until it mixes smoothly. Let this mixture simmer gently for about 5 minutes. Stir occasionally to avoid sticking. Next, add 1 cup of roughly chopped fresh spinach to the skillet. Stir it in and cook until the spinach wilts, which takes about 2 to 3 minutes. After that, slowly mix in 1/2 cup of grated Parmesan cheese and 1/2 teaspoon of ground nutmeg. Season with salt and freshly cracked pepper to taste. Keep stirring until the cheese melts and the sauce becomes creamy. Now it's time to combine the pasta and sauce. Add the warm penne to the skillet. Toss the pasta with the creamy pumpkin sauce until every piece is coated. Cook for another 2 to 3 minutes so the flavors blend well. Once everything is cooked, remove the skillet from heat. Let the dish cool for about a minute. For a beautiful finish, garnish the pasta with chopped fresh parsley. Serve the creamy pumpkin spinach Alfredo penne warm in shallow bowls. For an extra touch, drizzle a bit of heavy cream over the top and sprinkle more Parmesan cheese. Enjoy this delightful dish! To make the sauce extra creamy, use full-fat heavy cream. Avoid low-fat options as they can change the texture. Stir the sauce gently so it stays smooth. Adding a bit more Parmesan cheese helps too. It thickens the sauce and boosts the flavor. Don’t rush this step; letting it simmer for a few minutes helps the flavors blend well. Pair this creamy pumpkin spinach Alfredo penne with a green salad. A simple salad with mixed greens and cherry tomatoes works great. You can also serve garlic bread on the side. The crunch and flavor of the bread complement the creamy sauce. For protein, grilled chicken or roasted shrimp adds a nice touch. One common mistake is overcooking the pasta. Keep it al dente, as it will cook more in the sauce. Another mistake is not stirring the sauce enough. Stirring helps prevent sticking and burning. Lastly, don’t skip the nutmeg. It adds warmth and depth to the sauce. Remember, small details make a big difference! {{image_4}} You can easily make this dish vegan. Just swap the heavy cream for coconut cream. This will keep it rich and creamy. Use nutritional yeast instead of Parmesan for a cheesy flavor. It adds a nice depth without dairy. Choose a vegan butter or olive oil for cooking. These changes keep the flavor while making it plant-based. Want to add protein? Chicken works great in this dish. Cook it in the skillet before adding the sauce. Shrimp also adds a nice touch. Just sauté them until they turn pink, then mix them in. For a plant-based option, try tofu. Press it to remove water, then cube and sauté until golden. Each option adds heartiness to your creamy pasta. If you want to change up the pasta, there are many options. Whole wheat penne adds fiber and a nutty taste. Gluten-free penne is a great choice for those with allergies. You can even try spaghetti or fusilli for fun shapes. Each type of pasta gives a new texture and experience to the dish. Storing leftovers properly is key to keeping your creamy pumpkin spinach Alfredo penne fresh. First, allow the dish to cool down to room temperature. Next, transfer it to an airtight container. This helps keep moisture out and prevents odors from seeping in. It’s best to store it in the fridge. Enjoy your leftovers within three days for the best taste. When reheating, you want to keep that creamy texture. Start by placing the pasta in a skillet over low heat. Add a splash of heavy cream or water to help loosen the sauce. Stir gently to warm it up evenly. Avoid high heat; this can cause the sauce to separate. If you prefer the microwave, use a bowl with a lid. Heat in short bursts, stirring in between. If you want to freeze the creamy pumpkin spinach Alfredo penne, it’s best to do so before adding the pasta. You can store the sauce in a freezer-safe container for up to three months. When ready to use, thaw it in the fridge overnight. Then, reheat and mix in freshly cooked penne. This way, you maintain the best flavor and texture for your meal. Yes, you can use frozen spinach. Thaw it first and drain the water. Frozen spinach is convenient and still tasty. Just add it to the sauce in place of fresh spinach. To make more servings, double or triple the ingredients. For four servings, use 24 oz of penne and 2 cups of pumpkin puree. Keep the same cooking times, but check the pasta for doneness. If you lack heavy cream, use a mix of milk and butter. Combine 3/4 cup of milk with 1/4 cup of melted butter. It gives a rich taste, though not as thick. Yes, choose gluten-free penne pasta. Many brands offer tasty options made from rice or corn. Just cook it as you would regular pasta. This way, everyone can enjoy the dish! This dish combines creamy pumpkin, fresh spinach, and penne pasta for a tasty meal. I shared tips for making the sauce extra creamy and suggested pairing options. You can also customize the recipe with proteins and different pasta types. Don't forget to store leftovers properly to enjoy later. With simple steps and fun variations, you can impress anyone at the dinner table. Enjoy creating your own perfect creamy pumpkin spinach Alfredo penne!

Are you ready to savor a bowl of comfort? My Creamy Pumpkin Spinach Alfredo Penne is perfect for cozy nights. This dish combines smooth pumpkin and fresh spinach with rich …

Read more

Categories Dinner

Protein Cottage Cheese Pancake Bites Easy Recipe

October 28, 2025 by Chef Remy
To make protein cottage cheese pancake bites, gather these key items: - 1 cup cottage cheese - 1 cup rolled oats - 2 large eggs - 1 teaspoon baking powder - 1 teaspoon vanilla extract - 1 teaspoon ground cinnamon - 1 tablespoon honey or maple syrup - Pinch of salt - Cooking spray or coconut oil (for frying) These ingredients work together to create a tasty, protein-packed treat. The cottage cheese gives the bites fluffiness and moisture. The oats add fiber and a nice texture. Eggs help bind everything together, ensuring they hold their shape. You can add these toppings to enhance your pancake bites: - Fresh fruit (berries or sliced bananas) - Greek yogurt - Nut butter These toppings not only add flavor but also make the dish more nutritious. Try mixing and matching to find your favorite combination. Each serving of these pancake bites (about 3 bites) typically contains: - Calories: 220 - Protein: 12g - Carbohydrates: 30g - Fat: 6g These bites are a great way to start your day. They are filling and provide a good balance of nutrients. You can enjoy them as a breakfast dish or a snack! To start, gather all your ingredients. You will need: - 1 cup cottage cheese - 1 cup rolled oats - 2 large eggs - 1 teaspoon baking powder - 1 teaspoon vanilla extract - 1 teaspoon ground cinnamon - 1 tablespoon honey or maple syrup - Pinch of salt Place these ingredients into a blender. Blend on high until the mix is smooth. You want a thick but pourable batter. If it’s too thick, add a splash of water. This mix is rich in protein and gives a nice texture. Now, heat a non-stick skillet over medium heat. Lightly grease it with cooking spray or coconut oil. This helps prevent sticking. Once the skillet is hot, pour about 2 tablespoons of batter for each pancake bite. Make sure to leave space between them. Cook for 2-3 minutes. Look for bubbles on the surface. You’ll see the edges starting to set. This means it’s time to flip. Use a spatula to turn each pancake bite over. Cook for another 2-3 minutes until they turn golden brown. Carefully remove the pancake bites from the skillet. Place them on a plate and cover them with foil. This keeps them warm while you cook more. Repeat this until you cook all the batter. Serve the pancake bites warm. Top them with fresh fruit, Greek yogurt, or nut butter for extra taste. To get the best texture for your pancake bites, blend the ingredients well. I use a blender for a smooth mix. The batter should be thick but pourable. If it feels too thick, add a splash of milk or water. This adjustment helps the batter pour easily onto the skillet. Cooking these bites takes some care. Preheat your skillet over medium heat. Use cooking spray or coconut oil to coat the pan lightly. This step stops the bites from sticking. Pour about 2 tablespoons of batter for each bite. Space them apart to flip without trouble. Watch for bubbles on the surface; this shows they need flipping. Cook until golden brown for the best flavor. These pancake bites shine with toppings! Fresh fruit like berries or sliced bananas adds flavor and color. Greek yogurt gives a creamy touch, making them extra tasty. For a nutty twist, drizzle some nut butter on top. These combinations make your bites delicious and fun to eat! {{image_4}} You can have fun by adding flavors to your pancake bites. Try chocolate chips for a sweet twist. They melt and create pockets of goodness. You can also use pumpkin spice for a warm, cozy taste. Just add one teaspoon of pumpkin spice to the batter. Both options give your bites a tasty upgrade. Get creative with flavors that excite you! If you need gluten-free options, replace rolled oats with gluten-free oats. This keeps the texture while making it safe for gluten-free diets. You can also swap cottage cheese for a dairy-free option like silken tofu. This way, you can enjoy these bites without worries. Always check your labels to ensure everything fits your diet. You can easily adjust how many pancake bites you make. The recipe makes about 12 bites. If you want more, double the ingredients. If you need fewer, cut the recipe in half. Each pancake bite is about one serving. So, plan your servings based on who is eating. Adjusting the size helps keep everyone happy! To keep your pancake bites fresh, place them in an airtight container. Let them cool first. You can store them in the fridge for up to three days. If you want them to last longer, freezing is a great option. When you want to enjoy your leftover pancake bites, heat them quickly. Put them in the microwave for about 30 seconds. You can also use a skillet on low heat. This keeps them nice and warm without drying them out. For long-term storage, freeze the pancake bites. Arrange them in a single layer on a baking sheet. Once frozen, transfer them to a freezer bag. They can last up to three months in the freezer. Just remember to label the bag with the date for easy tracking. Yes, you can make these pancakes ahead of time. Just cook them and let them cool. Then, store the pancake bites in an airtight container in the fridge. They stay fresh for about three days. When you want to eat them, just reheat them in the microwave for about 30 seconds. This saves you time on busy mornings. You can customize the sweetness in many ways. Start with one tablespoon of honey or maple syrup. If you want it sweeter, add more. You can also use mashed bananas or a bit of brown sugar. Taste the batter before cooking. This way, you find the perfect sweetness for you. If you do not have cottage cheese, you can use Greek yogurt. It has a similar texture and is packed with protein. You can also use ricotta cheese, but it may change the flavor a bit. Another option is silken tofu for a dairy-free choice. Just blend it until smooth before adding it to your mix. This blog post covered how to make delicious pancake bites. We explored essential and optional ingredients, plus nutritional details. I shared step-by-step instructions to blend, cook, and serve these treats perfectly. You now have tips for consistency and cooking methods, alongside fun variations to try. Lastly, I explained how to store and reheat leftovers. These pancake bites are simple and tasty, making them a great addition to your meals. Enjoy experimenting with different flavors and toppings!

Craving a tasty breakfast that’s also packed with protein? You’re in luck! Today, I’ll share my easy recipe for Protein Cottage Cheese Pancake Bites. These delightful bites are not only …

Read more

Categories Breakfast

One-Pot Creamy Cajun Sausage Pasta Delightful Meal

October 28, 2025 by Chef Remy
For this delightful dish, you will need the following ingredients: - 12 oz penne pasta - 1 lb smoked sausage, sliced into coins - 1 medium onion, finely diced - 2 cloves garlic, minced - 1 bell pepper (choose either red or yellow), diced - 1 can (14.5 oz) diced tomatoes with green chilies, undrained - 4 cups chicken broth - 1 cup heavy cream - 1 tablespoon Cajun seasoning - 2 tablespoons olive oil - Salt and pepper to taste - 1 cup shredded mozzarella cheese - Fresh parsley, chopped, for garnish You can swap ingredients for what you have on hand. Use any pasta shape you like. Turkey sausage works well if you want a leaner option. For a lighter cream, use half-and-half instead of heavy cream. If you prefer, use vegetable broth for a vegetarian version. Canned tomatoes with herbs add extra flavor too. Fresh ingredients make a big difference in flavor. Pick firm bell peppers and onions. Look for sausage that is high quality, as it adds depth to the dish. Use fresh garlic for the best taste. When choosing chicken broth, go for low-sodium to control salt levels. Lastly, fresh parsley brightens the dish, adding color and flavor. Start by slicing the smoked sausage into coins. Heat 2 tablespoons of olive oil in a large pot over medium heat. Add the sausage and cook it. Stir occasionally for about 5-7 minutes. You want the sausage to be browned and slightly crispy. This step adds great flavor to your dish. Next, add 1 medium diced onion, 1 diced bell pepper, and 2 minced garlic cloves to the pot. Stir it all together. Cook for 3-4 minutes until the veggies soften and smell great. This process brings out the natural sweetness of the onion and pepper. Now, it's time to bring in flavor. Stir in 1 tablespoon of Cajun seasoning, 1 can of undrained diced tomatoes with green chilies, and 4 cups of chicken broth. Turn up the heat and bring this mixture to a rolling boil. This will help combine the flavors well. Once boiling, add 12 oz of penne pasta to the pot. Stir to make sure the pasta is covered in the liquid. Lower the heat to a simmer and cover the pot. Let it cook for about 12-15 minutes. Stir occasionally to prevent the pasta from sticking. You want it to be al dente. After the pasta is cooked, reduce the heat to low. Stir in 1 cup of heavy cream and 1 cup of shredded mozzarella cheese. Mix it well until the cheese melts. This makes the sauce creamy and smooth, giving your dish a rich flavor. Taste your pasta and add salt and pepper as needed. If the sauce is too thick, add a splash of chicken broth. Once seasoned, ladle the creamy Cajun sausage pasta into bowls. Garnish with chopped fresh parsley for color. Serve right away and enjoy the delightful flavors! Cooking pasta well makes a big difference. Always use a large pot with plenty of water. This helps the pasta cook evenly. Add salt to the water before boiling. A good rule is to use about one tablespoon of salt per gallon of water. Stir the pasta often while it cooks. This prevents it from sticking together. Cook it until it's al dente, which means firm to the bite. This way, it holds up in the sauce. Seasoning is key to a tasty dish. Cajun seasoning adds heat and depth. Feel free to adjust the amount based on your spice level. You can also add garlic powder or onion powder for extra flavor. Fresh herbs like parsley brighten the dish. Don’t forget to taste before serving. Adjust salt and pepper to your liking. This ensures your dish is packed with flavor. To make the sauce creamy, use heavy cream and mozzarella cheese. Add the cream after the pasta is cooked. This keeps it from curdling. Stir in the cheese once the cream is mixed in. This creates a rich and smooth texture. If the sauce is too thick, add more chicken broth. This helps you reach the perfect consistency. The goal is a creamy sauce that coats every piece of pasta. {{image_4}} You can easily make this dish vegetarian. Replace the smoked sausage with a meat alternative. Look for plant-based sausage brands that have Cajun flavors. You can also use mushrooms for a meaty texture. Cook them until they are browned, just like the sausage. Add your favorite veggies like zucchini or spinach to boost nutrients. Use vegetable broth instead of chicken broth for a rich taste. If you love heat, try adding more spice to your pasta. Use andouille sausage for a smokier, spicier kick. You can also add extra Cajun seasoning to the mix. For even more heat, toss in a few dashes of hot sauce or red pepper flakes when cooking. This will give your dish a fiery flavor that will make it memorable. Boost the flavor and nutrition by adding more veggies. Consider adding diced tomatoes, chopped spinach, or sliced mushrooms. You can also include broccoli or bell peppers for color and crunch. Sauté these veggies with the onion and garlic for the best taste. This not only makes your dish healthier but also adds more textures and flavors to enjoy. After enjoying this One-Pot Creamy Cajun Sausage Pasta, you may have some leftovers. To keep them fresh, place the pasta in an airtight container. Store it in the fridge. It will stay good for up to three days. Make sure to let it cool down before sealing the container. This step helps maintain the dish's rich flavors. When you’re ready to eat the leftovers, reheating is simple. You can use the microwave or the stove. If using the microwave, place a portion in a bowl and cover it. Heat it in short bursts, stirring in between. This helps avoid hot spots. If using the stove, add a splash of chicken broth to the pasta in a pan. Heat it over medium-low until warm, stirring often. This keeps the sauce creamy and tasty. Want to save some for later? You can freeze this dish too! Portion out the pasta into freezer-safe containers. Leave a little space at the top for expansion. Seal tightly and label with the date. It can last up to three months in the freezer. When you're ready to enjoy, thaw the pasta overnight in the fridge. Then, reheat it as mentioned above. Yes, you can use any pasta you like. Penne works well, but rotini or fusilli are great too. Just adjust the cooking time. Smaller pasta may cook faster, while larger shapes may take a bit longer. To add heat, use more Cajun seasoning or add a pinch of cayenne pepper. Fresh jalapeños or crushed red pepper flakes also work. Taste as you go to find your perfect spice level. Yes, you can prepare this dish ahead of time. Cook it fully and let it cool. Store it in the fridge for up to three days. Reheat on the stove, adding a splash of broth to keep it creamy. This pasta pairs well with a fresh salad or garlic bread. You can also serve it with roasted vegetables for a complete meal. A light white wine can enhance the flavors too! In this blog post, we covered the essential ingredients and detailed steps to cook your dish. We explored ingredient substitutions and tips for freshness. I shared methods for prepping, sautéing, and combining flavors to create a perfect meal. Finally, we highlighted variations, storage methods, and FAQs for your convenience. Cooking can be fun and creative. Don't hesitate to experiment with your ingredients and flavors. Enjoy your delicious creation and share it with others!

Looking for a quick meal that packs a punch? My One-Pot Creamy Cajun Sausage Pasta is the answer! This dish is both creamy and spicy, combining tender sausage with rich …

Read more

Categories Dinner
Older posts
Newer posts
← Previous Page1 … Page4 Page5 Page6 … Page130 Next →

ROASTED RECIPES

Where bold flavors meet everyday meals. Warm, vibrant, and made to share. 🔥🥗🍴

PAGES

Home About Contact Privacy Policy Terms & Conditions Cookie Policy GDPR Policy Copyright Policy Disclaimer

CATEGORIES

Appetizers Desserts Salads Breakfast Dinner

Contact

  • Pinterest
  • Mail
Copyright © 2025 Roasted Flavors. All rights reserved.