Skip to content
Roasted Flavors
  • Home
  • Appetizers
  • Desserts
  • Salads
  • Breakfast
  • Dinner
  • Privacy Policy
  • Contact
  • About

Chef Remy

Maple Fudge Delightful Treat for Any Occasion

August 23, 2025 by Chef Remy
To make delicious maple fudge, you need a few key ingredients. Each one plays a big role in the flavor and texture of the fudge. Here’s the list: - 2 cups granulated sugar - 1 cup pure maple syrup - 1/2 cup heavy cream - 1/4 cup unsalted butter, cubed - 1 teaspoon pure vanilla extract - 1/2 teaspoon fine sea salt - 1 cup chopped pecans (optional) Granulated sugar is the base. It adds sweetness and helps with texture. Pure maple syrup is the star. It gives that sweet, rich maple flavor we all love. Heavy cream adds a smooth, creamy richness. Unsalted butter makes the fudge rich and buttery. Pure vanilla extract adds warmth. Fine sea salt balances the sweetness. If you want a nutty crunch, add chopped pecans. They bring a nice texture contrast. You can also skip them if you prefer a smooth fudge. Each ingredient combines to create a delightful treat perfect for any occasion. Start by lining an 8-inch square baking pan with parchment paper. Make sure to leave some paper hanging over the edges. This overhang helps you lift the fudge out later. It makes cutting the fudge easy and keeps it from sticking. In a medium saucepan, combine 2 cups of granulated sugar, 1 cup of pure maple syrup, and 1/2 cup of heavy cream. Stir gently until the sugar dissolves. Then, turn the heat to medium-high. Bring the mixture to a gentle boil while stirring constantly. This step prevents the sugar from burning. Once it starts to boil, lower the heat to medium. Let it boil without stirring for about 5-7 minutes. Use a candy thermometer to check the temperature. You want it to reach the soft-ball stage, which is between 235°F and 240°F. Carefully take the saucepan off the heat. Without stirring, add in 1/4 cup of cubed unsalted butter, 1 teaspoon of pure vanilla extract, and 1/2 teaspoon of fine sea salt. Let the mixture sit for about 5 minutes to cool down a bit. After that time, grab a wooden spoon or a hand mixer. Beat the mixture for about 5-7 minutes until it thickens and loses its shiny look. This step adds air and makes the fudge creamy. If you want to add nuts, now is the time! Gently fold in 1 cup of chopped pecans. Then, pour the fudge mixture into the prepared baking pan. Use a spatula to spread it evenly. Let the fudge cool at room temperature for about 2 hours until it sets. Once it's firm, lift it out using the parchment overhang. Place it on a cutting board and cut it into squares. Enjoy your sweet creation! To make great fudge, you need to watch the temperature closely. A candy thermometer is your best friend. It helps you know when to stop cooking. The fudge should reach between 235°F and 240°F. This is the soft-ball stage. If it goes too far, your fudge becomes too hard. Burning can ruin your fudge. Stir your mixture well when it first heats up. Once it boils, stop stirring. Let it bubble for about 5-7 minutes. This keeps it from sticking to the pan. Watch it closely. If you see smoke or smell burning, take it off the heat right away. Once your fudge cools, it’s time to make it look pretty. Cut the fudge into squares and place them on a decorative plate. You can use any plate that matches your style. Arrange the squares neatly for a nice look. For a special touch, consider garnishing your fudge. You can sprinkle some extra chopped pecans on top. A light drizzle of maple syrup adds sweetness too. This makes it look and taste even better. {{image_4}} You can add nuts to your maple fudge for extra crunch. Pecans are my go-to choice. They add a rich, buttery flavor. Walnuts work well too; they bring a slightly bitter taste that balances the sweetness. If you prefer something different, try almonds. Their mild flavor and crunch make a great addition. Just chop them roughly and fold them in with the fudge mixture. Want to mix it up? You can add more flavors to your fudge! Chocolate is a popular choice. Just melt some chocolate and mix it in for a sweet twist. Caramel can also enhance the fudge's richness. Pour some in before it sets for a gooey surprise. Spices like cinnamon can bring warmth and depth. A half teaspoon can change the whole flavor profile. If you need to make your fudge vegan or dairy-free, it’s easy! Swap the heavy cream for coconut cream. It gives a rich texture without dairy. Use vegan butter instead of unsalted butter. This keeps the fudge creamy. Check your maple syrup to ensure it’s pure and vegan. These changes let everyone enjoy your fudge, no matter their diet. To keep your maple fudge fresh, you need to store it well. First, let the fudge cool completely at room temperature. Then, cut it into squares. I recommend you use an airtight container. This prevents air from getting in and drying out the fudge. Best practices for keeping fudge fresh: - Store in a cool, dry place. - Place parchment paper between layers if stacking. - Avoid direct sunlight or heat sources. Recommended storage containers: - Glass or plastic airtight containers work best. - You can also use a tin or metal box with a lid. If you have extra fudge, you can freeze it. Freezing keeps the fudge tasty for months. Tips for freezing and thawing fudge: - Wrap each piece in plastic wrap. - Place wrapped pieces in a freezer-safe bag or container. - To thaw, move fudge to the fridge overnight before eating. With these tips, your maple fudge will stay fresh and delicious for any occasion. You can tell fudge is done by checking its temperature. Use a candy thermometer. It should reach 235°F to 240°F. This is called the soft-ball stage. The fudge will also appear glossy. Once it starts to lose its shine, it's ready for beating. If you need a substitute for heavy cream, try full-fat coconut milk. It adds great creaminess and flavor. You can also use whole milk with a little melted butter. This mix creates a similar texture, but the taste may differ slightly. You can use artificial maple flavoring, but pure maple syrup is best. It gives a rich, natural flavor. Artificial flavoring may lack complexity. If you choose to use it, adjust the amount based on your taste. Homemade maple fudge lasts about one to two weeks at room temperature. Store it in an airtight container. For longer storage, you can freeze it. When frozen, it can last up to three months. Just remember to thaw it slowly in the fridge. This guide covered everything you need for perfect maple fudge. We looked at the main ingredients, step-by-step instructions, and helpful tips. We also explored fun variations, storage methods, and answered common questions. Fudge-making can be fun and rewarding. With the right ingredients and care, you can create tasty treats. Try my tips, and enjoy your fudge-making journey. Your homemade fudge will impress friends and family!

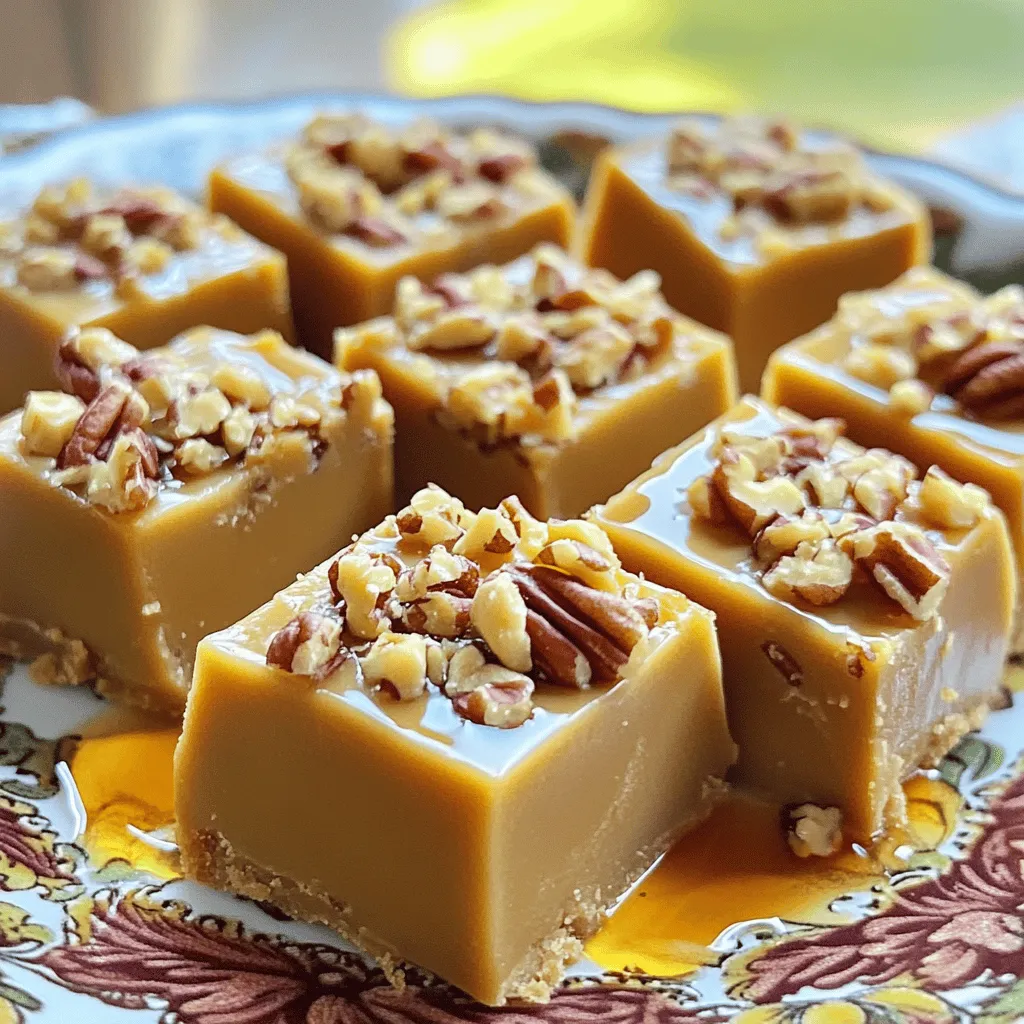
Have you ever craved a sweet treat that perfectly blends rich maple flavor and creamy texture? Look no further! Maple fudge is a simple, delightful dessert that’s perfect for any …

Read more

Categories Desserts

TikTok Cucumber Bell Pepper Salad Fresh and Crunchy

August 23, 2025 by Chef Remy
The TikTok Cucumber Bell Pepper Salad is colorful and packed with flavor. Here’s what you need to make this fresh dish: - 2 large cucumbers, thinly sliced into rounds - 2 bell peppers (1 red and 1 yellow), julienned for a vibrant look - 1 small red onion, paper-thin slices - 1 cup cherry tomatoes, halved to showcase their juicy interiors - 1/4 cup fresh cilantro, finely chopped for a burst of flavor - Juice of 2 limes for a zesty kick - 3 tablespoons high-quality extra virgin olive oil - 1 teaspoon honey (or replace with agave syrup for a vegan option) - Salt and pepper to taste - 1/2 teaspoon chili flakes (optional, to add a bit of heat) Each ingredient adds its own special touch. The cucumbers give crunch, while bell peppers add sweetness. Red onion brings a sharp bite, and cherry tomatoes add a burst of juice. Fresh cilantro brightens the taste, and lime juice gives a refreshing kick. Olive oil helps blend all the flavors, and honey adds a hint of sweetness. Finally, seasoning ties everything together. Gather these items, and you'll be ready to create a salad that not only looks good but also tastes amazing! Start by washing the cucumbers under cold water. Make sure to scrub them well. Slice the cucumbers into thin rounds. This gives each bite a nice crunch. Next, take the bell peppers. I like to use one red and one yellow for color. Julienne the bell peppers into thin strips. Then, slice the red onion into very thin pieces. Finally, cut the cherry tomatoes in half. This shows off their juicy insides. In a large salad bowl, combine the sliced cucumbers, julienned bell peppers, thinly sliced red onion, and halved cherry tomatoes. Stir gently with a wooden spoon. This helps to mix all the fresh veggies evenly. Grab a small bowl to make the dressing. Whisk together the lime juice, olive oil, and honey. If you're vegan, you can use agave syrup instead of honey. Add a pinch of salt and pepper. If you like some heat, add chili flakes. Whisk it all together until it is well mixed. Drizzle the dressing over the mixed vegetables in the salad bowl. Using two wooden spoons, toss the salad gently. Make sure all the veggies get coated with the dressing. Next, fold in the chopped cilantro. Do this carefully so you don’t bruise the leaves. Let the salad sit for about 10 minutes. This short time allows the flavors to blend together. You will taste the difference when you serve it! - Adjusting seasoning levels: Start with a pinch of salt and pepper. Taste as you go. If you want more zest, add a bit more lime juice. You can also try adding a dash of soy sauce for a savory touch. - Variations for extra crunch: Add sliced radishes or diced celery for more crunch. Toasted nuts like almonds or walnuts can also add a lovely texture. - Serving in glass bowls: Use clear glass bowls for a beautiful display. The vibrant colors of the salad pop against the glass. This makes the salad inviting and fun to eat. - Garnishing ideas: Top each serving with a sprig of fresh cilantro. You can also add a few lime wedges on the side for a fresh touch. - Alternative dressing options: Try using sesame oil instead of olive oil for a unique flavor. A bit of vinegar can also add a nice tang. Make it spicy by adding a few drops of Sriracha to the dressing. - Substitutes for honey: If you need a vegan option, use agave syrup or maple syrup. Both give a nice sweetness without using honey. {{image_4}} You can boost this salad by adding proteins. Chickpeas are a great choice. They add texture and fiber. Just rinse and drain a can of chickpeas before mixing them in. Grilled chicken also works well. Slice the chicken into thin strips and add it for a satisfying meal. You can mix in seasonal vegetables for more flavor. Try adding diced zucchini in summer or roasted butternut squash in fall. Carrots add color and crunch too. Feel free to experiment with what you find fresh at the market. To keep this dish vegan, use agave syrup instead of honey. Check your dressings to ensure they are gluten-free. Most olive oils and vinegar are safe. Always read labels to avoid hidden gluten. For the best storage, use airtight containers. Glass or plastic containers work well. Store leftover salad in the fridge. This keeps the flavors fresh and the crunch intact. To keep vegetables crisp, avoid adding the dressing until you eat. If you do add dressing, try to consume it within a day. You can keep this salad in the fridge for about 2 to 3 days. However, the cucumbers will lose their crunch over time. The bell peppers and onions will hold up better. If you store the dressing separately, the salad can last longer. Freezing this salad is not recommended. Vegetables like cucumbers and bell peppers lose their texture when thawed. If you want to prepare in advance, chop vegetables and store them separately. You can freeze some ingredients like cooked chickpeas or grilled chicken if you choose to add them later. The best way to cut cucumbers for salad is to slice them into thin rounds. This method gives a nice crunch and allows for even flavor distribution. Aim for about 1/8 inch thick. You can also use a mandoline for uniform slices. This keeps your salad looking neat and appealing. Yes, you can make this salad ahead of time. However, I recommend adding the dressing just before serving. This keeps the veggies crisp and fresh. If you mix the dressing early, the vegetables can become soggy. You can prepare the veggies and store them in the fridge. Just toss everything together when you are ready to eat. To make this salad spicier, add more chili flakes to the dressing. Start with an extra 1/2 teaspoon and adjust to your taste. You can also add sliced jalapeños for a fresh kick. If you like heat, consider using a spicy olive oil. This will add a nice warmth to every bite. Cucumbers are low in calories and high in water content. They help keep you hydrated. They also contain vitamins K and C, which are good for your skin. Bell peppers are rich in vitamins A and C, promoting eye health and boosting immunity. Together, these veggies make a healthy addition to your diet. Yes, you can substitute lime juice with lemon juice. Both have a tart flavor that brightens the salad. Lemon juice will give a slightly different taste but still works well. You can use the same amount as lime juice in the recipe for best results. This blog post covered a fresh and tasty salad recipe. You learned about key ingredients like cucumbers, bell peppers, and dressing. I shared step-by-step instructions to help you prepare the salad. You also discovered tips for flavor and presentation, and variations to suit your taste. Finally, we discussed storage options to keep leftovers fresh. By trying this recipe, you can enjoy a vibrant dish full of flavor and nutrients. Feel free to experiment and make it your own!

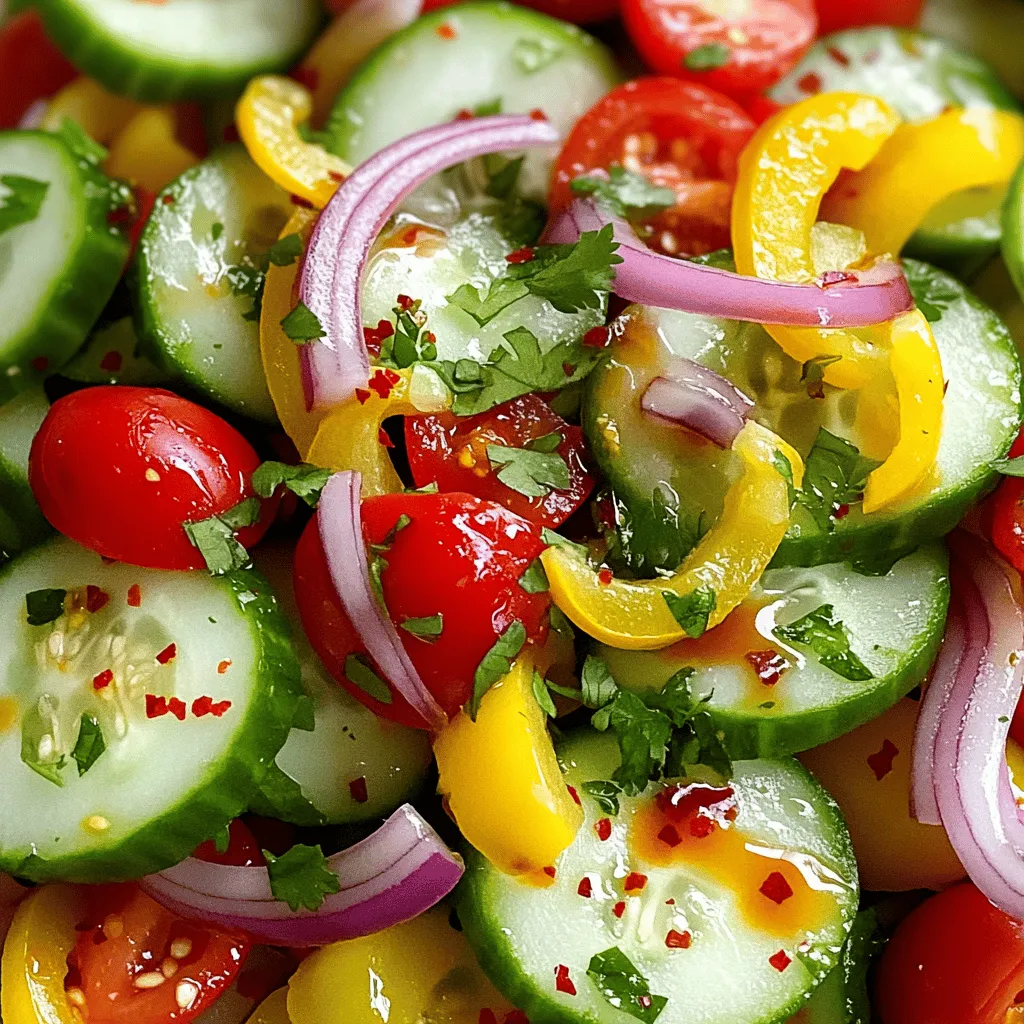
Looking for a fresh and crunchy salad recipe? The TikTok Cucumber Bell Pepper Salad is both fun and simple to make! This colorful salad mixes crisp veggies like cucumbers and …

Read more

Categories Salads

Cheesy Baked Vidalia Onions Simple and Savory Meal

August 23, 2025 by Chef Remy
To make Cheesy Baked Vidalia Onions, gather these ingredients: - 4 large Vidalia onions - 1 cup shredded sharp cheddar cheese - 1/2 cup cream cheese, softened - 1/4 cup grated Parmesan cheese - 1/4 cup plain breadcrumbs - 2 tablespoons fresh chives, chopped - 1 tablespoon olive oil (plus extra for greasing) - 1 teaspoon garlic powder - Salt and pepper to taste - 1/4 teaspoon paprika (for garnish) If you need substitutions, here are smart swaps: - Use yellow onions if Vidalia onions are not available. - Swap cheddar cheese with mozzarella or gouda for a different flavor. - Cream cheese can be replaced with ricotta for a lighter option. - For breadcrumbs, try crushed crackers or panko. - Fresh herbs like parsley can stand in for chives. To prepare this dish, you will need: - A sharp knife for cutting onions - A melon baller or teaspoon for scooping - A mixing bowl for combining the filling - A baking dish to hold the onions - Aluminum foil to cover the dish while baking - A fork to check the doneness of onions These tools make the process easier and more enjoyable. Happy cooking! First, preheat your oven to 375°F (190°C). Grab a baking dish and lightly grease it with olive oil. Next, take your large Vidalia onions. Cut off the tops and scoop out the insides. Leave about 1/2 inch of onion to form a sturdy shell. Set the scooped-out onion apart for later use. In a mixing bowl, add the shredded sharp cheddar cheese, softened cream cheese, and grated Parmesan cheese. Then, mix in the reserved onion flesh, finely chopped chives, and garlic powder. Add salt and pepper to taste. Stir the mix until it is smooth and well combined. Now, take each hollowed onion and fill it with the cheese mixture. Press down lightly to pack the filling firmly inside. Place the stuffed onions upright in the greased baking dish. Cover the dish with aluminum foil. This keeps the onions moist. Bake them in the oven for 25 minutes. After that, remove the foil and bake for another 10 to 15 minutes. The tops should turn golden brown and the onions should be soft when pierced with a fork. Enjoy the delicious aroma as they bake! When you pick Vidalia onions, look for large, firm ones. They should feel heavy for their size. Check for smooth skin without any blemishes. A sweet smell is a good sign too. Always choose onions that have a little green stem on top. This shows they are fresh. To make your filling creamy, use softened cream cheese. This helps it mix smoothly with the other cheeses. Shredded cheddar adds flavor and richness. You can also add a splash of milk if it seems too thick. Mix everything well to avoid lumps. Serve each stuffed onion on a small plate for a nice look. Sprinkle fresh chives on top for color. A drizzle of balsamic reduction adds a touch of elegance. For a fun twist, pair them with a green salad or crusty bread. This makes a great side for grilled meats too. {{image_4}} You can switch up the cheese in this dish. Try using mozzarella for a gooey texture. Gouda adds a smoky flavor that blends well with Vidalia onions. You can use feta for a salty kick. Mixing different types of cheese gives you unique tastes every time. Just keep the total amount of cheese about the same. If you want a vegetarian version, skip the cream cheese, and use ricotta instead. For a vegan option, swap the cream cheese for cashew cream or tofu. Nutritional yeast can give that cheesy flavor without dairy. Use plant-based cheese shreds for a cheesy finish. Just make sure they melt well! Herbs and spices can boost the taste of your onions. Fresh thyme or rosemary adds a lovely aroma. A pinch of cayenne pepper gives a nice kick. For a sweet touch, try adding a bit of brown sugar to the filling. You can also mix in some sautéed mushrooms for extra depth. These tweaks will make your dish even more special! After you bake your cheesy Vidalia onions, let them cool completely. Place them in an airtight container. Store in the fridge for up to 3 days. Make sure to keep them covered to avoid drying out. If you have leftovers, you can freeze the stuffed onions. Wrap each onion tightly in plastic wrap. Place them in a freezer bag or airtight container. They can last up to 2 months in the freezer. Just remember to label them with the date! To reheat, first thaw the onions in the fridge overnight. Preheat your oven to 350°F (175°C). Place the onions in a baking dish and cover with foil. Bake for about 20 minutes, or until heated through. If you want a crispy topping, remove the foil for the last 5 minutes of baking. Enjoy your cheesy goodness! Yes, you can use regular onions. However, Vidalia onions are sweet and mild. They add a unique flavor that regular onions may lack. If you use regular onions, choose sweet ones for the best taste. The onions are done when they are tender. You can check by piercing them with a fork. If it goes in easily, they are ready. Also, the top should be golden brown. This shows that the cheese mixture is baked perfectly. Yes, you can prepare these onions ahead of time. You can hollow them out and make the filling. Just store them separately in the fridge. When you are ready, stuff the onions and bake. This makes meal prep easy and saves time on busy days. This blog post covered all you need to know about making stuffed Vidalia onions. We listed the main ingredients and useful substitutes, plus the tools you’ll need. The steps for preparation, filling, and baking were detailed for easy following. You learned tips for choosing onions and ways to make a creamy filling. Variations let you explore different flavors or diets. Finally, we shared storage and reheating methods to keep your dish fresh. Try these ideas, and enjoy tasty stuffed Vidalia onions that you can share with friends!

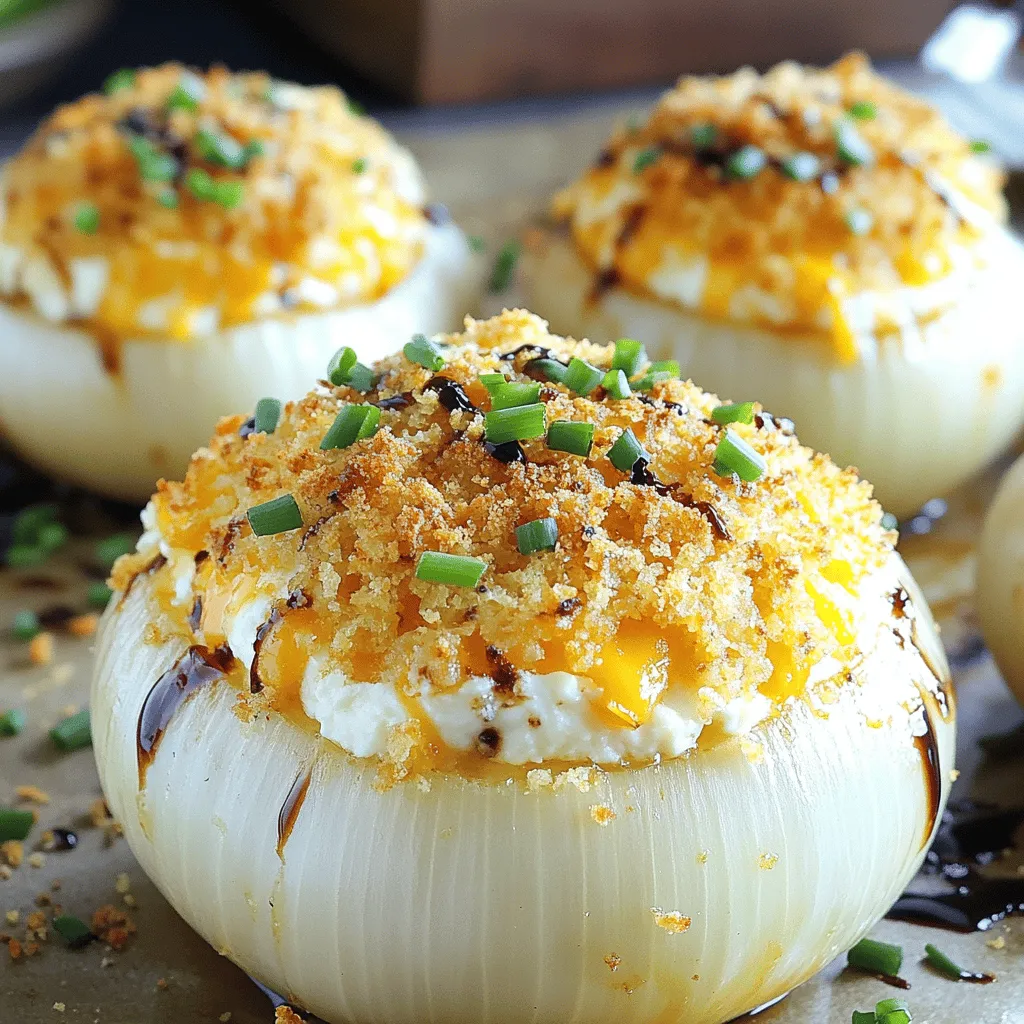
If you’re looking for a simple and tasty dish, Cheesy Baked Vidalia Onions should be on your menu. These sweet, tender onions are easy to make and packed with flavor. …

Read more

Categories Appetizers

Pumpkin Cheesecake Cookies Irresistible Fall Treat

August 23, 2025 by Chef Remy
To make pumpkin cheesecake cookies, you need a few key items. Here’s the list: - 1 cup all-purpose flour - 1 teaspoon baking soda - 1 teaspoon ground cinnamon - 1/2 teaspoon ground nutmeg - 1/4 teaspoon ground ginger - 1/4 teaspoon salt - 1/2 cup unsalted butter, softened - 1/2 cup granulated sugar - 1/2 cup packed brown sugar - 1 large egg - 1 teaspoon vanilla extract - 1/2 cup pumpkin puree - 1/2 cup cream cheese, softened - 1/4 cup powdered sugar (for the cheesecake filling) - 1/2 teaspoon vanilla extract (for the cheesecake filling) These ingredients come together to create a soft, spiced cookie with a creamy center. The pumpkin adds moisture and flavor, while the spices give a warm taste. You can enhance the cookies with some optional ingredients. If you want a bit of crunch, consider adding: - 1/4 cup chopped walnuts - 1/4 cup chopped pecans These nuts provide a nice contrast to the soft cookie and rich filling. They also add another layer of flavor. If you need alternatives, you have some options. Here are a few suggestions: - For gluten-free cookies, swap all-purpose flour with a gluten-free blend. - Use coconut oil instead of butter for a dairy-free option. - Replace granulated sugar with a sugar substitute like Stevia for lower calories. - If you want a cream cheese alternative, use a vegan cream cheese. These substitutions help make the recipe fit your diet while keeping the cookies delicious. Adjusting ingredients lets everyone enjoy these tasty treats! Start by preheating your oven to 350°F (175°C). Line a baking sheet with parchment paper. This helps the cookies not stick. In a small bowl, mix together the flour, baking soda, ground cinnamon, ground nutmeg, ground ginger, and salt. Whisk these dry ingredients well, then set them aside. In a large bowl, beat the softened butter, granulated sugar, and brown sugar using an electric mixer. Mix on medium speed for about 2-3 minutes. The mixture should turn creamy and smooth. Add the egg and one teaspoon of vanilla extract. Continue mixing for about a minute until everything blends well. Now, gently stir in the pumpkin puree. Use a spatula or wooden spoon to mix until smooth. Next, slowly fold the dry ingredients into the wet mixture. Be careful not to overmix. You want a soft cookie texture. In a separate bowl, combine the softened cream cheese, powdered sugar, and half a teaspoon of vanilla extract. Use a mixer to blend until the mixture is smooth and creamy. This will be your cheesecake filling. Using a tablespoon or cookie scoop, drop spoonfuls of cookie dough onto the lined baking sheet. Space them about 2 inches apart. With your fingertip, make a small indent in the center of each cookie. Now, spoon about half a teaspoon of cream cheese filling into each indent. If you like, sprinkle some chopped walnuts or pecans on top. Place the baking sheet in the oven and bake for 10-12 minutes. The edges should look lightly golden while the centers remain soft. After baking, let the cookies cool on the sheet for 5 minutes. Then, transfer them to a wire rack to cool completely. Enjoy your treats! To bake soft cookies, I follow a few simple steps. First, I use room temperature butter. This helps the butter mix well with sugar for a creamy texture. Next, I avoid overmixing the dough. Mixing just until combined keeps the cookies tender. Also, I remove the cookies when the edges are golden but the centers still look soft. Letting them cool on the pan for a few minutes helps them set without getting hard. To keep cookies fresh, I store them in an airtight container at room temperature. They stay soft for about a week. If you want to enjoy them warm, I reheat them in the microwave for about 10-15 seconds. This brings back that fresh-baked taste. For longer storage, I freeze the cookies. I place them in a freezer-safe bag, and they can last up to three months. For a lovely presentation, I like to arrange the cookies on a decorative platter. A light dusting of powdered sugar adds a nice touch. You can also serve them with a dollop of whipped cream. This makes the treat look fancy and inviting. Adding some fall-themed decorations, like small pumpkins or leaves, will enhance the autumn vibe of your dessert table. {{image_4}} You can boost the flavor of your cookies by adding spices. Try adding cloves for a warm spice kick. A pinch of allspice also adds depth. You could even mix in some citrus zest for a fresh twist. Consider using maple syrup instead of granulated sugar for a unique taste. These small changes will create a new experience with each bite. For a gluten-free version, swap all-purpose flour for a gluten-free blend. Make sure it includes xantham gum for the right texture. To make it vegan, replace the egg with a flax egg. Mix one tablespoon of ground flaxseed with three tablespoons of water. Let it sit for a few minutes to thicken. Use a vegan cream cheese for the filling, too. These swaps keep the treat delicious while catering to different diets. You can change the cookies for special times of the year. For Halloween, use black and orange sprinkles on top. At Thanksgiving, serve them with a dollop of whipped cream. For winter, add peppermint extract to the cream cheese filling. This creates a festive flavor. During spring, use fresh berries on top for a bright touch. Each variation brings new life to these pumpkin cheesecake cookies! To keep your pumpkin cheesecake cookies fresh, store them in an airtight container. This method prevents air from making them dry. Line the container with parchment paper to absorb moisture. You can also separate layers of cookies with paper towels. This extra step keeps them soft and tasty. Freezing is great for saving cookies for later. First, let the cookies cool completely. Then, place them in a single layer on a baking sheet. Freeze them for about 1 hour. Once frozen, transfer the cookies to a freezer bag or container. This method helps avoid sticking. You can keep them in the freezer for up to three months. When stored correctly, pumpkin cheesecake cookies can last about one week at room temperature. If you freeze them, they can stay good for three months. Just remember to let them thaw at room temperature before enjoying. Keeping track of storage time helps you enjoy these treats at their best! Yes, you can make these cookies ahead of time. Prepare the cookie dough and the cream cheese filling and store them separately in the fridge for up to two days. When you are ready, simply scoop the dough, add the filling, and bake. This way, you’ll have fresh cookies with minimal effort. You can tell when the cookies are done by checking the edges. They should be lightly golden and firm. The centers may look soft, but they will firm up as they cool. Bake for 10–12 minutes for the best results. It is not recommended to use pumpkin pie filling. Pumpkin pie filling contains added spices and sugar, which can change the cookie's taste and texture. Stick with pure pumpkin puree for the best flavor and a balanced recipe. You can serve these cookies with whipped cream for extra creaminess. A scoop of vanilla ice cream also pairs well. For a crunchy twist, offer chopped nuts or a drizzle of caramel sauce. Each addition enhances the cookie experience! We covered essential ingredients and helpful tips for making pumpkin cheesecake cookies. I shared steps for preparation, baking, and storage. We explored variations, ensuring you can customize your cookies for any occasion. In summary, these cookies are a fun treat for all. With the right ingredients and care, you can create a delicious dessert. Enjoy experimenting and sharing your tasty results with friends and family. Happy baking!

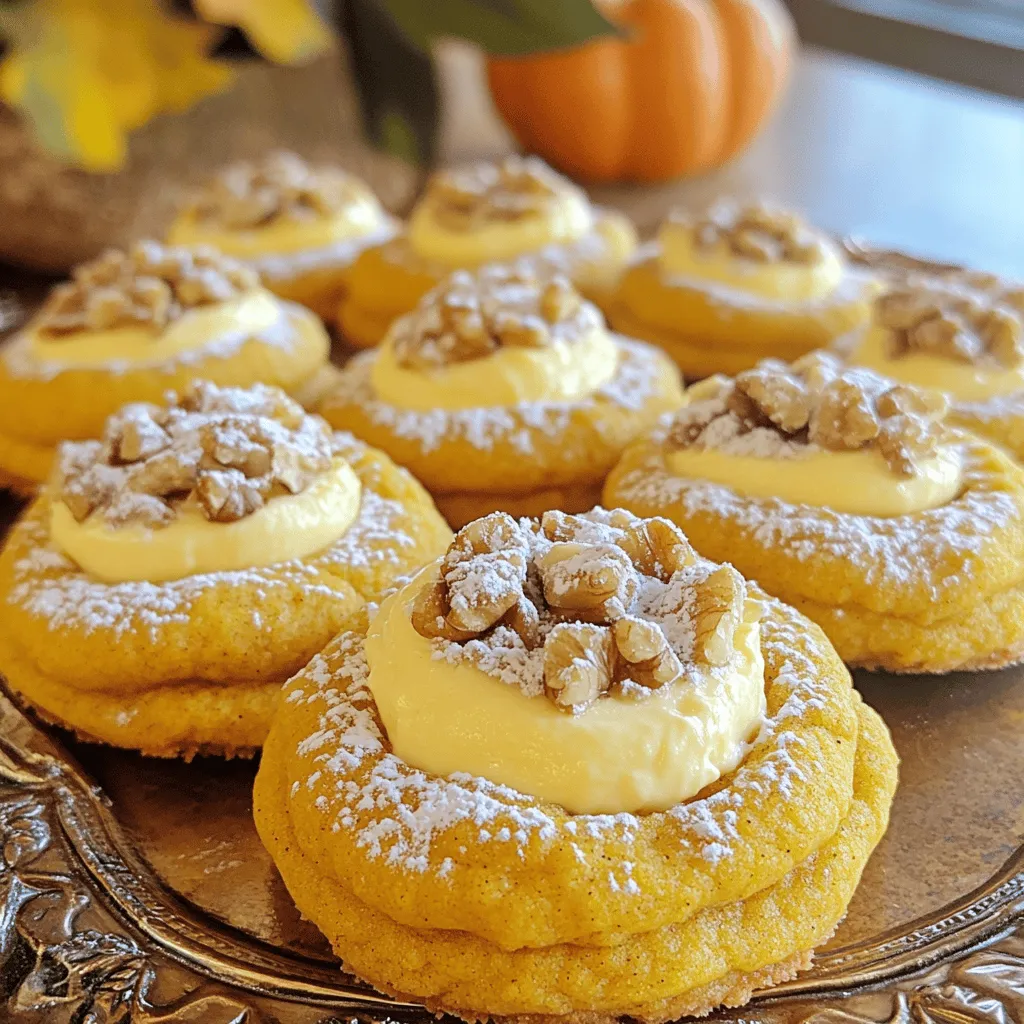
Get ready for the ultimate fall treat: Pumpkin Cheesecake Cookies! These cookies blend rich pumpkin flavor with creamy cheesecake filling, making them a must-try for any fall gathering. Whether you’re …

Read more

Categories Desserts

Vanilla Pudding Pumpkin Bread Savory and Simple Recipe

August 23, 2025 by Chef Remy
To make vanilla pudding pumpkin bread, you will need: - 1 cup canned pumpkin puree - 1 package (3.4 oz) instant vanilla pudding mix - 2 cups all-purpose flour - 1 teaspoon baking soda - 1 teaspoon baking powder - 1 teaspoon ground cinnamon - 1/2 teaspoon ground nutmeg - 1/2 teaspoon salt - 1/2 cup vegetable oil - 1 cup granulated sugar - 3 large eggs - 1 teaspoon vanilla extract - 1/2 cup chopped walnuts or pecans (optional) You can switch things up with these options: - Use fresh pumpkin instead of canned for a richer taste. - Swap the walnuts or pecans for chocolate chips if you love chocolate. - Try almond or coconut milk instead of vegetable oil for a unique flavor. - Add a pinch of ginger or cloves for extra warmth. When shopping for ingredients, keep these tips in mind: - Choose canned pumpkin with no added sugars or spices for the best flavor. - Check the expiry date on the pudding mix to ensure freshness. - Look for all-purpose flour that is stored in a cool, dry place. - Select eggs that are clean and have no cracks. - If using nuts, buy them whole and chop them yourself for better quality. Selecting fresh ingredients makes your pumpkin bread taste even better! First, set your oven to 350°F (175°C). Grab a 9x5 inch loaf pan and grease it lightly with butter or cooking spray. You can also use parchment paper for easy removal after baking. In a large mixing bowl, add 1 cup of canned pumpkin puree, 1 package of instant vanilla pudding mix, 1/2 cup of vegetable oil, and 1 cup of granulated sugar. Crack in 3 large eggs and add 1 teaspoon of vanilla extract. Use a whisk or an electric mixer to blend these until smooth and creamy. In another bowl, whisk together 2 cups of all-purpose flour, 1 teaspoon of baking soda, 1 teaspoon of baking powder, 1 teaspoon of ground cinnamon, 1/2 teaspoon of ground nutmeg, and 1/2 teaspoon of salt. Make sure they are all mixed well. Gradually add the dry mixture to the wet mixture. Use a spatula or wooden spoon to gently fold them together. Don't overmix, as this can make the bread dense. If you want, fold in 1/2 cup of chopped walnuts or pecans for a nice crunch. Pour the batter into your prepared loaf pan. Use a spatula to smooth the top if needed. This will help the bread bake evenly. Place the loaf pan in your preheated oven. Bake for 55-60 minutes. To check if it's done, insert a toothpick into the center. It should come out clean to show the bread is fully baked. Once baked, take the pan out of the oven and let it cool for about 10 minutes. If you used parchment, carefully lift the bread from the pan. Place it on a wire rack to cool completely. For serving, slice the bread warm or at room temperature. You can dust it with powdered sugar or add a dollop of whipped cream for extra flair. To make it festive, decorate the platter with small pumpkins or colorful leaves. To get the best texture, mix your wet and dry ingredients well. Use a whisk for the wet mix to make it smooth. Fold the dry mix gently into the wet mix. Overmixing can make the bread dense, which you want to avoid. For a lighter bread, let the batter rest for a few minutes before baking. Store leftover bread in an airtight container. This keeps it moist and fresh. You can also wrap it in plastic wrap for extra protection. If you want to keep it longer, freeze the slices. Just ensure they are sealed well to avoid freezer burn. Adding spices makes your bread even better. Use ground cinnamon and nutmeg as in the recipe. You can also try adding a pinch of ginger or allspice for a twist. Don’t be shy to experiment; spices can change the whole flavor profile. Avoid using cold eggs or oil. They should be at room temperature for the best mix. Don’t skip the baking soda and baking powder; they help the bread rise. Lastly, always check the bread with a toothpick. If it comes out clean, you’re good to go! {{image_4}} You can make this bread even sweeter by adding chocolate chips. Use about 1 cup of semi-sweet chocolate chips. Mix them into the batter when you combine the wet and dry ingredients. The rich chocolate pairs well with the warm spices in the pumpkin bread. To make a gluten-free version, swap all-purpose flour with a gluten-free flour blend. Ensure the blend has xanthan gum for better texture. This adjustment keeps the bread moist and delicious, just like the original. To make this recipe vegan, replace the eggs with flaxseed meal. Use 1 tablespoon of flaxseed meal mixed with 2.5 tablespoons of water for each egg. Also, substitute vegetable oil with coconut oil or applesauce. These changes will keep your bread tasty and plant-based. Feel free to get creative! Add 1/2 cup of chopped nuts, like pecans or walnuts, for crunch. You can also mix in dried fruits like raisins or cranberries. These additions will enhance the flavor and texture of your pumpkin bread, making it even more delightful. To store leftover pumpkin bread, let it cool completely. Wrap it tightly in plastic wrap or foil. Place it in an airtight container. This keeps the bread moist and fresh. You can store it at room temperature for up to three days. If you want to keep it longer, refrigeration is an option. However, it may dry out in the fridge. If you have more bread than you can eat, freeze it! Slice the bread before freezing. Wrap each slice in plastic wrap. Then, place the slices in a freezer bag. Make sure to remove as much air as possible. You can freeze the bread for up to three months. When you're ready, just thaw the slices at room temperature. To reheat your pumpkin bread, preheat your oven to 350°F (175°C). Place the bread on a baking sheet. Cover it with foil to prevent over-browning. Heat for about 10-15 minutes. For individual slices, use a microwave. Heat for about 15-20 seconds. This keeps the bread warm and soft for serving. Enjoy your delicious bread fresh again! Yes, you can use fresh pumpkin. Start by roasting the pumpkin. Cut it in half, remove the seeds, and roast it until soft. Then, scoop out the flesh and mash it until smooth. This method gives a fresh taste. Just make sure to measure the same amount as the canned pumpkin. To check if your pumpkin bread is done, use a toothpick. Insert it into the center of the loaf. If it comes out clean, your bread is ready. If it has batter on it, bake for a few more minutes. The edges should look golden brown and firm. Pumpkin bread pairs well with many things. You can serve it with butter or cream cheese for a rich taste. Adding a sprinkle of cinnamon or nutmeg on top can enhance the flavor. For a special touch, serve it with a warm drink like chai tea or apple cider. Pumpkin bread lasts about 3 to 4 days at room temperature. Keep it in an airtight container to keep it fresh. If you want to store it longer, it can last up to 3 months in the freezer. Just wrap it tightly in plastic wrap before freezing. Yes, you can double the recipe easily. Just double all the ingredients. Make sure to use a larger mixing bowl. Also, you may need to bake it longer if you're using a larger loaf pan. Check for doneness with a toothpick as mentioned earlier. To make the perfect pumpkin bread, focus on fresh ingredients, proper mixing, and careful baking. I shared helpful tips for texture, storage, and flavor. You now have options for variations, like gluten-free or vegan. Remember to check the bread for doneness and store it properly. With these skills, your baking will shine. Enjoy sharing your delicious pumpkin bread with friends and family!

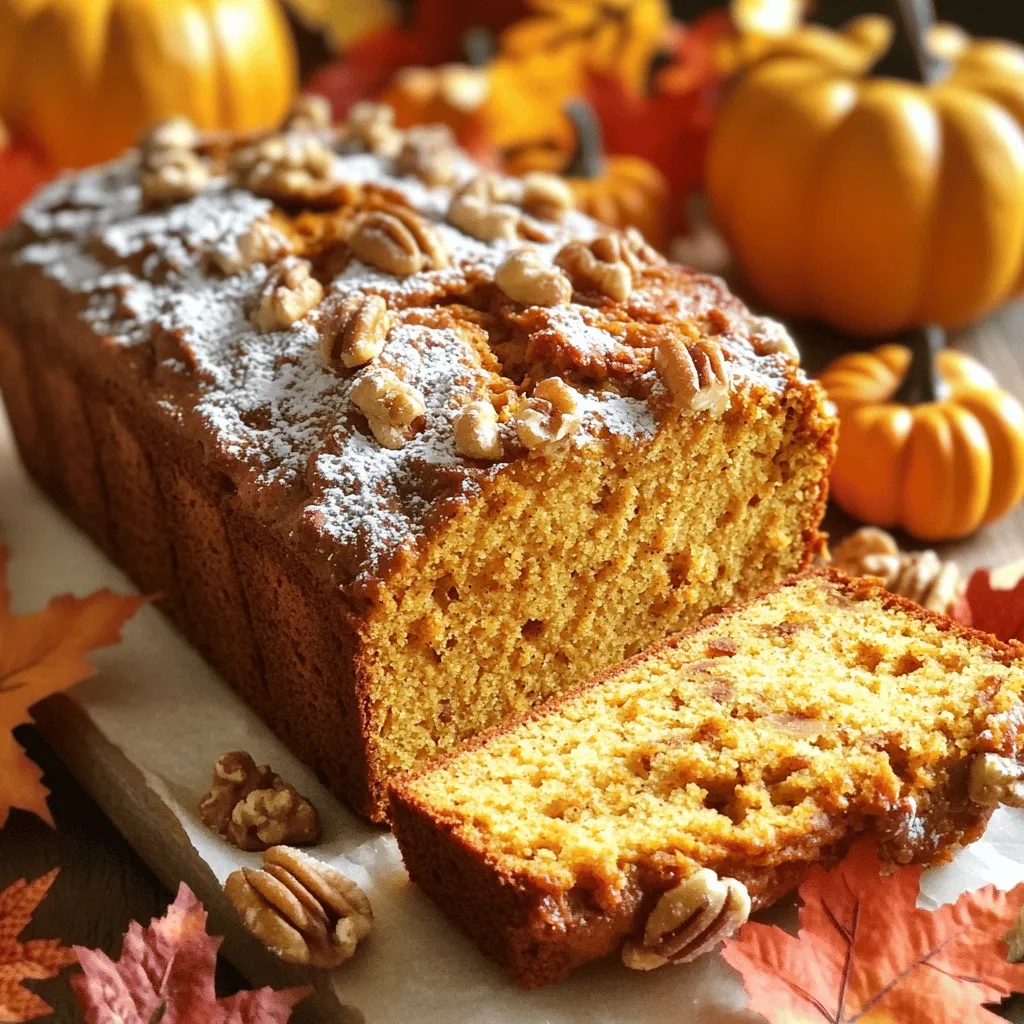
Are you ready to bake something special? This Vanilla Pudding Pumpkin Bread is easy and tasty. With rich flavors and a cozy aroma, it’s perfect for fall. I’ll guide you …

Read more

Categories Desserts

Spicy Shrimp Tacos with Mango Salsa Tasty Delight

August 18, 2025 by Chef Remy
- 1 lb large shrimp, peeled and deveined - 2 tablespoons olive oil - 1 teaspoon smoked paprika - 1 teaspoon ground cumin - 1 teaspoon chili powder - 1/2 teaspoon salt - 1/4 teaspoon cayenne pepper (adjust according to spice preference) - 8 small corn tortillas Large shrimp form the base of these tacos. They bring a sweet, juicy taste. Olive oil helps the spices stick and adds richness. The spices—smoked paprika, cumin, and chili powder—bring heat and depth to the dish. Adjust the cayenne pepper for your desired spice level. Corn tortillas wrap around the shrimp, adding a nice texture. - 1 ripe mango, diced into small cubes - 1/2 red onion, finely chopped - 1 jalapeño, seeded and minced - 1/4 cup fresh cilantro, chopped - Juice of 1 lime - Additional salt to taste The mango salsa complements the shrimp. Ripe mango adds a sweet and fruity note. Red onion gives crunch and bite. Jalapeño adds a fresh heat, while cilantro offers a burst of flavor. Lime juice brightens the mix and adds zest. This salsa balances the spicy shrimp perfectly. - Avocado slices - Lime wedges Adding avocado slices brings creaminess to the tacos. Lime wedges offer an extra citrus kick. Both make each bite even more delightful. Feel free to customize your tacos with these options for added texture and flavor! First, take 1 pound of large shrimp. Peel and devein them if needed. In a medium bowl, add the shrimp with 2 tablespoons of olive oil. Then, sprinkle in 1 teaspoon of smoked paprika, 1 teaspoon of ground cumin, and 1 teaspoon of chili powder. Add 1/2 teaspoon of salt and 1/4 teaspoon of cayenne pepper. Mix well to coat all shrimp. Let them marinate for 15 minutes. This time helps the shrimp soak up the flavors. While the shrimp marinates, let's make mango salsa. Dice 1 ripe mango into small cubes. Chop 1/2 red onion finely. Seed and mince 1 jalapeño. In a bowl, combine the mango, onion, and jalapeño. Add 1/4 cup of chopped cilantro. Squeeze in the juice of 1 lime and a pinch of salt. Mix gently and set aside for the flavors to blend. This salsa adds a fresh, sweet touch to your tacos. Next, heat a non-stick skillet over medium-high heat. Once hot, add the marinated shrimp in a single layer. Cook for about 2-3 minutes on each side. You'll know they are ready when they turn pink and opaque. Be careful not to overcook them. Perfectly cooked shrimp should be tender and juicy. Now, let’s warm the corn tortillas. Use a dry skillet and heat each tortilla for about 30 seconds on both sides. They should be pliable and slightly toasted. Warm tortillas make it easy to fold your tacos without breaking. It’s time to build your tacos! Take a warm tortilla and add a few shrimp on top. Generously spoon the mango salsa over the shrimp. If you like, add sliced avocado for a creamy finish. The combination of flavors and textures is delightful. For a beautiful presentation, arrange your tacos on a colorful platter. Sprinkle some extra cilantro on top for a fresh look. Serve with lime wedges on the side for an extra burst of flavor. Enjoy your tasty creation with friends and family! How do I adjust the spice level? You can easily change the heat by adjusting the cayenne pepper. Start with a little and add more if you like it spicier. Remember, you can always add heat, but you cannot take it away! What other spices can I use? You can try adding crushed red pepper or even chipotle powder for a smoky twist. Both options can enhance the flavor without overpowering the dish. What size shrimp should I use? I recommend large shrimp for tacos. They hold up well and are easy to eat. Look for shrimp that are fresh and firm to the touch. Should I use fresh or frozen shrimp? Fresh shrimp tastes great, but frozen shrimp is also good. Just make sure to thaw frozen shrimp in the fridge before cooking. This keeps them juicy and tender. What herbs can I use? Fresh cilantro adds a bright flavor. You can also use parsley or mint for a different taste. Experiment until you find your favorite! What toppings can I add? Slices of creamy avocado bring a nice texture. You can also try crumbled feta cheese or pickled onions for extra flavor. {{image_4}} If you want a change from shrimp, try chicken or fish. For chicken, use boneless, skinless thighs. Marinate them in the same spices as the shrimp. Grill or sauté until fully cooked. For fish, select white fish like tilapia or cod. Cook it with the same method. If you prefer a vegetarian option, consider using grilled portobello mushrooms. Slice them and marinate in olive oil and spices. They add a great texture and flavor. You can switch up the mango salsa for a pineapple salsa. Dice fresh pineapple, red onion, and jalapeño. Add cilantro and lime juice for zing. This gives a sweeter taste that pairs nicely with spicy proteins. Another fun idea is avocado salsa. Mash ripe avocados with lime juice, diced onions, and chopped cilantro. This creamy salsa adds richness to your tacos. For tortillas, you can use flour or corn. Corn tortillas are classic for tacos. They have a nice flavor and texture. Flour tortillas are softer and can hold more filling. If you need a gluten-free option, look for corn tortillas. They work well and keep the taco true to its roots. Check labels to ensure they are gluten-free. To keep your spicy shrimp and mango salsa fresh, follow these steps: - Place leftover shrimp in an airtight container. - Store the salsa in a separate container. - Refrigerate both items within two hours of cooking. Your shrimp should last for up to three days in the fridge. The salsa will stay fresh for about two days. When it’s time to enjoy your leftovers, you can reheat the shrimp and tortillas easily: - Shrimp: Heat a skillet over medium heat. Add a bit of oil and cook for 1-2 minutes until warmed. - Tortillas: Warm tortillas in a dry skillet for about 20 seconds on each side. Avoid overcooking the shrimp. It’s best when it’s just heated through. You can freeze shrimp tacos if you want to save them for later: - Yes, you can freeze them! - Wrap each taco tightly in plastic wrap. Then place them in a freezer bag. To thaw, place the tacos in the fridge overnight. Reheat on the stove as directed above. This keeps the shrimp tasty and the tortillas soft. You can tell shrimp are cooked by their color and texture. Cooked shrimp turn pink and opaque. Their shape also curls slightly. If the shrimp are firm to the touch, they are ready. Usually, this takes about 2-3 minutes per side. Avoid overcooking; it makes shrimp tough. Yes, you can make mango salsa ahead of time. It tastes even better after sitting. Just mix the diced mango, onion, jalapeño, cilantro, lime juice, and salt. Store it in the fridge for up to one day. This allows the flavors to blend nicely. Remember to stir it before serving. You can enjoy shrimp tacos with many side dishes. Some good options are: - Black beans - Mexican rice - Grilled corn - Chips and guacamole - Fresh salad For drinks, try: - A cold beer - Fresh lemonade - A fruity margarita Yes, shrimp tacos are a healthy choice. Shrimp are low in calories and high in protein. They also provide important nutrients like selenium and vitamin B12. The mango salsa adds vitamins and fiber from mangoes and vegetables. Overall, these tacos are a tasty and nutritious meal. Spicy shrimp tacos are a fun and tasty dish. You learned about key ingredients, like large shrimp and ripe mango. I shared easy steps to marinate shrimp, prepare salsa, and cook it all. Don’t forget garnishes like avocado. You can also swap in chicken or fish if you prefer. For a delightful meal, always pick fresh ingredients. Enjoy your cooking adventure with these shrimp tacos and make them your own.

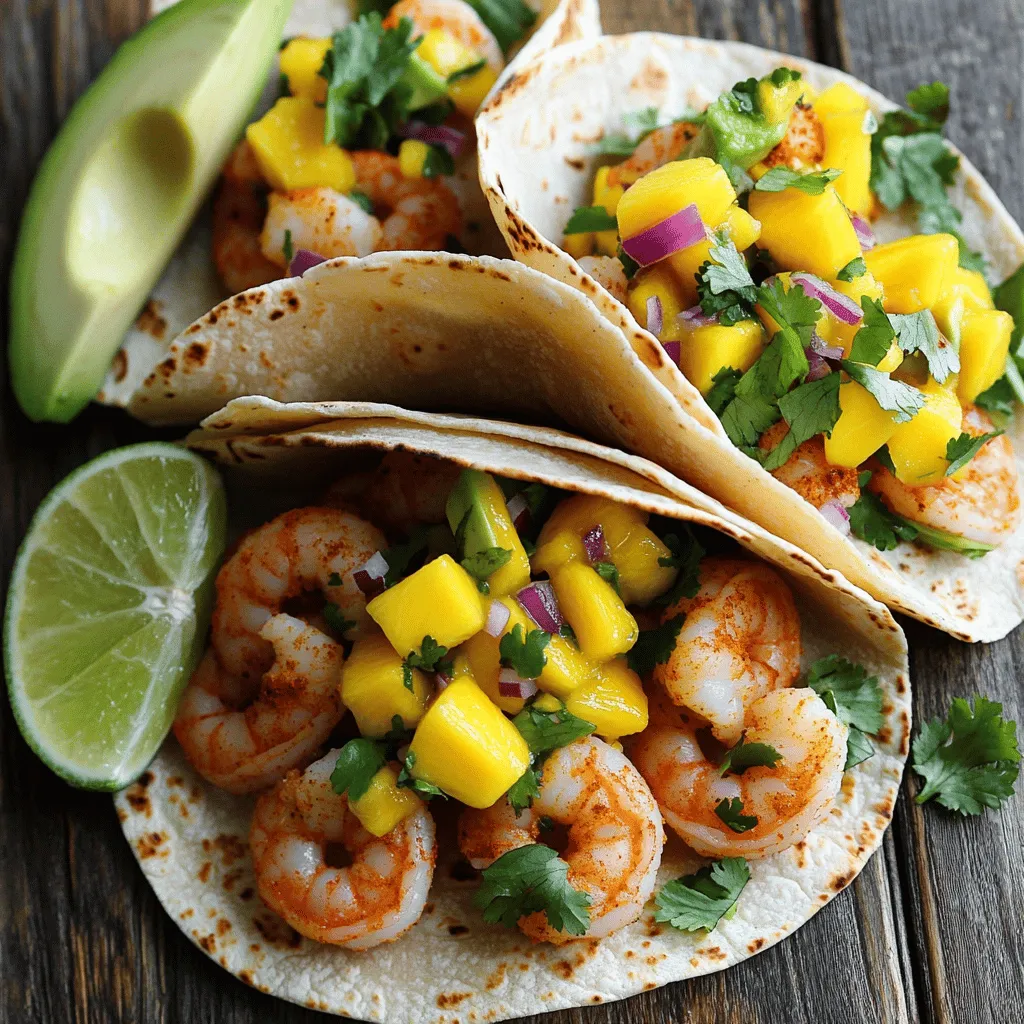
Looking to spice up your dinner? These Spicy Shrimp Tacos with Mango Salsa will hit the spot! Bursting with bold flavors and a refreshing twist, this dish is easy to …

Read more

Categories Dinner

Kielbasa Potato Soup Hearty and Comforting Recipe

August 18, 2025 by Chef Remy
To make a warm and tasty Kielbasa Potato Soup, you need simple ingredients. The key flavors come from the kielbasa and potatoes, while the broth and seasonings add depth. Let’s break down what you'll need. - Kielbasa and Potatoes - 1 pound kielbasa, sliced into half-moons - 4 medium potatoes, peeled and diced into bite-sized pieces - Broth and Seasonings - 1 medium onion, finely chopped - 3 cloves garlic, minced - 4 cups chicken or vegetable broth - 1 cup heavy cream - 2 tablespoons olive oil - 1 teaspoon smoked paprika - 1 teaspoon dried thyme - Salt and pepper to taste - Garnish and Optional Add-ins - Fresh parsley, chopped (for garnish) Each ingredient plays a big role in the final taste. The kielbasa gives a nice smoky flavor, while the potatoes add heartiness. The broth forms a rich base for the soup. Don't forget the cream to make it creamy and smooth! Adding chopped parsley at the end brings a fresh touch to your bowl. Enjoy every bite with these simple ingredients in hand! 1. Sautéing the Onions and Garlic Start by pouring olive oil into a large pot. Heat it over medium heat until it shimmers. Add the finely chopped onion. Sauté for about five minutes. You want the onion to soften and turn translucent. Next, add the minced garlic. Stir it in and let it cook for one minute more. The garlic should smell amazing! 2. Browning the Kielbasa Now, it’s time to add the sliced kielbasa. Stir it into the pot with the onions and garlic. Cook for about four to five minutes. The kielbasa should brown nicely and start to release its flavor. This step adds a rich taste to your soup. 3. Cooking the Potatoes and Broth Next, stir in the diced potatoes. Pour in the chicken or vegetable broth. Sprinkle in the smoked paprika and dried thyme. Increase the heat to bring the mix to a gentle boil. Once it bubbles, reduce the heat to low. Cover the pot and let it simmer for 15 to 20 minutes. You want the potatoes to be fork-tender. 1. Mashing the Potatoes for Texture After cooking, grab a potato masher. Mash some of the potatoes right in the soup. This gives it a thicker texture. You can leave some chunks for a nice bite. This step is key for that creamy feel! 2. Adding Heavy Cream and Seasoning Pour in the heavy cream and stir it all together. This adds richness. Now, season the soup with salt and pepper to your liking. Taste it! Adjust the seasoning as needed for the best flavor. 3. Final Heating Steps Heat the soup through for an extra five minutes. You want everything warm and well mixed. Once done, ladle the hot soup into bowls. Garnish with fresh parsley for color. This little touch makes it look beautiful too! Achieving the Best Flavor Start with good quality kielbasa. This adds a rich, savory taste. Sauté the onions until soft. It enhances the soup base. Don't rush this step; it builds flavor. Use smoked paprika for depth. It gives a hint of spice without being hot. Temperature and Cooking Time Keep the heat at medium when cooking the onions. This prevents burning. Bring the soup to a gentle boil for best results. Reduce the heat to low and cover it. Let it simmer for 15 to 20 minutes. This helps the potatoes cook evenly. Ideal Accompaniments and Toppings Serve the soup with crusty bread. It soaks up the creamy broth well. A sprinkle of fresh parsley adds color and flavor. You can also add a dollop of sour cream for extra creaminess. Storing Leftovers Cool the soup before storing. Use airtight containers for best results. It will last in the fridge for up to four days. You can also freeze it for about three months. Just thaw it in the fridge before reheating. {{image_4}} Using Different Types of Sausage You can try other sausages if you want to mix things up. Polish sausage works well, but you can also use turkey or chicken sausage for a leaner meal. Each type brings a unique taste, so feel free to explore. Alternatives for Creamy Texture If you want a lighter option, substitute heavy cream with half-and-half or coconut milk. For a non-dairy choice, cashew cream works wonderfully. These swaps give you creamy soup without the extra calories. Vegetables to Enhance Nutritional Value To boost nutrition, add veggies like carrots, celery, or spinach. These ingredients add color and taste. They also provide vitamins and minerals, making your soup healthier. Spicing it Up with Hot Sauce For a kick, add your favorite hot sauce. Just a few drops can elevate the flavor. You could also use red pepper flakes for a subtle heat that complements the soup's creaminess. To keep your kielbasa potato soup fresh, store it properly. First, let the soup cool to room temperature. Then, pour it into an airtight container. Label it with the date and place it in the fridge. This soup stays good for about three to four days. If you want to keep it longer, consider freezing it. Use a freezer-safe container. Make sure to leave some space at the top, as the soup will expand when frozen. Kielbasa potato soup can last up to three months in the freezer. When it's time to enjoy the soup again, there are great ways to reheat it. The best method is on the stove. Pour the soup into a pot over medium heat. Stir it often to ensure even heating. This helps keep the texture and flavor intact. You can also use the microwave. Pour the soup into a microwave-safe bowl. Heat it in short bursts, stirring in between. This method works too, but it may not keep the texture as nice as the stove. Always check that it’s hot throughout before serving. You can use any smoked sausage. Polish sausage or turkey sausage works well too. If you prefer a vegetarian option, try using tempeh or a plant-based sausage. Just make sure the alternative has a rich flavor to keep the soup tasty. Yes, you can! Start by sautéing the onions and garlic in a pan. Then, add all the ingredients to your slow cooker. Cook on low for 6-8 hours or on high for 3-4 hours. This method allows flavors to blend beautifully. If your soup is too thin, try mashing more potatoes. You can also add a cornstarch slurry. Mix equal parts cornstarch and water, then stir it into the soup. Let it cook for a few minutes to thicken. Absolutely! Kielbasa potato soup stores well. You can make a big batch and keep it in the fridge for up to 4 days. It also freezes nicely. Just portion it out and freeze for future meals. Reheat and enjoy whenever you’re ready! In this post, I covered how to make hearty Kielbasa Potato Soup. We explored key ingredients like kielbasa, potatoes, and rich broth. I gave you step-by-step guidance on cooking and thickening your soup. You now have tips for flavor and serving. Remember, you can swap ingredients or add extras to make it your own. This recipe is flexible for your kitchen needs. With these skills, your soup will be a hit every time. Enjoy every warm bowl you share!

Looking for a warm, filling dish that brings comfort to any meal? My Kielbasa Potato Soup recipe is your solution! This hearty soup features savory kielbasa, tender potatoes, and a …

Read more

Categories Dinner

Vegan Pumpkin Fluff Dip Creamy and Delicious Treat

August 18, 2025 by Chef Remy
- 1 cup canned pumpkin puree - 1 cup chilled coconut cream (the thick part only) - 1/4 cup pure maple syrup - 1 teaspoon vanilla extract - 1 teaspoon pumpkin pie spice - 1/4 teaspoon sea salt - Crushed graham crackers - Chopped pecans For this Vegan Pumpkin Fluff Dip, you need simple and fresh ingredients. First, grab a can of pumpkin puree. This gives your dip a rich, smooth base. Next, the chilled coconut cream adds a creamy texture. Make sure to use only the thick part for the best fluffiness. You will also need pure maple syrup. It sweetens the dip naturally. The vanilla extract adds a hint of warmth. Pumpkin pie spice brings in those cozy fall flavors. Finally, a touch of sea salt balances all the sweetness. To make it extra special, think about adding some garnishes. Crushed graham crackers add a nice crunch. Chopped pecans also give a lovely nutty flavor. Both options make your dip look great too! Start by grabbing a large mixing bowl. Add 1 cup of canned pumpkin puree. Next, pour in 1/4 cup of pure maple syrup. Then, add 1 teaspoon of vanilla extract, 1 teaspoon of pumpkin pie spice, and 1/4 teaspoon of sea salt. Use a spatula or whisk to mix everything well. Keep mixing until the mixture is smooth and all the ingredients blend nicely. In a separate bowl, scoop out 1 cup of chilled coconut cream, leaving any liquid behind. Using an electric mixer or a whisk, whip the coconut cream for about 2-3 minutes. Aim for a light and fluffy texture. This step is crucial for achieving the dip's fluffiness. Now, gently fold the whipped cream into the pumpkin mixture. Use a spatula to do this. Be careful not to deflate the whipped cream. The air in the cream helps the dip stay light and fluffy. After combining, give the dip a taste. If you want it sweeter, add more maple syrup. Mix gently again to ensure everything is well combined. Pour the fluffy pumpkin dip into a serving bowl. Smooth out the top with a spatula for a nice look. If you want, sprinkle the top with crushed graham crackers or chopped pecans for extra texture. Then, refrigerate the dip for at least 30 minutes. This chilling time helps the flavors meld together beautifully. To keep your dip light and airy, whip the coconut cream slowly. Start by chilling the coconut cream. The thicker part works best. When you scoop it out, avoid the liquid. Use an electric mixer for best results. Whip until it is fluffy, about 2-3 minutes. Fold this whipped cream into the pumpkin mix gently. Use a spatula to combine without deflating it. This step is key for a fluffy dip. You can add more spices to change the flavor. Consider cinnamon or nutmeg for warmth. A pinch of ginger can add a zing. For a sweeter touch, try adding a bit of cocoa powder. Mix and match these spices to find your perfect balance. You can also use flavored extracts, like almond or hazelnut, to switch things up. This dip pairs well with many dippers. Try using fresh apple slices for crunch. Graham crackers offer a sweet touch. Carrot sticks can add a nice contrast. For a fun twist, use pretzels for a salty kick. Garnish with crushed graham crackers or pecans for added texture. These choices will make your dip even more enjoyable. {{image_4}} If you want to switch up the cream, try using other non-dairy creams. You can use cashew cream or almond cream. Both options add a nice flavor. Cashew cream is rich and smooth. Almond cream has a subtle nutty taste. Make sure to whip them well, just like the coconut cream. This keeps your dip light and fluffy. You can also try different sweeteners for your dip. Agave syrup is a great option. It has a mild taste and mixes well. You can also use date syrup for a richer flavor. Both are good choices if you want to avoid maple syrup. If you prefer a low-calorie option, try stevia or erythritol. Just remember to adjust the amount to match the sweetness you like. You can change this dip for different holidays! For Halloween, add some spooky sprinkles or colored whipped cream on top. For Christmas, mix in some crushed peppermint for a festive twist. In the spring, swap pumpkin for sweet potato to create a lighter, springtime version. Each change gives you a fun way to celebrate the seasons with tasty flavors! To store leftovers, place the dip in an airtight container. This keeps it fresh. Make sure the lid is tight to avoid air exposure. You can keep it in the fridge for up to five days. Before serving again, give it a good stir to restore its fluffiness. Yes, you can freeze the dip! Simply scoop it into a freezer-safe container. Leave some space at the top, as it may expand when frozen. Cover it tightly with plastic wrap and a lid. The dip will stay good in the freezer for about three months. When ready to enjoy, thaw it in the fridge overnight and stir again before serving. For the best taste and quality, consume the dip within five days if stored in the fridge. If you freeze it, use it within three months for the best flavor. Always check for any changes in smell or texture before eating. Enjoy your Vegan Pumpkin Fluff Dip while it’s fresh for the best experience! Yes, you can use fresh pumpkin. Fresh pumpkin has a different texture and taste. To use it, first, you need to cook and puree it. Cut the pumpkin, remove seeds, and bake it at 400°F until soft. This usually takes about 45 minutes. After baking, scoop out the flesh and blend it until smooth. Use this in place of canned pumpkin puree in the dip. Just remember, fresh pumpkin might be a bit more watery, so you may need to adjust other ingredients. Yes, this dip is vegan-friendly! The main ingredients are canned pumpkin, coconut cream, maple syrup, and spices. All these ingredients are plant-based, making this dip perfect for anyone on a vegan diet. Be sure to check the labels on your coconut cream and maple syrup to ensure they are indeed vegan. You can serve this dip with many tasty items. Some popular options are: - Apple slices - Graham crackers - Celery sticks - Carrot sticks - Pretzels Each of these adds a nice crunch and pairs well with the creamy dip. You can even use cookies or pita chips for a fun twist! Absolutely! This dip is great for making ahead. You can prepare it a day in advance. Just store it in an airtight container in the fridge. This allows the flavors to blend well. Be sure to give it a quick stir before serving. If you want the best taste, aim to eat it within 3 days. This blog post covered everything you need to know about making a delicious vegan pumpkin fluff dip. We discussed the main ingredients, step-by-step instructions, and some handy tips. You also learned about variations and storage options to keep your dip fresh. Enjoy experimenting with flavors and serving ideas for any occasion. With these guidelines, you’ll create a tasty treat that everyone will love. Dive in and have fun with your pumpkin dip!

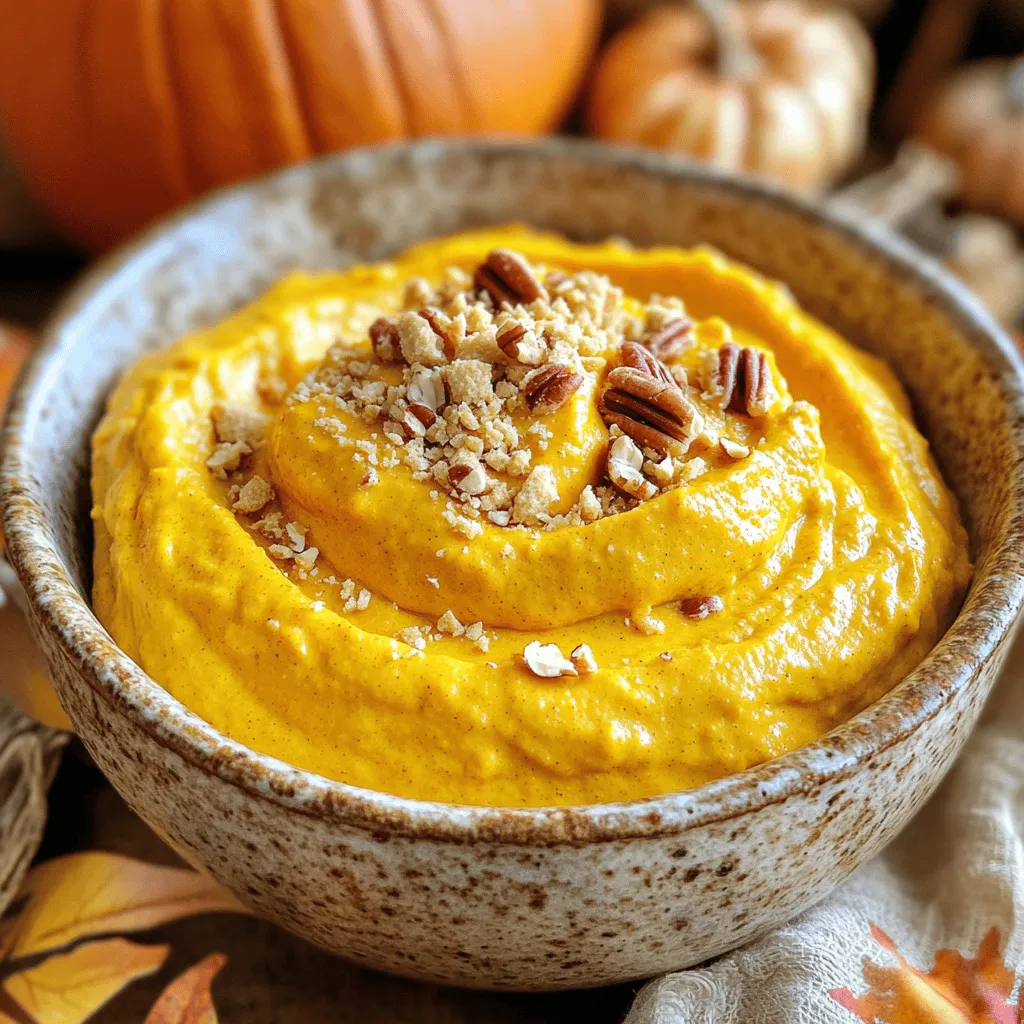
Get ready to indulge in a creamy, dreamy treat: Vegan Pumpkin Fluff Dip! This simple recipe calls for just six tasty ingredients, including smooth pumpkin puree and rich coconut cream. …

Read more

Categories Desserts

Cucumber and Sweet Pepper Salad Fresh and Crunchy Delight

August 18, 2025 by Chef Remy
- 2 cups cucumbers, thinly sliced - 1 cup assorted sweet bell peppers (red, yellow, orange), finely sliced - 1/2 red onion, cut into thin slices - 1/4 cup fresh parsley, finely chopped - 1/4 cup feta cheese, crumbled (optional) - 3 tablespoons extra virgin olive oil - 2 tablespoons apple cider vinegar - 1 teaspoon honey - Salt and freshly ground black pepper, to taste When measuring ingredients, be precise for the best taste. Use fresh vegetables for crunch and flavor. Wash the cucumbers and sweet peppers well to remove dirt. Slice the cucumbers evenly so they mix well with other ingredients. Thin slices of sweet peppers add a nice texture and vibrant look. You can add feta cheese for a creamy taste. Try adding sliced olives or cherry tomatoes for more color. A pinch of red pepper flakes can give your salad a bit of heat. Fresh herbs like basil or mint can also boost flavor. These extras make your salad even more exciting! Start by washing the cucumbers and sweet peppers under cold water. This step is key for removing dirt and residues. Next, slice the cucumbers into thin, even rounds. Aim for about a quarter inch in thickness. This helps all the pieces blend well. For the sweet peppers, cut them into delicate strips. Use red, yellow, and orange peppers for a colorful touch. Make sure all pieces are similar in size; this ensures a uniform look and taste. Now, slice half a red onion into thin pieces, keeping them consistent in size with the other veggies. Place all the sliced veggies in a big mixing bowl. In a separate small bowl, whisk together three tablespoons of extra virgin olive oil and two tablespoons of apple cider vinegar. The olive oil adds richness, while the vinegar gives a zesty kick. Then, stir in one teaspoon of honey for a hint of sweetness. Add salt and freshly ground black pepper to taste. Mix the dressing until it is well blended and slightly thickened. This will enhance the flavors in your salad. Now, it's time to bring everything together. Drizzle the prepared dressing over the bowl of veggies. Toss gently to coat all the ingredients evenly. Be careful not to mash the vegetables; you want them to stay crisp. Next, add a quarter cup of finely chopped parsley and, if you like, a quarter cup of crumbled feta cheese. Toss everything again gently, mixing in the parsley and feta without breaking them apart. For the best taste, let the salad sit for about ten minutes in the fridge. This resting time helps the flavors blend perfectly. Serve it up in a large, shallow bowl for a beautiful presentation. Enjoy your fresh and crunchy delight! When picking cucumbers, look for firm ones. They should be dark green and shiny. Avoid soft spots or blemishes. For sweet peppers, choose those with bright colors. Red, yellow, and orange peppers add great taste and color. They should feel heavy for their size. This means they are juicy and fresh. To get the best flavor, always wash your veggies well. This keeps dirt and pesticides away. Slice cucumbers thin for a nice crunch. Make sure the sweet peppers are cut into similar sizes. This helps them mix well. Use fresh parsley for a bright touch. If you like cheese, add feta for creaminess. Let the salad rest for 10 minutes. This time helps the flavors blend perfectly. For a lovely display, serve your salad in a shallow bowl. This makes it easy to see all the colors. You can sprinkle extra parsley on top to make it pop. Consider adding edible flowers for a fun touch. They will brighten your dish and impress your guests. Remember, we eat with our eyes first! {{image_4}} Want to make your cucumber and sweet pepper salad more filling? Adding protein is a great idea. Here are some tasty options: - Grilled Chicken: Slice grilled chicken breast and mix it in. The savory taste pairs well with the fresh veggies. - Chickpeas: For a plant-based choice, add canned chickpeas. They add texture and protein without meat. - Shrimp: Cooked shrimp gives a light seafood flavor. Toss in some shrimp for a delightful twist. - Tofu: Cubed tofu is a great vegan protein option. Marinate it first for extra flavor. Changing the dressing can give your salad a new life. Here are some ideas: - Lemon Vinaigrette: Replace apple cider vinegar with fresh lemon juice. This adds a bright and zesty flavor. - Creamy Dressing: Mix yogurt with herbs for a creamy option. It adds richness to the salad. - Balsamic Glaze: Drizzle balsamic glaze for a sweet and tangy kick. It works great with the veggies. - Spicy Dressing: Add a dash of hot sauce for some heat. This will spice up your salad nicely. This salad is already friendly for many diets, but here’s how you can make it gluten-free and vegan: - Gluten-Free: The ingredients are naturally gluten-free. Just check your dressing for any hidden gluten. - Vegan: Skip the feta cheese for a fully vegan dish. The salad is still delicious without it. - Whole Grains: Add quinoa or brown rice for a hearty, gluten-free addition. This makes the salad even more nutritious. Experiment with these variations to find your favorite mix. Each change can bring a new twist to the classic cucumber and sweet pepper salad! To keep your salad fresh, place it in an airtight container. Ensure the lid is tight to keep air out. Store it in the fridge for up to three days. If you have extra dressing, keep it separate. This helps prevent sogginess. When storing, avoid mixing in ingredients like feta cheese right away. Add it just before serving. This keeps the flavors bright and the texture crisp. For best results, eat the salad within the first day. Fresh is always best! Freezing this salad is not recommended. The cucumbers and peppers lose their crunch when thawed. If you want to enjoy it later, consider freezing the dressing separately. This way, you can whip up a fresh salad quickly when you need it. Yes, you can. Making this salad ahead is easy. Just prepare all the veggies and dressing. Keep them separate until you are ready to serve. This keeps the salad fresh and crunchy. If you mix it too early, the cucumbers may get soggy. If you do not have feta, try using goat cheese. Goat cheese gives a nice flavor too. You can also use cubed avocado for creaminess. For a nutty twist, sprinkle in some toasted sunflower seeds or pumpkin seeds. These options keep the salad tasty and fresh. To add heat, try slicing in some fresh jalapeños. They give a nice kick. You can also add red pepper flakes to the dressing. If you like a smoky flavor, use smoked paprika. These simple changes can turn up the spice level quickly. This blog post covered key ingredients and how to prepare a tasty salad. I shared tips on selecting fresh veggies and creating a rich dressing. You learned easy assembly steps for the perfect salad mix. I also explored fun variations to add protein or different dressings. Finally, I discussed how to store your salad for later enjoyment. Remember, simple choices lead to great meals. Enjoy making your salad your way!

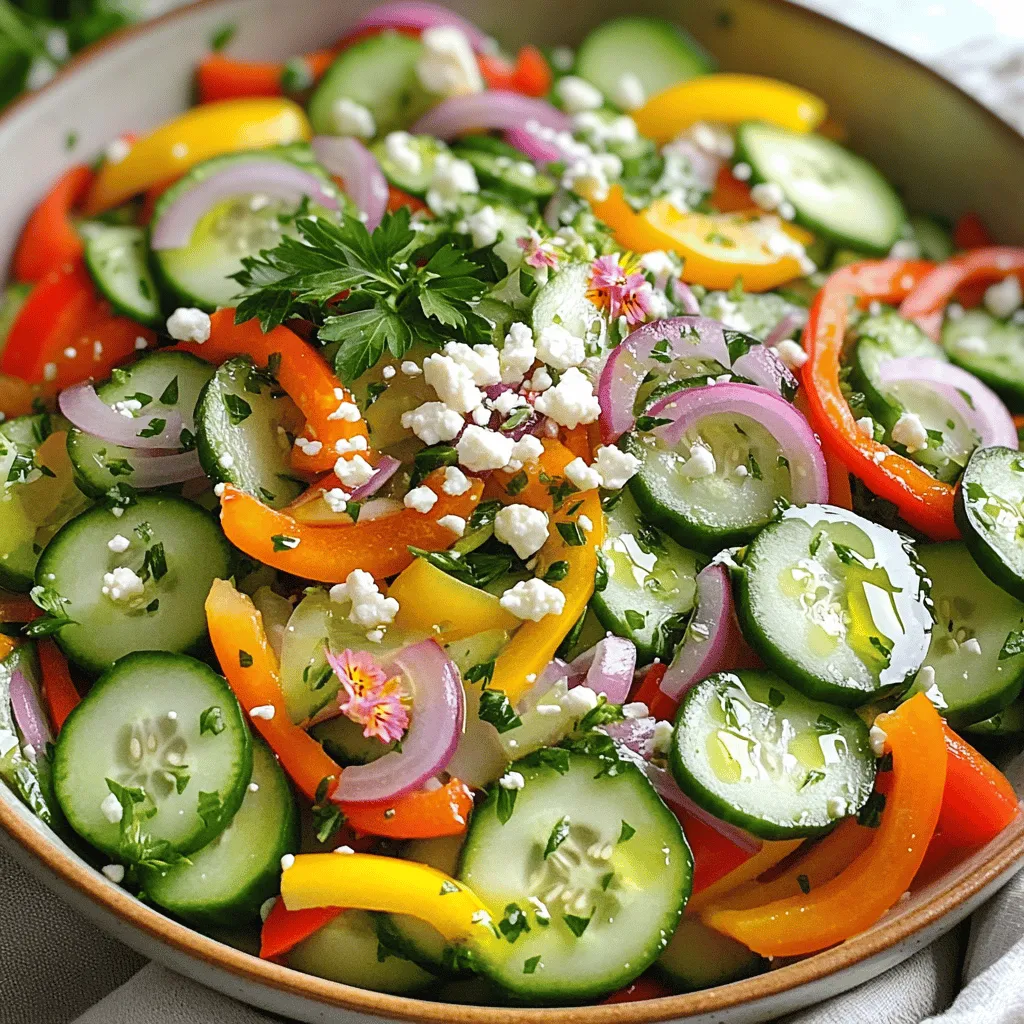
Looking for a fresh and crunchy salad that bursts with flavor? You’re in the right place! This Cucumber and Sweet Pepper Salad is easy to make and perfect for any …

Read more

Categories Salads

Savory Slow Cooker Chicken Noodle Soup Recipe

August 18, 2025 by Chef Remy
- Chicken and Broth Components - 2 boneless, skinless chicken breasts - 4 cups chicken broth - 2 cups water - Vegetables for Flavor and Texture - 1 large onion, diced - 3 cloves garlic, minced - 3 medium carrots, sliced into thin rounds - 3 celery stalks, chopped into bite-sized pieces - Herbs and Seasoning - 1 teaspoon dried thyme - 1 teaspoon dried rosemary - 1 bay leaf - 1 teaspoon salt (adjust to taste) - 1/2 teaspoon freshly ground black pepper - 2 cups egg noodles - 2 tablespoons fresh parsley, chopped (for garnish) This list covers all the essential ingredients you need to create a warm bowl of chicken noodle soup. Using fresh chicken and a mix of veggies helps build a tasty and hearty base. The herbs and spices add depth and flavor, making every bite comforting. Remember, you can adjust the salt to suit your taste. Start by placing the two chicken breasts in the slow cooker. Lay them flat at the bottom. This forms the base for our soup. It is key to keep the chicken whole for better flavor. Next, carefully pour in the four cups of chicken broth and two cups of water. This will ensure the chicken is fully submerged. Now, add one diced onion, three minced garlic cloves, three sliced carrots, and three chopped celery stalks. Spread everything evenly in the pot. Sprinkle in one teaspoon of dried thyme, one teaspoon of dried rosemary, one bay leaf, one teaspoon of salt, and half a teaspoon of black pepper. These herbs add great flavor. Secure the lid on the slow cooker. Set it to low and let it cook for 6 to 7 hours. The chicken will become tender and easy to shred. After the time is up, carefully take the chicken out using tongs. Shred the chicken into bite-sized pieces with two forks. Return the shredded chicken to the pot. Now, add two cups of egg noodles. Make sure they are well submerged in the broth. Cover the slow cooker again. Cook on high for 30 minutes until the noodles are tender. Before serving, taste the soup. Adjust the salt or pepper if needed. Don’t forget to remove the bay leaf! Ladle the warm soup into bowls. For a nice touch, sprinkle fresh parsley on top. This adds color and flavor to your dish. Enjoy your cozy soup! One common mistake is not seasoning enough. Always taste your soup before serving. If it needs more salt or pepper, add it. Another mistake is overcrowding the pot. Stick to the recipe's ingredient amounts. Too many veggies can make the soup too thick. Lastly, avoid cooking the noodles too long. They can turn mushy if left in the soup too long. You can easily boost the flavor of your soup. Try adding a splash of lemon juice for brightness. A tablespoon of soy sauce adds depth. You can also toss in some fresh spinach or kale for extra nutrition. If you like heat, add a pinch of red pepper flakes. This will give your soup a nice kick. Fresh herbs like dill or cilantro can also enhance the taste. Serve your soup with crusty bread or warm rolls. They are great for dipping. You may also add a side salad for a fresh crunch. For a fun twist, try adding some cheese on top of the soup. Grated Parmesan or shredded cheddar can add richness. Don't forget to sprinkle extra parsley for color before serving. {{image_4}} You can switch the chicken for turkey. Turkey breast works great in this soup. You can also use shredded rotisserie chicken for quicker prep. For a vegetarian option, try chickpeas or lentils. They add protein and a nice texture. Adding more veggies boosts the soup's nutrition. You can toss in some spinach or kale for a green touch. Bell peppers add color and crunch. Zucchini or peas also work well. Don’t be afraid to mix in whatever you have on hand! To make this soup gluten-free, swap the egg noodles for gluten-free pasta. You can also use zucchini noodles for a low-carb option. Just add them in the last 10 minutes of cooking. This keeps them tender but not mushy. To store leftovers, let the soup cool down to room temperature. Then, transfer it into airtight containers. Make sure to separate any noodles if you want them to stay firm. Keep the soup in the fridge for up to three days. For longer storage, freeze the soup. Use freezer-safe containers or bags. Leave some space in the containers for the soup to expand as it freezes. The soup can last for up to three months in the freezer. To reheat, thaw the soup overnight in the fridge if frozen. Heat it on the stove over medium heat, stirring often. You can also use the microwave. If the noodles get too mushy, you can add fresh noodles when reheating. Adjust the seasoning if needed for added flavor. Yes, you can use frozen chicken. Just add it to the slow cooker without thawing. The cooking time may be a bit longer, around 7 to 8 hours on low heat. Frozen chicken will cook through and become tender, just like fresh chicken. To make your soup creamier, add half a cup of heavy cream or whole milk. Stir it in during the last 30 minutes of cooking. You can also blend a portion of the soup and mix it back in for a thicker texture. If you need a substitute for egg noodles, try using rice or gluten-free pasta. Cook them separately and add them to the soup just before serving. This way, they won’t become mushy in the slow cooker. This soup lasts about 3 to 4 days in the fridge. Make sure to store it in an airtight container. Reheat it on the stove or in the microwave when you're ready to enjoy it again. Yes, you can make this soup on the stove. Start by boiling the broth and adding the chicken and veggies. Let it simmer for about 30 to 40 minutes until the chicken is tender. Shred the chicken, then add the noodles and cook for another 10 minutes. This method is quicker but still delicious! This blog post covered the key ingredients and steps for making delicious chicken soup. You learned about the best herbs, spices, and vegetables to boost flavor. We discussed tips to avoid common mistakes and enhance your dish further. I also shared storage advice to keep leftovers fresh. In conclusion, with a few simple steps and variations, you can create a soup that warms the soul. Enjoy experimenting and making it your own!

Looking for a warm, comforting meal? My Savory Slow Cooker Chicken Noodle Soup recipe will be your new favorite! This easy dish is perfect for busy days or chilly nights. …

Read more

Categories Dinner
Older posts
Newer posts
← Previous Page1 … Page41 Page42 Page43 … Page130 Next →

ROASTED RECIPES

Where bold flavors meet everyday meals. Warm, vibrant, and made to share. 🔥🥗🍴

PAGES

Home About Contact Privacy Policy Terms & Conditions Cookie Policy GDPR Policy Copyright Policy Disclaimer

CATEGORIES

Appetizers Desserts Salads Breakfast Dinner

Contact

  • Pinterest
  • Mail
Copyright © 2025 Roasted Flavors. All rights reserved.