Skip to content
Roasted Flavors
  • Home
  • Appetizers
  • Desserts
  • Salads
  • Breakfast
  • Dinner
  • Privacy Policy
  • Contact
  • About

Chef Remy

Creamy Pumpkin Sage Ravioli with Brown Butter Bliss

November 5, 2025 by Chef Remy
- 2 cups all-purpose flour - 2 large eggs - 1/2 teaspoon salt - 1 cup canned pumpkin puree - 1/2 cup ricotta cheese - 1 teaspoon grated Parmesan cheese - 1/2 teaspoon ground nutmeg - Salt and pepper to taste - 6 tablespoons unsalted butter - 10 fresh sage leaves - Grated Parmesan for serving When making creamy pumpkin sage ravioli, every ingredient matters. The dough starts with all-purpose flour, eggs, and a touch of salt. This mix gives the pasta its structure and flavor. Next, the filling needs canned pumpkin puree, ricotta cheese, Parmesan cheese, ground nutmeg, and some salt and pepper. This mix creates a rich, savory taste that pairs well with the pasta. For the brown butter sage sauce, you will need unsalted butter and fresh sage leaves. This sauce brings everything together with its warm, nutty flavor. Grated Parmesan on top adds a nice finish. Each ingredient plays a role, making this dish a true delight. 1. Start by sifting 2 cups of all-purpose flour and 1/2 teaspoon of salt into a large mixing bowl. This helps to aerate the flour and remove lumps. 2. Next, create a deep well in the center of the flour. Crack 2 large eggs into this well. 3. Use a fork to slowly mix the flour into the eggs. Incorporate the flour gradually until the dough forms. 4. Knead the dough on a lightly floured surface for about 8-10 minutes. It should become smooth and elastic. 5. Wrap the dough in plastic wrap and let it rest for 30 minutes at room temperature. This allows the gluten to relax. 1. In a medium bowl, mix 1 cup of canned pumpkin puree, 1/2 cup of ricotta cheese, and 1 teaspoon of grated Parmesan cheese. 2. Add 1/2 teaspoon of ground nutmeg and a pinch of salt and pepper. 3. Stir well until all ingredients are combined. Taste the filling and adjust the seasoning to your liking. 1. After resting, cut the dough into two equal portions. 2. Using a pasta machine or a rolling pin, roll each piece out to about 1/16-inch thickness. 3. Remember to flour the surface and the dough to avoid sticking. 1. Lay out one sheet of rolled pasta on a lightly floured surface. 2. Using a teaspoon, place small dollops of filling, about 1 teaspoon each, evenly spaced 1 inch apart along one half of the pasta sheet. 3. Brush the edges of the filling with water to help seal. 4. Carefully fold the other half of the pasta sheet over the filling. Press down firmly around each filling to seal. 5. Use a pasta cutter or a sharp knife to cut between the ravioli, separating them. 1. Bring a large pot of salted water to a gentle boil. 2. Add the ravioli in batches, cooking for 3-4 minutes or until they float to the surface. 3. Once cooked, use a slotted spoon to remove the ravioli and set them aside on a warm plate. 1. In a large skillet, melt 6 tablespoons of unsalted butter over medium heat until it begins to foam. 2. Add 10 fresh sage leaves to the skillet and sauté for about 3-4 minutes, stirring often. 3. Continue cooking until the butter turns a golden brown and the sage leaves become crispy. 4. Remove from heat and get ready to toss your ravioli in this delicious sauce. To get the best pasta, check for smoothness and elasticity. When you knead the dough, it should feel soft. You want it to bounce back when you press it. Resting the dough is key. Wrap it and let it sit for 30 minutes. This helps the gluten relax, making it easier to roll out. Adjusting flavors is fun. Taste your filling and play with spices. Add more nutmeg for warmth or extra salt for flavor. Fresh herbs can boost the taste. Try adding a pinch of thyme or a touch of parsley. This makes your filling stand out. Knowing when ravioli are done is important. Watch for them to float. This means they are cooked through. Cooking them for 3-4 minutes is usually perfect. Avoid overcooking; this makes them mushy. Once they float, use a slotted spoon to take them out. Enjoy your perfect ravioli! {{image_4}} You can change the filling in your ravioli. Butternut squash works well instead of pumpkin. It has a sweet and nutty flavor. If you want a different taste, try mixing cheeses. Use goat cheese or mascarpone for a creamy twist. Both add depth and richness to your dish. While brown butter is classic, you can switch it up. Try sage oil for a lighter taste. It gives a fresh, herbal note to your ravioli. You can also add cream to your brown butter. This makes the sauce richer and even more velvety. Just stir in a splash of cream after browning the butter. If you need gluten-free options, use gluten-free pasta. Many great brands make pasta that tastes amazing. For those who prefer vegan meals, swap out the cheese. Use a nut-based cheese or silken tofu. You can also replace butter with a plant-based option. This keeps the dish creamy and delicious. To keep your ravioli fresh, store them properly. Place leftover cooked ravioli in an airtight container. Refrigerate them for up to three days. If you want to keep them longer, freeze them. For freezing, lay the uncooked ravioli on a baking sheet. Make sure they do not touch. Freeze them until solid, then transfer them to a freezer bag. They will last up to three months in the freezer. When it's time to enjoy your ravioli again, reheating is key. The best way to reheat cooked ravioli is in a skillet. Add a little water or broth to the pan. Heat over medium-low heat and gently stir until warm. This keeps the ravioli moist. If you prefer the microwave, place them in a bowl, add a splash of water, and cover loosely. Heat for 30-second intervals until warmed through. Avoiding sogginess is important. Do not overcook them. If you use the microwave, check often to ensure they don't get too hot. Enjoy your ravioli with that delicious brown butter sage sauce! The ravioli are done when they float to the top of the water. This usually takes about 3-4 minutes. Once they float, they are ready to eat. Be careful not to overcook them, or they may fall apart. Yes, you can make the pasta dough ahead of time. Wrap it well in plastic wrap. Store it in the fridge for up to 2 days. When you are ready to use it, let it sit at room temperature for 15 minutes before rolling it out. This helps it soften. You can pair the ravioli with a simple green salad. A salad with mixed greens and a light vinaigrette works well. You can also serve it with garlic bread for a heartier meal. A glass of white wine, like Pinot Grigio, complements the dish nicely. Making creamy pumpkin sage ravioli is a rewarding journey. You learned about essential ingredients, step-by-step methods, and helpful tips. Perfecting the pasta and filling takes practice but leads to delicious results. You can experiment with variations and dietary needs to suit your taste. Store and reheat your ravioli for later enjoyment. With these insights, you can create a special meal that impresses everyone. Enjoy your cooking adventure!

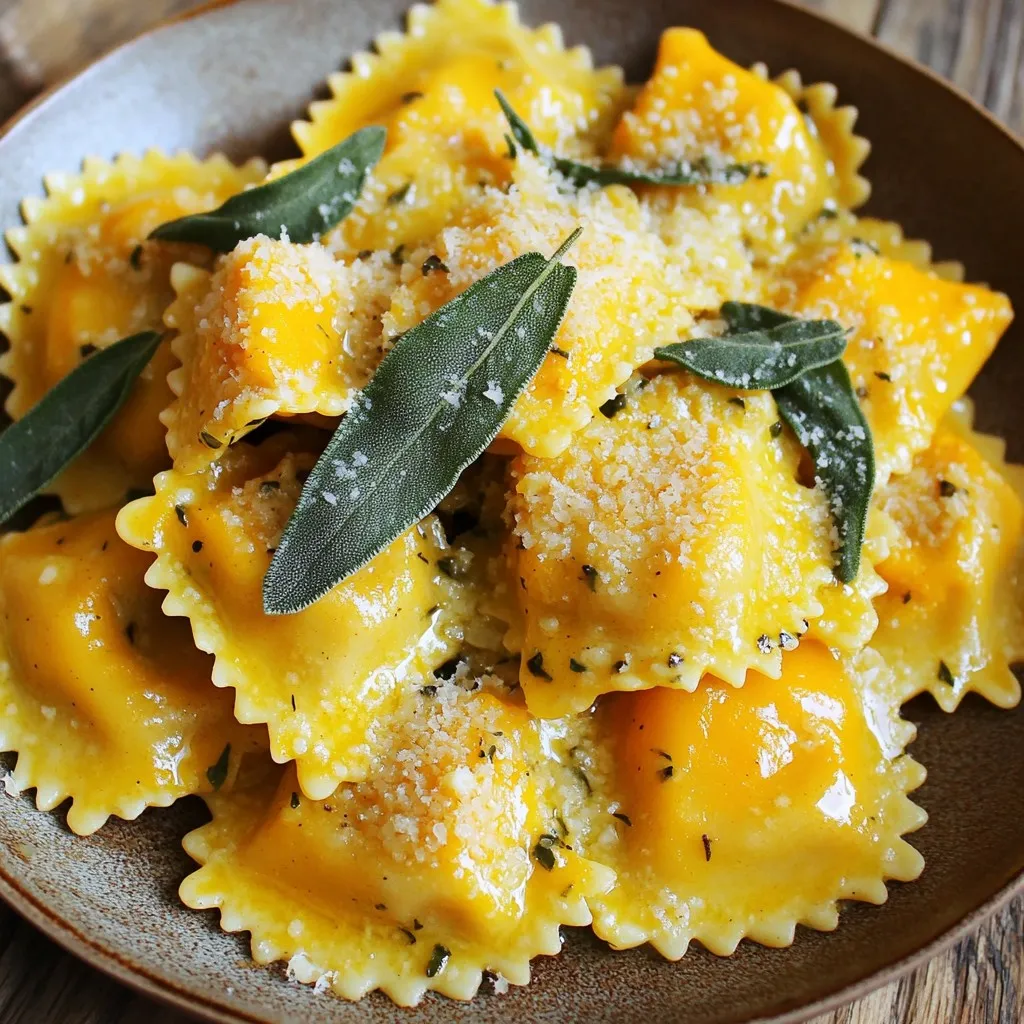
Get ready for a cozy culinary adventure with my Creamy Pumpkin Sage Ravioli with Brown Butter Bliss! This delightful dish combines the warmth of autumn flavors with the rich, nutty …

Read more

Categories Dinner

Air Fryer Garlic Parmesan Potato Wedges Crispy Delight

November 5, 2025 by Chef Remy
- 4 medium-sized russet potatoes - 3 tablespoons extra-virgin olive oil - 4 cloves garlic, finely minced - 1 teaspoon smoked paprika - 1 teaspoon dried oregano - 1/2 teaspoon freshly ground black pepper - Salt, to taste - 1/2 cup finely grated Parmesan cheese - Fresh parsley, chopped (optional) Gathering the right ingredients is key for making these crispy delights. The russet potatoes form the base of this dish. They have a great starch content, which helps achieve that perfect crispiness. I love using extra-virgin olive oil. It adds a rich flavor and helps the spices stick. Next, I always use freshly minced garlic. It brings a strong aroma and taste. For spices, smoked paprika enhances the flavor without being too spicy. Dried oregano adds a nice herbal note, while black pepper gives a gentle kick. Don't forget salt; it is essential for enhancing flavors. Finally, we can’t forget the topping! Grated Parmesan cheese adds that savory umami taste. It melts beautifully and creates a golden crust. Fresh parsley is optional, but it adds a pop of color and freshness. This mix of ingredients guarantees your potato wedges will be flavorful and delicious! Start by washing the russet potatoes under cold water. This step removes any dirt. Next, cut each potato into quarters lengthwise. You want thick wedges for a hearty bite. After cutting, gently pat the potato wedges dry with a paper towel. Removing moisture is key for crispiness. In a large bowl, mix the dried potato wedges with olive oil. Add minced garlic, smoked paprika, dried oregano, black pepper, and salt. Make sure to coat each wedge evenly with the oil and spices. This step is crucial for deep flavor in every bite. Now, preheat your air fryer to 400°F (200°C) for about 5 minutes. Preheating helps achieve the perfect crispness. Carefully place the seasoned potato wedges in the air fryer basket in a single layer. If your basket is small, cook in batches. Set the timer for 15 minutes. Halfway through, shake the basket to ensure even browning. After 15 minutes, pull out the basket carefully. Sprinkle grated Parmesan cheese over the hot potato wedges. This adds a delicious, cheesy layer. Return the basket back to the air fryer and cook for an additional 5-7 minutes. Watch for the wedges to turn crispy and golden brown. Once done, remove them from the air fryer and serve. Optionally, add chopped fresh parsley for color and freshness. To get those wedges nice and crispy, start by drying them well. Use a paper towel to soak up extra moisture after you cut the potatoes. This step is key for great crispiness. Next, set your air fryer to 400°F (200°C). This high heat cooks the wedges fast, making them golden and crunchy. Want to kick up the flavor? Try adding extra spices like chili powder or onion powder. These can bring a fun twist to your wedges. You can also experiment with different cheeses. Try mozzarella for a stretchy melt or feta for a tangy bite. For the best experience, serve your wedges with tasty dipping sauces. Creamy ranch or zesty garlic aioli pairs well with them. For a pretty presentation, place the wedges on a large platter. Drizzle with olive oil and sprinkle more Parmesan on top for a mouthwatering look. Adding fresh parsley as a garnish can make the dish pop with color. {{image_4}} To add heat, mix in chili flakes or cayenne pepper. Start with a pinch. Adjust to your heat level. The heat pairs well with garlic and cheese. You’ll find a nice kick in each bite. This adds a fun twist to the classic flavor. Fresh herbs elevate the taste. Try adding chopped rosemary or thyme. These herbs bring a nice aroma and depth. Just mix them into the seasoning. They blend well with garlic and olive oil. You’ll create a unique and fresh flavor profile. Want a plant-based twist? Substitute Parmesan with nutritional yeast. It gives a cheesy flavor without dairy. Use the same amount as you would Parmesan. This option is tasty and friendly for many diets. Your potato wedges will still shine with flavor. To keep your potato wedges fresh, store them in the fridge. First, let them cool down. Then, place them in an airtight container. This helps keep moisture out. You can also use a zip-top bag. Just remove as much air as you can. When it’s time to enjoy leftovers, the best way to reheat potato wedges is in the air fryer. Set it to 350°F (175°C) for about 5-7 minutes. This method keeps the wedges crispy. Avoid using the microwave, as it can make them soggy. If you do use the microwave, heat them for just 30 seconds, but be ready for a less crispy result. You can freeze both uncooked and cooked potato wedges. If freezing uncooked wedges, follow your recipe steps but skip the cooking. Spread them on a baking sheet and freeze until solid. Then, place them in a bag. For cooked wedges, let them cool completely before freezing. When you're ready to use them, put uncooked wedges straight in the air fryer. For cooked wedges, reheat as mentioned above. Air fryer garlic Parmesan potato wedges can last about 3 to 5 days in the fridge. Keep them in an airtight container for best results. To enjoy them again, reheat in the air fryer or oven to restore their crispiness. Yes, you can use other potatoes, like Yukon Gold or sweet potatoes. Each type gives a different flavor and texture. Just adjust cooking time based on the thickness of your wedges. To make your wedges extra crispy, follow these tips: - Ensure your potato wedges are dry before seasoning. - Use a high temperature, like 400°F (200°C). - Don't overcrowd the air fryer basket; cook in batches if needed. This recipe is naturally gluten-free. All the ingredients, like potatoes and spices, contain no gluten. However, always check labels on packaged items, like cheese, to ensure they are gluten-free. You now have a simple way to make delicious air fryer garlic Parmesan potato wedges. Start with fresh russet potatoes and season them well for a great flavor. Remember to dry your wedges for extra crispiness. You can also customize them with spices or toppings you love. Storage and reheating tips will help you enjoy leftovers. These wedges are fun to make and share. I hope you try this recipe and find joy in every bite.

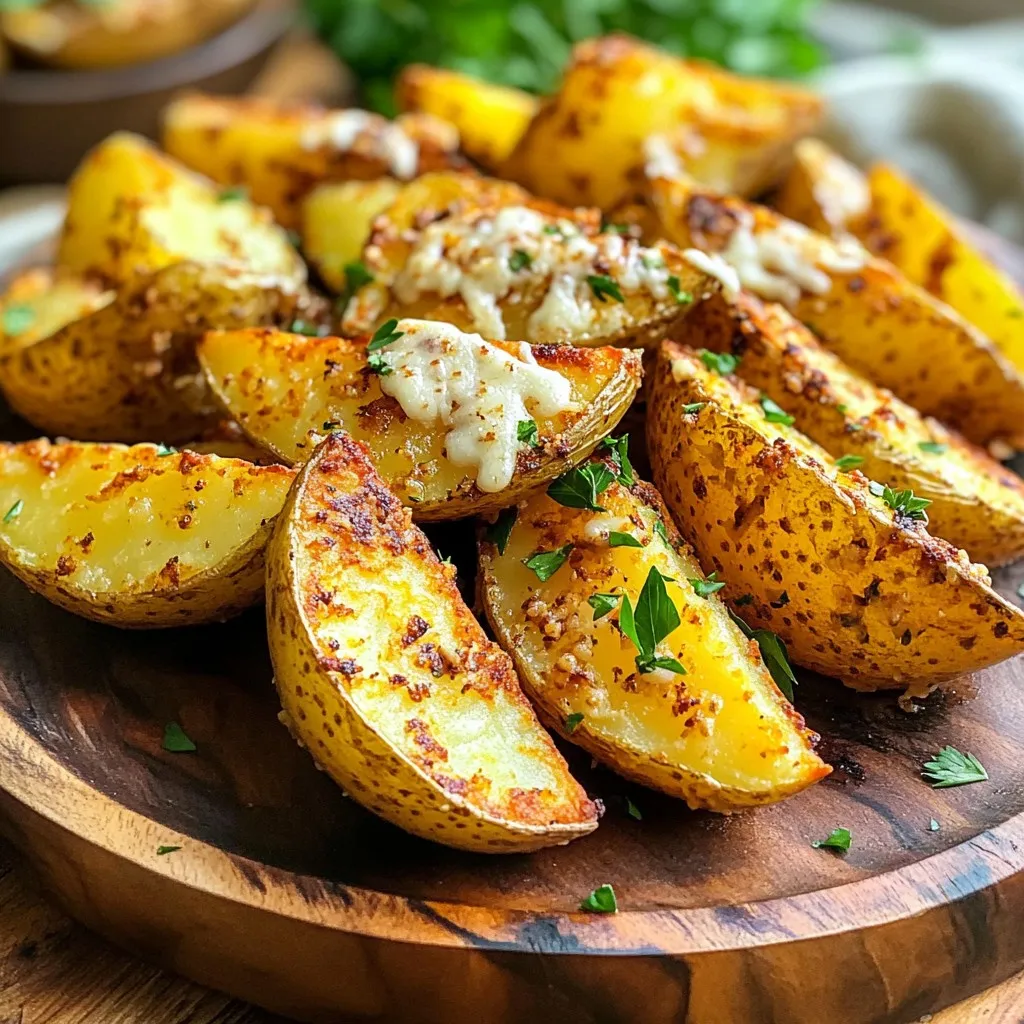
If you crave a snack that’s both crispy and packed with flavor, look no further! My Air Fryer Garlic Parmesan Potato Wedges are the perfect solution. With just a handful …

Read more

Categories Appetizers

Protein Pumpkin Spice Cottage Cheese Bowl Delight

November 3, 2025 by Chef Remy
- Cottage cheese - Pumpkin puree - Maple syrup (or honey) - Pumpkin pie spice - Vanilla extract - Chia seeds - Granola - Chopped pecans or walnuts - Optional garnish: ground cinnamon The Protein Pumpkin Spice Cottage Cheese Bowl is packed with flavor and nutrients. Each ingredient plays a key role. Cottage cheese forms the creamy base. It is high in protein and adds a great texture. Pumpkin puree brings that warm, autumn taste. It also adds vitamins and fiber. Maple syrup or honey gives just the right sweetness. You can choose based on your taste. Pumpkin pie spice combines cinnamon, nutmeg, and cloves for that classic fall flavor. Vanilla extract adds depth to the mix. Chia seeds boost nutrition with healthy omega-3s. Granola adds a satisfying crunch. Chopped nuts like pecans or walnuts provide extra texture and healthy fats. For a lovely finish, ground cinnamon can sprinkle on top. This simple bowl is not just tasty; it is also good for you. Enjoy all these ingredients together for a delightful treat! To start, grab a medium mixing bowl. In the bowl, combine 1 cup of cottage cheese and 1/2 cup of pumpkin puree. Use a whisk or a spoon to mix them well. Keep stirring until the mixture is smooth and creamy. This step is key. You want a nice, fluffy base that makes each bite enjoyable. Now, let’s add some flavor! Pour in 1 tablespoon of pure maple syrup, 1 teaspoon of pumpkin pie spice, and 1/2 teaspoon of vanilla extract. Mix it all together until every part of the base gets that delicious flavor. This blend of sweet and spice lifts the dish. Next, sprinkle 1 tablespoon of chia seeds over the mixture. Gently fold them in with your spoon. These tiny seeds pack a protein punch and add a fun texture. You’ll love the little crunch they bring to your bowl. Once your mixture is ready, it’s time to serve. Transfer it into a lovely serving bowl, spreading it out evenly. Aim for a smooth, even layer on top. This makes your bowl look nice and inviting. Finally, let’s make it extra special! Generously sprinkle 1/4 cup of granola and 1 tablespoon of chopped pecans or walnuts on top. This adds a great crunch. For a finishing touch, lightly dust the top with ground cinnamon. This spice adds a warm aroma that pairs perfectly with pumpkin. Enjoy your Protein Pumpkin Spice Cottage Cheese Bowl! To make your Protein Pumpkin Spice Cottage Cheese Bowl look great, try layering the ingredients. Start with the creamy base, then add granola and nuts on top. This creates a colorful display. You can use a clear glass bowl to show off those layers. Alternatively, a rustic wooden bowl adds a cozy, autumn feel. You can easily adjust the sweetness of your bowl. If you like it sweeter, add more maple syrup or honey. If you prefer less sweetness, use less. Change the spice levels, too! If you want more warmth, add extra pumpkin pie spice. For a milder taste, reduce the amount of spice you use. Want to make your bowl even healthier? Add superfoods like chia seeds or flaxseeds. These tiny seeds pack in extra protein and fiber. You can also mix in fruits like bananas or berries for added taste and nutrients. If you want a vegan option, swap cottage cheese for a plant-based alternative like almond or soy yogurt. {{image_4}} You can change your Protein Pumpkin Spice Cottage Cheese Bowl with seasonal fruits. Apples and pears add a nice crunch and sweetness. Slicing them thinly makes them easy to mix in or top. You can also swap in different fall spices. Try nutmeg, allspice, or ginger for a new twist. Each spice brings out unique flavors in the pumpkin. If you want a vegan option, you can use plant-based cottage cheese. There are many brands that offer great taste. For those who need gluten-free options, choose gluten-free granola. Many brands offer tasty choices that fit this need. These swaps help everyone enjoy this bowl. Want to mix it up? Try using chocolate protein powder for a chocolate twist. This simple change makes it rich and decadent. You can also play with nut butters as toppings. Almond, cashew, or peanut butter all work well. Each nut butter adds a creamy texture and new flavor. To store leftovers in the fridge, use an airtight container. This keeps the bowl fresh for up to three days. Make sure to let it cool before sealing. For best practices, try to avoid adding toppings until you are ready to eat. This keeps the granola crunchy and the nuts fresh. Yes, you can freeze the mixture. Place it in a freezer-safe container with a lid. It will stay good for about one month. When you are ready to eat it, thaw in the fridge overnight. Reheat in the microwave for about one minute, stirring halfway through. This will help restore the creamy texture. For meal prep, consider portion sizes of about one cup. This makes it easy to grab and go. You can also mix things up through the week. Try adding different toppings like fruits or seeds. You could also switch the nut types or use different spices for variety. This bowl is a tasty mix of cottage cheese and pumpkin. It has a creamy base and a hint of spice. You use pumpkin puree, maple syrup, and pumpkin pie spice for flavor. Chia seeds add nutrition, making it a protein-rich snack. Topped with granola and nuts, it offers a nice crunch. It’s both healthy and delicious, perfect for breakfast or a snack. Yes, you can use fresh pumpkin! Fresh pumpkin gives a nice flavor and texture. However, it takes time to cook and puree. Canned pumpkin is quick and easy, and it’s often smoother. If you want to save time, canned is a great choice. If you use fresh, just cook it until soft, then puree it well. To sweeten the bowl, you can add more maple syrup or honey. Both give a nice touch of sweetness. You can also use stevia or agave syrup for a different flavor. Just start with a small amount and taste as you go. This lets you find the perfect sweetness for your liking. Yes! This bowl is great for meal prep. You can make it in advance and store it in the fridge. Just keep the toppings separate until you’re ready to eat. This keeps the granola crunchy. You can prepare several servings at once to enjoy throughout the week. This bowl has about 350 calories in total. The cottage cheese is high in protein, while the pumpkin adds fiber. The granola and nuts add healthy fats and some extra calories. If you want to lower the calories, use less granola or skip the nuts. Absolutely! You can use dairy-free cottage cheese made from nuts or soy. Another option is to use Greek yogurt made from coconut. Both will give you a similar texture. Be sure to check labels for added sugars and ingredients to fit your needs. This blog post detailed how to create a delicious Protein Pumpkin Spice Cottage Cheese Bowl. You learned the key ingredients, step-by-step instructions, and helpful tips for customization and presentation. Don't forget about variations and storage tips to keep your bowl fresh. Enjoy experimenting with flavors and textures. This dish can fit any season or dietary need. With a few tweaks, you can enjoy this nutritious treat anytime!

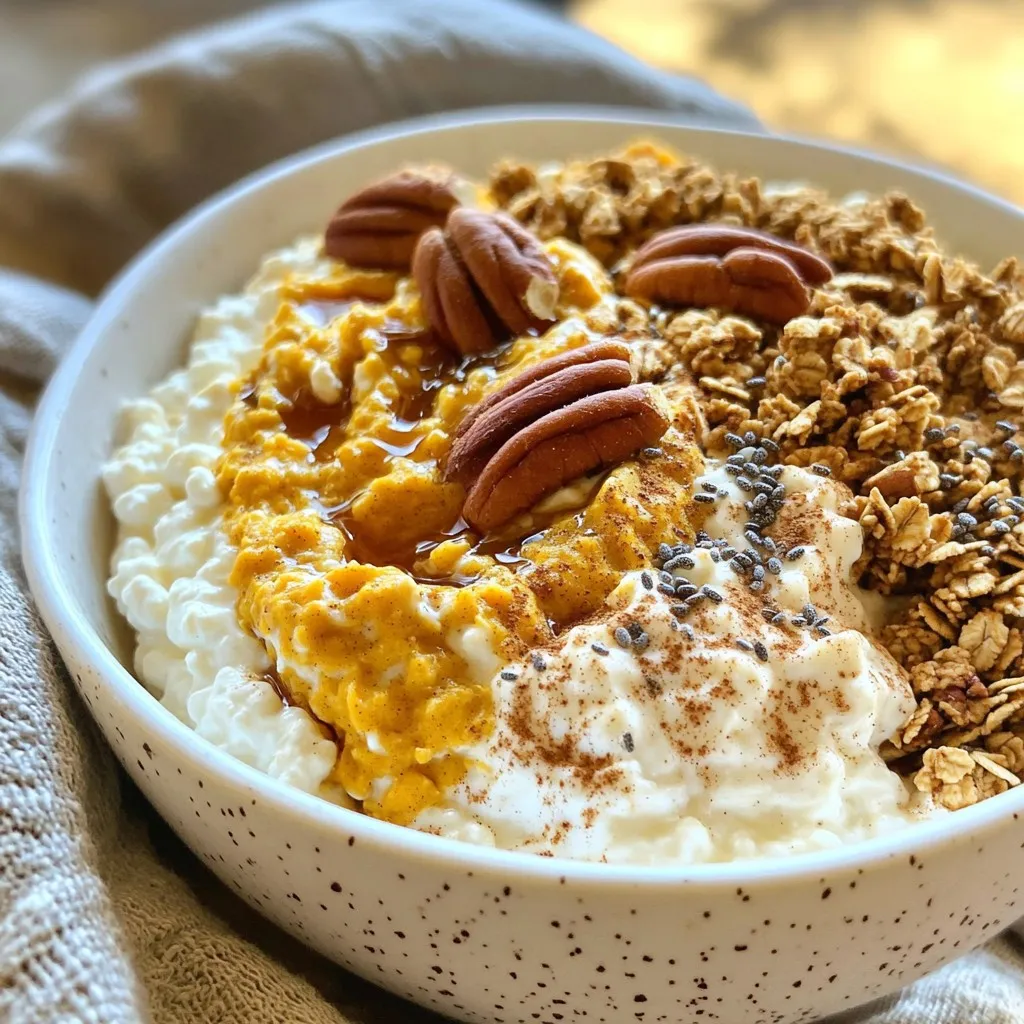
If you’re craving a healthy, tasty treat this fall, look no further! The Protein Pumpkin Spice Cottage Cheese Bowl Delight is your answer. It combines creamy cottage cheese and pumpkin …

Read more

Categories Breakfast

Air Fryer Cajun Potato Wedges Crispy and Flavorful

November 3, 2025 by Chef Remy
- 4 medium russet potatoes - 3 tablespoons olive oil - 2 teaspoons Cajun seasoning - 1 teaspoon garlic powder - 1 teaspoon smoked paprika - ½ teaspoon onion powder - ½ teaspoon black pepper - Salt, to taste - Fresh parsley for garnish - Additional spices for enhanced flavor - Dipping sauces to serve alongside When I make these air fryer Cajun potato wedges, I love using russet potatoes. They are starchy and crisp up nicely. The olive oil helps the spices stick and adds flavor. Cajun seasoning adds a spicy kick that I can’t resist. I also throw in garlic powder and smoked paprika for depth. The onion powder and black pepper round everything out. For a fun twist, I often mix in other spices based on my mood. I might add some cayenne for heat or Italian herbs for a different flavor. Dipping sauces are a must! I enjoy ranch, spicy ketchup, or garlic aioli on the side. They make the meal even better. I start by washing the potatoes well. I use 4 medium russet potatoes for the best texture. After washing, I cut them into wedges. Aim for uniform sizes for even cooking. Soaking the wedges in water is optional. If you soak them for 30 minutes, it helps make them crispier. After soaking, drain and dry them thoroughly. Next, I coat the wedges with 3 tablespoons of olive oil. I drizzle the oil over the wedges in a large mixing bowl. This helps the spices stick and makes them crispy. In a small bowl, I mix 2 teaspoons of Cajun seasoning, 1 teaspoon of garlic powder, 1 teaspoon of smoked paprika, ½ teaspoon of onion powder, ½ teaspoon of black pepper, and salt. I whisk these spices together until they blend well. Then, I sprinkle the spice mix over the oiled wedges. I toss the wedges gently, ensuring every piece gets a good coating. I preheat my air fryer to 400°F (200°C) for about 5 minutes. This step is key for even cooking. After preheating, I arrange the seasoned wedges in the air fryer basket. I make sure they lie flat in a single layer to avoid steaming. If needed, I cook them in batches. I set the timer for 15 to 20 minutes. Halfway through, I shake the basket. This helps them crisp up all around. When they turn golden brown and crispy, I take them out. I love adding a sprinkle of fresh parsley on top before serving. To get the best crispy texture, oil is key. I recommend using olive oil. Three tablespoons work great for four medium potatoes. This amount helps coat each wedge well. Make sure the wedges are in a single layer in the air fryer. This ensures hot air reaches all sides, giving you that perfect crunch. If you crowd the basket, the wedges will steam instead of fry, and you’ll lose that crispiness. You can boost the flavor with your choice of herbs and spices. Besides Cajun seasoning, try adding a pinch of cayenne for heat. If you prefer milder flavors, reduce the spice amount. You can even mix in dried herbs like oregano or thyme for a twist. Tailor the spice levels to fit your taste. Taste the seasoning blend before tossing it on the wedges to find the right balance for you. For a fun serving idea, use a rustic basket to hold the hot wedges. You can also use a colorful platter. This makes the dish pop on the table. Pair the wedges with tasty dips like garlic aioli or spicy ketchup. These dips complement the flavors and add an extra layer of fun. Your guests will love the options! {{image_4}} You can make these Cajun potato wedges healthier by using less oil. Instead of three tablespoons, try two or even one. You can also cook them in the oven if you prefer. Just spread them on a baking sheet and bake at 400°F (200°C) for about 25-30 minutes. You can substitute regular potatoes with sweet potatoes. Sweet potatoes add a different flavor and more nutrients. You can also try using zucchini or carrots cut into wedges for a fun twist. You can play with spice levels by using spicy Cajun seasoning or milder options. If you want less heat, try half the amount of Cajun seasoning. You can also mix in some Italian herbs or even taco seasoning for a fun change. Other seasoning blends to try include garlic and herb mixes or lemon pepper. These can give your wedges a fresh taste and keep things exciting. Explore flavors from around the world by trying different cultural seasonings. For example, use za'atar for a Middle Eastern flair or curry powder for an Indian twist. You can also think about creative takes from international cuisines. Try adding chimichurri sauce from Argentina or a spicy sriracha mix from Thailand. These variations can make your potato wedges a unique dish every time. To keep your leftover potato wedges fresh, place them in an airtight container. You can store them in the fridge for about three days. If you want to save them longer, freeze them. Just make sure they cool down first. For freezing, use a freezer-safe bag. Squeeze out as much air as possible before sealing. When reheating, your goal is to keep them crispy. The best way to do this is in the air fryer. Set it to 350°F (175°C) and heat for about 5 to 7 minutes. This method brings back their crunch. You can also use an oven to reheat, but it might take a little longer. In the fridge, your potato wedges remain fresh for about three days. After this, they may start to lose their flavor and texture. You will know they are spoiled if they smell bad or feel slimy. It’s best to throw them away if you see any signs of mold. Always keep an eye on your leftovers to ensure they stay tasty and safe to eat. Yes, you can. You can bake them in the oven. Preheat your oven to 425°F (220°C). Line a baking tray with parchment paper. Spread the seasoned potato wedges on the tray. Bake for 25 to 30 minutes, flipping halfway through. This method gives you crispy wedges too! You can use several options. Try a mix of paprika, cayenne pepper, and garlic powder. You can also use taco seasoning or a store-bought spice mix. For a milder taste, use Italian seasoning or a blend of chili powder and cumin. Yes, these potato wedges are gluten-free. All the ingredients listed are naturally gluten-free. Make sure to check your seasoning for any hidden gluten. Enjoy these tasty wedges without worry! In this article, we explored how to make crispy, flavorful potato wedges. We covered the ingredients you need, from potatoes to spices, and provided step-by-step instructions. I shared tips for perfecting the texture and flavor, along with variations and storage advice. You can easily customize this dish to fit your taste. By following these steps, your wedges will impress family and friends. Enjoy every bite of your delicious creation!

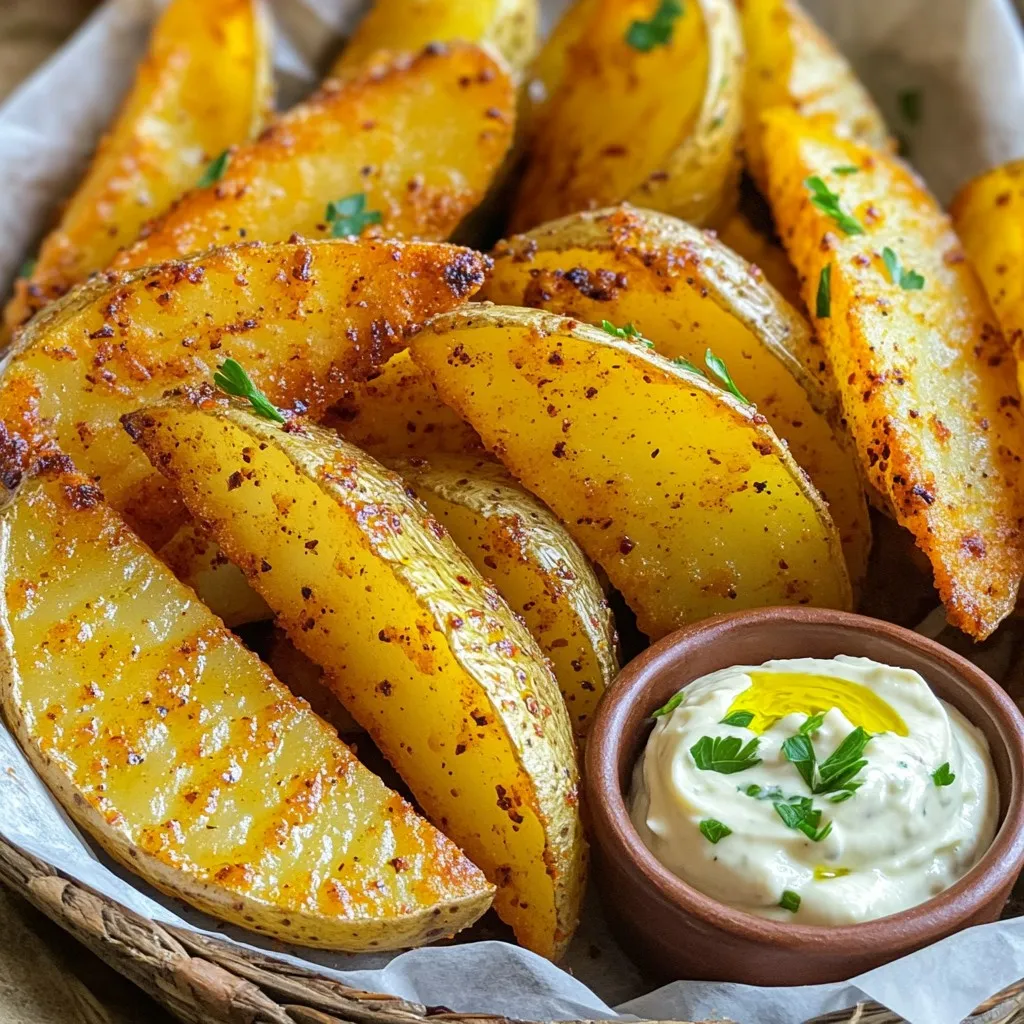
Crispy, flavorful, and bursting with zest, Air Fryer Cajun Potato Wedges can transform your snacking game. With just a handful of ingredients, you’ll whip up a mouthwatering treat that pairs …

Read more

Categories Appetizers

One-Pan Creamy Tuscan Salmon Rich and Flavorful Meal

November 3, 2025 by Chef Remy
To create the One-Pan Creamy Tuscan Salmon, you need fresh and quality ingredients. Here’s a detailed list: - 4 salmon fillets, skin-on for crispiness - 2 tablespoons extra virgin olive oil - Salt and pepper, to taste - 3 cloves garlic, finely minced - 1 cup cherry tomatoes, halved - 1 cup fresh baby spinach, rinsed - 1 cup heavy cream - 1 teaspoon Italian seasoning blend - 1/2 cup freshly grated Parmesan cheese - A handful of fresh basil leaves, for garnish - Salmon: If you cannot find salmon, try trout or chicken breast. - Heavy Cream: For a lighter sauce, use half-and-half or coconut cream. - Spinach: Kale or Swiss chard works well too. - Parmesan: Pecorino Romano adds a fun twist. - Salmon: Look for bright, firm fillets with no fishy smell. - Olive Oil: Choose extra virgin for the best flavor. - Tomatoes: Pick ripe cherry tomatoes that feel firm. - Spinach: Fresh spinach should be vibrant green and crisp. - Parmesan: Buy block cheese and grate it fresh for better taste. Using fresh and high-quality ingredients makes this dish shine. Enjoy crafting this meal! To start, heat 2 tablespoons of extra virgin olive oil in a large skillet over medium heat. While the oil warms, season both sides of the salmon fillets with salt and pepper. Use enough seasoning so that it coats the fillets well. This step is key to flavor. Choosing the right skillet matters. A non-stick or cast-iron skillet works best. These types help the salmon sear nicely and prevent sticking. For the perfect sear, wait until the oil shimmers. This shows that it is hot enough. Carefully place the salmon skin-side down. Let it cook without moving it for 4-5 minutes. This helps form a nice crust. Timing and temperature are important here. After the first side gets that golden-brown color, flip the fillets. Cook the other side for another 4-5 minutes. The salmon is done when it flakes easily with a fork. When removing the salmon, use a spatula. This helps keep the fillets intact. Place them on a plate and set them aside while you make the sauce. Now, let’s focus on the sauce. In the same skillet, add 3 cloves of minced garlic. Sauté for about 30 seconds, stirring constantly. This prevents the garlic from burning and brings out its flavor. Next, toss in 1 cup of halved cherry tomatoes. Sauté for 3-4 minutes until they soften and release their juices. Then, add 1 cup of fresh baby spinach. Stir it until it wilts, which takes about 1-2 minutes. Pour in 1 cup of heavy cream and add 1 teaspoon of Italian seasoning. Stir the mixture and let it gently simmer. This step is vital for blending the flavors. To thicken the sauce, mix in 1/2 cup of freshly grated Parmesan cheese. Stir until the cheese melts and the sauce becomes creamy. Adjust the seasoning with salt and pepper as needed. Finally, return the cooked salmon to the skillet. Spoon the creamy sauce over the fillets. Let everything simmer together for 2-3 minutes. This allows the flavors to meld beautifully. One-pan cooking is simple and fun. Here are some tips to make it easier: - Use a large skillet to fit all ingredients. A wide pan helps cook evenly. - Always season your salmon well. This adds great flavor and makes it tasty. - Keep the skin on the salmon for crispiness. It adds texture and flavor. To keep your salmon moist: - Cook over medium heat. This helps it cook slowly and keeps it tender. - Don’t overcook the salmon. It should flake easily but still be juicy. If you use different cuts of salmon, adjust cooking times. - For thicker cuts, increase cooking time by a couple of minutes. - If using thinner fillets, reduce cooking time to avoid dryness. Pair your creamy salmon with these sides: - Serve it over fresh pasta for a hearty meal. - Crusty bread goes well for dipping into the creamy sauce. - A light salad can balance the richness of the dish. For garnishing, try: - Fresh basil leaves for a pop of color and flavor. - A sprinkle of extra Parmesan cheese adds richness. - A squeeze of lemon juice brightens the dish. Meal prepping? - Cook the salmon and sauce, then store them separately. - This keeps the salmon fresh and prevents sogginess. - Reheat gently on low heat to keep it moist. {{image_4}} You can switch proteins in this dish. If you prefer chicken, use boneless thighs or breasts. Cook them for about 6-7 minutes per side. Shrimp is also a great option. Just sauté them for 3-4 minutes until they turn pink. For a vegetarian version, replace salmon with hearty tofu or chickpeas. Both options soak up the creamy sauce well. You can also use mushrooms for a meaty texture. Seasonal vegetables can boost flavor and nutrition. In spring, try asparagus or peas. In fall, use roasted butternut squash. Both add color and taste. To change the flavor, add spices or herbs. A pinch of red pepper flakes gives a nice heat. Fresh dill or parsley can brighten the dish. For something tangy, squeeze fresh lemon juice over the salmon. It pairs well with the cream sauce. If you love cheese, try adding feta or goat cheese. They add a different twist to the creamy sauce. Each type brings its own flavor. To keep your One-Pan Creamy Tuscan Salmon fresh, follow these steps: - Refrigerating: Place leftovers in an airtight container. Store in the fridge for up to 3 days. - Freezing: You can freeze the salmon. Wrap each piece tightly in plastic wrap, then place in a freezer bag. It lasts for up to 3 months. - Reheating: Reheat on low heat. Use a skillet or microwave. This keeps the salmon moist and creamy. For easy meal prep, consider these tips: - Prepping Ingredients: Chop garlic, halve tomatoes, and wash spinach ahead. Store them in separate containers. - Storing Components: Keep the salmon and sauce separate. This helps maintain freshness. - Repurposing Leftovers: Use leftover salmon in salads or pasta dishes. It adds great flavor and saves time. You can use Greek yogurt or coconut milk as a lighter sauce. Both options provide creaminess without the heaviness. If you want even less fat, try using broth and a little cornstarch for thickness. Mix the yogurt or coconut milk with the sautéed garlic and tomatoes for a tasty twist. Yes, you can use frozen salmon! First, thaw it in the fridge overnight or place it in a sealed bag and submerge it in cold water for quick thawing. Once thawed, cook it just like fresh salmon. Keep an eye on the cooking time, as frozen pieces may need a minute or two longer. This dish pairs well with many sides. Here are some tasty options: - Garlic bread for a nice crunch - Steamed broccoli for a green side - Pasta, like fettuccine or penne, to soak up the sauce - A fresh salad with a light vinaigrette to balance the creaminess The best way to check salmon is by using a meat thermometer. The perfect internal temperature is 145°F. If you don’t have a thermometer, look for the salmon to turn from bright pink to a lighter shade. It should also flake easily with a fork. In this blog post, we explored the essential ingredients, step-by-step instructions, and helpful tips for making One-Pan Creamy Tuscan Salmon. We covered how to choose high-quality ingredients, perfect your cooking technique, and serve the dish with flair. Remember, cooking is about enjoying the process as much as the meal. Follow these steps, use your creativity, and you’ll impress anyone at your table. This dish can easily become a favorite in your kitchen. Enjoy the flavors and make it your own!

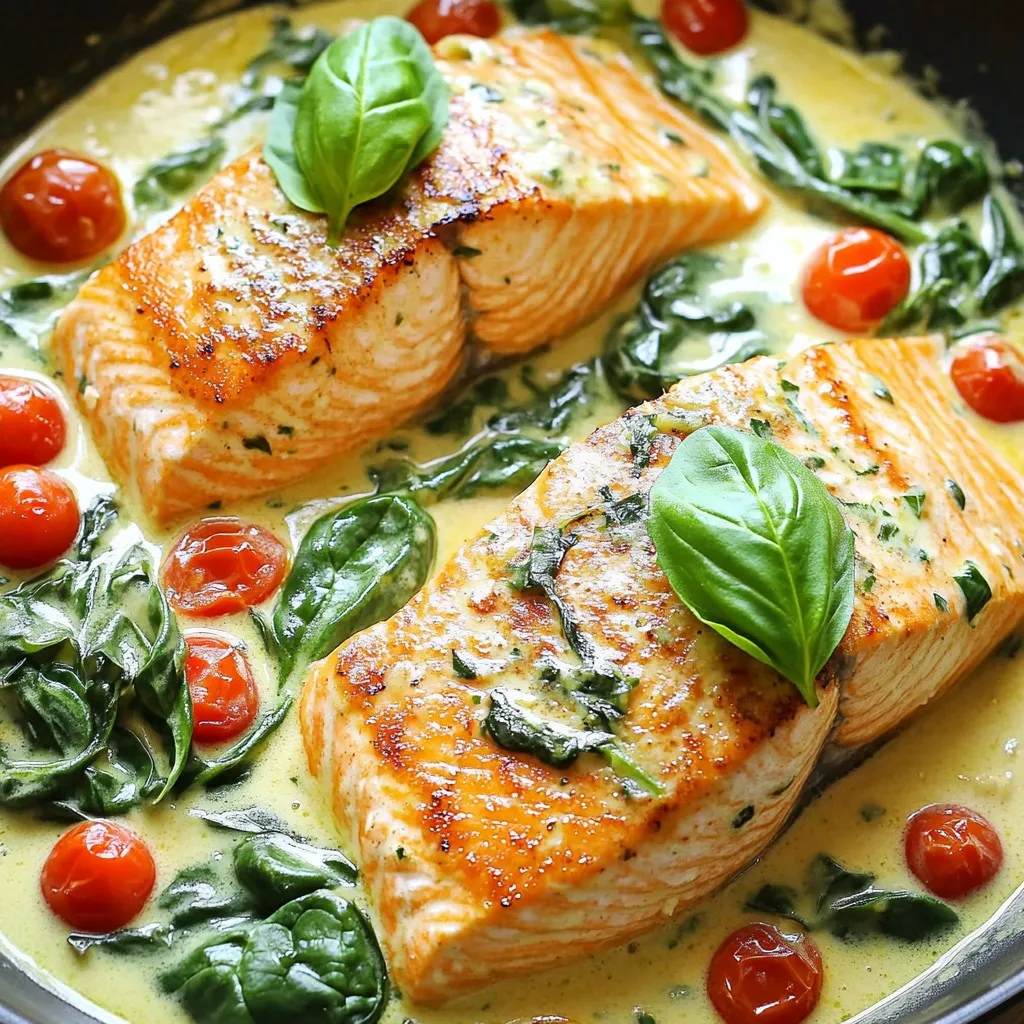
Are you ready to elevate your weeknight dinners? This One-Pan Creamy Tuscan Salmon is a delicious and rich meal that you’ll love. In just one skillet, I’ll guide you through …

Read more

Categories Dinner

Minute Chili Crisp Noodles Quick and Flavorful Meal

November 3, 2025 by Chef Remy
- 8 oz (225g) instant noodles - 2 tablespoons chili crisp (store-bought or homemade) - 2 tablespoons soy sauce - 1 tablespoon sesame oil - 1 teaspoon sugar - 1 cup mixed vegetables (carrots, bell peppers, and snow peas) - 2 green onions, finely sliced - 1 clove garlic, minced - 1 teaspoon ginger, minced - Optional garnishes: Fresh cilantro, sesame seeds To make Minute Chili Crisp Noodles, gather these ingredients first. You can find instant noodles at any store. Choose chili crisp based on your spice level. I love to use homemade chili crisp for extra flavor. The soy sauce adds saltiness. Sesame oil gives a nice nutty taste. Sugar balances the heat from the chili crisp. Mixed vegetables add color and crunch. I like to use carrots, bell peppers, and snow peas for their sweetness and texture. Don't forget the green onions, garlic, and ginger! They bring a fresh aroma. For a lovely finish, add cilantro and sesame seeds as garnishes. These ingredients make your dish not only tasty but also pretty. Once you have everything ready, you can start cooking! This quick meal is perfect for busy days. Plus, it’s easy to adjust based on what you have at home. Enjoy making your own version of this delicious dish! Fill a pot with water. Bring it to a rolling boil. Carefully add the instant noodles. Cook them for about 3-5 minutes, as the package says. When done, drain the noodles in a colander. Set them aside for later. Take a large non-stick skillet or wok. Pour in the sesame oil and heat it over medium heat. Once hot, add the minced garlic and ginger. Stir them for about 30 seconds. You want to smell their lovely fragrance. Now, toss in your mixed vegetables. I like using carrots, bell peppers, and snow peas for color. Stir-fry these for about 2-3 minutes. You want them to stay vibrant and crunchy. This keeps the dish fresh and appealing. In a small bowl, combine soy sauce, sugar, and chili crisp. Whisk these together well. It is important to dissolve the sugar fully. This step helps balance the flavors later on. Add the drained noodles to the skillet with the cooked vegetables. Pour the sauce mixture over everything. Use tongs or a spatula to gently toss them all together. Cook this for another 1-2 minutes. This allows all the flavors to meld. Remove the skillet from the heat. Plate the noodles in deep bowls. Garnish with sliced green onions and fresh cilantro if you like. A sprinkle of sesame seeds adds a nice touch too. For a zesty twist, add a wedge of lime on the side. To get the best noodle texture, start with boiling water. Add the instant noodles and cook them for 3-5 minutes. Drain them well. Rinse under cold water to stop cooking. This keeps them from getting mushy. You want them firm and bouncy. Making chili crisp at home is simple and fun. Start with these quick steps: - Ingredients: - ½ cup oil - 2 tablespoons chili flakes - 1 teaspoon garlic powder - 1 teaspoon onion powder - Salt to taste 1. Heat the oil in a pan. 2. Once hot, add chili flakes and mix well. 3. Stir in garlic and onion powder. 4. Cook for a minute until fragrant. 5. Let it cool and store in a jar. You can change the flavors by adding spices like paprika or cumin for a twist. These noodles pair well with many sides. Try serving with a fresh salad or crispy spring rolls. A cold drink like lime soda complements the heat. To boost the flavors, squeeze lime juice over the dish. Add more spices like crushed red pepper for an extra kick. Enjoy the mix of flavors! {{image_4}} You can easily add protein to your Minute Chili Crisp Noodles. Here are a few options: - Chicken: Use cooked, shredded chicken. It adds a hearty touch. - Tofu: For a plant-based choice, cube firm tofu. Sauté it for extra flavor. - Shrimp: Add peeled shrimp to the skillet. Cook until they turn pink. Each protein brings its own flavor and texture. Choose what fits your taste! This dish works well for vegetarians and vegans. Here are some simple swaps: - Soy Sauce: Use a low-sodium soy sauce to reduce salt. - Chili Crisp: Ensure the chili crisp is vegan-friendly. Some brands may use animal products. - Sugar: Substitute sugar with maple syrup or agave for a vegan option. These adjustments keep the dish tasty and suitable for all diets. Feel free to mix in seasonal vegetables! Here are some great ideas: - Broccoli: Adds crunch and nutrients. - Zucchini: Slice it thin for quick cooking. - Spinach: Toss it in at the end for a pop of color and health. Using seasonal veggies not only enhances flavor but also adds variety to your meal. Get creative! To store leftover noodles, let them cool first. Place them in an airtight container. Refrigerate the container right away. This keeps the noodles fresh for up to three days. When you want to reheat, add a splash of water. Heat them in the microwave or on the stove. Stir often to avoid clumping. Frozen vegetables work great in this dish. They save time and add nutrition. You can use peas, corn, or broccoli. Just toss them in with the garlic and ginger. Cook them for an extra minute. This helps them stay bright and crunchy. Each ingredient in this recipe has a different shelf life: - Instant noodles: Last up to 2 years if stored in a cool, dry place. - Chili crisp: Can last for 6 months once opened. Keep it sealed. - Soy sauce: Lasts indefinitely if kept sealed. Once opened, use within 6 months. - Sesame oil: Best used within 3 months after opening. - Mixed vegetables: Use fresh ones within a week. Frozen veggies can last for 8-12 months. - Green onions: Keep in the fridge for about a week. - Garlic and ginger: Last about 2-3 weeks fresh. You can also freeze them for longer storage. Instant noodles usually take around 3 to 5 minutes to cook. Different brands may vary slightly. Always check the package for specific cooking times. Most brands have similar cooking methods, so they work well in this recipe. Yes, you can make it spicier! Add more chili crisp to the dish. You can also include sliced fresh chilies or chili oil. For an extra kick, try adding crushed red pepper flakes. Adjust the heat to your taste. These noodles go great with many sides. You can serve them with a simple salad or steamed dumplings. Try pairing them with egg rolls or spring rolls for a fun meal. A side of pickled vegetables can also add a nice crunch. Yes, you can use other noodles! Rice noodles, udon, or soba work well. Just adjust the cooking time based on the noodle type. Follow the package instructions for the best results. Experimenting can lead to new favorite dishes! You can find chili crisp in many grocery stores. Look in the international aisle or near the Asian foods section. Online stores like Amazon also offer a variety of brands. If you prefer, you can make it at home with simple ingredients. This blog post showed you how to make tasty chili crisp noodles. We covered each ingredient, from vegetables to sauces, and shared step-by-step cooking tips. I shared ways to customize your dish with proteins, variations, and storage tips. Remember, you can switch up ingredients and adjust heat levels for your taste. Whether it’s a quick weeknight meal or a special dish, these noodles are easy and fun to make. Enjoy your cooking and make it your own!

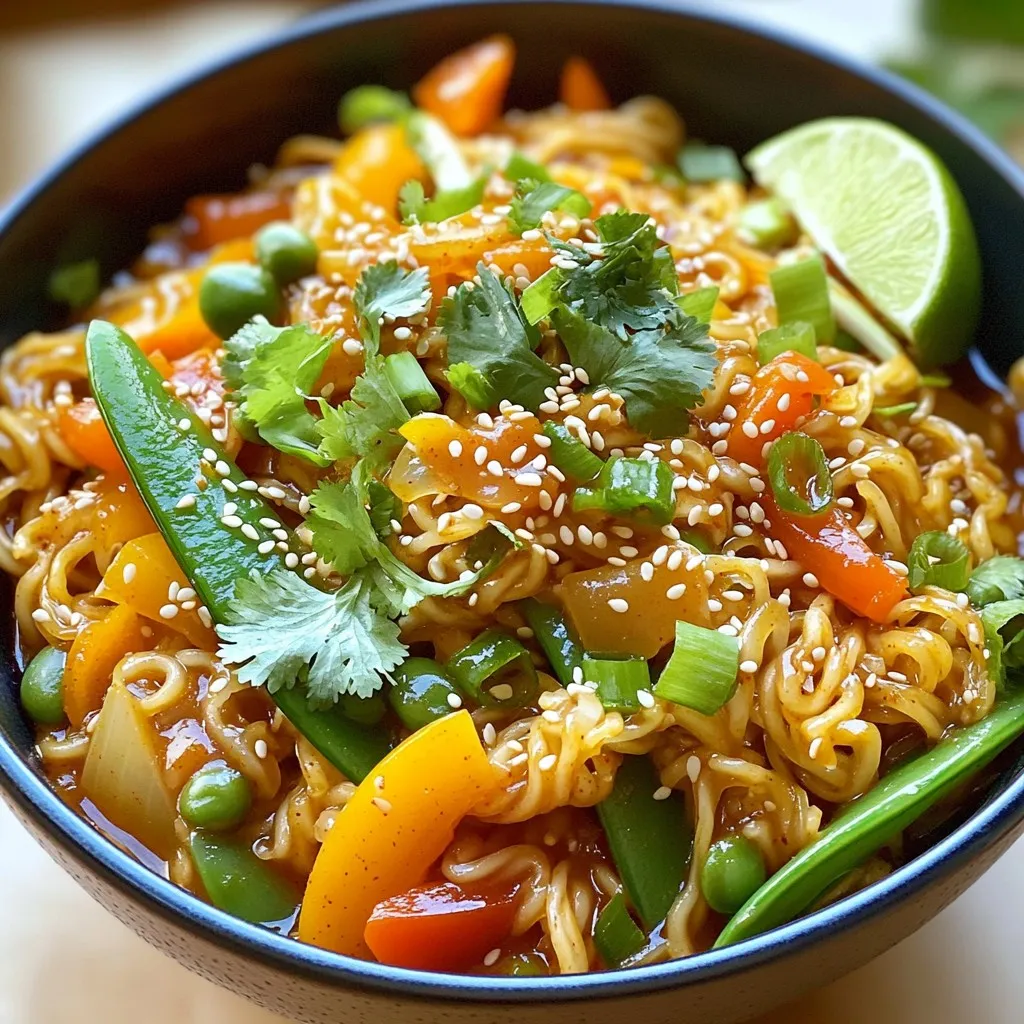
Craving a quick meal that packs a punch? Minute Chili Crisp Noodles are your answer. With just a handful of ingredients and under 30 minutes, you can whip up a …

Read more

Categories Dinner

Maple Pecan Latte Overnight Oats Tasty Breakfast Boost

November 3, 2025 by Chef Remy
To make Maple Pecan Latte Overnight Oats, you need: - 1 cup rolled oats - 1 cup unsweetened almond milk (or any milk of your choice) - 2 tablespoons pure maple syrup - 1 tablespoon brewed coffee, cooled to room temperature - 1/2 teaspoon vanilla extract - 1/4 teaspoon ground cinnamon - 1/4 cup pecans, coarsely chopped - A pinch of salt These ingredients create a creamy, flavorful meal that fills you with energy. You can add extra flavor and texture with these toppings: - Additional chopped pecans - A drizzle of maple syrup - A sprinkle of ground cinnamon These options make the oats even more delicious and fun to eat. If you need substitutes, here are some ideas: - Use regular milk instead of almond milk for a creamier taste. - Swap maple syrup with honey for a different sweet flavor. - Replace pecans with walnuts or almonds if you prefer. These swaps let you customize the recipe to your taste and pantry. Start by gathering your ingredients. You will need rolled oats and almond milk. In a medium bowl or jar, add 1 cup of rolled oats. Pour in 1 cup of almond milk. Next, add 2 tablespoons of pure maple syrup. This sweetens your oats and adds a rich flavor. Then, include 1 tablespoon of cooled brewed coffee. This gives it a nice latte twist. Don't forget 1/2 teaspoon of vanilla extract for warmth. Add 1/4 teaspoon of ground cinnamon for spice. Finally, a pinch of salt brightens all the flavors. Mix these ingredients well with a spoon or whisk. Make sure there are no dry oats left. Now, it’s time to fold in the pecans. Take 1/4 cup of coarsely chopped pecans. Carefully add them to the oat mixture. Use a spatula to gently fold the pecans in. This helps keep them whole for a nice crunch. You can save a few pecans for later. They will make a great topping. Mixing them well ensures every bite has that nutty flavor. To store your oats, cover the bowl or jar tightly. You can use a lid or plastic wrap. Place it in the refrigerator to chill overnight. If you’re short on time, let it sit for at least 4 hours. This soaking helps the oats soften and absorb the flavors. When you’re ready to eat, give the oats a good stir. If they seem too thick, splash in a bit more almond milk. Serve your oats in bowls or jars. Top with extra pecans, maple syrup, and a sprinkle of cinnamon for a lovely finish. To get the best texture for your overnight oats, start with rolled oats. These oats soak up liquid well. Use equal parts oats and milk for a creamy base. If your oats feel too thick, add a splash of milk before serving. This gives you that perfect bite. Remember, letting them sit overnight helps them soften. For a richer taste, try using strong brewed coffee. The coffee adds depth to the oats. You can also mix in a bit more cinnamon for a warm flavor. If you like it sweeter, add a bit more maple syrup. Don't forget to top with extra pecans and a drizzle of syrup for a sweet finish. Make a big batch to save time. Store them in jars for easy grab-and-go meals. You can mix in fruits, yogurt, or seeds for added nutrition. Keep them in the fridge for up to five days. This way, you have a tasty breakfast ready whenever you need it. {{image_4}} You can switch almond milk for any milk you like. Try oat milk for a creamy taste. Coconut milk adds a tropical flair. Soy milk gives a protein boost. Each choice changes the flavor, making your oats unique. If you want something different, use honey or agave syrup instead of maple syrup. Coconut sugar works well too. Each sweetener brings a new taste. Adjust the amount based on how sweet you want your breakfast. Pecans are great, but don't stop there! Try walnuts for a richer flavor. Almonds add crunch and a mild taste. Seeds like chia or flax can boost nutrition. Mix and match your favorites for a fun twist! Overnight oats can last in the fridge for about 3 to 5 days. They stay fresh and tasty when stored properly. Always check for any changes in smell or texture before eating. Keep your overnight oats in an airtight container. This helps lock in moisture and flavor. Store them in the refrigerator, away from strong-smelling foods. This way, they stay delicious and safe to eat. You can freeze overnight oats for later use. Just place them in a freezer-safe container. Make sure to leave some space for expansion. When you want to eat them, thaw them overnight in the fridge. Stir well before enjoying. Yes, you can use regular milk. It works just as well. You can choose whole, skim, or any milk you like. Each type will change the flavor a bit. If you want to keep it dairy-free, almond milk is a great choice. To change the sweetness, add more or less maple syrup. You can also try honey or agave nectar. Taste your mixture before it chills. This way, you can adjust it just right for your taste. Yes, overnight oats are healthy! They are full of fiber and protein. The oats help keep you full for longer. Plus, pecans add healthy fats and crunch. Using almond milk keeps it light and dairy-free. Enjoy them as part of a balanced breakfast! This blog post shared simple steps to make delicious Maple Pecan Latte Overnight Oats. You learned the key ingredients, tasty toppings, and how to store them. I gave tips to make your oats creamy and flavorful. We explored fun variations to keep breakfast exciting. In conclusion, you can enjoy healthy, easy, and tasty overnight oats every day. Try new flavors and make it your own! Your mornings can be better with this quick and tasty recipe.

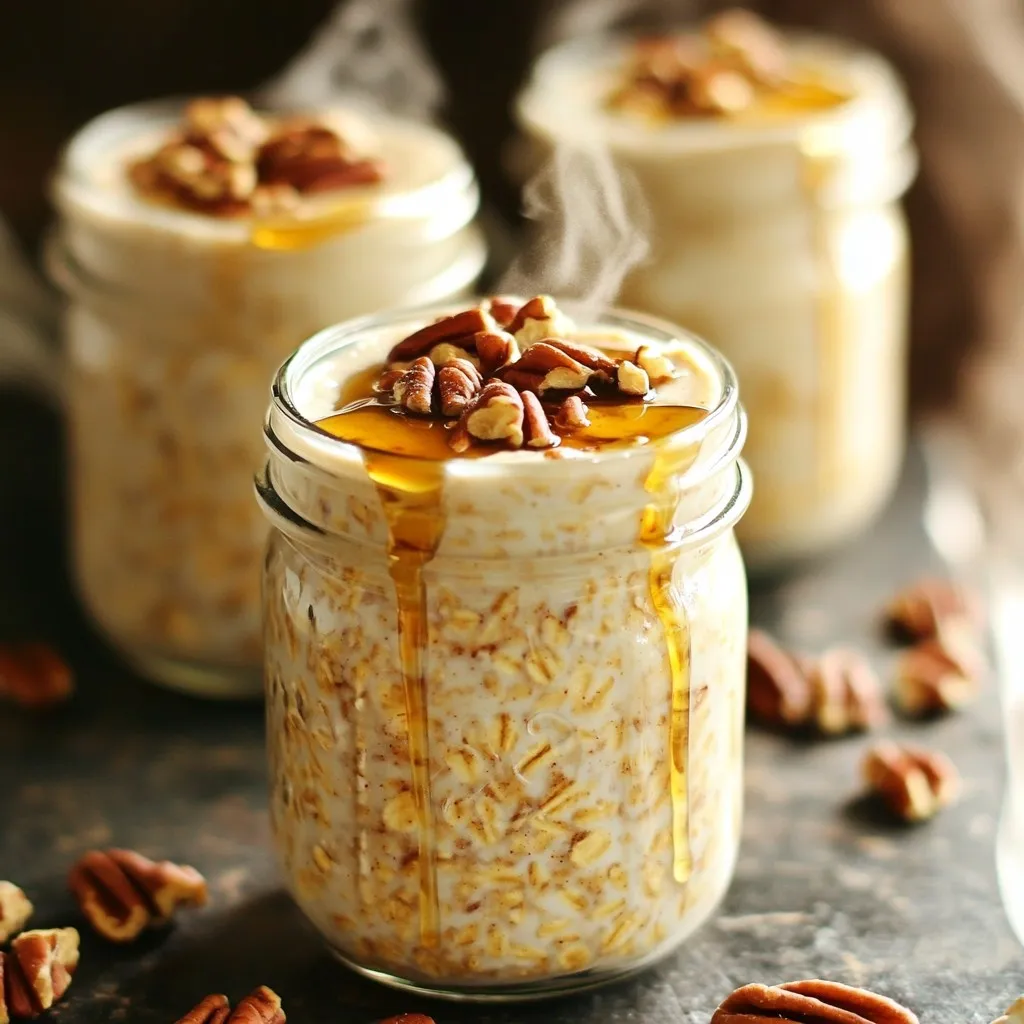
Start your day strong with my Maple Pecan Latte Overnight Oats! This recipe packs rich maple flavor and crunchy pecans into a creamy, nutritious meal. Perfect for busy mornings, you …

Read more

Categories Breakfast

Slow Cooker Loaded Potato Soup Simple Comfort Dish

November 3, 2025 by Chef Remy
- 6 medium russet potatoes - 1 large onion - 3 cloves fresh garlic - 4 cups vegetable broth - 1 cup heavy cream or coconut milk - 1 cup shredded sharp cheddar cheese - 1/2 cup sour cream or Greek yogurt - 1 teaspoon smoked paprika - 1 teaspoon black pepper - Salt to taste - 4 green onions - 1/2 cup crispy turkey bacon or plant-based bacon These ingredients make a rich and hearty soup. The russet potatoes are the star, giving the soup its creamy base. The onion and garlic add depth of flavor. You can choose between heavy cream or coconut milk for richness. The sharp cheddar cheese makes it extra cheesy and delicious. Sour cream or yogurt adds a tangy touch. The smoked paprika brings a lovely warmth, while black pepper gives it a kick. Don't forget the green onions for freshness and the bacon for crunch! You can easily swap ingredients for your taste. For a lighter option, use Greek yogurt. You can even skip the bacon for a vegetarian choice. Remember, the best soups come from using fresh ingredients! Each ingredient plays a key role in creating a comforting bowl of loaded potato soup. 1. Start by peeling and cutting the 6 medium russet potatoes into 1-inch cubes. This size helps them cook evenly. 2. Next, finely chop 1 large onion and mince 3 cloves of fresh garlic. The onion and garlic add great flavor. 3. In the base of your slow cooker, layer the potatoes, onion, and garlic. Spread them out to ensure all cook well together. 4. Pour 4 cups of vegetable broth over the mix. Make sure everything is submerged. This broth is the heart of the soup. 1. Secure the lid on the slow cooker. You can set it to cook on low for 6 to 8 hours or high for 4 to 5 hours. Choose low for a gentle cook, which makes the flavor better. 2. Monitor the cooking time. You want the potatoes to be fork-tender. They should break apart easily when done. 1. When the cooking time is up, it's time to blend. If you like a rustic texture, use a potato masher. For a smooth finish, an immersion blender works best. 2. Carefully mix in 1 cup of heavy cream, or use creamy coconut milk for a dairy-free option. Add 1 cup of shredded sharp cheddar cheese, 1/2 cup of sour cream, 1 teaspoon of smoked paprika, and 1 teaspoon of black pepper. Stir well until everything is combined. 3. Let the soup warm through for an additional 10 to 15 minutes on low. Taste and adjust the seasoning as needed. You might want to add more salt or pepper. 4. Serve the soup in bowls, and top with more shredded cheddar cheese, chopped green onions, and crumbles of crispy turkey bacon if you like. Enjoy the rich, creamy goodness! Seasoning is key to a great soup. Always taste as you go. Start with salt and pepper. I like to add smoked paprika for warmth. - Herbs: Try fresh thyme or rosemary. - Spices: A pinch of cayenne can add a nice kick. Mix these in early to let the flavors meld. This makes each bite delicious. You can choose how smooth or chunky you want your soup. For a rustic feel, use a potato masher. This leaves some texture. If you prefer a smooth soup, an immersion blender works great. Just blend until it’s creamy and dreamy. Garnishes make your soup pop. Top with extra cheese and green onions. A swirl of sour cream looks fancy. - Best Pairings: Serve with crusty bread or a fresh salad. - Presentation Tips: Use rustic bowls for a cozy feel. A sprinkle of crispy bacon adds crunch and flavor. {{image_4}} You can make this soup dairy-free with a few easy swaps. Use coconut milk instead of heavy cream. This gives a rich and creamy taste. For cheese, try using vegan cheese. It melts well and adds flavor. These options keep the soup tasty without dairy. You can add more to your soup for variety. Chopped carrots, celery, or bell peppers work great. They add color and nutrition. If you want protein, consider adding cooked chicken or beans. For a spicy kick, toss in some diced jalapeños or a splash of hot sauce. These ingredients give your soup a fun twist. If you're short on time, you can use an Instant Pot or stovetop. For the Instant Pot, cook on high for about 15 minutes. Use the quick release method to save time. On the stovetop, simmer the soup for about 30 minutes until the potatoes are soft. This way, you still get that cozy taste without the wait. To keep your loaded potato soup fresh, use airtight containers. Glass containers work great, but plastic ones are fine too. Make sure the soup cools before sealing it. Store leftovers in the fridge for up to four days. If you want to keep it longer, freezing is a good option. When you’re ready to enjoy the soup again, heat it gently. Use the stove or microwave, but avoid high heat. This keeps the flavors intact. If the soup seems thick, add a splash of broth or water to adjust the consistency. Stir well while reheating to make sure it warms evenly. To freeze your soup, let it cool completely first. Pour it into freezer-safe bags or containers. Leave some space at the top for expansion. Seal tightly and label with the date. It will stay good for up to three months. To thaw, move it to the fridge overnight. Reheat it gently on the stove, adding broth or water if needed. This way, you can enjoy this comforting dish anytime! Slow Cooker Loaded Potato Soup can last in the fridge for 3 to 5 days. Store it in an airtight container to keep it fresh. Before you serve it again, check for any off smells or changes in texture. Yes, you can use red potatoes instead of russet potatoes. They will add a different flavor and texture. Red potatoes are waxy and hold their shape well. This choice makes for a chunkier soup, which many find appealing. You can substitute heavy cream with creamy coconut milk or cashew cream. These options provide a rich texture without dairy. They add a unique taste that complements the soup nicely. Yes, this soup is gluten-free. All the ingredients used, like potatoes and vegetable broth, do not contain gluten. Always check labels on pre-made broth to ensure it meets your dietary needs. Absolutely! You can add crispy turkey bacon, chicken, or even beans for protein. These additions make the soup heartier and more filling. You can also top it with hard-boiled eggs or serve it with a side of grilled chicken for a complete meal. You now know how to make a delicious slow cooker loaded potato soup. We covered essential ingredients, preparation steps, and cooking tips to create the perfect bowl. Remember to customize the texture and flavor for your taste. Don't hesitate to try variations and make it your own. Proper storage will keep your leftovers fresh for later enjoyment. With these steps, you can serve up warmth and comfort any day of the week. Enjoy your cooking journey!

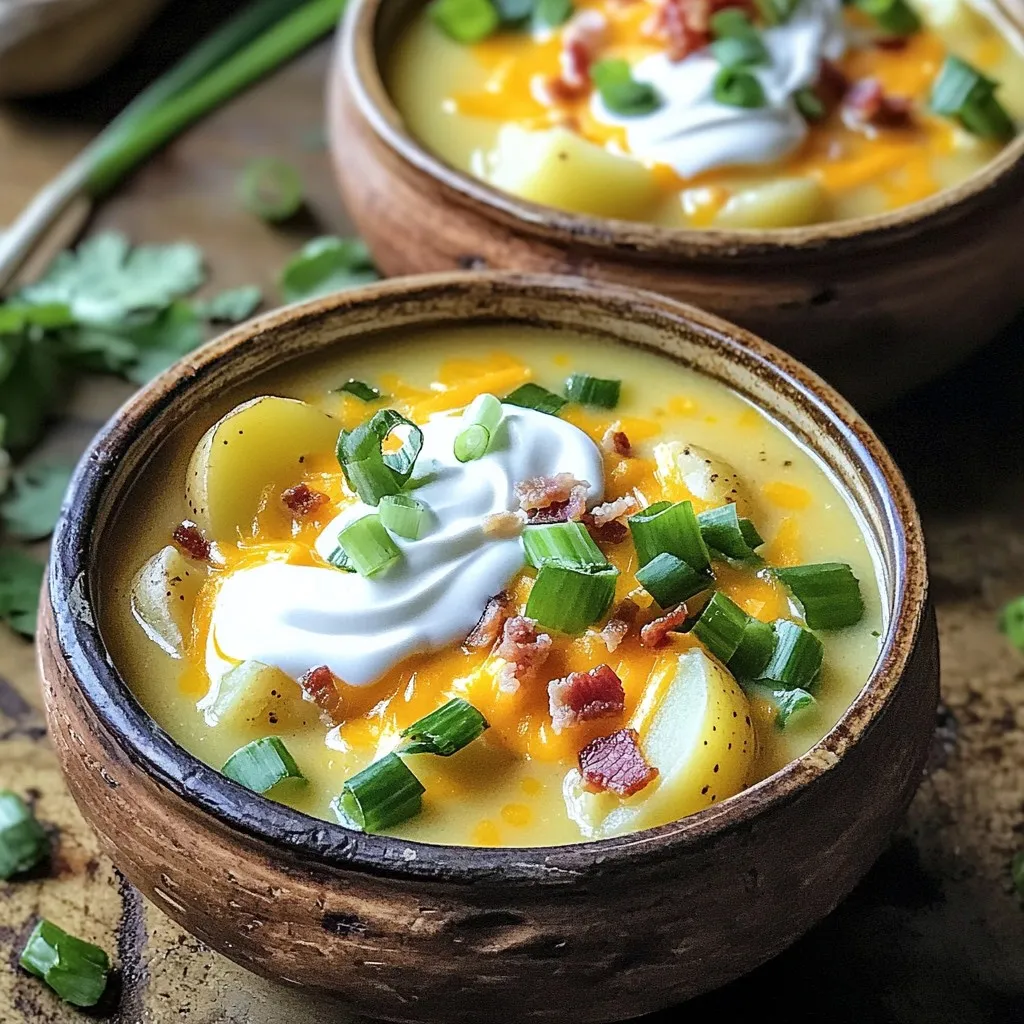
Looking for a cozy meal that warms you from the inside out? Slow Cooker Loaded Potato Soup is the perfect answer! This soup blends creamy, rich flavors with the comfort …

Read more

Categories Dinner

Sheet-Pan Honey Garlic Shrimp & Broccoli Delight

November 3, 2025 by Chef Remy
- 1 lb large shrimp, peeled and deveined - 4 cups broccoli florets - 1/4 cup honey - 1/4 cup low-sodium soy sauce - 3 cloves garlic, minced - 1 tablespoon fresh ginger, grated - 2 tablespoons sesame oil - 1 tablespoon rice vinegar - 1 teaspoon red pepper flakes - Salt and pepper to taste - 2 tablespoons sesame seeds (for garnish) - Fresh cilantro, chopped (optional) Gathering the right ingredients makes a big difference. The shrimp should be large, fresh, and ready to go. I prefer using peeled and deveined shrimp for ease. Broccoli is the perfect veggie here. It brings great crunch and color. I use four cups of florets to balance the shrimp. Honey is key for the sweetness. It adds a lovely glaze. Low-sodium soy sauce gives depth to the sauce. The garlic and ginger bring bold flavors. They make the dish bright and tasty. Don't skip the sesame oil and rice vinegar. They add richness and a slight tang. The red pepper flakes let you control the heat. Season with salt and pepper to taste. Sesame seeds and fresh cilantro add a perfect finish. They not only look good but taste great too! - Preheat the oven to 400°F (200°C). - Line the baking sheet with parchment paper. This makes cleanup easy later. - In a bowl, mix honey, soy sauce, minced garlic, grated ginger, sesame oil, rice vinegar, and red pepper flakes. - Whisk them together until fully blended. This sauce adds a sweet and savory touch. - Toss the shrimp with half of the sauce. Let it marinate for about 10 minutes. This helps the shrimp soak up the flavors. - Spread the broccoli florets on the baking sheet. Roast them for 10 minutes until they begin to soften. - After 10 minutes, remove the baking sheet from the oven. - Arrange the marinated shrimp over the broccoli and drizzle the remaining sauce on top. - Roast everything for an additional 8-10 minutes until the shrimp are pink and cooked through. To make this dish just right for you, adjust the red pepper flakes. Start with one teaspoon. If you love spice, add more. You can also brighten the flavor by adding a splash of lemon or lime juice. Just squeeze it in before serving. This adds a nice zest that pairs well with the shrimp and broccoli. To cook the shrimp and broccoli evenly, spread them out on the baking sheet. Avoid crowding them; this helps them roast nicely. Check the shrimp for doneness by looking for a pink color. They should be opaque and firm. If you cook them too long, they might get tough. So, keep an eye on the timer! You can serve the dish right from the baking sheet for a rustic look. If you prefer, plate the shrimp and broccoli separately. Drizzle any leftover sauce on top for extra flavor. For a complete meal, serve it with rice or quinoa. This adds a nice base and makes it filling. {{image_4}} You can switch shrimp for chicken or tofu. For chicken, use boneless thighs or breasts. Cut them into bite-sized pieces. Cook them until they reach an internal temp of 165°F (75°C). Tofu is a great choice for a vegan option. Press it to remove extra water, then cube it. Use the same marinade and bake until golden. Both options give you a tasty meal. Feel free to get creative with veggies. Bell peppers, snap peas, and carrots work well here. Cut them into small pieces to match the broccoli. Adjust cooking times based on what you add. For instance, bell peppers may need less time than broccoli. Start roasting the broccoli for 10 minutes before adding other veggies. This way, everything cooks evenly and stays crisp. Want some heat? Add sriracha to the honey garlic sauce for a spicy kick. Start with one tablespoon and adjust to taste. For a sweeter dish, add more honey or maple syrup. This change makes the sauce richer and thicker. Both variations give you new flavors to try while keeping the dish fun and tasty. Store your leftover shrimp and broccoli in an airtight container. This keeps them fresh and safe. You can keep them in the fridge for up to three days. After that, the shrimp may lose its texture, and the broccoli may not taste as good. To freeze the dish, let it cool completely first. Then, place it in a freezer-safe container or bag. Be sure to remove as much air as possible. This helps prevent freezer burn. You can store it in the freezer for up to three months. When it’s time to enjoy again, thaw it overnight in the fridge. For the best results, reheat in the oven. Preheat to 350°F (175°C). Place the shrimp and broccoli on a baking sheet and cover it with foil. This keeps the moisture in. Heat for about 15 minutes or until warm. If using the microwave, place the dish in a microwave-safe container. Heat in short bursts, stirring in between. This helps maintain the texture and flavor. Enjoy your meal! Cooking shrimp on a sheet pan takes about 8 to 10 minutes. You want to see the shrimp turn pink and opaque. This shows they are done. Make sure not to overcook them, or they will become tough. Keep an eye on them towards the end of cooking. Yes, you can use frozen shrimp. Just make sure to thaw them first. You can do this in cold water for about 15 minutes. Once thawed, peel and devein them if needed. The taste will be great, but fresh shrimp may cook faster. For sides, steamed rice or quinoa works well. You can also try serving with noodles or a light salad. Adding a squeeze of lemon or lime can brighten the meal. Fresh herbs like cilantro can also enhance the flavors. This dish combines shrimp, broccoli, and a tasty honey garlic sauce. We learned how to prepare the ingredients, make the sauce, and roast everything for a quick meal. You can adjust spice levels and try different proteins or veggies. Storing leftovers properly keeps the dish fresh. In the end, this recipe is easy, flavorful, and fun to make. Enjoy your cooking adventure!

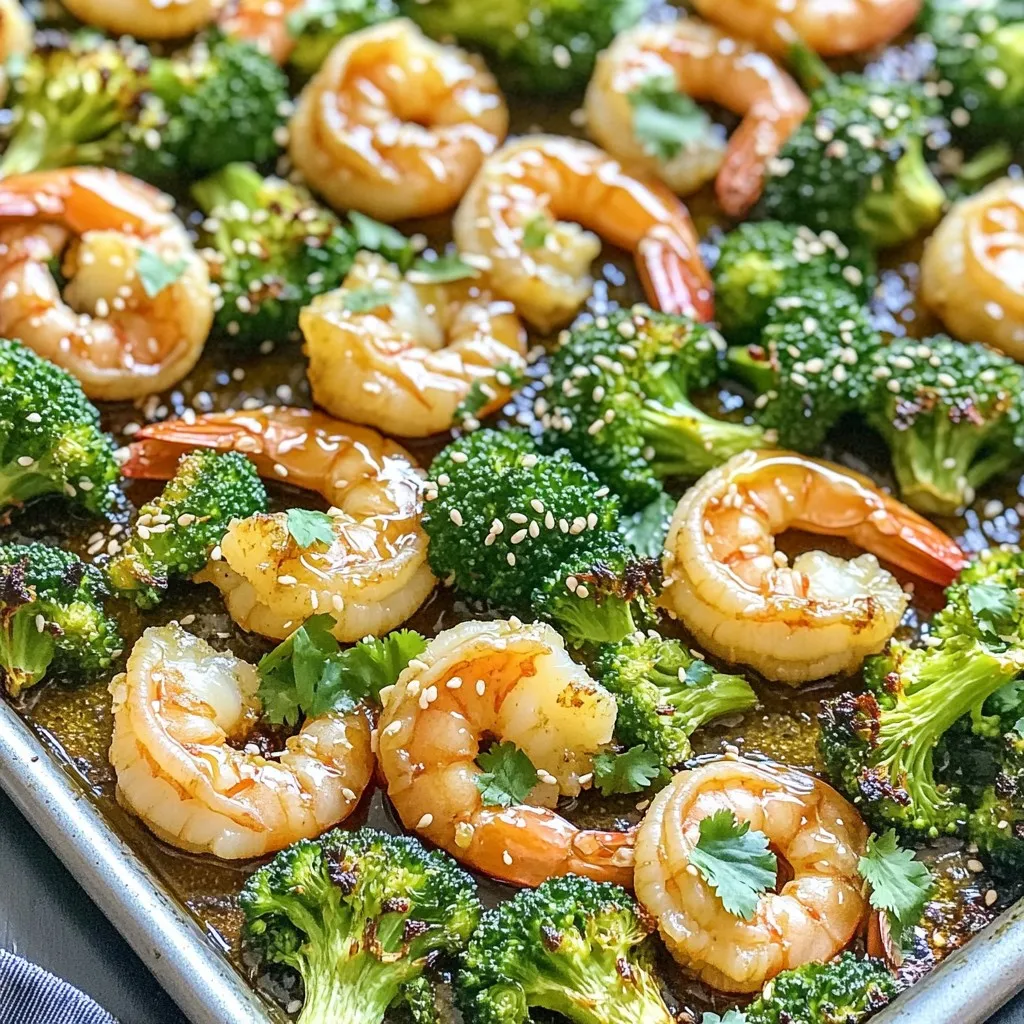
Get ready for a meal that’s quick, tasty, and healthy! In this blog post, I’ll show you how to make Sheet-Pan Honey Garlic Shrimp & Broccoli. This dish combines juicy …

Read more

Categories Dinner

No-Bake Chocolate Hazelnut Cheesecake Cups Delight

November 3, 2025 by Chef Remy
- 1 cup crushed graham crackers - 1/4 cup unsweetened cocoa powder - 1/4 cup melted coconut oil - 1/2 cup cream cheese, softened to room temperature - 1/2 cup hazelnut spread (like Nutella) - 1/4 cup powdered sugar - 1 teaspoon pure vanilla extract - 1 cup whipped cream (store-bought or homemade) - 1/2 cup chopped hazelnuts (for garnish) - Chocolate shavings (for garnish) These ingredients create a rich and creamy cheesecake. The graham crackers form a crunchy base that pairs well with the smooth filling. The cocoa powder adds a deep chocolate flavor, while the hazelnut spread brings in nutty sweetness. You can customize this recipe too! Try using different nut spreads, like almond or peanut. If you want more texture, add crushed cookies or nuts to the crust. You can also swap whipped cream with a dairy-free version to meet dietary needs. Each change can give the cheesecake a fresh twist. Enjoy your creative cooking! Mixing the crust First, grab a medium bowl. Add 1 cup of crushed graham crackers and 1/4 cup of unsweetened cocoa powder. Mix them well until they are evenly combined. This will be the base of your cheesecake cups. Next, pour in 1/4 cup of melted coconut oil. Stir the mixture until it looks like wet sand. This helps bind the crust together. Creating the cheesecake filling In a separate bowl, add 1/2 cup of softened cream cheese. Then, mix in 1/2 cup of hazelnut spread, 1/4 cup of powdered sugar, and 1 teaspoon of pure vanilla extract. Use an electric mixer or a whisk to blend these until smooth and creamy. Once that’s done, gently fold in 1 cup of whipped cream. This makes the filling light and fluffy. Assembling the cups Now it’s time to assemble! Take your graham cracker mixture and divide it evenly among four serving cups. Press it down firmly to create a solid base. Next, spoon the cheesecake filling over the crust in each cup. Smooth the tops with a spatula for a nice finish. Chill time requirements After assembly, place your cheesecake cups in the refrigerator. They need to chill for at least 2 hours. This helps the filling set properly and ensures a good texture. Importance of setting in the refrigerator Setting the cheesecake in the fridge is key. It allows the flavors to meld and the texture to firm up. This step ensures that every bite is creamy and delicious. Don’t skip it! Mixing is key to a great cheesecake. Start with room temperature cream cheese. This helps it blend smoothly. Use a hand mixer or whisk to beat the cream cheese and hazelnut spread. Mix until it is creamy and free of lumps. For the right consistency, fold in the whipped cream gently. Use a spatula and be careful not to deflate it. This keeps your cheesecake light and fluffy. If the mixture feels too thick, add a tiny bit of milk to loosen it. To present your cheesecake cups nicely, place them on a pretty tray. You can layer them with fresh berries for color. Raspberries and strawberries look great and add a tangy flavor. For a fun twist, serve with a drizzle of chocolate sauce. This adds extra sweetness and makes it even more appealing. Enjoy these cups as a treat after dinner or at a gathering with friends! {{image_4}} You can make these cheesecake cups even more fun! Try adding different nut spreads. Almond butter or peanut butter can bring a new taste. Each nut spread gives a unique twist to the flavor. You can also mix in extra flavors or spices. A pinch of cinnamon or a splash of espresso can enhance the chocolate. For a fruity vibe, blend in some raspberry or orange zest. These small changes can make a big impact! If you need gluten-free options, swap graham crackers for gluten-free cookies. Almond flour or oats can work well too. Just make sure to check the labels for gluten-free marks. For dairy-free alternatives, use a dairy-free cream cheese. There are many brands available now. You can also use coconut cream instead of whipped cream. This keeps the cheesecake rich and creamy without dairy. These swaps ensure everyone can enjoy this dessert! To keep your no-bake chocolate hazelnut cheesecake cups fresh, use airtight containers. Glass jars or plastic food storage containers work well. They protect the cups from drying out and keep flavors strong. Store them in the fridge for up to three days. After that, the texture may change, but they will still taste good. If you want to save some for later, you can freeze these cheesecake cups. First, cover each cup with plastic wrap or aluminum foil. Then, place them in a freezer-safe container. This helps prevent freezer burn. They can last in the freezer for up to three months. When ready to enjoy, take the cups out and place them in the fridge overnight. This allows them to thaw slowly and stay smooth. Avoid microwaving them, as it can ruin the texture. Enjoy your delicious treats when they are perfectly chilled! Can I use a different type of cracker for the crust? Yes, you can use different crackers. Try digestive biscuits or vanilla wafers. Both give a nice flavor and texture. Just crush them to a fine crumb. What can I substitute for coconut oil? If you don’t have coconut oil, you can use unsalted butter. It adds a rich taste and helps the crust hold together. Melt the butter before mixing it in. How can I make these ahead of time? You can prepare these cheesecake cups a day in advance. Just chill them in the fridge. They will taste even better after resting overnight. What to do if the cheesecake filling is too runny? If your filling is too runny, try adding more cream cheese. Mix it in well. You can also chill the cups longer to help them set. How to ensure the crust holds together? Make sure to mix the melted coconut oil well with the crumbs. Press the crust down firmly in the cups. This helps it stay together when you scoop out the cheesecake. You learned how to make delicious cheesecake cups from scratch. We covered the key ingredients, step-by-step instructions, tips for perfecting your treats, and fun variations. Remember, chilling is crucial for the best texture. Use proper storage to keep them fresh longer. These cheesecake cups can impress anyone and suit various diets. So, gather your tools, get creative, and enjoy this tasty treat at home!

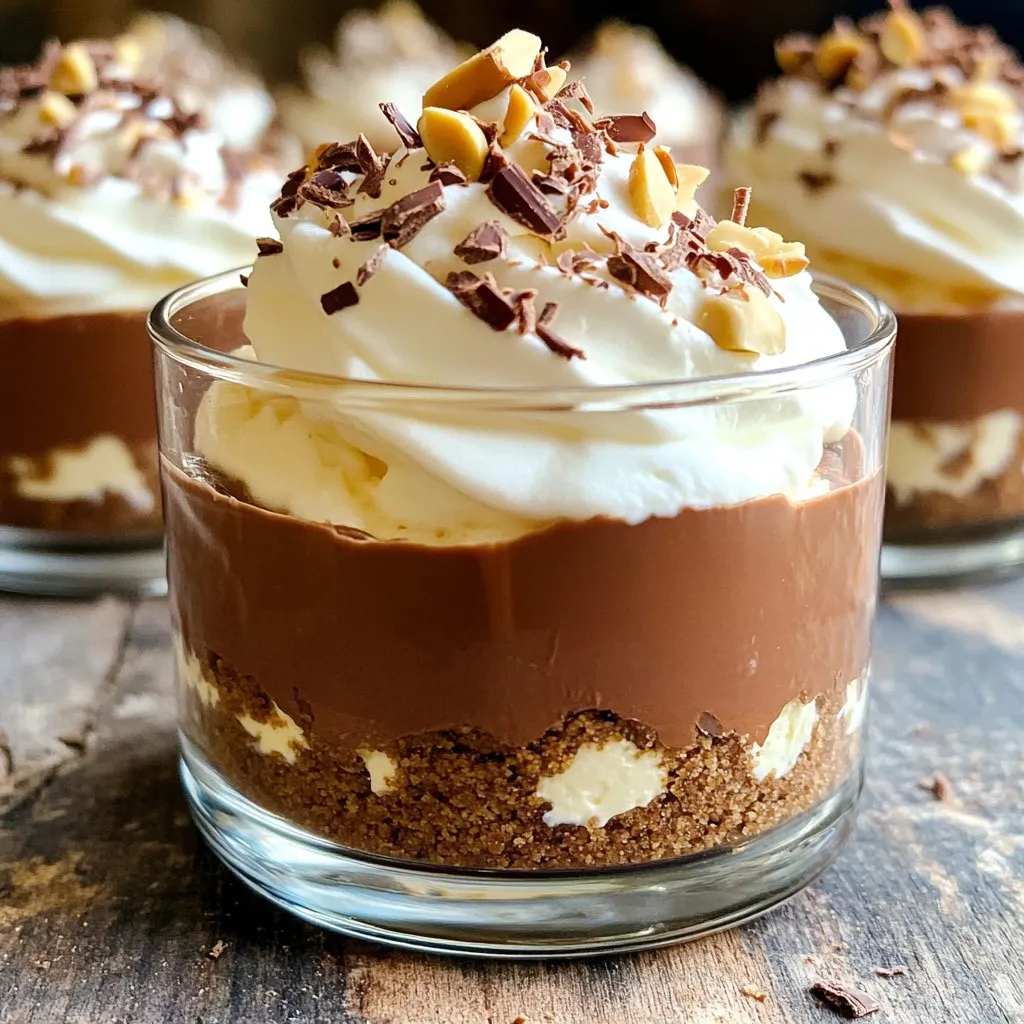
If you’re craving a sweet treat without the fuss of baking, you’ve hit the jackpot! These No-Bake Chocolate Hazelnut Cheesecake Cups are creamy, rich, and oh-so-easy to make. I’ll guide …

Read more

Categories Desserts
Older posts
Newer posts
← Previous Page1 … Page3 Page4 Page5 … Page130 Next →

ROASTED RECIPES

Where bold flavors meet everyday meals. Warm, vibrant, and made to share. 🔥🥗🍴

PAGES

Home About Contact Privacy Policy Terms & Conditions Cookie Policy GDPR Policy Copyright Policy Disclaimer

CATEGORIES

Appetizers Desserts Salads Breakfast Dinner

Contact

  • Pinterest
  • Mail
Copyright © 2025 Roasted Flavors. All rights reserved.