Skip to content
Roasted Flavors
  • Home
  • Appetizers
  • Desserts
  • Salads
  • Breakfast
  • Dinner
  • Privacy Policy
  • Contact
  • About

Chef Remy

Quick Cinnamon Apple Cake Simple and Delicious Recipe

August 26, 2025 by Chef Remy
To make this quick cinnamon apple cake, you will need: - 2 medium apples, peeled and diced into bite-sized pieces - 1 cup granulated sugar - 1/2 cup unsalted butter, softened to room temperature - 2 large eggs, at room temperature - 1 teaspoon pure vanilla extract - 1 1/2 cups all-purpose flour - 1 teaspoon baking powder - 1/2 teaspoon baking soda - 1 teaspoon ground cinnamon - 1/4 teaspoon fine salt These ingredients create the perfect mix of sweet and spice. To add a nice crunch to your cake, consider using: - 1/2 cup chopped walnuts Walnuts enhance the flavor and texture, making each bite delightful. You can skip them if you prefer a softer cake. If you find yourself missing an ingredient, don't worry! Here are some substitutes: - Use brown sugar instead of granulated sugar for a richer flavor. - Swap unsalted butter with coconut oil for a dairy-free option. - For gluten-free options, use a 1-to-1 gluten-free flour blend. These swaps will keep your cake tasty while fitting your needs. 1. Preheat your oven to 350°F (175°C). This step is key for even baking. 2. Grease and flour an 8-inch round cake pan. This helps the cake come out clean. 3. In a large bowl, mix the softened butter and sugar. Use a mixer to blend until light and fluffy. 4. Add the eggs, one at a time. Mix well after each addition. Then, stir in the vanilla extract. 5. In another bowl, whisk together the flour, baking powder, baking soda, cinnamon, and salt. This makes sure everything is evenly mixed. 6. Gradually mix the dry ingredients into the wet mixture. Use a spatula to combine gently. Do not overmix, or the cake may be tough. 7. Fold in the diced apples and walnuts, if using. Ensure they are evenly spread in the batter. 8. Pour the batter into the prepared cake pan. Use a spatula to smooth it out. 9. Bake in the preheated oven for 30-35 minutes. 10. To check if the cake is done, insert a toothpick into the center. If it comes out clean, the cake is ready. 11. Once baked, let the cake cool in the pan for 10 minutes. Then, transfer it to a wire rack to cool completely. 12. After cooling, dust the top with powdered sugar. This adds a sweet finish to your cake. Start by creaming the butter and sugar. Use a mixer for best results. Mix until light and fluffy. This step adds air to the batter, making it rise. Add the eggs one at a time. Mix well after each. This keeps the cake smooth and even. When you add the dry ingredients, do it slowly. Mix just until you see no dry flour. Overmixing can make the cake tough. You can change the flavor with different spices. Try nutmeg or allspice with the cinnamon. For a fun twist, add vanilla bean paste instead of extract. If you love nuts, use pecans or almonds instead of walnuts. Add raisins or dried cranberries for sweetness. Fresh lemon zest can brighten the taste. Get creative with what you have on hand. Let the cake cool completely before serving. This helps with cutting nice slices. Dust the top with powdered sugar for a sweet touch. Serve it on a pretty plate to impress guests. You can add thin apple slices on top for decoration. A sprinkle of cinnamon around the edges looks great too. For a warm treat, serve with whipped cream or vanilla ice cream. {{image_4}} You can switch out apples for other fruits. Pears add a soft touch, while berries give a fresh burst. Peaches bring a sweet, juicy flavor too. Just remember to adjust the sugar if you use very sweet fruits. Each fruit will change the cake's look and taste. Want more flavor? Try adding spices like nutmeg or cardamom. A splash of almond extract can also brighten the cake. You can mix in chocolate chips for a rich twist. For a nutty flavor, add chopped pecans or almonds. These small changes can make a big difference. To make this cake gluten-free, replace all-purpose flour with a gluten-free blend. Make sure it has xanthan gum to help with texture. You can also use almond flour for a nutty taste. Adjust the baking time as needed, since gluten-free cakes may bake differently. Enjoy every bite without worry! To store leftover Quick Cinnamon Apple Cake, let it cool completely. Place the cake in an airtight container. You can also wrap it tightly in plastic wrap. Store it at room temperature for up to three days. If you want it to last longer, keep it in the fridge for about a week. To freeze the cake, make sure it is fully cooled. Wrap the cake tightly in plastic wrap, then in aluminum foil. This prevents freezer burn. You can freeze it for up to three months. When you’re ready to enjoy it, just thaw it in the fridge overnight. To reheat slices, place them in a microwave-safe dish. Heat for about 15-20 seconds. For a crispier texture, preheat your oven to 350°F (175°C). Place the cake on a baking sheet and warm it for about 10 minutes. This will refresh the cake's flavors and texture. Yes, you can make this cake without eggs. You can use unsweetened applesauce or mashed bananas as a substitute. Use 1/4 cup of applesauce or banana for each egg. This will help keep the cake moist, just like eggs do. I recommend using tart apples like Granny Smith or Honeycrisp. They add a great balance of sweetness and tartness. You can also try Fuji or Gala apples. Just make sure they are firm and fresh for the best flavor. Once baked, the cake stays fresh for about 3 to 4 days at room temperature. Store it in an airtight container to keep it moist. If you want it to last longer, you can refrigerate it for up to a week. Yes, you can use different sweeteners. Brown sugar or coconut sugar works well. If you prefer a sugar-free option, try using stevia or monk fruit sweetener. Just keep in mind that the texture may change slightly, but it will still taste great. This post covered the key ingredients, step-by-step baking, and useful tips for your cake. You learned about custom flavors, storage, and even gluten-free options. With these insights, you can create a delicious cake that suits your taste. Remember, baking is about experimenting and having fun. So go ahead, mix and match ingredients! Enjoy your cake-making journey.

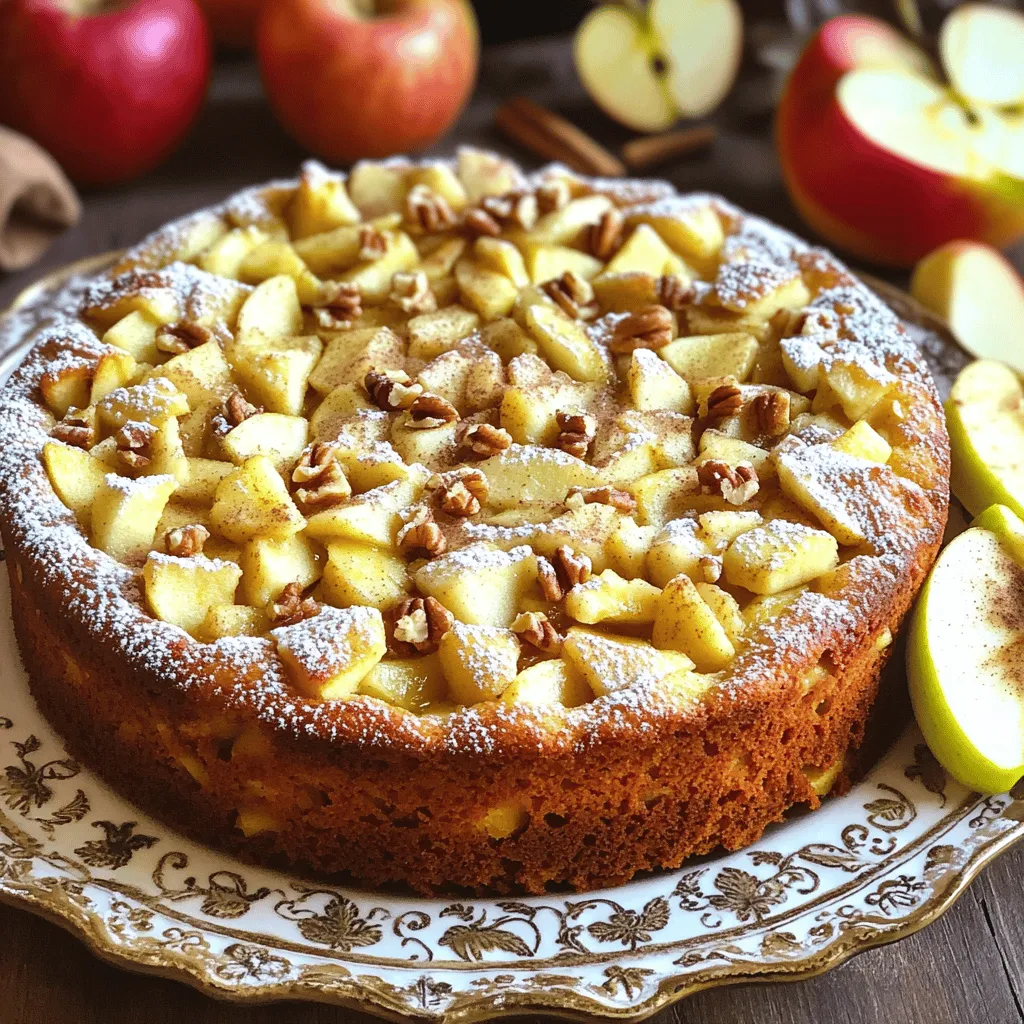
Are you ready to savor a warm slice of Quick Cinnamon Apple Cake? This simple and delicious recipe is perfect for any occasion. With just a handful of ingredients, you …

Read more

Categories Desserts

Minute Creamy Turkey Stroganoff Easy Family Meal

August 26, 2025 by Chef Remy
To make Minute Creamy Turkey Stroganoff, you need the following ingredients: - 1 pound ground turkey - 1 medium onion, finely diced - 2 cloves garlic, minced - 8 ounces mushrooms, thinly sliced - 1 cup chicken broth - 1 cup sour cream - 2 tablespoons all-purpose flour - 1 tablespoon Worcestershire sauce - 1 teaspoon Dijon mustard (or yellow mustard) - 1 teaspoon dried thyme - Salt and freshly ground black pepper, to taste - 8 ounces egg noodles - Fresh parsley, chopped, for garnish You can add more flavor with these options: - A splash of white wine for depth - Fresh herbs like basil or chives - A pinch of red pepper flakes for heat - Crumbled bacon for a smoky touch If you need to swap some ingredients, consider these substitutes: - Use ground chicken or beef in place of turkey. - Replace sour cream with Greek yogurt for a tangy twist. - If you don’t have egg noodles, use any pasta type you like. - Swap chicken broth for vegetable broth to make it meat-free. Using these ingredients, your Minute Creamy Turkey Stroganoff will be rich and tasty! Start by boiling a large pot of salted water. When the water boils, add 8 ounces of egg noodles. Cook them until they are al dente, following the package instructions. This usually takes about 7-9 minutes. Once cooked, drain the noodles in a colander. Set them aside while you prepare the turkey and sauce. In a large skillet, heat it over medium heat. Add 1 pound of ground turkey to the skillet. Use a spatula to break the turkey apart as it cooks. Brown the turkey for about 5-7 minutes until it's fully cooked and no longer pink. This gives the dish a rich flavor base. Next, add 1 medium onion, finely diced, and 2 cloves of minced garlic to the turkey. Sauté these for 3-4 minutes. The onion should soften and become clear. This step adds depth to your stroganoff. Then, add 8 ounces of thinly sliced mushrooms. Stir them into the turkey mixture. Sauté for another 5 minutes until the mushrooms brown and release their moisture. This makes the filling even more flavorful. Sprinkle 2 tablespoons of all-purpose flour evenly over the turkey and mushroom mix. Stir well to combine. Gradually pour in 1 cup of chicken broth while stirring. This helps avoid lumps. Bring the mixture to a gentle simmer for about 2 minutes. It will thicken slightly, creating a nice base for the sauce. Now, lower the heat and stir in 1 cup of sour cream. Also add 1 tablespoon of Worcestershire sauce, 1 teaspoon of Dijon mustard, and 1 teaspoon of dried thyme. Mix everything well and let it simmer gently for 3-5 minutes. Taste and add salt and freshly ground black pepper as needed. This is where the dish gets its creamy texture and rich taste. Gently fold the cooked egg noodles into the creamy turkey mixture. Make sure each noodle gets coated with the sauce. Heat the combined dish through for about 1 minute. Finally, ladle the creamy turkey stroganoff into bowls. For a nice touch, sprinkle freshly chopped parsley on top for color and freshness. Serve it warm and enjoy this easy family meal. To make your stroganoff creamy, use full-fat sour cream. It blends better and adds richness. Stir the sour cream in on low heat to prevent it from curdling. You can also mix in a bit of cream cheese for a thicker texture. If you like a tangy kick, add a little more mustard. This enhances the flavor and keeps it interesting. Prep your ingredients before cooking. Dice the onion and mince the garlic ahead of time. You can also slice the mushrooms and measure out the broth. This step cuts down cooking time. Use pre-cooked egg noodles or even microwaveable options to save more time. Keep everything on hand so you can cook the dish in about 25 minutes. Presentation makes the meal feel special. Serve the stroganoff in wide, shallow bowls. This lets the creamy sauce shine. Top each serving with fresh parsley for color. A drizzle of olive oil around the plate adds a nice touch too. To impress, add a sprinkle of paprika or a few mushroom slices on top for flair. {{image_4}} You can boost the nutrition of your turkey stroganoff easily. Add vegetables like spinach, bell peppers, or peas. Simply sauté them with the onion and garlic. This adds color and vitamins. You can also use zucchini or carrots, sliced thin. They cook quickly and blend well with the turkey and sauce. If you want to switch things up, try different proteins. Chicken or beef works great in this dish. For a vegetarian option, use mushrooms or lentils. Cook them in the same way as the turkey. This keeps the flavor rich and hearty, while still being quick to make. You can make this stroganoff gluten-free with a few easy swaps. Use gluten-free noodles and cornstarch instead of flour. For a dairy-free version, replace sour cream with coconut cream or cashew cream. These options keep the dish creamy while meeting dietary needs. Adjust seasonings to match your taste, and enjoy a tasty meal! To keep your creamy turkey stroganoff fresh, let it cool first. Once cool, place it in an airtight container. This helps keep moisture in and air out. Store it in the fridge for up to three days. Make sure to label the container with the date. This way, you know when to use it. When it's time to enjoy your leftovers, you can reheat them easily. Use a skillet on low heat for the best results. Stir often to avoid burning. You can also use a microwave. Place it in a microwave-safe bowl and cover it. Heat in short intervals, stirring in between. This keeps the sauce creamy and avoids drying out the dish. If you want to save some for later, freezing is a great option. Place cooled stroganoff in a freezer-safe container. Leave some space at the top for expansion. You can freeze it for up to three months. When ready to eat, thaw it in the fridge overnight. Reheat it on the stove, stirring well to bring back that creamy texture. Yes, you can use leftover turkey. It makes this dish easy and quick. Just shred or chop your turkey into small pieces. Add it to the skillet after cooking the onions and garlic. This way, the turkey heats through and soaks up the flavors. To make this recipe healthier, you can swap the ground turkey for lean ground chicken or even a plant-based meat. Use low-fat sour cream or Greek yogurt instead of regular sour cream. You can also add more vegetables, like spinach or bell peppers, to boost nutrients without adding many calories. You can serve creamy turkey stroganoff with a fresh green salad or steamed vegetables. Garlic bread or crusty bread works well to soak up the sauce too. For a fun twist, serve it over rice or quinoa instead of egg noodles. This blog post gave you all the key steps to make creamy turkey stroganoff. We covered required and optional ingredients to enhance flavors. You learned detailed cooking steps and helpful tips for the best results. Consider adding veggies or trying new proteins for variety. Storage tips keep your leftovers fresh. Now you can create a dish that tastes great and feels comforting. Enjoy your cooking adventure!

If you’re searching for a quick, tasty meal, look no further! This Minute Creamy Turkey Stroganoff is the answer to your busy weeknight dinners. In just a few simple steps, …

Read more

Categories Dinner

Party Perfect Churro Cheesecake Delightful Dessert Treat

August 26, 2025 by Chef Remy
- 1 ½ cups graham cracker crumbs - ⅓ cup unsalted butter, melted - 2 tablespoons granulated sugar - 2 packages (8 oz each) cream cheese, softened to room temperature - 1 cup granulated sugar - 1 teaspoon pure vanilla extract - 3 large eggs, at room temperature - 1 teaspoon ground cinnamon - 1 cup granulated sugar - 2 teaspoons ground cinnamon - ½ cup unsalted butter - 1 cup water - 1 ¼ cups all-purpose flour - 3 large eggs When making this churro cheesecake, you need to gather all the right ingredients. For the crust, you will use graham cracker crumbs, unsalted butter, and granulated sugar. This mix gives the base a sweet and crunchy texture. In the filling, cream cheese is key. It makes the cheesecake rich and creamy. You will also need granulated sugar, vanilla extract, eggs, and ground cinnamon. These ingredients blend together to create a smooth and flavorful filling. The churro topping is what makes this dessert extra special. You will need granulated sugar, ground cinnamon, unsalted butter, water, all-purpose flour, and eggs. This topping adds a fun twist and a crunchy texture. Make sure you have everything ready. This way, you can enjoy the process of creating your Party Perfect Churro Cheesecake. Each ingredient plays a key role in making this dessert a crowd-pleaser. Happy baking! - Preheat the oven: Set your oven to 325°F (160°C) to get it ready for baking. - Make the crust: In a medium bowl, mix 1 ½ cups of graham cracker crumbs, ⅓ cup of melted unsalted butter, and 2 tablespoons of granulated sugar. Stir until the crumbs are coated. Press this mixture tightly into the bottom of a 9-inch springform pan. Bake for 10 minutes and let it cool slightly. - Prepare the cream cheese mixture: In a large bowl, beat 2 packages of softened cream cheese with 1 cup of sugar until smooth. Add 1 teaspoon of pure vanilla extract. Then, add 3 large eggs, one at a time, mixing well after each one. Finally, sprinkle in 1 teaspoon of ground cinnamon and mix until everything combines well. - Fill the crust with cheesecake filling: Pour the smooth cheesecake mixture over the cooled crust. Use a spatula to make the top even. - Bake the cheesecake: Place the springform pan in the oven. Bake for 50-60 minutes. The edges should be firm, but the center should still jiggle a little. After baking, turn off the oven and crack the door slightly. Let the cheesecake cool in the oven for about 1 hour to help avoid cracks. - Cool in the oven: This cooling step helps the cheesecake set perfectly. It also keeps the texture creamy and smooth. To avoid cracks, bake the cheesecake slowly. After baking, leave it in the oven with the door slightly open for an hour. This helps it cool down gently. A smooth filling starts with soft cream cheese. Make sure to beat it well. Mix in the sugar and vanilla until creamy. Add eggs one at a time, mixing thoroughly after each. Frying churros needs the right oil temperature. Heat your oil to 375°F (190°C) for crispy churros. Pipe the dough into the hot oil carefully to avoid splatter. Fry for 2-3 minutes on each side until golden. For a crunchy finish, roll the hot churros in the cinnamon-sugar mix right after frying. Serve slices of cheesecake on dessert plates. Top with extra churro pieces for a fun look. Lightly dust with cinnamon sugar for a sweet touch. This adds color and taste to your dish. Consider adding fresh fruit or chocolate drizzle for extra flair. {{image_4}} You can spice up your churro cheesecake with fun flavors. - Adding chocolate or caramel: Drizzle warm chocolate or caramel sauce over the top. It adds a rich taste that pairs well with the creamy cheesecake. - Fruit toppings: Fresh berries or sliced bananas can add a bright touch. They bring a burst of color and flavor, making your dessert even more special. Want to make this cheesecake fit different diets? Here are some easy swaps. - Gluten-free modifications: Use gluten-free graham cracker crumbs for the crust. This keeps the base tasty while being safe for those who can't have gluten. - Lower sugar alternatives: Swap granulated sugar with a sugar substitute. This way, you can enjoy the sweetness without all the calories. Pairing your cheesecake with drinks and snacks makes it more fun. - Pairing with beverages: Serve slices with coffee, tea, or milk. These drinks complement the flavors and make for a cozy treat. - Dessert platter ideas: Place slices on a platter with cookies, brownies, or fruit. This creates a dessert spread that pleases any crowd. - Refrigerating Leftovers: After you enjoy your churro cheesecake, cover it with plastic wrap or foil. Place it in the fridge. This helps keep it fresh. It can last for about 5 days in the fridge. - Freezing Options: If you need to store it longer, you can freeze it. Wrap the cheesecake tightly in plastic wrap and then in foil. It can last for up to 2 months in the freezer. Just remember to thaw it in the fridge before serving. - Maintaining Freshness: Always keep the cheesecake covered. This prevents it from drying out or absorbing odors from the fridge. - How Long It Lasts: In the fridge, your cheesecake stays tasty for about 5 days. If frozen, it remains good for 2 months. - Reheating Recommendations: Churro cheesecake is best served cold. If you like it warm, heat a slice in the microwave for just a few seconds. - Serving Cold or at Room Temperature: You can serve it cold right from the fridge. It also tastes great at room temperature. Let it sit out for about 20 minutes before serving for the best flavor. Yes, you can make this cheesecake a day in advance. To store, cover it well with plastic wrap. Keep it in the fridge. This helps the flavors blend better. Just wait to add the churros until serving time. They are best when fresh and crispy. If you want a dairy-free option, use cashew cream or tofu. Both can work well in this recipe. Cashew cream gives a rich texture. Tofu blended with a bit of lemon juice can mimic the tangy taste. Both choices will keep your cheesecake creamy and delicious. Look for the edges to be set. The center should still jiggle a little. You can also use a toothpick. Insert it in the center, and it should come out clean. When the cheesecake cools, it will firm up more. This ensures a perfect slice every time. This blog covered how to make a tasty cheesecake with a churro topping. We discussed the key ingredients, step-by-step instructions, and helpful tips to perfect your dish. Remember, using the right techniques ensures a smooth filling and avoids cracks. Don't forget to try different flavors and make it your own. With proper storage, your cheesecake will stay fresh for days. Enjoy creating this delicious dessert, and don’t hesitate to share your twists and experiences!

Craving a dessert that dazzles at every party? You’re in for a treat! My Party Perfect Churro Cheesecake combines creamy cheesecake with delicious churro flavors. It’s a crowd-pleaser that’s easy …

Read more

Categories Desserts

Zesty Lemon Cheesecake Squares Refreshing and Sweet Treat

August 26, 2025 by Chef Remy
- 1 ½ cups graham cracker crumbs - ½ cup unsalted butter, melted - ¼ cup granulated sugar - 1 teaspoon vanilla extract - 16 oz cream cheese, softened - ¾ cup granulated sugar - 3 large eggs, at room temperature - Zest of 2 lemons - ¼ cup fresh lemon juice - 1 teaspoon vanilla extract - ½ cup sour cream - 2 tablespoons powdered sugar - Fresh mint leaves for garnish Creating Zesty Lemon Cheesecake Squares starts with gathering ingredients. For the crust, use graham cracker crumbs for a sweet base. Melt unsalted butter to mix with the crumbs and sugar. Add vanilla extract for flavor. The cheesecake filling needs softened cream cheese. This helps it blend smoothly. Granulated sugar adds sweetness. You will also need three eggs, which should be at room temperature. Zest two lemons to get a fresh taste. Fresh lemon juice is key for that bright zing. Vanilla extract rounds out the flavors. For the topping, use sour cream mixed with powdered sugar. This adds a creamy layer that balances the sweetness. Fresh mint leaves can be a nice touch on top for color and flavor. Make sure to measure the ingredients carefully. Good measurements lead to great results. 1. First, preheat your oven to 325°F (160°C). Grease an 8x8 inch baking pan with cooking spray or line it with parchment paper. Leave some paper hanging over the edges for easy lifting after baking. 2. In a medium bowl, mix 1 ½ cups of graham cracker crumbs, ½ cup of melted unsalted butter, ¼ cup of granulated sugar, and 1 teaspoon of vanilla extract. Stir with a fork until it looks like wet sand, with no dry bits left. 3. Next, press the mixture firmly into the bottom of the prepared pan. Make it even. Bake for 10 minutes. After baking, let it cool slightly while you make the filling. 1. In a large bowl, use an electric mixer to beat 16 oz of softened cream cheese on medium speed. Mix until it's smooth and creamy, which takes about 2 minutes. 2. Gradually add in ¾ cup of granulated sugar. Keep mixing until fluffy and fully combined. 3. Now, add 3 large eggs, one at a time. Mix on low speed until just combined after each egg. Be careful not to overmix. 4. Gently fold in the zest of 2 lemons, ¼ cup of fresh lemon juice, and 1 teaspoon of vanilla extract with a spatula until it’s well blended. 5. Now, pour the cheesecake filling over the cooled crust. Spread it out evenly. 1. Bake the filled cheesecake in the oven for 40 to 45 minutes. The edges should set, but the center should still wiggle slightly. 2. Turn off the oven and leave the cheesecake inside with the door slightly open for about an hour. This helps to cool slowly and prevents cracks. 3. While it cools, make the topping. In a small bowl, whisk together ½ cup of sour cream and 2 tablespoons of powdered sugar until smooth. 4. After the cheesecake cools, spread the sour cream mixture evenly over the top. 5. Cover the cheesecake with plastic wrap and refrigerate for at least 4 hours, or overnight for a better taste and texture. 6. When ready to serve, lift the cheesecake out of the pan using the parchment paper. Cut it into squares and garnish with fresh mint leaves if you like. To get a smooth and creamy cheesecake, start with room temperature ingredients. When cream cheese is cold, it can clump. Let it sit out for 30 minutes before you mix it. This small step helps your cheesecake fill with air and become fluffy. Next, avoid overmixing when you add eggs. Mix just until you see no streaks of egg. Overmixing can make your cheesecake dense, so keep it gentle. You want a light batter, not a heavy one. For maximum lemon flavor, use fresh lemons. Zest the lemons before juicing them. The zest holds oils that give a bright taste. You can also add a bit of lemon extract for extra zing if you like. When serving, presentation matters. Place your cheesecake squares on a nice platter. Dust with powdered sugar for a sweet touch. Add lemon slices or fresh mint leaves on the side for color. This makes your dessert look as good as it tastes. Cheesecakes can crack, but you can prevent this. Bake the cheesecake slowly. After baking, leave it in the oven with the door slightly open for an hour. This cools it slowly and helps stop cracks. To make sure the crust holds together, press it firmly into the pan. Use the back of a measuring cup to pack it down. If your crust is too crumbly, add a bit more melted butter. This will help it stick better. Keeping these tips in mind will help you make the best Zesty Lemon Cheesecake Squares! {{image_4}} You can change the taste of Zesty Lemon Cheesecake Squares by mixing in fruit. Try adding purees like raspberry or blueberry for a fruity twist. This will add color and a burst of flavor. You can also use other citrus fruits. Lime adds a tangy note, while orange brings a sweet zest. Both options make the dessert unique and tasty. To make this treat lighter, you can use low-fat cream cheese. It still gives the same creamy texture but with fewer calories. You can also swap granulated sugar for natural sweeteners like honey or maple syrup. These options can lower sugar content while keeping the cheesecake sweet and delicious. If you need a gluten-free option, use almond flour or gluten-free cookies for the crust. This will keep the dessert tasty for everyone. You can also experiment with other types of cookies, such as Oreos or gingersnaps. Each cookie will give the crust a different flavor, making your cheesecake even more special. To keep your Zesty Lemon Cheesecake Squares fresh, store them in the fridge. Use an airtight container to protect them from odors. The ideal temperature for refrigeration is between 32°F to 40°F (0°C to 4°C). This helps maintain their delicious taste and creamy texture. You can store them in the fridge for up to 5 days. After that, they may lose their flavor and texture. If you want to save some squares for later, freezing is a great option. First, let the cheesecake cool completely. Then, cut the squares and wrap each piece in plastic wrap. Place them in a freezer-safe container or bag. This helps prevent freezer burn. You can freeze them for up to 3 months. When you're ready to serve, take out the squares and place them in the fridge for a few hours to thaw. For a quick thaw, you can leave them at room temperature for about 30 minutes. This makes them easy to enjoy again without losing taste or texture. Yes, you can make Zesty Lemon Cheesecake Squares a day or two in advance. This dessert actually tastes better after chilling for a while. Here are some tips for chilling and serving later: - Chill Overnight: After preparing and topping the cheesecake, cover it well. Refrigerate for at least four hours or overnight for the best taste. - Serve Cold: When ready to serve, it’s best served cold. This enhances the refreshing lemon flavor. - Garnish Just Before Serving: Add fresh mint or any toppings right before serving. This keeps them fresh and attractive. Cutting cheesecake squares neatly can be tricky. Here are some recommended techniques for nice portions: - Use a Sharp Knife: A sharp knife cuts smoothly through the cheesecake. This helps avoid any tearing of the squares. - Warm the Knife: Dip the knife in hot water, then wipe it dry. This helps make cleaner cuts. - Cut in One Motion: Instead of sawing back and forth, press down firmly in one smooth motion. This gives you nice, even squares. Yes, you can make substitutions for common allergies. Here are some ideas: - Gluten-Free Option: Use gluten-free graham cracker crumbs for the crust. - Dairy-Free Cheese: Replace cream cheese with a dairy-free cream cheese alternative. - Egg Substitutes: For a vegan version, use flax eggs or applesauce instead of eggs. You’ve learned how to make Zesty Lemon Cheesecake Squares from scratch. We covered the crust, filling, and tasty toppings. You also found tips for texture, flavor, and troubleshooting. Don’t forget, you can add fun twists or go healthy with alternatives. Store your cheesecake right to enjoy it longer. Whether for a party or a quiet night, these squares are a treat. I hope you feel inspired to try this recipe and impress your friends and family. Enjoy the delicious results!

Craving a sweet treat to brighten your day? My Zesty Lemon Cheesecake Squares deliver a perfect balance of refreshing lemon and creamy goodness. With simple ingredients like cream cheese and …

Read more

Categories Desserts

Fluffy Pumpkin Oatmeal Bars Simple and Tasty Recipe

August 26, 2025 by Chef Remy
- 1 ½ cups rolled oats - 1 cup pumpkin puree - 1/2 cup almond milk or milk of choice - 1/4 cup pure maple syrup - 1/4 cup honey or agave syrup - 2 large eggs - 1 teaspoon pure vanilla extract - 1 teaspoon ground cinnamon - 1/2 teaspoon ground nutmeg - 1 teaspoon baking powder - 1/4 teaspoon salt - 1/2 cup chopped nuts (walnuts or pecans) - 1/4 cup dried cranberries or chocolate chips When I make Fluffy Pumpkin Oatmeal Bars, I start with the essential ingredients. First, I gather my rolled oats, pumpkin puree, and almond milk. Rolled oats give the bars a great texture. Pumpkin puree adds moisture and flavor. Almond milk keeps the mix creamy. Next, I choose my sweeteners and flavorings. I love using pure maple syrup and honey. They add a natural sweetness. The two large eggs help bind everything together. Pure vanilla extract makes the bars smell amazing and taste even better. The spices and leavening are key to flavor. Ground cinnamon and nutmeg always bring warmth. The baking powder helps the bars rise, making them fluffy. A pinch of salt balances the sweetness. Sometimes, I add extra fun with optional add-ins. Chopped nuts like walnuts or pecans give a nice crunch. Dried cranberries or chocolate chips can make these bars even more special. You can mix and match these ingredients to fit your taste. First, preheat your oven to 350°F (175°C). This step is key for even baking. Next, grease an 8x8-inch baking pan or line it with parchment paper. This makes it easy to remove the bars later. In a large bowl, combine 1 ½ cups of rolled oats, 1 teaspoon of baking powder, 1 teaspoon of ground cinnamon, ½ teaspoon of ground nutmeg, and ¼ teaspoon of salt. Stir these together well. Even distribution of spices ensures every bite is tasty. In another bowl, whisk 1 cup of pumpkin puree, ½ cup of almond milk, ¼ cup of pure maple syrup, ¼ cup of honey or agave syrup, 2 large eggs, and 1 teaspoon of pure vanilla extract. Mix until smooth. A well-blended mixture helps the bars rise nicely. Now, pour the wet mixture into the dry ingredients. Stir gently until just combined. Be careful not to over-mix. This keeps the bars fluffy and light. If you want, fold in ½ cup of chopped nuts and ¼ cup of dried cranberries or chocolate chips. This adds great flavor and texture. It’s a fun way to make your bars unique. Pour the batter into your prepared pan. Spread it out evenly with a spatula. Bake for 25-30 minutes. The bars are ready when the edges turn lightly golden and a toothpick comes out clean from the center. Let the bars cool in the pan for about 10 minutes. Then, transfer them to a wire rack to cool completely. Once cooled, slice the bars into squares or rectangles. Enjoy your fluffy pumpkin oatmeal bars! To get soft and fluffy bars, avoid over-mixing. Stir gently when combining the wet and dry ingredients. This keeps air in the batter. Air makes the bars rise well. If you mix too hard, they may turn out dense. Keep it light and simple. Want a twist on flavor? You can use different spices. Try ginger or allspice for a warm taste. You can also add a pinch of cloves for more depth. If you want to change up the mix, consider adding extras like shredded coconut or sunflower seeds. These add fun textures and flavors. For a cozy autumn look, serve your bars on a wooden platter. Dust with powdered sugar for a sweet touch. You can add a few cinnamon sticks or pumpkin seeds as a garnish. Pair these bars with warm apple cider or a scoop of vanilla ice cream to make it special. Enjoy each bite! {{image_4}} You can easily make these bars dairy-free. For eggs, use flaxseed meal. Mix 1 tablespoon of flaxseed with 3 tablespoons of water. Let it sit for 5 minutes. This makes a great egg substitute. For milk, use almond milk, coconut milk, or oat milk. These options keep your bars creamy and tasty. If you need gluten-free bars, choose gluten-free oats. These oats are safe for those with gluten allergies. You can also swap honey with maple syrup for a vegan-friendly option. Always check labels to ensure all ingredients are gluten-free to avoid cross-contamination. Feel free to add seasonal spices like ginger or cloves for a twist. These spices enhance the pumpkin flavor. You can also mix in chopped apples or pears for added sweetness and texture. Nuts like pecans and walnuts offer a nice crunch and flavor. To keep your fluffy pumpkin oatmeal bars fresh, store them in an airtight container. This helps to lock in moisture and flavor. You can keep them at room temperature for up to three days. If it’s warm or humid, the fridge is a better choice. Just make sure to seal them well. If you want to save some for later, freezing is a great option. To freeze, wrap each bar in plastic wrap, then place them in a freezer bag. This keeps them from sticking together. They can stay in the freezer for up to three months. When you’re ready to eat, simply take out a bar and let it thaw at room temperature. You can also warm it in the microwave for a few seconds for that fresh-baked taste. These oatmeal bars stay fresh for about a week in the fridge. Check for signs of spoilage, like a sour smell or visible mold. If you see any of these signs, it’s best to toss them. Enjoy these tasty treats while they're fresh! Yes, you can use quick oats. Quick oats will make the bars softer. Rolled oats give a chewier texture. If you want more bite, stick with rolled oats. You can add more maple syrup or honey. Brown sugar is another option. If you want a unique twist, try adding mashed bananas or applesauce for natural sweetness. You can use applesauce or mashed sweet potatoes instead. These will change the flavor slightly but still keep it tasty. Unsweetened yogurt can also work if you want a creamy texture. Yes, you can make these bars in advance. Store them in an airtight container. They will stay fresh for up to five days at room temperature. You can also freeze them for later enjoyment. Absolutely! These bars are packed with oats and pumpkin, both healthy choices. They offer fiber and protein to keep you full. Enjoy them with a glass of milk or a piece of fruit for a complete breakfast. In this post, we covered how to make delicious pumpkin oat bars. You learned about essential ingredients, like oats and pumpkin puree, and sweeteners like maple syrup. We walked through step-by-step instructions, tips for the best texture, and easy variations to suit your needs. Overall, these bars are simple to make and perfect for any meal. With a few quick modifications, you can personalize them to fit your taste. Enjoy your baking process and the tasty results!

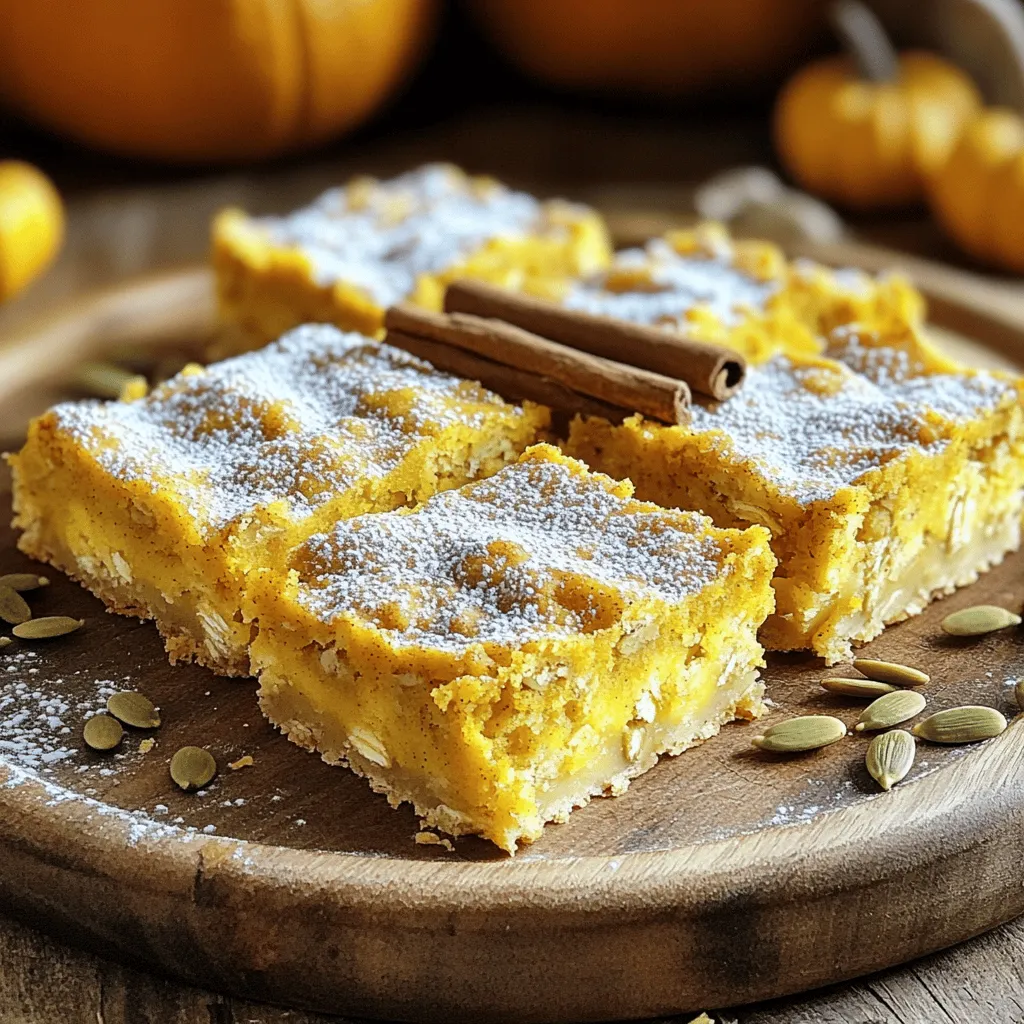
Looking for a delightful treat that combines the warmth of pumpkin and the goodness of oats? You’re in the right place! My Fluffy Pumpkin Oatmeal Bars are simple to make …

Read more

Categories Desserts

No Bake Butterfinger Pie Delightful and Easy Recipe

August 26, 2025 by Chef Remy
- 1 cup crushed graham crackers - 1/4 cup unsalted butter, melted - 1 cup smooth peanut butter - 1 cup powdered sugar - 8 oz cream cheese, at room temperature - 1 cup whipped topping - 1 cup Butterfinger candies, chopped - 1/2 cup chocolate sauce To make No Bake Butterfinger Pie, gather all the ingredients. The crushed graham crackers form the crust. Melt the unsalted butter to mix with the crumbs. This gives the crust a rich flavor. You need smooth peanut butter for the filling. It blends well with cream cheese. The powdered sugar adds sweetness. The cream cheese must be at room temperature. It helps to mix easily. Whipped topping makes the filling light and fluffy. You can use Cool Whip or homemade whipped cream. The chopped Butterfinger candies add a crunchy texture. Finally, chocolate sauce drizzles nicely on top. Each ingredient plays a vital role. Using quality ingredients ensures a tasty pie. Be ready to enjoy this delightful dessert! 1. In a medium bowl, combine 1 cup of crushed graham crackers and 1/4 cup of melted unsalted butter. Mix well with a fork until every crumb is coated. 2. Press this mixture firmly into the bottom and slightly up the sides of a 9-inch pie dish. Make sure it is even and compact. Set the crust aside for now. 1. In a large bowl, beat 8 oz of cream cheese using a hand mixer. Mix until it is smooth and creamy. 2. Gradually blend in 1 cup of smooth peanut butter and 1 cup of powdered sugar. Keep mixing until it is silky and well combined. 3. Now, gently fold in 1 cup of whipped topping. Use a spatula and be careful not to deflate the mixture. 4. Stir in 1 cup of chopped Butterfinger candies, saving some for later. 1. Spread the peanut butter filling evenly over the graham cracker crust. Use a spatula to smooth the top. 2. Cover the pie with plastic wrap and place it in the fridge. Let it chill for at least 4 hours, but overnight is better. Enjoy your no-bake treat! To get a creamy texture, soften your cream cheese first. Let it sit at room temperature for about 30 minutes. This helps it mix well. When mixing, use a hand mixer or stand mixer. Beat the cream cheese on medium speed. This makes it smooth. Gradually add peanut butter and powdered sugar. Keep mixing until the filling is silky and well combined. For the crust, press the graham cracker mix evenly into the pie dish. Use the bottom of a measuring cup to flatten it. Press hard to avoid a crumbly crust. If you want a change, use chocolate cookies or vanilla wafers instead of graham crackers. Both add a new flavor twist! Serve slices on individual dessert plates for a nice touch. You can add a dollop of whipped topping on each slice. Drizzle some chocolate sauce on top for extra flair. To make it more inviting, sprinkle some chopped Butterfinger candies over the pie before serving. This adds color and crunch! {{image_4}} You can change up your no bake Butterfinger pie in fun ways. Adding different candies gives you a new taste. Try Snickers, Reese's, or M&M's for a tasty twist. You can also use flavored whipped toppings like chocolate or vanilla. This adds extra flavor and makes each bite special. If you need gluten-free options, swap out the graham crackers for gluten-free cookies. Look for brands that fit your diet. For vegan substitutes, use dairy-free cream cheese and coconut whipped cream. The pie will still be creamy and delicious! For chocolate lovers, why not add chocolate to the filling? Mix in melted chocolate or chocolate chips for a richer taste. You can also use a chocolate cookie crust instead of the graham cracker crust. This gives a double chocolate treat that will please any chocolate fan. To keep your No Bake Butterfinger Pie fresh, cover it tightly. You can use plastic wrap or aluminum foil. Properly covering the pie helps keep it moist. Store it in the fridge for up to four days. If you have leftover pie, slice it for easier access. You can freeze this pie for longer storage. First, let it chill in the fridge for a few hours. Once set, cover it well in plastic wrap and then in foil. This double layer prevents freezer burn. To thaw, place the pie in the fridge overnight. This keeps the texture nice and creamy. The pie lasts about four days in the fridge. After that, the texture may change. If you notice any odd smells or colors, it’s best to toss it. Always trust your senses when it comes to food safety. Enjoy your pie while it’s fresh for the best taste! Yes, you can use crunchy peanut butter instead of smooth. It adds a nice texture. The pie will still taste great and have that classic peanut flavor. Just make sure the crunchy bits mix well with the other ingredients. You should refrigerate the pie for at least 4 hours. However, I recommend leaving it overnight. This helps the pie set properly and makes it easier to slice. The longer it chills, the better the flavors blend. If you prefer, you can use homemade whipped cream. Just whip heavy cream until soft peaks form. You can also use Greek yogurt for a healthier option. Both will work well in this pie and still taste delicious. Yes, you can make this pie a day or two in advance. Just keep it covered in the fridge. This makes it a great choice for parties or gatherings. The flavors deepen as it sits, making each bite even better. This blog post covered a delicious peanut butter pie recipe. We explored the key ingredients like graham crackers and cream cheese. You learned how to prepare the crust and make the filling step-by-step. We shared tips for a creamy texture and ways to present the pie beautifully. Don't forget the fun variations and storage tips for leftovers. This pie is easy to customize, so feel free to get creative. Enjoy sharing this delightful treat with friends and family!

Craving a sweet treat that’s both easy and delicious? Look no further! This No Bake Butterfinger Pie uses simple ingredients to create a tasty dessert that will impress your friends …

Read more

Categories Desserts

Easy Apple Crisp Delicious Dessert Recipe to Enjoy

August 26, 2025 by Chef Remy
- 4 large apples (preferably Granny Smith or Honeycrisp), peeled, cored, and sliced - 1 teaspoon fresh lemon juice - 1 cup rolled oats - 1/2 cup all-purpose flour - 1/2 cup packed light brown sugar - 1/2 teaspoon ground cinnamon - 1/4 teaspoon ground nutmeg - 1/4 teaspoon kosher salt - 1/2 cup unsalted butter, melted - 1/4 cup chopped walnuts or pecans (optional for added crunch) - Vanilla ice cream or whipped cream for serving (optional) Choose fresh apples for the best taste. Granny Smith apples add a nice tartness, while Honeycrisp offers sweetness. Peel, core, and slice them evenly to ensure they cook at the same rate. Adding lemon juice helps prevent browning and adds a zesty kick. When measuring flour, spoon it into the cup and level it off. This gives you the right amount for the recipe. For the topping, make sure your butter is melted but not too hot. This helps mix the dry ingredients better. If you want a crunchy topping, don’t skip the nuts. They add great flavor and texture. If you don’t have Granny Smith apples, you can use any tart apple. Fuji or Braeburn work well too. For a gluten-free version, swap the all-purpose flour with a gluten-free blend. You can also replace the butter with coconut oil for a dairy-free option. If you want a sweeter taste, use brown sugar instead of white sugar. If you have no nuts, feel free to leave them out or use seeds instead. Start by preheating your oven to 350°F (175°C). This is key for even baking. A hot oven helps the apples cook well and the topping crisp up nicely. Next, take your four large apples. Peel, core, and slice them thin. I recommend using Granny Smith or Honeycrisp apples. They add a nice tart flavor. Place the apple slices in a large bowl. Drizzle one teaspoon of fresh lemon juice over them. Toss gently to coat all the slices. This keeps them from browning and adds a zesty taste. In a separate bowl, combine the dry ingredients. Mix one cup of rolled oats, half a cup of all-purpose flour, and half a cup of packed light brown sugar. Add half a teaspoon of ground cinnamon, a quarter teaspoon of ground nutmeg, and a quarter teaspoon of kosher salt. Stir until everything is well mixed. This will be your tasty topping. Now, melt half a cup of unsalted butter. Pour the melted butter over the dry mix. Stir with a fork until it looks crumbly. If you like nuts, fold in a quarter cup of chopped walnuts or pecans now. This adds a nice crunch. Spread the apple slices evenly in a greased 9x13 inch baking dish. Sprinkle the oat topping over the apples. Make sure to cover all the apple slices. This ensures no gaps. Now, place the baking dish in the oven. Bake for 30 to 35 minutes. Look for the apples to get tender and the topping to turn golden brown. You’ll know it’s ready when you smell that sweet aroma wafting through your kitchen! Once it's done, take it out and let it cool for a few minutes before serving. This rest time helps the flavors come together. Enjoy with a scoop of vanilla ice cream or a dollop of whipped cream if you like! To get the best texture, choose the right apples. I like Granny Smith or Honeycrisp. They hold their shape well and bring a nice tart flavor. Peel, core, and slice them thin. This helps them cook evenly. Mix the apples with lemon juice. It keeps them fresh and adds a zing. When making the topping, combine oats, flour, and sugar well. Drizzling melted butter helps create a crumbly texture. If you want more crunch, add chopped walnuts or pecans. To boost flavors, don't skip the spices. Ground cinnamon and nutmeg add warmth and depth. You can even add a pinch of ginger for a kick. If you like sweetness, adjust the brown sugar to taste. You can also mix in some vanilla extract for extra aroma. If you use tart apples, a bit more sugar can help balance the flavor. Experiment with your favorite nuts or seeds for a twist! Serve your apple crisp warm for the best experience. A scoop of vanilla ice cream adds a lovely cold contrast. Whipped cream is another great option. You can also top it with caramel sauce for extra sweetness. If you want a fun twist, serve it in individual dishes. It looks nice and is easy to share. Enjoy this dessert with family and friends for a cozy treat! {{image_4}} If you want to make a nut-free apple crisp, simply leave out the chopped walnuts or pecans. The recipe will still taste great without them. You can add extra oats or some seeds, like pumpkin or sunflower seeds, for a bit of crunch. These seeds give a nice texture and keep it nut-free while still being delicious. Using tart apples can make your apple crisp even better. Granny Smith apples are my top choice. They add a nice tang that balances the sweetness. You can also try other tart apples, like Jonagold or Braeburn. Mixing a few types of apples can bring different flavors to the dish. This mix can make each bite unique and tasty. Adding seasonal fruits can take your apple crisp to a new level. In fall, try adding cranberries for a bright flavor. In summer, you can mix in berries like raspberries or blueberries. These fruits add a fresh twist and extra color. Just make sure to adjust the sugar a bit if you add tart fruits, so the crisp remains sweet and balanced. To keep your apple crisp fresh, let it cool fully. Once cooled, cover the dish tightly with plastic wrap or aluminum foil. You can also transfer it to an airtight container. Store it in the fridge for up to three days. This way, the apples stay tasty, and the topping won’t get too soft. When you want to enjoy your apple crisp again, preheat your oven to 350°F (175°C). Place the apple crisp in an oven-safe dish. Cover it with foil to keep it from browning too much. Heat for about 15-20 minutes. If you want a crispier topping, remove the foil for the last 5 minutes. You can also reheat individual servings in the microwave for about 30-45 seconds. If you want to save some for later, freezing is a great option. After cooling, wrap the apple crisp tightly in plastic wrap. Then, place it in a freezer bag. It can last for up to three months in the freezer. When ready to eat, thaw it in the fridge overnight. Reheat it in the oven as mentioned above. Enjoy your delicious dessert anytime! Yes, you can prepare apple crisp ahead of time. You can slice the apples and mix them with lemon juice. Store the apple mixture in the fridge for up to 24 hours. You can also prepare the topping in advance. Just keep it in a sealed container until you’re ready to bake. When you're ready, layer the topping over the apples and bake as directed. This makes it easy to serve warm dessert anytime! I recommend using Granny Smith or Honeycrisp apples. These apples hold their shape well when baked. They also provide a nice tartness that balances the sweetness of the topping. You can mix different types of apples too. This adds more flavor and texture to your crisp. Your apple crisp is done when the apples are soft and the topping is golden brown. You should see bubbles around the edges. The kitchen will smell amazing when it’s ready! If you want, you can check the apples with a fork. They should be tender but not mushy. Yes, you can use rolled oats in your apple crisp. Rolled oats give a nice chewy texture. Quick oats will make a finer topping, but both work well. Just remember that rolled oats may take a little longer to bake. The choice depends on your texture preference! This blog post covered all the key steps to make a great apple crisp. We examined the ingredients, preparation tips, and substitutions for a tasty dessert. I shared detailed instructions for baking and offered tips to enhance texture and flavor. You also learned about variations and storage options. With these insights, you can create a delicious apple crisp that suits your tastes. Enjoy experimenting with the recipe to make it your own!

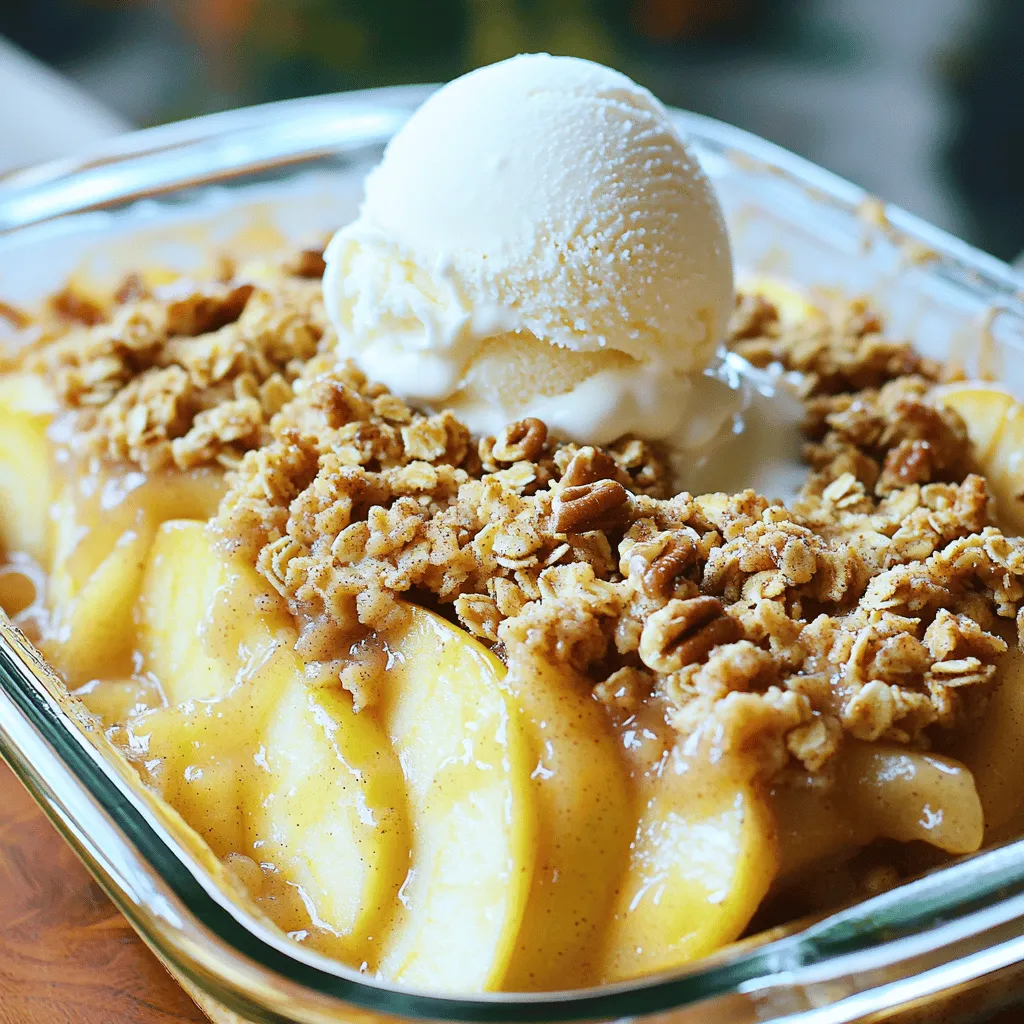
Do you love warm, sweet desserts that are easy to make? You’re in the right place! This Easy Apple Crisp recipe is not only simple but also packed with flavor. …

Read more

Categories Desserts

Creamy Crockpot Crack Potato Soup Simple and Satisfying

August 26, 2025 by Chef Remy
- 6 medium russet potatoes, peeled and diced into 1-inch cubes - 1 large onion, finely chopped - 3 cloves garlic, minced - 4 cups chicken or vegetable broth - 1 cup cream cheese, softened - 1 cup sharp cheddar cheese, shredded - 1/2 cup sour cream I love using russet potatoes for this soup. They are starchy and creamy, making the soup rich. The onion and garlic add a depth of flavor that really shines through. Cream cheese and sharp cheddar make it indulgent. The sour cream adds a nice tang and creaminess too. - 1 teaspoon garlic powder - 1 teaspoon onion powder - 1/2 teaspoon smoked paprika - Salt and freshly cracked pepper The spices are simple but effective. Garlic and onion powder boost the flavors of fresh garlic and onion. Smoked paprika adds a hint of smokiness that takes the soup up a notch. Always taste and adjust the salt and pepper for your perfect blend. - 4 green onions, sliced thinly - 4 strips of crispy cooked turkey bacon Toppings can make your soup even better. Green onions add a fresh crunch. Turkey bacon gives a nice salty bite. You can mix and match toppings to suit your taste and impress your guests. - Prepare the crockpot with cooking spray or liner. - Dice 6 medium russet potatoes into 1-inch cubes. - Chop 1 large onion finely. - Mince 3 cloves of garlic. Start by getting your crockpot ready. A quick spray with cooking oil or a liner makes cleanup easy. Then, focus on the veggies. Dice your potatoes, chop the onion, and mince the garlic. This sets a great base for the soup. - Combine the diced potatoes, chopped onion, and minced garlic in the crockpot. - Pour in 4 cups of chicken broth (or vegetable broth). - Add 1 teaspoon of garlic powder, 1 teaspoon of onion powder, and 1/2 teaspoon of smoked paprika. - Season with salt and pepper to taste. - Stir gently to mix everything. Now, combine all your prepared ingredients in the crockpot. Make sure the potatoes, onion, and garlic are well mixed. Pour in the broth, covering the veggies fully. Sprinkle in your spices, then stir gently. This will help all the flavors blend nicely. Cover the crockpot and set it to cook. You can choose to cook on low for 6 to 8 hours or high for 4 to 5 hours. The potatoes should be fork-tender when done. - Mash the potatoes with a potato masher or fork for the desired consistency. - Incorporate 1 cup of softened cream cheese and 1 cup of shredded sharp cheddar cheese. - Add 1/2 cup of sour cream and mix until smooth. - Taste and adjust seasoning with salt and pepper. - If too thick, stir in more broth or water. When the cooking time is up, it’s time to finish the soup. Use a masher to mash some of the potatoes. This gives the soup a creamy texture while keeping some chunks. Next, fold in the cream cheese and cheddar until they melt. Add the sour cream, mixing until everything is smooth. Taste your soup and adjust the seasoning if needed. If it’s too thick, add a bit more broth or water. Let it warm for another 10 to 15 minutes. Now, you are ready to serve this creamy delight! To get a creamy mouthfeel, mash the cooked potatoes well. I like to leave some chunks intact. This gives the soup a nice texture. If the soup feels too thick, you can add broth or water. Just stir a little in at a time until you reach the perfect consistency. To boost the flavor, try adding spices like thyme or basil. You can even mix in a dash of cayenne for some heat. If you want a different taste, swap cream cheese for Greek yogurt. For cheddar, consider using gouda or mozzarella. This soup pairs well with crusty bread or garlic rolls. They are perfect for dipping. For a nice touch, garnish your soup with extra green onions and some crumbled turkey bacon. A sprinkle of cheese on top looks nice too. Serve in warm bowls for a cozy meal. {{image_4}} You can make this soup vegetarian by using vegetable broth instead of chicken broth. Just skip the bacon too. You still get a rich and creamy taste without the meat. To add more flavor, think about mixing in other veggies. Carrots and celery work great! They add nice texture and taste. You can also try different types of cheese. Gouda or Monterey Jack can give a new twist to the classic cheddar. If you like heat, add jalapeños or hot sauce. Start with a little, then taste. You can always add more! The spice will make the soup exciting and keep you warm on cold days. To store leftover soup, let it cool first. Pour the soup into an airtight container. Make sure to leave some space at the top. Seal it well to keep out air. Place the container in the fridge. Your soup will stay fresh for about 3 to 4 days. When you're ready to eat, just pull it out. If you want to freeze the soup, use a freezer-safe container. Leave some room at the top for expansion. You can also use freezer bags. Just make sure to remove as much air as possible. Label the bags with the date. The soup can last in the freezer for up to 3 months. When you're ready to enjoy it, thaw it overnight in the fridge. To reheat the soup, you have a few good choices. You can use the stovetop or microwave. If using the stovetop, heat it on low. Stir often to keep it from sticking. If using the microwave, place it in a microwave-safe bowl. Heat in short bursts, stirring in between. This helps to keep the texture nice and creamy. Avoid boiling the soup, as this can change its taste. Enjoy it warm, just like the first time! Yes, you can make this soup ahead of time. It stores well in the fridge. After cooking, let the soup cool down. Transfer it to an airtight container. It will stay fresh for about three days. When you are ready to enjoy it, reheat on the stove or in the microwave. Stir it well to mix the flavors. You might want to add a splash of broth if it thickens too much. If you need a swap for cream cheese, try using Greek yogurt. It gives a nice tang and creamy texture. Another option is cottage cheese, which is lighter but still blends well. You can also use sour cream for a similar flavor. Each option may slightly change the taste but will keep the soup creamy. To thicken the soup, you can mash more potatoes. This adds creaminess without changing the flavor. If you prefer a smoother texture, blend some of the soup using an immersion blender. You can also stir in a cornstarch slurry. Just mix one tablespoon of cornstarch with two tablespoons of cold water. Add it to the soup and stir well. Cook for a few more minutes to thicken. Yes, this soup can easily be made gluten-free. Use gluten-free chicken or vegetable broth. Always check the labels to ensure no gluten is present. You can also swap out any ingredients that may have gluten. For example, make sure your cream cheese is gluten-free. This way, everyone can enjoy this creamy soup! This blog post covered how to make a tasty potato soup. You learned about the main ingredients, spices, and optional toppings that elevate the dish. We shared step-by-step instructions for preparation and included helpful tips for the best texture and flavor. You can explore variations to fit your taste and find ways to properly store leftovers. Try this recipe, and enjoy a warm bowl of comforting soup that you made!

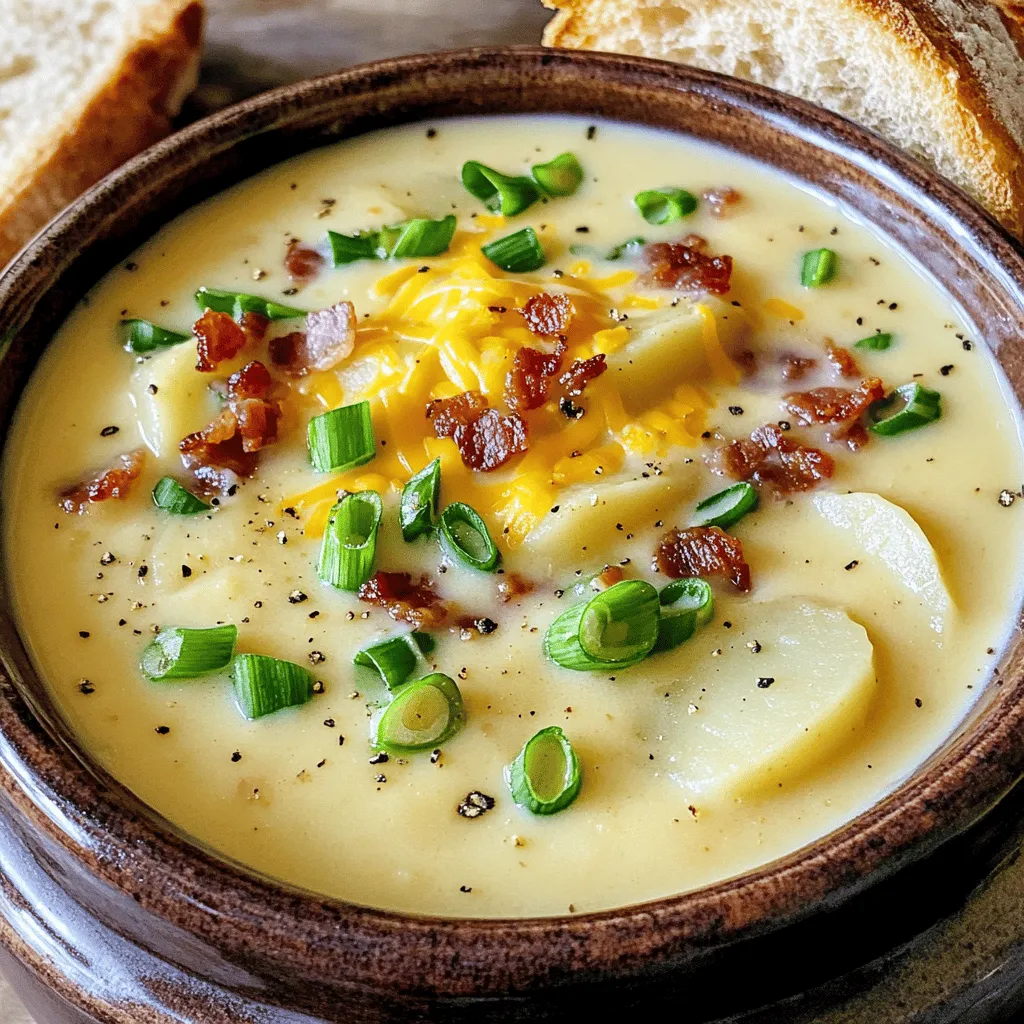
Craving a warm and hearty meal? My Creamy Crockpot Crack Potato Soup is just what you need! Packed with tender potatoes, rich cheeses, and spices, this easy recipe combines simple …

Read more

Categories Dinner

Crispy Air Fryer Apple Fries Simple and Tasty Snack

August 26, 2025 by Chef Remy
- Apples: Use Granny Smith or Honeycrisp for the best crunch. - Dry ingredients: You need 1 cup all-purpose flour, 1 teaspoon ground cinnamon, 1/2 teaspoon ground nutmeg, and 1/4 cup granulated sugar. - Wet ingredients: For this, use 1 large egg and 1 tablespoon of milk. - Coating: 1/2 cup panko breadcrumbs adds extra crunch. - Optional ingredients: A light mist of cooking spray helps fries cook evenly. You can also use caramel sauce for a sweet dip. These ingredients create a perfect balance of flavors and textures. Using the right apple is key. Granny Smith gives a tartness, while Honeycrisp adds sweetness. The spices enhance the flavor, making each bite delightful. The panko breadcrumbs ensure crispiness that rivals deep-fried snacks. Don't skip the caramel sauce; it adds a fun touch! Enjoy making this simple, tasty snack! First, wash your apples well under cold water. This removes dirt and germs. Next, use a sharp knife to core the apples. Be careful! After coring, slice the apples into thin strips. Aim for a fry-like shape to get that perfect texture. A good thickness is about 1/4 inch. This helps them cook evenly. In a shallow dish, mix your dry ingredients. Combine 1 cup of flour, 1 teaspoon of cinnamon, 1/2 teaspoon of nutmeg, and 1/4 cup of sugar. Whisk them until they blend perfectly. In another bowl, crack 1 large egg and add 1 tablespoon of milk. Whisk these together until smooth. Now, prepare a third dish with 1/2 cup of panko breadcrumbs. For coating, take each apple strip. First, dust it in the flour mixture, covering it well. Next, dip it in the egg mixture. Let any extra drip off. Finally, roll the strip in the panko breadcrumbs. Press gently to make sure they stick. Before cooking, preheat your air fryer to 375°F (190°C). This step is key for crispy apple fries. Lightly spray the air fryer basket with cooking spray to prevent sticking. Next, arrange the apple fries in a single layer. Leave space between each strip for even cooking. For an extra crunch, mist the tops of the fries with more cooking spray. Cook the apple fries for 10-12 minutes. Flip them halfway through for even browning. They should turn golden brown and crispy. When done, carefully remove them from the air fryer. Let them cool for a few minutes. This step enhances their flavor and texture. To get crispy apple fries, cooking spray is key. It helps create a nice outer layer. Without it, your apple fries may turn out soggy. I suggest using a light mist before the fries go into the air fryer. This small step makes a big difference. Flipping the apple fries halfway through cooking is another trick. This ensures even cooking on all sides. It helps them get nice and golden. You want that crunch, right? So, make sure to flip them! To make your apple fries even tastier, consider adding spices. A pinch of ginger or clove can add a nice twist. You might also try a dash of cayenne for heat. Mix in these spices with cinnamon and nutmeg for a deeper flavor. If you love caramel sauce, here are some tips. Use warm caramel for dipping. It makes each bite extra special. You can even add a sprinkle of sea salt on top. This adds a nice sweet and salty contrast. Enjoy experimenting with flavors! {{image_4}} For your apple fries, you can choose different types of apples. Each type gives a unique taste. I recommend using Granny Smith apples for a tart flavor. They hold up well when cooked. Honeycrisp apples, on the other hand, offer a sweet and crisp bite. Mixing these apples can create fun flavor combinations. Try both to see which one you like best! You can switch up the coating to change the flavor. Whole wheat flour or almond flour are great choices. They add a bit of nuttiness. For a sweeter taste, add brown sugar to the flour mix. You can also try adding vanilla for a warm flavor. These changes can make your apple fries even more exciting! While caramel sauce is a classic choice, you have other options. Try honey or yogurt for a healthier dip. You can use peanut butter or chocolate sauce for a fun twist. Each sauce brings a different flavor to the fries. Experiment with these dips to find your favorite! To keep your crispy air fryer apple fries fresh, follow these steps: - Allow the apple fries to cool completely before storing. - Place them in an airtight container to prevent moisture. - You can use glass containers or plastic ones with a tight seal. - Store in the refrigerator for up to three days. When you're ready to enjoy your apple fries again, here’s how to reheat them: - Use an air fryer to keep them crispy. Set it to 375°F (190°C). - Place the apple fries in a single layer in the basket. - Heat for about 5 minutes, checking for crispiness. - Avoid using a microwave, as it will make them soggy. Yes, you can use other apples. Each type gives a unique taste. Granny Smith apples are tart and crisp. Honeycrisp offers a sweet, juicy crunch. Other varieties like Fuji or Gala will also work. Just remember, the taste and texture will change based on the apple. Try different types to find your favorite! Apple fries stay fresh for about three days in the fridge. Make sure to store them in an airtight container. If you want to keep them longer, freeze them. Frozen apple fries can last for about two months. Just remember to reheat them well. This keeps them crispy and tasty. Yes, you can make vegan apple fries! Instead of the egg, use a flaxseed meal mixed with water. This acts as a binding agent. For the milk, you can use almond or soy milk. These swaps will keep the fries delicious while making them vegan-friendly. Enjoy the same crunchy treat! In this blog post, we explored how to make delicious crispy apple fries. You learned about the best apple varieties, the right mix of dry and wet ingredients, and air frying tips. We also covered ways to enhance flavor, try different coatings, and suggested dipping sauces. Remember, using the right apples and techniques matters for taste and texture. Enjoy experimenting with variations and storing tips to make the most of your fries. Get ready to share these tasty treats with friends and family!

Looking for a fun, healthy snack? Try my crispy air fryer apple fries! This simple recipe transforms fresh apples into a delightful treat that’s both tasty and easy to make. …

Read more

Categories Desserts

Classic Homemade Apple Pie Flavorful and Easy Recipe

August 26, 2025 by Chef Remy
- 6 cups of thinly sliced apples - 3/4 cup granulated sugar - 1 teaspoon ground cinnamon - 1/4 teaspoon ground nutmeg - 2 tablespoons lemon juice - 1 tablespoon cornstarch - 2 tablespoons unsalted butter - 1 egg (for egg wash) - Pre-made pie crusts or homemade pie crust - Pinch of salt To make a classic homemade apple pie, you need fresh apples. I like using a mix of Granny Smith and Honeycrisp. This blend gives a good sweet and tart flavor. You also need sugar, cinnamon, and nutmeg to spice up the filling. Adding lemon juice brightens the taste. Cornstarch helps thicken the filling. It keeps the pie from being too runny. You will also need butter to make the filling rich. For the crust, you can use pre-made pie crusts or make your own from scratch. An egg wash adds a nice golden color to the top. Finally, don’t forget a pinch of salt. It balances all the sweet flavors in your pie. Gather these ingredients, and you’re ready to start making a pie that will impress everyone! First, you need to preheat your oven to 425°F (220°C). This high heat helps set the crust just right. Next, grab a large mixing bowl. Add 6 cups of thinly sliced apples. I like using a mix of Granny Smith and Honeycrisp apples for a great taste. Add 3/4 cup of granulated sugar, 1 teaspoon of ground cinnamon, and 1/4 teaspoon of ground nutmeg. Then, squeeze in 2 tablespoons of fresh lemon juice. This brightens the flavor. Sprinkle in 1 tablespoon of cornstarch and a pinch of salt. Toss everything gently. You want to coat the apples well. Let this sit for about 10 minutes. This lets the flavors mix and the juices flow. Now, roll out one of your pie crusts. Use a lightly floured surface to keep it from sticking. You want it to fit into your 9-inch pie pan. Let it hang over the edges a bit. Pour your apple filling into the crust. Spread the apples evenly for the best taste. Dot the filling with small pieces of 2 tablespoons of unsalted butter. This makes the pie rich and tasty. Roll out the second pie crust. Carefully place it on top of the apple filling. Trim any extra dough from the edges. Crimp the edges together to seal it well. Make several slits in the top crust. This helps steam escape while baking. Brush the top crust with 1 beaten egg for a golden look. Put the pie on a baking sheet. This catches any spills. Place it in your preheated oven. Bake at 425°F (220°C) for 15 minutes. After that, lower the temperature to 350°F (175°C) and bake for another 30-35 minutes. Watch for the pie to turn golden brown. The filling should bubble up through the slits. When done, take it out and let it cool on a wire rack. Allow at least 2 hours before slicing. This waiting time helps the filling set, making it easier to serve. To make a flaky crust, use cold ingredients. Cold butter and water help create layers. Cut the butter into the flour until it looks like crumbs. Then, add cold water little by little. Mix until just combined. Avoid overworking the dough, or it will become tough. Chilling the dough is key. Wrap it in plastic and refrigerate for at least 30 minutes. This step relaxes the gluten and firms up the fat. A chilled dough rolls out smoothly and holds its shape better. For the best apple pie, you need the right apples. A mix of Granny Smith and Honeycrisp works well. Granny Smith apples are tart and hold their shape. Honeycrisp adds a nice sweetness and crunch. Add spices to enhance the flavor. Ground cinnamon and nutmeg bring warmth and depth. A splash of lemon juice brightens the filling. It balances the sweetness and keeps the apples fresh. Understanding baking temperatures is crucial. Start at a high temperature of 425°F (220°C) for the first 15 minutes. This helps set the crust quickly. Then, lower the heat to 350°F (175°C) to bake the pie evenly. To know when your pie is done, look for a golden crust and bubbling filling. If the crust browns too fast, cover it with foil. Let the pie cool for at least 2 hours before slicing. This helps the filling set nicely. {{image_4}} You can change the crust for your apple pie. A lattice crust looks fancy and lets steam escape. To make it, cut the top crust into strips and weave them over the filling. This method adds a nice touch to your pie. You can also try a crumb topping. Mix flour, brown sugar, and butter until it resembles coarse crumbs. Sprinkle this mixture on top of your filling instead of a full crust. This gives a nice crunch to each bite. There are many ways to change the flavor of your apple pie. Adding caramel gives it a rich taste. You can use caramel sauce, drizzled over the apples before sealing the crust. Nuts can also add a nice crunch. Chopped walnuts or pecans mixed in with the apples create a new texture. You can switch up the spices too. Instead of just cinnamon and nutmeg, try adding ginger or allspice. These spices bring warmth and depth to the pie’s flavor. Serving your apple pie warm is a classic choice. It pairs perfectly with vanilla ice cream. The cold ice cream melts into the warm pie, creating a delicious mix. Whipped cream is another great option. A dollop on top adds a light and airy touch. Some people enjoy pie chilled. This lets the flavors set even more. You can enjoy it plain or with a side of yogurt for a creamy contrast. To keep your apple pie fresh, you need the right storage methods. If you have leftover pie, the best way to store it is in the fridge. Place the pie in an airtight container or cover it tightly with plastic wrap. This helps keep the pie moist and prevents it from absorbing other smells in the fridge. If you want to save the pie for later, you can freeze it. Wrap the cooled pie in plastic wrap, then in aluminum foil. This double wrapping keeps the pie safe from freezer burn. You can freeze it for up to three months. When you’re ready to eat it, just thaw it in the fridge overnight. When you want to enjoy a slice of your pie, reheating it right is key. The best way to reheat slices is in the oven. Preheat the oven to 350°F (175°C). Place the slice on a baking sheet and cover it loosely with foil. Heat for about 10-15 minutes. This method keeps the crust crisp and warm. To avoid a soggy crust when reheating, avoid the microwave. The microwave can make the crust chewy and wet. By using the oven, you ensure a warm, tasty slice with a nice crust. Enjoy your pie as if it was just baked! Yes, you can use frozen apples. They work well if you thaw and drain them first. This step helps reduce extra moisture. If you skip this, your pie might be too wet. To make it easier, use apples that are already sliced before freezing. To stop your filling from being runny, use cornstarch as a thickener. Mix it well with the apples and sugar. Allow the apple mixture to sit for at least ten minutes. This lets the apples release some juice. You can also use less sugar if your apples are sweet. The best apples for baking are Granny Smith and Honeycrisp. Granny Smith apples are tart and hold their shape well. Honeycrisp apples are sweet and add great flavor. You can mix both for a balanced taste. Other good options include Fuji and Braeburn apples. Yes, you can make apple pie ahead of time. You can bake it one day in advance. Just store it at room temperature, covered with a cloth. If you want to make it even earlier, freeze it unbaked. Bake it straight from the freezer; just add extra time. You now have all the steps to create a delicious apple pie. Start with the right ingredients and follow the instructions carefully. Use tips to perfect your crust and filling. Don’t forget to explore variations to make each pie unique. Whether you serve it warm with ice cream or store it for later, your apple pie will be a hit. Enjoy baking and sharing this classic dessert with family and friends!

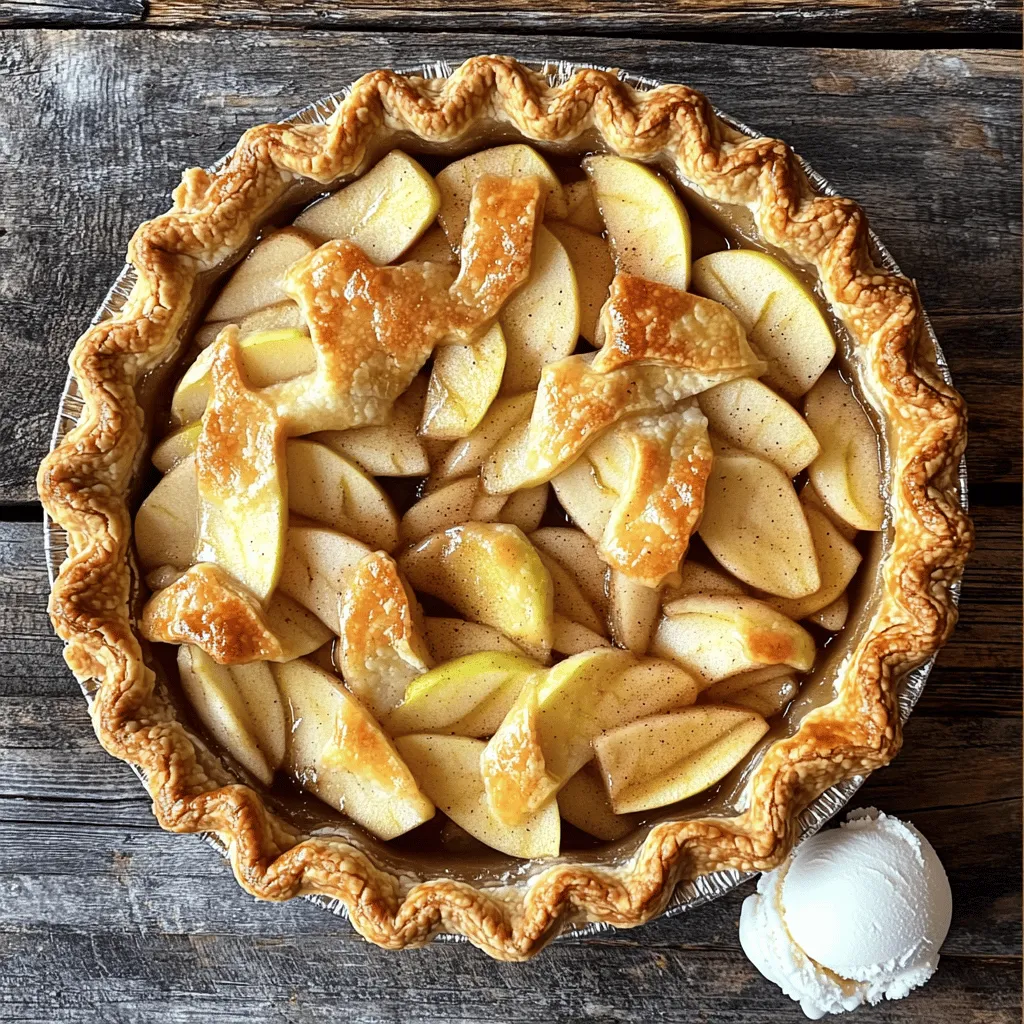
There’s nothing like the aroma of a classic homemade apple pie filling your kitchen. In this easy recipe, I’ll guide you step-by-step to create a delicious pie that’s perfect for …

Read more

Categories Desserts
Older posts
Newer posts
← Previous Page1 … Page38 Page39 Page40 … Page130 Next →

ROASTED RECIPES

Where bold flavors meet everyday meals. Warm, vibrant, and made to share. 🔥🥗🍴

PAGES

Home About Contact Privacy Policy Terms & Conditions Cookie Policy GDPR Policy Copyright Policy Disclaimer

CATEGORIES

Appetizers Desserts Salads Breakfast Dinner

Contact

  • Pinterest
  • Mail
Copyright © 2025 Roasted Flavors. All rights reserved.