Skip to content
Roasted Flavors
  • Home
  • Appetizers
  • Desserts
  • Salads
  • Breakfast
  • Dinner
  • Privacy Policy
  • Contact
  • About

Chef Remy

Vegan Pumpkin Spice Cake Delightful Fall Recipe

September 2, 2025 by Chef Remy
To make this delightful vegan pumpkin spice cake, gather the following ingredients: - 1 cup pumpkin puree (canned or homemade) - 1 cup almond milk (or any plant-based milk of your choice) - 1/2 cup coconut oil, melted - 1 cup brown sugar (or substitute with coconut sugar for a healthier option) - 1 teaspoon vanilla extract - 2 cups all-purpose flour - 1 teaspoon baking powder - 1 teaspoon baking soda - 1 teaspoon ground cinnamon - 1/2 teaspoon ground nutmeg - 1/2 teaspoon ground ginger - 1/4 teaspoon cayenne pepper (add more for extra heat if desired) - 1/4 teaspoon salt You can easily swap some ingredients for others based on what you have. For instance: - Pumpkin Puree: Use sweet potato puree if you prefer. - Almond Milk: Any plant-based milk works, like oat or soy milk. - Coconut Oil: You can replace it with vegetable oil or applesauce for less fat. - Brown Sugar: Coconut sugar makes a great alternative for a lower glycemic index. When selecting your ingredients, consider these tips: - Freshness: Use fresh pumpkin puree for best flavor. If using canned, check the label for added sugars or preservatives. - Quality of Oils: Opt for organic coconut oil for a richer taste. - Spices: Fresh spices give better flavor. Check dates on your spice jars to ensure they’re not expired. - Flours: If you’re gluten-free, consider almond flour or a gluten-free blend. Just be aware of the different baking properties they have. These details help you create a rich and tasty cake that celebrates fall flavors! Start by setting your oven to 350°F (175°C). This is the perfect temp for baking. Grab a 9-inch round cake pan. Lightly grease it with oil. Line the bottom with parchment paper. This helps the cake come out easily later. In a large bowl, combine the pumpkin puree, almond milk, melted coconut oil, brown sugar, and vanilla extract. Use a whisk or a hand mixer. Blend until the mixture is smooth and creamy. This step adds great flavor and moisture to your cake. In another bowl, whisk together the all-purpose flour, baking powder, baking soda, ground cinnamon, ground nutmeg, ground ginger, cayenne pepper, and salt. Mix these dry ingredients well. Now, fold the dry mix into the wet mix. Do this in batches. Stir gently until just combined. You want a smooth batter, but don’t overmix it. This keeps your cake light and fluffy. Pour the batter into the prepared cake pan. Use a spatula to spread it evenly. Tap the pan on the counter to release air bubbles. Place the pan in the oven. Bake for 30 to 35 minutes. To check if it's done, insert a toothpick into the center. If it comes out clean, your cake is ready. Once baked, let the cake cool in the pan for about 10 minutes. Then, run a knife around the edges and flip it onto a wire rack. Let it cool completely. Enjoy the delightful aroma as it cools! To make your vegan pumpkin spice cake light and fluffy, mix your wet and dry ingredients separately. This way, you blend them just before baking. When you fold the dry mix into the wet mix, do it gently. Overmixing can make the cake dense. Use a spatula to fold until you see no dry flour. This keeps the batter airy. One common mistake is not measuring ingredients correctly. Use measuring cups and spoons for accuracy. Another mistake is skipping the cooling time. Letting the cake cool helps it set and makes it easier to frost. Lastly, don’t forget to check your oven temperature. An oven that’s too hot can burn the cake. To check if your cake is done, use a toothpick. Insert it into the center of the cake. If it comes out clean, the cake is ready. If it has wet batter on it, bake for a few more minutes. Keep an eye on the cake during the last few minutes of baking to avoid overcooking. {{image_4}} You can change the flour in your vegan pumpkin spice cake. Try using whole wheat flour for a nutty flavor. Gluten-free flour works too, if needed. For sweeteners, brown sugar is great, but coconut sugar can also add a unique taste. Maple syrup is a fun option, but adjust the liquid in your recipe. Adding mix-ins can make your cake even better. You might add chopped walnuts or pecans for crunch. Chocolate chips can bring a sweet surprise. Dried fruits like cranberries or raisins can add moisture and flavor. Just fold them in gently to keep the batter light. You can customize this cake for any holiday. For Halloween, decorate with spooky icing or candy. For Thanksgiving, add spices like allspice or cloves for warmth. During the winter, a touch of peppermint extract can give a fresh twist. Always think of how to match the cake to your holiday spirit! To keep your vegan pumpkin spice cake fresh, wrap it well. Use plastic wrap or foil to cover the cake. You can also place it in an airtight container. Store it in a cool place, like your kitchen counter, or in the fridge for extra freshness. If stored properly, your vegan cake can last for about 3 to 5 days at room temperature. In the fridge, it can keep well for up to a week. Just check for any signs of spoilage, like changes in smell or texture. To freeze your cake, let it cool completely first. Then, wrap it tightly in plastic wrap. Follow this with a layer of aluminum foil for extra protection. You can freeze it for up to 3 months. When ready to enjoy, thaw the cake overnight in the fridge. It will taste just as good as fresh! Yes, you can use other plant-based milks. Almond, soy, oat, or coconut milk all work well. Each milk adds a unique flavor. Almond milk keeps the cake light, while coconut milk adds a rich taste. Make sure to choose unsweetened versions to control the sweetness. Yes, you can make this cake gluten-free. Use a gluten-free flour blend instead of all-purpose flour. Look for blends that include xanthan gum for better texture. This helps the cake rise and stay fluffy. Always check the labels of your ingredients for hidden gluten. The best frosting is vegan cream cheese frosting. It complements the spices in the cake. You can also use a simple glaze made from powdered sugar and almond milk. Just mix until smooth, then drizzle over the cooled cake. Both options are delicious and add sweetness. This blog post showed how to make a delicious vegan pumpkin spice cake. We explored key ingredients, helpful tips, and variations. I shared what you need to know about substituting ingredients, checking doneness, and storing leftovers. You now have all the tools to bake your own cake. Remember, practice makes perfect. Enjoy the joy that comes from baking and sharing. Your kitchen adventures just got sweeter!

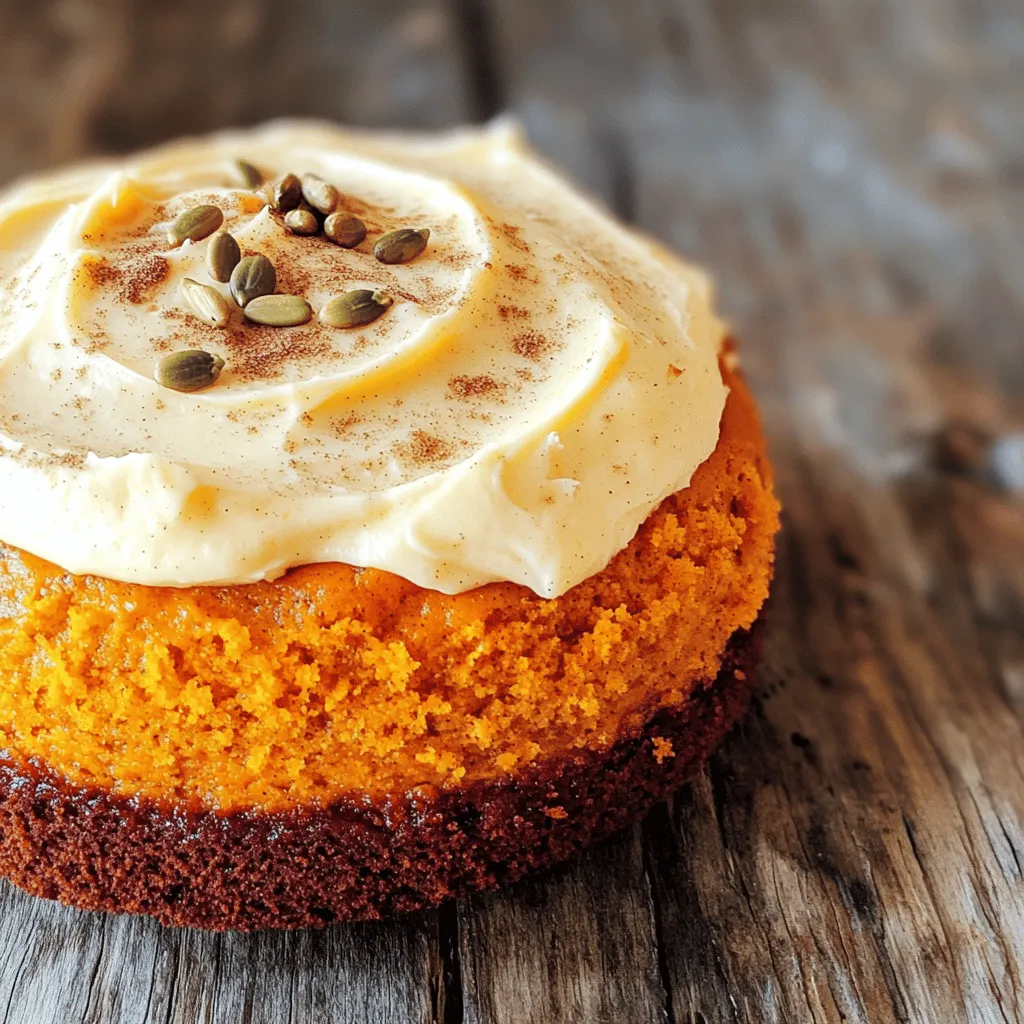
Fall is here, and so is the time for cozy treats! If you love the warm flavors of pumpkin spice but want a vegan twist, you’re in the right place. …

Read more

Categories Desserts

Frosted Soft Pumpkin Cookies Perfect for Fall Treats

September 2, 2025 by Chef Remy
- 1 cup pumpkin puree - 1 cup granulated sugar - 1/2 cup packed brown sugar - 1/2 cup unsalted butter, softened - 1 large egg - 1 teaspoon vanilla extract - 3 cups all-purpose flour - 1 teaspoon baking soda - 1 teaspoon baking powder - 1 teaspoon ground cinnamon - 1/2 teaspoon ground nutmeg - 1/2 teaspoon ground ginger - 1/4 teaspoon salt To make these cookies, we start with pumpkin puree. This gives them a rich flavor and soft texture. The sugars, both granulated and brown, add sweetness and depth. The unsalted butter gives a nice creaminess. We also need an egg and vanilla extract for binding and flavor. Next, we blend in our dry ingredients. Flour helps the cookies hold their shape. Baking soda and baking powder help them rise. The spices—cinnamon, nutmeg, and ginger—bring that wonderful fall taste. Finally, a bit of salt balances all the flavors. - 1 cup powdered sugar - 2 tablespoons unsalted butter, softened - 1 tablespoon milk (add more as needed) - 1/2 teaspoon vanilla extract For the frosting, we use powdered sugar for sweetness and a smooth texture. Softened butter adds creaminess. Milk helps us control the thickness. A splash of vanilla extract enhances the flavor. Mix these together until smooth, and you have a delightful frosting for your cookies. This adds a sweet touch that makes each bite even better. 1. Preheating the oven and preparing baking sheet First, preheat your oven to 350°F (175°C). While it heats, line a baking sheet with parchment paper. This step helps your cookies not stick. 2. Creaming butter and sugars In a large bowl, use an electric mixer to cream together 1/2 cup softened butter, 1 cup granulated sugar, and 1/2 cup brown sugar. Mix for about 2-3 minutes. The mixture should be light and fluffy. 3. Incorporating pumpkin, egg, and vanilla Next, add 1 cup pumpkin puree, 1 large egg, and 1 teaspoon vanilla extract. Beat on medium speed until everything blends well and is smooth. 1. Combining flour and leavening agents In a separate bowl, whisk together 3 cups all-purpose flour, 1 teaspoon baking soda, and 1 teaspoon baking powder. This mix helps your cookies rise. 2. Adding spices and salt Now, add 1 teaspoon ground cinnamon, 1/2 teaspoon ground nutmeg, 1/2 teaspoon ground ginger, and 1/4 teaspoon salt into the flour mix. Whisk until combined, allowing the spices to mix well. 1. Forming cookie dough portions Using a tablespoon or cookie scoop, drop rounded portions of dough onto the prepared baking sheet. Keep them spaced about 2 inches apart. This space allows them to spread while baking. 2. Baking duration and checking doneness Bake the cookies in the preheated oven for 10-12 minutes. They are done when the edges are lightly golden, but the centers should feel soft. 3. Cooling process after baking Once baked, remove the cookies from the oven. Let them cool on the baking sheet for about 5 minutes. Then, transfer them to a wire rack to cool completely. 1. Whisking ingredients to achieve the right consistency While the cookies cool, make the frosting. In a medium bowl, whisk together 1 cup powdered sugar, 2 tablespoons softened butter, 1 tablespoon milk, and 1/2 teaspoon vanilla extract. Mix until smooth and creamy. 2. Adjusting thickness with milk If the frosting is too thick, add a little more milk. This will help you get the right drizzle consistency. You want it to be easy to spread on the cookies. To ensure your cookies stay soft and chewy, check your baking time. Pull them out when the edges are light golden. The centers should feel soft but set. This helps lock in moisture, making each bite delightful. Avoid overmixing your dough. When you combine wet and dry ingredients, mix just until you see no dry flour. Overmixing can make the cookies tough. You want a soft and slightly sticky dough for the best texture. For spreading frosting effectively, use a small offset spatula. Start from the center of the cookie and move outward. This helps create a smooth finish. Let the frosting flow over the edges for a lovely look. Achieving the desired drizzle consistency is key. If your frosting is too thick, add a splash of milk. Mix until it’s smooth and pourable. You want it to drizzle easily but not run off the cookie. Arranging cookies aesthetically makes a big difference. Place them on a decorative platter with space between each cookie. This showcases their soft texture and beautiful frosting. Using garnishes enhances visuals. A sprinkle of cinnamon or mini chocolate chips on top adds flair. These small touches make your cookies stand out and look even more inviting. {{image_4}} You can change the frosting for your cookies. A cream cheese frosting adds a tangy twist. It blends smoothly with the sweet cookie. To make it, mix 8 oz of cream cheese with 1/4 cup of butter. Add 2 cups of powdered sugar and a splash of vanilla. This frosting is rich and pairs well with pumpkin. If you love chocolate, try a chocolate ganache instead. Melt 1 cup of chocolate chips with 1/2 cup of heavy cream. Stir until smooth, then let it cool slightly. This ganache is glossy and decadent. It makes your cookies feel extra special. Mix-ins can take your cookies to the next level. Consider adding chocolate chips for a sweet surprise. They melt and create gooey pockets of chocolate. You can also add nuts for a nice crunch. Walnuts or pecans work well here. Dried fruits can enhance the flavor too. Raisins or cranberries bring a burst of sweetness. You might even try spices like cloves or allspice. They add warmth and depth to the cookies. Experiment and find your favorite mix! If you need gluten-free cookies, swap all-purpose flour for a gluten-free blend. Many brands offer one-to-one flour substitutes. This keeps the texture similar. For a vegan option, use flax eggs instead of a real egg. Mix 1 tablespoon of ground flaxseed with 2.5 tablespoons of water. Let it sit until it thickens. Also, replace butter with coconut oil or vegan butter. Choose a dairy-free milk for the frosting, like almond or oat milk. These swaps make your cookies plant-based while still delicious. To keep your frosted soft pumpkin cookies fresh, store them at room temperature. Place them in an airtight container. This will keep them soft for several days. If you like chilled cookies, you can refrigerate them. Just make sure to layer them with parchment paper to prevent sticking. To freeze your cookies, first let them cool completely. Then, place them in a single layer on a baking sheet. Freeze them for about an hour. Once frozen, transfer the cookies to a freezer bag. Remove as much air as possible before sealing. They can stay fresh for up to three months. When you want to enjoy a cookie, take it out and let it thaw at room temperature. If you want to refresh them, pop them in the microwave for a few seconds. This will warm them up and make them soft again. Enjoy your delicious cookies any time! How do I know when the cookies are done? You can tell the cookies are done when their edges turn golden. The centers should feel soft but set. Check them around the 10-minute mark. Can I use canned pumpkin for this recipe? Yes, canned pumpkin works great! It saves time and keeps the flavor rich and moist. Just make sure it’s pure pumpkin, not pumpkin pie filling. What other spices can I add for flavor enhancement? You can add allspice or cloves for extra warmth. A pinch of cardamom also brings a nice twist. Feel free to mix and match spices to suit your taste. My cookies spread too much; what went wrong? If cookies spread too much, your butter might be too soft. Try chilling the dough for 30 minutes before baking. Also, make sure you use the right amount of flour. Why are my cookies too dry? Dry cookies can happen if you overbake them or add too much flour. Be sure to measure carefully and check them at the 10-minute mark. If they feel dry, try adding a little more pumpkin next time. What to serve with frosted pumpkin cookies? These cookies pair well with warm drinks like coffee or chai. A scoop of vanilla ice cream on the side is also a delightful treat! Are these cookies suitable for holiday gatherings? Absolutely! Their soft texture and sweet frosting make them a hit at any gathering. They add a festive touch and are easy to share. You now know how to make soft pumpkin cookies and their frosting step by step. With the right ingredients and tips, you’ll bake cookies that taste great. Remember to mix well but avoid overdoing it. Try different frostings or mix-ins for a twist, and store your cookies properly for freshness. These cookies are perfect for any gathering or just a tasty treat at home. Enjoy your baking journey!

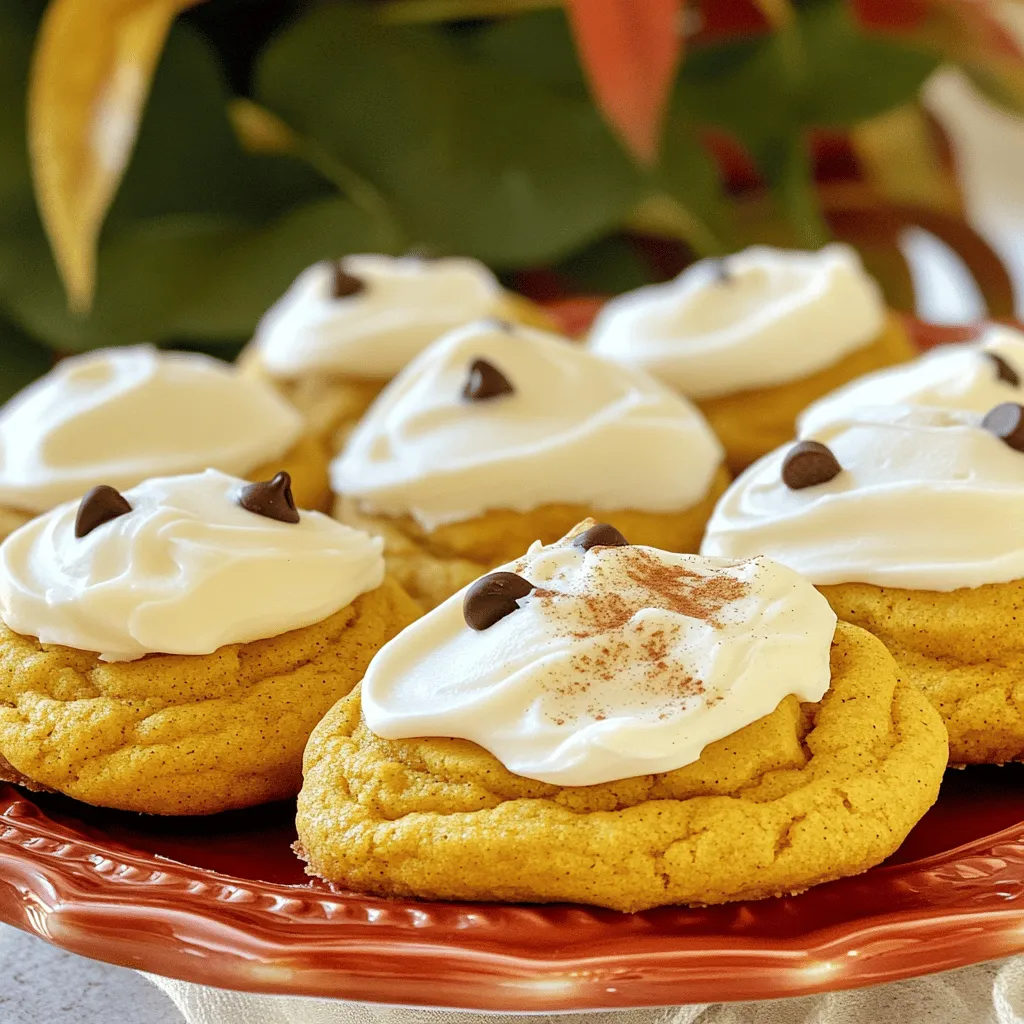
Fall is here, and it’s the perfect time for Frosted Soft Pumpkin Cookies! With their warm spices and rich pumpkin flavor, these cookies capture all the cozy vibes of the …

Read more

Categories Desserts

Pumpkin Chocolate Chip Blondies Irresistible Treats

September 1, 2025 by Chef Remy
- 1 cup canned pumpkin puree - 1/2 cup brown sugar, packed - 1/2 cup granulated sugar - 1/2 cup unsalted butter, melted and cooled slightly - 1 teaspoon pure vanilla extract - 2 large eggs, at room temperature - 1 1/2 cups all-purpose flour - 1 teaspoon baking powder - 1/2 teaspoon baking soda - 1/2 teaspoon fine sea salt - 1 teaspoon ground cinnamon - 1/2 teaspoon ground nutmeg - 1 cup semi-sweet chocolate chips Canned pumpkin puree is key for a moist texture. Use unsalted butter for better control over salt. Pure vanilla extract elevates the flavor. Always use fresh eggs at room temp; they mix better. For the flour, all-purpose works best. Fresh spices give a warm taste. Use fine sea salt for even flavor. Semi-sweet chocolate chips provide a sweet contrast to the pumpkin. These simple choices create a rich, tasty treat. 1. Preheat your oven to 350°F (175°C). 2. Grease a 9x9 inch baking pan with butter or spray. You can also line it with parchment paper. Leave some paper hanging over the sides. This helps you lift the blondies out later. 3. In a large bowl, mix the melted butter, brown sugar, and granulated sugar. Whisk until the mix is smooth. Make sure there are no lumps left. 4. Add the canned pumpkin and vanilla extract. Stir until it looks silky and smooth. 5. Crack the eggs into the bowl, one at a time. Mix well before adding the next egg. 1. In a separate bowl, whisk together flour, baking powder, baking soda, sea salt, cinnamon, and nutmeg. Mix until all the dry ingredients are blended well. 2. Gently fold the dry mix into the wet mixture. Stop mixing as soon as you see no more flour streaks. It is okay if there are a few small lumps. 3. Now stir in the chocolate chips, making sure they spread throughout the batter. 4. Pour the batter into the prepared pan. Use a spatula to spread it out evenly. 5. Bake in the oven for 25-30 minutes. To check if they are done, insert a toothpick into the center. It should come out clean or with a few moist crumbs. 1. After baking, take the pan out of the oven. Let the blondies cool in the pan for about 10 minutes. 2. Carefully move them to a wire rack. Let them cool completely before cutting. 3. For cutting, use a sharp knife. This helps you make neat squares. Enjoy your blondies as they are, or dust with powdered sugar. For a treat, serve warm with ice cream! To make your pumpkin chocolate chip blondies perfect, watch out for common issues. One common mistake is overmixing the batter. This can make your blondies tough instead of soft. Mix the dry and wet ingredients until just combined. A few flour streaks are okay. Another pitfall is baking time. Each oven is different. Start checking at 25 minutes. Insert a toothpick into the center. If it comes out clean or with a few moist crumbs, they are done. Let them cool before cutting for the best texture. You can boost the flavor and texture of your blondies with fun add-ins. Consider adding chopped nuts like walnuts or pecans for some crunch. You can also add a pinch of ginger or cloves for a spicier kick. If you want a fudgier blondie, reduce the flour by a few tablespoons. For a cakier texture, add a little more flour. You can also try using dark chocolate chips instead of semi-sweet for a richer taste. Experiment to find your favorite mix! {{image_4}} You can switch up the chocolate in this recipe. Use dark chocolate chips for a richer flavor. If you prefer a sweeter taste, try white chocolate chips. You can also mix different types for fun. Adding almond extract brings a lovely nutty taste. Just a teaspoon can enhance the flavor profile. Feel free to experiment with other extracts like maple or hazelnut. If you need a gluten-free option, use almond flour or coconut flour. Both can work well in this recipe. Just remember to adjust the amount; you may need less than all-purpose flour. For vegan blondies, replace the eggs with flaxseed meal mixed with water. Use melted coconut oil or vegan butter instead of regular butter. These swaps keep the blondies just as tasty! To keep your pumpkin chocolate chip blondies fresh, store them in an airtight container. This helps retain their moistness and flavor. You can place parchment paper between layers to prevent sticking. For longer storage, freezing is a great option. Wrap each blondie tightly in plastic wrap, then place them in a freezer bag. This prevents freezer burn and keeps them tasty. When you're ready to enjoy them, thaw at room temperature for a few hours or microwave for a few seconds. At room temperature, these blondies stay fresh for up to four days. If you keep them in the fridge, they can last about a week. The cold can make them firmer, so you may want to warm them slightly before serving. For the best flavor, enjoy them fresh. Can I use fresh pumpkin instead of canned? Yes, you can use fresh pumpkin. Make sure to cook and puree it well. Fresh pumpkin adds a nice taste. Just remember that it may have more moisture. Adjust flour if needed. What should I do if the batter is too thick? If your batter is too thick, add a splash of milk. This helps loosen it up. Mix well to combine. The batter should be thick but spreadable. Can I make these blondies ahead of time? Yes, you can make these blondies ahead of time. Bake them, then let them cool. Store them in an airtight container. They stay fresh for a few days. What's the best way to cut blondies? To cut blondies, use a sharp knife. Make sure they are cool first. Clean the knife between cuts for neat squares. This gives a nice look for serving. How can I tell when they are done baking? Check for doneness with a toothpick. Insert it into the center. If it comes out clean or with few moist crumbs, they are ready. Be careful not to overbake, or they can dry out. In this guide, we covered all you need to know about making pumpkin chocolate chip blondies. I shared key ingredients, step-by-step instructions, and tips for success. You learned about variations, storage tips, and FAQs. Baking blondies can be fun and rewarding. Experiment with flavors, and enjoy your tasty treats! With these tips, you can make the perfect batch every time. Happy baking!

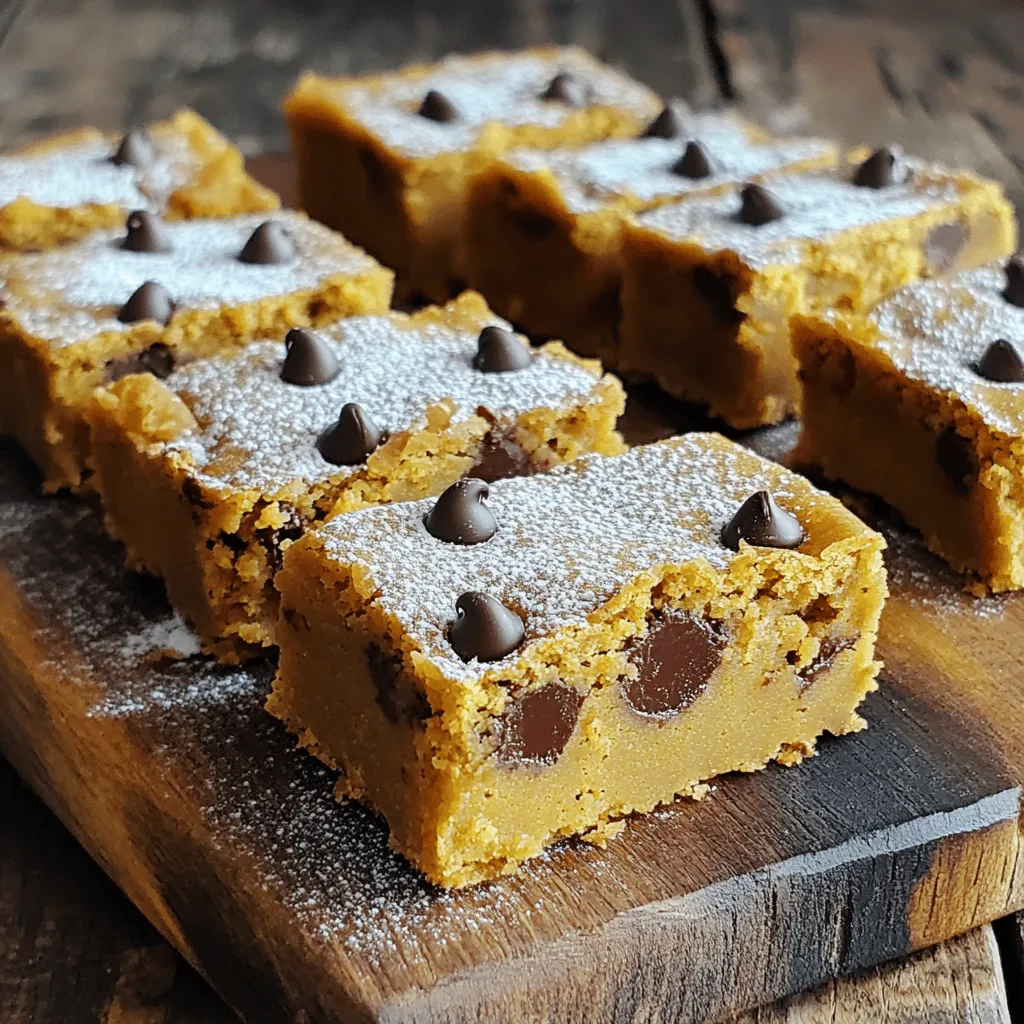
Get ready to indulge in the best fall dessert! My Pumpkin Chocolate Chip Blondies combine the warm, cozy flavor of pumpkin with sweet chocolate chips for a treat you can’t …

Read more

Categories Desserts

Creamy Spinach Tortellini Flavorful Dinner Delight

September 1, 2025 by Chef Remy
- 15 ounces fresh spinach tortellini - 2 tablespoons olive oil - 2 cloves garlic, minced - 1 cup heavy cream - 1/2 cup grated Parmesan cheese - 1/2 cup ricotta cheese - 1 teaspoon dried oregano - Salt and black pepper to taste - Fresh spinach leaves (for garnish) - A pinch of red pepper flakes (optional for a kick) Each serving of creamy spinach tortellini offers a tasty balance of flavors and nutrients. Here’s a quick breakdown: - Calories: About 480 - Protein: 18g - Fat: 28g - Carbohydrates: 40g - Fiber: 2g - Sugar: 2g This dish is rich in flavor and provides a good source of protein from both cheeses and tortellini. You can easily adjust some ingredients to fit your needs: - Tortellini: Use any stuffed pasta you prefer. Cheese or mushroom-filled versions work well. - Heavy cream: Swap with half-and-half or coconut cream for a lighter option. - Parmesan cheese: Nutritional yeast makes a great vegan substitute. - Ricotta cheese: Cottage cheese can work in a pinch. - Olive oil: Avocado oil or butter are good alternatives for cooking. - Fresh spinach leaves: Arugula or kale can add a different twist for garnish. These swaps let you customize the dish while keeping it delicious. Start by filling a large pot with water. Add a generous pinch of salt. Bring the water to a rolling boil. Once boiling, carefully add 15 ounces of fresh spinach tortellini. Cook them for about 3-4 minutes, or until they are al dente. Be sure to follow the package instructions for best results. After cooking, drain the tortellini well and set them aside in a bowl. In a spacious skillet, pour in 2 tablespoons of olive oil. Heat the oil over medium heat until it shimmers. Then, add 2 cloves of minced garlic. Sauté the garlic for around 30 seconds. Stir constantly to let the aroma fill your kitchen. Make sure not to let the garlic brown. Next, carefully add 1 cup of heavy cream to the skillet. Stir it in slowly, allowing it to heat without boiling. Now, it’s time to make the sauce creamy. Add 1/2 cup of grated Parmesan cheese and 1/2 cup of ricotta cheese. Stir continuously until both cheeses melt into the cream. This creates a rich, smooth texture. Sprinkle in 1 teaspoon of dried oregano. Season the sauce with salt and black pepper to taste. For a little heat, add a pinch of red pepper flakes if you like. Gently add the cooked tortellini to the skillet. Toss them in the creamy sauce until they are well coated. Let the tortellini simmer in the sauce for about 2-3 minutes. This lets all the flavors blend together beautifully. Your creamy spinach tortellini is now ready to serve! For a pop of color, garnish with fresh spinach leaves before plating. Enjoy your flavorful dinner delight! To cook tortellini just right, follow these tips: - Use plenty of water: Fill a large pot with water. Add a good amount of salt. This helps season the pasta. - Boil water first: Wait for the water to boil before adding the tortellini. This keeps them from getting mushy. - Don’t crowd the pot: Cook in batches if needed. This helps each piece cook evenly. - Check doneness: Taste a piece after 3 minutes to see if it’s al dente. It should have a slight bite. To make your sauce smooth and creamy, consider these points: - Heat gently: Add cream slowly to the garlic. Don’t let it boil, as this can make it separate. - Melt cheese properly: Stir in the cheeses until fully melted. This creates a rich, creamy texture. - Season carefully: Taste the sauce before adding more salt or pepper. Balance is key for flavor. - Add herbs last: Mix in oregano at the end for fresh flavor. Dried herbs can lose their taste when cooked too long. To make your dish beautiful and tasty, try these ideas: - Use fresh spinach: Garnish with fresh spinach leaves for color and crunch. It brightens the dish. - Extra cheese: A sprinkle of Parmesan on top adds flavor and looks great. - Red pepper flakes: If you like heat, add a pinch of red pepper flakes. It gives a nice kick. - Plate with care: Serve in shallow bowls for a fancy touch. Drizzle extra sauce on top for visual appeal. {{image_4}} You can make this dish vegan. For a dairy-free sauce, use coconut cream instead of heavy cream. Choose nutritional yeast for a cheesy flavor. You can also replace the cheeses with vegan options. Look for vegan ricotta and Parmesan in stores. These swaps keep the dish creamy and flavorful. Adding protein makes this meal heartier. Cooked chicken breast works well. Simply slice it and mix it with the tortellini. Shrimp is another tasty option. Sauté shrimp until they turn pink, then add them to the creamy sauce. These proteins add texture and taste. Using seasonal vegetables boosts flavor and nutrition. Try adding fresh tomatoes in summer. Their sweetness brightens the dish. In fall, mix in roasted butternut squash for a warm touch. Spinach is perfect here, but feel free to add kale or peas. These veggies make your meal colorful and exciting. To store your creamy spinach tortellini, wait for it to cool. Place it in an airtight container. It will stay fresh in the fridge for up to three days. When you’re ready to eat, just take it out and enjoy! Reheat your tortellini on the stove for the best results. Add a splash of milk or cream in a skillet. This will keep it creamy. Heat on low, stirring gently until warmed through. You can also use the microwave. Place it in a bowl, cover it, and heat for 1-2 minutes. Stir halfway for even warmth. You can freeze creamy spinach tortellini for later. Use a freezer-safe container or bag. It will stay good for up to three months. To reheat, let it thaw in the fridge overnight. Then, warm it on the stove or in the microwave as mentioned above. This way, you can enjoy a delicious meal anytime! To make creamy spinach tortellini from scratch, you need a few key steps. First, create fresh pasta dough. Combine flour and eggs to form a smooth mix. Roll the dough thin and cut it into circles. Next, prepare a filling. You can use ricotta cheese, spinach, and a pinch of salt. Place a small amount of filling in the center of each circle. Fold the dough over and seal the edges to form tortellini. Cook the tortellini in boiling salted water until they float. Then, follow the sauce steps in the recipe for a creamy delight. Yes, you can use frozen tortellini. It is a great time-saver. Just cook the frozen tortellini in boiling water for about 5-7 minutes. Follow the package instructions for the best results. After cooking, drain the tortellini and add them to the creamy sauce. The flavors will still meld well, making a delicious meal. Creamy spinach tortellini pairs well with many sides. Here are a few ideas: - A fresh garden salad with a light vinaigrette. - Garlic bread for a crunchy texture. - Roasted vegetables to add color and nutrients. - A glass of white wine, like Pinot Grigio, enhances the meal. These sides balance the creamy dish and create a delightful dining experience. In this article, we explored the magic of creamy spinach tortellini. We covered the key ingredients and their nutritional value. I shared easy steps to prepare the dish and tips for perfect results. You learned about fun variations and how to store leftovers. Embrace this dish’s flexibility to suit your taste. Enjoy cooking, experimenting, and sharing this delightful meal with friends and family. Simple, tasty, and rewarding, creamy spinach tortellini can elevate any dining experience.

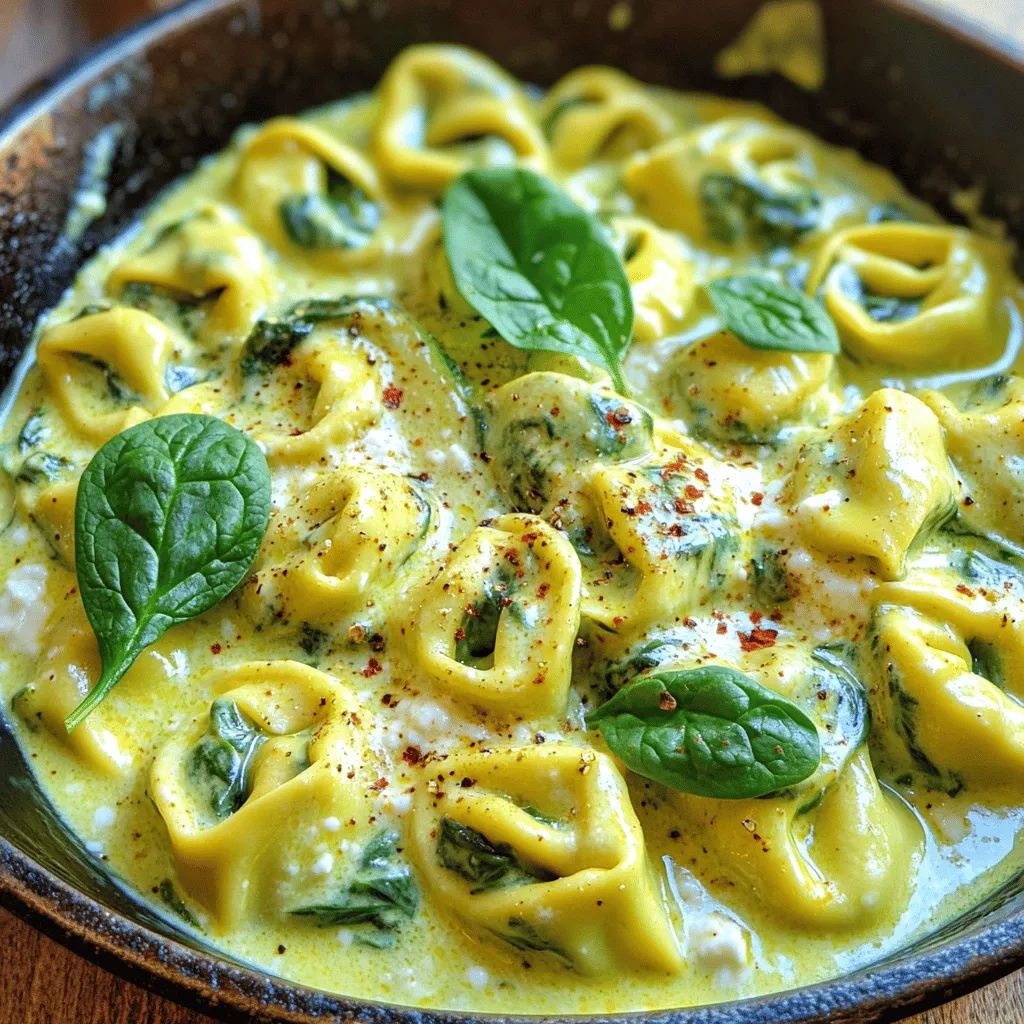
Looking for a quick, tasty dinner that shines at the table? You’re in the right place! My Creamy Spinach Tortellini is rich, comforting, and oh-so-delicious. In just a few simple …

Read more

Categories Dinner

Ultimate One-Pot Chili Easy and Flavorful Recipe

September 1, 2025 by Chef Remy
To make the best chili, gather these key ingredients: - 1 lb ground beef (or turkey for a lighter option) - 1 can (15 oz) kidney beans, thoroughly rinsed and drained - 1 can (15 oz) black beans, thoroughly rinsed and drained - 1 can (28 oz) diced tomatoes with green chilies - 1 medium onion, finely diced - 2 cloves garlic, minced - 1 bell pepper (any color), diced - 2 tablespoons chili powder - 1 teaspoon ground cumin - 1 teaspoon smoked paprika - Salt and freshly ground black pepper to taste - 2 cups beef or vegetable broth - 1 tablespoon olive oil These ingredients blend together to create a rich and hearty dish. Toppings can elevate your chili experience. Here are some tasty options: - Shredded cheese - Sour cream - Chopped cilantro - Sliced jalapeños These extras add flavor and texture. Feel free to mix and match! If you need alternatives, here are some great swaps: - Use ground turkey or chicken instead of beef for a lighter meal. - For a vegetarian version, replace meat with extra beans or lentils. - Swap kidney beans for chickpeas or pinto beans if desired. - Use vegetable broth instead of beef broth for a vegan option. These substitutes help meet various dietary needs while keeping the dish delicious. Start by gathering all your ingredients. You need: - 1 lb ground beef (or turkey) - 1 can (15 oz) kidney beans - 1 can (15 oz) black beans - 1 can (28 oz) diced tomatoes - 1 medium onion - 2 cloves garlic - 1 bell pepper - 2 tablespoons chili powder - 1 teaspoon ground cumin - 1 teaspoon smoked paprika - Salt and pepper - 2 cups broth - 1 tablespoon olive oil Next, chop the onion, garlic, and bell pepper. Rinse the beans in cold water. This helps remove some salt and makes them fresher. You’re ready to cook! Heat the olive oil in a large pot over medium heat. Wait about one minute for the oil to warm. Add the diced onion and bell pepper. Cook them for about 3-4 minutes until soft. The onion should look clear. Then, add the minced garlic. Cook for another minute. You want the garlic to smell great and not burn. This step builds a strong flavor base for the chili. Now, add the ground beef (or turkey) to the pot. Break it apart with a wooden spoon. Cook it for 5-7 minutes until it turns brown. If there is too much fat, drain it. Next, stir in the chili powder, cumin, smoked paprika, salt, and pepper. Cook this mixture for 1-2 minutes. This helps the spices release their flavors into the meat. Pour in the diced tomatoes (with juices), kidney beans, black beans, and broth. Stir everything well to mix. Increase the heat until it boils gently. Once boiling, reduce the heat to low. Let it simmer for about 30 minutes. Stir it occasionally. This helps blend all the great flavors. After 30 minutes, taste the chili. Adjust the seasoning if you need to. If you want a thicker chili, simmer longer. Enjoy your delicious one-pot chili! To boost flavor, use fresh spices. Fresh chili powder packs a punch. Try toasting spices in the pot before adding other ingredients. This step wakes up the flavors. You can also add a dash of hot sauce or a spoonful of sugar to balance flavors. For a smoky taste, consider adding chipotle peppers. They add depth and warmth. One big mistake is cooking meat without browning it. Brown the meat well for deep flavor. Avoid skipping the sauté step for onions and garlic. It builds a solid base. Another common error is not adjusting the seasoning. Always taste and tweak as you cook. If your chili is too salty, add a bit of sugar or more tomatoes. If you want thicker chili, let it simmer longer. This lets the liquid reduce. You can also mash some beans against the pot's side. This thickens the mix naturally. For a thinner chili, add more broth or water. Stir it in slowly until you reach your desired consistency. Always remember to taste as you adjust. {{image_4}} You can easily make this chili vegetarian or vegan. Just swap the meat for plant-based options. Try using lentils or textured vegetable protein (TVP). They absorb flavors well and add a nice texture. For a vegan option, replace beef broth with vegetable broth. The other ingredients remain the same, giving you a hearty dish. If you like heat, add more spice! Chili powder is great, but you can also use cayenne pepper or crushed red pepper flakes. Start with a small amount and taste as you go. For less heat, leave out the jalapeños or use mild chili powder. Balance is key to a tasty chili. Feel free to get creative with your chili. Try adding corn for sweetness or diced zucchini for extra vegetables. Black olives can add a nice briny flavor. You can even toss in some chocolate or cocoa powder for depth. Each addition gives your chili a personal touch, making it your own. To store leftover chili, first let it cool to room temperature. Then, transfer it to a container with a tight lid. Make sure to store it in the fridge if you plan to eat it within a few days. Chili stays fresh for about 3 to 4 days in the fridge. If you want to keep it longer, consider freezing it. To freeze your chili, use freezer-safe containers. Leave some space in each container. This space allows the chili to expand as it freezes. You can freeze chili for up to 3 months. When ready to eat, thaw it in the fridge overnight. Reheat it in a pot over low heat, stirring often. You can also use the microwave. Just heat it in short bursts, stirring in between. The best containers for storing chili are glass or plastic. Look for airtight containers to keep the chili fresh. Glass containers let you see the food inside. They are also great for reheating. If you use plastic, choose BPA-free options. For freezing, use heavy-duty freezer bags. They save space and keep the chili safe from freezer burn. The best meat for chili is ground beef or turkey. Ground beef gives a rich flavor. It also adds a nice texture. However, turkey is a great lighter choice. You can also try ground chicken or even pork for a twist. Each meat brings a unique taste to your chili. One-pot chili lasts about 3 to 5 days in the fridge. Make sure to store it in a sealed container. This keeps it fresh and tasty. If you want to enjoy it later, freeze it. Frozen chili can last up to 6 months. Just remember to thaw it in the fridge before reheating. Yes, you can use canned beans in your chili. They save time and add great flavor. Just make sure to rinse and drain them well. This removes excess sodium and helps prevent a mushy texture. Canned beans are tasty and easy to use in your recipe. You can serve chili with many tasty sides. Cornbread is a classic choice. It pairs well with the chili's spice. You can also serve it with rice or tortilla chips. For a fresh touch, add a simple salad or guacamole. These options make a great meal even better! In this post, I covered how to make the ultimate one-pot chili. We talked about key ingredients, cooking steps, and tips to boost the flavor. You learned about variations, storage, and common questions. Chili can be adjusted to your taste and diet. Remember, each bowl is unique, just like you. So, have fun experimenting and sharing your tasty chili with others!

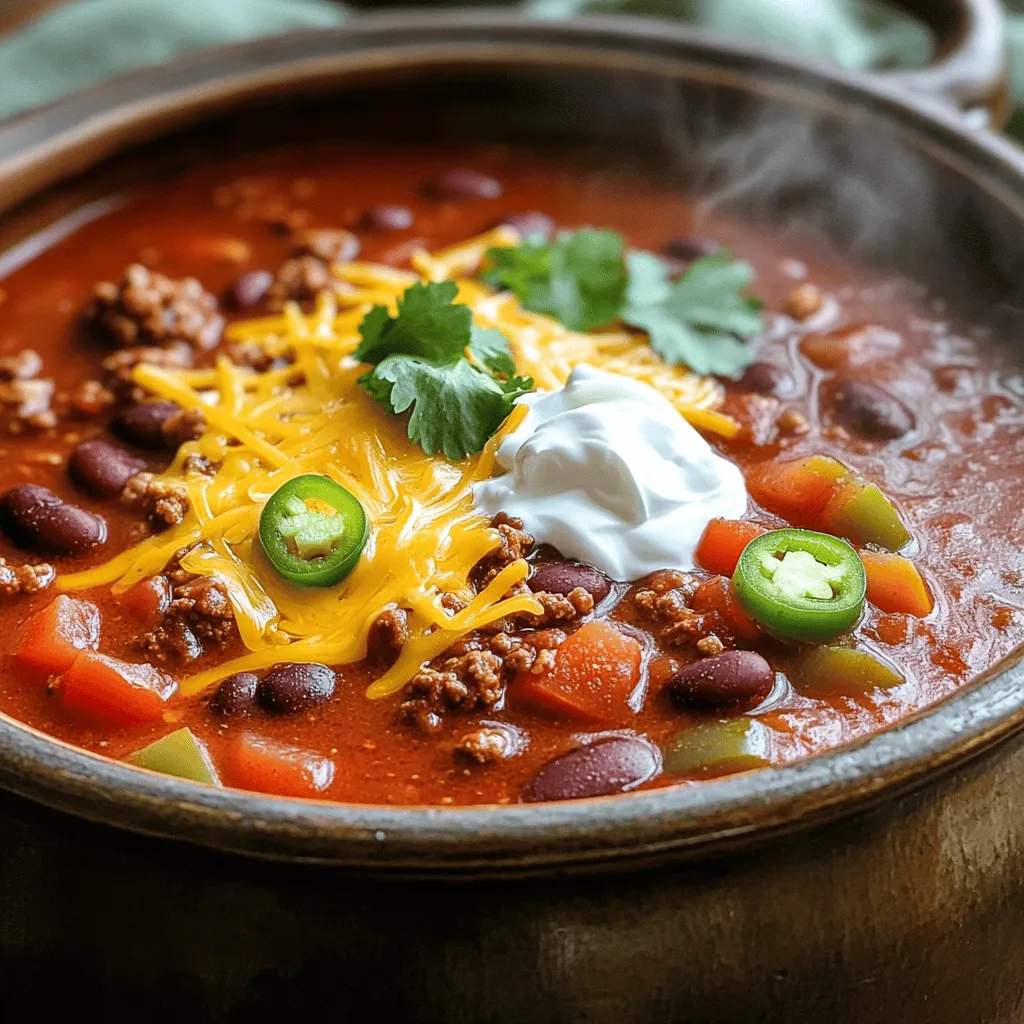
Are you ready for a warm bowl of comfort? My Ultimate One-Pot Chili is easy, flavorful, and perfect for any occasion. Whether you’re a busy parent or a weekend cook, …

Read more

Categories Dinner

High-Protein Pumpkin Muffins Flavorful and Nutritious

September 1, 2025 by Chef Remy
- 1 cup canned pumpkin puree - 1 cup Greek yogurt - 2 large eggs - 1/2 cup honey or maple syrup - 1/4 cup coconut oil, melted - 1 1/2 cups almond flour - 1/2 cup oat flour - 1/2 cup vanilla protein powder - 1 teaspoon baking soda - 1 teaspoon baking powder - 1 teaspoon ground cinnamon - 1/2 teaspoon ground nutmeg - 1/4 teaspoon salt - 1/2 cup chopped walnuts or pecans (optional) - 1/4 cup dark chocolate chips (optional) These muffins are not just tasty; they pack a punch in nutrition. Each muffin contains a good amount of protein, thanks to the Greek yogurt and protein powder. The pumpkin puree adds fiber, which helps with digestion. Here are some key highlights: - High protein content from Greek yogurt and protein powder. - Rich in fiber from pumpkin and oat flour. - Healthy fats from coconut oil and nuts. - Antioxidants from dark chocolate and spices. You can easily swap some ingredients to fit your taste or diet: - Sweeteners: Use agave syrup or stevia instead of honey or maple syrup for a lower-calorie option. - Flours: If you want gluten-free, replace almond flour with a gluten-free flour blend. - Nuts: Omit walnuts or pecans if you have a nut allergy or use seeds instead. - Protein Powder: Use any flavor of protein powder or skip it for a lighter muffin. First, preheat your oven to 350°F (175°C). This step is key for even baking. Next, prepare your muffin tin by lining it with paper liners or greasing it. This prevents the muffins from sticking later. In a large bowl, mix together the canned pumpkin puree, Greek yogurt, eggs, honey (or maple syrup), and melted coconut oil. Use a whisk to blend until you have a smooth and creamy mixture. In another bowl, whisk the almond flour, oat flour, vanilla protein powder, baking soda, baking powder, cinnamon, nutmeg, and salt. Make sure all dry ingredients blend well. Now, slowly fold the dry mix into the wet mix. Do this gently to avoid over-mixing, which can make the muffins tough. If you want to add some crunch, fold in the chopped walnuts or pecans and dark chocolate chips at this stage. Using a spoon or a scoop, fill each muffin cup about three-quarters full with batter. This allows the muffins to rise nicely. Place the muffin tin in your preheated oven and bake for 20-25 minutes. To check if they are done, insert a toothpick into the center of a muffin. If it comes out clean, your muffins are ready! Let them cool in the tin for about 5 minutes, then move them to a wire rack to cool completely. This step helps keep them fluffy. To get the best muffin texture, start by mixing wet and dry ingredients separately. Mix the wet ingredients until creamy. This helps combine the flavors well. When you add the dry mix, fold gently. Avoid over-mixing the batter. This keeps the muffins light and fluffy. If you want a little crunch, add chopped nuts. Walnuts or pecans work great. They give a nice texture and taste. You can also add dark chocolate chips for sweetness. Just remember to fold them in gently, too! Store your muffins in an airtight container. This keeps them fresh and moist. You can keep them at room temperature for 2 to 3 days. If you want to save some for later, freeze them! Wrap each muffin in plastic wrap, then place them in a freezer bag. They stay good for up to 3 months. When you're ready to eat one, just thaw it at room temperature or warm it in the microwave for a few seconds. Serve these muffins warm for the best taste. You can dust them with powdered sugar for a sweet touch. A sprinkle of cinnamon also adds flavor. For a creamy boost, top them with Greek yogurt. This makes a delicious snack or breakfast. Pair them with a cup of coffee or tea for a perfect treat! {{image_4}} You can enhance your muffins with various spices and extracts. Here are some ideas: - Vanilla extract: A splash adds warmth and depth. - Ginger: Fresh or ground ginger gives a nice kick. - Cloves: A pinch adds a holiday vibe. - Cardamom: This spice brings a unique flavor twist. Feel free to mix and match these spices to find your favorite blend. Each addition transforms the taste and makes the muffins special. If you want to change up the protein, you have options: - Pea protein powder: Great for plant-based diets. - Hemp protein: Offers a nutty flavor and extra nutrition. - Soy protein: A solid choice if you want a complete protein source. These alternatives maintain the muffin's texture while boosting protein content. Choose based on your dietary needs and taste preferences. You can easily make these muffins vegan or gluten-free. Here’s how: - Vegan: Replace eggs with flax eggs. Mix 1 tablespoon of flaxseed meal with 2.5 tablespoons of water. Let it sit until it thickens. - Gluten-free: Use a gluten-free flour blend in place of almond and oat flour. These swaps make the muffins accessible to more people and still keep them delicious. Enjoy experimenting with these variations! High-protein pumpkin muffins are a tasty treat packed with nutrients. Each muffin has about: - Calories: 180 - Protein: 8g - Carbohydrates: 22g - Fat: 7g - Fiber: 3g This balance makes them great for breakfast or a snack. The protein comes mainly from Greek yogurt and protein powder. - Pumpkin puree is rich in vitamins A and C. It supports good vision and boosts your immune system. - Greek yogurt adds protein and probiotics. This helps your gut health and keeps you feeling full. - Almond flour is a great source of healthy fats and vitamin E. It promotes heart health. - Oat flour offers fiber, which aids digestion and helps control blood sugar levels. - Honey or maple syrup provide natural sweetness while offering antioxidants. These ingredients work together to make your muffins not just tasty, but good for you too! For the best experience, enjoy one muffin at a time. This portion gives you enough protein and energy without overdoing it. If you want a more filling snack, pair it with a small serving of Greek yogurt or a piece of fruit. You can lower the calories in these muffins by making a few simple swaps. First, use a sugar substitute instead of honey or maple syrup. Options like stevia or erythritol work well. Second, reduce the amount of coconut oil by half, or use unsweetened applesauce instead. This will keep moisture without adding too many calories. Lastly, try using only one egg and adding more Greek yogurt to maintain texture. Yes, you can freeze these muffins. To do this, let them cool completely. Then, wrap each muffin in plastic wrap or foil. Place the wrapped muffins in a freezer-safe bag or container. They can last up to three months in the freezer. When you are ready to eat, simply thaw them in the fridge or heat them in the microwave. Store leftover muffins at room temperature for up to three days. Keep them in an airtight container to maintain freshness. If you want them to last longer, refrigerate them for up to a week. Just remember that refrigeration can change the texture, making them a bit denser. If you prefer them warm, pop them in the microwave for a few seconds before serving. This blog post covered everything you need to know about making high-protein pumpkin muffins. We discussed the key ingredients, their nutritional benefits, and even how to substitute them. You learned the step-by-step process for preparing and baking, plus tips for perfect texture and storage. Explore variations with flavors and protein sources to suit your taste. With this knowledge, you can make delicious, healthy muffins your way. Enjoy the process and get creative in your kitchen!

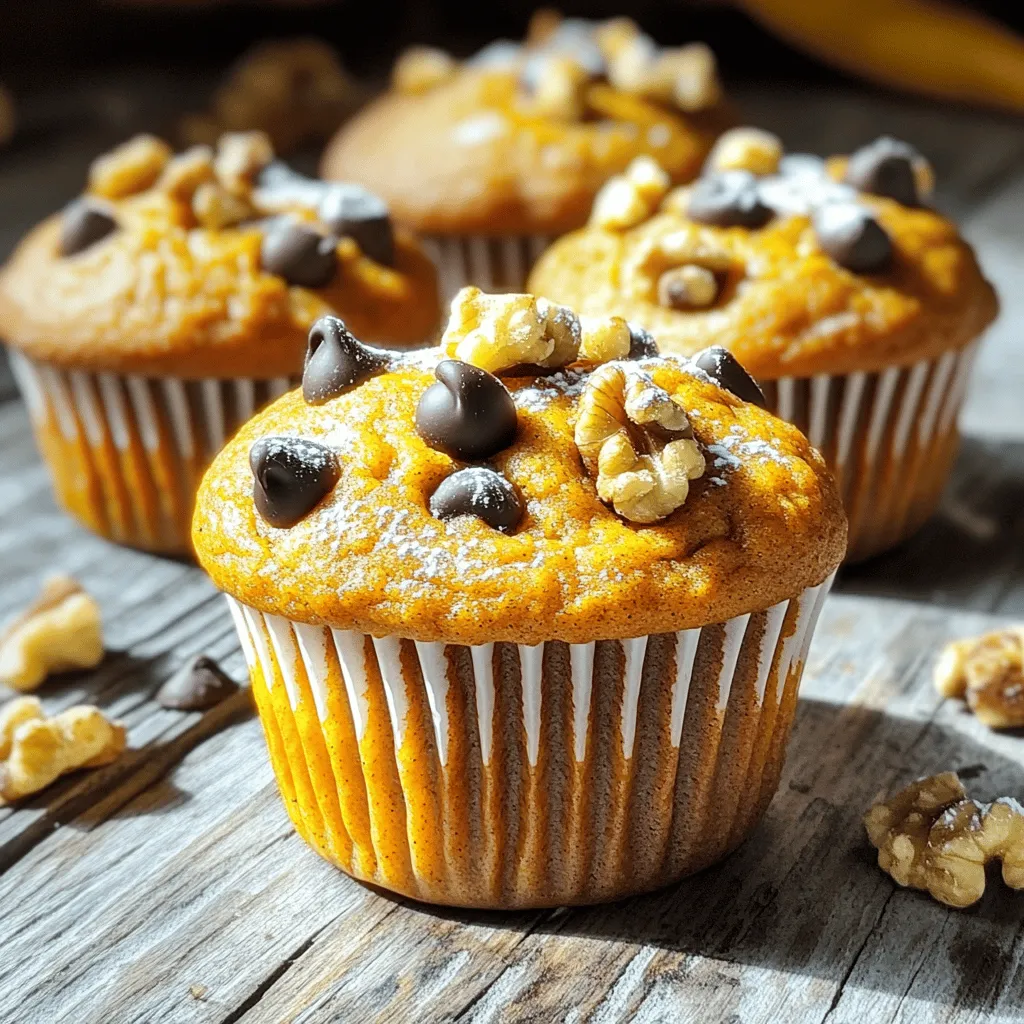
Are you ready to boost your snack game? These High-Protein Pumpkin Muffins are the perfect blend of flavor and nutrition. Packed with protein and made with wholesome ingredients, they satisfy …

Read more

Categories Breakfast

Red Velvet Brownies with Cream Cheese Frosting Delight

September 1, 2025 by Chef Remy
To make the perfect red velvet brownies, you need a few key ingredients: - 1 cup all-purpose flour - 1 cup granulated sugar - 1/2 cup unsweetened cocoa powder - 1/2 teaspoon baking powder - 1/4 teaspoon salt - 1/2 cup unsalted butter, melted and slightly cooled - 2 large eggs, at room temperature - 1 tablespoon red food coloring - 1 teaspoon pure vanilla extract These ingredients create a rich and soft brownie base. The red food coloring gives it a unique look and flavor. The cream cheese frosting adds a rich touch to the brownies. You will need: - 4 oz cream cheese, softened to room temperature - 1/4 cup unsalted butter, softened to room temperature - 1 cup powdered sugar, sifted for smoothness - 1 teaspoon pure vanilla extract - 1 tablespoon milk (optional, to adjust consistency) This frosting is creamy and smooth, perfectly balancing the brownie’s sweetness. For an extra treat, consider these optional ingredients: - 1/2 cup chocolate chips Adding chocolate chips makes the brownies even more indulgent. You can mix them in before baking for delightful pockets of chocolate. Start by preheating your oven to 350°F (175°C). This step is key for even baking. Next, grab an 8x8 inch baking dish. Line it with parchment paper. Leave some paper hanging over the sides. This helps lift the brownies out later. In a medium bowl, whisk together the dry ingredients. Combine 1 cup of all-purpose flour, 1 cup of granulated sugar, 1/2 cup of cocoa powder, 1/2 teaspoon of baking powder, and 1/4 teaspoon of salt. Make sure everything mixes well. This blend gives the brownies their rich flavor and texture. In a larger bowl, mix the wet ingredients. Combine 1/2 cup of melted butter, 2 large eggs, 1 tablespoon of red food coloring, and 1 teaspoon of vanilla extract. Whisk until the mixture is smooth. This step adds moisture and vibrant color to your brownies. Now, it’s time to combine the ingredients. Gradually add the dry mixture to the wet mixture. Use a spatula to gently fold them together. Be careful not to overmix. If you want a richer taste, fold in 1/2 cup of chocolate chips. Pour your brownie batter into the prepared dish. Use the spatula to spread it evenly. Bake in your preheated oven for 25-30 minutes. Check for doneness by inserting a toothpick. It should come out with a few moist crumbs, not wet batter. While the brownies bake, prepare the cream cheese frosting. In a medium bowl, beat 4 oz of softened cream cheese and 1/4 cup of softened butter. Mix until creamy and smooth. This frosting adds a sweet and tangy touch. Once the brownies are baked, remove them from the oven. Let them cool completely in the pan on a wire rack. After cooling, lift the brownies out using the parchment paper. This makes frosting easier. Spread a generous layer of cream cheese frosting over the top of the brownies. Use a spatula for an even layer. Cut into 16 squares or rectangles for serving. For a nice touch, add a chocolate chip or a sprinkle of cocoa powder on each square. Serve on a stylish platter for a beautiful presentation. To get the best brownie texture, start with room temperature eggs. This helps create a smooth batter. Be careful not to overmix when you combine the wet and dry ingredients. Overmixing can make brownies tough. Instead, fold gently until just combined. You can also add chocolate chips for extra richness, which enhances the taste and texture. For a smooth cream cheese frosting, make sure both the cream cheese and butter are at room temperature. This makes mixing easy and gives a creamy texture. Add powdered sugar slowly to avoid lumps. If your frosting is too thick, add a tablespoon of milk. This will help you reach the desired spreadable consistency. You can boost flavor in your brownies by adding a bit of espresso powder to the dry mix. This enhances the chocolate taste without adding coffee flavor. For a unique twist, try mixing in nuts or dried fruit. These additions can bring new flavors and textures to your brownies. Don't forget to sprinkle some cocoa powder on top for a nice finishing touch! {{image_4}} You can easily make gluten-free red velvet brownies. Just swap all-purpose flour with a gluten-free blend. Look for a blend that works well in baking. This will keep your brownies soft and chewy. Ensure to check if the blend contains xanthan gum for the best texture. You can enjoy the same rich flavor without worry. While cream cheese frosting is classic, you can try other frostings too. A rich chocolate ganache adds a deep flavor. To make ganache, heat equal parts cream and chocolate until smooth. You can also use whipped cream for a lighter touch. Simply whip heavy cream with sugar until firm peaks form. Each frosting brings a new taste to your brownies. Mix-ins can enhance your brownies. Try adding chocolate chips or nuts for crunch. You can also mix in dried fruits like cherries or cranberries for a sweet twist. For toppings, consider crushed cookies or sprinkles for fun. A drizzle of caramel or chocolate sauce will add decadence. Get creative with your favorite flavors and textures! To store your red velvet brownies, first, let them cool completely. Once they are cool, cut them into squares. Place the brownies in an airtight container. Layer them with parchment paper to prevent sticking. You can store them at room temperature for up to three days. If you want to keep them longer, put them in the fridge. They will stay fresh for about a week in the fridge. You can freeze the brownies for even longer storage. Wrap each brownie individually in plastic wrap. Then, put them in a freezer-safe bag or container. They can last in the freezer for up to three months. For the cream cheese frosting, store it in an airtight container. You can freeze the frosting too, but make sure to thaw it in the fridge before using. When you’re ready to enjoy your brownies, let them thaw first. You can warm them in the microwave for 10 to 15 seconds. This will give you that fresh-baked taste. If you prefer, you can also reheat them in the oven. Set the oven to 350°F (175°C) and place the brownies on a baking sheet. Heat them for about 5 to 10 minutes. Enjoy your delicious red velvet brownies warm! Yes, you can make these brownies a day in advance. Just store them in an airtight container at room temperature. This allows the flavors to meld, making them even better! Red velvet brownies last about 3-4 days at room temperature. If you keep them in the fridge, they can last up to a week. Just make sure they are covered well. If you prefer a natural option, use beet juice or pomegranate juice for color. These alternatives give a lovely hue without using artificial coloring. Keep in mind that the flavor may change slightly. You can try almond flour or coconut flour for gluten-free brownies. However, you may need to adjust the liquid in the recipe. Each type of flour has different properties, so results may vary. To check if your brownies are done, insert a toothpick in the center. If it comes out with a few moist crumbs, they are ready. Be careful not to overbake, or they can become dry. You now have all the steps needed to make delicious red velvet brownies. We covered key ingredients, easy mixing techniques, and helpful tips for baking. Don't forget to try different variations and storage methods. Experiment with toppings or frostings to make this treat your own. Enjoy this fun baking project, and share it with friends and family. Remember, these brownies are not just tasty; they are a joy to create!

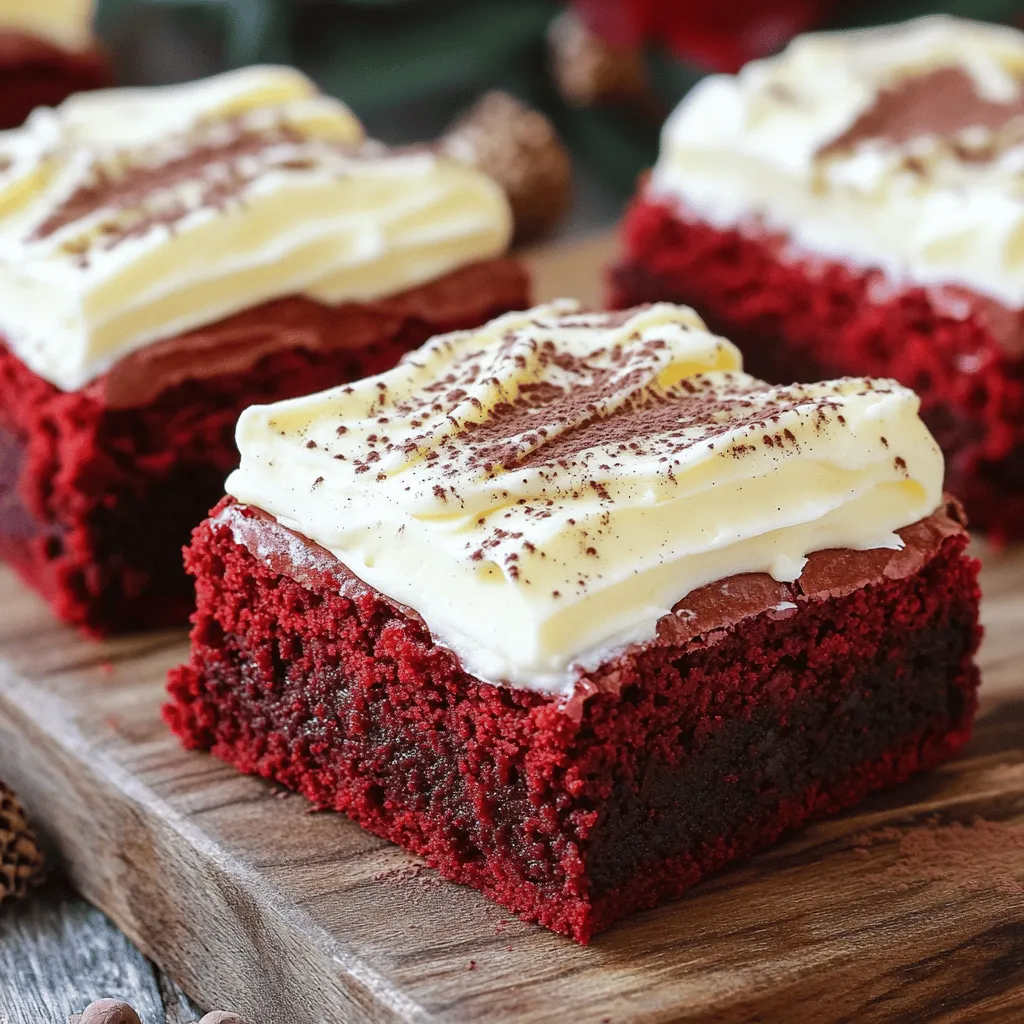
Get ready to indulge in a sweet treat that’s both rich and vibrant! In my latest post, I’m sharing my recipe for Red Velvet Brownies with Cream Cheese Frosting. This …

Read more

Categories Desserts

One Pan Honey Garlic Chicken Flavorful and Easy Meal

August 31, 2025 by Chef Remy
- 4 boneless, skinless chicken thighs - 1 cup fresh broccoli florets - 1 red bell pepper, thinly sliced - 1 cup sugar snap peas - 4 cloves garlic, finely minced - 1/4 cup honey The chicken thighs form the heart of this dish. They stay juicy and tender while cooking. Broccoli, bell pepper, and sugar snap peas add color and crunch. The garlic and honey bring a sweet, rich flavor that ties everything together. - 2 tablespoons low-sodium soy sauce - 1 tablespoon rice vinegar - 1 tablespoon extra virgin olive oil - 1 teaspoon toasted sesame oil - 1/2 teaspoon crushed red pepper flakes (optional for heat) - Salt and freshly cracked black pepper to taste The soy sauce and rice vinegar create a tasty base for the honey garlic sauce. Olive oil and sesame oil help achieve that perfect sear on the chicken. You can add red pepper flakes if you like a bit of heat. - Chopped green onions - Sesame seeds Green onions add a fresh touch and a pop of color. Sesame seeds give a nice crunch and a nutty flavor. Together, they make your dish look and taste amazing. This recipe is all about balance. Each ingredient plays a role in creating a dish that is both flavorful and easy to prepare. 1. In a small bowl, add the honey, low-sodium soy sauce, rice vinegar, minced garlic, and crushed red pepper flakes, if you want some heat. 2. Whisk these ingredients together until the sauce is smooth. This sauce will bring great flavor to the chicken and veggies. 1. Season the chicken thighs well with salt and freshly cracked black pepper on both sides. 2. Heat a large skillet over medium-high heat. Add the extra virgin olive oil and toasted sesame oil. 3. Once the oils shimmer, add the chicken thighs to the pan. 4. Sear them for about 6-7 minutes on each side. You want a golden-brown crust and an internal temperature of 165°F. 1. After the chicken is done, take it out and set it aside on a plate. 2. In the same skillet, add the fresh broccoli florets, sliced red bell pepper, and sugar snap peas. 3. Sauté these veggies for around 4-5 minutes. They should be bright and tender-crisp. 1. Pour the honey garlic sauce over the sautéed vegetables. Stir gently to coat everything well. 2. Let it simmer for 2-3 minutes. This thickens the sauce and blends the flavors nicely. 3. Add the cooked chicken thighs back to the skillet. Nestle them among the veggies and coat them with the sauce. 4. Cook everything together for an extra 2 minutes to heat through. Now you have a delicious one-pan meal ready to enjoy! For great flavor, season the chicken well. Use salt and black pepper on both sides. Don't skip this step; it adds depth to your dish. The honey garlic sauce is vital too. Mix honey, soy sauce, rice vinegar, and garlic in a bowl. Whisk until smooth. If you love spice, add crushed red pepper flakes. This sauce will bring a sweet and savory taste. To sear chicken perfectly, heat your pan on medium-high. Add olive and sesame oil and wait until they shimmer. Place the chicken in the pan and let it cook without moving it. This helps form a nice crust. Cook for about 6-7 minutes each side. Check the chicken's internal temperature; it should reach 165°F (75°C). For the veggies, add them after the chicken is done. Stir-fry them quickly to keep them crunchy. Cook them for about 4-5 minutes. They should stay bright and tender. This will give your dish a fresh taste and great texture. When serving, place the chicken and veggies over fluffy jasmine rice or quinoa. This adds a nice touch and helps soak up the sauce. For extra flair, add a lime wedge on the side. The citrus will brighten your meal. Garnish the dish with chopped green onions and sesame seeds. This adds color and makes your dish look appealing. A well-presented meal makes it even more enjoyable. {{image_4}} You can easily make One Pan Honey Garlic Chicken healthier. Use leaner cuts of chicken. Skinless chicken breasts work well. They are lower in fat but still juicy. For veggies, swap out broccoli or bell pepper for others. Try carrots or zucchini for a different taste. You can even add spinach for extra nutrients. Want to boost the flavor? Add spices or herbs. Fresh ginger adds warmth. Try thyme or rosemary for depth. You can also mix in different sauces. A splash of sriracha gives heat. A bit of hoisin sauce brings sweetness. Experiment to find your favorite mix! Pair your dish with great sides. Jasmine rice or quinoa are perfect. They soak up the sauce well. If you want veggies, serve a fresh salad. A simple green salad adds crunch. You can also try roasted sweet potatoes for a sweet touch. This way, you create a complete meal that everyone will love. Enjoy the tasty balance of flavors and textures! To store your One Pan Honey Garlic Chicken, let it cool first. Place leftovers in an airtight container. This keeps the flavors fresh. You can store it in the fridge for up to three days. When you want to eat it, just reheat it on the stove or microwave. If you plan to enjoy this dish later, freezing works great. Place the cooled chicken and veggies in a freezer-safe bag. Squeeze out the air before sealing. This prevents freezer burn. You can freeze it for up to three months. When you're ready to eat, thaw it in the fridge overnight. Reheat it gently in a pan to keep the chicken juicy. You can also use the microwave, but watch it closely so it doesn't dry out. Enjoy your meal! Yes, you can use chicken breasts. They cook faster and are leaner. However, they may be less juicy compared to thighs. Chicken thighs have more fat, which adds flavor and tenderness. If you choose breasts, watch the cooking time closely. Overcooking can make them dry. To add heat, include crushed red pepper flakes in the sauce. You can also use fresh sliced jalapeños or a dash of hot sauce. Start with small amounts, then adjust to your taste. Experiment to find the heat level you enjoy. Just remember, spice can build over time. Yes, you can prep this dish ahead of time. Marinate the chicken in the sauce for a few hours or overnight. This adds great flavor. You can also chop the vegetables in advance. Store them in the fridge. On cooking day, it will save you time and effort. This blog post covered how to make a tasty honey garlic chicken dish. We explored key ingredients like chicken thighs, fresh veggies, and honey with garlic. I shared tips on seasoning, cooking, and the best presentation ideas. When you follow these steps, you get a great meal. You can also try healthier options or make it spicier. With proper storage, leftovers stay fresh. Enjoy cooking and make it your own!

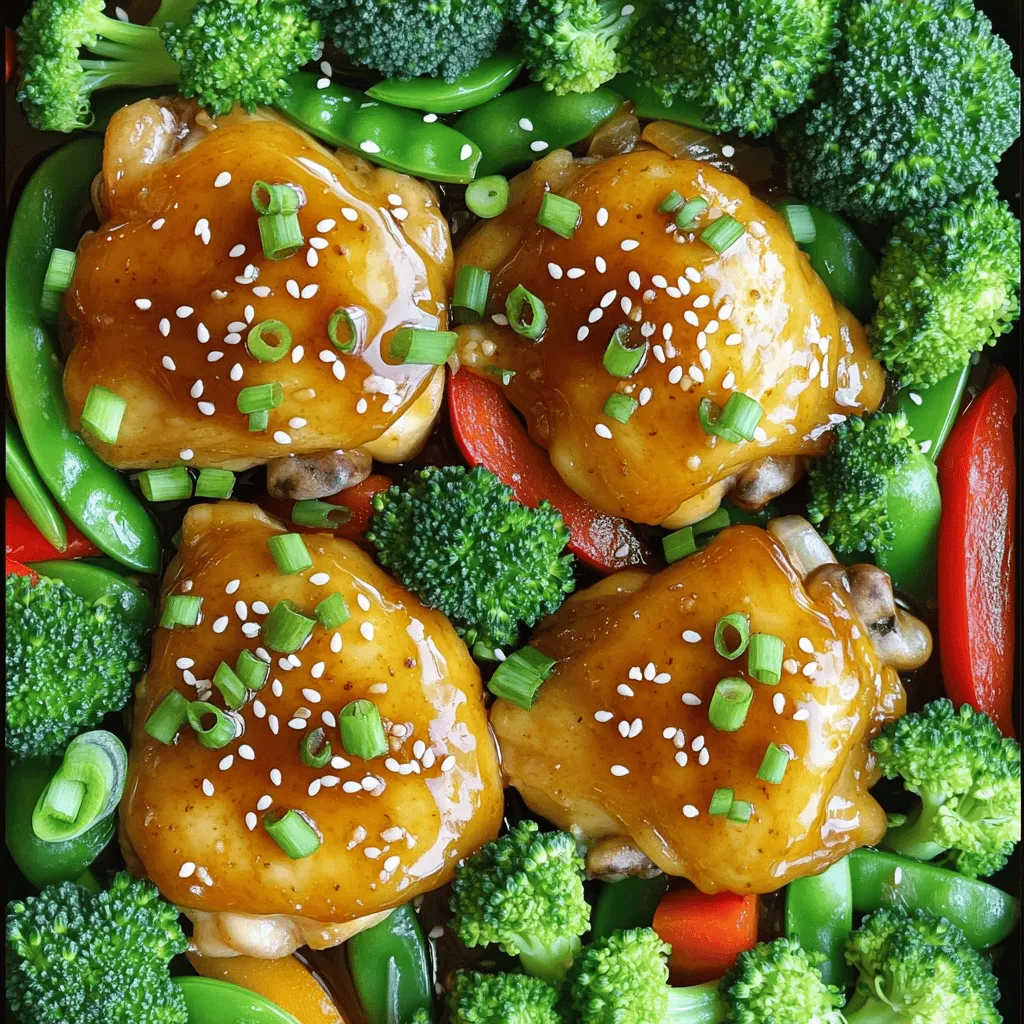
If you’re looking for a quick, tasty dinner that packs a flavor punch, you’re in the right place! My One Pan Honey Garlic Chicken is not just simple to make; …

Read more

Categories Dinner

Soft Pumpkin Chocolate Chip Cookies Irresistible Treat

August 31, 2025 by Chef Remy
- 1 cup canned pumpkin puree - 1/2 cup unsalted butter, softened to room temperature - 1 cup brown sugar, packed - 1/2 cup granulated sugar - 1 large egg - 1 teaspoon vanilla extract - 2 cups all-purpose flour - 1 teaspoon baking soda - 1/2 teaspoon baking powder - 1 teaspoon ground cinnamon - 1/2 teaspoon ground nutmeg - 1/2 teaspoon salt - 1 cup semi-sweet chocolate chips You can swap the butter for coconut oil if you want a dairy-free option. Use a flaxseed egg (1 tablespoon of ground flaxseed mixed with 3 tablespoons of water) to replace the egg for a vegan choice. If you have nut allergies, skip any nuts and stick with just the chocolate chips. When picking pumpkin puree, aim for brands that list only pumpkin. Avoid those with added sugars or spices. For chocolate chips, select high-quality semi-sweet options for the best taste. Fresh spices give more flavor, so choose whole spices and grind them at home if possible. Always check the expiration dates on your baking soda and powder for freshness. First, set your oven to 350°F (175°C). This helps the cookies bake evenly. While the oven heats, line two baking sheets with parchment paper. This keeps the cookies from sticking and makes cleanup easy. In a big bowl, combine 1/2 cup of softened butter, 1 cup of brown sugar, and 1/2 cup of granulated sugar. Use an electric mixer on medium speed. Mix for about 2-3 minutes. The mixture should look light and fluffy. This step adds air to the dough. Now, add 1 cup of canned pumpkin puree, 1 large egg, and 1 teaspoon of vanilla extract to the creamed mixture. Mix on medium speed until everything blends well and is smooth. This adds moisture and flavor to your cookies. In a separate bowl, whisk together 2 cups of all-purpose flour, 1 teaspoon of baking soda, 1/2 teaspoon of baking powder, 1 teaspoon of ground cinnamon, 1/2 teaspoon of ground nutmeg, and 1/2 teaspoon of salt. This helps the cookies rise and gives them spice. Slowly add the dry mix to the wet mix. Use low speed to combine. Stop mixing once you see no dry flour. Overmixing can make cookies tough. Now, gently fold in 1 cup of semi-sweet chocolate chips using a spatula. This spreads the chocolate evenly through the dough. Using a cookie scoop or tablespoon, drop rounded dollops of dough onto the baking sheets. Keep each dollop about 2 inches apart. This gives the cookies room to spread. Bake them in the oven for 10-12 minutes. The edges should be slightly golden, while the centers stay soft. After baking, take the cookies out and let them cool on the sheets for 5 minutes. Then, move them to a wire rack to cool completely. For a fun touch, serve them on a pretty platter. Dust with powdered sugar or drizzle melted chocolate on top for a special treat! To make soft cookies, start with room temperature butter. Creaming butter with sugars is key. You want it light and fluffy. This step adds air to the dough, which helps the cookies stay soft. Also, use pumpkin puree. This adds moisture and flavor. Do not overmix your dough. Mix until just combined to keep cookies tender. One common mistake is using cold butter. Cold butter makes cookies hard. Another mistake is overbaking. Check your cookies at 10 minutes. They should be slightly golden on the edges but soft in the middle. If you bake them too long, they will dry out. Lastly, don’t skip the cooling time. Let them cool on the baking sheet to set properly. Use parchment paper on your baking sheets. This helps cookies not stick and makes cleanup easy. Bake one sheet at a time in the center of the oven for even heat. Rotate your baking sheets halfway through for uniform baking. Use a cookie scoop for even sizes. This ensures all cookies bake at the same rate, giving you perfect results every time. {{image_4}} You can boost texture and flavor by adding nuts or dried fruit. Chopped walnuts or pecans add crunch. Dried cranberries or raisins give a sweet twist. Use about 1/2 cup of nuts or fruit. Mix them in just before you scoop the dough. This makes each bite unique and fun! You can make these cookies vegan and gluten-free with simple swaps. Use coconut oil instead of butter. Replace the egg with a flaxseed egg. To make a flaxseed egg, mix one tablespoon of ground flaxseed with three tablespoons of water. Let it sit for five minutes until it thickens. For gluten-free cookies, use a gluten-free flour blend. This way, everyone can enjoy them! Enhance the cookie flavor with different spices or extracts. Try adding a pinch of ginger for warmth. You can also mix in a teaspoon of almond extract for a nutty hint. Experiment with the spices you love. Each twist can turn these cookies into something new and exciting! To keep your soft pumpkin chocolate chip cookies fresh, store them in an airtight container. This helps to lock in moisture, keeping the cookies soft. Place parchment paper between layers if stacking. Keep the container at room temperature. Avoid placing them in the fridge, as this may dry them out. For longer storage, you can freeze these cookies. First, let them cool completely. Then, place them in a single layer on a baking sheet. Freeze them for about two hours until firm. After that, transfer the cookies to a freezer-safe bag. Make sure to remove as much air as possible. They can last up to three months in the freezer. If your cookies are a bit firm after storage, you can easily soften them. Preheat your oven to 300°F (150°C). Place the cookies on a baking sheet. Heat them for about 5-10 minutes. You can also microwave them for about 10-15 seconds. This quick method brings back their soft texture and warm flavor. Yes, you can use fresh pumpkin. You will need to cook and puree the pumpkin first. Make sure to remove any excess water. This will keep your cookies from getting too wet. Fresh pumpkin can add a lovely flavor and texture. To reduce the sweetness, cut back on the sugar. You can use 3/4 cup of brown sugar instead of 1 cup. You could also use dark chocolate chips, which are less sweet. This will help balance the flavors. To soften hard cookies, place them in a container with a slice of bread. The bread will add moisture back into the cookies. You can also microwave them for a few seconds. Just be careful not to overdo it. These cookies stay fresh for about a week when stored in an airtight container. You can also freeze them for up to three months. Just make sure to wrap them well to prevent freezer burn. Yes, you can easily double the recipe. Just make sure you have enough space on your baking sheets. You may need to bake in batches if your oven is small. Doubling the recipe is a great way to share with friends or family! These cookies come together with simple ingredients and easy steps. You learned how to select the best ingredients, bake perfectly soft cookies, and explore fun variations. Remember, avoid common mistakes for great results. Store your cookies well for lasting freshness. I hope this guide inspires you to bake and share delicious treats. Enjoy your cookie-making journey!

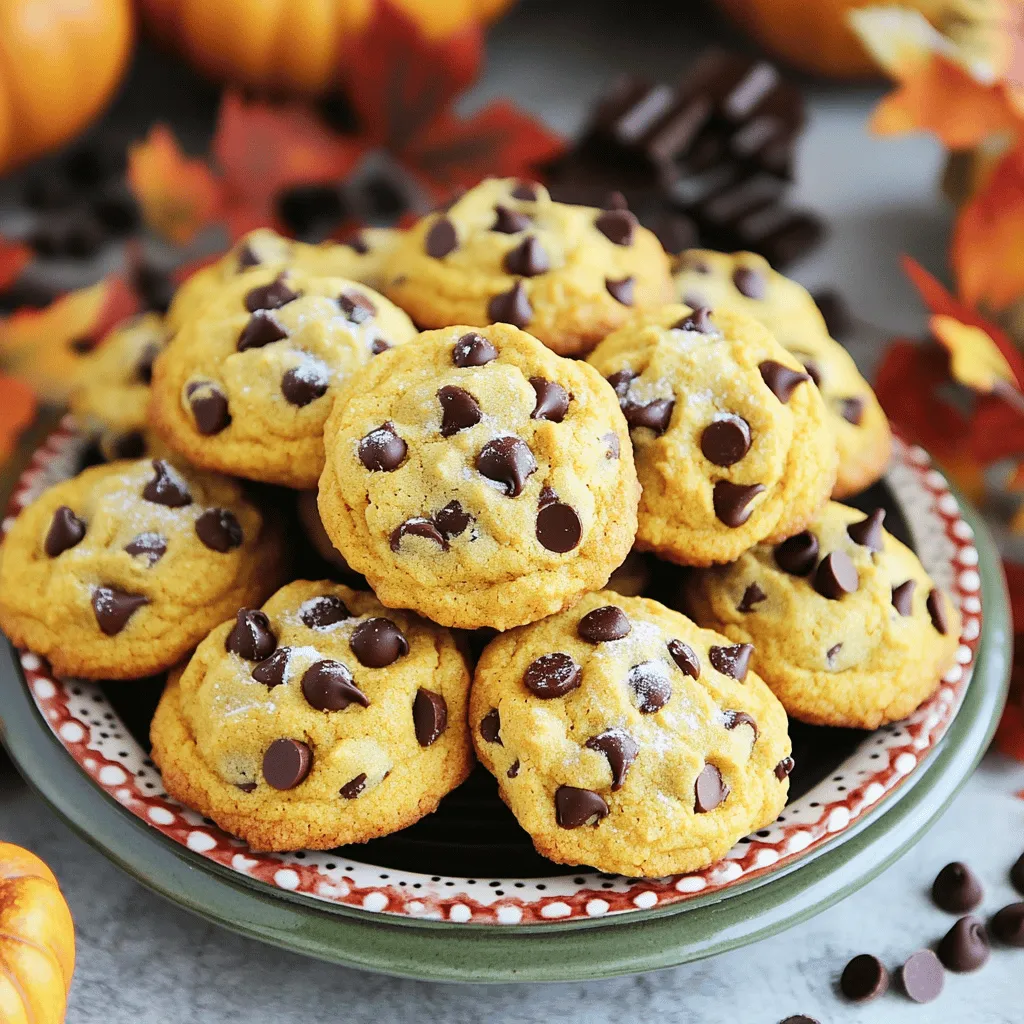
If you’re craving a cozy treat that blends fall flavors with sweet chocolate, you’ve come to the right place! In this post, I’ll show you how to make soft pumpkin …

Read more

Categories Desserts

Easy Apple Dumplings Simple and Satisfying Recipe

August 31, 2025 by Chef Remy
- Apples: I love using Granny Smith or Honeycrisp apples. They are tart and firm. This helps them hold their shape during baking. The tartness balances the sweetness of the sugar and cinnamon. Honeycrisp adds a nice crunch and sweetness. - Crescent Roll Dough: You can buy store-bought dough for ease. It saves time and tastes great. If you prefer, you can make homemade dough, but it requires more steps. Store-bought is perfect for a quick treat. - Brown Sugar: This sugar adds a rich, caramel flavor. If you’re out, you can use white sugar or coconut sugar as a substitute. Brown sugar gives a deeper taste and helps with moisture. - Ground Cinnamon: I recommend using Ceylon cinnamon for its sweet flavor. If you use Cassia cinnamon, it has a stronger, spicier taste. Both work well, but I love the warmth of Ceylon. - Butter: Unsalted butter is best for this recipe. It allows you to control the salt in your dish. You can also use vegan butter if you want a dairy-free option. - Apple Juice: Regular apple juice is great, but feel free to use cider for a richer taste. Sparkling apple juice can add a fun twist. Avoid using too much juice; it should just surround the dumplings. 1. Preheat oven: Set your oven to 350°F (175°C). This temperature is perfect for baking. Grease a 9x9 inch baking dish well. This step keeps the dumplings from sticking to the dish. 2. Apple preparation: Choose large apples like Granny Smith or Honeycrisp. Wash them first. Peel off the skin and remove the core. Position the apples upright in the center of the greased dish. This helps them cook evenly. 1. Wrapping apples in dough: Open the package of crescent roll dough. Carefully unroll it. Each triangle will wrap around one apple. Make sure to cover the apple completely. Pinch the seams tightly to keep the dough secure. This prevents the filling from leaking out during baking. 2. Sprinkling sugar and cinnamon: In a bowl, mix brown sugar and ground cinnamon. Use a spoon to sprinkle the mixture evenly over each wrapped apple. This adds sweetness and flavor. Make sure every part of the dough gets some of this mix. 1. Pouring apple juice: Carefully pour apple juice into the dish. Surround the dumplings but avoid pouring directly on top. This keeps the dough from getting soggy while baking. 2. Cooking time and temperature: Bake the dumplings for 30-35 minutes. Watch for the crescent dough to turn golden brown. The apples should also soften and smell wonderful. These signs mean your dumplings are ready to enjoy. To get a perfect golden color, watch the baking time closely. Start checking your apple dumplings around 30 minutes. They should look golden brown when done. If you want to check the apple's tenderness, use a toothpick. Insert it through the dough, but don’t open the oven door. This method helps keep the heat in and ensures even baking. You can add spices like nutmeg, allspice, or cloves to give your dumplings a twist. A pinch goes a long way and adds warmth. If you make extra dumplings, consider freezing them. Wrap each one tightly in plastic wrap and place them in a freezer bag. They can stay fresh for up to three months. Choosing the right ice cream can enhance the taste. Vanilla pairs well with warm dumplings. You can also try caramel or cinnamon ice cream for extra flavor. For presentation, serve the dumplings on a plate. Drizzle some sweet sauce from the baking dish over them. Top with a sprinkle of cinnamon for a nice finish. This makes your dish look as good as it tastes! {{image_4}} For those on a gluten-free diet, you can swap the crescent roll dough with gluten-free dough. Many stores offer ready-made gluten-free dough options. Just check the label for safety. If you prefer a vegan version, replace the butter with a plant-based option like coconut oil. For ice cream, look for non-dairy ice cream made from almond or coconut milk. These adjustments keep the dish friendly for more diets. You can change up the fruit in this recipe. Try using pears or peaches for a twist. Berries can also add a fun burst of flavor. You can also experiment with different fillings. Adding chopped nuts or raisins inside the dough can enhance the taste. These variations keep things exciting and let you personalize your dumplings. After you bake the apple dumplings, let them cool down. This step is key. If you put hot dumplings in the fridge, they will get soggy. Place them on a wire rack for about 15 minutes. Once cooled, you can put them in a container with a lid. You can store these dumplings in the fridge for up to three days. Just remember to cover them well to keep them fresh. If you want to save apple dumplings for later, freezing is a great option. Here’s how to do it: 1. Cool Completely: Make sure the dumplings are completely cool before freezing. 2. Wrap Individually: Wrap each dumpling in plastic wrap. This prevents freezer burn. You can also place them in a freezer bag. 3. Label: Don’t forget to label the bag with the date. You can freeze apple dumplings for up to three months. When you’re ready to enjoy them, remove them from the freezer. Let them sit in the fridge overnight to thaw. For the best texture, reheat them in the oven. Preheat to 350°F (175°C) and bake for about 15 minutes. This way, they stay warm and tasty! How can I make apple dumplings ahead of time? You can prepare your apple dumplings ahead. Follow the recipe until you wrap the apples. Place the wrapped apples in the baking dish. Cover with plastic wrap and store in the fridge. When ready to bake, take them out and let them sit for about 10 minutes. Then, pour the apple juice and bake as directed. Can I use other types of dough for this recipe? Yes, you can use other types of dough. Puff pastry or biscuit dough works well. Just ensure the dough wraps around the apple completely. Each dough will change the texture slightly, but the flavor will remain delicious. What to do if the dough doesn't stick to the apple? If the dough doesn't stick, try pinching the seams more tightly. You can also brush the apple lightly with melted butter before wrapping. This helps the dough adhere better, making it easier to keep the filling inside. How to fix overcooked apple dumplings? If your dumplings are overcooked, don’t worry! You can add a drizzle of apple juice over them when serving. This will help add moisture back. Serve them warm with vanilla ice cream for a delightful treat. What drinks pair well with apple dumplings? Apple dumplings pair nicely with hot cider or sweet tea. You could also enjoy them with a scoop of vanilla ice cream. Coffee or a light dessert wine also complements the flavors well. Can I serve apple dumplings for breakfast? Absolutely! Apple dumplings make a sweet breakfast treat. Serve them warm with a dollop of yogurt or a sprinkle of nuts. They are a fun way to start your day! You’ve learned how to create delicious apple dumplings, from choosing the right apples to baking them perfectly. We covered tips for flavor and storage, plus tasty variations. Remember, the right ingredients make a big difference. Take your time while baking and enjoy experimenting with flavors. These dumplings can be a cozy dessert or even a breakfast treat. Now, get in the kitchen and share these tasty treats with friends and family!

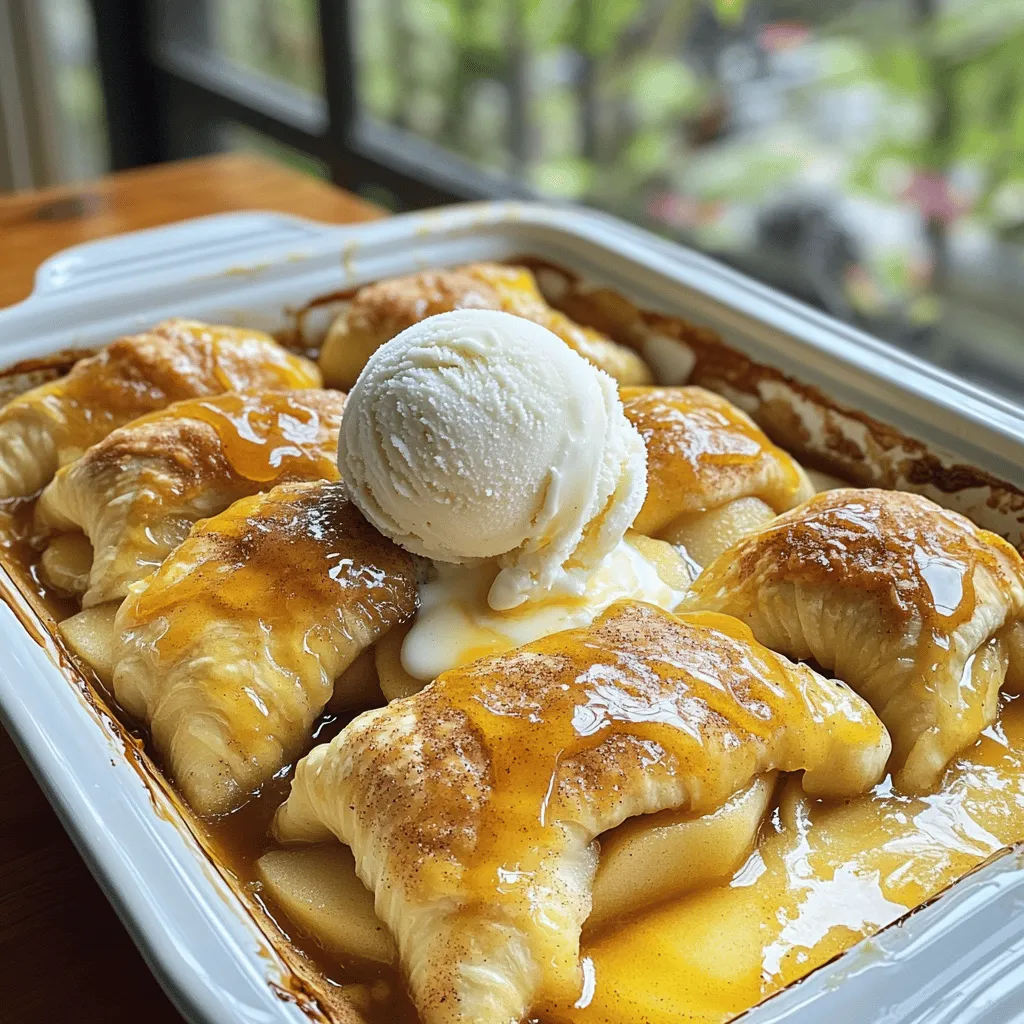
Are you ready to enjoy a warm dessert that’s easy to make and oh-so-satisfying? This Easy Apple Dumplings recipe uses simple ingredients like apples and crescent dough. I’ll guide you …

Read more

Categories Desserts
Older posts
Newer posts
← Previous Page1 … Page34 Page35 Page36 … Page130 Next →

ROASTED RECIPES

Where bold flavors meet everyday meals. Warm, vibrant, and made to share. 🔥🥗🍴

PAGES

Home About Contact Privacy Policy Terms & Conditions Cookie Policy GDPR Policy Copyright Policy Disclaimer

CATEGORIES

Appetizers Desserts Salads Breakfast Dinner

Contact

  • Pinterest
  • Mail
Copyright © 2025 Roasted Flavors. All rights reserved.