Skip to content
Roasted Flavors
  • Home
  • Appetizers
  • Desserts
  • Salads
  • Breakfast
  • Dinner
  • Privacy Policy
  • Contact
  • About

Chef Remy

Protein Packed Cottage Cheese Chocolate Mousse Delight

September 19, 2025 by Chef Remy
- 1 cup cottage cheese (low-fat recommended) - 1/2 cup unsweetened cocoa powder - 1/4 cup honey or maple syrup - 1 teaspoon pure vanilla extract - 1/4 cup almond milk (or any milk of choice) - A pinch of salt In this recipe, cottage cheese is key. It gives the mousse a creamy texture and packs in protein. I like to use low-fat cottage cheese for a lighter feel. Cocoa powder adds deep chocolate flavor. You can choose unsweetened cocoa for control over sweetness. For sweetness, honey or maple syrup works well. You can adjust the amount based on your taste. Vanilla extract brings warmth and depth to the dish. Almond milk adds creaminess but feel free to swap in any milk you prefer. The pinch of salt is crucial. It balances the sweetness and enhances the overall flavor. - Dark chocolate shavings - Fresh berries (raspberries or strawberries) - Crushed nuts (almonds or walnuts) Toppings make this mousse even better. Dark chocolate shavings add a rich touch. Fresh berries are bright and refreshing. Raspberries and strawberries work best for flavor contrast. Crushed nuts, like almonds or walnuts, give a nice crunch. You can mix and match toppings based on what you love! First, gather your ingredients. You will need: - 1 cup cottage cheese (low-fat recommended) - 1/2 cup unsweetened cocoa powder - 1/4 cup honey or maple syrup - 1 teaspoon pure vanilla extract - 1/4 cup almond milk (or any milk of choice) - A pinch of salt Add all these ingredients into your blender or food processor. Blend on high speed for about 2-3 minutes. You want it to be smooth and creamy. Stop halfway to scrape down the sides. This helps mix everything well. After blending, taste your mousse. If you want it sweeter, add more honey or maple syrup. Blend briefly again to mix in the sweetener. This step lets you control the flavor just how you like it. Carefully pour the mousse into individual serving bowls. Once you’ve done that, refrigerate them for at least 30 minutes. This time allows the mousse to firm up and the flavors to meld. It’s a simple but key step for the best taste. To get a smooth mousse, blend the ingredients well. A thick mixture can leave lumps. Blend for about 2-3 minutes on high speed. Halfway through, stop to scrape down the sides. This step ensures all ingredients mix well and you avoid any chunks. Adjust the sweetness to fit your taste. Start with 1/4 cup of honey or maple syrup. If you want it sweeter, add more. Blend again briefly to mix in any extra sweetener. You can also swap almond milk for any milk you prefer. Try coconut milk for a tropical twist or oat milk for a creamier texture. Serve the mousse in clear glass cups. This makes it look fancy and shows off the rich color. For a fresh touch, add a sprig of mint on top. You can also sprinkle dark chocolate shavings, fresh berries, or crushed nuts for extra flair. These toppings not only add taste but also make your dessert look irresistible! {{image_4}} You can make your mousse even more delightful with a few simple tweaks. Try adding peanut butter or almond butter. This gives a rich, nutty flavor that pairs perfectly with chocolate. Just mix in a tablespoon or two when blending. You can also incorporate espresso for a mocha twist. A teaspoon of espresso powder or a shot of brewed coffee boosts the chocolate taste. Blend it in for a coffee-chocolate fusion that’s hard to resist! If you need a vegan version, swap cottage cheese for coconut cream. The cream adds a rich texture without dairy. Use full-fat coconut cream for the best results. You can also find sugar-free alternatives. Try using stevia or erythritol instead of honey or maple syrup. This way, you can enjoy a low-sugar treat without losing taste. The mousse is great on its own, but you can enhance it further! Pair it with fresh fruits like raspberries or strawberries. Their tartness balances the sweetness nicely. You can also sprinkle some granola on top for a crunchy texture. Another fun idea is to use the mousse as a filling for cakes or pastries. Imagine a chocolate mousse cake or a chocolate-filled pastry; it’s a treat that impresses everyone! You should store your Protein Packed Cottage Cheese Chocolate Mousse in the fridge. It stays fresh for up to three days. To keep it fresh longer, cover the bowls with plastic wrap or a lid. This helps avoid any unwanted odors and keeps the mousse creamy. Yes, you can freeze this protein-packed mousse! It keeps well for about two months. To thaw, move it to the fridge overnight. Avoid using the microwave, as it may change the texture. After thawing, stir gently to restore its creaminess. Chill the mousse for at least 30 minutes before serving. This helps it firm up and enhances the flavors. The taste improves as it sits, allowing the cocoa and sweet notes to blend beautifully. Enjoy it at its best after chilling! Yes, you can use different types of cottage cheese. Light cottage cheese has less fat and calories. It can make your mousse lighter. Regular cottage cheese is creamier and richer. Both options work well, so choose based on your taste. Absolutely! This mousse is great for kids. It packs protein from cottage cheese, which helps build strong muscles. The cocoa powder adds flavor and antioxidants. You can adjust the sweetness to suit their taste. It's a fun and healthy treat they will love! If you want to swap honey or maple syrup, try agave nectar or coconut sugar. Both are natural sweeteners that work well. You could also use stevia for a low-calorie option. Adjust the amount based on your sweetness preference. This blog post shared a simple and tasty way to make protein-packed mousse. You learned about key ingredients and step-by-step instructions to create it. I emphasized tips for texture, flavor, and presentation. You can also try different toppings or variations to match your taste. Remember to store it correctly for the best results. Enjoy your delicious dessert, knowing you made it with simple, wholesome ingredients. This mousse is not just tasty; it’s fun to make and good for you. Time to get blending and enjoy!

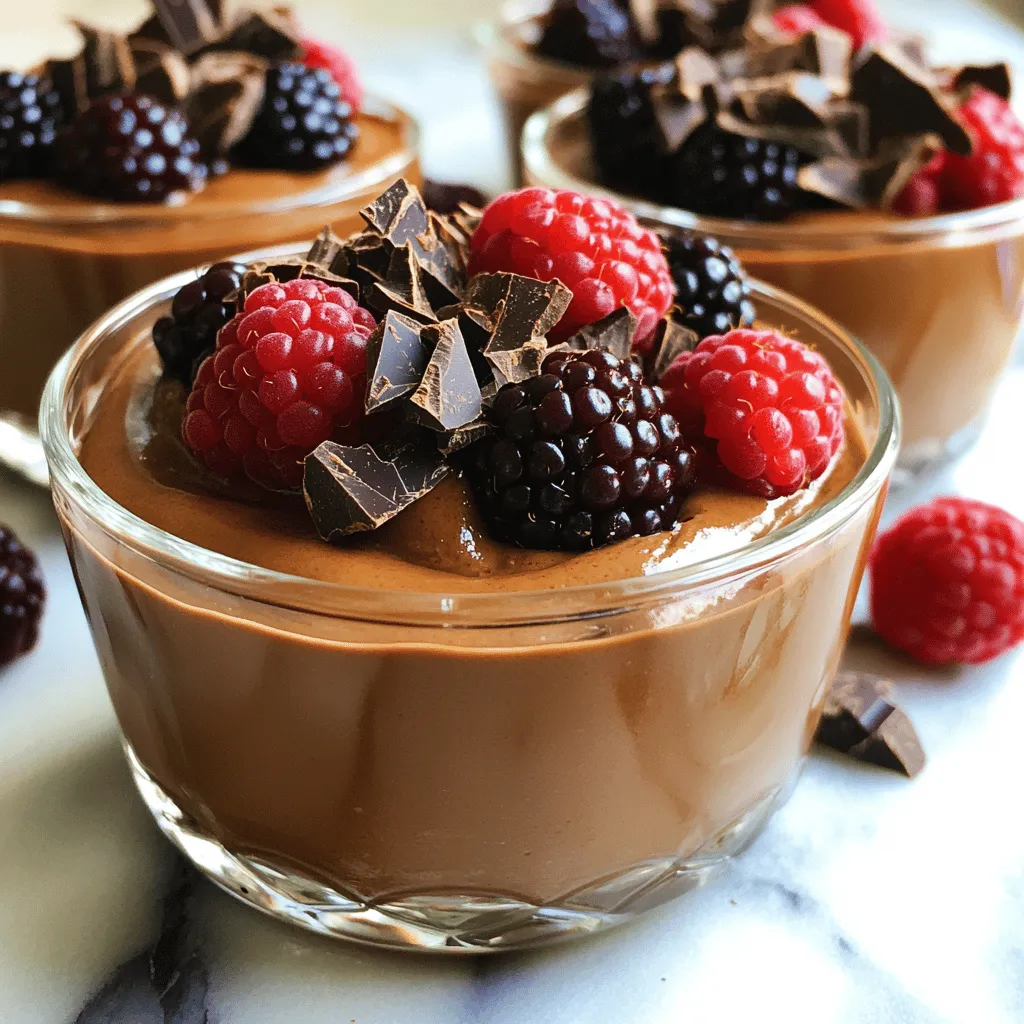
Are you ready to indulge in a dessert that’s both tasty and packed with protein? This Protein Packed Cottage Cheese Chocolate Mousse Delight is the perfect treat for anyone wanting …

Read more

Categories Desserts

No Bake Pumpkin Cheesecake Cups Deliciously Easy Treat

September 19, 2025 by Chef Remy
- 1 cup graham cracker crumbs - 1/4 cup unsalted butter, melted - 3 tablespoons brown sugar - 1 (8 oz) package cream cheese, softened - 1 cup canned pumpkin puree - 1/2 cup powdered sugar - 1 teaspoon vanilla extract - 1 teaspoon pumpkin pie spice - 1 cup whipped topping (or heavy cream, whipped) - Whipped cream and cinnamon for garnish To make the no bake pumpkin cheesecake cups, gather these simple ingredients. The graham cracker crumbs form a tasty crust. Mix them with melted butter and brown sugar for a sweet touch. The cream cheese gives the cheesecake its smooth texture. Canned pumpkin puree is key here. Make sure it’s not pumpkin pie filling. You need pure pumpkin for the best flavor. The powdered sugar sweetens the filling just right. Vanilla extract adds depth to the taste. Pumpkin pie spice brings warmth and aroma to the dessert. Finally, the whipped topping makes the filling light and fluffy. For a finishing touch, top each cup with whipped cream and a sprinkle of cinnamon. This adds both beauty and flavor. These ingredients come together to create a dessert that is easy, quick, and absolutely delicious. - First, gather your ingredients: graham cracker crumbs, melted butter, and brown sugar. - In a medium bowl, combine the graham cracker crumbs, melted butter, and brown sugar. - Stir the mixture until the crumbs feel like wet sand. - Next, take small serving cups and spoon the crumb mixture into each cup. - Press down gently to form a solid layer for the crust. - In a large bowl, beat the softened cream cheese with an electric mixer. - Mix until the cream cheese is smooth and free of lumps. - Add the pumpkin puree, powdered sugar, vanilla extract, and pumpkin pie spice. - Continue to beat the mixture until fluffy and well blended. - Carefully fold in the whipped topping into the pumpkin filling. - Take your time to keep the mixture light and airy. - Spoon the creamy pumpkin filling into each cup, filling them about three-quarters full. - Place the cups in the refrigerator to chill for at least 2-3 hours. - For best results, chill them overnight to let the flavors meld. - Before serving, top each cup with whipped cream and a sprinkle of cinnamon. To make a perfect cheesecake, you need soft cream cheese. Take the cream cheese out of the fridge. Let it sit at room temperature for about 30 minutes. This softens it and helps it mix better. When you mix in the other ingredients, use a gentle folding technique. This keeps the filling light and fluffy. Overmixing can make it dense, so mix just until combined. Garnishing is key for a great look. Top each cup with whipped cream. A light dusting of cinnamon adds color and flavor. You can also use chocolate shavings or caramel drizzle for extra flair. Pair these cups with coffee or hot cider. The warm drinks balance the cool cheesecake. They make a lovely combo for a cozy dessert. One big mistake is overmixing the filling. This can lead to a heavy texture. Mix just enough for a smooth blend. Another common error is not chilling long enough. For the best taste and texture, let the cups chill for at least 2-3 hours. Overnight is even better, as it helps the flavors develop. {{image_4}} You can change up the flavor of your pumpkin cheesecake cups. Try adding spices like cinnamon or nutmeg. These spices can give your dessert a warm, cozy taste. You can also swirl in caramel or chocolate for a sweet twist. This simple addition makes each bite even more delightful. If you need a gluten-free dessert, you can swap the graham cracker crust. Use gluten-free cookie crumbs or nuts for the base. Check other ingredients too, like the whipped topping. Make sure they are gluten-free to keep the treat safe for everyone to enjoy. For a dairy-free version, look for dairy-free cream cheese. Brands like Tofutti or Kite Hill work well. Instead of regular whipped topping, use coconut whipped cream. It adds a nice flavor and keeps it light. These swaps make the dessert suitable for those with dairy allergies. You can store the no bake pumpkin cheesecake cups in the fridge for up to five days. Use an airtight container to keep them fresh. If you stack the cups, place a layer of plastic wrap between them to avoid sticking. If you want to freeze the cups, do it after they chill. Place the cups in a freezer-safe container, with space between them. To thaw, move the cups to the fridge for about 4 hours before serving. This keeps the texture smooth. The expected shelf life of these dessert cups is about one week when stored in the fridge. However, for best taste and texture, enjoy them within three days. Yes, you can use homemade whipped cream. Just whip heavy cream until it forms soft peaks. This adds a fresh taste to your cheesecake cups. The texture will be light and fluffy, just like with whipped topping. You can tell the cheesecake is set when it feels firm to the touch. Gently press the top with your finger. If it bounces back, it's ready. Chilling for 2-3 hours helps the layers firm up. For best results, chill overnight. Absolutely! These cheesecake cups are perfect for making ahead. Prepare them a day in advance and store them in the fridge. This saves you time and lets the flavors blend nicely. Just add the whipped cream and cinnamon before serving for a fresh look. This blog shows you how to make tasty pumpkin cheesecake cups. We covered the ingredients, step-by-step directions, and tips to avoid mistakes. You learned how to create different flavors and variations for special diets. With these easy steps, you can impress friends and family. Try this dessert for your next gathering. Enjoy making and sharing these delicious treats!

Craving a simple yet delicious dessert? You’ll love these No Bake Pumpkin Cheesecake Cups! They come together quickly and require no oven. With creamy pumpkin filling and a crunchy crust, …

Read more

Categories Desserts

Maple Dijon Sheet Pan Salmon Veggie Dinner Delight

September 19, 2025 by Chef Remy
- 4 salmon fillets - 2 tablespoons Dijon mustard - 3 tablespoons pure maple syrup - 1 cup cherry tomatoes, halved - 1 bell pepper, sliced into strips - 1 medium zucchini, sliced into rounds - 1 medium red onion, sliced into wedges You will start with fresh salmon fillets. They are rich in omega-3 fatty acids, making them healthy and tasty. Next, you need Dijon mustard and pure maple syrup. These create a sweet and tangy glaze that pairs well with the salmon. Fresh vegetables are key for color and flavor. I love using cherry tomatoes, bell pepper, zucchini, and red onion. They add crunch and sweetness to the dish. - 1 tablespoon extra virgin olive oil - 1 teaspoon garlic powder - 1 teaspoon dried thyme - Salt and freshly ground black pepper For the pantry staples, you will need olive oil for cooking. Garlic powder adds depth to the sauce, while dried thyme brings a hint of earthiness. Salt and pepper help enhance all the flavors. They are simple but very important. - Fresh parsley, finely chopped To finish, I like to add fresh parsley. It adds a pop of color and freshness to the dish. Just sprinkle it on top right before serving for a lovely touch. Enjoy this vibrant and tasty meal! 1. Preheat your oven to 400°F (200°C). This heat will help cook the food evenly. 2. Line a large sheet pan with parchment paper. This makes cleanup easy and prevents sticking. 3. In a small bowl, mix together 2 tablespoons of Dijon mustard, 3 tablespoons of maple syrup, and 1 tablespoon of olive oil. 4. Add 1 teaspoon of garlic powder, 1 teaspoon of dried thyme, salt, and pepper. Whisk until smooth. This sauce adds a sweet and tangy taste to the dish. 1. Place your 4 salmon fillets on one side of the sheet pan. 2. Use a brush or spoon to coat the top of each fillet with the maple Dijon sauce. Make sure they are well covered for the best flavor. 3. In a large bowl, combine 1 cup of halved cherry tomatoes, 1 sliced bell pepper, 1 medium zucchini sliced into rounds, and 1 medium red onion cut into wedges. 4. Drizzle the remaining sauce over the veggies and toss gently. This step ensures they get a yummy glaze. 1. Spread the veggies on the other side of the sheet pan. Leave space between them for air to flow. This helps them caramelize nicely. 2. Bake in the preheated oven for 15-20 minutes. Check the salmon; it is done when it flakes easily with a fork. It should reach 145°F (63°C). 3. The veggies should be tender and slightly caramelized. 4. Remove the pan from the oven and let it rest for a few minutes. This lets the juices settle in the salmon. 5. Before serving, sprinkle with freshly chopped parsley for a burst of color and freshness. To make the salmon tasty, use a thick layer of the maple Dijon sauce. This mix has Dijon mustard and sweet maple syrup. Brush it generously on the salmon. This keeps the fish moist and flavorful. For the veggies, caramelizing them is key. Spread them out on the sheet pan. This gives each piece room to brown. When veggies touch, they steam instead of roast. Toss them in the remaining glaze to coat well. This adds a sweet touch to each bite. Salmon fillets vary in thickness. If your fillets are thick, they need more time. Thin fillets cook faster. Adjust the bake time by a few minutes. Different veggies also cook at different rates. Cherry tomatoes cook fast, while zucchini takes longer. Cut the zucchini smaller to match the tomatoes’ cook time. This way, all veggies finish at once. Serving from the pan creates a cozy feel. The colors of salmon and veggies look great together. Just sprinkle fresh parsley on top for a nice touch. If you prefer individual plates, divide the salmon and veggies. Drizzle leftover glaze over each plate. This adds extra flavor and a polished look. Use a fork to pull apart the salmon for easy serving. {{image_4}} You can easily change the protein in this dish. If you want to try other seafood, use cod or tilapia. Both work well with the sweet and tangy glaze. If you prefer meat, chicken breasts or thighs are great options too. Just ensure they cook through before serving. For a vegetarian option, tofu or tempeh is perfect. They absorb flavors well and provide a nice texture. Simply marinate them in the maple Dijon sauce for extra taste. Seasonal veggies can change the vibe of this dish. In spring, use asparagus or snap peas. In the fall, roasted Brussels sprouts or sweet potatoes are tasty choices. You can also mix in other flavors with your veggies. Try adding a bit of lemon zest or some chili flakes for a kick. Fresh herbs like basil or dill can also brighten up the dish. Want to spice things up? Add some sriracha or cayenne pepper to the sauce. This will give your salmon and veggies a nice heat. For a different flavor profile, swap the Dijon for a spicy mustard or even BBQ sauce. You can also add a splash of soy sauce for an Asian flair. Each twist brings a new taste to your dinner! To keep your leftovers fresh, cool them first. Place them in airtight containers. Make sure to refrigerate any leftovers within two hours. Store salmon and veggies together or separately, based on your preference. Use glass or BPA-free plastic containers for the best results. They help maintain flavor and moisture. You can reheat salmon and veggies in various ways. The oven works well to keep the texture nice. Preheat your oven to 350°F (175°C). Place the salmon and veggies on a baking sheet and cover with foil. Heat for about 10 to 15 minutes. Alternatively, use a microwave for quick reheating. Just be careful not to overcook, as this can dry out the salmon. Yes, you can freeze this dish! Wrap the salmon and veggies tightly in plastic wrap or foil. Then, place them in a freezer-safe bag. This helps prevent freezer burn. For best quality, eat them within three months. To defrost, move the dish to the fridge overnight. Reheat in the oven or microwave as described above. You should bake salmon for 15-20 minutes at 400°F. The salmon is ready when it flakes easily with a fork. The internal temperature should reach 145°F. This ensures a juicy and tender piece of fish. Yes, you can use frozen salmon. Just make sure to thaw it first. Place it in the fridge overnight for the best results. If you are in a hurry, you can use cold water to speed up the thawing. - Suggested sides for a complete meal: - Quinoa or brown rice - Roasted sweet potatoes - Steamed asparagus or green beans - Salads or grains that pair well: - A light arugula salad with lemon vinaigrette - A refreshing cucumber and tomato salad - Couscous with herbs and lemon zest This blog post covers a simple and tasty sheet pan salmon recipe. We went through key ingredients, like salmon and fresh veggies, and how to prepare them. You learned step-by-step baking tips and ways to tweak flavors with various sauces. Remember to store any leftovers wisely for future meals. Cooking can be both fun and easy with these methods. You now have a solid foundation to create delicious, healthy meals that impress. Enjoy making this dish your own, and let your creativity shine in the kitchen.

Ready to whip up a tasty meal that’s quick and easy? Welcome to my Maple Dijon Sheet Pan Salmon Veggie Dinner Delight! This one-pan recipe combines tender salmon, fresh veggies, …

Read more

Categories Dinner

Cozy Spiced Apple Cider Pancakes Perfect Weekend Treat

September 19, 2025 by Chef Remy
To start, gather your dry ingredients. You will need: - 1 cup all-purpose flour - 1 tablespoon brown sugar - 1 teaspoon baking powder - 1/2 teaspoon baking soda - 1/2 teaspoon ground cinnamon - 1/4 teaspoon ground nutmeg - 1/4 teaspoon allspice - 1/4 teaspoon salt These ingredients create a warm, spiced base for the pancakes. The mix of spices adds great flavor. Next, you will mix the wet ingredients. You will need: - 1 cup apple cider (preferably fresh) - 1 large egg - 2 tablespoons unsalted butter, melted (plus extra for cooking) Apple cider gives these pancakes a lovely sweetness. The egg binds everything together while the melted butter adds richness. Toppings can make your pancakes even better. Here are some ideas: - Maple syrup, for serving - Extra diced apples, for garnish - A dusting of powdered sugar - A dollop of whipped cream These toppings add texture and flavor. You can mix and match to find what you like best. Enjoy your cozy pancakes! First, grab a big mixing bowl. In it, whisk together: - 1 cup all-purpose flour - 1 tablespoon brown sugar - 1 teaspoon baking powder - 1/2 teaspoon baking soda - 1/2 teaspoon ground cinnamon - 1/4 teaspoon ground nutmeg - 1/4 teaspoon allspice - 1/4 teaspoon salt Make sure to mix well. You want no lumps in this mix. Each spice adds warmth and flavor to the pancakes. Now, take a separate bowl. Crack one large egg into it and whisk lightly. Then pour in 1 cup of apple cider and 2 tablespoons of melted unsalted butter. Stir until smooth. This mix brings sweetness and moisture. Next, gently combine the wet and dry mixes. Pour the wet mix into the dry mix. Stir just until combined. It's okay to see small lumps. Then, fold in 1/2 cup of diced apples. This gives a nice crunch. Heat a non-stick skillet over medium heat. Add a bit of butter to coat the bottom. Pour about 1/4 cup of batter for each pancake. Cook for 2-3 minutes. Look for bubbles on top. The edges should look set. Now flip the pancake carefully. Cook for another 1-2 minutes until golden brown. Repeat this until your batter is gone. Serve warm with maple syrup. Enjoy! To get fluffy pancakes, mix the batter carefully. Overmixing makes them tough. You want a few lumps in the batter. This keeps the pancakes light and airy. Let the batter rest for about five minutes. This helps the gluten relax and gives a better texture. Cook your pancakes on medium heat. If it's too hot, the outside burns while the inside stays raw. Use a non-stick skillet or griddle. Melt a small amount of butter before adding the batter. This helps create a nice golden crust. Watch for bubbles on the surface. When bubbles form and edges look set, it’s time to flip. Spice up your pancakes with extras. Try adding chopped nuts or dried fruits. Walnuts or raisins pair well with the apple flavor. You can also add a dash of vanilla extract to the wet mix for depth. If you like more spice, increase the cinnamon or add a pinch of clove. These small tweaks can elevate your pancake experience. {{image_4}} You can use various apples for your pancakes. Granny Smith apples give a tart flavor. Honeycrisp apples add sweetness and crunch. Fuji apples are juicy and sweet, making them a great choice too. Experiment with your favorite apple to find the best taste. Each type can change the flavor and texture of your pancakes. To make these pancakes gluten-free, swap all-purpose flour for a gluten-free blend. Look for a blend that has xanthan gum in it, as it helps with texture. You may also use almond flour or oat flour. Adjust the liquid slightly, as gluten-free flours can absorb more moisture. This way, everyone can enjoy these cozy pancakes. Adding nuts or dried fruits makes these pancakes even better. Chopped walnuts or pecans add a nice crunch. You can also include dried cranberries or raisins for a sweet touch. Mix them into the batter when you fold in the apples. This adds flavor and texture, making your pancakes special. Don't be afraid to get creative! You can store leftover pancakes in the fridge. Place them in an airtight container. They will keep fresh for about 2-3 days. If you want them to taste their best, let them cool completely before storing. This helps prevent sogginess. Freezing is a great option for longer storage. To freeze pancakes, stack them with parchment paper in between each one. This prevents sticking. Place the stack in a freezer-safe bag or container. They will stay good for up to 2 months. When you’re ready to eat, just pull out what you need. Reheating pancakes is quick and easy. For the microwave, place one pancake on a plate and heat for about 20-30 seconds. For extra crispiness, use a skillet. Heat the skillet over medium heat and warm each pancake for about 1-2 minutes on each side. Enjoy them warm with maple syrup again! Yes, you can make the batter ahead. Mix the dry and wet ingredients as directed. Store the wet mix in the fridge for up to 24 hours. When ready to cook, gently fold in the diced apples. This will save you time on busy mornings. Maple syrup is the classic choice for these pancakes. Its rich flavor pairs perfectly with the spiced apple cider. You can also try apple syrup for a fun twist. If you want to get creative, caramel sauce adds a sweet touch too. Watch for bubbles to form on the surface of the pancakes. When the edges look set, it's time to flip them. Cook until they turn golden brown. You can also use a toothpick to check; it should come out clean when inserted into the center. In this post, we explored the key elements of making delicious pancakes. We covered ingredients, cooking steps, and tips for perfect texture. We also looked at fun variations and storage methods. Pancakes can be a simple treat or a fun project. Enjoy different flavors by adding nuts or fruits. Remember, cooking is about trying and having fun. So gather your ingredients and start flipping some pancakes today!

Imagine waking up to the cozy smell of spiced apple cider pancakes. These pancakes are a perfect way to enjoy your weekend mornings. With simple ingredients and easy steps, you …

Read more

Categories Breakfast

Air Fryer Honey Mustard Chicken Tenders Delight

September 19, 2025 by Chef Remy
- 1 lb chicken tenders - 1/4 cup Dijon mustard - 1/4 cup honey - 1 tablespoon olive oil - 1 teaspoon garlic powder - 1 teaspoon onion powder - 1/2 teaspoon smoked paprika - Salt and pepper to taste - 1/2 cup panko breadcrumbs - Fresh parsley, chopped (for garnish, optional) To create the best Air Fryer Honey Mustard Chicken Tenders, you need fresh and quality ingredients. I always pick out chicken tenders that are tender and juicy. The honey and Dijon mustard blend gives a sweet and tangy flavor that makes these tenders shine. For seasoning, I love adding a mix of garlic powder and onion powder. They add depth without being too strong. Smoked paprika gives a light smoky taste that brings out the other flavors. Remember to season with salt and pepper to make everything pop. Panko breadcrumbs are key for a crunchy texture. They crisp up nicely in the air fryer. If you want to add a fresh touch, a sprinkle of chopped parsley on top looks great and adds a hint of color. With these ingredients, you're set to make a dish that is both simple and delicious. In a medium bowl, I start by mixing the Dijon mustard, honey, and olive oil. I then add garlic powder, onion powder, smoked paprika, and a good pinch of salt and pepper. I whisk it all together until it is smooth and well mixed. This marinade adds a sweet and tangy flavor to the chicken. Next, I add the chicken tenders to the bowl. I make sure each tender is fully coated in the honey mustard mixture. I cover the bowl with plastic wrap and place it in the fridge. I let it marinate for at least 30 minutes. For the best flavor, I recommend marinating for up to an hour or even overnight. I preheat my air fryer to 400°F (200°C) for about 5 minutes. While it heats, I pour the panko breadcrumbs into a shallow dish. After marinating, I take each chicken tender from the bowl and dredge it in the breadcrumbs. I press gently to help the crumbs stick. Then, I place the breaded tenders in the air fryer basket in a single layer. I make sure to leave space between them for even cooking. I air fry the chicken tenders for 10-12 minutes, flipping them halfway through. They are done when they are golden brown and reach an internal temperature of 165°F (74°C). Once cooked, I remove them carefully and let them rest for a few minutes. This helps keep them juicy. If I want to add a nice touch, I garnish them with fresh parsley before serving. Marinate the chicken longer for a deeper flavor. I suggest at least one hour. If you have time, let it sit overnight. This way, the chicken absorbs all the yummy honey mustard goodness. A longer marination makes every bite burst with flavor. Use panko breadcrumbs for extra crunch. They give a great texture to the chicken tenders. Regular breadcrumbs work, but panko takes it to another level. When you coat the chicken, press the panko into the meat. This helps it stick better and makes the tenders crispier. Monitor the internal temperature to ensure chicken is cooked through. Chicken should reach 165°F (74°C). Use a meat thermometer for best results. When you cut into the chicken, it should be juicy and tender, not dry. This step is key for safe and delicious chicken tenders. {{image_4}} You can switch up your coating for these chicken tenders. Consider using regular breadcrumbs or crushed cornflakes. Both options add great texture. They give a different crunch but still taste amazing. Experiment to find your favorite! Want to spice things up? Try different mustards like spicy brown or whole grain. You can also add a pinch of cayenne for heat. This will give your tenders a nice kick. Mixing flavors keeps your meals exciting and fresh. These chicken tenders shine when paired with tasty sides. A fresh salad or steamed veggies work well. You can also serve them with your favorite dips. Honey mustard, ranch, or barbecue sauce are all great choices. Enjoying different sides makes each meal feel special! Keep any leftover chicken tenders in an airtight container. They stay fresh in the fridge for 3-4 days. Make sure to let them cool before sealing up the container. This helps keep them tasty. For the best results, reheat your chicken tenders in the air fryer. Set it to 350°F (175°C). Cook them for about 5-7 minutes. This way, they stay crispy and delicious. You can freeze both uncooked and cooked tenders. If you freeze uncooked ones, coat them in the honey mustard mix and breadcrumbs first. Place them in a freezer bag. When ready to cook, just air fry them from frozen. Cook for a few extra minutes. If you freeze cooked tenders, let them cool before packing them away. Enjoy them later for a quick meal! Marinate the chicken for at least 30 minutes. Ideally, let it sit for 1 hour or even overnight. This extra time helps the flavors soak into the meat. The longer you marinate, the better the taste! Yes, you can use chicken breasts. Just remember to adjust the cooking time. Chicken breasts take longer to cook through than tenders. Make sure they reach an internal temperature of 165°F (74°C). Great dips for honey mustard chicken tenders include: - Honey mustard - Ranch - Barbecue - Buffalo sauce These dips enhance the flavor and make eating more fun. Enjoy experimenting with different combinations! This blog post covered how to make tasty honey mustard chicken tenders. You learned about the key ingredients, from chicken to seasonings and coatings. I shared step-by-step instructions, helpful tips for flavor and crunch, and options for variations. Finally, remember to store leftovers properly and reheat them for the best taste. Making these tenders is easy, and you can customize them to your liking. Enjoy your cooking!

Are you ready to make the crispiest, most flavorful chicken tenders? In this post, I’ll show you how to create Air Fryer Honey Mustard Chicken Tenders that will delight your …

Read more

Categories Appetizers

Creamy 20 Minute Garlic Butter Shrimp Pasta Delight

September 19, 2025 by Chef Remy
- 8 ounces spaghetti pasta - 1 pound large shrimp, peeled and deveined - 4 tablespoons unsalted butter, divided - 4 cloves garlic, minced - 1 cup heavy cream - 1 cup grated Parmesan cheese - 1/2 teaspoon red pepper flakes - 1/4 cup fresh parsley, finely chopped - Lemon wedges for serving - Salt - Black pepper Gather these ingredients for a quick and tasty meal. Start with 8 ounces of spaghetti pasta. This will be our base. You’ll need 1 pound of large shrimp, peeled and deveined. The shrimp add great flavor and protein. Use 4 tablespoons of unsalted butter, divided, to give a rich taste. Next, add 4 cloves of minced garlic. Garlic brings warmth and aroma to the dish. For creaminess, you’ll need 1 cup of heavy cream. It makes the sauce rich and smooth. Don't forget 1 cup of grated Parmesan cheese. This will add depth and a cheesy finish. For a bit of heat, use 1/2 teaspoon of red pepper flakes, but this is optional. You can sprinkle in 1/4 cup of fresh parsley for color and freshness. Lastly, have lemon wedges ready for serving. The lemon brightens up the dish. Now, season with salt and black pepper to taste. This will enhance all the flavors. With these ingredients, you are on your way to making a delightful garlic butter shrimp pasta! 1. First, fill a big pot with water. 2. Add a generous pinch of salt and bring it to a boil. 3. Once boiling, add 8 ounces of spaghetti. 4. Cook until the spaghetti is al dente, about 8-10 minutes. 5. After cooking, drain the pasta. Make sure to save 1/2 cup of pasta water. 1. In a large skillet, melt 2 tablespoons of butter over medium heat. 2. Once melted, add 4 minced garlic cloves and optional red pepper flakes. 3. Sauté for about 30 seconds until the garlic smells good. 4. Then, add 1 pound of peeled shrimp, seasoning with salt and black pepper. 5. Cook the shrimp for 2-3 minutes per side, until pink and opaque. 6. When cooked, remove the shrimp from the skillet and set them aside. 1. In the same skillet, add the remaining 2 tablespoons of butter. 2. Once melted, pour in 1 cup of heavy cream and stir well. 3. Let the cream simmer for 2-3 minutes to thicken a bit. 4. Gradually mix in 1 cup of grated Parmesan cheese, whisking until smooth. 5. If the sauce is too thick, stir in some reserved pasta water until you like it. 1. Return the cooked spaghetti and shrimp to the skillet. 2. Toss everything together until the pasta and shrimp are coated with the sauce. 3. Add 1/4 cup of chopped parsley for a fresh touch. 1. Plate the creamy shrimp pasta in bowls. 2. Garnish with extra parsley and serve with lemon wedges on the side. 3. The lemon adds a nice zing to the dish! To make the best pasta, avoid overcooking. Cook spaghetti until it is al dente. This means it should be firm to the bite. If you cook it too long, it becomes mushy. Always check the package for cooking times. When draining the pasta, save some water. Reserve about 1/2 cup of pasta water. This starchy water helps adjust the sauce later. If your sauce is too thick, add some reserved pasta water. Stir well to combine. For a smooth cream sauce, keep an eye on the consistency. You want it thick but pourable. If it gets too thick, add the reserved pasta water. Stir in small amounts until you reach the right texture. You can also mix in different cheese options. Try adding mozzarella or cream cheese for a twist. Each cheese gives a unique flavor to the dish. Experiment to find what you like best. To know when shrimp is done, watch for color changes. They should turn pink and opaque. This takes about 2-3 minutes on each side. Undercooking is better, as they will cook more in the sauce. To avoid rubbery shrimp, do not overcook them. Shrimp cooks quickly, so stay attentive. If they curl tightly, they are overdone. Keep a close eye to get them just right. {{image_4}} You can switch up the protein in this dish. Try using chicken instead of shrimp. Simply cut the chicken into small pieces and sauté until golden. If you like seafood, scallops are another great choice. They cook quickly and add a nice flavor. Don't forget to adjust cooking times. Also, consider adding vegetables for extra nutrients. Spinach wilts nicely in the creamy sauce. Asparagus adds a nice crunch. Just chop it into small pieces and cook it with the shrimp. You can play with flavors in this dish. Add fresh herbs like basil or thyme for a new taste. If you want a little kick, use more red pepper flakes. Sun-dried tomatoes give a sweet, tangy twist. Chop them up and mix them in the sauce. Olives can also add a briny flavor. Just slice them and stir them in before serving. Experimenting with flavors makes this dish fun and unique. If you're watching carbs, try making this dish low-carb. Use zucchini noodles instead of spaghetti. They add a fresh taste and are easy to cook. You can spiralize zucchini to get the noodle shape. For those who need a dairy-free option, you can swap the heavy cream. Use coconut milk for a rich base. Nutritional yeast can add a cheesy flavor without dairy. These adaptations let everyone enjoy this dish! To keep your creamy garlic butter shrimp pasta fresh, store it in an airtight container. This helps prevent any strong odors from your fridge. It will last for about 3 days. Make sure to let it cool before sealing it up. When you're ready to enjoy leftovers, reheating is key. You can use the microwave or stovetop. If you use the microwave, heat in short bursts. Stir in between to keep it moist. If you prefer stovetop, add a splash of water or cream to the pan. Heat it over low heat, stirring gently until warm. You can freeze this dish if you want to save it for later. Place it in a freezer-safe container. It will stay fresh for about 2 months. When you're ready to eat, move it to the fridge overnight to thaw. After it's thawed, reheat as mentioned before. This way, you can enjoy a quick meal anytime! To make creamy shrimp pasta from scratch, start by cooking your spaghetti in salted boiling water. Once it's al dente, drain it but save some pasta water. In a skillet, melt butter and cook minced garlic until fragrant. Then, add shrimp seasoned with salt and pepper. Cook the shrimp until pink, then set them aside. In the same skillet, add more butter and heavy cream. Let it simmer, then stir in grated Parmesan cheese until smooth. Finally, combine the pasta and shrimp in the sauce and toss well. Yes, you can use frozen shrimp for this recipe. Just thaw the shrimp before cooking. You can do this by leaving them in the fridge overnight or placing them in cold water for about 15-20 minutes. Once thawed, peel and devein them if needed. This will save you time and still give you great flavor. If you need a substitute for heavy cream, use half-and-half mixed with a little butter. You can also try coconut cream for a dairy-free option. Another choice is to mix milk with cornstarch to thicken it. This gives a rich texture without using heavy cream. To add spice to this dish, include more red pepper flakes. You can adjust the amount based on your spice level. Another option is to add a dash of hot sauce while cooking. For more heat, consider using fresh chopped chili peppers or a sprinkle of cayenne pepper. Yes, it is safe to reheat shrimp pasta. Just be careful not to overheat it, as shrimp can become rubbery. You can reheat it in the microwave or on the stovetop. If using the stovetop, add a splash of water or broth to keep it moist. Heat it gently until warmed through. This blog post covered a simple, delicious creamy shrimp pasta recipe. We explored key ingredients like spaghetti, shrimp, butter, and heavy cream, as well as optional add-ins like red pepper flakes and parsley. I shared easy step-by-step instructions and offered tips to elevate your dish. Remember, you can customize it with different proteins and flavors to suit your taste. Enjoy creating this meal, and don’t forget to store any leftovers properly. With a few simple techniques, you will impress your family and friends with your cooking skills.

Looking for a quick, tasty meal? Try my Creamy 20 Minute Garlic Butter Shrimp Pasta Delight! This easy recipe combines tender shrimp, rich garlic butter, and creamy goodness for a …

Read more

Categories Dinner

Skillet Caramel Apple Crisp Simple and Delightful Recipe

September 17, 2025 by Chef Remy
- 4 large apples, peeled, cored, and sliced into thin wedges - 1 tablespoon lemon juice - 1 teaspoon ground cinnamon - ½ cup packed brown sugar - 1 tablespoon all-purpose flour - 1 cup rolled oats - ½ cup all-purpose flour - ½ cup cold unsalted butter, cubed into small pieces - 1 teaspoon pure vanilla extract - ½ cup chopped walnuts (optional) - ½ cup caramel sauce - Ice cream for serving (optional) To make this skillet caramel apple crisp, you need fresh apples. I like to use large, firm apples. You want apples that will hold their shape when baked. Next, the dry ingredients and spices add flavor. Ground cinnamon gives warmth, while brown sugar adds sweetness. For the topping, rolled oats create a chewy texture. Flour makes it crispy. Cold butter binds everything together. If you want crunch, add walnuts. Finally, caramel sauce brings a rich sweetness. Ice cream pairs perfectly for a warm dessert. Gather these ingredients, and you are on your way to a delicious treat! Preheating your oven to 350°F (175°C) is key. A hot oven helps the crisp bake evenly. This step ensures the topping turns golden and the apples bubble nicely. While the oven heats, you can prep the apples. In a large bowl, mix the sliced apples with lemon juice, ground cinnamon, brown sugar, and flour. Toss gently so the apples get coated well. Let this mixture sit for about 10 minutes. This wait time helps the apples soften and absorb flavor. Heat a large, oven-safe skillet on medium heat. Pour in the apple mixture. Cook for about 5-7 minutes, stirring often. The apples should start to soften but still hold some crunch. Once they’re tender, take the skillet off the heat. In a separate bowl, mix rolled oats, flour, brown sugar, and cold butter cubes. Use your fingers or a pastry cutter to combine until it looks like coarse crumbs. If you like, stir in chopped walnuts for added crunch. Spread the warm apple mixture evenly in the skillet. Then, sprinkle the oat topping generously over the apples. Make sure the topping covers all the apples for even baking. Carefully move the skillet to the preheated oven. Bake for 25-30 minutes. Look for a golden brown topping and bubbling apples around the edges. This means your dish is ready. As soon as you take the skillet out, drizzle caramel sauce over the hot crisp. Timing is important here. Let it cool slightly for the flavors to mix well. Scoop generous portions into bowls. For a fun twist, add a scoop of ice cream on top. The warm crisp and cold ice cream create a delightful contrast. You can also garnish with extra cinnamon or walnuts for a pretty finish. When it comes to making a great apple crisp, the type of apples you choose matters. I like using a mix of sweet and tart apples. Some good choices include: - Granny Smith: tart and holds shape well - Honeycrisp: sweet and juicy - Fuji: crisp and slightly sweet Make sure the apples are ripe. A ripe apple has a nice color and feels firm but not hard. If they are too soft, they may turn mushy in the oven. The topping is key to a delicious apple crisp. You can add flavor in many ways. Here are some ideas: - Add spices like nutmeg or allspice for warmth. - Mix in some brown sugar for extra sweetness. - Use different nuts, like pecans or almonds, instead of walnuts. If you have dietary needs, you can make swaps. Use coconut oil instead of butter for a dairy-free option. You can also use gluten-free oats and flours to keep it gluten-free. To make your caramel apple crisp even better, serve it with ice cream. The cold ice cream melts into the warm crisp, creating a great mix. Here are some other ideas for serving: - Top with whipped cream for extra richness. - Serve with a side of caramel sauce for dipping. - Pair with a hot drink, like cider or coffee, for a cozy touch. {{image_4}} You can make this dish gluten-free easily. Swap the all-purpose flour for almond flour or oat flour. These flours work well and keep the crisp texture. You can also use certified gluten-free oats for the topping. When mixing the apple ingredients, ensure all items are gluten-free. This way, everyone can enjoy the dish. Want to make this recipe vegan? Replace the butter with coconut oil or vegan butter. Both options will keep it rich and tasty. You can also use maple syrup instead of brown sugar for sweetness. This keeps the dish sweet while adding a hint of flavor. Use non-dairy ice cream for serving if desired, ensuring everyone can enjoy a scoop. If you have nut allergies, just skip the walnuts. You can add sunflower seeds or pumpkin seeds instead. They provide crunch without the nut allergy risk. For the topping, using rolled oats alone offers a nice texture. This way, everyone can enjoy the sweet, caramel goodness without worry. To keep your skillet caramel apple crisp fresh, place it in an airtight container. Use a glass or plastic container with a tight lid. This helps prevent air from getting in and keeps it tasty. It's best to store it in the fridge. Make sure it cools down first before sealing it up. This way, it won’t create steam inside the container. When you want to enjoy your leftovers, you can reheat them in the oven. Preheat the oven to 350°F (175°C). Place the crisp in an oven-safe dish and cover it with foil. Heat for about 15-20 minutes until warm. This method keeps the topping crunchy. You can also use a microwave, but it may soften the crisp. Heat it in short bursts of 30 seconds until hot. To freeze your caramel apple crisp, let it cool completely. Then, place it in a freezer-safe container. You can also wrap it tightly in plastic wrap, then aluminum foil. This helps protect it from freezer burn. It will last for up to three months in the freezer. When you're ready to eat it, move it to the fridge to thaw overnight. After thawing, reheat in the oven for the best texture. Yes, you can use other fruits. Pears, peaches, or berries work well. Just keep the amount the same, about four cups total. Adjust the sugar based on the fruit's sweetness. Skillet caramel apple crisp lasts about three to five days in the fridge. Look for signs like a sour smell or mold. If it smells off or looks strange, toss it out. You can make the apple mixture a day ahead. Store it in the fridge. For the topping, keep it in a separate container. When ready, just bake it fresh. An oven-safe skillet is best. Cast iron or stainless steel works great. Avoid non-stick skillets for high heat. Always check if the handle can go in the oven. This blog post covered how to make a delicious caramel apple crisp from scratch. We explored key ingredients, step-by-step instructions, and handy tips. Whether you're looking for a gluten-free version or ways to serve it, you now have the tools to create this treat at home. Remember, the right apples and topping make all the difference. Enjoy every bite, and share it with friends and family for the best experience. Dive into this recipe, and let your kitchen fill with warm, sweet scents!

Are you ready to impress your family with a warm, sweet dessert? My Skillet Caramel Apple Crisp is simple and delightful! With juicy apples, a crispy topping, and gooey caramel, …

Read more

Categories Desserts

Cozy Keto Chili Hearty Delight for Comfort Food

September 17, 2025 by Chef Remy
- 1 lb ground beef or turkey - 2 cups diced tomatoes - 1 cup chicken broth - 1 medium yellow onion, finely diced - 3 cloves garlic, minced - 1 bell pepper, diced - 1 tablespoon chili powder - 1 teaspoon ground cumin - 1 teaspoon smoked paprika - 1/2 teaspoon dried oregano - 1/2 teaspoon salt - 1/4 teaspoon black pepper - 1 cup zucchini, diced - 1/2 cup chopped green onions - 1/2 cup shredded cheddar cheese (optional) --- The main ingredients in cozy keto chili set the stage for flavor. The ground beef or turkey gives a rich base. Diced tomatoes add sweetness and moisture. Chicken broth brings everything together. Next, we have the additional ingredients. The yellow onion gives a nice, sweet bite. Garlic adds depth and aroma. The bell pepper brings color and crunch. For the seasonings and garnishes, chili powder is key for heat. Ground cumin and smoked paprika add warmth and smokiness. Oregano brings a touch of earthiness. Salt and pepper enhance all the flavors. Finally, we add zucchini for a nutritious touch. Green onions make a fresh garnish, while shredded cheddar cheese adds creaminess. This mix of ingredients makes the chili hearty and satisfying. 1. Start by heating a large pot over medium heat. 2. Add 1 pound of ground beef or turkey. 3. Cook the meat for about 5 to 7 minutes. 4. Use a spatula to break up the meat as it cooks. 5. Once it’s browned and fully cooked, it's ready. 6. Now, add 1 medium yellow onion. 7. Dice the onion finely for even cooking. 8. Sauté for about 3 to 4 minutes until soft and translucent. 1. Next, stir in 3 cloves of minced garlic. 2. Add 1 diced bell pepper for a pop of color. 3. Cook this mixture for another 2 to 3 minutes. 4. Let the bell pepper soften and the garlic become fragrant. 5. Now, add 2 cups of diced tomatoes to the pot. 6. Pour in 1 cup of low-sodium chicken broth. 7. Add 1 tablespoon of chili powder for heat. 8. Mix in 1 teaspoon of ground cumin and 1 teaspoon of smoked paprika. 9. Don't forget 1/2 teaspoon of dried oregano, 1/2 teaspoon of salt, and 1/4 teaspoon of black pepper. 10. Stir well to combine all the flavors. 1. Increase the heat to bring the mixture to a gentle simmer. 2. Once it starts to simmer, reduce the heat to low. 3. Cover the pot and cook for about 20 minutes. 4. This step helps the flavors meld beautifully. 5. After 20 minutes, add in 1 cup of diced zucchini. 6. Stir well and cover the pot again. 7. Let it simmer for another 10 minutes. 8. This will make the zucchini tender but not mushy. 9. Taste your chili and adjust the seasoning if needed. - Adjusting cook times: Keep an eye on your meat. If you use turkey, it cooks faster than beef. Brown it well for great flavor. When you add the zucchini, let it simmer for just 10 minutes. This keeps it tender and bright. - Adding flavor depth: Use smoked paprika for a rich taste. You can also try adding a splash of Worcestershire sauce. This will enhance the umami and give your chili a nice kick. - Perfect pairings with bread or sides: Serve your chili with keto-friendly bread. A slice of almond flour bread works well. You can also pair it with a fresh salad for a light side. - Ideal toppings for extra flavor: Top your chili with chopped green onions and shredded cheddar cheese. For a spicy kick, add jalapeños. Avocado slices also make a creamy touch. - How to store leftovers: Put any leftovers in an airtight container. It stays fresh in the fridge for up to four days. You can also freeze it for longer storage. - Best reheating methods: Reheat on the stove over medium heat. Stir it often to heat evenly. You can also use the microwave. Heat in short bursts and stir in between to avoid hot spots. {{image_4}} You can switch out the ground beef or turkey for chicken. Ground chicken offers a leaner choice. Alternatively, try plant-based options like lentils or beans. These add texture and keep the dish hearty. If you want a different meat, consider using pork or lamb. Each type brings a unique flavor. Feel free to add more low-carb vegetables to your chili. Chopped spinach or kale works great. You can also use mushrooms or cauliflower for added texture. Customizing veggies helps you tailor the dish to your taste. If you love a certain vegetable, toss it in! To adjust the spice level, start with the chili powder. You can add more if you like heat. For a milder chili, reduce the chili powder. You can also add diced jalapeños for heat. If you love flavor, consider adding smoked paprika or cayenne pepper. These ingredients boost taste and warmth. Each serving of Cozy Keto Chili has about 350 calories. Here’s how the macros break down: - Protein: About 30 grams. This comes mainly from the ground beef or turkey. - Fats: Roughly 20 grams. This comes from the meat and optional cheese. - Carbohydrates: Around 8 grams. Most carbs come from the veggies, making it keto-friendly. This chili is filling and fits well in a low-carb diet. Eating low-carb meals, like this chili, has many perks. First, they can help you feel full longer. This means fewer snacks between meals. Low-carb meals can also support weight loss. They may help regulate blood sugar levels, which is great for energy. Cozy Keto Chili uses healthy ingredients like lean meat and fresh veggies. These ingredients provide vitamins and minerals, boosting your health while you enjoy comfort food. Cozy Keto Chili is a great choice for many diets. It is naturally gluten-free, making it safe for those with gluten sensitivities. If you're planning a family meal, this chili works well. Kids love the taste, and you can adjust the heat. You can even add extra toppings like cheese or sour cream for a fun twist. This dish makes a perfect weeknight dinner that everyone can enjoy! Keto-friendly chili fits into a low-carb diet. The keto diet focuses on low carbs and high fats. This chili uses ground beef or turkey, veggies, and spices. It avoids beans and grains, which are high in carbs. By using zucchini and tomatoes, the dish stays low in carbs but high in flavor. Yes, you can freeze Cozy Keto Chili. Freezing helps keep it fresh for later. First, let the chili cool to room temperature. Then, place it in airtight containers or freezer bags. Be sure to remove as much air as possible. Label the bags with the date. You can freeze it for up to three months. When ready to eat, thaw it in the fridge overnight. Reheat it on the stove or in the microwave until hot. To add heat to your chili, try these tips: - Add more chili powder. Start with an extra half tablespoon. - Toss in diced jalapeños or serrano peppers for fresh heat. - Use hot sauce to boost spice levels to your liking. - Stir in a pinch of cayenne pepper for a quick kick. These tweaks can help you find the perfect heat level for your taste. Enjoy your spicy Cozy Keto Chili! This chili recipe combines beef, tomatoes, and tasty spices, creating a comforting dish. You can adjust the ingredients to fit your taste or dietary needs. Pay attention to cooking tips and storage methods for the best experience. With various protein options and veggie add-ins, it’s perfect for everyone. Enjoy this hearty meal that’s not only delicious but nutritious too. Now, get cooking and delight in your own cozy keto chili creation!

Are you craving a warm, satisfying meal that fits your keto lifestyle? Cozy Keto Chili offers hearty flavors without the carbs! In this article, I’ll guide you through simple ingredients, …

Read more

Categories Dinner

Soft Pumpkin Chocolate Chip Cookies Irresistibly Delicious

September 17, 2025 by Chef Remy
- 1 cup canned pumpkin puree - 1/2 cup unsalted butter, softened - 1 cup brown sugar, packed - 1/2 cup granulated sugar - 1 large egg, room temperature - 2 teaspoons pure vanilla extract - 2 cups all-purpose flour - 1 teaspoon baking soda - 1 teaspoon baking powder - 1/2 teaspoon sea salt - 1 teaspoon ground cinnamon - 1/2 teaspoon ground nutmeg - 1/4 teaspoon ground cloves - 1 cup semi-sweet chocolate chips - Substitute chocolate chips with white or dark chocolate - Add nuts or dried fruits for added texture and flavor I love using canned pumpkin puree for these cookies. It gives a rich, warm flavor. The unsalted butter adds a nice creaminess, while the sugars provide sweetness and depth. The egg binds everything together and keeps the cookies soft. The spices are key. Ground cinnamon, nutmeg, and cloves bring out the fall vibes. They make these cookies smell amazing while baking. The semi-sweet chocolate chips add a sweet touch and make them extra delicious. Feel free to switch things up! If you like white chocolate or dark chocolate, go for it. Adding nuts or dried fruits can make the cookies even more fun. - Preheat your oven to 350°F (175°C). - Line your baking sheet with parchment paper. This helps cookies bake well and not stick. - In a large bowl, cream together the softened butter, brown sugar, and granulated sugar. - Mix these for about 2-3 minutes until light and fluffy. - Next, add the pumpkin puree, egg, and vanilla extract. Mix well until smooth. - In another bowl, whisk together the flour, baking soda, baking powder, sea salt, and spices. - This helps spread the flavors evenly. - Slowly fold the dry mix into the wet ingredients. Mix gently, just until combined. A few flour streaks are fine. - Use a cookie scoop or tablespoon to drop rounded dough balls onto the baking sheet. - Make sure to space them about 2 inches apart for even baking. - Bake in the preheated oven for 12-15 minutes. Look for golden edges and soft centers. - Let the cookies rest on the baking sheet for 5 minutes, then move them to a wire rack to cool completely. To make soft pumpkin chocolate chip cookies, avoid overmixing the dough. When you combine the wet and dry ingredients, mix gently. Stop as soon as you see no flour streaks. A few lumps are okay. Overmixing can make cookies tough. Let the cookies cool on the baking sheet for a few minutes. This helps them set slightly and stay soft. After 5 minutes, move them to a wire rack to cool completely. This way, they remain soft and chewy. Chill the cookie dough for 30 minutes before baking. This gives the flavors time to blend and helps the cookies hold their shape. Chilling makes a big difference in taste and texture. Rotate the baking sheet halfway through baking. This helps the cookies bake evenly. Your cookies will come out golden all around, instead of brown on one side. Serve your warm cookies with a light dusting of powdered sugar or cinnamon. This adds a nice touch and enhances the fall flavors. Pair the cookies with seasonal drinks. A warm apple cider or a spiced latte makes for a festive treat. Your guests will love this cozy combination! {{image_4}} You can easily make these cookies gluten-free. Simply substitute the all-purpose flour with a gluten-free flour blend. Look for a blend that has a mix of flours and starches. This way, you can still enjoy the soft texture and rich flavor. Just make sure to follow the same measurements. If you want a vegan version, it’s super simple. Use vegan butter instead of regular butter. For the egg, replace it with flax eggs. To make one flax egg, mix one tablespoon of ground flaxseed with two and a half tablespoons of water. Let it sit for five minutes until it thickens. This will help bind your cookies without any animal products. Feel free to get creative with flavors! You can add different spices like ginger or cardamom. These spices will give your cookies a unique twist. Also, try using various types of chocolate chips or flavored chips. Dark chocolate, white chocolate, or even butterscotch chips can add a fun touch. The options are endless! Keep your soft pumpkin chocolate chip cookies in an airtight container. This keeps them fresh and moist. Store them at room temperature. If you follow this tip, your cookies will stay yummy for several days. You can freeze cookie dough balls. This makes baking quick and easy later. Just scoop the dough and place the balls on a tray. Freeze them until solid, then transfer to a freezer bag. For baked cookies, let them cool completely. Store them in a freezer-safe container for long-term preservation. This way, you can enjoy them anytime! When you want a warm cookie, use the microwave for a few seconds. This warms them up nicely. You can also restore freshness in the oven. Set it to a low temperature and heat for a few minutes. This keeps your cookies soft and tasty! Yes, you can use fresh pumpkin. Start by cooking the pumpkin until it's soft. Then, scoop out the flesh and puree it in a blender. Aim for a smooth texture similar to canned puree. You may need to drain excess water to avoid a soggy dough. Fresh pumpkin brings a bright flavor and a lovely color to your cookies. Look for a few signs to know when your cookies are ready. The edges will turn lightly golden. The centers should look soft and slightly puffy. You can gently press a cookie with your finger. If it springs back, they are done. Remember, cookies will firm up as they cool on the baking sheet. If your cookies spread too much, try these tips. First, chill the dough for at least 30 minutes before baking. This helps the butter firm up. Also, ensure that you measure your flour correctly; too little flour can cause spreading. Lastly, check your oven temperature with a thermometer. An oven that runs hot can lead to flat cookies. Yes, you can prepare the dough ahead of time. After mixing, wrap the dough tightly in plastic wrap. Store it in the fridge for up to three days. If you want to keep it longer, freeze the dough for up to three months. When ready to bake, thaw in the fridge overnight. Then, scoop and bake as usual. These cookies combine simple ingredients for a tasty treat. We explored the essential and optional elements needed, including various flavor boosts. I walked you through the easy steps to bake perfect cookies and shared tips for the right texture. Whether you prefer gluten-free options or vegan adaptations, there’s something for everyone. Keeping cookies fresh is easy with proper storage methods. Enjoy creating these delicious cookies, and remember to have fun while baking!

Are you ready for a tasty fall treat? These soft pumpkin chocolate chip cookies are not only easy to make, but they also bring the cozy flavors of the season …

Read more

Categories Desserts

Ultra Moist Banana Nut Bread Simple and Flavorful Recipe

September 17, 2025 by Chef Remy
For ultra moist banana nut bread, gather these key ingredients: - 3 ripe bananas, thoroughly mashed - 1/2 cup coconut oil, melted and slightly cooled - 1 cup packed brown sugar - 2 large eggs, at room temperature - 1 teaspoon pure vanilla extract - 1 teaspoon baking soda - 1/4 teaspoon fine sea salt - 1 1/2 cups all-purpose flour - 1/2 cup walnuts or pecans, roughly chopped - 1/4 teaspoon ground cinnamon (optional, but recommended) - 1/4 cup plain Greek yogurt These ingredients work together to create a rich, moist loaf. Ripe bananas are the star of this recipe. They add natural sweetness and moisture. Choose bananas with brown spots on the peel. These spots mean the sugars have developed fully. This ripeness makes the bread tender and flavorful. Mashed bananas blend easily into the batter. They give the bread that ultra moist texture we all love. Nuts add crunch and flavor to banana nut bread. I recommend using walnuts or pecans. Walnuts bring a nice earthy taste, while pecans offer a sweeter profile. Both nuts work well in the batter. Chop them roughly to ensure even distribution. This way, every slice has a bite of nutty goodness. You can experiment with other nuts too, but stick to these for the best results. First, set your oven to 350°F (175°C). This helps the banana nut bread bake evenly. Next, take a 9x5-inch loaf pan. Grease it with butter or coconut oil. You can also line it with parchment paper. This makes it easy to remove the bread later. In a large bowl, mash 3 ripe bananas until smooth. Add 1/2 cup of melted coconut oil. Mix these together until they are well blended. This step is key to keeping the bread moist. Now, slowly add 1 cup of packed brown sugar. Stir until it's fully mixed in. Next, add 2 large eggs, one at a time. Mix well after each egg. Finally, stir in 1 teaspoon of pure vanilla extract and 1/4 cup of plain Greek yogurt. This adds creaminess and moisture. In another bowl, whisk together 1 1/2 cups of all-purpose flour, 1 teaspoon of baking soda, 1/4 teaspoon of fine sea salt, and 1/4 teaspoon of ground cinnamon if you choose to use it. Make sure these dry ingredients are mixed evenly. Now, gently add the dry mix to the wet ingredients. Use a spatula or wooden spoon to combine. Stir just until mixed. Overmixing can make the bread tough. Pour the batter into the prepared loaf pan. Smooth the top with a spatula to make it even. Place the pan in the oven. Bake for 60 to 70 minutes. To check if it’s done, insert a toothpick into the center. It should come out clean or have a few moist crumbs. Once baked, let the bread cool in the pan for 10 minutes. Then transfer it to a wire rack to cool completely before slicing. To make your banana bread ultra moist, start with ripe bananas. The riper, the better! They add natural sweetness and moisture. Use three bananas and mash them well. Mixing in melted coconut oil helps too. It keeps the bread soft. Avoid overmixing when combining wet and dry ingredients. This keeps the bread tender and fluffy. Adding Greek yogurt to your batter boosts moisture. It also makes the bread richer. Use 1/4 cup of plain Greek yogurt. Mix it in with the wet ingredients. This small step makes a big difference in taste and texture. You will love the creaminess it brings to every bite. One common mistake is using under-ripe bananas. They do not provide enough moisture or sweetness. Another mistake is overmixing the batter. This can make your bread tough. Be sure to fold in the nuts gently. Lastly, remember to check for doneness. Insert a toothpick in the center. It should come out clean or with a few moist crumbs. These tips will help you bake the perfect banana nut bread! {{image_4}} To make gluten-free banana nut bread, swap out the all-purpose flour. Use a gluten-free flour blend instead. Look for one that contains xanthan gum. This helps give the bread structure. You can find many blends at your local store. For a vegan version, replace the eggs with flaxseed meal. Mix 1 tablespoon of flaxseed meal with 2.5 tablespoons of water. Let it sit for five minutes to thicken. Also, swap the Greek yogurt for a plant-based yogurt. This keeps the bread moist while being dairy-free. You can spice up your banana nut bread in many ways. Adding 1/4 teaspoon of nutmeg works well with cinnamon. You can also fold in chocolate chips or dried fruit for a twist. Try mixing in shredded coconut for a tropical touch. Each option adds unique flavor and texture. To keep your banana nut bread fresh, store it at room temperature. Wrap it tightly in plastic wrap or place it in an airtight container. This helps prevent it from drying out. If you plan to eat it within a few days, this method works great. Just remember to keep it away from direct sunlight or heat sources. Freezing banana nut bread is easy. First, let the bread cool completely. Then, slice it into individual pieces. Wrap each slice in plastic wrap. After that, place the wrapped slices in a freezer bag. Squeeze out the air before sealing the bag. This keeps your bread fresh for up to three months. When ready to enjoy, just thaw a slice at room temperature or toast it directly from the freezer. To reheat your banana nut bread, use an oven or toaster. Preheat the oven to 350°F (175°C). Place the bread or slices on a baking sheet. Heat for about 10 to 15 minutes. If using a toaster, toast each slice for a few minutes until warm. This helps restore the moist texture and delicious flavor. Enjoy it warm with a pat of butter or a drizzle of honey! Yes, you can use other oils. You can try vegetable oil or canola oil. They will work fine. You can also use melted butter for a rich flavor. Just remember, different oils can change the taste slightly. To ripen bananas fast, place them in a brown paper bag. This traps the ethylene gas they emit. It speeds up the ripening process. You can also add an apple to the bag for even faster results. If you're in a rush, you can bake unpeeled bananas at 300°F (150°C) for about 15-20 minutes. To check if your banana nut bread is ready, insert a toothpick into the center. If it comes out clean or with a few moist crumbs, it is done. If it has wet batter, bake it a bit longer. Don’t rush this step; it’s key for great bread! Yes, you can make banana nut bread without nuts. Just skip the nuts in the recipe. You can add chocolate chips or dried fruit instead. This keeps the bread moist and tasty while adding a fun twist! This blog focused on making the best banana nut bread. We covered key ingredients, like ripe bananas and nuts, and why they matter. I shared step-by-step instructions to ensure your bread is moist and delicious. You learned simple tips to avoid common mistakes and variations for special diets. In the end, treat this banana nut bread as your canvas. Let your creativity shine with flavors and mix-ins. You’ll enjoy tasty results every time you bake.

Welcome to my kitchen, where I’ll show you how to make ultra moist banana nut bread! This simple and flavorful recipe is perfect for breakfast or a snack. With ripe …

Read more

Categories Desserts
Older posts
Newer posts
← Previous Page1 … Page24 Page25 Page26 … Page130 Next →

ROASTED RECIPES

Where bold flavors meet everyday meals. Warm, vibrant, and made to share. 🔥🥗🍴

PAGES

Home About Contact Privacy Policy Terms & Conditions Cookie Policy GDPR Policy Copyright Policy Disclaimer

CATEGORIES

Appetizers Desserts Salads Breakfast Dinner

Contact

  • Pinterest
  • Mail
Copyright © 2025 Roasted Flavors. All rights reserved.