Skip to content
Roasted Flavors
  • Home
  • Appetizers
  • Desserts
  • Salads
  • Breakfast
  • Dinner
  • Privacy Policy
  • Contact
  • About

Chef Remy

High-Protein Eggnog Cottage Cheese Smoothie Recipe

September 26, 2025 by Chef Remy
Here is a list of what you need for the High-Protein Eggnog Cottage Cheese Smoothie: - 1 cup cottage cheese - 1 cup unsweetened almond milk - 1 medium ripe banana - 1/2 teaspoon pure vanilla extract - 1/2 teaspoon ground nutmeg (plus extra for garnish) - 1/4 teaspoon ground cinnamon (plus extra for garnish) - 1 tablespoon honey or maple syrup (optional) - Ice cubes (optional) These ingredients come together to make a smooth and creamy drink. The cottage cheese adds protein, while the banana gives sweetness. Almond milk keeps it light and dairy-free. You can add honey or maple syrup if you want more sweetness. The spices, like nutmeg and cinnamon, create that cozy, holiday feel. Enjoy this smoothie as a quick breakfast or a tasty snack. - Start by placing 1 cup of cottage cheese into your blender. - Add 1 cup of unsweetened almond milk. - Blend on medium speed until the mixture is smooth and creamy. - Peel and add 1 medium ripe banana to the blender. - Pour in 1/2 teaspoon of pure vanilla extract. - Sprinkle in 1/2 teaspoon of ground nutmeg and 1/4 teaspoon of ground cinnamon. - For sweetness, add 1 tablespoon of honey or maple syrup if you like. - Increase the speed to high and blend until everything is well mixed. - If you want a thicker smoothie, add a handful of ice cubes. - Blend again until the ice is crushed and mixed in well. - Taste the smoothie and adjust sweetness or spices if needed. - Pour it into a glass and garnish with a sprinkle of nutmeg and cinnamon. To make your smoothie thicker, add ice cubes. Ice gives it a frosty feel. Blend the ice until it is crushed well. If you want a creamier texture, blend on high speed. This helps mix everything smoothly. You can also blend longer for a whipped consistency. You can change the spices to fit your taste. If you love nutmeg, add more. If cinnamon is your favorite, feel free to increase it too. For sweetness, use honey or maple syrup. Start with a little, then taste it. Add more if you want it sweeter. To make your smoothie look nice, garnish it with nutmeg and cinnamon. Just sprinkle a little on top for a festive touch. You can serve it in a tall glass for an elegant look. Add a straw or a fun drink stirrer to make it more inviting. {{image_4}} You can easily switch cottage cheese for Greek yogurt. Greek yogurt gives a creamy texture and adds protein. If you want a dairy-free option, try different plant-based milk. Almond, oat, or soy milk work well. Each type adds its unique flavor to the smoothie. Want to mix things up? Incorporate other fruits like strawberries or cherries. They add freshness and a fun twist. You can also add protein powder for extra energy. This is great for after workouts or busy mornings. Just blend it in with the other ingredients. For fall, make a pumpkin spice version. Add a teaspoon of pumpkin puree and a pinch of pumpkin spice. It gives a warm, cozy flavor. In winter, try mint or peppermint changes. A drop of peppermint extract adds a festive touch. It’s a fun way to celebrate the season! Store your smoothie in the fridge. Use a sealed container to keep it fresh. It’s best to drink it within 1 to 2 days. If you have leftovers, pour the smoothie into a jar or bottle. This helps prevent spills and keeps it cold. You might wonder if you can reheat a smoothie. It’s not the best idea. Smoothies taste best cold and refreshing. If you want it warm, try blending it again. This can smooth out any changes in texture. You can keep your smoothie for up to 48 hours in the fridge. After that, it may lose flavor and texture. Signs of spoilage include a sour smell or off appearance. If it looks or smells bad, don’t drink it. Yes, you can use flavored almond milk. Flavored options add extra sweetness and taste. However, it may change the overall flavor of the smoothie. If you prefer a sweet drink, flavored almond milk works well. If you want a more classic taste, stick to unsweetened. You can make this smoothie ahead of time. Just blend the ingredients and store it in the fridge. It’s best to drink it within 24 hours for freshness. If you want it to last longer, freeze the smoothie in portions. Thaw it overnight in the fridge before drinking. Cottage cheese is high in protein and calcium. It helps build strong bones and muscles. Eggnog, especially homemade, can provide vitamins like A and D. Using low-fat options can make it healthier. Together, they create a filling drink with added nutrition. To make this smoothie vegan, swap the cottage cheese for vegan yogurt. You can also replace the honey with maple syrup or agave syrup. Use plant-based milk like soy or oat milk. This way, you keep the creamy texture while staying plant-based. Yes, this smoothie is great for post-workout recovery. It has protein from cottage cheese, which helps repair muscles. The banana adds carbs for energy. Together, they make a perfect blend to help you recover and feel great after your workout. This smoothie combines simple ingredients for a tasty treat. We blend cottage cheese, almond milk, and banana for a creamy base. You can spice it up with nutmeg, cinnamon, or swap ingredients for fun twists. Don’t forget to store any leftovers right. This recipe is perfect for breakfast or a snack. Enjoy experimenting with flavors and enjoy a nutritious drink!

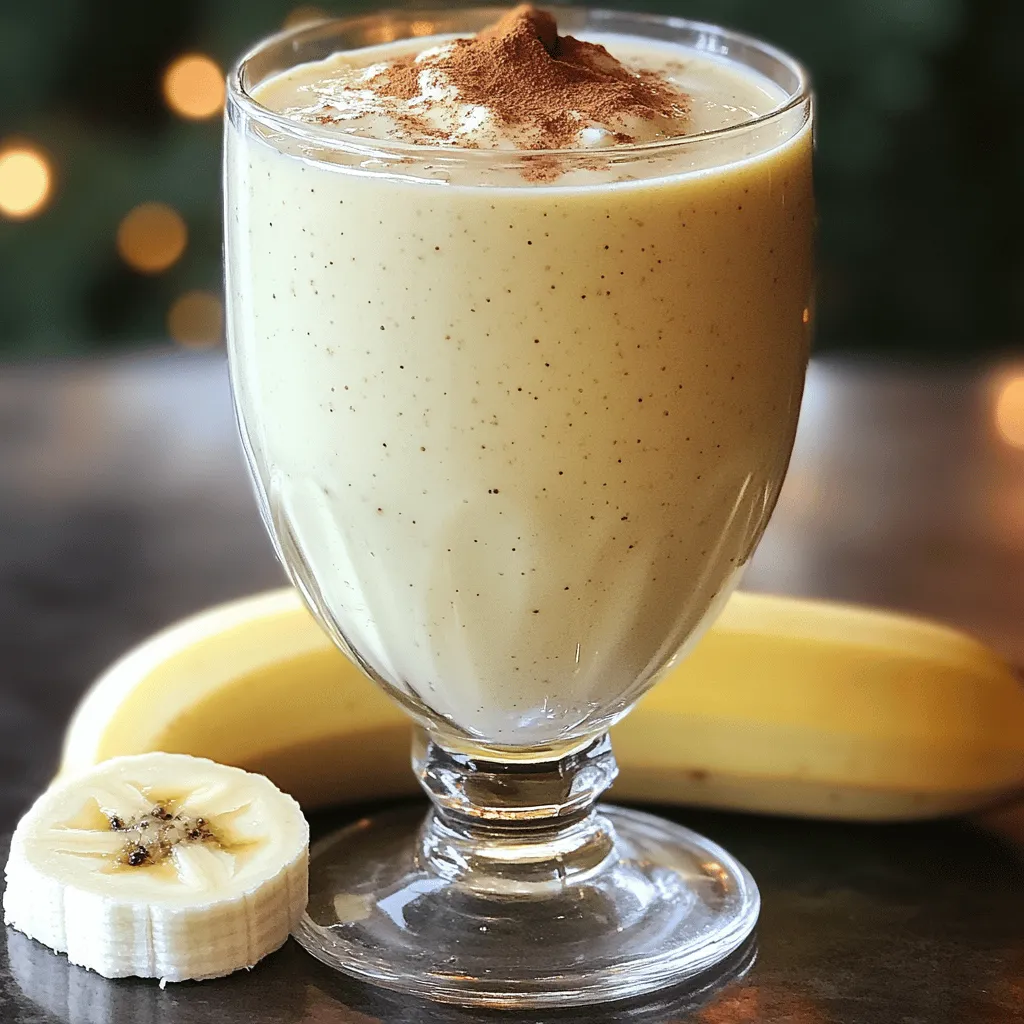
Are you ready to boost your holiday spirit and your protein intake? This High-Protein Eggnog Cottage Cheese Smoothie is a creamy, festive treat that’s quick to make. Packed with healthy …

Read more

Categories Breakfast

Sheet-Pan Honey Mustard Chicken with Roasted Veggies Delight

September 26, 2025 by Chef Remy
- 4 boneless, skinless chicken thighs - 1/4 cup honey - 1/4 cup Dijon mustard - 2 tablespoons olive oil - 1 teaspoon garlic powder - 1 teaspoon paprika - Salt and pepper, to taste I use boneless, skinless chicken thighs for this recipe. They stay juicy and tender. The honey and Dijon mustard create a tasty marinade that adds flavor. Olive oil helps everything cook nicely. Garlic powder and paprika give it extra depth. Adding salt and pepper brings out the best in every bite. - 2 cups broccoli florets - 1 cup baby carrots, halved - 1 red bell pepper, sliced - 1 yellow zucchini, sliced I love using fresh veggies for this dish. Broccoli florets add crunch and nutrition. Baby carrots bring sweetness and color. Red bell pepper gives a vibrant look and taste. Yellow zucchini adds a lovely texture and mild flavor. Together, they make a colorful and healthy side. - Fresh parsley, chopped Chopped fresh parsley is my favorite garnish. It adds a pop of green and freshness. It also makes the dish look more appealing on the plate. Plus, it enhances the overall flavor with its light taste. - Preheat the oven to 425°F (220°C). - Gather all ingredients and kitchen tools. You will need a large sheet pan, mixing bowl, whisk, and spatula. - In a small mixing bowl, combine: - 1/4 cup honey - 1/4 cup Dijon mustard - 2 tablespoons olive oil - 1 teaspoon garlic powder - 1 teaspoon paprika - Salt and pepper, to taste Whisk these ingredients together until smooth. This sauce adds a sweet and tangy kick to your chicken. - Place 4 boneless, skinless chicken thighs in a large bowl. - Pour half of the honey mustard mixture over the chicken. - Use your hands or a spatula to coat each piece evenly. This step infuses the chicken with flavor and keeps it juicy during cooking. - On a large sheet pan, arrange: - 2 cups broccoli florets - 1 cup baby carrots, halved - 1 red bell pepper, sliced - 1 yellow zucchini, sliced Make sure the veggies are in a single layer for even roasting. Drizzle a little olive oil over them and sprinkle with salt and pepper. Toss gently to coat. - Create space in the center of the sheet pan. - Lay the marinated chicken thighs flat in this space. - Brush the tops of the chicken with the remaining honey mustard mixture. Now, place the sheet pan in the preheated oven. Roast for 20-25 minutes. Use a meat thermometer to check for doneness. The chicken should reach an internal temperature of 165°F (75°C). This method ensures the chicken cooks perfectly with crispy veggies alongside. To ensure even roasting of vegetables, cut them all to similar sizes. This helps them cook at the same rate. Spread them out in a single layer on the sheet pan. If they are crowded, they may steam instead of roast, which can lead to soggy veggies. Resting the chicken before serving is key. After taking it out of the oven, let it sit for five minutes. This lets the juices settle back into the meat. You’ll get a juicier and more flavorful chicken. For a family-style dining experience, serve directly on the sheet pan. This looks rustic and inviting. If you prefer, plate the chicken and veggies separately. Drizzle with extra honey mustard sauce for added flavor and flair. Pair this dish with a light salad or crusty bread. A chilled white wine or sparkling water enhances the meal’s freshness and balance. To spice things up, add a pinch of cayenne pepper to the marinade. This will give the dish a nice kick. You can also try using different mustards, like whole grain or spicy brown, for varied flavors. For a twist, mix in some fresh herbs like thyme or rosemary. These can add a lovely aroma and depth to your honey mustard chicken. {{image_4}} You can switch the chicken thighs for several other proteins. Chicken breast works well if you prefer leaner meat. It cooks faster, so check it at 20 minutes. For a plant-based option, use firm tofu. Press it to remove water, then marinate just like the chicken. Fish is another great choice. Salmon or cod will soak up the honey mustard flavor nicely. Just be careful not to overcook it. Using seasonal veggies makes this dish even better. In spring, try asparagus or snap peas. In summer, zucchini and cherry tomatoes shine bright. Autumn brings squash or Brussels sprouts. Winter is perfect for root veggies like sweet potatoes or parsnips. Use what you find fresh at your local market. This keeps your meal exciting and tasty. If you want to mix things up, try different marinades. Teriyaki adds a sweet and savory twist. Just swap out the honey and mustard for teriyaki sauce. BBQ sauce can also bring a smoky flavor. Brush it on the chicken and veggies for a fun change. Experimenting with flavors keeps your meals fresh and enjoyable. To store leftovers, let the dish cool first. Place the chicken and veggies in an airtight container. Keep it in the fridge for up to three days. Make sure the lid is secure. This keeps the flavors fresh and safe to eat. For reheating, use the oven for best results. Preheat your oven to 350°F (175°C). Place the chicken and veggies on a baking sheet. Heat them for about 15 minutes. Check that the chicken is hot all the way through. You can also use a microwave, but the oven keeps the texture better. If you want to freeze the dish, let it cool completely. Pack the chicken and veggies in freezer-safe bags. Remove as much air as you can before sealing. This helps prevent freezer burn. You can keep it frozen for up to three months. To thaw, place it in the fridge overnight before reheating. Yes, you can use chicken breasts. They will cook faster than thighs. Adjust the cooking time to about 15-20 minutes. Always check for an internal temperature of 165°F (75°C) to ensure they are safe to eat. You can use many veggies! Here are some great options: - Brussels sprouts - Cauliflower - Asparagus - Sweet potatoes - Bell peppers of any color These vegetables add flavor and color to your dish. You can store leftovers in the fridge for up to 3 days. Keep them in an airtight container. Make sure the chicken and veggies cool before sealing. Absolutely! You can mix the sauce a day before. Store it in the fridge. Just give it a good stir before using it. Yes, you can use yellow mustard or whole grain mustard. Each will change the flavor slightly. Experiment and find what you like best! This blog covered a tasty, easy dish with chicken thighs and fresh veggies. You learned how to make a sweet and tangy honey mustard sauce. We also explored cooking tips, serving ideas, and different variations to try. In the end, this recipe is flexible and fun. You can adapt it to fit your taste. Enjoy experimenting with flavors and ingredients. Happy cooking!

Ready for a tasty meal that’s quick and easy? This *Sheet-Pan Honey Mustard Chicken with Roasted Veggies Delight* brings flavor to your table without the fuss. Imagine juicy, marinated chicken …

Read more

Categories Dinner

No-Bake Gingerbread Cookie Dough Bars Delight

September 26, 2025 by Chef Remy
- 1 cup almond flour - 1/2 cup rolled oats - 1/4 cup coconut sugar - 1/4 teaspoon ground ginger - 1/4 teaspoon ground cinnamon - 1/4 teaspoon nutmeg - 1/4 teaspoon salt - 1/4 cup pure maple syrup - 1/4 cup creamy almond butter (or your choice of nut butter) - 1/2 teaspoon pure vanilla extract - 1/4 cup mini dark chocolate chips (optional) These ingredients come together to create a tasty treat. Each item plays a key role. Almond flour gives a nutty base. Rolled oats add texture and fiber. Coconut sugar is a sweet touch. The spices—ginger, cinnamon, and nutmeg—bring warmth and flavor. Salt balances the sweetness perfectly. Maple syrup adds moisture and sweetness. Almond butter helps bind the mixture. Vanilla extract adds depth to the flavor. The optional chocolate chips make it even better. You can mix and match to suit your taste; feel free to swap out nut butter or add other spices. Collect these ingredients before you start. They are simple to find and work with. This recipe makes it easy to enjoy a no-bake dessert that feels special. Plus, it’s quick to prepare, so you can enjoy your bars in no time! First, grab a big bowl. Combine 1 cup of almond flour, 1/2 cup of rolled oats, and 1/4 cup of coconut sugar. Next, add 1/4 teaspoon of ground ginger, 1/4 teaspoon of ground cinnamon, 1/4 teaspoon of nutmeg, and 1/4 teaspoon of salt. Use a whisk or fork to blend them well. This mix gives our bars a warm, spiced flavor. Now, let’s add the wet stuff. Add 1/4 cup of creamy almond butter and 1/4 cup of pure maple syrup. Don’t forget 1/2 teaspoon of pure vanilla extract! Stir this mixture with a spatula until it forms a sticky dough. It should feel a bit moist but not too wet. If you like chocolate, fold in 1/4 cup of mini dark chocolate chips now. Make sure they spread evenly throughout the dough. This will add a nice touch of sweetness and richness to each bite. Take an 8x8 inch baking dish and line it with parchment paper. Leave some paper hanging over the edges. This will help you lift the bars out later, making it easy to cut them. Using your hands or a spatula, press the cookie dough mixture firmly into the lined dish. Make sure it’s even and tightly packed. This step is key for the bars to hold their shape. Then, pop the dish into the fridge for about an hour. This chilling time helps the bars firm up. Once chilled, lift the bars out using the overhanging parchment paper. Place them on a cutting board. Cut them into squares or rectangles based on how big you want each piece. Enjoy your no-bake gingerbread cookie dough bars cold or at room temperature. They are a sweet treat perfect for any time! To get the right texture for your no-bake gingerbread cookie dough bars, follow these steps: - Use almond flour for a fine, smooth base. - Mix the dry ingredients well to avoid clumps. - The dough should be slightly sticky but easy to handle. - If the dough is too dry, add a touch more maple syrup or almond butter. - Press the mixture firmly into the dish for a solid layer. You can easily adapt this recipe for different diets. Here are some ideas: - For nut-free bars, swap almond flour with sunflower seed flour. - Use sunflower butter or tahini instead of almond butter. - To make it vegan, ensure your chocolate chips are dairy-free. - You can also replace maple syrup with agave syrup for a vegan option. Want to add more flavor? Consider these options: - Add a pinch of ground cloves for deeper warmth. - Mix in some dried fruits like raisins or cranberries for sweetness. - Try adding a splash of molasses for a richer taste. - Experiment with different spices, such as allspice or cardamom, for a unique twist. {{image_4}} You can switch up the chocolate chips in these bars for a fun twist. Try using milk chocolate chips for a sweeter taste. Dark chocolate brings a rich flavor, while white chocolate adds creaminess. You can even use flavored chips, like mint or peanut butter, for a unique touch. Just remember to fold them in gently to distribute evenly. Adding nuts or seeds can boost the flavor and texture of your bars. Chopped walnuts or pecans add crunch and healthy fats. Sunflower seeds or pumpkin seeds give a nice bite and are great for extra nutrition. To keep it fun, try mixing different nuts or seeds. Just make sure to chop larger pieces to keep the bars easy to eat. You can change the spice mix to match the seasons. In fall, add some cloves or allspice for warmth. Spring brings a chance to use lemon zest or cardamom for a fresh taste. In summer, think about adding dried fruits like cranberries or cherries for sweetness. Each change gives these bars a new life and keeps them exciting! To keep your no-bake gingerbread cookie dough bars fresh, store them in an airtight container. You can place parchment paper between layers to avoid sticking. This helps maintain texture and flavor. Keep them in the fridge for quick access to a tasty snack. If you want to save some bars for later, freezing is a great choice! First, cut the bars into pieces. Then, wrap each piece in plastic wrap. Place the wrapped bars into a freezer-safe bag or container. To thaw, just take out a bar and let it sit at room temperature for about 30 minutes. You'll enjoy a treat that tastes just as good! In the fridge, these cookie dough bars last about one week. If you freeze them, they can stay fresh for up to three months. Just remember to label the container with the date. This way, you can enjoy them at your leisure! Yes, you can! For gluten-free options, try oat flour or coconut flour. These flours work well in this recipe. Oat flour gives a nice texture and flavor. Coconut flour is more absorbent, so use less. Always check the measurements when swapping flours. To make these bars vegan, swap the honey or maple syrup for agave syrup. You can also use a nut butter made from seeds. Ensure that the chocolate chips are dairy-free. These simple changes keep the flavors while making it vegan-friendly. If you need a substitute for coconut sugar, try brown sugar or maple sugar. Both give a similar sweetness. You can also use white sugar, but the flavor will change a bit. Keep in mind that some sugars may affect the final taste. Serve these bars chilled or at room temperature. You can cut them into squares or rectangles for easy sharing. Pair with a warm drink, like tea or coffee. For a fun twist, top with a sprinkle of cinnamon or a drizzle of chocolate. Enjoy! In this post, we explored a simple recipe for healthy bars. We listed key ingredients, step-by-step instructions, and tips for perfect texture. I shared ideas for variations, storage tips, and answers to common questions. These bars are easy to make and customize. Whether you want a vegan treat or a nut-free option, there’s a choice for you. Enjoy baking these bars and make them your own!

Get ready to enjoy a tasty treat that requires no baking! My No-Bake Gingerbread Cookie Dough Bars are a perfect mix of flavors and textures. Made with simple ingredients like …

Read more

Categories Desserts

Air Fryer Peppermint Mocha Donut Holes Delight

September 26, 2025 by Chef Remy
To create Air Fryer Peppermint Mocha Donut Holes, gather the following ingredients: - 1 cup all-purpose flour - 1/4 cup granulated sugar - 1/2 teaspoon baking powder - 1/4 teaspoon baking soda - 1/4 teaspoon salt - 1/2 teaspoon ground cinnamon - 1/4 cup unsweetened cocoa powder - 1/2 cup buttermilk - 1 large egg - 2 tablespoons melted butter - 1/2 teaspoon peppermint extract - 1/2 cup powdered sugar (for coating) - Crushed peppermint candies (for garnish) For those with dietary restrictions, here are some alternatives: - Gluten-Free: Use gluten-free all-purpose flour instead of regular flour. - Dairy-Free: Substitute buttermilk with almond milk mixed with a splash of vinegar. - Vegan: Replace the egg with a flax egg (1 tablespoon flaxseed meal + 2.5 tablespoons water). 1. First, take a large bowl. Add the following dry ingredients: - 1 cup all-purpose flour - 1/4 cup granulated sugar - 1/2 teaspoon baking powder - 1/4 teaspoon baking soda - 1/4 teaspoon salt - 1/2 teaspoon ground cinnamon - 1/4 cup unsweetened cocoa powder Whisk them well until mixed. 2. In a separate bowl, mix together these wet ingredients: - 1/2 cup buttermilk - 1 large egg - 2 tablespoons melted butter - 1/2 teaspoon peppermint extract Whisk until smooth. 3. Gradually add the wet mix to the dry mix. Stir gently until just combined. Don’t overmix; this keeps the donut holes light and fluffy. 4. Preheat your air fryer to 350°F (175°C). This helps the donut holes cook evenly. 5. Lightly coat the air fryer basket with cooking spray. This step prevents the donut holes from sticking. 6. Use a small cookie scoop or your hands to form the dough into small balls, about 1 tablespoon each. Place them in the basket, ensuring they are spaced apart. 7. Air fry the donut holes for about 5-6 minutes. They should puff up. Check for doneness by inserting a toothpick; it should come out clean. 8. When done, remove the donut holes carefully. Let them cool for a few minutes. 9. On a shallow plate, pour in 1/2 cup powdered sugar. Roll each warm donut hole in the powdered sugar. This creates a sweet and snowy coating. 10. To finish, sprinkle crushed peppermint candies over the top. This adds color and flavor for a festive touch. - Overmixing the batter: This can lead to tough donut holes. Mix just until combined. - Incorrect air fryer settings: Always preheat the air fryer. This ensures even cooking. - Best techniques for rolling the dough: Use your hands or a cookie scoop. Aim for 1 tablespoon size for even cooking. - Achieving ideal texture and flavor: Keep the dough light by not overmixing. The right amount of air will keep them fluffy. - Suggestions for additional toppings: Try drizzling chocolate or adding sprinkles. A touch of caramel can also add a nice twist. - Using different extracts for variation: Swap peppermint for vanilla or almond for a different taste. Experiment to find your favorite! {{image_4}} You can change the flavors of your donut holes easily. For a chocolate mocha version, add more cocoa powder. This gives your donut holes a richer taste and a deeper color. You can also use coffee in place of buttermilk for an extra mocha kick. If you want a lighter option, try the vanilla bean peppermint variation. Just swap the cocoa powder for vanilla extract. This creates a sweet and creamy donut hole that tastes great. The peppermint extract will still shine through. Need gluten-free options? Use a gluten-free flour blend. It works well in this recipe and keeps the texture light. Make sure your baking powder is also gluten-free. For a vegan version, replace the egg with a flax egg. To make a flax egg, mix 1 tablespoon of ground flaxseed with 3 tablespoons of water. Let it sit for five minutes to thicken. You can also use almond or soy milk instead of buttermilk. You can make these donut holes extra festive. Adding spices like nutmeg or ginger can give them a holiday flair. Just a pinch will do, and it makes them smell amazing. Want to make them fun for a party? Use colorful sprinkles on top of the powdered sugar. This simple touch brightens them up for any occasion. You can match the sprinkles to the theme of your event. To keep your donut holes fresh, store them in an airtight container. Place a paper towel in the container to absorb any moisture. This helps keep them fluffy. You can refrigerate them for up to three days. If you want to enjoy them later, freezing is a great option. When it's time to enjoy your donut holes again, you can reheat them in the air fryer. Set it to 300°F (150°C) and warm them for about 3 minutes. This method keeps them crisp. Avoid microwaving them, as this can make them soggy. Always check if they are warm all the way through. To freeze your donut holes, place them in a single layer on a baking sheet. Freeze them for about an hour until firm. Then, transfer them to a freezer bag. They can last for up to three months in the freezer. When you want to eat them, thaw them overnight in the fridge. Reheat them in the air fryer for the best texture. Air Fryer Peppermint Mocha Donut Holes stay fresh for about 2 days at room temperature. Store them in an airtight container, away from heat. If you keep them in the fridge, they can last up to a week. Just remember to take them out and let them warm up before enjoying! Yes, you can bake these donut holes in the oven! Preheat your oven to 350°F (175°C). Place the donut holes on a lined baking sheet, spaced apart. Bake for about 10-12 minutes, or until a toothpick comes out clean. The texture will be slightly different, but still delicious! If you don’t have buttermilk, don’t worry! You can easily make a substitute. Combine 1/2 cup of milk with 1/2 tablespoon of vinegar or lemon juice. Let it sit for about 5 minutes to thicken. You can also use yogurt or sour cream, mixed with a bit of water to thin it out. Absolutely! You can switch peppermint extract for vanilla or almond extract. For a twist, try using orange or hazelnut extract. Each will give your donut holes a unique flavor that still pairs well with chocolate and spices. Feel free to experiment! You learned how to make tasty Air Fryer Peppermint Mocha Donut Holes. We covered ingredients, detailed steps, and useful tips for perfecting the recipe. Remember, avoid overmixing your batter for the best texture. Experiment with flavors and toppings to make these treats your own. Store any extras properly to keep them fresh. Enjoy these delightful donut holes for any occasion! They are easy to make and full of flavor. Try them out, and share your favorite variations!

Looking for a festive treat that combines the joy of donuts and peppermint mocha? Try my Air Fryer Peppermint Mocha Donut Holes! With simple ingredients and a quick cooking process, …

Read more

Categories Desserts

Creamy Garlic Butter Salmon with Spinach and Orzo Dish

September 26, 2025 by Chef Remy
- 4 salmon fillets, skin-on - 2 cups fresh spinach, washed and trimmed - 1 cup orzo pasta - 4 tablespoons unsalted butter, divided - 4 cloves garlic, minced - 1 cup heavy cream - 1 cup chicken or vegetable broth - 1 tablespoon fresh lemon juice - Salt and freshly ground black pepper, to taste - Fresh parsley, finely chopped (for garnish) Gathering the right ingredients is key to making this dish shine. The salmon fillets bring a rich flavor and healthy fats. The fresh spinach adds color and nutrients. Orzo pasta gives a nice texture, soaking up the creamy sauce. For the cooking essentials, unsalted butter is best for control over saltiness. Garlic adds depth to the sauce. Heavy cream turns the sauce rich and velvety, while broth boosts the overall flavor. Lastly, lemon juice brightens everything with its acidity. When it comes to seasoning, salt and black pepper enhance the natural flavors. Fresh parsley not only looks great but also adds a fresh taste. With these ingredients ready, you are set for a delicious meal! - Bring a large pot of salted water to a boil. - Add the orzo and cook it until al dente, about 8-10 minutes. - Drain the orzo in a colander and set it aside. - Heat a large skillet over medium heat and add 2 tablespoons of butter. - Season both sides of the salmon fillets with salt and pepper. - Once the butter melts and shimmers, place the salmon skin-side down in the skillet. - Cook for about 4-5 minutes, then flip the fillets and cook for another 4-5 minutes until golden brown and cooked through. - Remove the salmon from the skillet and place it on a plate while you prepare the sauce. - In the same skillet, add the remaining 2 tablespoons of butter. - When the butter melts, add the minced garlic and sauté for 1-2 minutes until fragrant. - Pour in the chicken or vegetable broth and lemon juice. Bring to a gentle simmer. - Reduce the heat to low and slowly stir in the heavy cream. Blend well. - Let the sauce simmer for 3-4 minutes until it thickens slightly. - Gently fold the fresh spinach into the sauce. Stir until the spinach wilts, about 2-3 minutes. - Add the cooked orzo to the skillet, tossing gently to coat the pasta with the creamy sauce. - Place the seared salmon fillets on top of the orzo and sauce, drizzling some sauce over the salmon to keep it moist and flavorful. To cook salmon with crispy skin, start with a hot skillet. Use a bit of oil or butter to coat the pan. When the salmon hits the pan, it will sizzle. Cook it skin-side down for about 4-5 minutes. Don’t move it around. This helps the skin crisp up nicely. Flip the salmon and cook for an additional 4-5 minutes. This gives you a golden brown finish. The ideal internal temperature for salmon is 145°F (63°C). You can check this with a meat thermometer. The fish should flake easily with a fork when fully cooked. To avoid curdling in your cream sauce, keep the heat low. Never let it boil. When you add the cream, stir slowly. This keeps the sauce smooth. If the sauce starts to thicken too much, add a splash of broth. This will help adjust the consistency. You can customize the thickness of your sauce. If you want it thicker, let it simmer a bit longer. For a lighter sauce, add more broth or cream. Just mix until you find the right balance for your taste. Salmon pairs well with many sides. Try serving it with roasted vegetables or a fresh salad. A light, zesty side dish complements the rich flavors. For serving dishes, shallow bowls or plates work best. They allow you to showcase the salmon and orzo beautifully. Drizzle the creamy sauce over the top. Add a lemon wedge on the side for a fresh touch. A sprinkle of parsley adds color and flavor too! {{image_4}} You can easily swap out salmon for other proteins. Chicken works well in this dish. Just cook it until golden and juicy. Shrimp is another great choice. Sauté them in the same pan until they turn pink and tender. For a meatless meal, try using tofu or chickpeas. These options add protein and keep the dish hearty. If you need a gluten-free option, use rice or quinoa instead of orzo. Both will soak up the sauce nicely. You can also try other pasta shapes, like penne or fusilli. These shapes hold the creamy sauce well, making each bite satisfying. Adding herbs can take your dish up a notch. Fresh dill or thyme adds a nice touch. You can also use paprika for a hint of spice. If you want more veggies, consider adding cherry tomatoes or bell peppers. They add color and sweetness, making the dish even more vibrant. To store your creamy garlic butter salmon with spinach and orzo, let it cool first. Put it in an airtight container. This keeps the flavors fresh. You can store it in the fridge for up to three days. Make sure to label the container with the date. This helps you track how long it has been stored. If you want to keep it longer, you can freeze the dish. Use a freezer-safe container to avoid freezer burn. It can last up to three months in the freezer. When you're ready to eat, thaw it in the fridge overnight. For reheating, place it in a skillet over low heat. Add a splash of broth or cream to keep it moist. Stir until heated through. Enjoy your meal just like the first time! To check if the salmon is done, look for a few signs. The fish should change from translucent to opaque. It should also flake easily with a fork. The internal temperature should reach 145°F. If you see these signs, your salmon is perfect. Yes, you can prepare parts of this dish in advance. You can cook the orzo and store it in the fridge. Cook the salmon and sauce fresh for the best taste. You could also sauté the spinach ahead and add it later. Just reheat everything gently before serving. Several side dishes work well with this creamy salmon. Consider a fresh salad for crunch. Roasted vegetables add color and flavor too. Garlic bread is also a great choice. Each of these sides will complement your salmon and orzo beautifully. This blog post detailed how to make creamy garlic butter salmon with orzo. You learned the key ingredients, step-by-step instructions, tips for perfect cooking, and creative variations. The recipe is simple and satisfying. Whether you choose salmon, chicken, or shrimp, the flavors shine through. Remember to store leftovers correctly for fresh meals later. Enjoy your cooking and impress friends and family with this dish. Your kitchen adventure just got tastier!

Get ready to impress your taste buds with my Creamy Garlic Butter Salmon with Spinach and Orzo dish. This meal pairs tender salmon fillets with a rich garlic butter sauce, …

Read more

Categories Dinner

Crispy Air Fryer Chicken Mozzarella Wraps Delight

November 12, 2025September 26, 2025 by Chef Remy
- 2 cups cooked chicken breast, shredded - 1 cup fresh mozzarella cheese, shredded - 4 large flour tortillas - 1 teaspoon Italian seasoning - 1 teaspoon garlic powder - ½ teaspoon onion powder - 1 cup breadcrumbs (preferably panko for extra crunch) - 2 eggs, beaten - Olive oil spray For these crispy wraps, it all starts with quality chicken. Use cooked chicken breast, shredded into fine pieces. This adds great flavor and texture. Next, fresh mozzarella cheese brings a creamy, melty delight to each bite. Grab some large flour tortillas to hold all this goodness together. Now, let’s talk about seasoning. Italian seasoning adds a warm, herbal note. Garlic powder gives it a nice kick, and a hint of onion powder enhances the flavor. Breadcrumbs provide that perfect crunch when we air fry. I love to use panko breadcrumbs for an extra crispy finish. Don't forget the eggs! Beaten eggs help the breadcrumbs stick to the wraps. A light spray of olive oil adds a nice golden color and keeps the wraps from sticking in the air fryer. This mix of ingredients creates a balanced and tasty wrap that everyone will enjoy. {{ingredient_image_2}} To start, I combine the cooked chicken and cheese in a large bowl. I use 2 cups of shredded chicken and add 1 cup of fresh mozzarella and ½ cup of grated Parmesan. Then, I sprinkle in 1 teaspoon of Italian seasoning, 1 teaspoon of garlic powder, and ½ teaspoon of onion powder. I also add salt and pepper to taste. I mix everything well with a spatula until it’s evenly blended. Next, I lay a large flour tortilla on a clean surface. I spoon one-fourth of the chicken and cheese mixture onto the lower third of the tortilla. I create a long strip along the edge. Then, I carefully roll the tortilla tightly from the bottom up, folding in the sides as I go. This helps secure the filling. I place the rolled wrap seam-side down on a plate. I repeat this with the other tortillas and filling. Now, I prepare the coating. In a shallow dish, I pour 1 cup of breadcrumbs. In another dish, I beat 2 eggs until mixed well. I take each rolled wrap and dip it into the beaten eggs first. I let any excess egg drip off. After that, I roll it in the breadcrumbs, making sure each wrap is fully coated for the best crunch. I preheat my air fryer to 375°F (190°C). While it heats up, I lightly spray the air fryer basket with olive oil to prevent sticking. I arrange the wraps seam-side down in a single layer without overcrowding. Then, I lightly spray the tops of the wraps with olive oil spray. I air fry the wraps for 10-12 minutes. I flip them halfway through to ensure they cook evenly. Once they are golden brown and crispy, I carefully remove them from the air fryer. I let them cool slightly on a wire rack before slicing each wrap diagonally to show off the delicious filling. - Choosing the right breadcrumbs: For the best crunch, use panko breadcrumbs. Panko is lighter and creates a better texture than regular breadcrumbs. It gives your wraps that golden, crispy finish everyone loves. - Importance of oil spray: A light spray of olive oil makes a big difference. It helps the breadcrumbs crisp up nicely. Spray lightly on the wraps before cooking. This small step ensures that you get the perfect crunch. - Best dips and sauces: These wraps taste great with marinara sauce. It adds a nice tang and pairs well with the cheese. You can also try ranch or garlic aioli for a creamy twist. - Garnishing ideas: Fresh basil or parsley adds color and flavor. Just sprinkle some on top before serving. It makes your dish look more appealing and adds a fresh taste. - Overfilling the wraps: Avoid the urge to stuff the wraps too much. If you add too much filling, they can burst open while cooking. Stick to a quarter of the filling per wrap for the best results. - Not preheating the air fryer: Preheating is key for even cooking. If you skip this step, your wraps may not cook properly. Always set your air fryer to 375°F (190°C) for a few minutes before you start. This ensures a perfect crispiness! Pro Tips Use Leftover Chicken: This recipe is perfect for using up leftover rotisserie chicken or any cooked chicken you have on hand, making it a quick and resourceful meal option. Breadcrumb Variety: For extra crunch, use panko breadcrumbs or try seasoned breadcrumbs for an added flavor boost. Customize Fillings: Feel free to get creative with the filling! Add vegetables like spinach or bell peppers, or try different cheeses like cheddar or pepper jack. Serving Suggestions: Serve these wraps with a side of marinara or garlic sauce for dipping, and consider a fresh salad to round out the meal. {{image_4}} You can change the cheese in the wraps for a twist. Try using provolone or cheddar. Each cheese adds a unique flavor. If you prefer not to use chicken, swap it for turkey or tofu. Both options work well in these wraps. Adding vegetables can boost the flavor and nutrition. Try spinach, bell peppers, or mushrooms. These ingredients add color and crunch. You can also play with spices. Add paprika for a smoky taste or chili powder for heat. Experimenting with flavors keeps the dish exciting. Not a fan of flour tortillas? Use whole grain or gluten-free tortillas instead. They are just as tasty and can fit your diet. You can also try flatbreads or wraps made from other grains. These options give a fun twist to the classic recipe. After you enjoy your Crispy Air Fryer Chicken Mozzarella Wraps, store the leftovers in the fridge. Place them in an airtight container. These wraps will last for about three to four days in the fridge. Make sure to let them cool before sealing the container. This helps keep them fresh. If you want to keep the wraps longer, freezing is a great option. Wrap each cooled wrap in plastic wrap, then place them in a freezer-safe bag. They can stay good for about two to three months. When you are ready to eat, reheat them in the air fryer. Set it to 375°F (190°C) for about 8-10 minutes. This keeps them crispy! To save time, you can prepare these wraps ahead of time. Mix your filling and roll the wraps. Then, store them in an airtight container in the fridge for up to a day. For best results, use clear containers. This way, you can see what’s inside and grab them quickly. Crispy Air Fryer Chicken Mozzarella Wraps stay fresh for about 3 to 4 days in the fridge. Make sure to keep them in an airtight container. They can lose their crunch, but they still taste great. If you want to enjoy them longer, you can freeze the wraps. They can last up to 2 months in the freezer. Yes, you can cook these wraps in an oven. Preheat your oven to 400°F (200°C). Place the wraps on a baking sheet lined with parchment paper. Bake them for about 15-20 minutes, flipping halfway through. They will be crispy, but may not be as fast as the air fryer. These wraps pair well with a variety of sides. You can serve them with marinara sauce for dipping. A fresh salad or crispy fries also make great sides. Consider adding some roasted vegetables for extra flavor and nutrition. To spice up your wraps, add some chili flakes or cayenne pepper to the chicken mixture. You can also use spicy sauces, like hot sauce or sriracha, in the filling. For a kick, serve with a spicy dipping sauce on the side. This blog post explored making crispy air fryer chicken mozzarella wraps. We covered essential ingredients and easy steps to prepare, assemble, and cook the wraps. I shared tips to ensure crispiness and offered variations for extra flavor. Remember, avoid overfilling the wraps and always preheat your air fryer for the best results. Enjoy these tasty wraps with your favorite dips or sauces. Experiment with your own ideas to make them unique. Your creativity will make these wraps a family favorite.

Looking for a quick and tasty meal? Crispy Air Fryer Chicken Mozzarella Wraps are your answer! With juicy chicken, melty mozzarella, and seasoned breadcrumbs, these wraps are perfect for any …

Read more

Categories Appetizers

Bakery-Style Cranberry Orange Streusel Muffins Delight

September 25, 2025 by Chef Remy
To make bakery-style cranberry orange streusel muffins, gather these key ingredients: - 2 cups all-purpose flour - 1 cup granulated sugar - 2 teaspoons baking powder - 1/2 teaspoon baking soda - 1/2 teaspoon salt - 1/2 cup unsalted butter, melted - 1 large egg - 1 cup buttermilk - Zest of 1 large orange - 1 cup fresh or frozen cranberries, halved - 1/2 teaspoon vanilla extract For the streusel topping, you will need: - 1/3 cup all-purpose flour - 1/4 cup brown sugar, packed - 1/4 cup rolled oats - 2 tablespoons unsalted butter, cold and cubed - 1/2 teaspoon ground cinnamon Each ingredient plays a big role. The all-purpose flour gives the muffins structure. Granulated sugar adds sweetness and a nice crust. Baking powder and baking soda help the muffins rise. Salt enhances overall flavor. Unsalted butter provides richness, while eggs and buttermilk create a moist texture. The orange zest brings a bright note, and cranberries add a tart burst. Vanilla extract gives a warm flavor. The streusel topping adds a crunchy, sweet layer that makes these muffins special. You can change ingredients based on what you have. Use whole wheat flour for a healthier option. Adjust the sugar if you prefer less sweetness. The muffins are versatile, so feel free to get creative! 1. First, preheat your oven to 375°F (190°C). Prepare your muffin tin by lining it with paper liners or greasing it with non-stick spray. 2. Next, mix your dry ingredients. In a large bowl, combine 2 cups of all-purpose flour, 1 cup of granulated sugar, 2 teaspoons of baking powder, 1/2 teaspoon of baking soda, and 1/2 teaspoon of salt. Whisk them well until they are evenly mixed. 3. Now, combine your wet ingredients. In another bowl, whisk together 1/2 cup of melted unsalted butter, 1 large egg, 1 cup of buttermilk, the zest of 1 large orange, and 1/2 teaspoon of vanilla extract until smooth. 4. Gradually pour the wet mixture into the dry ingredients. Use a spatula or wooden spoon to gently fold them together. Mix just until combined. Be careful not to overmix, as this can make the muffins dense. 5. Finally, add in the cranberries. Gently fold in 1 cup of halved cranberries, making sure they are spread evenly throughout the batter. 1. In a medium bowl, mix together 1/3 cup of all-purpose flour, 1/4 cup of packed brown sugar, 1/4 cup of rolled oats, and 1/2 teaspoon of ground cinnamon. 2. Add 2 tablespoons of cold, cubed butter into the dry mixture. Use your fingertips to rub the butter into the mix until it forms coarse crumbs. 1. Fill your muffin cups with the batter. Divide the batter evenly among the cups, filling each about 2/3 full. Then, generously sprinkle the streusel topping over each muffin. 2. Place your muffin tin in the preheated oven. Bake for 18-22 minutes. To check for doneness, insert a toothpick into the center of a muffin. If it comes out clean, they are ready. 3. Once baked, let the muffins cool in the pan for about 5 minutes. Then, transfer them to a wire rack to cool completely. This helps ensure they have the best texture. - Avoiding overmixing the batter: Overmixing makes muffins dense. Mix gently until just combined. Use a spatula or wooden spoon for this step. - Ensuring even cranberry distribution: Fold in halved cranberries carefully. You want them spread throughout the batter. This helps each muffin have a burst of cranberry flavor. - Optimal baking times and temperatures: Bake at 375°F (190°C) for 18-22 minutes. Check for doneness by inserting a toothpick. If it comes out clean, the muffins are ready. - Dusting with powdered sugar: After cooling, lightly dust the muffins with powdered sugar. This adds a nice touch and looks inviting. - Creative serving suggestions: Serve muffins warm on a decorative platter. Add fresh cranberries and orange slices around them. This makes for a beautiful display and invites everyone to enjoy! {{image_4}} You can easily change the flavors in these muffins. Try using different fruits like blueberries or raspberries. Both add a fun twist. If you want crunch, add nuts like walnuts or pecans. You can also mix in chocolate chips for a sweet touch. Just make sure to keep the same amount of fruit or chocolate as cranberries. This way, you maintain the muffin's balance and texture. For those needing gluten-free options, use gluten-free all-purpose flour. It works well in this recipe. Just be sure the other ingredients are also gluten-free. If you want to make these muffins vegan, replace the egg with a flaxseed egg. Mix one tablespoon of ground flaxseed with three tablespoons of water and let it sit for five minutes. You can also use almond milk instead of buttermilk. These swaps keep the muffins tasty and moist while meeting dietary needs. You can store your muffins at room temperature. Place them in an airtight container to keep them fresh. This method works best for up to three days. If you want to enjoy them warm, simply pop them in the microwave for about 10 seconds. For longer storage, freezing is a great option. Wrap each muffin tightly in plastic wrap. Then, place them in a freezer-safe bag. These muffins can last up to three months in the freezer. When you’re ready to enjoy them, remove the muffins and let them thaw at room temperature. Reheating recommendations are simple. For a warm muffin, heat it in the microwave for 15 to 20 seconds. If you prefer a crispy top, use an oven. Preheat the oven to 350°F, then bake the muffin for 5 to 10 minutes. This way, you get the best taste and texture every time. Yes, you can use frozen cranberries in these muffins. Just toss them in flour before adding them to the batter. This helps prevent them from sinking. Using frozen cranberries gives you the same tart flavor as fresh ones. To make these muffins healthier, consider these options: - Replace some all-purpose flour with whole wheat flour. - Use less sugar or substitute with honey or maple syrup. - Swap buttermilk for Greek yogurt for added protein. These changes keep the muffins tasty while boosting their nutrition. To ensure your muffins rise well: - Use fresh baking powder and baking soda. - Don’t overmix the batter; mix until just combined. - Fill muffin cups about 2/3 full to allow room to rise. These steps help create fluffy, bakery-style muffins. You can prepare the batter in advance. Store it in the fridge for up to 12 hours. Just remember to give it a gentle stir before filling the muffin cups. Baking fresh muffins in the morning makes for a delightful start to the day. You’ve learned how to make delicious cranberry muffins from scratch. We covered the ingredients, step-by-step instructions, and handy tips to help you succeed. Remember, avoid overmixing and have fun experimenting with flavors. These muffins are easy to store and great to share. With a few variations and simple adjustments, you can make them fit your taste. Enjoy the process and the tasty results! Happy baking!

If you crave bakery-style treats at home, these Cranberry Orange Streusel Muffins will wow you. Bursting with fresh flavors and topped with a sweet crunch, these muffins are perfect for …

Read more

Categories Desserts

Minute Creamy Garlic Shrimp Risotto Flavorful Dish

September 25, 2025 by Chef Remy
- 1 cup Arborio rice - 1 pound large shrimp, peeled and deveined - 4 cups vegetable broth The heart of this dish is Arborio rice. This rice has a unique ability to absorb flavors and become creamy. Large shrimp add a nice texture and taste. Using vegetable broth makes the risotto rich and flavorful. - 1/2 cup heavy cream - 4 cloves garlic, minced - 1 small onion, finely chopped - 1 cup grated Parmesan cheese Heavy cream gives the risotto its smoothness. Garlic and onion create a savory base that makes your taste buds dance. Parmesan cheese adds a salty, nutty flavor that brings everything together perfectly. - 2 tablespoons olive oil - 2 tablespoons unsalted butter - Salt and freshly ground black pepper to taste Olive oil and butter create a rich cooking base. They help sauté the garlic and onion, releasing their flavors. Don't forget to season with salt and pepper. This step is key to making the dish taste balanced and delicious. - Warming the vegetable broth: First, take a medium pot and add 4 cups of vegetable broth. Turn the heat to medium and warm it until it's hot but not boiling. This keeps the cooking process smooth. - Preparing the shrimp: Next, grab 1 pound of large shrimp. Make sure they are peeled and deveined. This makes them ready for cooking and adds to the dish's flavor. - Sautéing onions and garlic: In a large skillet, pour in 2 tablespoons of olive oil and 2 tablespoons of unsalted butter. Heat it over medium heat. Once the butter melts, add 1 small finely chopped onion. Sauté it for about 3 minutes until it becomes soft and translucent. After that, mix in 4 minced garlic cloves. Cook for 1 more minute until you smell the garlic's aroma. - Adding Arborio rice: Now, stir in 1 cup of Arborio rice. Make sure the rice gets coated in the oil and butter. Let it cook for about 2 minutes. This helps the rice absorb the flavor from the onions and garlic. - Gradually incorporating broth: Start adding the warm vegetable broth, one ladle at a time. Stir constantly. Only add more broth when the rice absorbs the previous amount. This takes about 15 minutes. You want the rice to be creamy and tender but still firm, or al dente. - Stirring in cream and cheese: When the rice reaches that perfect creamy texture, reduce the heat. Mix in 1/2 cup of heavy cream and 1 cup of grated Parmesan cheese. Stir until everything is well combined and creamy. - Cooking the shrimp: Move the risotto to one side of the skillet. Create space and add the shrimp. Cook them for about 3 to 4 minutes until they turn pink and opaque. Stir the shrimp into the risotto just before they finish cooking. This helps blend the flavors. - Final seasoning adjustments: Season your dish with salt and freshly ground black pepper to taste. Mix everything well. Once it's ready, remove the skillet from heat. Let it rest for a couple of minutes to allow the flavors to meld. Stirring is key to making risotto creamy. When you stir, you help the rice release starch. This starch makes the risotto smooth and rich. If you don’t stir, the rice may stick and burn. You want to keep a gentle motion while cooking. Al dente rice means the grains are tender but still firm in the center. You’ll know it’s ready when it has a slight bite. Test a few grains a couple of minutes before you finish cooking. If they are too hard, keep stirring and adding broth. To boost flavor, try adding herbs like thyme or basil. A pinch of red pepper flakes can add some heat. You can also experiment with lemon zest for a fresh taste. For cheese, Parmesan is classic, but you can use Pecorino Romano for a sharper flavor. Mixing in some goat cheese can add creaminess, too. Each cheese adds its own twist to the dish. Serve risotto in shallow bowls for an elegant look. A sprinkle of extra Parmesan on top makes it beautiful. You can add a few parsley leaves for color and freshness. A drizzle of olive oil adds shine and richness. For a fun touch, you might try serving it with lemon wedges on the side. This allows guests to add a splash of citrus if they like. {{image_4}} You can switch up the shrimp in this dish. Use scallops or your favorite fish. Both options can bring great taste. If you want to add more color and nutrition, toss in some fresh spinach or peas. They add a nice crunch and pop of green. Want a vegan option? Swap the shrimp for plant-based alternatives like chickpeas or tofu. Use coconut cream instead of heavy cream. This keeps the dish creamy while making it suitable for vegans. For gluten-free adjustments, choose a gluten-free broth and ensure your ingredients are certified gluten-free. To boost the flavor, try adding fresh herbs like basil or thyme. They add a nice fragrance and depth. If you like a bit of heat, sprinkle in some red pepper flakes. A touch of lemon zest can also brighten the dish, giving it a fresh twist. To store your Minute Creamy Garlic Shrimp Risotto, let it cool first. Once cool, place it in an airtight container. This helps keep the flavors fresh. You can keep it in the fridge for up to three days. Make sure to label the container with the date. If you want to freeze the risotto, first cool it completely. Then, portion it into freezer-safe bags. Remove as much air as possible before sealing. This process helps prevent freezer burn. You can freeze it for up to three months. When you're ready to eat it, thaw it overnight in the fridge. Reheat it gently on the stove, adding a splash of broth or cream for moisture. Risotto can lose its creamy texture if not stored correctly. To avoid this, always keep it sealed in the right container. Glass or BPA-free plastic containers are great options. When reheating, stir often and add liquid as needed to restore creaminess. This makes your dish just as tasty as when you first made it! To make risotto creamy, focus on a few key techniques: - Use Arborio rice; it has more starch. - Stir often while adding broth slowly. - Finish with heavy cream and cheese for extra richness. These steps help create that rich, creamy texture you want. You can use other rice types, but Arborio is best. Regular rice lacks the starch needed for creaminess. Long-grain rice will also not give the same results. It may cook faster but won’t create the desired texture. If you need a substitute for Parmesan cheese, consider these options: - Pecorino Romano adds a salty kick. - Nutritional yeast is great for a vegan option. - Grana Padano works well too, with a similar flavor. Each of these can give your risotto a nice taste twist. This blog explains how to make a delicious risotto using shrimp and simple ingredients. You learned about the key components like Arborio rice and broth, as well as tips for perfect texture. I shared variations to fit your taste and dietary needs, plus storage tips for leftovers. Remember, risotto takes practice. Keep stirring, and don’t rush the process. Enjoy making your perfect dish, and share your creations with others!

Welcome to a delicious journey where we whip up a Minute Creamy Garlic Shrimp Risotto. This dish is perfect when you crave comfort food that’s rich and creamy. In just …

Read more

Categories Dinner

Better-Than-Takeout Mongolian Beef Noodles Delight

September 25, 2025 by Chef Remy
To make Better-Than-Takeout Mongolian Beef Noodles, gather the following ingredients: - 8 oz. egg noodles - 1 lb. flank steak, thinly sliced against the grain - 3 tablespoons soy sauce, divided - 1 tablespoon hoisin sauce - 1 tablespoon packed brown sugar - 2 teaspoons sesame oil - 1 tablespoon vegetable oil - 4 cloves garlic, minced - 1 inch fresh ginger, grated - 1 red bell pepper, thinly sliced - 1 cup green onions, chopped (divide white and green parts) - 1 tablespoon cornstarch - 1 tablespoon water - Salt and black pepper to taste These ingredients create a mix of flavors and textures. The egg noodles give a soft base. Flank steak adds heartiness. Soy sauce and hoisin sauce bring rich umami. Brown sugar balances the saltiness. Sesame oil adds warmth, while garlic and ginger provide a fragrant kick. Red bell pepper and green onions add color and crunch. Cornstarch helps the beef stay tender. Using fresh ingredients makes all the difference. You’ll taste the care in each bite! - Preparing and Draining Noodles: Cook 8 oz. of egg noodles as per the package. Drain them well and set aside. This step is key to prevent sogginess. - Ensuring Noodles Don't Stick: To keep the noodles from sticking, toss them with a teaspoon of oil after draining. This will help them stay separate. - Time and Method for Marinating: For the best flavor, marinate 1 lb. of flank steak for 15 minutes. Mix it with 1 tablespoon of soy sauce, 1 tablespoon of cornstarch, and salt and pepper. - Importance of Even Coating: Ensure each piece of beef is coated well. This helps the beef absorb the flavors during cooking. - Heat Levels and Cooking Time: Heat 1 tablespoon of vegetable oil in a skillet over medium-high heat. Cook the beef in one layer for about 3-4 minutes. - Tips for Achieving the Perfect Browning: Avoid stirring too much. Let the beef sit to get that nice brown crust. This adds flavor. - Garlic, Ginger, and Green Onions: After removing the beef, add 1 tablespoon sesame oil. Then add 4 cloves of minced garlic, 1 inch of grated ginger, and the white parts of 1 cup of chopped green onions. Stir for about 30 seconds. - Avoiding Overcooking: Watch carefully! You want the garlic golden, not burnt. This adds a lovely aroma. - Cooking Red Bell Pepper: Toss in 1 thinly sliced red bell pepper. Stir-fry for 2-3 minutes until it softens but stays bright. - Maintaining Color and Crispness: You want the pepper to be tender yet still vibrant. This keeps the dish appealing. - Mixing Ingredients for Sauce: In a bowl, whisk 2 tablespoons of soy sauce, 1 tablespoon of hoisin sauce, 1 tablespoon of brown sugar, and 1 tablespoon of water. - Simmering for Flavor: Pour this sauce over the vegetable mix in the pan. Let it simmer gently for a few minutes to meld the flavors. - Mixing Beef, Noodles, and Vegetables: Return the beef to the pan and add the drained noodles. Toss everything gently to coat well. - Final Cooking Tips: Heat all ingredients together for 2-3 minutes. This ensures everything is warm and flavors blend. - Serving Techniques: Serve in deep bowls for a relaxed vibe. This makes the dish inviting. - Garnishing for Appeal: Top with extra green onions and sesame seeds. This adds a nice touch and makes it look gourmet! - Recommended Seasonings: Use fresh garlic and ginger. They add depth to the dish. You can also sprinkle a little red pepper flakes for extra heat. - Tips for a Richer Sauce: Mix soy sauce, hoisin sauce, and brown sugar. This combo gives a sweet and savory taste. Adding a splash of water helps combine the flavors well. - Best Practices for Stir-Frying: Heat your pan before adding oil. This helps cook the beef quickly. Always keep the beef in a single layer for even cooking. - Achieving Tender Beef: Slice flank steak against the grain. This makes each bite tender. Marinate it with cornstarch and soy sauce for extra flavor and tenderness. - Common Errors to Avoid: Don’t overcrowd the pan. This can steam the beef instead of browning it. Also, be careful not to burn the garlic when sautéing. - Troubleshooting Overcooked Ingredients: If your beef is tough, try slicing it thinner next time. For overcooked veggies, cook them just until soft but still bright in color. {{image_4}} You can easily switch out the flank steak for chicken or tofu. Both options work well. For chicken, use boneless thighs or breasts. Cut them into bite-sized pieces. For tofu, use firm or extra-firm tofu for the best texture. When cooking chicken, use the same method. Just adjust the cooking time. Cook until the chicken is no longer pink. For tofu, press it first to remove excess water. Then, cube and sauté it until golden. Fresh veggies can enhance this dish’s flavor. Try adding seasonal vegetables like snap peas or bok choy. They add color and crunch. A good mix includes: - Snap peas - Carrots, julienned - Broccoli florets Add them after cooking the beef. Stir-fry for a few minutes until tender but crisp. If you want a gluten-free version, swap the egg noodles for rice noodles. They cook quickly and absorb flavors well. For the sauce, use tamari instead of soy sauce. It has a similar taste without gluten. Check the hoisin sauce too; many brands offer gluten-free versions. Adjust the sugar and vinegar in the sauce if needed to keep it balanced. - Store your leftovers in airtight containers. - Keep them in the fridge for up to 3 days. Storing your Mongolian beef noodles properly helps keep them fresh. Make sure to let the dish cool down before you put it in the fridge. This helps prevent extra moisture, which can make the noodles soggy. - Use the microwave for quick heating. - Heat on medium power to avoid overcooking. To keep the texture nice, add a splash of water or soy sauce when reheating. This adds moisture back into the dish. Stir every minute to ensure even heating. - Freeze leftovers in freezer bags or containers. - Use within 2 months for best taste. If you freeze your noodles, it's best to separate the beef and noodles. This helps them stay fresh. When you want to eat them again, thaw in the fridge overnight. Then, reheat on the stove for the best results. The ideal marination time for the beef is 15 minutes. This short time allows the meat to soak up some flavor from the soy sauce and cornstarch. It helps make the beef tender and delicious. Yes, you can use other noodles. Some great alternatives are rice noodles or udon noodles. Just adjust the cooking time based on the type you choose. Always follow the package instructions to ensure they cook well. If you don’t have hoisin sauce, try using a mix of soy sauce and peanut butter. You can also use teriyaki sauce or a blend of soy sauce and brown sugar. These options will keep the flavor close to the original dish. To add heat, include red pepper flakes or sliced fresh chili peppers. You can also add a dash of sriracha or chili oil to the sauce. Adjust the amount based on your spice preference. You can prepare this dish ahead of time. Store the cooked noodles and beef separately to keep them fresh. When ready to eat, simply reheat them in a pan. They taste great even after a day in the fridge! You now have the tools to create delicious Mongolian Beef Noodles. We covered key ingredients, cooking steps, and helpful tips throughout the process. Remember to marinate the beef well and avoid overcooking the veggies for the best taste. Feel free to experiment with proteins and veggies to suit your preferences. By storing and reheating properly, you can enjoy great flavors later. With practice, you'll impress everyone with your skills. Enjoy making this dish and sharing it with friends and family!

Are you tired of ordering the same takeout every week? Let’s change that! My Better-Than-Takeout Mongolian Beef Noodles are not just quick to make; they pack a flavorful punch that …

Read more

Categories Dinner

Maple Pecan Sticky Buns with Brown Butter Delight

September 25, 2025 by Chef Remy
To make Maple Pecan Sticky Buns with Brown Butter, you need the following ingredients: - 3 cups all-purpose flour - 1/4 cup granulated sugar - 1 packet (2 1/4 teaspoons) active dry yeast - 1/2 teaspoon salt - 3/4 cup whole milk, warmed (around 110°F/43°C) - 1/4 cup unsalted butter, melted - 2 large eggs, at room temperature - 1 teaspoon vanilla extract - 1/2 cup packed brown sugar, light or dark - 1/4 cup pure maple syrup - 1 teaspoon ground cinnamon - 1 cup pecans, roughly chopped - 1/4 cup unsalted butter (for browning) - Pinch of salt These ingredients work together to create a soft, sweet dough with a rich filling. The combination of brown butter and maple syrup gives these sticky buns a unique flavor. You will enjoy the crunch from the pecans and the warm spices that fill the kitchen with a comforting aroma. Prepare these ingredients ahead of time, and you can easily follow the steps to create a delightful treat. To start, mix the warmed milk with granulated sugar and yeast in a bowl. Let it sit for about 5 minutes. This helps the yeast wake up and get foamy. In another bowl, whisk together the flour and salt. After mixing, add melted butter, eggs, vanilla, and the yeast mix. Stir until you form a soft dough. Next, transfer the dough to a floured surface. Knead it for about 5 minutes. You want it smooth and elastic. Then, shape it into a ball and place it in a greased bowl. Cover it with a towel and let it rise in a warm spot for about 1 hour. The dough should double in size. In a small bowl, mix brown sugar, maple syrup, and cinnamon. Make sure it is well combined. Now, let’s brown the butter. In a saucepan over medium heat, melt a quarter cup of unsalted butter. Stir it often until it turns golden brown and smells nutty. This takes about 5 to 7 minutes. After the dough rises, gently punch it down to release air. Roll it out on a floured surface into a rectangle about 1/4 inch thick. Brush the brown butter on top, then sprinkle the brown sugar mixture over it. Finally, add the chopped pecans evenly. Starting from the long side, roll the dough tightly into a log. Seal the seam and slice it into 12 equal pieces. Place the rolls cut side up in a greased baking dish. Cover the dish with a cloth and let the rolls rise for another 30 minutes. Preheat your oven to 350°F (175°C) while they rise. Bake the rolls for 25 to 30 minutes. They should be golden brown when done. Once baked, cool the rolls in the pan for about 10 minutes. Then, flip them out onto a serving platter. Enjoy the sticky syrup that drizzles down over the rolls! To make great sticky buns, the dough must feel just right. You want a soft, smooth texture. When you knead it, it should spring back when pressed. If it feels too sticky, add a bit more flour. If it’s too dry, a splash of milk can help. For yeast activation, make sure your milk is warm, not hot. You want it around 110°F (43°C). Mix the yeast with the sugar and milk, and wait for it to foam. This shows that your yeast is alive and ready to work. Browning butter adds depth and flavor. To avoid burning, use medium heat and stir often. Keep your eyes on it; butter can turn brown quickly. To get that lovely nutty aroma, look for a golden color with a slight froth. This usually takes about 5-7 minutes. Once you see that, take it off the heat. Let it cool for a minute before using it in your rolls. When serving your sticky buns, a drizzle of extra maple syrup makes them shine. You can also sprinkle some chopped pecans on top for a nice crunch. These buns taste best warm, right out of the oven. If you let them cool too much, they may lose that gooey texture. Serve them hot for a truly delightful treat! {{image_4}} You can add your own twist to these sticky buns. Try adding spices like nutmeg or ginger for warmth. You can also use different extracts, like almond or maple, to enhance flavor. For a fruity touch, mix in dried fruits such as raisins or cranberries. These choices will change the flavor and make your buns unique. If you want a lighter version, consider using less sugar. You can replace some sugar with applesauce for moisture. Another option is to use honey or agave syrup for sweetness. For those who need gluten-free options, try gluten-free flour blends. These can work well and keep your buns fluffy. The sticky sauce doesn’t have to be the same each time. You can mix up the syrup by using honey or caramel. If you want to switch nuts, walnuts or almonds can also work beautifully. These changes can create a whole new taste experience each time you make them. To keep your maple pecan sticky buns fresh, store them in an airtight container. This helps keep the moisture in and stops them from drying out. If you plan to eat them within two days, you can leave them at room temperature. For longer storage, place them in the fridge. Just remember, refrigeration can change their texture. When you want to enjoy your sticky buns again, reheating is key. I recommend using the oven. Preheat it to 350°F (175°C). Wrap the buns in foil to keep them moist. Heat for about 10 to 15 minutes. You can also use the microwave, but be careful. Heat for just a few seconds at a time to avoid dryness. To freeze sticky buns, wait until they cool completely. Wrap each bun tightly in plastic wrap, then place them in a freezer bag. This way, they can last up to three months. When you’re ready to eat, thaw them overnight in the fridge. Reheat using the methods I shared earlier for the best taste. Yes, you can! To prepare in advance, make the dough the night before. Let it rise as usual, then cover and refrigerate it. In the morning, take it out and let it warm up for about 30 minutes. Then, roll out the dough, add the filling, and shape the buns. This saves time and keeps them fresh. If you need a substitute for pecans, walnuts work well. They have a similar crunch and taste. You can also use almonds or hazelnuts for a different flavor. Just chop them up like the pecans and follow the same steps in the recipe. Look for a golden brown color on top. The rolls should also spring back when lightly tapped. You can use a toothpick to check inside. It should come out clean. If it has dough on it, bake for a few more minutes. Serve the sticky buns warm for the best taste. Drizzle some extra maple syrup on top before serving. You can also add some chopped pecans for a nice garnish. This makes them look great and adds more crunch. To make these buns vegan, swap the eggs for flax eggs or applesauce. Use plant-based milk, like almond or oat milk, instead of whole milk. Replace the butter with a vegan butter alternative. You can still enjoy the yummy taste and texture! You learned the key ingredients needed for delicious sticky buns. I shared step-by-step instructions, tips, and variations to help you create the perfect treat. Remember, each part of the process matters, from kneading dough to choosing toppings. Whether you make these ahead of time or explore different flavors, you have options. Store them properly for fresh results. Enjoying warm, gooey buns will delight anyone. Dive into this fun baking adventure and make some sticky buns today!

Are you ready to indulge in a sweet treat that will make your mornings brighter? These Maple Pecan Sticky Buns with Brown Butter are the perfect balance of gooey sweetness …

Read more

Categories Desserts
Older posts
Newer posts
← Previous Page1 … Page19 Page20 Page21 … Page130 Next →

ROASTED RECIPES

Where bold flavors meet everyday meals. Warm, vibrant, and made to share. 🔥🥗🍴

PAGES

Home About Contact Privacy Policy Terms & Conditions Cookie Policy GDPR Policy Copyright Policy Disclaimer

CATEGORIES

Appetizers Desserts Salads Breakfast Dinner

Contact

  • Pinterest
  • Mail
Copyright © 2025 Roasted Flavors. All rights reserved.