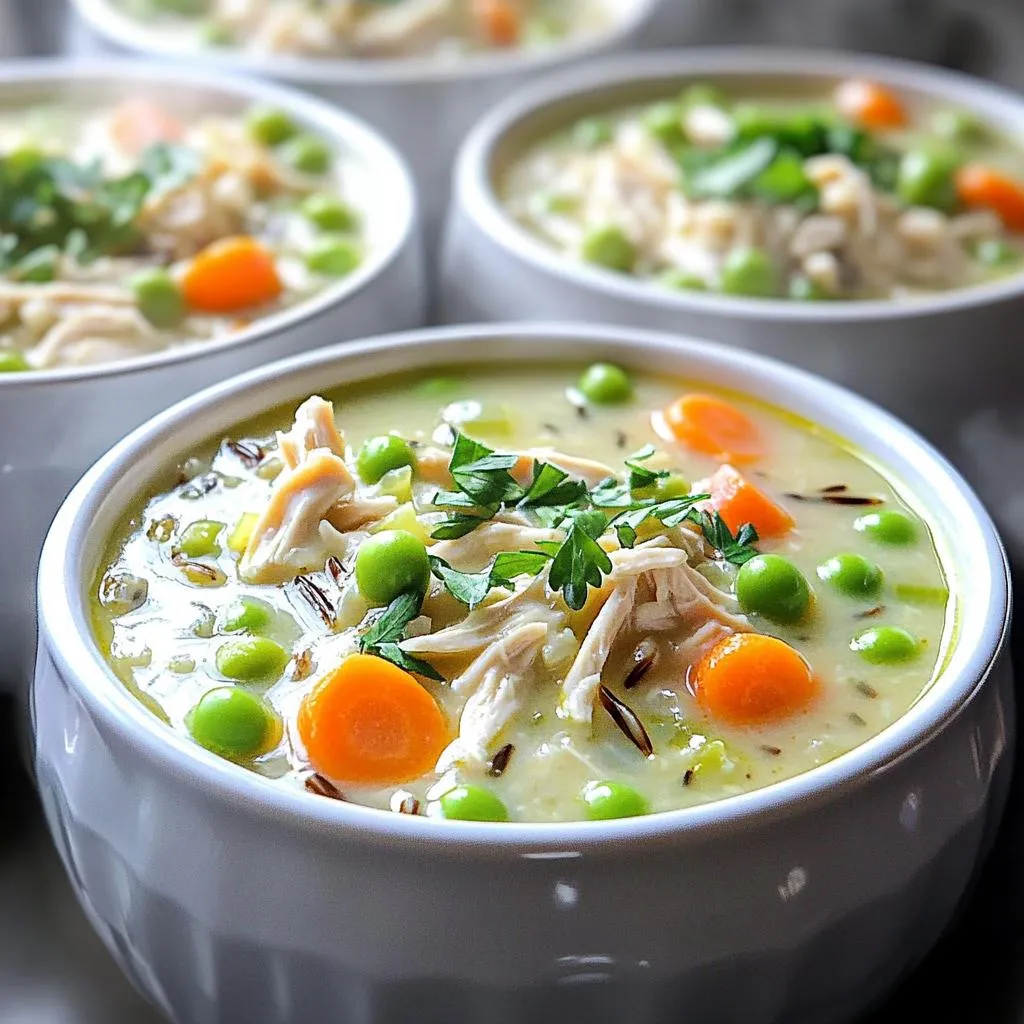
Skip to content
Roasted Flavors
  • Home
  • Appetizers
  • Desserts
  • Salads
  • Breakfast
  • Dinner
  • Privacy Policy
  • Contact
  • About

Chef Remy

Apple Pie Oatmeal Breakfast Cookies Tasty and Wholesome

September 15, 2025 by Chef Remy
- 1 cup rolled oats - 1 cup whole wheat flour - 1 teaspoon baking soda - 1 teaspoon ground cinnamon - 1/2 teaspoon ground nutmeg - 1/4 teaspoon salt - 1/2 cup unsweetened applesauce - 1/4 cup almond butter (or preferred nut butter) - 1/4 cup honey or maple syrup - 1 teaspoon pure vanilla extract - 1 cup diced apples (peeled and cored) - 1/3 cup raisins or chopped walnuts I love using simple and healthy ingredients for my Apple Pie Oatmeal Breakfast Cookies. The base starts with rolled oats and whole wheat flour, which give my cookies great texture. Baking soda helps them rise, making them soft and chewy. Next, I add spices to create that warm, cozy apple pie flavor. Ground cinnamon and nutmeg bring a lovely taste, while a little salt balances everything out. For moisture and sweetness, I use unsweetened applesauce and almond butter. Honey or maple syrup adds a touch of natural sweetness. The vanilla extract rounds it all out with a rich aroma. I often toss in diced apples for a fresh crunch. If you want a little extra, raisins or walnuts make perfect add-ins. They boost flavor and add fun texture. These ingredients come together to make cookies that are not just tasty but also wholesome. - Preheat the oven to 350°F (175°C). - Line a baking sheet with parchment paper. Start by preheating your oven. It helps the cookies bake evenly. While the oven warms, grab a baking sheet and line it with parchment paper. This step keeps the cookies from sticking and makes cleanup simple. - Combine rolled oats, whole wheat flour, baking soda, cinnamon, nutmeg, and salt. In a large bowl, mix the rolled oats and whole wheat flour. Add baking soda, cinnamon, nutmeg, and salt. Stir these dry ingredients well until they blend evenly. This mix gives the cookies their great flavor and texture. - Whisk together applesauce, almond butter, honey (or maple syrup), and vanilla extract. In another bowl, whisk together the applesauce and almond butter. Add honey or maple syrup, along with the vanilla extract. Whisk until smooth. This mix adds moisture and sweetness to the cookies. - Gradually add wet ingredients to dry ingredients and mix. - Fold in diced apples and optional add-ins. Now, pour the wet mix into the dry mix. Stir well until everything combines. Next, fold in the diced apples. If you want extra flavor, add raisins or chopped walnuts. This step brings in that apple pie taste. - Scoop dough onto prepared baking sheet, leaving space between cookies. - Flatten cookies slightly and bake for 12-15 minutes. Using a tablespoon, scoop the dough onto the baking sheet. Leave some space between each scoop. Lightly flatten the tops with your spoon. Bake them in the oven for 12 to 15 minutes. Watch for the edges to turn golden brown. - Cool cookies on the baking sheet for 5 minutes. - Transfer to a wire rack to cool completely. Once baked, let the cookies cool on the sheet for about five minutes. This allows them to set. After that, move them to a wire rack to cool fully. Enjoy the wonderful smell while they cool down! To make your cookies chewy, use less flour. A thicker dough means a crunchier cookie. Try baking your cookies for 12 minutes for chewiness. For a crispier texture, bake them for up to 15 minutes. Keep an eye on them to avoid burning. If you need a nut-free option, swap almond butter for sunflower seed butter. You can also use cashew or peanut butter if you prefer. For sweeteners, replace honey with agave syrup for a lighter taste. Maple syrup adds a nice flavor too. For uniform cookies, use a tablespoon to scoop the dough. This ensures each cookie is the same size. If you want to make a big batch, simply double the recipe. Just remember to adjust your baking time based on the size of your cookies. {{image_4}} You can make these cookies even more fun! Here are a few ideas: - Add spices like ginger or cloves. These spices bring warmth and depth. - Try dark chocolate chips for a rich, sweet twist. They pair well with apples. Need to adapt the recipe? No problem! - For gluten-free cookies, use oat flour or almond flour. They work great and taste good. - You can also make them vegan. Just swap the honey for maple syrup. Don’t be afraid to get creative! - Use different fruits like juicy pears or mixed berries. They add a fresh taste. - Experiment with nuts and seeds. Walnuts, almonds, or sunflower seeds give a nice crunch. To keep your cookies fresh, store them in an airtight container. This helps prevent them from getting dry. Place a piece of bread in the container to help keep cookies soft. Use a container made of glass or plastic with a tight lid. Keep the cookies at room temperature, away from heat and light. Freezing cookies is easy. Let them cool completely first. Place cookies in a single layer on a baking sheet. Freeze them for about an hour until firm. After that, transfer them to a freezer bag. Remove as much air as possible before sealing. To thaw, take out a cookie and leave it at room temperature. For warm cookies, microwave them for about 10 seconds. When stored properly, these cookies last about a week at room temperature. You can keep frozen cookies for up to three months. Signs that cookies have gone stale include a hard texture or a dry taste. If they lose their tasty flavor, it's time to toss them out. Enjoy your fresh cookies while they last! Yes, you can make these cookies gluten-free! Use gluten-free rolled oats and almond flour instead of whole wheat flour. You can also try oat flour, which works well. To make the cookies sweeter, you can add more honey or maple syrup. You could also use mashed bananas for natural sweetness. If you like, try adding a bit of brown sugar too. Store the cookies in an airtight container at room temperature. They stay fresh for about a week. You can also refrigerate them for longer shelf life. Just let them warm up before serving. Yes, you can add protein powder! Start with one scoop and mix it into the dry ingredients. Make sure to reduce the flour slightly to keep the texture nice. Serve the cookies warm with a sprinkle of cinnamon. Pair them with yogurt or fresh fruit for a balanced breakfast. You can also add a drizzle of honey for extra sweetness. You now have a simple and tasty recipe for Apple Pie Oatmeal Breakfast Cookies. We covered the key ingredients, easy steps, and helpful tips. You can customize the flavors and even store them well for later. Remember, perfect cookies start with the right mix of dry and wet ingredients. Try new flavors and adjust to your taste. Enjoy making these cookies as a fun breakfast or snack option!

Start your day with a delicious twist on breakfast! Apple Pie Oatmeal Breakfast Cookies combine the flavors of classic apple pie with wholesome oats. They are easy to make and …

Read more

Categories Breakfast

Slow Cooker Hearty Beef Veggie Stew for Comfort

September 12, 2025 by Chef Remy
- 2 lbs beef chuck, cut into 1-inch cubes - 4 medium carrots, sliced into thick rounds - 3 medium potatoes, peeled and diced into 1-inch pieces - 1 large onion, chopped - 3 cloves garlic, minced - 1 cup green beans, trimmed and cut into 1-inch pieces - 4 cups beef broth - 1 can (14.5 oz) diced tomatoes, undrained - 2 tablespoons tomato paste I love the base of this stew. The beef chuck gives it a rich flavor. The carrots and potatoes add both sweetness and heartiness. The green beans bring a nice crunch. - 2 teaspoons dried thyme - 1 teaspoon dried rosemary - 1 bay leaf - Salt and pepper to taste Seasonings are key. Dried thyme adds earthiness. Dried rosemary gives a fresh taste. The bay leaf enhances the stew while cooking. - 2 tablespoons olive oil for searing - Optional garnishes like fresh parsley I always sear the beef in olive oil first. This step locks in flavor and gives a lovely brown color. Fresh parsley as a garnish brightens up the dish. It’s a simple touch that looks great. Searing the beef is key to great flavor. It helps build a rich, deep taste. Start by heating olive oil in a large skillet over medium heat. Once hot, add the beef cubes. Sear them for about 5-7 minutes. Make sure they are browned on all sides. This step locks in juices and adds a nice crust. Remember, browning the beef cubes matters. It adds layers of flavor that make the stew taste amazing. Now it’s time to layer your ingredients in the slow cooker. Place the browned beef in first. Next, add the sliced carrots, diced potatoes, chopped onion, minced garlic, and cut green beans. Stir everything together gently. This mix ensures every bite is filled with flavor. For the sauce, combine beef broth, diced tomatoes, and tomato paste in a bowl. Add dried thyme, dried rosemary, and the bay leaf. Season with salt and pepper to taste, then mix well. Make sure the tomato paste is fully dissolved before pouring. Once your sauce is ready, pour it over the beef and veggies. Ensure all ingredients are submerged in the liquid. This helps the flavors meld beautifully as they cook. You can choose between low and high cooking settings. Cooking on low for 8 hours gives the best tenderness. If you're short on time, cook on high for about 4 hours. Either way, the beef will become tender and the veggies soft. Keep the lid on during cooking. This keeps all the steam inside, making your stew rich and hearty. Enjoy the delicious smells wafting through your kitchen as it cooks! To make your stew even better, add extra herbs. You can try adding fresh parsley or a sprig of thyme. For a kick, add a pinch of cayenne or smoked paprika. These spices can bring new life to your stew. If you want a thicker stew, there are a few easy tricks. You can mix a little cornstarch with cold water and stir it in. Let it cook for a bit longer to thicken. Another way is to mash some of the potatoes in the pot. This will create a nice, creamy texture without adding extra steps. Pair your hearty beef veggie stew with crusty bread. It’s perfect for mopping up that rich broth. A fresh side salad with a light vinaigrette also works well for balance. For a nice touch, garnish each bowl with fresh parsley. A drizzle of olive oil can make it shine. Use colorful bowls to make the dish pop. A well-presented meal looks inviting and makes everyone want to dig in. One common mistake is overcrowding the slow cooker. If you add too many ingredients, they won’t cook evenly. Stick to the recipe amounts for the best results. Another mistake is skipping the searing step. Browning the beef first adds rich flavor. This step is key for a deep, comforting taste. Take the time to sear the beef, and you will taste the difference. {{image_4}} You can easily change the veggies in this stew. If you have other favorites, try them! Sweet potatoes or parsnips work well. You can also add bell peppers for a pop of color. Just remember to cut them into similar sizes. This helps everything cook evenly. For beef, you can use other cuts besides chuck. Brisket or round can be great choices too. Each cut offers its own flavor and texture. Just make sure to adjust cooking times if you switch cuts. To make a gluten-free stew, choose gluten-free broth. Most store-bought options work well. You can also skip the tomato paste if it has gluten. This keeps the dish safe for those with gluten allergies. For a lighter version, use lean cuts of beef. You can also add more vegetables and less meat. This way, you keep the stew hearty without all the calories. Want to add a global touch? Try spices like cumin or paprika. These can give your stew a warm flavor. You can also add a bit of chili powder for some heat! Incorporating regional ingredients can also change the flavor. For an Italian twist, add some diced zucchini and basil. Or, for a Mexican spin, toss in corn and cilantro. Each option brings a new taste to your comforting stew. To store leftover stew in the fridge, let it cool first. Transfer the stew to an airtight container. This keeps moisture in and air out. Label the container with the date. Store it in the fridge for up to three days. To maintain flavor and freshness, reheat only what you plan to eat. This stops the stew from breaking down too much. To properly freeze stew, let it cool completely. Pour the stew into freezer-safe bags or containers. Leave some space at the top for expansion. Seal tightly and label with the date. You can freeze it for up to three months. For reheating once thawed, place it in a pot over low heat. Stir often until it is heated through. You can also use a microwave. Just be sure to stir it halfway through. In the fridge, the stew lasts about three days if stored well. In the freezer, it can be kept for three months. After thawing, use it within three days for the best taste. Always check for any off smells or changes in texture before eating. Yes, you can use frozen beef in this stew. Just remember a few tips: - Thaw first: If you can, thaw the beef in the fridge overnight. This helps it cook evenly. - Sear it: Searing frozen beef can be tricky. Cook it on a lower heat, and make sure it browns well. - Adjust time: Add an extra hour to the cooking time if using frozen beef. Check for tenderness before serving. Using frozen beef can make this stew ready when you are. It saves time and still tastes great. Making this stew ahead can save you time later. Here are the best ways to prep: - Prep veggies: Chop all your vegetables a day before. Store them in the fridge in a sealed bag. - Brown the meat: Sear the beef a day ahead. Cool it and store it in the fridge. - Mix the sauce: Combine the broth, tomatoes, and seasonings. Store this mix in the fridge too. On the day you want to serve it, layer all the ingredients in your slow cooker. Then, just set it to cook! If your stew ends up watery, don’t worry. Here are some quick solutions to thicken it: - Cornstarch slurry: Mix 1 tablespoon of cornstarch with 2 tablespoons of cold water. Stir this into the stew and let it cook for a few more minutes. - Add potatoes: Mash a few potatoes from the stew and mix them back in. This naturally thickens the broth. - Reduce liquid: Remove the lid and cook on high for another 30 minutes to let some liquid evaporate. These tricks will help you achieve the perfect thickness for your hearty stew. In this post, we covered how to create a delicious slow-cooked beef stew. We discussed key ingredients, like beef chuck and fresh veggies, that enhance flavor. I shared step-by-step instructions for preparation and cooking. You can customize the recipe with spices and different veggies. Remember to store leftovers properly to keep them fresh. Slow-cooked beef stew is easy and allows for personal twists. Enjoy making it your own!

When the chill of winter hits, nothing warms the soul quite like a Slow Cooker Hearty Beef Veggie Stew. This dish is not only easy to make, but it’s full …

Read more

Categories Dinner

Sheet Pan Lemon Herb Chicken and Potatoes Delight

September 12, 2025 by Chef Remy
- 4 boneless, skinless chicken thighs - 1 pound baby potatoes, halved - 3 tablespoons olive oil, divided - Zest and juice of 2 fresh lemons - 4 cloves garlic, minced - 1 tablespoon Dijon mustard - 1 teaspoon dried oregano - 1 teaspoon dried thyme - ½ teaspoon paprika - Salt and pepper to taste - Fresh parsley, finely chopped (for garnish) Using fresh and quality ingredients makes your dish shine. I use boneless, skinless chicken thighs for their juicy texture. They absorb flavors well and stay tender during cooking. Baby potatoes are a favorite because they cook evenly and get crispy. The olive oil adds richness and helps everything roast perfectly. Zesty lemons bring a bright taste. I love using both the juice and zest. Garlic adds a warm, savory flavor. Dijon mustard enhances the marinade’s tanginess. Dried herbs like oregano and thyme give depth to the dish. Paprika adds a hint of smokiness. A sprinkle of salt and pepper balances everything out. Fresh parsley is my go-to for garnish. It adds color and a fresh taste. When I sprinkle it on top, it makes the dish look even more inviting. These ingredients come together to create a meal that is both comforting and vibrant. 1. First, preheat your oven to 425°F (220°C). This heat will make your chicken and potatoes nice and crispy. 2. Now, grab a large mixing bowl. In it, whisk together the olive oil, lemon juice, lemon zest, minced garlic, Dijon mustard, oregano, thyme, paprika, salt, and pepper. This yummy marinade packs a lot of flavor. 1. Next, take your chicken thighs. Coat them well in the marinade. Make sure each piece gets a good covering of that tasty mix. 2. For the best flavor, let the chicken sit in the marinade. Fifteen minutes is good, but two hours is even better if you have the time. 1. While the chicken marinates, let’s prep those baby potatoes. Halve them and place them on a large baking sheet. 2. Drizzle the potatoes with a tablespoon of olive oil. Sprinkle with salt, pepper, and a bit more paprika. Toss them well to coat them evenly. 3. Arrange the potatoes in a single layer on the sheet pan. This helps them get crispy while cooking. 4. Once your chicken is ready, place the thighs on the same sheet pan with the potatoes. Pour any leftover marinade over the chicken for extra flavor. 1. Roast the chicken and potatoes in the preheated oven for 25 to 30 minutes. 2. Keep an eye on them. The chicken needs to reach an internal temperature of 165°F (75°C). When done, the potatoes should be golden and crispy. 3. After cooking, let the dish rest for a few minutes before serving. This helps all the flavors come together. Enjoy your meal! Marinating chicken adds depth to its taste. I recommend marinating for at least 15 minutes. If you have time, let it sit for up to 2 hours. This helps the chicken absorb all the zesty lemon and herb flavors. Using fresh herbs makes a big difference. Fresh oregano and thyme add brightness. Dried herbs work, but the taste is not as vibrant. If you use dried herbs, cut the amount in half. This keeps the flavor balanced. To get crispy potatoes, choose baby potatoes. Cut them in half for even cooking. Toss them with olive oil, salt, and pepper. Lay them out in a single layer on the sheet pan. This allows hot air to circulate, making them crispy. Cook the potatoes with the chicken. Check for doneness by piercing a potato with a fork. If it feels soft, they are ready. If not, give them a few more minutes. For a beautiful presentation, serve the chicken on a large platter. Arrange the crispy potatoes around the chicken. Drizzle some pan juices over everything for extra flavor. Finish with a sprinkle of fresh parsley for a pop of color. Pair this dish with a light salad or steamed vegetables. A side of green beans or a fresh garden salad works well. These add freshness and balance to your meal. {{image_4}} You can switch out chicken thighs for chicken breasts or tofu. Chicken breasts have less fat and cook faster. Tofu adds a great plant-based option. As for potatoes, baby potatoes work well, but you can use sweet potatoes or red potatoes too. Each option brings a unique taste and texture to the dish. Want to spice it up? Add a pinch of cayenne pepper or red pepper flakes for heat. You can also swap dried oregano and thyme for fresh herbs like basil or rosemary. Fresh herbs give a brighter flavor. Experiment with your favorites to find the mix you love. You can add other vegetables to your sheet pan. Try carrots, bell peppers, or zucchini for color and taste. If you want a smoky flavor, cook on a grill instead of in the oven. Grill marks add a nice touch and change the taste. Just keep an eye on the cooking time, as it may differ. To keep your Lemon Herb Chicken and Potatoes fresh, let them cool first. Then, store the leftovers in the fridge. Use airtight containers to keep them safe. This helps avoid any odors or moisture that can spoil the food. - Best Practices for Refrigeration: - Cool down the dish to room temperature before sealing. - Store in the fridge within two hours to keep it safe. - Recommended Storage Containers: - Use glass or plastic containers with tight-fitting lids. - Label containers with the date for easy tracking. Reheating is easy and quick. You want to warm it up without losing flavor or texture. - Methods for Reheating Chicken and Potatoes: - Use an oven at 350°F (175°C) for 15-20 minutes. - Alternatively, microwave for 1-2 minutes, checking often. - Tips for Keeping Potatoes Crispy: - If using the oven, place the potatoes on a baking sheet. - Broil for a few minutes to get them crispy again. This dish can be frozen, making it great for meal prep. - Can It Be Frozen? - Yes, it freezes well for up to three months. - How to Properly Freeze and Thaw: - Place cooled portions in freezer-safe bags or containers. - To thaw, move it to the fridge overnight before reheating. Yes, you can use chicken breasts. However, chicken breasts cook faster than thighs. Adjust the cooking time to about 20-25 minutes. Check for an internal temperature of 165°F (75°C) to ensure they are safe to eat. To check if the chicken is done, use a meat thermometer. Insert it into the thickest part of the thigh or breast. The safe internal temperature for chicken is 165°F (75°C). If you don’t have a thermometer, cut into the chicken. It should be white and the juices should run clear. Yes, you can prepare this dish ahead of time. Marinate the chicken and store it in the fridge for up to 2 hours. You can also cook it and store leftovers in the fridge. For reheating, place it in the oven at 350°F (175°C) until heated through. This dish pairs well with a fresh salad or steamed veggies. Consider serving a simple green salad with a light vinaigrette. Roasted broccoli or green beans also complement the meal nicely. You now have all the tools to create a delicious Lemon Herb Chicken and Potatoes dish. We covered easy steps, perfect ingredients, and useful tips. Remember to marinate your chicken well and season your potatoes for the best flavor. Explore variations for new tastes and don’t forget to store leftovers properly. This meal is not just tasty; it’s simple and fun to make. Dive in and enjoy a delightful dinner with family or friends!

Looking for a simple and delicious dinner? This Sheet Pan Lemon Herb Chicken and Potatoes Delight is your answer! With juicy chicken thighs, tender baby potatoes, and vibrant flavors, you’ll …

Read more

Categories Dinner

No Bake Nutella Cheesecake Cups Delicious and Easy

September 12, 2025 by Chef Remy
- 1 cup cream cheese, softened to room temperature - 1 cup Nutella - 1/2 cup powdered sugar - 1 teaspoon vanilla extract The cream cheese brings a rich, tangy flavor to the dessert. Nutella adds that irresistible chocolate and hazelnut taste. Powdered sugar sweetens the mix without any graininess. Vanilla extract adds a warm, aromatic touch to the cheesecake. - 1 cup graham cracker crumbs - 4 tablespoons unsalted butter, melted - A pinch of salt The graham cracker crumbs form the base of your cheesecake cups. They give a sweet and crunchy texture. The melted butter binds the crumbs together. Just a pinch of salt balances the sweetness for the perfect crust. - Crushed hazelnuts - Chocolate shavings Adding crushed hazelnuts gives a nice crunch and flavor. Chocolate shavings add a touch of elegance and extra chocolatey goodness. These garnishes make your cheesecake cups look and taste even better. First, gather your ingredients. In a medium bowl, blend 1 cup of softened cream cheese and 1 cup of Nutella together. Use a hand mixer on medium speed. Add 1/2 cup of powdered sugar and 1 teaspoon of vanilla extract. Mix until your mixture is smooth and creamy. Ensure there are no lumps. This will be the rich base of your cheesecake. Next, take a separate bowl and pour in 1 1/2 cups of cold heavy cream. Use a hand mixer to whip the cream. Start at medium speed and increase it to high. Whip until you see soft peaks form. This will take about 3 to 4 minutes. Be careful not to overwhip the cream, or it will become grainy. Once your whipped cream is ready, it’s time to combine it with the Nutella mixture. Start by adding one-third of the whipped cream to the Nutella mix. Use a spatula to fold gently. This lightens the mixture without deflating the whipped cream. Repeat this until all the whipped cream is mixed in. Now, let’s make the crust. In another bowl, mix together 1 cup of graham cracker crumbs with 4 tablespoons of melted unsalted butter and a pinch of salt. Stir until the crumbs look like wet sand. This will form a tasty base for your cheesecake cups. To assemble, take serving cups or glasses. Add about 2 tablespoons of the graham cracker mixture to the bottom. Press it down lightly to form a base. Next, layer about 3 tablespoons of the Nutella cheesecake filling on top. Keep repeating the layers until your cups are filled, finishing with a layer of the cheesecake filling on top. After assembling the cups, place them in the refrigerator. Let them chill for at least 2 to 3 hours. This helps the flavors mix and the texture to set. Chilling is key to a perfect cheesecake. Just before serving, sprinkle the tops with crushed hazelnuts and chocolate shavings. This adds a nice crunch and extra flavor. For a fun twist, you might add a sprig of mint for color. Enjoy these delightful cheesecake cups! - Avoiding overwhipping cream: When you whip the cream, stop once soft peaks form. If you whip too long, the cream can become grainy. - Mixing tips for lightness: Use a spatula to gently fold the whipped cream into the Nutella mixture. This keeps it airy and smooth. - Mixing techniques to prevent lumps: Always blend the cream cheese and Nutella until smooth before adding anything else. This helps prevent lumps in your cheesecake. - Tips for crust consistency: Make sure the graham cracker crumbs are well-coated with melted butter. The texture should feel like wet sand, not dry. - Pairing with beverages or other desserts: These cheesecake cups go great with coffee or a sweet dessert wine. Try them with fresh fruit for a nice balance. - Ideal occasions for serving: Serve these cups at parties, picnics, or family gatherings. They are easy to share and look lovely on any table. {{image_4}} You can easily change the flavor of your no-bake Nutella cheesecake cups. Here are a few ideas: - Adding different flavor extracts: Try adding almond or hazelnut extract for a fun twist. Just one teaspoon can change the taste. - Mixing in other chocolate types: Swap Nutella for dark or white chocolate spreads. Each option brings a unique flavor. If you have dietary needs, don't worry! You can still enjoy these cups: - Gluten-free crust options: Use gluten-free graham cracker crumbs. Many brands offer great substitutes. - Dairy-free substitutes for cream cheese: Look for dairy-free cream cheese. These are often made from nuts or soy. Presentation can make a big difference! Here are a few serving ideas: - Alternative serving vessels: Use mason jars, shot glasses, or small bowls. These can add a cute touch. - Miniature versions for events: Create bite-sized cups for parties. Just reduce the ingredients and layer them in small cups. They are perfect for sharing! To keep your No Bake Nutella Cheesecake Cups fresh, refrigeration is key. Always place them in the fridge right after making. This helps flavors meld and keeps the cups firm. Use airtight containers for the best results. This ensures no air gets in, which can spoil the dessert. In the fridge, your cheesecake cups can last up to five days. After that, they may start to lose their creamy texture. Always check for signs of spoilage. If you see any changes in color, or if they smell off, it's best to toss them. Yes, you can freeze these cheesecake cups! They freeze well for up to three months. To thaw, just move them to the fridge overnight. This keeps their texture smooth and tasty. When ready to serve, add fresh toppings for a delightful finish. Yes, you can make these cups ahead of time. Prepare the cheesecake mixture and crust. Layer them in cups and chill. They taste great after resting for a few hours or overnight. This also helps the flavors blend well. If you need a Nutella swap, try other chocolate spreads. Options include chocolate hazelnut spreads or even peanut butter. For a DIY option, mix cocoa powder with sweetened hazelnut spread. You can adjust the sweetness to your liking. To make gluten-free cheesecake cups, use gluten-free graham crackers. You can also use crushed nuts or gluten-free cookies for the crust. Ensure all other ingredients are gluten-free to keep your dessert safe. Yes, you can use other nuts for garnish. Chopped almonds, pecans, or walnuts work well. They add extra crunch and flavor. Feel free to mix and match based on what you like. You can indeed make a vegan version. Use dairy-free cream cheese and coconut cream instead of heavy cream. For a sweetener, use maple syrup or agave nectar. This way, you can enjoy a plant-based treat without losing flavor. In this blog post, I covered how to make Nutella cheesecake cups from scratch. We explored the key ingredients like cream cheese and graham cracker crumbs, and I shared step-by-step instructions to achieve that perfect texture. You learned tips to avoid common mistakes and how to customize your dessert to fit any occasion. Making these cheesecake cups is simple and fun. Whether you enjoy them at a party or just for yourself, they will impress everyone.

Are you ready for a treat that’s both easy and delicious? These No Bake Nutella Cheesecake Cups are perfect for chocolate lovers. With just a few simple ingredients, you can …

Read more

Categories Desserts

Pumpkin Chocolate Marble Bread Simple and Tasty Treat

September 12, 2025 by Chef Remy
- 1 cup pumpkin puree - 1/2 cup packed brown sugar - 1/2 cup granulated sugar - 1/2 cup vegetable oil - 2 large eggs - 1 teaspoon pure vanilla extract - 1 1/2 cups all-purpose flour - 1 teaspoon baking soda - 1/2 teaspoon baking powder - 1/2 teaspoon salt - 1 teaspoon ground cinnamon - 1/2 teaspoon ground nutmeg - 1/2 cup unsweetened cocoa powder - 1/2 cup chocolate chips This Pumpkin Chocolate Marble Bread is not just tasty; it’s simple too. You start with basic ingredients. You need pumpkin puree, which gives it a moist texture. Brown sugar adds a rich flavor, while granulated sugar gives sweetness. Vegetable oil keeps the bread soft. Eggs and vanilla extract help bind everything together and add taste. Next, we have dry ingredients. All-purpose flour provides structure. Baking soda and baking powder help it rise. Salt brings out the flavors. Ground spices like cinnamon and nutmeg add warmth. Unsweetened cocoa powder gives that delicious chocolate taste. If you want to make it extra special, add chocolate chips. They melt while baking and create sweet pockets of chocolate. This combination of flavors makes the bread perfect for any time of year, especially during the fall. - Preheat your oven to 350°F (175°C). - Grease or line a 9x5-inch loaf pan with parchment paper. - In a large bowl, combine: - 1 cup pumpkin puree - 1/2 cup packed brown sugar - 1/2 cup granulated sugar - 1/2 cup vegetable oil - 2 large eggs - 1 teaspoon pure vanilla extract - Mix these ingredients until smooth. - In another bowl, whisk together: - 1 1/2 cups all-purpose flour - 1 teaspoon baking soda - 1/2 teaspoon baking powder - 1/2 teaspoon salt - 1 teaspoon ground cinnamon - 1/2 teaspoon ground nutmeg - Gradually add the dry mixture to the pumpkin mixture. Stir gently until just combined. - To prepare the chocolate mixture, mix: - 1/2 cup unsweetened cocoa powder - 1/2 cup boiling water - Stir until smooth. - Split the batter into two bowls. Keep one as the pumpkin batter. - Mix the chocolate mixture into the second bowl. - Alternate spoonfuls of the pumpkin and chocolate batters in the loaf pan. - Use a knife or skewer to swirl the batters together. Be gentle to keep the marbled look. - Bake for 50-60 minutes. - To test for doneness, insert a toothpick in the center. It should come out clean or with a few crumbs. - Once done, remove the bread from the oven. Let it cool in the pan for about 10 minutes. - Carefully transfer the bread to a wire rack to cool completely. - Ensuring Moisture and Texture To keep your bread moist, use fresh pumpkin puree. Canned pumpkin works well too. Adding oil to the batter helps maintain a soft texture. Check your bread for doneness by inserting a toothpick into the center. It should come out clean. - Avoiding Overmixing When mixing the batter, stir just until combined. Overmixing can make your bread tough. Gently fold the dry ingredients into the wet ones. This keeps your bread light and fluffy. - Slicing and Serving Ideas Slice the bread into thick pieces for a nice look. Serve on a wooden board or a colorful platter. This makes it more inviting. You can also serve it warm with butter or cream cheese. - Garnishing Suggestions For a touch of elegance, dust the top with powdered sugar. You can add a dollop of whipped cream on the side. Fresh berries also add great color and flavor. - Addressing Texture Problems If your bread is too dry, it may have baked too long. If it’s too wet, it may need more time in the oven. Always check with a toothpick to avoid these problems. - Fixing Overcooked or Underbaked Bread If your bread is overcooked, it may be crumbly. To fix this in the future, adjust the baking time according to your oven. If it’s underbaked, put it back in the oven for a few more minutes. Just keep an eye on it! {{image_4}} Adding Nuts or Seeds You can enhance the texture by adding nuts or seeds. Walnuts and pecans work great. They add a crunchy bite. You can also try sunflower seeds or pumpkin seeds for a fun twist. Just fold in about half a cup before pouring the batter into the pan. Using Different Spices Feel free to switch up the spices. You can add ginger for a warm kick. Allspice or cardamom can also bring new flavors. Use about half a teaspoon of any spice you choose. This will make your bread unique and exciting. Gluten-Free Options To make this bread gluten-free, swap the all-purpose flour for a gluten-free blend. Look for one that measures cup-for-cup. You may need to add a bit more liquid. Keep an eye on the batter; it should not be too thick. Vegan Adaptations For a vegan version, replace the eggs. You can use flaxseed meal mixed with water. Mix one tablespoon of flaxseed with three tablespoons of water for each egg. This will keep your bread moist and delicious. Pairing with Beverages This bread pairs well with many drinks. A warm cup of tea is a perfect match. You can also serve it with coffee for a cozy breakfast. Hot chocolate makes a sweet treat too! Creative Serving Ideas Slice the bread thick and serve it on a wooden board. Dust it with powdered sugar for a pretty touch. You can also add whipped cream or a scoop of ice cream on the side. These ideas make your treat even more special. You can store leftover pumpkin chocolate marble bread at room temperature or in the fridge. If you plan to eat it within two days, keep it in an airtight container at room temperature. This keeps it fresh and soft. If you want it to last longer, place it in the fridge. The bread will stay good, but it may dry out a bit. To freeze the bread, first, let it cool completely. Then, wrap it tightly in plastic wrap or aluminum foil. Place it in a freezer-safe bag or container. This helps to prevent freezer burn. You can freeze it for up to three months. For thawing, take the bread out of the freezer and remove the wrapping. Let it sit at room temperature for a few hours. You can also heat slices in the microwave for about 15 seconds for a warm treat. Pumpkin chocolate marble bread lasts about two days at room temperature. In the fridge, it can last up to a week. If you freeze it, it will stay good for three months. Always check for signs of spoilage, like mold or an off smell, before eating. Yes, you can make this bread ahead of time. It stays fresh for several days. Just cool it completely and wrap it well. Store it in a cool, dry place. You can also freeze it for longer storage. Just make sure to slice it before freezing. If you don’t have pumpkin puree, you can use butternut squash puree. Applesauce is another option, but it will change the flavor. You can also use sweet potato puree for a different taste. Each substitute will give a unique twist to the bread. To check if your bread is done, insert a toothpick into the center. If it comes out clean or with a few moist crumbs, your bread is ready. It usually takes about 50-60 minutes in the oven. Keep an eye on it as ovens can vary. Absolutely! You can use milk chocolate or dark chocolate for a different taste. White chocolate can also work, but it will change the look and flavor. Just make sure to chop it into small pieces for even melting. To wrap up, this blog post covered how to make Pumpkin Chocolate Marble Bread. We went through all the key ingredients, from pumpkin puree to optional chocolate chips. I explained step-by-step instructions for mixing the batters and marbling them. We explored handy tips for baking and serving, plus variations for different diets. Lastly, I shared how to store leftovers for lasting freshness. Enjoy baking, and remember, this bread brings joy with its flavors and texture!

Looking for a simple and tasty treat that combines pumpkin and chocolate? You’ve found the right recipe! This Pumpkin Chocolate Marble Bread is moist, flavorful, and perfect for any occasion. …

Read more

Categories Desserts

Spicy Garlic Butter Shrimp Tacos Quick and Tasty Meal

September 12, 2025 by Chef Remy
To make Spicy Garlic Butter Shrimp Tacos, you need a few key items: - 1 lb large shrimp, peeled and deveined - 4 tablespoons unsalted butter - 4 cloves garlic, minced - 1 teaspoon red pepper flakes - 1 teaspoon smoked paprika - Salt and freshly cracked black pepper to taste - 8 small corn tortillas - 1 cup finely shredded red cabbage - 1 ripe avocado, sliced - 1 fresh lime, cut into wedges - Fresh cilantro, chopped, for garnish These ingredients create a balance of flavors. The shrimp provides protein, while the garlic and butter add rich taste. The lime and fresh veggies bring brightness and crunch. Using fresh shrimp gives the best taste and texture. Fresh shrimp cooks quickly and stays tender. However, frozen shrimp is a good option if fresh isn’t available. Just make sure to thaw it properly before cooking. It’s easy to do; let it sit in the fridge overnight or run it under cold water. If you don’t have all the ingredients, here are some swaps: - Use olive oil instead of butter for a lighter option. - Any white fish can replace shrimp if you prefer. - Swap red cabbage for green or even lettuce for a different crunch. - If you want creaminess but lack avocado, try sour cream or Greek yogurt. These substitutions keep the dish tasty while allowing for personal preferences. Start by melting 4 tablespoons of unsalted butter in a large skillet over medium heat. Watch closely as it melts. We want it creamy, not brown. Next, add 4 minced garlic cloves and 1 teaspoon of red pepper flakes. Stir this mix for about 1 minute. You want the garlic to smell great but not burn. Now, season 1 pound of shrimp with 1 teaspoon of smoked paprika, salt, and black pepper. Add the shrimp to the skillet. Cook them for 2-3 minutes on each side. They will turn pink and opaque when done. While the shrimp cooks, take another skillet or a dry pan. Warm 8 small corn tortillas over medium heat. You can also warm them over a low flame. Flip them often until they are soft and easy to fold. This should take about 30 seconds to 1 minute on each side. Keep an eye on them so they do not get too crispy. Once your shrimp is ready, remove it from the heat. Now it’s time to build your tacos! Place a good amount of shrimp on each warm tortilla. Add a handful of finely shredded red cabbage for some crunch. Then, layer a few slices of ripe avocado on top for creaminess. Squeeze fresh lime juice over each taco. Finally, sprinkle chopped cilantro for a fresh touch. Serve your tacos with extra lime wedges on the side for more zest with every bite. To cook shrimp just right, keep an eye on the color. You want them pink and opaque. Start with medium heat and cook for 2-3 minutes on each side. If you overcook them, they turn rubbery. Use fresh shrimp for the best taste but frozen works too. Just thaw them before cooking. To boost the flavor, add lime juice right before serving. The zesty lime cuts through the richness of the garlic butter. You can also add more red pepper flakes if you like it hot. Fresh herbs like cilantro add a nice touch. Try a bit of cumin for a deeper flavor. When serving, stack the tacos on a wooden board for a fun look. Add lime wedges for extra zest. Serve with a small bowl of leftover garlic butter for dipping. This gives a tasty twist with every bite. Don't forget to include extra toppings like salsa or hot sauce for variety. {{image_4}} If you love heat, you can switch up the spices. Try adding more red pepper flakes for a bolder kick. You can also mix in some cayenne pepper or hot sauce. Another good choice is to use chipotle powder. It gives a smoky flavor along with the spice. This will make your tacos stand out even more. For a meat-free twist, replace the shrimp with mushrooms or cauliflower. Both options soak up flavors well. You can sauté them in the same garlic butter mix. Add some black beans for protein and fiber. This keeps the meal filling and delicious. You can also use grilled zucchini or bell peppers as a tasty base. Toppings can change the game for your tacos. Try crunchy pickled onions for a zesty taste. Fresh mango or pineapple salsa adds sweetness and freshness. You can also use a spicy crema made of sour cream and lime juice. For a nutty flavor, sprinkle some toasted pumpkin seeds on top. Each topping adds its own flair and makes the tacos unique. You can store leftover shrimp in an airtight container. Make sure it cools down first. Place it in the fridge for up to two days. Shrimp can dry out, so keep it sealed well. You can also add a bit of the garlic butter to keep it moist. When you are ready to eat, heat leftover shrimp gently. Use a skillet on low heat. This way, the shrimp stays tender. Stir it often to avoid overcooking. You can also microwave it, but do so in short bursts. This helps prevent rubbery shrimp. You can freeze the shrimp if you need to store it longer. Put it in a freezer-safe bag and remove as much air as possible. It will last for about three months. To freeze tacos, wrap them tightly in foil or plastic wrap. Keep them in a freezer bag. For the best taste, eat them within two months. You can also freeze the cabbage and avocado slices separately. Just remember, avocado may brown a bit after thawing. Yes, you can! Feel free to swap shrimp for other seafood. Good options include scallops, crab, or even fish like tilapia. Just remember to adjust the cooking time. For example, fish cooks faster than shrimp, so keep an eye on it. To reduce the spice, cut back on red pepper flakes. You can also add more butter to tone down the heat. Another option is to add a creamy topping, like sour cream or yogurt. These will help balance the spice and add richness. The best way to warm corn tortillas is in a skillet. Heat a dry skillet over medium heat. Place the tortillas in for about 30 seconds. Flip them, and warm the other side for another 30 seconds. You can also warm them over a low flame directly on the stove. Just watch closely to avoid burning! Yes, these tacos are gluten-free! Corn tortillas do not contain gluten. Always check labels to make sure. If you use any other toppings, like sauces or dips, confirm that they are gluten-free too. Enjoy your meal without worry! You’ve learned about making spicy garlic butter shrimp tacos from scratch. We discussed main ingredients, tips for cooking shrimp, and how to assemble tacos. Remember, fresh ingredients enhance flavor, but frozen works too. Try different toppings to match your taste. Store leftovers properly, and don’t hesitate to explore variations, such as vegetarian options or less spicy recipes. Enjoy these tacos and get creative! Your journey in taco-making can only get better from here.

Get ready to elevate taco night with my Spicy Garlic Butter Shrimp Tacos! This quick and tasty meal packs bold flavors and a simple prep. Whether you’re a busy parent …

Read more

Categories Dinner

Bakery Style Cinnamon Apple Muffins Irresistible Treat

September 12, 2025 by Chef Remy
- 2 cups all-purpose flour - 1 cup granulated sugar - 1 tablespoon baking powder - 1 teaspoon baking soda - 1 teaspoon ground cinnamon - ½ teaspoon salt - 1 large egg, at room temperature - ½ cup unsalted butter, melted and cooled - 1 cup buttermilk (or milk with vinegar) - ½ teaspoon vanilla extract - 2 cups diced apples (Granny Smith or Honeycrisp preferred) - Cinnamon sugar topping: 1 tablespoon granulated sugar & 1 teaspoon ground cinnamon Gathering ingredients is the first step to making these muffins. Start with your dry ingredients. Flour gives the muffins their base. Sugar adds sweetness, while baking powder and baking soda help them rise. Cinnamon perks up the flavor, and salt balances it all. Next, focus on your wet ingredients. The egg binds everything together. Butter adds richness, and buttermilk brings a tangy taste. If you don’t have buttermilk, mix milk with vinegar. Vanilla adds a lovely aroma. Now, for the star of the show: the apples. Diced Granny Smith or Honeycrisp apples add a tartness that contrasts with the sweet batter. Finally, mix sugar and cinnamon for a tasty topping. This sweet crunch on top makes each muffin special. Start by preheating your oven to 375°F (190°C). This helps the muffins rise well. Prepare a muffin tin by lining it with paper liners or using non-stick spray. In a large bowl, whisk together: - 2 cups all-purpose flour - 1 cup granulated sugar - 1 tablespoon baking powder - 1 teaspoon baking soda - 1 teaspoon ground cinnamon - ½ teaspoon salt Make sure these dry ingredients mix well. This step is key to a light muffin. In another bowl, beat 1 large egg. Then, add: - ½ cup unsalted butter, melted and slightly warm - 1 cup buttermilk (or milk with vinegar) - ½ teaspoon vanilla extract Whisk until smooth. This mixture should blend nicely without lumps. Pour the wet mixture into the bowl of dry ingredients. Gently fold them together using a spatula. Be careful not to overmix; a few lumps are okay. This keeps the muffins tender. Fold in 2 cups of diced apples carefully. Use Granny Smith or Honeycrisp for the best taste. Make sure the apples spread evenly in the batter for a sweet surprise in each bite. In a small bowl, mix: - 1 tablespoon granulated sugar - 1 teaspoon ground cinnamon This topping gives a nice crunch and adds flavor. Using a cookie scoop or a spoon, fill each muffin cup about two-thirds full. Sprinkle the cinnamon sugar topping generously over each one. Bake in the preheated oven for 18-22 minutes. A toothpick should come out clean with a few crumbs. After baking, let the muffins cool in the tin for about 5 minutes. Then, transfer them to a wire rack to cool completely. This step helps them stay moist and fluffy. To get that perfect rise, start by preheating your oven to 375°F (190°C). Use a good-quality muffin tin and line it with paper liners. This will help the muffins rise well without sticking. Mix your dry ingredients well to avoid lumps. When adding wet to dry, fold gently. This keeps the muffins light and fluffy. If you don’t have buttermilk, it’s easy to make a substitute. Mix 1 cup of milk with 1 tablespoon of vinegar. Let it sit for 5 minutes. This will give you a tangy flavor similar to buttermilk. It helps the muffins rise and stay moist. Overmixing is a common pitfall. Mix just until the wet and dry ingredients combine. It’s okay if the batter is a bit lumpy. This helps keep the texture light. Also, check your oven temperature with a thermometer. Ovens can vary. Baking too hot can burn the tops before they cook through. {{image_4}} You can make these muffins even better with fun add-ins. Here are some ideas: - Nuts: Try adding chopped walnuts or pecans. They add a nice crunch. - Chocolate Chips: Mix in semi-sweet or dark chocolate chips for a sweet twist. - Spices: Add nutmeg or ginger for a warm flavor boost. Different apples can change the taste of your muffins. Here are some great options: - Granny Smith: These apples are tart and give great flavor. - Honeycrisp: They are sweet and crunchy, adding a lovely texture. - Fuji: These apples are sweet and juicy, great for a sweeter muffin. If you need a gluten-free version, you can still enjoy these muffins. Consider these swaps: - Gluten-Free Flour: Use a 1-to-1 gluten-free baking blend. Brands like Bob's Red Mill work well. - Oats: Ground oats can also be a good substitute. They add fiber and flavor. - Check Labels: Ensure your other ingredients are gluten-free, too. To keep your muffins fresh, store them in an airtight container. This helps prevent them from drying out. Place a paper towel in the container to absorb moisture. If you plan to eat them within a couple of days, this method works well. If you want to keep them longer, choose freezing instead. To freeze your muffins, first let them cool completely. Wrap each muffin tightly in plastic wrap. Then, place them in a freezer bag. Be sure to label the bag with the date. This way, you can enjoy them up to three months later. When you're ready to eat, just thaw them in the fridge overnight. To reheat muffins, use the oven for the best results. Preheat your oven to 350°F (175°C). Place the muffins on a baking sheet for about 10 minutes. This method keeps them moist and warm. If you are short on time, the microwave is an option too. Heat each muffin for about 15-20 seconds. Just be careful not to overheat, or they may become tough. Yes, you can use other flours. Whole wheat flour adds a nutty taste. Almond flour makes muffins moist and rich. If you use these flours, mix them with all-purpose flour for the best results. This keeps the texture light and fluffy. You can also try gluten-free flour blends if you need a gluten-free option. These muffins have a balanced sweetness. They use one cup of sugar, which is moderate. If you prefer less sweetness, cut the sugar by a quarter cup. You can also add a bit more cinnamon for flavor without extra sugar. Adjust to your taste for the best result. Serve these muffins warm for the best flavor. You can place them on a pretty platter. Adding a light dusting of powdered sugar makes them look special. Pair them with coffee or tea for a cozy treat. They are also great with a dollop of apple butter or cream cheese. Yes, you can make mini muffins! Use a mini muffin tin and fill each cup halfway. Bake them for about 10-12 minutes. Check for doneness with a toothpick. Mini muffins are perfect for snacks or parties. You can enjoy them without feeling too full. Buttermilk adds a tangy flavor and helps the muffins rise. It reacts with baking soda, making the muffins light. Regular milk will work, but your muffins may be less fluffy. To mimic buttermilk, mix regular milk with vinegar. Let it sit for five minutes before using. This will help achieve a similar effect. You can create delicious apple muffins with simple steps and basic ingredients. We covered everything from choosing the right apples to mixing the batter and baking. Remember, use quality ingredients for the best flavors. Try different add-ins and variations for your unique twist. Store any leftovers properly and enjoy them later or freeze them for future treats. With these tips, you’ll bake mouthwatering muffins every time. Happy baking!

Who doesn’t love the warm, comforting smell of fresh muffins baking? In this post, I’ll show you how to make Bakery Style Cinnamon Apple Muffins that taste just like your …

Read more

Categories Desserts

Slow Cooker Chicken Enchilada Soup Flavor Boost

September 12, 2025 by Chef Remy
- 2 boneless, skinless chicken breasts - 1 can (15 oz) black beans, drained and rinsed - 1 can (15 oz) corn kernels, drained - 1 can (10 oz) enchilada sauce (choose red or green) - 1 can (14.5 oz) diced tomatoes with green chilies, undrained - 1 medium onion, finely diced - 2 cloves garlic, minced - 1 teaspoon ground cumin - 1 teaspoon chili powder - 1 teaspoon smoked paprika - 4 cups chicken broth - Salt and freshly ground black pepper to taste - 1 cup shredded cheddar cheese (for topping) - Fresh cilantro, chopped (for garnish) - Sour cream or Greek yogurt (optional, for serving) You can swap out chicken for turkey if you prefer. Canned beans can be any type you like. If you want a milder soup, use mild enchilada sauce. For a fresh touch, add fresh tomatoes instead of canned. Don't have chicken broth? Water works too, but the taste won't be as rich. Using fresh, high-quality ingredients makes a big difference. Fresh chicken ensures tenderness. Good enchilada sauce adds depth. Always choose low-sodium broth to control the salt level. Fresh herbs like cilantro enhance flavor and color. Quality ingredients lead to a more delicious soup. Start with two boneless, skinless chicken breasts. Place them at the bottom of your slow cooker. This helps the chicken cook well in the broth. Next, pour in four cups of chicken broth. This forms the base of your soup, adding moisture and flavor. Now, it's time to add the other ingredients. First, add one can of drained black beans and one can of drained corn. These provide great texture and nutrition. Next, pour in one can of enchilada sauce. You can choose red or green based on what you like. Then, add one can of diced tomatoes with green chilies. Make sure to keep the juices for extra flavor. Sprinkle in one teaspoon of ground cumin, one teaspoon of chili powder, and one teaspoon of smoked paprika. These spices give your soup a rich, warm taste. Finally, add salt and black pepper to suit your taste. Cover your slow cooker and set it to cook. You can choose low for 6-8 hours or high for 3-4 hours. Cooking on low makes the flavors blend well. When the chicken is fully cooked, it should shred easily. After cooking, take the chicken out. Use two forks to shred it into bite-sized pieces. Return the shredded chicken to the soup and stir. This makes sure every bowl has tender chicken and bold flavors. Enjoy your flavorful slow cooker chicken enchilada soup! To make your soup burst with flavor, use fresh herbs. Fresh cilantro gives a bright taste. Choose high-quality enchilada sauce for depth. I prefer a brand with a smooth texture. Consider toasting your spices like cumin and chili powder. This enhances their aroma and flavor. One common mistake is not adding enough liquid. Always ensure your chicken and veggies are covered. This helps them cook evenly. Overcooking the chicken can make it dry. Use a timer and check for doneness. Lastly, don’t skip seasoning. A pinch of salt can elevate the taste. For a fun twist, add crispy tortilla strips on top. They add crunch and texture. You can also serve with lime wedges for a tangy kick. A dollop of sour cream or Greek yogurt offers creaminess. Lastly, try adding avocado slices for a creamy touch. {{image_4}} To make a vegetarian version, skip the chicken. Use more beans or lentils for protein. You can add chopped bell peppers and zucchini for texture and flavor. Replace chicken broth with vegetable broth. This keeps the soup hearty and full of taste. For a vegan option, swap sour cream with a plant-based yogurt. You can control the heat level easily. For a mild soup, use a mild enchilada sauce and skip the chili powder. If you love spice, add jalapeños or use hot enchilada sauce. A pinch of cayenne pepper also adds a nice kick. Taste as you go to find your perfect balance. Toppings can change the dish completely. Shredded cheddar cheese adds richness. Fresh cilantro brightens the flavors. For crunch, consider crispy tortilla strips. You can also add sliced avocado for creaminess. Greek yogurt is a healthy substitute for sour cream. Each topping brings its own flair to the soup. I suggest storing your soup in airtight containers. Glass containers work best. Make sure to let it cool down before sealing. This keeps the flavor fresh and prevents spills. To reheat, pour the soup into a pot over medium heat. Stir often until it's hot. You can also use a microwave in short bursts. Just make sure to cover the bowl. This helps heat evenly and keeps the soup moist. If you want to freeze your soup, first let it cool completely. Then, use freezer-safe bags or containers. Leave some space at the top for expansion. When you're ready to eat, thaw it in the fridge overnight. Reheat as mentioned earlier. Enjoy your tasty soup any time! Yes, you can use frozen chicken breasts. Just add an extra hour to the cooking time. This ensures they cook fully and stay juicy. Make sure to check if they are cooked through before shredding. The flavors will still blend well in the soup. You can serve this soup with several tasty sides. Here are some ideas: - Crispy tortilla strips for crunch - Fresh avocado slices for creaminess - A side of cornbread for a sweet touch - A simple salad for freshness These sides not only add flavor but also make your meal more satisfying. To boost the heat, try these options: - Add more chili powder or cumin. - Use a spicier enchilada sauce, like green. - Toss in jalapeños or diced serrano peppers. - Top with hot sauce when serving. Adjust the spice to your taste for a perfect kick! You now know how to make Chicken Enchilada Soup from start to finish. We covered the key ingredients and their importance for flavor. I shared easy steps to prepare and cook the soup perfectly. You learned tips to enhance taste and avoid common errors. There are even variations to suit different diets and spice levels. Lastly, I shared the best ways to store and reheat leftovers. With this guide, you can create a delicious soup that everyone will love. Enjoy your cooking adventure!

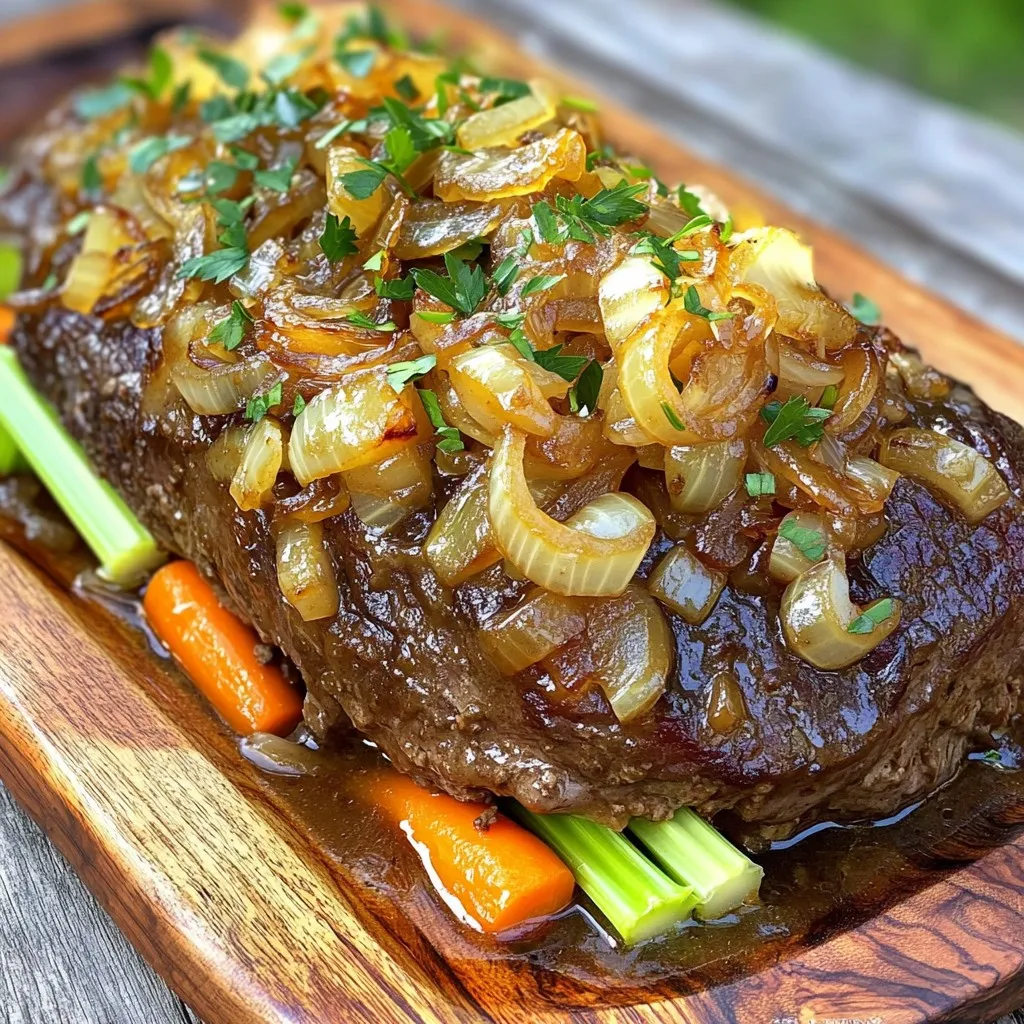
Are you ready to elevate your dinner game? My Slow Cooker Chicken Enchilada Soup is not just easy to make; it’s packed with bold flavors that will wow your taste …

Read more

Categories Dinner

Air Fryer Honey Mustard Salmon Bites Quick Recipe

September 12, 2025 by Chef Remy
You need 1 pound of fresh salmon fillet. Make sure the skin is off and cut it into bite-sized pieces. This helps the salmon cook evenly and makes it easy to eat. Fresh salmon gives the best taste. For the marinade, gather these items: - 2 tablespoons honey - 2 tablespoons Dijon mustard - 1 tablespoon soy sauce - 1 teaspoon garlic powder - 1 teaspoon smoked paprika - Salt and pepper to taste These ingredients create a sweet and tangy flavor. Honey adds sweetness, while Dijon mustard gives it a nice bite. Soy sauce adds depth, and garlic powder and smoked paprika bring warmth. For a beautiful finish, consider using fresh chopped parsley. It adds color and a fresh taste. You can also serve with lemon wedges. The lemon gives a bright flavor that pairs well with salmon. To start, gather your ingredients. In a medium bowl, mix: - 2 tablespoons honey - 2 tablespoons Dijon mustard - 1 tablespoon soy sauce - 1 teaspoon garlic powder - 1 teaspoon smoked paprika - A pinch of salt and pepper Whisk these until smooth. This blend creates a rich and tasty marinade. Next, take your fresh salmon fillet, cut it into bite-sized pieces. Place the salmon in the bowl with the marinade. Make sure each piece gets coated well. Cover the bowl and let it sit for 15-20 minutes. This allows the flavors to soak in deeply. Once the salmon is marinated, preheat your air fryer to 400°F (200°C) for about 5 minutes. Lightly spray the air fryer basket with non-stick spray. This step ensures the salmon won’t stick. Arrange the salmon bites in a single layer in the basket. Avoid crowding them. Cook for 8-10 minutes, flipping halfway through. The salmon should look golden and flaky when done. After cooking, let the bites rest for a minute. This keeps them juicy. Finally, sprinkle fresh chopped parsley on top before serving. Enjoy! To ensure your honey mustard salmon bites burst with flavor, let them marinate. I recommend at least 20 minutes. This time allows the salmon to soak up the marinade. The mix of honey, Dijon mustard, soy sauce, and spices creates a bold taste. For a sweet touch, adjust the honey. If you prefer more heat, add a dash of cayenne pepper. Cooking time can change based on salmon bite size. Smaller pieces may cook faster, around 6-8 minutes. Larger chunks might need 10-12 minutes. Always check for doneness. The salmon should flake easily with a fork. If needed, return it to the air fryer for a few more minutes. Serve your salmon bites with lemon wedges for a zesty kick. Fresh parsley adds color and flavor. Pair them with a light salad or some steamed veggies. These bites also work great as an appetizer or snack. Don't forget to offer toothpicks for easy serving! {{image_4}} You can switch up the marinade to fit your taste. Try using maple syrup instead of honey for a sweeter kick. You can also use whole grain mustard instead of Dijon for extra texture. If you like heat, add a dash of hot sauce to the mix. This gives your salmon bites a nice spice. If you don't have fresh salmon, you can use canned salmon. Just drain it well and break it into bite-sized pieces. For a gluten-free option, swap soy sauce with tamari. You can also replace garlic powder with fresh minced garlic for a stronger flavor. Don't hesitate to be creative with what you have! These salmon bites pair well with many sides. Try serving them with a fresh salad for a light meal. Roasted veggies are another great choice. You can also serve them with rice or quinoa for a heartier dish. Don't forget about dipping sauces like tzatziki or a spicy mayo. To store leftovers, place the salmon bites in an airtight container. This keeps them fresh. You can refrigerate them for up to three days. Make sure they cool down before sealing. This helps avoid excess moisture. When you're ready to eat, reheating is key. I suggest using the air fryer again. Set it to 350°F (175°C) for about five minutes. This method keeps them crispy. You can also use the microwave, but it may make them soggy. If you choose the microwave, heat them for 30 seconds at a time. You can make these salmon bites ahead. Marinate the salmon and store it in the fridge for up to 24 hours. This lets the flavors deepen. When you’re ready, pop them in the air fryer. They cook quickly, making this a great meal prep option. You should air fry salmon bites for 8 to 10 minutes. Flip them halfway for even cooking. When done, they should look golden and flaky. Yes, you can use frozen salmon. Just thaw it first before marinating. This ensures the marinade sticks well. Set your air fryer to 400°F (200°C). This high heat cooks the salmon quickly and makes it crispy. This blog detailed how to prepare flavorful air-fried salmon. We discussed key ingredients, like fresh salmon and marinade choices. I walked you through simple steps for marinating and air frying. We also shared tips for flavor and cooking times. Lastly, we explored variations and storage options. Air-fried salmon is easy and tasty. You can enjoy it as a meal or snack!

Craving a quick and tasty meal? My Air Fryer Honey Mustard Salmon Bites are just what you need! This easy recipe transforms fresh salmon into a flavorful dish that’s perfect …

Read more

Categories Appetizers

Creamy Garlic Mushroom Risotto Rich and Flavorful Meal

September 12, 2025 by Chef Remy
To make creamy garlic mushroom risotto, gather these items: - 1 ½ cups Arborio rice - 4 cups vegetable broth, kept warm - 1 cup mushrooms (shiitake or cremini), sliced - 1 medium onion, finely chopped - 3 cloves garlic, minced - 1 cup heavy cream or a plant-based alternative - ½ teaspoon dried thyme - ½ cup grated Parmesan cheese or a vegan substitute - 2 tablespoons olive oil - 1 tablespoon butter or a vegan option - Salt and freshly cracked pepper to taste - Fresh parsley, chopped for garnish Using quality ingredients makes a big difference in risotto. Fresh mushrooms give a rich flavor. Arborio rice absorbs liquid well, creating that lovely creamy texture. Good broth adds depth to the dish. Always choose fresh produce for the best taste. Quality cheese enhances the overall dish. Each ingredient plays a vital role in the final product. You can easily adjust this recipe for dietary needs: - Rice: Use other short-grain rice if Arborio is not available. - Broth: Use chicken broth for a non-vegetarian version. - Cream: Swap heavy cream with coconut milk or cashew cream for a vegan option. - Cheese: Nutritional yeast can replace cheese for a dairy-free touch. - Butter: Use olive oil instead for a vegan-friendly option. These substitutions keep the creamy garlic mushroom risotto tasty and satisfying for everyone. Start by warming the vegetable broth in a saucepan on low heat. This step is key. A warm broth helps the rice cook evenly. You want to keep it hot but not boiling. This prepares you for the next steps. In a large skillet, heat olive oil and butter over medium heat. Once hot, add the chopped onion. Sauté it until it turns translucent. This usually takes about 3-4 minutes. Then, add the minced garlic. Stir it in and let it cook for about 30 seconds. This helps release its great flavor. Next, toss in the sliced mushrooms. Stir occasionally, cooking until they are tender and golden brown. This should take about 5-7 minutes. Once the mushrooms are ready, add the Arborio rice. Stir well to coat the rice with the garlic-mushroom mix. Cook for 1-2 minutes. You want the rice to look slightly translucent on the edges. Now it’s time to start adding broth. Use a ladle to add one scoop of warm vegetable broth to the skillet. Stir the rice often. Wait until the rice absorbs the broth before adding more. Repeat this process for 18-20 minutes. You want the rice to be creamy and just al dente. Once the rice is cooked, stir in the heavy cream and grated Parmesan cheese. If you prefer, you can use a vegan cheese. Add the dried thyme, salt, and freshly cracked pepper. Adjust the seasoning to your taste. Remove the skillet from the heat and cover it. Let the risotto sit for a few minutes to thicken. Serve it hot, garnished with fresh parsley and extra cheese if you like. Enjoy this warm and flavorful dish! To get smooth and creamy risotto, you must stir often. As the rice cooks, it releases starch. This starch helps create a rich texture. Add broth one ladle at a time. Wait for the rice to soak in the liquid before adding more. This slow process gives you that perfect creamy finish. Keep an eye on the rice. It should be tender but still have a slight bite, known as al dente. One common mistake is adding all the broth at once. This leads to uneven cooking and a thick mess. Another mistake is not stirring enough. Stirring helps keep the rice from sticking and helps it cook evenly. Also, don’t rush the cooking. Each step is important for the flavors to build. Lastly, don’t skip the resting time after cooking. This allows the flavors to meld and the risotto to thicken. To boost flavor, use fresh thyme or parsley. These herbs add brightness and depth. Try adding a pinch of nutmeg for warmth. A splash of white wine can also elevate the dish. If you want a spicy kick, add a dash of crushed red pepper. Always taste as you go. Adjust salt and pepper to suit your preferences. These simple additions make your risotto even more delicious. {{image_4}} You can easily make this risotto vegan. Use plant-based cream instead of heavy cream. Nutritional yeast can replace Parmesan cheese. This will give you a cheesy flavor without dairy. Olive oil and vegan butter work well too. Just follow the same steps in the recipe. The taste remains rich and creamy. To add protein, consider chicken, shrimp, or tofu. For chicken, cook bite-sized pieces in the skillet before adding onions. Shrimp can join the mushrooms, cooking until pink. If you prefer tofu, use firm tofu and cook until golden. Adding protein makes the dish more filling and satisfying. The type of mushroom can change the flavor. Shiitake and cremini are great choices. You can also try portobello for a meaty texture. If you like a stronger taste, use oyster mushrooms. Each type brings a unique flavor to the risotto. Mix and match for an exciting twist! Once you finish your meal, let the risotto cool down. Place it in an airtight container. Make sure you store it in the fridge. Risotto can last up to three days this way. For the best taste, eat it within two days. To reheat your risotto, add a splash of broth or water to a pan. Heat it over low heat. Stir often until it warms. This helps keep the creaminess. You can also use the microwave. Just add some liquid and cover it to avoid drying out. If you want to freeze risotto, let it cool completely first. Then, scoop portions into freezer bags. Squeeze out the air and seal them well. This method keeps the risotto fresh for up to two months. When you’re ready to eat, thaw it in the fridge overnight. Then, reheat it with some broth or water to restore the creamy texture. No, Arborio rice is best for risotto. It has more starch than regular rice. This starch makes the risotto creamy. If you use regular rice, the dish may not be as rich. Risotto lasts about 3 to 5 days in the fridge. Store it in an airtight container. Let it cool down before placing it in the fridge. This helps keep the flavors fresh. You can make risotto in advance, but it is best fresh. If you make it early, undercook it slightly. This way, when you reheat, it will not become mushy. Add a bit of broth when reheating to restore creaminess. You can serve risotto with many dishes. Try a simple green salad for freshness. Grilled vegetables or garlic bread are also great choices. For protein, consider chicken or sautéed shrimp. In this article, we covered key points for making creamy garlic mushroom risotto. We explored the best ingredients, the step-by-step cooking method, and tips for perfect texture. Understanding substitutions helped meet dietary needs. We also looked at delicious variations and proper storage. My final thought is that great risotto comes from quality ingredients and practice. Enjoy your cooking journey!

Welcome to the world of Creamy Garlic Mushroom Risotto! This meal is rich, flavorful, and perfect for any occasion. You’ll learn how to pick top-notch ingredients for a wonderful taste. …

Read more

Categories Dinner
Older posts
Newer posts
← Previous Page1 … Page16 Page17 Page18 … Page115 Next →

ROASTED RECIPES

Where bold flavors meet everyday meals. Warm, vibrant, and made to share. 🔥🥗🍴

PAGES

Home About Contact Privacy Policy Terms & Conditions Cookie Policy GDPR Policy Copyright Policy Disclaimer

CATEGORIES

Appetizers Desserts Salads Breakfast Dinner

Contact

  • Pinterest
  • Mail
Copyright © 2025 Roasted Flavors. All rights reserved.