Skip to content
Roasted Flavors
  • Home
  • Appetizers
  • Desserts
  • Salads
  • Breakfast
  • Dinner
  • Privacy Policy
  • Contact
  • About

Chef Remy

Garlic Butter Chicken Orzo Skillet Flavorful Delight

October 11, 2025 by Chef Remy
- 1 pound boneless, skinless chicken thighs, cut into bite-sized pieces - 2 cups orzo pasta - 4 cloves garlic, minced - 1 medium onion, finely diced - 1 cup cherry tomatoes, halved - 1 cup baby spinach - 1 teaspoon dried oregano - 1 teaspoon smoked paprika - Salt and freshly cracked black pepper to taste - 3 cups chicken broth - 4 tablespoons unsalted butter, divided - Fresh parsley, chopped - Additional seasoning - Cut 1 pound of chicken thighs into bite-sized pieces. - Mince 4 cloves of garlic and dice 1 medium onion. - Melt 2 tablespoons of butter in a large skillet over medium heat. - Add the diced onion and cook until it is soft and clear, about 3-4 minutes. - Raise the heat to medium-high and add the chicken. - Season the chicken with salt, pepper, oregano, and smoked paprika. - Cook until the chicken is brown on all sides, around 5-7 minutes. - Add the minced garlic and cook for another minute until fragrant. - Stir in 1 cup of halved cherry tomatoes and cook for 2 minutes. - Pour in 3 cups of chicken broth and bring to a boil. - Add 2 cups of orzo pasta, stirring well to mix everything. - Lower the heat, cover, and simmer for 10-12 minutes. - Stir occasionally to stop the orzo from sticking. - When the orzo is tender, fold in 1 cup of baby spinach. - Stir in the last 2 tablespoons of butter until the spinach wilts. - Taste and adjust with more salt and pepper if needed. - Let it rest for a few minutes before serving. To ensure proper browning of chicken, pat the pieces dry before cooking. This helps them brown better. Cook the chicken in a hot skillet and avoid overcrowding it. This way, each piece gets a nice crust. To avoid orzo sticking, stir it often while cooking. Add a bit of extra broth if it looks too dry. This keeps the pasta fluffy and tender. Adjusting seasoning to taste is key. After cooking, taste your dish. If it needs more flavor, add salt or pepper. You can also add a splash of lemon juice for brightness. For extra flavor, consider adding a splash of white wine or some parmesan cheese. These will give your dish a tasty boost. Fresh herbs like basil or thyme can also enhance the flavor. For serving styles, wide, shallow bowls work best. They give an elegant look for any meal. Garnish your dish with freshly chopped parsley for a pop of color. You can also drizzle a bit of melted butter over the top before serving. This adds a rich finish. Enjoy serving this dish with a side salad or crusty bread to round out the meal! {{image_4}} You can easily change the protein in this dish. Try shrimp or tofu for a twist. Both options cook quickly and soak up the garlic butter flavor well. If you want a lighter meal, shrimp works great. Tofu is perfect for a vegetarian choice. Another fun swap is the pasta. If you don't have orzo, use other types like rice or small shells. Each will give a unique taste and texture. Just make sure to adjust the cooking time as needed. To make this dish gluten-free, choose gluten-free pasta. There are many options available that cook just like regular pasta. Follow the package instructions for cooking time. For a dairy-free option, swap unsalted butter for olive oil or a dairy-free butter. This change keeps the dish rich while accommodating dietary needs. Want to add more veggies? Toss in bell peppers, zucchini, or even peas. Just add them when you cook the onions. This adds more color and nutrients to your meal. You can also play with herbs and spices. Try fresh basil or thyme for a different flavor. Adding a pinch of red pepper flakes gives a nice kick too. Be creative and have fun with it! To store leftovers, let the Garlic Butter Chicken Orzo Skillet cool down first. Once cool, place it in an airtight container. This keeps the flavors fresh and prevents spills. I recommend using glass or BPA-free plastic containers. These materials help keep your food safe and tasty. You can keep it in the fridge for up to three days. The best way to reheat this dish is on the stove over low heat. This method warms it evenly and keeps the orzo from getting mushy. Stir it often to maintain the texture. You can also use the microwave. Just cover the bowl with a microwave-safe lid or wrap. Heat in short bursts, stirring in between. This way, you keep the flavor intact. Yes, you can freeze Garlic Butter Chicken Orzo Skillet! To freeze it, let it cool completely. Then, place it in a freezer-safe container. Make sure to leave some space at the top since things expand when frozen. This meal can last up to three months in the freezer. To reheat, thaw it in the fridge overnight. Then, warm it on the stove or in the microwave. Enjoy your easy meal anytime! What can I serve with Garlic Butter Chicken Orzo Skillet? You can serve this dish with a fresh side salad or crusty bread. A simple green salad with vinaigrette works well. If you want something warm, garlic bread complements the flavors. Can I make this recipe ahead of time? Yes, you can make this dish ahead of time. Store it in an airtight container in the fridge. It tastes great the next day. Just reheat on the stove or in the microwave. How do I know when chicken is cooked through? Check the chicken with a meat thermometer. The internal temperature should reach 165°F. If you don’t have a thermometer, cut into a piece. The meat should be white, not pink. What can I substitute for unsalted butter? You can use salted butter if you prefer. Just reduce the added salt. Olive oil also works well for a healthier option. It adds great flavor and keeps the dish light. Can I add a side salad or bread? Absolutely! A crisp side salad adds freshness. Crusty bread or garlic bread is perfect for soaking up the sauce. Both options enhance the meal and make it more filling. How spicy is this dish? This dish is not very spicy. The smoked paprika adds depth without heat. If you want more spice, add crushed red pepper flakes to taste. This blog post examined a delicious Garlic Butter Chicken Orzo Skillet recipe. We looked at the main ingredients, step-by-step instructions, and useful tips. You can make this dish your own by swapping proteins and adjusting flavors. We also covered how to store and reheat leftovers. Enjoy experimenting with this recipe and make it unique to your taste. A simple, tasty meal can bring joy to your table. Happy cooking!

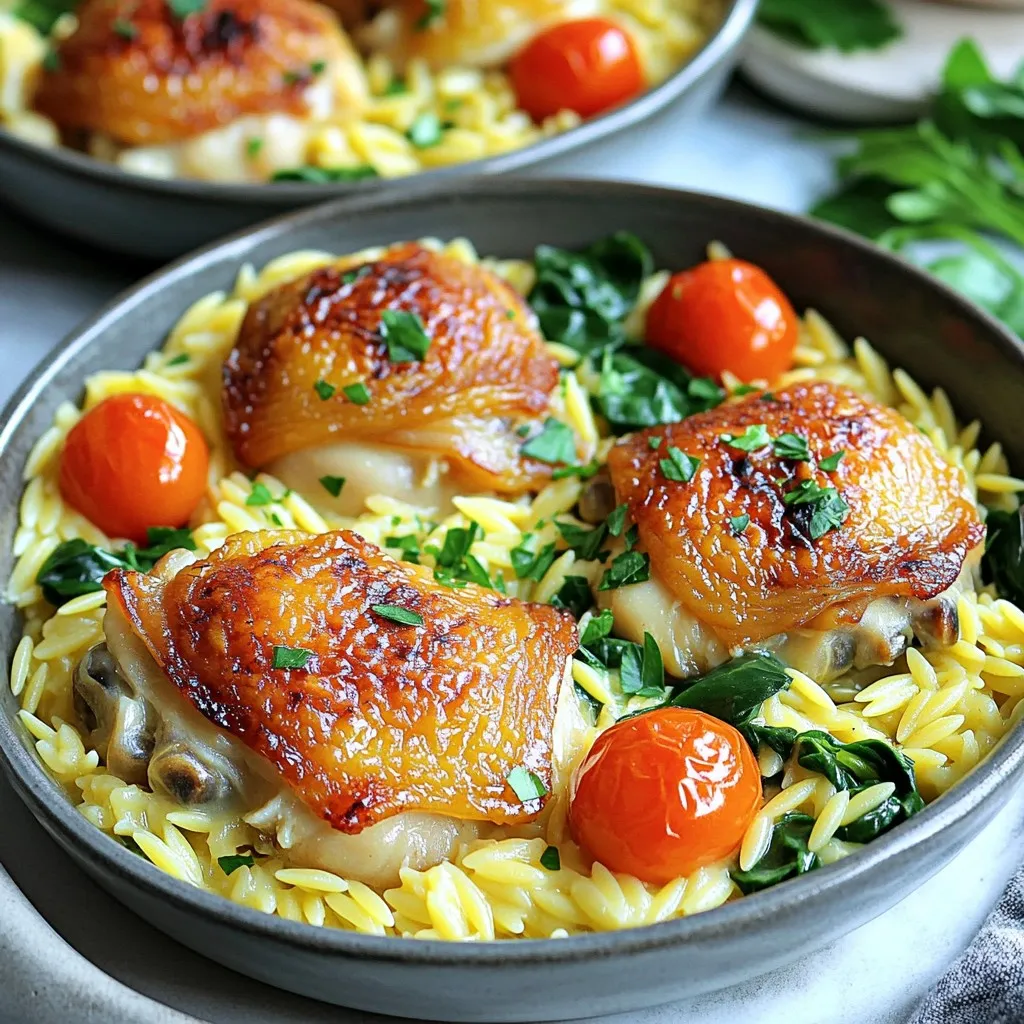
Get ready for a tasty meal that’s easy to make! This Garlic Butter Chicken Orzo Skillet is full of flavor and simple to prepare. You’ll love how the chicken, garlic, …

Read more

Categories Dinner

Sheet Pan Maple Dijon Chicken and Veggies Delight

October 10, 2025 by Chef Remy
- 4 bone-in, skin-on chicken thighs - 1 pound baby potatoes, halved - 2 cups fresh broccoli florets - 1 red bell pepper, sliced into strips - 1/4 cup pure maple syrup - 3 tablespoons Dijon mustard - 2 tablespoons olive oil - 1 teaspoon garlic powder - 1 teaspoon onion powder - 1 teaspoon dried thyme - Salt and freshly ground black pepper to taste The main ingredients in this dish are simple yet flavorful. Chicken thighs offer rich taste and juicy texture. Baby potatoes add a hearty bite, while broccoli and red bell pepper bring color and crunch. For the marinade, we mix maple syrup and Dijon mustard. This combo gives a sweet and tangy kick. Olive oil helps make everything smooth and shiny. Seasoning is key for flavor. Garlic powder and onion powder elevate the dish. Dried thyme adds earthiness, while salt and pepper balance it all. Each element works together to create a tasty meal you will enjoy. Begin by preheating your oven to 425°F (220°C). This high temperature is key. It helps the chicken skin turn golden and crisp. In a small bowl, whisk together the following ingredients until smooth: - 1/4 cup pure maple syrup - 3 tablespoons Dijon mustard - 2 tablespoons olive oil - 1 teaspoon garlic powder - 1 teaspoon onion powder - Salt and black pepper to taste Whisking well ensures the flavors blend nicely. The marinade should be thick but pourable. Once your marinade is ready, place the chicken thighs in a large bowl. Pour half of the marinade over the chicken. Use your hands or a brush to coat each thigh evenly. This helps the chicken soak up all the tasty flavors. Let it marinate for about 15 minutes at room temperature. While the chicken marinates, grab a sheet pan. Add these veggies: - 1 pound baby potatoes, halved - 2 cups fresh broccoli florets - 1 red bell pepper, sliced into strips Drizzle the remaining marinade over the veggies. Sprinkle with dried thyme, salt, and pepper. Toss gently to coat them well. This step ensures every bite is seasoned. Nestle the marinated chicken thighs on top of the veggies. Place them skin side up. This way, the skin gets crispy while roasting. Slide the sheet pan into your preheated oven. Roast for 30-35 minutes. Check that the chicken's internal temperature reaches 165°F (74°C). The veggies should be tender and slightly caramelized, adding to the dish’s charm. To add an extra touch of crispiness, turn on the broiler for an additional 2-3 minutes. Watch closely to prevent burning. This step brings out the best in the chicken skin. After roasting, carefully remove the pan from the oven. Let the dish rest for about 5 minutes. This resting time allows the juices to spread throughout the chicken, enhancing the flavor and moisture. To get that crispy skin on your chicken, start with bone-in, skin-on thighs. Before marinating, pat the skin dry with paper towels. This helps remove moisture. The drier the skin, the crispier it will get. You can also score the skin lightly with a sharp knife. This allows the fat to render out better during cooking. To boost flavor, think about adding fresh herbs or citrus. Fresh thyme works well with this dish. You can sprinkle some on the chicken and veggies before roasting. Zest from a lemon or orange adds brightness too. Just a little juice will bring out the sweetness of the maple syrup. Ovens vary, so cooking times may change. If you have a convection oven, reduce the temperature by 25°F. This helps the chicken cook evenly. Check the chicken's internal temperature. It should reach 165°F for safety. If the skin isn't crispy enough, broil for a few minutes. Keep a close eye to prevent burning. {{image_4}} You can switch up the veggies for more variety. Here are some great options: - Carrots, sliced - Zucchini, cubed - Cauliflower florets - Asparagus spears - Green beans Each vegetable brings its own flavor and texture. Pick what you love or what you have on hand. Feel free to mix it up with the marinade! You can try these alternatives: - Use honey instead of maple syrup for a different sweetness. - Swap Dijon mustard for whole grain mustard for a rustic touch. - Try a spicy mustard to add some heat. These changes add new tastes while keeping the dish simple. Chicken thighs are great, but you can use other proteins too: - Bone-in chicken breasts for leaner meat. - Pork chops for a heartier meal. - Firm tofu for a vegetarian option. Each protein changes the dish's flavor but keeps it easy and delicious. Enjoy experimenting! To store your leftovers, let the dish cool first. Place the chicken and veggies in an airtight container. This helps keep them fresh. Store it in the fridge for up to three days. When reheating, heat only what you need. This way, you keep the rest fresh longer. You can freeze this dish if you want to keep it longer. First, let it cool completely. Then, wrap the chicken and veggies tightly in plastic wrap. Place them in a freezer-safe bag or container. Label it with the date. You can freeze it for up to three months. To reheat, thaw it in the fridge overnight. Then, you can warm it in the oven at 350°F (175°C) for about 20 minutes. This helps keep the flavors intact and the chicken juicy. Leftovers from this dish should be eaten within three days when stored in the fridge. If frozen, aim to eat it within three months. Always check for any off smells or changes in texture before eating. This ensures your meal stays safe and tasty! Yes, you can use boneless chicken. Boneless chicken cooks faster and is easier to eat. However, bone-in chicken adds more flavor and moisture. If you prefer boneless, adjust your cooking time. Aim for about 25-30 minutes instead of 30-35 minutes. This dish pairs well with several sides. Try serving it with: - Rice or quinoa for a grain option - A fresh green salad for crunch - Garlic bread for a tasty addition - Steamed corn or green beans for extra veggies Yes, you can prep this dish ahead of time. Marinate the chicken and chop the veggies the night before. Store them in the fridge in separate containers. On cooking day, just assemble and roast. It saves time and makes for a stress-free meal. Yes, you can swap maple syrup for other sweeteners. Honey works well and adds a nice flavor. Agave nectar or brown sugar are also good options. If you want less sugar, try using a sugar-free syrup. Check the chicken with a meat thermometer. The internal temperature should reach 165°F (74°C). If you don't have a thermometer, cut into the thickest part. The juices should run clear, not pink. Make sure the veggies are tender too. This recipe combines chicken thighs, fresh veggies, and a simple marinade. You learned how to roast the dish and achieve a tasty meal. Remember to rest the dish after cooking for the best flavor. You can also try different veggies, proteins, or marinades for variety. Whether storing leftovers or preparing in advance, these tips help keep your meals fresh and tasty. Enjoy exploring your kitchen with this easy and delicious recipe!

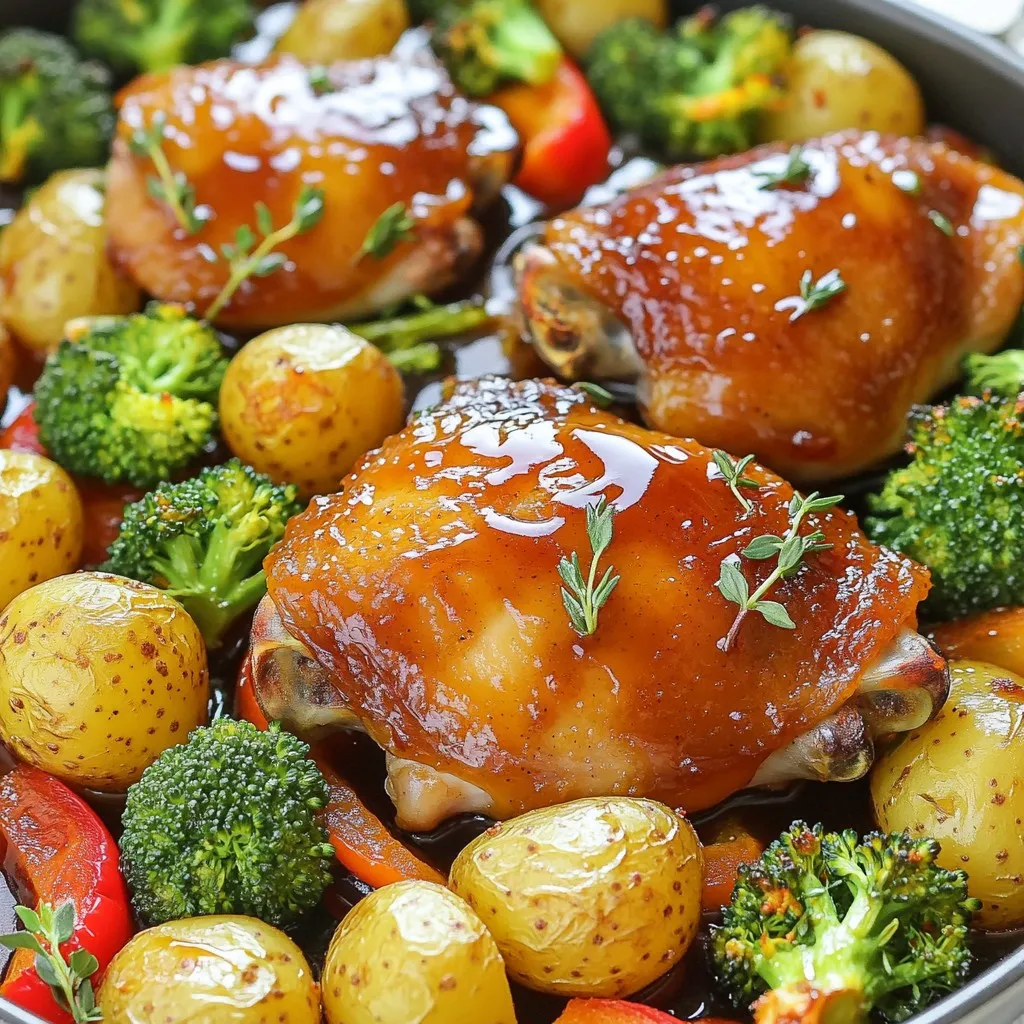
Welcome to the delicious world of sheet pan meals! Today, I’m excited to share my favorite recipe: Sheet Pan Maple Dijon Chicken and Veggies Delight. This dish combines juicy chicken …

Read more

Categories Dinner

No Bake Chocolate Pumpkin Cheesecake Bars Delight

October 10, 2025 by Chef Remy
- 1 ½ cups graham cracker crumbs - ½ cup unsweetened cocoa powder - ½ cup granulated sugar - ½ cup unsalted butter, melted - 1 cup cream cheese, softened - 1 cup canned pumpkin puree - ½ cup powdered sugar - 1 teaspoon pure vanilla extract - 1 teaspoon pumpkin pie spice - 1 cup whipped cream - A pinch of salt - Chocolate shavings or cocoa nibs for garnish Gathering these ingredients is a fun step. The graham cracker crumbs create a sweet base, while the cocoa powder adds a rich flavor. I love using unsalted butter for a smooth taste. Cream cheese makes the filling creamy and delightful. Canned pumpkin puree is key for that fall flavor. Always choose the puree, not the pie filling. The powdered sugar gives sweetness, and vanilla extract enhances the taste. Pumpkin pie spice adds warmth with its mix of cinnamon and nutmeg. For a finishing touch, whipped cream lightens the filling. A pinch of salt balances the sweetness. Finally, chocolate shavings or cocoa nibs make for a pretty garnish. These ingredients come together to create a special dessert that you will love! To start, gather your crust items. In a medium bowl, combine 1 ½ cups of graham cracker crumbs, ½ cup of unsweetened cocoa powder, and ½ cup of granulated sugar. Pour in ½ cup of melted unsalted butter. Mix until it feels like wet sand. Next, press this mixture firmly into the bottom of a 9x9 inch baking dish. Make sure it is even. Place the dish in the fridge to chill for 15 minutes. This helps the crust hold its shape. Now, focus on the filling. In a large bowl, beat 1 cup of softened cream cheese with an electric mixer. Keep mixing until it is smooth and free of lumps. Gradually add in 1 cup of canned pumpkin puree, ½ cup of powdered sugar, 1 teaspoon of pure vanilla extract, and 1 teaspoon of pumpkin pie spice. Add a pinch of salt too. Keep mixing until everything is fluffy and well combined. Next, bring in the whipped cream. Take 1 cup of whipped cream and gently fold it into the pumpkin mixture using a silicone spatula. Be careful not to deflate the whipped cream. The goal is to keep it light and airy. Fold until just mixed; some small swirls are fine! Now it’s assembly time. Pour the creamy pumpkin cheesecake mixture over the chilled chocolate crust. Use an offset spatula to spread the filling evenly across the top. Make sure it looks smooth and inviting. Cover the baking dish tightly with plastic wrap or aluminum foil. This keeps out any fridge smells. Refrigerate for at least 4 hours, but overnight is best. This wait helps the bars set and meld the flavors. After chilling, take the bars out of the fridge. Use a sharp knife to cut them into squares. For a pretty touch, garnish each square with chocolate shavings or cocoa nibs. If you want to impress, drizzle melted chocolate over the bars or add a dollop of fresh whipped cream on the side. Enjoy your delicious creation! To get the best texture, avoid overmixing your filling. Overmixing can make your bars dense and heavy. Instead, mix just until smooth. This keeps the filling light and fluffy. Use a rubber spatula to fold in the whipped cream. This helps you keep the airiness. Gently fold in the whipped cream until it is just combined. Small swirls of cream add charm to your cheesecake. To boost the flavor, try adding more spices. Nutmeg and allspice work well with pumpkin. A pinch of ginger can also add warmth. If you like it sweeter, use maple syrup or honey instead of sugar. These can add a nice twist to your bars. For a beautiful presentation, slice your bars carefully. Use a sharp knife to ensure clean edges. Place the bars on a fancy serving platter. Drizzle melted chocolate over the top for a special touch. Adding a dollop of whipped cream beside each bar makes it look gourmet. Finish with chocolate shavings or cocoa nibs for a lovely finish. {{image_4}} You can play with flavors in many fun ways. Try adding spices like nutmeg or allspice. These spices add warmth and depth to your bars. You can also swirl in chocolate or caramel for a special touch. This will give your dessert a rich flavor and a fancy look. If you need gluten-free options, use almond flour or gluten-free cookies for the crust. This change keeps the yummy taste while making it safe for everyone. For a dairy-free version, swap the cream cheese with a dairy-free cream cheese. You can also use coconut cream for the filling. This keeps the bars creamy and delicious without dairy. To keep your No Bake Chocolate Pumpkin Cheesecake Bars fresh, refrigerate them. Use an airtight container or cover the dish tightly. This will help prevent odors from the fridge. These bars will last about 5 days in the fridge. Enjoy them chilled for the best taste! To freeze the bars, cut them into squares first. Place the pieces in a single layer on a baking sheet. Freeze them for about an hour until solid. Then, transfer the squares to a freezer-safe bag or container. Make sure to remove as much air as possible. They can stay frozen for up to 3 months. When ready to eat, thaw the bars in the fridge overnight. This keeps the texture creamy and smooth. Yes, you can make these bars a day or two before serving. It helps the flavors blend well. Just make sure to cover them tightly in the fridge. This keeps them fresh and tasty. When ready to serve, slice and enjoy! You can use butternut squash puree if you can’t find pumpkin. Sweet potato puree also works well. Both options bring a nice flavor and texture. Just ensure they are purees, not pie fillings. To make the crust firmer, try adding a bit more melted butter. The butter helps bind the crumbs together. You can also press the crust down more firmly in the dish. This helps it hold its shape better when cut. If you prefer, you can use Cool Whip or other whipped toppings. For a dairy-free option, try coconut cream. It adds a nice flavor and texture. Just whip it until light and fluffy before folding it in. In this blog post, we explored how to create delicious pumpkin bars from scratch. We covered key ingredients like graham cracker crumbs and cream cheese, and provided step-by-step instructions for mixing, chilling, and serving. I shared tips to enhance flavor and presentation, along with variations and storage options. These pumpkin bars are easy to make and perfect for sharing. With a few tweaks, you can adjust them to fit dietary needs or personal taste. Enjoy making these tasty treats!

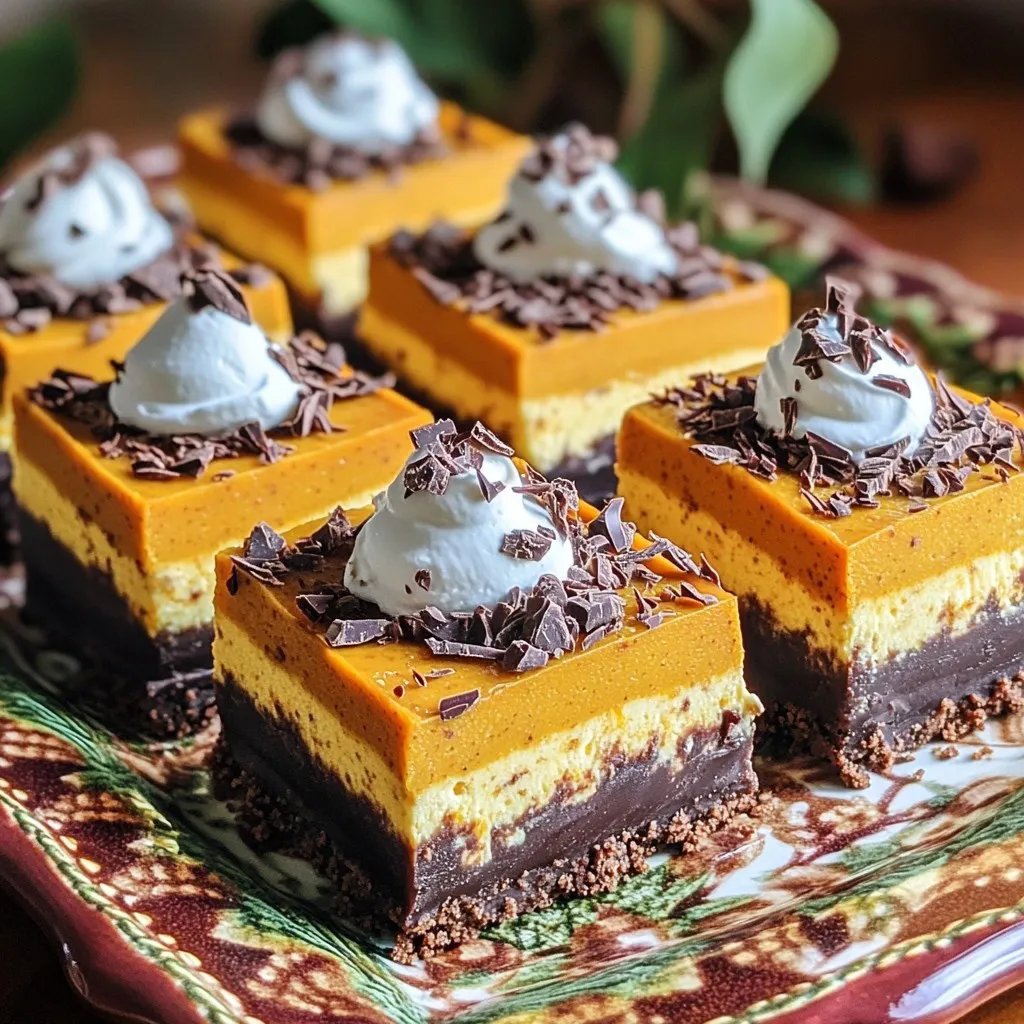
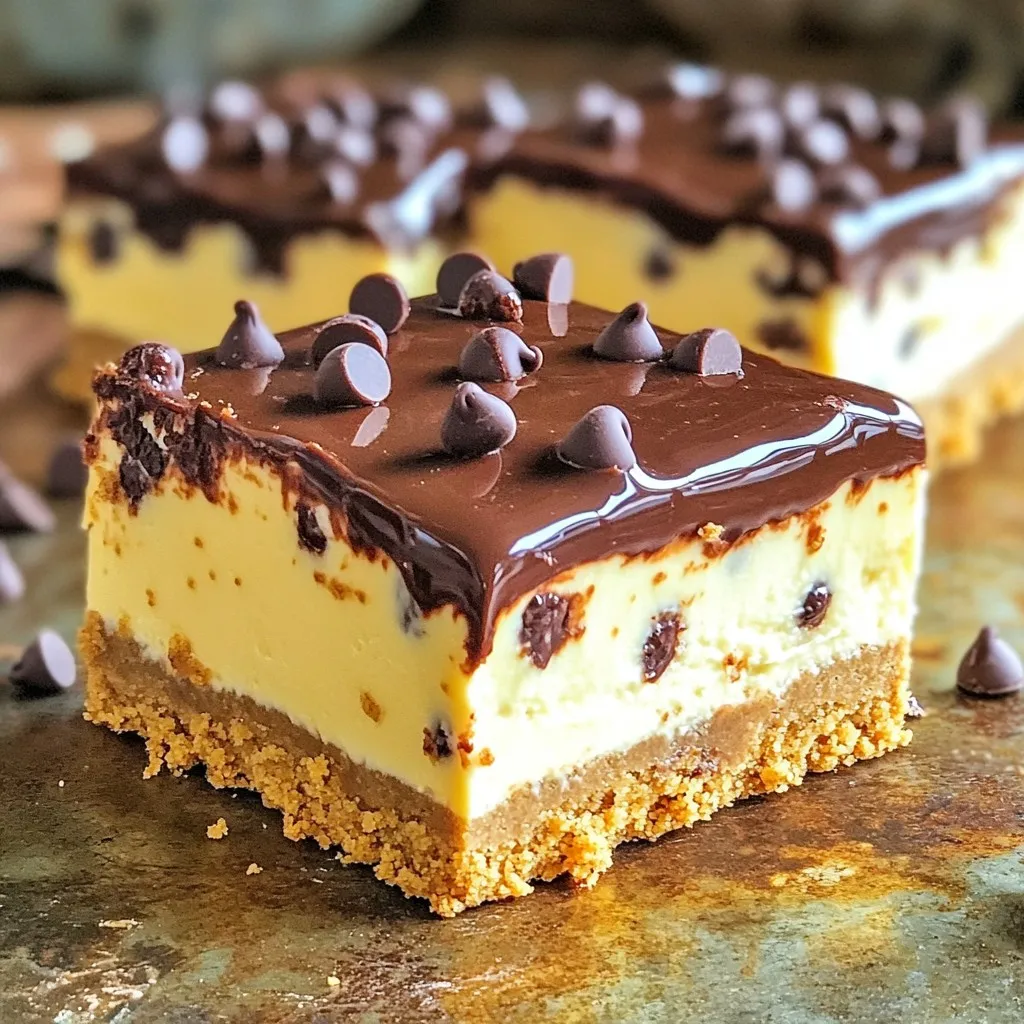
Get ready to delight your taste buds with a treat that combines chocolate and pumpkin in the best way! These No Bake Chocolate Pumpkin Cheesecake Bars are easy to make …

Read more

Categories Desserts

Slow Cooker Honey Garlic Chicken Thighs Tasty Dish

October 10, 2025 by Chef Remy
- Chicken and Marinade Components - 4 bone-in, skin-on chicken thighs - 1/2 cup honey - 1/4 cup soy sauce (or tamari for a gluten-free option) - 3 cloves garlic, finely minced - 1 tablespoon fresh ginger, finely grated - 1 tablespoon sesame oil - 1/2 teaspoon freshly ground black pepper - 1/4 teaspoon red pepper flakes (optional for an extra kick) - Optional Garnishes - 2 green onions, finely chopped (for garnish) - Sesame seeds (for garnish) Gather these ingredients before you start. The chicken thighs give a rich flavor. Honey adds sweetness, while soy sauce brings umami. Garlic and ginger add depth. Sesame oil gives a nice finish. The black pepper and red pepper flakes offer a bit of heat. If you want to add some color, consider garnishing with green onions and sesame seeds. They not only look good, but they also add flavor. This dish is simple, yet every bite is full of taste. Happy cooking! To make the honey garlic marinade, start with a medium bowl. Add 1/2 cup honey, 1/4 cup soy sauce, and 3 cloves of minced garlic. Then, grate 1 tablespoon of fresh ginger into the bowl. Next, pour in 1 tablespoon of sesame oil. Finally, add 1/2 teaspoon black pepper and 1/4 teaspoon red pepper flakes if you want some heat. Whisk everything together until smooth. This marinade is the key to great flavor. Lightly grease your slow cooker for easy cleanup. Place 4 bone-in, skin-on chicken thighs in the cooker. Pour the honey garlic marinade over the chicken. Make sure each piece is well coated. Secure the lid. Cook on Low for 6 hours or on High for 3 hours. The chicken is done when it is tender and reaches 165°F (75°C). This slow cooking makes the chicken juicy and full of flavor. Once the chicken is cooked, use tongs to lift it from the slow cooker. Let excess sauce drip off. If you like, skim any fat from the sauce with a spoon. For a thicker sauce, transfer the cooking liquid to a medium saucepan. Simmer it for about 10 minutes until it thickens. To serve, place the chicken on a platter. Drizzle it with the thickened sauce. Top with chopped green onions and sesame seeds for a nice look. Enjoy this tasty dish with friends or family! To get the best flavor, use fresh garlic and ginger. They add a bright taste. Make sure to whisk the marinade well. This helps all the flavors mix. If you want more spice, add extra red pepper flakes. Let the chicken marinate for a few hours or overnight. This gives the meat time to soak up the flavors. Cooking times matter. For tender chicken, cook on Low for 6 hours. If you’re in a hurry, you can cook on High for 3 hours. Always check the internal temperature. The chicken should reach 165°F (75°C). This ensures it is safe to eat. If you have a meat thermometer, use it to check. You need a few tools for this recipe. A slow cooker is key. A medium mixing bowl works well for the marinade. Tongs help you lift the chicken out safely. You might want a whisk for mixing the sauce. If you want to thicken the sauce, use a medium saucepan to simmer it down. This makes the sauce rich and tasty. {{image_4}} You can change up the ingredients for more flavor. Try using boneless chicken thighs instead of bone-in ones. This will cut down on cooking time. If you want a different taste, swap honey for maple syrup. You can also add a splash of apple cider vinegar for a tangy kick. For more crunch, toss in some sliced bell peppers or carrots with the chicken. If you don’t have a slow cooker, you can use an oven. Preheat it to 375°F (190°C). Place the chicken in a baking dish and pour the sauce over it. Bake for about 45 minutes, or until the chicken reaches 165°F (75°C). You can also grill the chicken for a smoky flavor. Just marinate as usual and grill for about 6-7 minutes per side. For a gluten-free option, use tamari instead of soy sauce. If you want a lower sugar version, try using a sugar substitute like monk fruit or stevia. For a lighter dish, you can remove the skin from the chicken thighs. This will cut down on fat while still keeping the flavor. If you're vegan, substitute chicken with firm tofu, and adjust cooking times as needed. Store your leftover honey garlic chicken thighs in an airtight container. Make sure to let them cool first. Place the container in the fridge. They will stay fresh for up to four days. For best taste, try to eat them within two days. To reheat, take the chicken out of the fridge. You can use a microwave or an oven. If using a microwave, heat for one to two minutes. Check that it is hot all the way through. For the oven, preheat to 350°F (175°C). Place the chicken on a baking sheet for about 10-15 minutes. If you want to freeze the chicken, wrap it well. Use plastic wrap or a freezer bag. It will last up to three months in the freezer. When ready to eat, thaw it in the fridge overnight. Reheat as mentioned above for the best taste. Yes, you can use boneless chicken thighs. They will cook faster than bone-in thighs. Adjust the cooking time to about 4 hours on low or 2 hours on high. The meat will still soak up the tasty honey garlic sauce. To add spice, increase the amount of red pepper flakes. You can also add sliced fresh jalapeños or a dash of hot sauce. Adjust the heat level to your liking. Just remember, spice can change the flavor balance. Honey garlic chicken goes well with many sides. Here are some ideas: - Steamed rice - Roasted vegetables - Mashed potatoes - Asian slaw - Quinoa salad These sides will complement the sweet and savory flavors of the chicken. Yes, you can substitute chicken with pork or tofu. Adjust cooking times as needed. Pork should be cooked to an internal temp of 145°F (63°C). Tofu cooks quicker, so check it at about 2 hours on low. Store leftovers in an airtight container. They can last in the fridge for 3 to 4 days. Make sure to let the chicken cool before storing. Yes, you can freeze it. Place the chicken in a freezer-safe container. It will last for up to 3 months. Thaw it overnight in the fridge before reheating. If you don’t have sesame oil, you can use olive oil or vegetable oil instead. The flavor will be different but still tasty. To thicken the sauce, simmer it in a saucepan. Cook it over medium heat until it reduces to your desired thickness. This makes a richer sauce that clings to the chicken. Absolutely! You can add vegetables like carrots or bell peppers. Just cut them into even pieces. Add them halfway through cooking for the best texture. This blog post covers how to make honey garlic chicken. You learned about the key ingredients, cooking steps, and helpful tips. We discussed ingredient swaps and variations for dietary needs. Finally, we explored storage and reheating options. Cooking can be fun and easy. With these steps, you can impress anyone with your skills. Enjoy your honey garlic chicken in new ways!

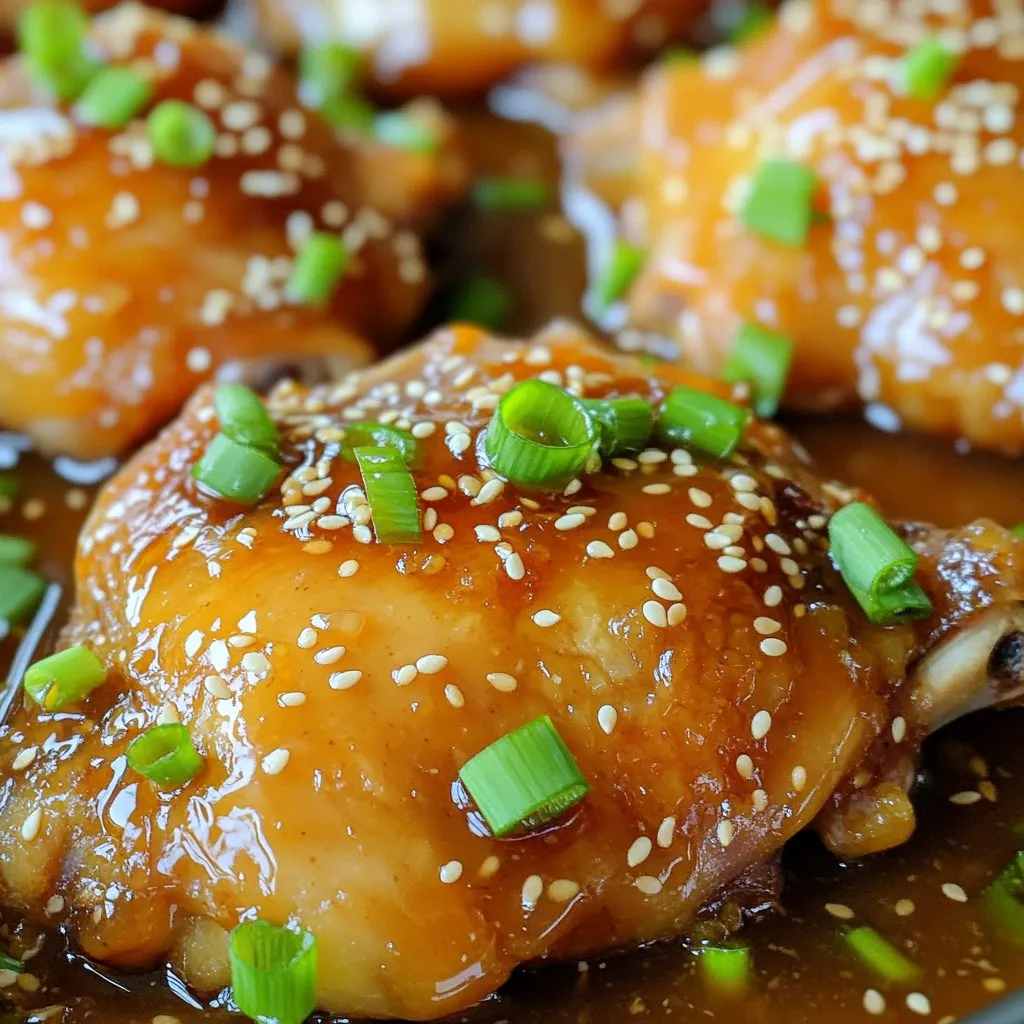
Are you ready to elevate your dinner game? In this post, I’ll show you how to make Slow Cooker Honey Garlic Chicken Thighs, a sweet and savory delight that’s simple …

Read more

Categories Dinner

Pumpkin Cream Cheese Coffee Cake Tasty Fall Dessert

October 10, 2025 by Chef Remy
To make a delicious Pumpkin Cream Cheese Coffee Cake, you'll need the following ingredients: - 1 ½ cups all-purpose flour - 1 teaspoon baking powder - 1 teaspoon baking soda - 1 teaspoon ground cinnamon - ½ teaspoon ground nutmeg - ½ teaspoon salt - ½ cup unsalted butter, softened - 1 cup granulated sugar - 2 large eggs, at room temperature - 1 cup canned pumpkin puree - 1 teaspoon vanilla extract - ½ cup cream cheese, softened - ¼ cup powdered sugar - 1 tablespoon milk - ¼ cup chopped walnuts or pecans (optional) Each ingredient plays a key role in creating that perfect balance of flavors. The all-purpose flour gives structure, while the baking powder and baking soda help it rise. Spices like cinnamon and nutmeg add warmth and depth. Butter and sugar create a lovely base, while eggs give moisture and richness. Using canned pumpkin puree makes it easy, as it’s already cooked and ready to blend into the batter. The cream cheese filling adds a creamy contrast that elevates this cake. If you want a little crunch, sprinkle in some walnuts or pecans. Now that you know what you need, you're ready to create this tasty fall dessert! 1. Preheat your oven to 350°F (175°C). Prepare a 9-inch round cake pan or an 8x8-inch square dish. Grease it with butter or cooking spray, then dust it with flour. This helps the cake come out easily. 2. In a medium mixing bowl, combine 1 ½ cups flour, 1 teaspoon baking powder, 1 teaspoon baking soda, 1 teaspoon ground cinnamon, ½ teaspoon ground nutmeg, and ½ teaspoon salt. Whisk these dry ingredients well, then set this bowl aside. 3. In a large bowl, cream together ½ cup softened butter and 1 cup granulated sugar. Use an electric mixer at medium speed. Mix for about 3-4 minutes until it is light and fluffy. This adds air to your batter. 4. Add 2 large eggs one at a time to the butter-sugar mixture. Mix well after each egg. Then, blend in 1 cup canned pumpkin puree and 1 teaspoon vanilla extract until smooth. 5. Slowly fold the dry ingredients into the wet mixture using a spatula. Be gentle to avoid overmixing. Stop mixing as soon as no dry flour shows. 1. In a small bowl, prepare the cream cheese filling. Combine ½ cup softened cream cheese, ¼ cup powdered sugar, and 1 tablespoon milk. Mix until smooth and creamy with no lumps. 2. Pour half of the pumpkin batter into your prepared pan. Spread it evenly. Spoon the cream cheese mixture over this layer. Use a knife to gently swirl it for a marbled look, but don’t mix too much! 3. Pour the rest of the pumpkin batter over the cream cheese layer. Smooth the top with a spatula. If you like, sprinkle ¼ cup chopped walnuts or pecans on top for added crunch. 1. Bake the cake in your preheated oven for about 30-35 minutes. To check if it's done, insert a toothpick into the center. If it comes out clean or with a few moist crumbs, the cake is ready. 2. Let the cake cool in the pan for about 10 minutes. This makes it easier to transfer. After that, gently move the cake to a wire rack to cool completely before slicing. - Ensure ingredients are at room temperature: This helps the batter mix well. Cold butter or eggs can cause lumps. - Don’t overmix the batter: Mix just until you see no dry flour. Overmixing can lead to a tough cake. - Dust with powdered sugar: A light dusting gives a lovely finish. It adds a touch of sweetness. - Add a dollop of whipped cream: This makes each slice feel special. It adds a creamy texture that pairs well with pumpkin flavor. - Not measuring ingredients accurately: Use measuring cups and spoons. This ensures your ratios are perfect. - Overbaking the cake: Check for doneness at 30 minutes. A toothpick should come out clean or with a few moist crumbs. Overbaking makes the cake dry. These tips will help ensure your Pumpkin Cream Cheese Coffee Cake is both delicious and beautiful every time you bake it! {{image_4}} You can easily change some ingredients in this recipe. If you want a different crunch, swap the nuts. Try almonds or pecans. If you prefer no nuts, just leave them out. You can also use different sweeteners. Maple syrup or honey can add a unique taste. Want to kick the flavor up a notch? Consider adding chocolate chips or cranberries. Both options add a sweet burst in every bite. You can also try new spices. Ginger or allspice can give your cake a warm, spicy twist that is perfect for fall. If you need a gluten-free cake, it’s simple. You can use almond flour or oat flour instead of regular flour. This makes the cake just as tasty. If you want a healthier option, cut back on sugar. This small change makes the cake lighter while still being delicious. To keep your pumpkin cream cheese coffee cake fresh, store it in an airtight container. This simple step helps prevent it from drying out. You can leave it at room temperature for a day or two. For longer storage, place it in the fridge. You can freeze this cake if you want to save some for later. First, let the cake cool completely. Wrap it tightly in plastic wrap, then in aluminum foil. This double wrap helps keep it fresh. When you’re ready to enjoy it, thaw the cake overnight in the fridge. At room temperature, the cake stays fresh for about two days. In the refrigerator, it lasts up to a week. If you freeze it, the cake stays good for about three months. Always check for any changes in smell or texture before eating. Yes, you can make this cake ahead of time. I often bake it a day in advance. Just let it cool, then cover it tightly. Store it at room temperature for up to two days. If you plan to keep it longer, refrigerate it for up to a week. Just remember to bring it back to room temperature before serving! If you need a cream cheese substitute, try Greek yogurt or ricotta cheese. Both options give a creamy texture. You can also use mascarpone for a richer flavor. Just mix it with some sugar and milk, just like the cream cheese filling. Adjust the sweetness to fit your taste! To check if the cake is done, insert a toothpick into the center. If it comes out clean or with a few crumbs, the cake is ready. I recommend checking it after 30 minutes. If it needs more time, keep baking, but check every few minutes. This will help you avoid overbaking. - What is the best way to serve pumpkin cream cheese coffee cake? For serving, slice the cake into squares or wedges. I love dusting the top with powdered sugar for a nice look. You can add a dollop of whipped cream on the side. A sprinkle of cinnamon adds a lovely touch. This makes each slice feel special! - Can I use homemade pumpkin puree instead of canned? Yes, you can use homemade pumpkin puree! Just make sure it is smooth and not too watery. Fresh puree can have a different taste, which may enhance your cake. Be sure to measure it out the same as the canned version for best results. This blog covered how to make a tasty pumpkin cream cheese coffee cake. We explored key ingredients, step-by-step instructions, and helpful tips. Remember, measuring accurately is vital for great results. Don’t skip cooling the cake properly. You can also try various ingredient swaps for fun twists. Store leftovers in an airtight container to keep them fresh. Baking is a journey, so enjoy every moment. I hope you feel inspired to bake your own delicious cake!

Fall is here, and that means it’s time for pumpkin treats! This Pumpkin Cream Cheese Coffee Cake is the perfect blend of cozy flavors and creamy goodness. With its warm …

Read more

Categories Desserts

Air Fryer Sweet Chili Chicken Lettuce Wraps Delight

October 10, 2025 by Chef Remy
- 1 lb ground chicken - 1 tablespoon olive oil - 1 small onion, finely chopped - 2 cloves garlic, minced - 1 red bell pepper, diced - 1 carrot, grated - 1/4 cup sweet chili sauce - 1 tablespoon soy sauce - Salt and pepper, to taste - 1 head of butter lettuce (or iceberg lettuce), leaves carefully separated - Chopped green onions and sesame seeds, for garnish You can easily adjust these ingredients based on your taste. For example, if you prefer a spicier kick, add more sweet chili sauce. If you don’t have ground chicken, you can use ground turkey or beef. Olive oil can be swapped with canola oil if needed. For added flavor, top your wraps with: - Chopped green onions - Sesame seeds - A drizzle of extra sweet chili sauce for dipping These garnishes not only add taste but also make the dish look more inviting. Enjoy customizing your Air Fryer Sweet Chili Chicken Lettuce Wraps to match your style! Set your air fryer to 370°F (190°C). Allow it to preheat for about 5 minutes. This step is key for even cooking. In a large skillet, add 1 tablespoon of olive oil. Heat it over medium heat. Once hot, add 1 small onion, finely chopped, and 2 cloves of minced garlic. Sauté them until the onion turns translucent, which takes about 3-4 minutes. The smell will be amazing! Now, add 1 pound of ground chicken to the skillet. Use a spatula to break it apart as it cooks. Keep cooking until the chicken turns brown and is fully cooked. This should take about 5-7 minutes. Make sure there’s no pink left! Next, stir in 1 diced red bell pepper and 1 grated carrot. Cook for an additional 3 minutes. This helps the veggies soften and adds color to your dish. Drizzle in 1/4 cup of sweet chili sauce and 1 tablespoon of soy sauce. Stir until everything is mixed well. Taste the mixture and add salt and pepper as needed. Remove it from the heat. Carefully transfer a portion of the chicken mixture into the air fryer basket. Spread it out evenly. Cook for 10 minutes, shaking the basket halfway through. This ensures even cooking and browning. Lay a leaf of butter lettuce flat on your surface. Spoon a generous amount of the sweet chili chicken mixture right in the center. This is where the fun begins! Top each lettuce wrap with chopped green onions and a sprinkle of sesame seeds. This adds great flavor and texture. For a nice touch, serve the wraps on a platter with extra sweet chili sauce on the side. Enjoy! - Preheat your air fryer before cooking. This ensures even cooking. - Do not overcrowd the basket. Give food space to crisp up. - Shake the basket halfway through cooking. This helps with even browning. - Use a light coat of oil for best results. It aids in crisping. - Use medium heat when cooking ground chicken. This helps it cook evenly. - Break the meat apart as it cooks. This ensures all pieces brown well. - Cook until the chicken is no longer pink. This means it's safe to eat. - Add seasonings early on. This helps the flavors mix in. - Look for crisp leaves with a vibrant color. This means the lettuce is fresh. - Avoid any wilting or browning on the edges. This is a sign of age. - Choose heads that feel heavy for their size. Heaviness usually means more moisture. - Check for a clean stem end. A fresh cut shows it was just harvested. {{image_4}} You can switch out the ground chicken for turkey or tofu. Ground turkey has a similar texture and taste. It cooks well and absorbs flavors nicely. Tofu is a great choice for a plant-based meal. Use firm tofu, and crumble it to match the chicken's texture. Both options create healthy and tasty wraps. You can mix up the flavor by using different sauces. Teriyaki sauce adds a sweet and salty taste. It pairs well with chicken and veggies. Hoisin sauce offers a rich, slightly spicy flavor. It has a unique taste that makes your wraps exciting. Experiment with these sauces to find your favorite. Adding more vegetables boosts nutrition and flavor. Try zucchini for a fresh crunch. Just slice it thinly and mix it in. Mushrooms also add a savory depth. Sauté them with the onions and garlic for the best taste. Feel free to get creative with your veggie choices. The more, the better! After you enjoy your Air Fryer Sweet Chili Chicken Lettuce Wraps, you might have some chicken mixture left. Store it in an airtight container. Make sure to let it cool first. This helps keep the chicken fresh. The mixture lasts in the fridge for up to three days. Label the container with the date. This way, you know when to use it. When you want to enjoy the leftover chicken, you can reheat it easily. Heat a skillet over medium heat. Add a splash of water or a bit of oil to keep it moist. Stir the chicken mixture for about 5 minutes until it is hot. You can also use the microwave. Place the chicken in a microwave-safe bowl. Cover it with a lid or a damp paper towel. Heat for 1-2 minutes. Check that it is hot all the way through. If you want to save the chicken mixture for later, freezing works great. Use a freezer-safe bag or container. Make sure to remove as much air as possible. This helps prevent freezer burn. The chicken mixture can last in the freezer for up to three months. When you're ready to eat it, thaw it overnight in the fridge. Then, reheat it as mentioned above. Enjoy your tasty wraps anytime! Yes, you can use chicken breast. Just cut it into small pieces. Cook it longer to ensure it is fully cooked. Ground chicken offers a softer texture, but diced chicken works well too. Butter lettuce is my favorite for these wraps. It has a soft texture and wraps nicely. Iceberg lettuce is also good. It adds a nice crunch and holds the filling well. The air-fried chicken mixture lasts about 3 to 4 days in the fridge. Store it in an airtight container. Make sure it cools down before placing it in the fridge to keep it fresh. You can prepare the chicken mixture ahead of time. Just store it in the fridge until you are ready to serve. Assemble the wraps right before eating for the best taste and texture. In this post, I covered ingredients, step-by-step instructions, and useful tips for making delicious wraps. You learned how to prepare and cook ground chicken using an air fryer. I also shared ideas for variations and storage methods. These wraps are fresh, tasty, and easy to customize. Use fresh ingredients for the best flavor and feel free to experiment with your favorite proteins and sauces. Enjoy making these wraps with your creative twist, and happy cooking!

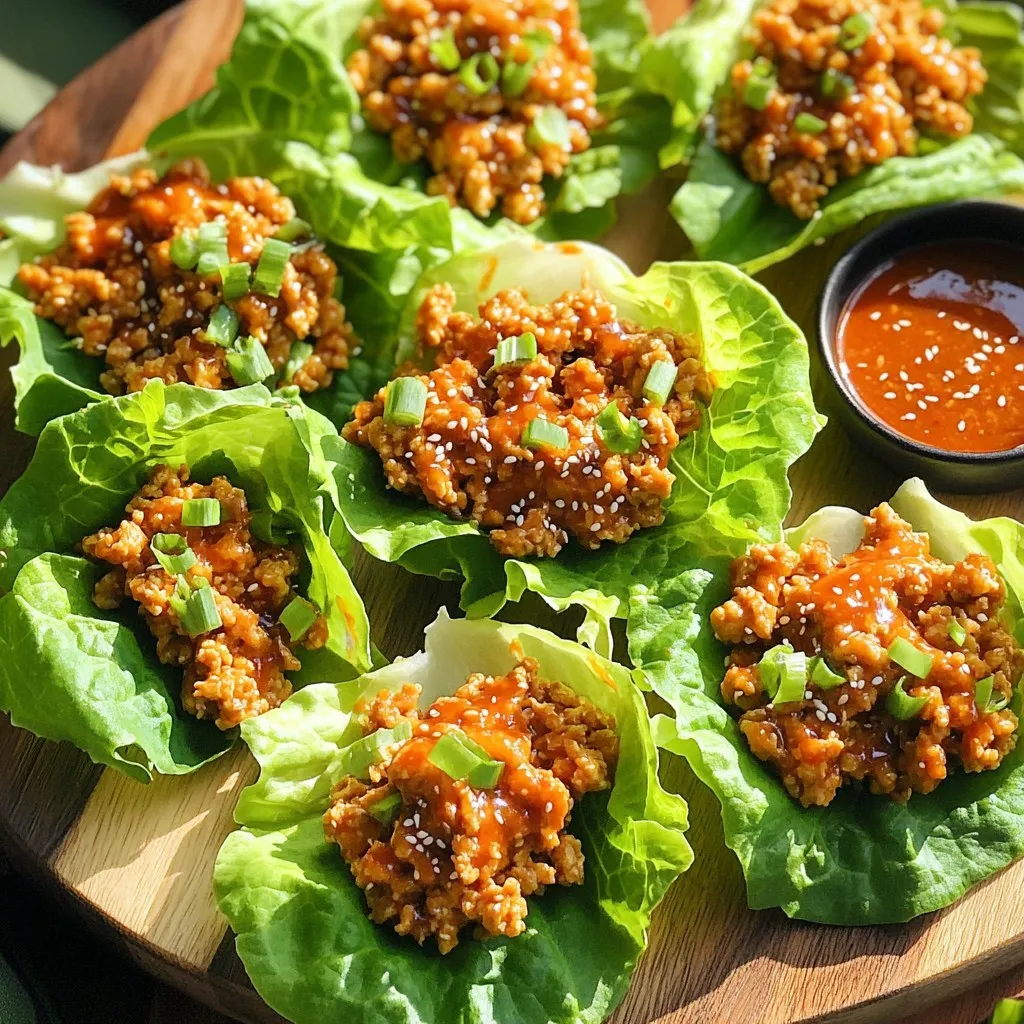
Looking for a quick and tasty dinner? You’ll love these Air Fryer Sweet Chili Chicken Lettuce Wraps! This recipe is simple and bursting with flavor. With just a few ingredients …

Read more

Categories Appetizers

One Pot Creamy Garlic Butter Salmon and Spinach Dish

October 10, 2025 by Chef Remy
- 2 fresh salmon fillets - 2 tablespoons unsalted butter - 4 cloves garlic, finely minced - 1 cup heavy cream - 1 cup fresh baby spinach, washed and drained - 4 cups vegetable or chicken broth - 1 teaspoon lemon zest - 1 tablespoon lemon juice - 1/2 teaspoon sea salt - 1/4 teaspoon black pepper - 1/2 teaspoon red pepper flakes (optional for heat) - Fresh parsley, chopped (for garnish) - I recommend fettuccine or spaghetti. - Cook pasta in salted water for the best flavor. - Stir pasta occasionally to keep it from sticking. First, melt the unsalted butter in a large pot over medium heat. Once it starts to bubble, add the minced garlic. Sauté the garlic for about one minute. You want it to smell nice, but don’t let it burn. After this, pour in 4 cups of vegetable or chicken broth. Stir gently and bring it to a gentle simmer. Next, add 8 ounces of pasta to the bubbling broth. I like to use fettuccine or spaghetti. Cook the pasta according to the package instructions. Stir it often to keep it from sticking. When the pasta is almost al dente, about two minutes before it's done, push it to one side of the pot. Now, it’s time for the salmon. Place two fresh salmon fillets on the empty side of the pot. Season them with sea salt, black pepper, and red pepper flakes if you like some heat. Pour in 1 cup of heavy cream over everything. Then, gently add 1 cup of fresh baby spinach, 1 teaspoon of lemon zest, and 1 tablespoon of lemon juice. Stir everything together to mix it well. Cover the pot with a lid and let it cook for about five more minutes. Check the salmon to see if it is cooked through. It should flake easily when you test it with a fork. Carefully remove the salmon from the pot and place it on plates. You may want to flake it into bite-sized pieces. Serve the creamy pasta and spinach in bowls, topped with the salmon. Finish with chopped parsley for a nice touch. How to prevent burning garlic To keep garlic from burning, watch it closely. Sauté it on medium heat for just one minute. Stir it often and remove it from heat once it smells good. Garlic burns fast and can turn bitter. Ensuring perfect salmon doneness To check salmon doneness, use a fork. Gently flake the thickest part of the fillet. If it flakes easily, it's done. The fish should look opaque and slightly pink inside. Cooking time varies with thickness, so keep an eye on it. Suggestions for additional spices or herbs You can add more flavor with spices like dill or thyme. These herbs pair well with salmon. If you want extra heat, try adding cayenne pepper. Paprika can add a nice smoky note too. Ways to adjust creaminess or thickness For a thicker sauce, use less broth. If you want it creamier, add more heavy cream. You could also stir in some grated cheese. Cream cheese can add a nice tang too! How to plate the dish nicely To plate, use a large spoon to add the pasta and spinach first. Then, place the salmon on top. Drizzle some sauce over the salmon. Finally, sprinkle fresh parsley for a pop of color. Ideal serving suggestions Serve this dish warm. Pair it with a simple green salad or garlic bread. A glass of white wine can enhance the meal nicely. Enjoy it with family or friends for a cozy dinner! {{image_4}} You can switch out the salmon for chicken or shrimp. Both options cook well in this dish. Chicken thighs add a hearty flavor, while shrimp brings a nice touch of sweetness. For veggies, try kale or broccoli instead of spinach. Both add great taste and nutrition. Kale adds a chewy texture, while broccoli gives a nice crunch. If you need gluten-free options, use gluten-free pasta. Many brands taste great and hold up well. For a dairy-free version, try coconut cream or nut-based creamy alternatives. These still give a rich taste without dairy. To kick up the flavor, add cheese like Parmesan. It melts beautifully and adds depth. You can also try nutritional yeast for a cheesy flavor without dairy. For a bright twist, add citrus flavors like lime or orange. These give the dish a fresh zing that brightens each bite. To store your One Pot Creamy Garlic Butter Salmon and Spinach, let it cool first. Place leftovers in an airtight container. This keeps moisture in and prevents odors from mixing with other foods. You can store it in the fridge for up to three days. If you notice any signs of spoilage, like a sour smell or discoloration, throw it away. If you want to freeze this dish, it’s best to do so without the salmon. Freeze the pasta and sauce separately from the salmon. Use freezer-safe bags or containers to avoid freezer burn. When you’re ready to eat, thaw it overnight in the fridge. Reheat gently on the stovetop or in the microwave. Add a splash of cream or broth to bring back the creaminess. You can make this dish ahead of time. Cook the pasta and sauce but leave the salmon out until you're ready to eat. Store the pasta and sauce together in the fridge. Keep the salmon fillets in a separate container. When it’s time to serve, just add the salmon. This way, the salmon stays fresh and doesn't overcook. How long does it take to cook salmon? It usually takes about 10 to 15 minutes to cook salmon on the stove. The salmon should be cooked until it flakes easily with a fork. Can this recipe be made ahead of time? Yes, you can prepare the dish ahead. Cook the pasta and salmon, then store them separately. When ready to serve, reheat gently on low heat. What can I substitute for heavy cream? You can use half-and-half or coconut milk as lighter options for cream. Both will give a nice texture but change the flavor slightly. How to tell when the salmon is cooked? Check the salmon with a fork. It should flake easily and have a light pink color inside. Use a meat thermometer for accuracy; it should reach 145°F. Can I use frozen salmon for this recipe? Yes, you can use frozen salmon. Just thaw it first in the fridge overnight for best results. You may need to cook it a bit longer. What should I do if I don’t have fresh spinach? If you don’t have fresh spinach, you can use frozen spinach instead. Just thaw and drain it well before adding to the dish. Can I add more garlic for flavor? Absolutely! If you love garlic, feel free to add extra cloves. It will boost the flavor and make the dish even tastier. This post guided you through making a delicious salmon pasta. You learned about ingredients, step-by-step cooking, and useful tips. We discussed how to enhance flavor and presented various ingredient swaps. Remember, you can modify for your needs or store leftovers for later. Cooking can be fun and simple. Enjoy creating this dish, and don't hesitate to experiment! Your kitchen is a place for creativity.

Looking for a simple yet delicious dinner? This one-pot creamy garlic butter salmon and spinach dish is your answer! With fresh salmon fillets nestled in rich cream and vibrant spinach, …

Read more

Categories Dinner

Sheet Pan Honey Garlic Chicken & Broccoli Delight

October 9, 2025 by Chef Remy
- 4 boneless, skinless chicken thighs - 2 cups fresh broccoli florets - 1/4 cup pure honey - 1/4 cup low-sodium soy sauce - 2 cloves garlic, finely minced - 1 tablespoon fresh ginger, grated - Salt and freshly ground black pepper to taste - 1 tablespoon extra virgin olive oil - 1 teaspoon sesame seeds (for garnish) - 2 green onions, thinly sliced (for garnish) For this dish, I love using boneless, skinless chicken thighs. They stay juicy and tender. Fresh broccoli adds a nice crunch and pairs well with the sweet sauce. The honey gives a sweet touch, while soy sauce adds depth. Garlic and ginger are key. They add flavor that no one can resist. A touch of salt and pepper enhances everything. The olive oil helps the broccoli roast perfectly. For garnish, sesame seeds add a nice crunch. Green onions give a fresh bite and color. This combo of ingredients makes your meal bright and inviting. Enjoy the process of gathering these simple, fresh items. You will love how they come together! - Preheat oven to 400°F (200°C). - Line a baking sheet with parchment paper. Start by setting your oven to 400°F (200°C). This high heat helps cook the chicken and broccoli evenly and quickly. Next, grab a baking sheet and line it with parchment paper. This makes cleanup a breeze and prevents sticking. - Whisk together honey, soy sauce, minced garlic, and ginger. - Season and marinate the chicken thighs. In a bowl, whisk together 1/4 cup of honey, 1/4 cup of soy sauce, 2 cloves of minced garlic, and 1 tablespoon of grated ginger. This mix will give your chicken a sweet and savory kick. Season both sides of 4 chicken thighs with salt and pepper. Place the chicken in a zip-lock bag or a bowl. Pour half of the marinade over the chicken. Seal the bag or cover the bowl. Let it sit in the fridge for at least 15 minutes. For more flavor, let it marinate for up to 2 hours. - Arrange chicken and broccoli on the baking sheet. - Bake and glaze the chicken with reserved marinade. After marinating, place the chicken thighs on one side of your baking sheet. On the other side, spread out 2 cups of fresh broccoli florets. Drizzle the broccoli with 1 tablespoon of olive oil and sprinkle with salt and pepper. Toss gently to coat. Bake everything in the preheated oven for 20 minutes. After that, take it out and brush the chicken with some of the reserved marinade. This adds a nice glaze. Return the sheet to the oven for another 10 minutes. The chicken should reach an internal temp of 165°F (75°C), while the broccoli stays tender yet crisp. Marinating chicken longer boosts its taste. I often let mine sit for two hours. This gives the chicken time to soak in all those sweet and savory flavors. You can also add spices like paprika or herbs like thyme. These extras can make the dish pop even more. To keep broccoli crisp, roast it at high heat. This helps lock in its bright color and crunch. Toss it with olive oil, salt, and pepper before baking. For perfectly cooked chicken thighs, use an instant-read thermometer. Aim for 165°F (75°C) for juicy and safe chicken. Plating is key for a stunning meal. I like to arrange the chicken and broccoli with space in between. This makes the colors stand out. For garnish, sprinkle sesame seeds and sliced green onions on top. It adds a nice touch and a burst of flavor. {{image_4}} You can easily swap chicken thighs for chicken breasts. This change will make the dish leaner. For a twist, try using shrimp or tofu instead of chicken. Both add great taste and texture. Broccoli is a star, but you can mix in other vegetables too. Carrots, bell peppers, or snap peas work well with the honey garlic sauce. To make this recipe gluten-free, use tamari instead of soy sauce. Tamari has a similar flavor without gluten. If you want a low-sugar version, reduce the honey. You can also use a sugar substitute like stevia or monk fruit. This way, you keep the taste but cut back on sugar. Want to spice things up? Add chili flakes to the marinade for a kick. This little change adds warmth without overpowering the dish. You can also try different sauces for fun. Teriyaki or barbecue sauce can give a new flavor. Experimenting with marinades can lead to tasty surprises! To keep your honey garlic chicken and broccoli fresh, use airtight containers. Glass or sturdy plastic works best. Make sure to let the dish cool before sealing. This helps prevent moisture buildup. In the fridge, the dish lasts up to four days. Always check for any off smells before eating. For the best taste, reheat in the oven. Set it to 350°F (175°C) and warm for about 15 minutes. If you're in a hurry, the microwave works too. Heat in short bursts to avoid drying the chicken. Add a splash of water to keep it moist. This helps maintain texture and flavor. To freeze, first cool the dish completely. Place it in freezer-safe containers, leaving space for expansion. Label the containers with the date. The dish can last up to three months in the freezer. For thawing, move it to the fridge overnight. Reheat in the oven to ensure even cooking. You should marinate the chicken for at least 15 minutes. For more flavor, try marinating for up to 2 hours. This time allows the chicken to absorb the honey and soy sauce mix. The more time it sits, the better the taste. Yes, you can use frozen broccoli. Just make sure to thaw it first. If you don’t thaw it, the broccoli may release too much water while baking. This can make it soggy instead of crisp. The best way to check chicken is to use a meat thermometer. You want the inside to reach 165°F (75°C). If you don’t have a thermometer, cut into the chicken. It should be white all the way through, with no pink left. To add spice, sprinkle some chili flakes or hot sauce on the chicken. You can also add sliced jalapeños to the broccoli. Adjust the heat to your taste. Remember, a little spice can really enhance the flavor. Yes, it is safe to eat leftovers if you store them properly. Keep the chicken in an airtight container in the fridge. It will last for about 3 to 4 days. Make sure to reheat it to at least 165°F (75°C) before eating. This blog post covers a simple yet tasty honey garlic chicken and broccoli recipe. You can make it with just a few main ingredients. I shared steps for marinating and baking, along with tips to enhance flavor and presentation. Try substitutions for dietary needs or different tastes. Remember to store leftovers wisely for best results. Enjoy experimenting with this dish as you discover what you like best!

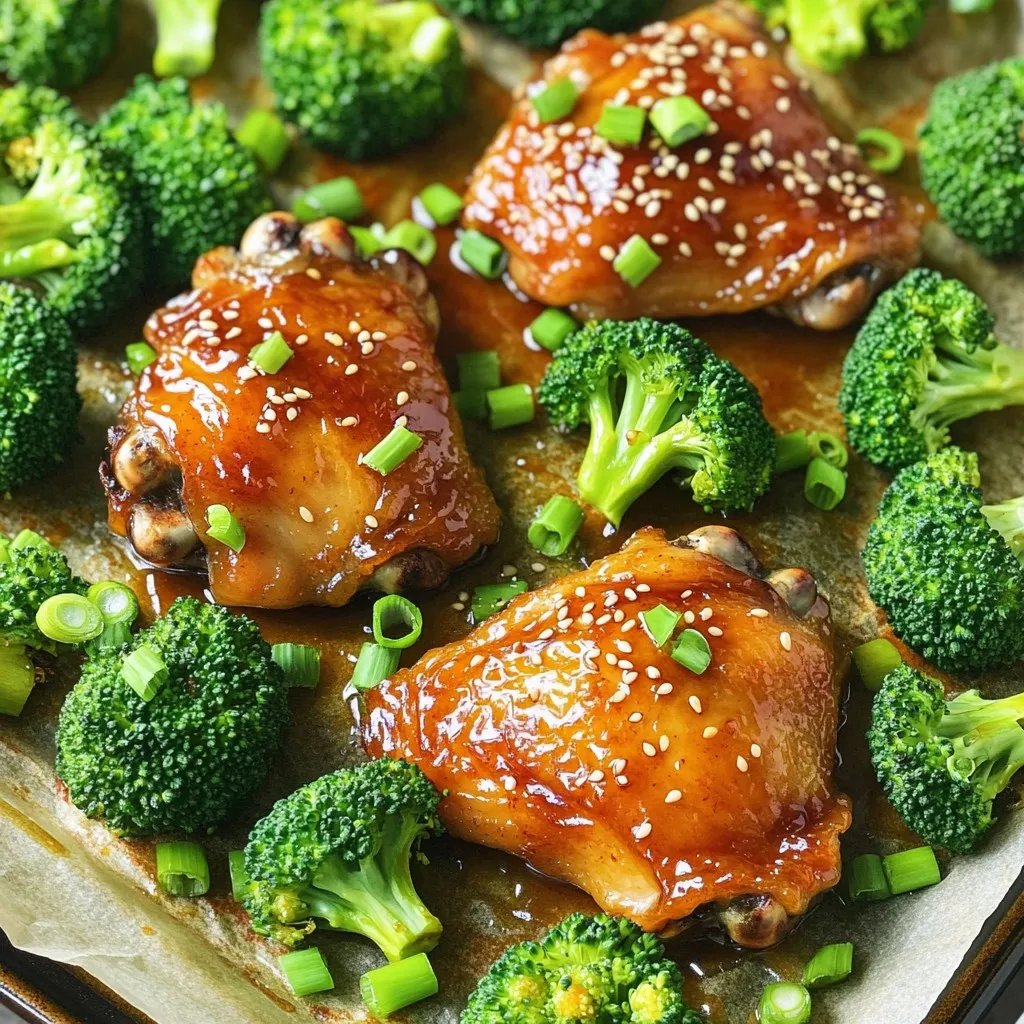
Are you ready for a one-pan meal that bursts with flavor? My Sheet Pan Honey Garlic Chicken & Broccoli Delight packs sweet and savory goodness into every bite! This easy …

Read more

Categories Dinner

No-Bake Cookie Dough Cheesecake Bars Delight Await

October 9, 2025 by Chef Remy
- 1 ½ cups graham cracker crumbs - ½ cup unsalted butter, melted - 1 cup cream cheese, softened to room temperature - ½ cup granulated sugar - 1 teaspoon pure vanilla extract - 1 cup heavy whipping cream - ½ cup all-purpose flour (heat-treated) - ½ cup packed brown sugar - ½ cup mini chocolate chips Using fresh ingredients makes a big difference. I recommend using high-quality cream cheese. This will help create a creamy texture. Choose unsalted butter for a balanced flavor. Pure vanilla extract always tastes better than imitation. For the best results, use heavy whipping cream that is cold. This helps it whip up perfectly. If you don't have graham cracker crumbs, try crushed cookies, like Oreos. You can use coconut oil instead of unsalted butter for a dairy-free version. For those avoiding sugar, try using a sugar substitute like stevia or monk fruit. If you want a different flavor, you can swap in almond extract for vanilla. To start, grab a mixing bowl. Combine 1 ½ cups of graham cracker crumbs with ½ cup of melted butter. Stir until it looks like wet sand. Next, press this mixture firmly into the bottom of a lined 9x9 inch pan. Make sure it’s even. This crust needs to chill in the fridge while you make the filling. In another large bowl, beat together 1 cup of softened cream cheese and ½ cup of granulated sugar. You can use an electric mixer or a whisk. Mix until it’s smooth and creamy. Add in 1 teaspoon of pure vanilla extract and mix again. Make sure everything is blended well. Now, take a clean mixing bowl and pour in 1 cup of heavy cream. Use an electric mixer to whip it until stiff peaks form. This will take about 2-3 minutes. Next, gently fold this whipped cream into the cream cheese mixture. Use a spatula and be careful not to deflate the whipped cream. Just mix until everything is smooth. In a small bowl, mix together ½ cup of heat-treated flour, ½ cup of packed brown sugar, and ½ cup of mini chocolate chips. This is our cookie dough. Fold this mixture into the cheesecake filling. Make sure the chocolate chips are spread evenly throughout. Pour the cookie dough cheesecake filling over the chilled graham cracker crust. Use a spatula to spread it evenly. Smooth the top so it looks nice and flat. Cover the pan with plastic wrap or foil. Refrigerate for at least 4 hours, or until the cheesecake filling is firm. Once it’s set, lift the bars out of the pan using the parchment paper. Place them on a cutting board and slice into squares. Enjoy these delicious bars chilled! To make a smooth cheesecake, start with room temperature cream cheese. Cold cream cheese can make lumps. Beat the cream cheese and sugar until creamy. This step helps mix air into the batter. Whip the heavy cream to stiff peaks. Fold it in gently. This keeps the texture light. A great way to present these bars is to drizzle chocolate sauce on top. You can also sprinkle mini chocolate chips for fun. For an extra touch, add whipped cream on the side. Serve the bars chilled for the best flavor and texture. One common mistake is not chilling the bars long enough. They need at least four hours to set. Another mistake is overmixing the whipped cream. This can make the filling dense. Also, make sure to use heat-treated flour. It makes the cookie dough safe to eat. Follow these tips for a perfect treat! {{image_4}} You can easily switch up the flavor of your No-Bake Cookie Dough Cheesecake Bars. For a peanut butter twist, add ½ cup of creamy peanut butter to the cheesecake filling. Mix it well with the cream cheese and sugar. If you like mint, try adding a few drops of mint extract instead of vanilla. You can also fold in some crushed mint candies for a fun crunch. These little changes can make your bars feel like a whole new dessert! Making these bars gluten-free is simple. Just swap out regular graham cracker crumbs for gluten-free ones. Many brands sell gluten-free graham crackers now. Be sure to check the labels to ensure they meet your needs. For the cookie dough, use gluten-free flour instead of all-purpose flour to keep the dough safe for everyone. Toppings can make your cheesecake bars pop! You might drizzle chocolate sauce over the top for a classic touch. Or, sprinkle extra mini chocolate chips for added texture. Try crushed nuts or colorful sprinkles for a fun look. You can even add fresh fruit like berries for a refreshing bite. The right toppings make each bite even more exciting! To store leftover cheesecake bars, first cover them well. Use plastic wrap or foil to keep them fresh. You can also place them in an airtight container. This will help prevent them from drying out. Store them in the refrigerator for the best taste. They will stay fresh for several days. If you want to keep them longer, freezing is a great option. Cut the bars into squares before freezing. Wrap each piece tightly in plastic wrap. Then, place them in a freezer-safe bag or container. They can last up to three months in the freezer. To thaw, simply move them to the fridge overnight. These no-bake cookie dough cheesecake bars have a shelf life of about five days in the fridge. For the best flavor and texture, serve them chilled. Avoid leaving them at room temperature for too long. If you notice any changes in smell or texture, it's best to discard them. Always trust your senses when it comes to food safety. Yes, you can make these cheesecake bars a day or two ahead. They taste better when chilled. Just store them in the fridge until you are ready to serve. Heat-treated flour is flour that you bake to make it safe to eat raw. Raw flour can contain harmful bacteria. To heat-treat it, spread flour on a baking sheet. Bake it at 350°F for 5 minutes. Let it cool before using it in your recipe. To make the bars firmer, chill them longer. Refrigerate them for at least 6 hours or overnight. You can also use more cream cheese in the filling. This will help the bars hold their shape better when you cut them. Yes, you can use a different crust. Try crushed cookies, like Oreos, for a chocolate flavor. You can also use a nut crust for a gluten-free option. Just make sure your crust is firm enough to hold the filling. You can serve these bars with fresh fruit, like strawberries or raspberries. A drizzle of chocolate or caramel sauce adds a nice touch. Whipped cream on top can also enhance the flavor and look of your bars. In this blog post, we explored how to make delicious cheesecake bars from scratch. We covered the best ingredients and why quality matters. You learned to prepare the crust, filling, and cookie dough step by step. I shared tips for a great texture and decoration. We also discussed variations to suit your taste and how to store leftovers safely. Making cheesecake bars is fun and simple. Enjoy making them your own and sharing with others!

Get ready for a sweet treat that’s easy to make! These No-Bake Cookie Dough Cheesecake Bars combine rich flavors and creamy texture without turning on the oven. Perfect for any …

Read more

Categories Desserts

Slow Cooker Chicken & Gnocchi Soup Hearty and Easy Dish

October 9, 2025 by Chef Remy
- 1 lb boneless, skinless chicken breast - 4 cups chicken broth - 1 cup carrots, sliced into rounds - 1 cup celery, diced into small pieces - 1 cup onion, chopped finely - 3 cloves garlic, minced - 1 tsp dried thyme - 1 tsp dried basil - 1/2 tsp salt - 1/2 tsp freshly cracked black pepper - 1 cup heavy cream - 1 package (16 oz) gnocchi (fresh or frozen) - 2 cups baby spinach Using fresh ingredients makes a big difference. Choose high-quality chicken for tender meat. Look for low-sodium chicken broth to control salt levels. Fresh veggies like carrots and celery add crunch and flavor. Organic heavy cream gives a rich taste. If you can find fresh gnocchi, it will elevate the dish even more. If you want to switch things up, here are some ideas: - Chicken: Use turkey breast instead for a leaner option. - Broth: Vegetable broth works if you're going vegetarian. - Cream: For a lighter soup, swap heavy cream for half-and-half or coconut cream. - Gnocchi: Use pasta like small shells if gnocchi is not available. - Spinach: Kale can substitute spinach for a different texture and taste. These swaps help you customize the soup while keeping it hearty and delicious! Start by getting your slow cooker ready. Place the whole boneless chicken breasts at the bottom. This is the base of your soup. Next, pour in four cups of chicken broth. This will give your soup a rich flavor. Now, add one cup of sliced carrots, one cup of diced celery, and one cup of chopped onion. These veggies add texture and taste. Lastly, sprinkle in three cloves of minced garlic for a nice kick. Now it's time to season the mixture. Evenly sprinkle one teaspoon of dried thyme, one teaspoon of dried basil, half a teaspoon of salt, and half a teaspoon of freshly cracked black pepper over the top. Use a wooden spoon to stir gently, so all the flavors mix well. Cover the slow cooker with its lid. Set the temperature to low for 6-7 hours or high for 3-4 hours. Cook until the chicken is tender and shreds easily. Once the chicken is fully cooked, carefully remove it from the slow cooker. Use two forks to shred the chicken into bite-sized pieces. Return the shredded chicken back to the pot. Next, pour in one cup of heavy cream. This makes the soup creamy and rich. Add one package of gnocchi, either fresh or frozen. Stir well and let it cook on high for an additional 30 minutes. This time allows the gnocchi to become tender. Finally, stir in two cups of baby spinach and let it wilt for about 2-3 minutes. This adds color and nutrition to your soup. Taste the soup and adjust the seasoning if needed. To make your soup really shine, use fresh ingredients. Fresh herbs like thyme and basil boost taste. For extra depth, sauté the garlic and onions before adding them to the slow cooker. This step brings out their natural sweetness. Don’t skip the seasoning! Taste your soup before serving. Adjust salt and pepper if needed. A dash of lemon juice at the end also brightens the flavors. Cooking times can vary based on your slow cooker. If you use the low setting, plan for 6 to 7 hours. On high, it should take 3 to 4 hours. To check if the chicken is done, it should shred easily. If you have more time, let it cook longer on low for deeper flavors. Just be careful not to overcook the gnocchi, as they can turn mushy. This soup pairs well with crusty bread or a light salad. A simple green salad with lemon vinaigrette adds a fresh touch. For a cozy dinner, serve with garlic bread. For a fancy twist, top each bowl with a sprinkle of Parmesan cheese. Garnish with fresh basil or parsley for color. Enjoying it with a glass of white wine can elevate your meal too. {{image_4}} You can lighten this soup by using low-fat cream instead of heavy cream. This change keeps the soup creamy but cuts down on fat. Just swap in an equal amount of low-fat cream. The taste remains rich while being a bit healthier. If you want a vegetarian meal, use tofu instead of chicken. Start by pressing firm tofu to remove extra moisture. Then, cube it and add it to your slow cooker with the other veggies. This will give you a hearty soup without meat. Add more spices if needed to boost the flavor. For a gluten-free version, look for gluten-free gnocchi. Many brands offer this option made from potato or rice flour. You can also make your own by mixing mashed potatoes with gluten-free flour. This way, you can enjoy the soup while sticking to a gluten-free diet. To store your leftover chicken and gnocchi soup, let it cool first. Use an airtight container to keep the soup fresh. You can keep it in the fridge for up to three days. Make sure to label the container with the date. When you're ready to enjoy your soup again, pour the desired amount into a pot. Heat it over medium heat on the stove. Stir often to avoid burning. If the soup is too thick, add a splash of chicken broth or water. Heat until it's warm throughout. This should take about 5-10 minutes. You can also use a microwave. Place the soup in a microwave-safe bowl and cover it with a paper towel. Heat in short bursts of 1-2 minutes, stirring in between. If you want to freeze your soup, do so before adding the gnocchi. The gnocchi can change texture when frozen and reheated. Place the soup in freezer-safe containers. Leave some space at the top for expansion. The soup can last for up to three months in the freezer. When you're ready to eat, thaw it overnight in the fridge. Then, heat it on the stove and add fresh gnocchi before serving. Yes, you can use frozen chicken. The slow cooker will safely cook it. Just add the frozen chicken breasts to the bottom. Pour the broth and add vegetables as usual. Cook on high for about 4-5 hours. This way, you save time and still enjoy a great soup. You’ll know the soup is done when the chicken shreds easily. Use two forks to check. If it pulls apart without effort, it's ready. Also, check that the gnocchi are tender. They should only take about 30 minutes to cook after you add them. Yes, you can make this soup ahead. It tastes even better the next day! Just store it in an airtight container in the fridge. Reheat it on the stove or in the microwave when you’re ready to serve. If you plan to freeze it, add the spinach fresh after thawing. You now have everything to make a delicious slow cooker soup. We covered the key ingredients, cooking steps, and tips for the best flavor. Consider some tasty variations, too, like a healthy version or a vegetarian option. Proper storage and reheating help you enjoy leftovers later. Remember, you can ask questions if you're unsure about cooking times or using frozen chicken. With this guide, you're ready to create a meal that warms your soul. Enjoy your cooking!

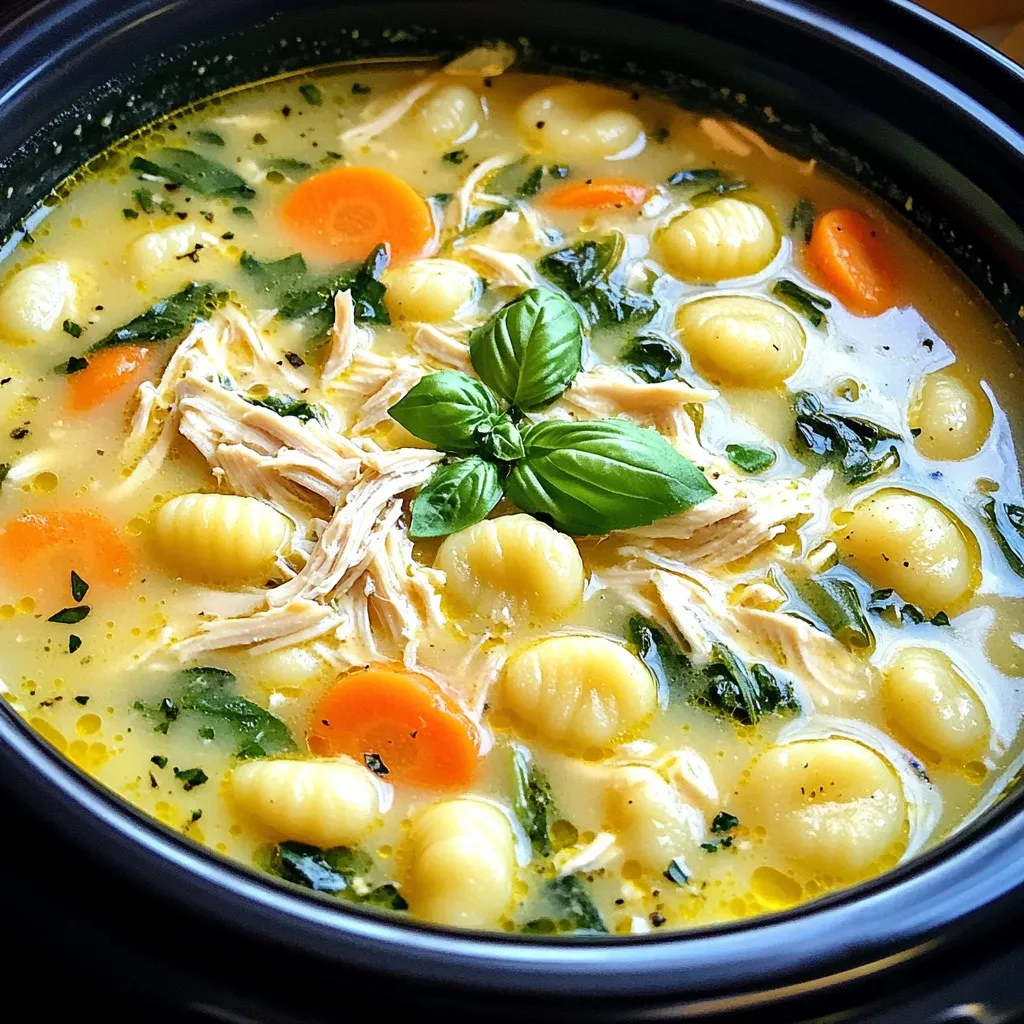
Looking for a warm, comforting dish that fits perfectly into your busy life? My Slow Cooker Chicken & Gnocchi Soup delivers heartiness with ease. This simple recipe uses fresh ingredients …

Read more

Categories Dinner
Older posts
Newer posts
← Previous Page1 … Page11 Page12 Page13 … Page130 Next →

ROASTED RECIPES

Where bold flavors meet everyday meals. Warm, vibrant, and made to share. 🔥🥗🍴

PAGES

Home About Contact Privacy Policy Terms & Conditions Cookie Policy GDPR Policy Copyright Policy Disclaimer

CATEGORIES

Appetizers Desserts Salads Breakfast Dinner

Contact

  • Pinterest
  • Mail
Copyright © 2025 Roasted Flavors. All rights reserved.