Skip to content
Roasted Flavors
  • Home
  • Appetizers
  • Desserts
  • Salads
  • Breakfast
  • Dinner
  • Privacy Policy
  • Contact
  • About

Chef Remy

The Classic Italian Muffuletta Sandwich Delight

May 19, 2025 by Chef Remy
The classic muffuletta sandwich needs a few key items to shine. You’ll want a nice round loaf of Italian bread. This will be the base of your sandwich. Next, gather both green and black olives. They should be pitted and chopped finely. Roasted red peppers add a sweet touch, so grab some of those too. Garlic brings flavor, and oregano adds an Italian twist. For meats, use mortadella and salami, and don't forget provolone cheese for that creamy finish. Here’s what you need for the recipe: - 1 round loaf of Italian bread (10-12 inches) - 1 cup green olives, pitted and finely chopped - 1 cup black olives, pitted and finely chopped - 1/2 cup roasted red peppers, chopped - 2 cloves garlic, minced - 1 teaspoon dried oregano - 1/2 cup olive oil - 8 ounces mortadella, thinly sliced - 8 ounces salami, thinly sliced - 8 ounces provolone cheese, thinly sliced - Fresh basil leaves (optional) - Salt and black pepper to taste To make your sandwich pop, consider adding fresh basil. This adds a bright color and fresh flavor. You can also serve pickles or a light salad on the side. These will complement the rich flavors of the muffuletta. Enjoy the mix of tastes and textures! For the full recipe, check the Muffuletta Extravaganza 🥖. To start, gather your ingredients. You will need green olives, black olives, roasted red peppers, garlic, oregano, and olive oil. In a medium bowl, mix the green olives, black olives, roasted red peppers, minced garlic, and dried oregano. This mix gives your sandwich a fresh and zesty flavor. Slowly pour in the olive oil while you stir. This helps the flavors meld together. Season your olive salad with salt and black pepper to taste. Make sure it's well mixed. Set this aside while you prepare the bread. Now, take your round Italian bread. Carefully slice it in half horizontally. Be gentle so you don’t break it. Use your fingers or a spoon to hollow out some soft bread from both halves. This step creates more room for your filling. Spread half of your olive salad on the bottom half of the bread. Spread it evenly to cover the entire surface. Next, layer the mortadella slices over the olive salad. Then, add a layer of salami slices. Finally, top it all off with provolone cheese slices. Spoon the remaining olive salad over the cheese. This adds flavor to every bite. Once you have assembled the sandwich, place the top half of the bread back on. Press down gently to compact the layers. This helps all the flavors mix. Wrap the sandwich tightly in plastic wrap. Place it under a heavy object, like a cast-iron skillet, for about 30 minutes to 1 hour. This pressing step is key. It makes the sandwich easier to slice and enhances the taste. After pressing, unwrap the sandwich. Use a sharp knife to slice it into wedges or quarters for serving. Enjoy your classic Italian Muffuletta sandwich. For more details, check the Full Recipe. To make your classic Italian Muffuletta stand out, use fresh ingredients. Fresh olives and herbs boost the flavor. Let the olive salad sit for at least 30 minutes before spreading. This time allows all the flavors to mix well. Also, don’t skip the salt and pepper. They bring out the best in your ingredients. You can personalize your Muffuletta easily. Try different meats like ham or turkey. Add your favorite cheeses too, like mozzarella or cheddar. If you like heat, sprinkle in some crushed red pepper flakes. For a veggie twist, add more roasted red peppers or even artichokes. Think of your taste and make it yours! Having the right tools helps you make the best Muffuletta. Use a sharp bread knife for easy slicing. A mixing bowl is great for your olive salad. A spoon helps mix and spread the filling. Use plastic wrap to tightly seal your sandwich for pressing. A heavy object, like a skillet, helps compact the layers. With these tools, you’ll create a delightful sandwich every time! {{image_4}} You can enjoy a Muffuletta without meat. Start with the same bread and olive mix. Swap out the meats for tasty veggies. Consider using grilled zucchini or eggplant. You can also add marinated artichokes for extra flavor. Fresh mozzarella makes a great cheese alternative. This option keeps the classic taste while being meat-free. You can change ingredients to fit your taste. If you can’t find mortadella, use turkey or ham. For a different cheese, try mozzarella or feta. Adjust the olives based on what you have. Green olives give a nice tang, while kalamata adds depth. Don’t be afraid to mix and match! This way, you create your own special Muffuletta. Muffuletta sandwiches vary by region. In New Orleans, they use a unique olive salad. This salad often includes capers and pickled veggies. The bread may also differ, with some places using a softer roll. In other parts of Italy, you might find different meats and cheeses. Each region adds its own twist, making the Muffuletta a fun dish to explore. For the classic recipe, check out the Full Recipe. To keep your muffuletta sandwich fresh, wrap it tightly. Use plastic wrap or foil. Store it in the fridge. This helps to keep the flavors intact. Make sure to press the sandwich well before wrapping. This step makes the sandwich easier to store and enhances the taste. Leftover muffuletta can taste great again. To revive it, consider heating it slightly. Place the sandwich in a pan over low heat. Cover it with a lid to warm it through. This method helps to melt the cheese and refresh the flavors. Enjoy it warm for a delightful experience. You can freeze the muffuletta for later use. Wrap it tightly in plastic wrap and then in foil. This method protects it from freezer burn. When ready to eat, thaw it in the fridge overnight. After that, heat it up in an oven for the best taste. This option keeps the sandwich delicious even after freezing. A Muffuletta sandwich is a tasty Italian creation. It features layers of meats and cheese. The sandwich includes a special olive salad spread. This mix gives it a unique flavor. You usually serve it on round Italian bread. The bread holds all the yummy fillings together. It comes from New Orleans but has Italian roots. People love it for its bold taste and easy preparation. You can make Muffuletta ahead to save time. First, prepare the olive salad and let it chill. This helps the flavors blend well. Next, assemble the sandwich but do not cut it yet. Wrap it tightly in plastic wrap. Place a heavy object on top. This helps press the sandwich and meld the flavors. You can keep it in the fridge. It stays fresh for a day or two. Just slice it when you are ready to serve. Muffuletta sandwiches taste great with various sides. Here are some ideas: - A light salad with vinaigrette - Tangy pickles for a crunchy bite - Potato chips for some extra crunch - Roasted vegetables for a healthy option - Antipasto platter with cheese and olives These sides enhance the flavors of your Muffuletta and make your meal complete. Enjoy the mix of flavors! For a full recipe, check out the Muffuletta Extravaganza 🥖. We explored the key ingredients and steps to make a perfect Muffuletta sandwich. I shared tips for adding flavor and personalizing your creation. We also looked at variations, including vegetarian options and regional styles. Lastly, I provided storage advice for keeping your Muffuletta fresh. Making this sandwich is fun and rewarding. Enjoy your delicious Muffuletta, whether you eat it now or save it for later!

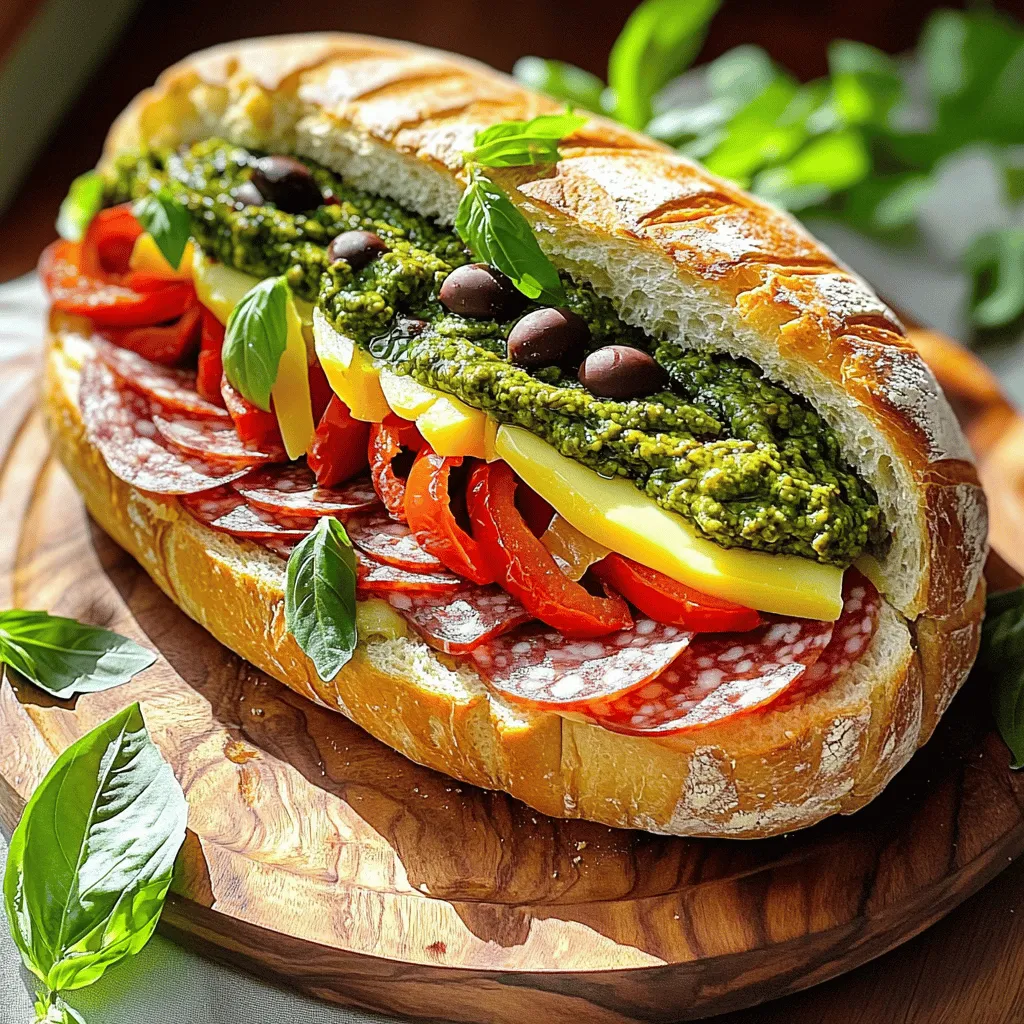
If you’ve never tried a Muffuletta sandwich, you’re in for a treat. This classic Italian delight bursts with flavor, thanks to its unique olive salad and tasty meats. In this …

Read more

Categories Appetizers

Savory Short Rib Ragu Hearty and Rich Pasta Sauce

May 19, 2025 by Chef Remy
- 2 pounds bone-in beef short ribs - 1 medium onion, finely diced - 2 cloves garlic, minced - 1 large carrot, finely diced - 1 celery stalk, finely diced - 1 can (14 ounces) crushed tomatoes - 1 cup beef broth I love using bone-in beef short ribs in this ragu. They add a deep, rich flavor. The meat becomes tender and falls off the bone after slow cooking. Fresh vegetables like onion, garlic, carrot, and celery create a tasty base. They add sweetness and depth to the sauce. Crushed tomatoes and beef broth provide a lovely, hearty texture. - 1 teaspoon dried thyme - 1 teaspoon dried oregano - 1 bay leaf - Salt and freshly ground black pepper, to taste - Fresh parsley, chopped (for garnish) Seasonings are key to a great ragu. Dried thyme and oregano give it a classic Italian flavor. A bay leaf adds an earthy note. Use salt and black pepper to enhance the taste. Finally, fresh parsley makes a beautiful garnish. It adds color and freshness to your dish. - 12 ounces pappardelle pasta For this ragu, I recommend using pappardelle. Its wide, flat shape holds the sauce well. You can also try other pasta types like tagliatelle or fettuccine. They work beautifully too. Pairing the right pasta with your sauce is important for a perfect meal. You can find the full recipe to guide you in making this delicious dish. First, heat 2 tablespoons of olive oil in a large pot over medium-high heat. Season 2 pounds of bone-in beef short ribs with salt and black pepper. Carefully place the short ribs in the hot oil. Sear each side for about 4-5 minutes. You want them to be deeply browned and full of flavor. Once browned, remove the short ribs and set them aside on a plate. In the same pot, lower the heat to medium. Add 1 medium diced onion, 1 large diced carrot, 1 finely diced celery stalk, and 2 minced garlic cloves. Sauté these vegetables for about 5-6 minutes. Stir frequently until the onion is translucent and all the veggies soften. This mix forms the base of your ragu. Now, return the seared short ribs to the pot with the sautéed veggies. Pour in 1 can of crushed tomatoes and 1 cup of beef broth. Add 1 teaspoon of dried thyme, 1 teaspoon of dried oregano, and 1 bay leaf. Mix everything well to combine. Bring the mixture to a gentle simmer. Cover the pot with a lid and reduce the heat to low. It is important to cook this ragu low and slow for 2.5 to 3 hours. This method helps the ribs become very tender. Stir occasionally to prevent sticking. You will know it is done when the meat falls off the bone. About 15 minutes before your ragu is ready, bring a large pot of salted water to a boil. Cook 12 ounces of pappardelle pasta according to the package instructions until al dente. Drain the pasta, but save a bit of the pasta water. This water can help adjust the ragu's consistency later if needed. Remove the short ribs from the pot. Use two forks to shred the meat, discarding the bones and excess fat. Return the shredded meat to the pot with the ragu, mixing until combined. Let it simmer for another 10 minutes. If the ragu is too thick, add some reserved pasta water. Serve the cooked pappardelle pasta topped with your ragu. Garnish with chopped fresh parsley for a pop of color and taste. For the full experience, check out the Full Recipe. When buying short ribs, look for meat that is bright red. The fat should be white and firm. A good rib has a good balance of meat and fat. Bone-in ribs provide more flavor. Boneless ribs can be easier to handle but may lack depth. To boost flavor, add fresh herbs like rosemary or bay leaves. You can also use spices like smoked paprika or red pepper flakes. For a richer taste, consider adding a splash of red wine. Letting the sauce simmer longer can deepen its flavor profile. For shredding short ribs, first let them cool slightly. Use two forks to pull the meat apart. Make sure to remove any bones and excess fat. A common pitfall is shredding meat while it’s too hot, which can burn your hands. Shredding it too early may make it dry. {{image_4}} You can swap short ribs with other meats. Pork shoulder works well. Lamb shanks provide a rich flavor, too. Turkey thighs are a lighter choice. For a meatless ragu, use mushrooms or lentils. Both add depth and heartiness. Want to change up the sauce? Try adding red wine. It brings a nice complexity. You can also use beef stock or vegetable broth for different flavors. Spice it up with a pinch of red pepper flakes. Adding chopped bell peppers or zucchini can boost nutrition and taste. While pappardelle is perfect, other pasta types work too. Fettuccine, rigatoni, or even gnocchi are great choices. Serve the ragu with a side of crusty bread. A fresh green salad complements it nicely. Check out the Full Recipe for more ideas! To keep your savory short rib ragu fresh, transfer it to an airtight container. Let it cool first before sealing. Store it in the fridge. It can stay fresh for about three days. Use a glass or BPA-free plastic container. These materials help keep flavors intact. You can freeze this ragu for future meals. Pour it into freezer-safe containers, leaving some space for expansion. Seal tightly and label with the date. This ragu can last up to three months in the freezer. When you're ready to eat, thaw it overnight in the fridge. Reheat on low heat in a pot, stirring often. You can also use a microwave if you're in a hurry. In the fridge, your savory short rib ragu lasts for about three days. If you freeze it, expect it to last for up to three months. Always check for signs of spoilage before eating. Look for off smells or a change in color. If it smells sour or looks unusual, it’s best to toss it out. Enjoy your ragu safely! Cooking Savory Short Rib Ragu takes about 3 hours and 15 minutes. This includes prep time of 15 minutes and cooking time of about 3 hours. The long cook time helps break down the meat, making it tender and full of flavor. Yes, you can make Savory Short Rib Ragu ahead of time. It tastes even better the next day as the flavors deepen. Store it in an airtight container in the fridge for up to 3 days. You can also freeze it for up to 3 months. Just let it cool before freezing. Savory Short Rib Ragu pairs well with pappardelle pasta, but you can use any pasta you like. It also works great with crusty bread or a fresh salad. For drinks, a nice red wine like Chianti or a rich Merlot complements the ragu perfectly. You can definitely make Savory Short Rib Ragu in a slow cooker! Sear the meat first, then add it to the slow cooker with the vegetables and liquids. Cook on low for 6-8 hours or on high for about 4 hours. This method makes the meat incredibly tender and easy to shred. In this blog post, we explored how to create a rich and flavorful Savory Short Rib Ragu. We covered important ingredients like bone-in beef short ribs, fresh vegetables, and aromatic herbs. The process involves searing, slow cooking, and pairing the ragu with the right pasta. Remember to select quality short ribs and feel free to customize with different meats or sauces. Enjoy making this hearty dish, and savor every bite of your creation!

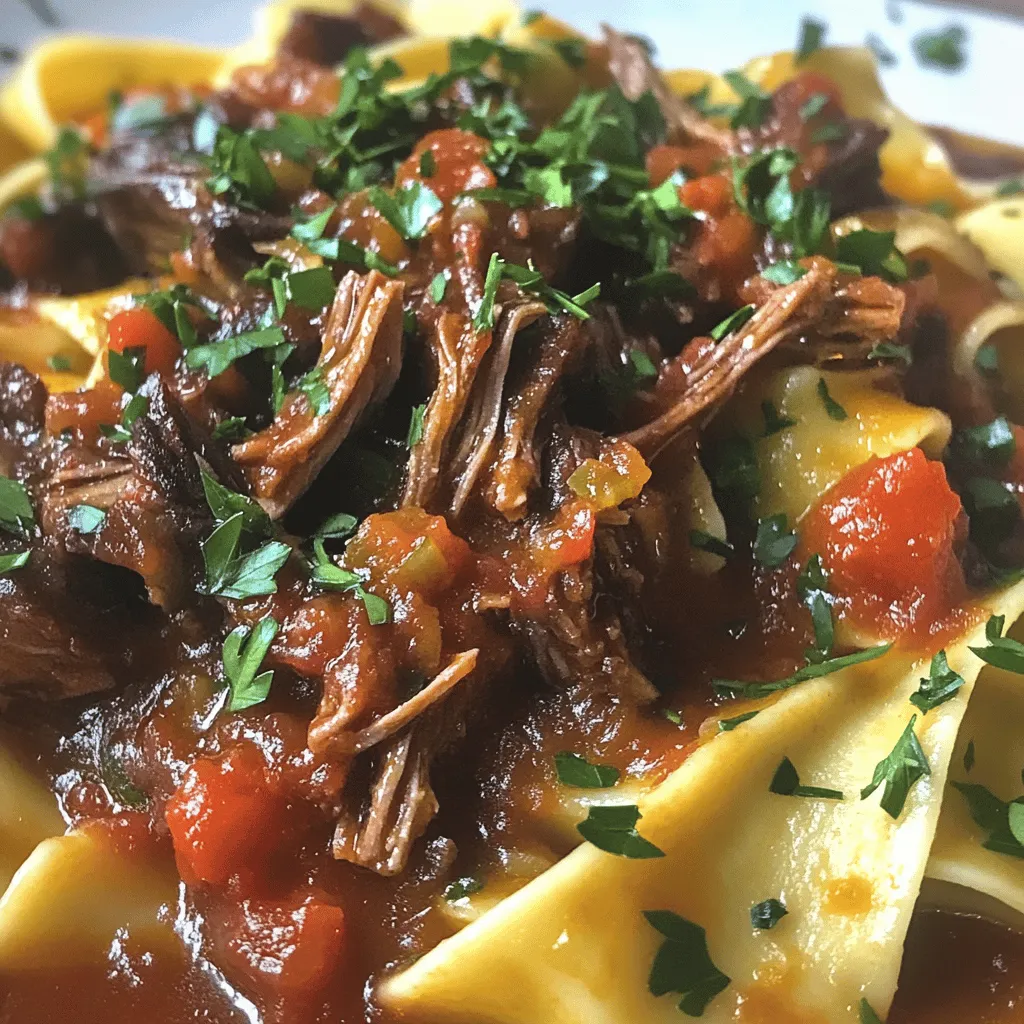
If you’re looking for a comforting meal that warms the soul, you’ve come to the right place! My Savory Short Rib Ragu is a hearty and rich pasta sauce that …

Read more

Categories Dinner

Creamy Tuscan Ravioli Flavorful Dinner Delight

May 19, 2025 by Chef Remy
- 12 oz refrigerated cheese ravioli - 1 tablespoon extra virgin olive oil - 3 cloves garlic, finely minced - 1 cup cherry tomatoes, halved - 2 cups fresh baby spinach - 1 cup heavy cream - 1 teaspoon Italian seasoning blend - ¼ cup freshly grated Parmesan cheese - Sea salt and freshly cracked black pepper to taste - Fresh basil leaves, loosely torn, for garnish When making creamy Tuscan ravioli, you need these fresh and simple ingredients. Start with 12 ounces of cheese ravioli. I love using the refrigerated kind for a quick meal. This ravioli cooks fast and tastes great! For flavor, you will need one tablespoon of extra virgin olive oil. This oil adds richness to your dish. Next, three cloves of garlic, finely minced, will give your sauce a lovely aroma. You will also need one cup of cherry tomatoes, halved, to add sweetness and color. Now, let’s add some greens. You will need two cups of fresh baby spinach. This spinach wilts down nicely, adding nutrients and a pop of color. For creaminess, use one cup of heavy cream. It makes the sauce smooth and rich. To spice things up, add one teaspoon of Italian seasoning blend. This will give your dish a classic Italian taste. Lastly, don’t forget the cheese! You’ll want a quarter cup of freshly grated Parmesan cheese for that salty, nutty flavor. For seasoning, use sea salt and freshly cracked black pepper to taste. These will help bring out all the flavors in your dish. Finally, garnish with fresh basil leaves, which add a nice touch and aroma. Get ready to cook! You can find the full recipe for creamy Tuscan ravioli [here]. Begin by boiling a large pot of salted water. This step is key to flavoring the ravioli. Once the water bubbles, add the cheese ravioli. Cook them as per package instructions, usually 3-5 minutes. You want them to be al dente. When done, drain the ravioli but save a small cup of the pasta water for later. While the ravioli cooks, heat one tablespoon of extra virgin olive oil in a large skillet over medium heat. Once hot, add three cloves of finely minced garlic. Sauté this until it smells great, about one minute. Next, toss in one cup of halved cherry tomatoes. Cook them for three to four minutes until they soften and let out their juicy goodness. Now, stir in two cups of fresh baby spinach. Keep stirring until the spinach wilts, which should take about two to three minutes. The bright green color adds charm and taste. Lower the heat and carefully pour in one cup of heavy cream. Mix well, and then sprinkle in one teaspoon of Italian seasoning and a quarter cup of freshly grated Parmesan cheese. Season with sea salt and black pepper to taste. If the sauce is too thick, add the reserved pasta water one tablespoon at a time until it’s just right. Gently fold the cooked ravioli into the creamy sauce. Make sure every piece gets coated and warmed through. Remove the skillet from heat and let it rest for a minute. This helps the sauce thicken around the ravioli. Serve it on warm plates and garnish with fresh basil leaves. If you like, add more Parmesan cheese for a delicious final touch. Enjoy your creamy Tuscan ravioli! For complete details, check out the Full Recipe. To cook ravioli perfectly, aim for al dente. This means they should be firm but not hard. Follow the package's cooking time closely. After boiling, always taste a piece to check doneness. If they feel too soft, cook them less next time. Burnt garlic can ruin your dish. To avoid this, sauté garlic for just a minute or until fragrant. Keep the heat medium and watch closely. If it starts to brown, remove it right away. This will keep your sauce fresh and tasty. If your creamy sauce is too thick, add pasta water. Start with a tablespoon and mix well. Repeat until you reach the right consistency. If it’s too thin, let it simmer on low heat. This will help thicken the sauce naturally. Seasoning is key for great flavor. Use sea salt and freshly cracked black pepper. Taste your sauce before serving. Adjust seasoning based on your preference. You can also try adding fresh herbs for extra flavor. For an elegant look, serve ravioli in shallow bowls. This helps showcase the colors of the dish. Drizzle a little extra olive oil on top for shine. Garnish with fresh basil leaves and a sprinkle of red chili flakes. This adds a pop of color and a hint of heat. It makes your dish not just tasty but also beautiful. For more ideas, check out the Full Recipe! {{image_4}} You can change things up with different ravioli fillings. Try mushroom or spinach ravioli for a fun twist. You can also use butternut squash for a sweet flavor. If you want a dairy-free option, look for vegan cream. Cashew cream or coconut cream works well too. These substitutions keep the dish tasty while catering to different diets. Adding other vegetables can enhance the dish. Bell peppers and zucchini add color and nutrition. You can sauté them along with the tomatoes. For added protein, consider chicken, shrimp, or sausage. These options make the dish heartier. Just cook them separately and mix them in with the ravioli. Italian regions have their own special takes on ravioli. For example, in Emilia-Romagna, they often use rich meat fillings. You can recreate these flavors by using beef or pork ravioli. To achieve traditional Tuscan tastes, focus on fresh herbs and quality olive oil. This can elevate your creamy sauce and bring out authentic flavors. To store leftover creamy Tuscan ravioli, let it cool first. Place it in an airtight container. This keeps it fresh. Use glass or plastic containers with tight lids. They prevent leaks and odors. To reheat, use the stovetop or microwave. For the stovetop, add a little water or cream to the pan. Heat on low, stirring gently. This helps keep the sauce creamy. In the microwave, cover the dish loosely. Heat for 1-2 minutes, stirring halfway through. This warms it evenly and prevents drying out. To freshen up leftovers, add a splash of cream or olive oil before serving. This boosts the flavor and texture. You can also sprinkle some fresh herbs on top for a nice touch. Yes, you can freeze creamy Tuscan ravioli. Store it in a freezer-safe container. Make sure to leave some space at the top for expansion. This keeps the ravioli from getting mushy. For best results, freeze it in single servings. This makes it easier to thaw just what you need. To defrost, place it in the fridge overnight. When ready to eat, reheat as mentioned before. Enjoy your meal with ease! For the full recipe, check out the detailed cooking steps. Creamy Tuscan ravioli is a rich and savory pasta dish. It features cheese ravioli in a creamy sauce. The sauce includes garlic, cherry tomatoes, and fresh spinach. This dish is colorful and full of flavor, making it a favorite. Making Creamy Tuscan ravioli takes about 25 minutes. You’ll spend around 10 minutes prepping ingredients. Cooking the ravioli and sauce takes about 15 minutes. It’s quick and perfect for busy nights. Yes, you can make this dish in advance. Cook the ravioli and sauce separately. Store them in the fridge for up to three days. When ready to eat, heat them together in a skillet. Add a splash of cream to freshen it up. Creamy Tuscan ravioli pairs well with a simple salad. A fresh green salad with vinaigrette works great. You can also serve garlic bread for dipping. A glass of white wine can enhance the meal, too. Yes, you can find gluten-free ravioli at many stores. Look for brands that use rice or chickpea flour. You can also make your own gluten-free pasta. This way, everyone can enjoy this tasty dish without worry. Creamy Tuscan ravioli is a simple, yet delicious dish that brings joy to any meal. We covered essential ingredients like cheese ravioli, garlic, and fresh spinach, then walked through cooking it step-by-step. You learned tips to make your meal even better and explored fun variations. Cooking should be easy and enjoyable. Now, you can create a rich dish that delights your taste buds. Whether you stick to the classic or try something new, your creamy Tuscan ravioli will impress. Enjoy every bite and share with friends!

Are you ready to elevate your dinner game? Creamy Tuscan Ravioli is a dish that combines cheesy pasta with a rich, flavorful sauce. With fresh spinach, juicy tomatoes, and a …

Read more

Categories Dinner

Chicken Puttanesca Simple and Flavorful Dinner Idea

May 19, 2025 by Chef Remy
To make Chicken Puttanesca, gather these fresh ingredients: - 500g boneless, skinless chicken thighs, diced into bite-sized pieces - 2 tablespoons extra virgin olive oil - 4 cloves garlic, finely minced - 1 teaspoon crushed red pepper flakes (adjust to preference) - 1 can (400g) diced tomatoes, preferably with herbs - 1/2 cup kalamata olives, pitted and coarsely chopped - 2 tablespoons capers, rinsed and drained - 1 tablespoon dried oregano - Salt and freshly ground black pepper to taste - 300g spaghetti or your preferred pasta - Fresh parsley, roughly chopped, for garnishing - Grated Parmesan cheese, for serving (optional) You can mix things up with these optional ingredients: - Fresh basil for a fragrant touch - Red wine for deeper flavor - Zucchini or bell peppers for more veggies Prepare your kitchen with these tools: - Large pot for boiling pasta - Large skillet for cooking chicken and sauce - Colander for draining pasta - Wooden spoon for stirring - Chef’s knife and cutting board for chopping ingredients To start, fill a large pot with water and add salt. Bring the water to a rolling boil. Once it boils, add 300g of spaghetti or your favorite pasta. Cook it for 8 to 10 minutes or until it's al dente. Remember, we want it firm, not mushy. After cooking, drain the pasta in a colander. Save about a cup of the starchy water for later. Next, grab a large skillet and heat 2 tablespoons of olive oil over medium heat. While the oil heats, season 500g of diced chicken thighs with salt and black pepper. Once the oil is hot, add the chicken to the skillet. Cook for about 5 to 7 minutes. Stir often to ensure it browns nicely. When it's fully cooked, take the chicken out and set it aside on a plate. In the same skillet, reduce the heat slightly. Add 4 cloves of minced garlic and 1 teaspoon of crushed red pepper flakes. Sauté for about 1 minute, stirring constantly. The garlic should smell amazing but not turn brown. Now, pour in 1 can of diced tomatoes, 1/2 cup of chopped kalamata olives, 2 tablespoons of capers, and 1 tablespoon of dried oregano. Mix well and let it simmer for 7 to 10 minutes. This helps the flavors blend. It's time to bring it all together. Return the cooked chicken to the skillet. Mix it well with the sauce. If the sauce is too thick, add some of that reserved pasta water until it reaches the right consistency. Now, add the drained spaghetti directly into the skillet. Toss everything together gently for a couple of minutes. Make sure the pasta is coated in that tasty sauce. Taste and adjust the seasoning with salt and pepper if needed. To serve, scoop the spicy Chicken Puttanesca onto plates. Garnish with roughly chopped fresh parsley and, if you like, add some grated Parmesan cheese on top. This dish pairs great with a side of crusty bread. It’s perfect for scooping up the delicious sauce. Enjoy the blend of flavors! To get juicy chicken, use boneless, skinless thighs. They stay moist and flavorful. Dice them into small pieces for even cooking. Heat the olive oil in a skillet over medium heat. Season the chicken well with salt and pepper. Cook it for 5-7 minutes, stirring often. Look for a golden brown color. This shows the chicken is cooked well. Always check if it’s no longer pink inside. The sauce is key to Chicken Puttanesca. Start by adding garlic and crushed red pepper flakes. Sauté them until fragrant. This step boosts the flavor. Next, add canned diced tomatoes, olives, and capers. The tomatoes bring sweetness, while olives and capers add saltiness. Use dried oregano for a touch of earthiness. Let the sauce simmer for 7-10 minutes. This melds all the flavors together. If it’s too thick, add some pasta water. This helps blend it perfectly. Avoid overcooking the chicken; it can become dry. Don’t skip the resting time after cooking. This helps retain moisture. Be careful not to burn the garlic, as it turns bitter. Also, taste the sauce before serving. Adjust seasoning as needed. If you find it too salty, add a pinch of sugar. This can balance the flavors. For a great meal, follow these tips and enjoy this spicy Chicken Puttanesca! For more details, check the Full Recipe. {{image_4}} If you want a vegetarian version of Chicken Puttanesca, swap the chicken for hearty mushrooms. They add a nice texture. You can also use eggplant or zucchini. These veggies soak up the sauce well and keep the dish tasty. You can follow the same steps in the full recipe, just replacing the chicken. Want to boost the nutrition? Toss in more vegetables! Spinach or kale works great. Add them during the sauce step, letting them wilt. Bell peppers or artichokes also mix well. They will add color and crunch. Always remember to cut them small for even cooking. To spice things up, try adding more herbs and spices. Basil pairs nicely with the flavors. For a smoky twist, add a bit of smoked paprika. If you love heat, consider more crushed red pepper flakes. Always taste as you go to keep the balance right. Each tweak can make your dish unique and exciting! Store leftover Chicken Puttanesca in an airtight container. Let it cool to room temperature first. It keeps well in the fridge for up to three days. If you want to keep it longer, consider freezing it. To reheat, you can use the stovetop or microwave. For the stovetop, place it in a pan over low heat. Add a splash of water or broth to keep it moist. Stir often until heated through. In the microwave, heat in short bursts. Stir between each burst to ensure even heating. To freeze Chicken Puttanesca, let it cool completely. Then, transfer it to a freezer-safe container. Make sure to leave some space at the top, as the sauce may expand. It can be frozen for up to three months. When ready to eat, thaw overnight in the fridge before reheating. Chicken Puttanesca is a savory dish that mixes chicken with a bold sauce. The sauce has tomatoes, olives, and capers. It is hearty and packed with flavor. This dish often features pasta, making it a complete meal. The origins are Italian, and it offers a unique twist on traditional Puttanesca, which usually uses fish. Yes, you can choose many types of pasta. While spaghetti is common, penne or fusilli also work well. Select any shape you enjoy. Just cook it according to the package directions. The key is to ensure it pairs well with the rich sauce. The spice level depends on the red pepper flakes you use. The base recipe calls for one teaspoon. If you like more heat, add more flakes. You can also skip them if you prefer a milder dish. It offers flexibility to suit your taste. Yes, you can prepare parts of the dish in advance. Cook the chicken and sauce, then store them separately. This way, you can quickly combine them with pasta later. Just reheat before serving. It saves time on busy days. For a detailed guide, check out the Full Recipe. Here are some tips: - Use fresh ingredients for the best flavor. - Taste the sauce as you cook to adjust seasoning. - Don't overcook the chicken; it should stay juicy. - Garnish with fresh parsley for a pop of color and taste. Chicken Puttanesca is a tasty dish with rich flavors and simple steps. We covered key ingredients, tools, and how to cook everything perfectly. I shared tips to avoid mistakes and make it your own. You can even try vegetarian options or add veggies for health. Remember to store leftovers properly for later enjoyment. Cooking should be fun and rewarding, so don’t hesitate to get creative. Enjoy every bite and impress your friends with your skills!

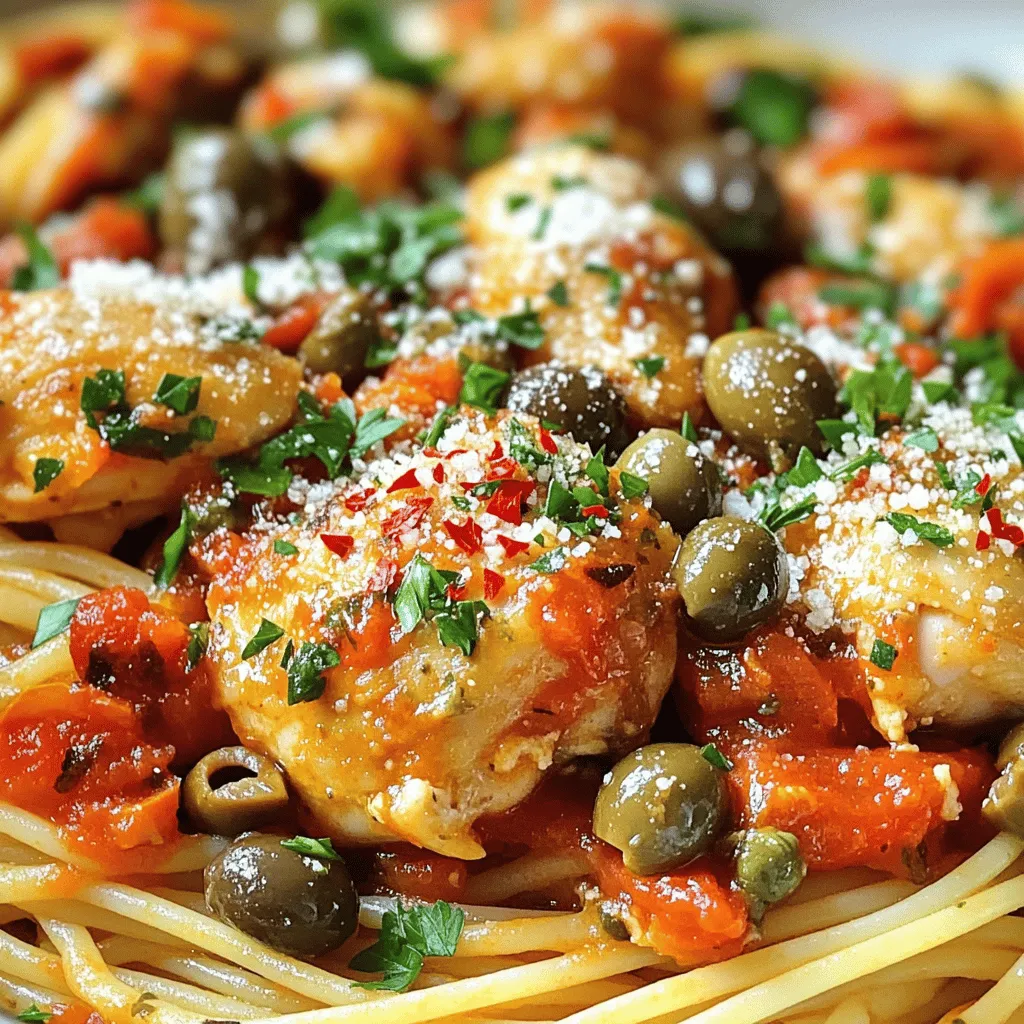
Looking for a quick, tasty dinner idea? Try Chicken Puttanesca! This dish combines juicy chicken and a rich tomato sauce, bursting with flavor. It’s simple to make and perfect for …

Read more

Categories Dinner

Roasted Tomato and Garlic Ricotta Pasta Delight

May 19, 2025 by Chef Remy
To create this delightful dish, you will need: - 2 cups cherry tomatoes, halved - 3 cloves garlic, unpeeled - 250g (9 oz) pasta of your choice, such as spaghetti, fusilli, or penne - 1 cup creamy ricotta cheese - 1/4 cup freshly grated Parmesan cheese - A handful of fresh basil leaves, for garnish - Zest from 1 lemon You should have these pantry staples on hand: - 2 tablespoons extra virgin olive oil - Salt to taste - Freshly cracked black pepper to taste You can add these garnishes for extra flavor: - Extra Parmesan cheese - Crushed red pepper flakes for heat - More fresh basil leaves This recipe balances fresh, bold flavors with simple ingredients. You can find the full recipe for Roasted Tomato and Garlic Ricotta Pasta at the top of this section. Enjoy the cooking process, and feel free to modify the ingredients to fit your taste! Start by preheating your oven to 400°F (200°C). This step is key for roasting. Next, grab a large, rimmed baking sheet. Place the halved cherry tomatoes on it. Don’t forget the unpeeled garlic cloves! Drizzle the veggies with extra virgin olive oil. Then, sprinkle salt and freshly cracked black pepper on top. Toss everything gently to coat. Spread the tomatoes and garlic out in a single layer. Now, slide the baking sheet into the preheated oven. Roast the tomatoes and garlic for about 20-25 minutes. You want the tomatoes to blister and burst. The garlic should turn golden and soft. After roasting, take them out and let them cool for a few minutes. This cooling time makes them easier to handle. While the tomatoes and garlic roast, bring a large pot of salted water to a boil. Add your favorite pasta—spaghetti, fusilli, or penne work well. Cook the pasta according to the package instructions until it’s al dente. Before draining, save 1/2 cup of that starchy pasta water. Once it’s done, drain the pasta and set it aside for later. For the full recipe, check the details above. Seasoning is key to a tasty dish. I like to use salt and black pepper. They bring out the natural flavors in the tomatoes and garlic. You can also add a pinch of red pepper flakes for heat. Fresh herbs, like basil, add a pop of flavor too. Don’t forget to taste as you go. It helps you adjust the seasoning just right. For creamy ricotta pasta, texture matters. Start with high-quality ricotta cheese. It should be smooth and rich. If your mixture is too thick, add a little pasta water. This helps create a silky sauce that clings to your pasta. Mix well until everything is combined. The goal is creamy but not runny. Roasting tomatoes and garlic brings out their sweetness. Use a rimmed baking sheet for easy cleanup. Spread the tomatoes and garlic in a single layer. This helps them roast evenly. Keep an eye on them while they cook. You want blistered tomatoes and soft garlic. This usually takes about 20-25 minutes. Trust me, the smell will be worth it. For the full recipe, check out our Roasted Tomato & Garlic Ricotta Pasta. {{image_4}} You can easily add protein to your roasted tomato and garlic ricotta pasta. Chicken, shrimp, or even tofu work well. For chicken, grill or sauté it first, then slice it. Toss it with the pasta for a hearty meal. For shrimp, sauté them until pink and cooked through. Tofu can be cubed and roasted to add texture. Each option brings its own flavor and makes the dish more filling. If you want a vegan version, swap the ricotta for plant-based cheese or blended tofu. Use nutritional yeast to add a cheesy flavor. You can also add cashew cream for richness. For the Parmesan, use a vegan alternative or skip it altogether. This keeps the dish creamy and delicious without any animal products. Feel free to change the tomatoes and garlic with seasonal vegetables. In spring, use asparagus or peas for a fresh twist. In fall, add roasted butternut squash for sweetness. Zucchini and bell peppers are great in summer. Mixing in seasonal veggies makes the pasta vibrant and adds variety to your meal. Enjoy experimenting with what you have on hand! After enjoying your roasted tomato and garlic ricotta pasta, let it cool down. Transfer it to an airtight container. This helps keep it fresh. Store the pasta in the fridge for up to three days. If you have extra sauce, keep it separate to maintain the pasta's texture. When you're ready to enjoy your leftovers, reheat the pasta gently. Use a microwave-safe dish. Heat it in short intervals, stirring in between. This prevents hot spots. If it seems dry, add a splash of reserved pasta water. Stir well to combine everything again. If you want to freeze your roasted tomato and garlic ricotta pasta, start by letting it cool completely. Portion it into freezer-safe bags or containers. Squeeze out any air before sealing. You can freeze it for up to three months. When you're ready to eat, thaw it in the fridge overnight and reheat as mentioned before. For the full recipe, check out the instructions above. Yes, you can use any pasta you like. I enjoy spaghetti, fusilli, and penne. Each type brings a different texture. Just make sure to cook it al dente for the best bite. Leftovers will stay good for about three days in the fridge. Store them in an airtight container. To keep the pasta fresh, it’s best to reheat only what you plan to eat. If you don’t have ricotta, you can use cottage cheese or cream cheese. Both provide a creamy texture. You might add a bit of lemon juice for tang. This can help mimic ricotta’s flavor. For the full recipe, click here: [Full Recipe]. We covered easy recipes and tips for a tasty dish. Fresh ingredients and pantry staples are key. Roasting tomatoes and garlic helps build flavor, while tips guide texture. Don't forget protein options or vegan swaps to fit your needs. Store wisely to enjoy leftovers. Remember, cooking is fun. Try new things. Use this information to make your meals better. Keep it creative and enjoy every bite!

Welcome to Roasted Tomato and Garlic Ricotta Pasta Delight. If you love simple, tasty dishes, you’re in for a treat! This pasta combines sweet roasted tomatoes and creamy ricotta for …

Read more

Categories Dinner

Savory Chicken Parmesan Sliders Easy and Tasty Meal

May 19, 2025 by Chef Remy
- 1 lb ground chicken - 1/2 cup breadcrumbs - 1/4 cup grated Parmesan cheese - 1 tablespoon Italian seasoning - 1 teaspoon garlic powder - 1 teaspoon salt - 1/2 teaspoon black pepper - 1 cup marinara sauce - 1 1/2 cups shredded mozzarella cheese - 12 slider buns - Fresh basil leaves, for garnish - Olive oil spray Ground chicken is the star of this dish. It cooks quickly and stays juicy. I love using fresh breadcrumbs for better taste and texture. Grated Parmesan adds a salty, nutty flavor that blends well with chicken. Italian seasoning brings a mix of herbs that really shines through. Marinara sauce adds both moisture and rich flavor. Shredded mozzarella melts beautifully. It gives that classic gooey texture we all love in sliders. Fresh basil is not just for looks; it adds freshness to each bite. For ground chicken, I recommend Perdue or Tyson. They provide quality and taste. For breadcrumbs, try Progresso or 4C. Their texture works well in this recipe. For marinara sauce, Rao's and Prego are both great choices. They add rich flavor without any extra fuss. Finally, for mozzarella, I love Sargento. It melts perfectly and tastes fresh. You can find these brands at most grocery stores. Start by preheating your oven to 375°F (190°C). This step helps cook the sliders evenly. Next, take a baking tray and lightly coat it with olive oil spray. This keeps the sliders from sticking. In a large bowl, mix the ground chicken, breadcrumbs, Parmesan cheese, Italian seasoning, garlic powder, salt, and black pepper. Use your hands or a spatula to combine everything well. After mixing, form the chicken into small patties. Aim for patties about the size of your palm, roughly 2-3 inches wide. You should get around 12 patties from this mixture. Heat a non-stick skillet over medium heat. Add a drizzle of olive oil to coat the pan. Carefully place the chicken patties in the skillet. Cook each patty for about 5 minutes on each side. You want them to turn golden brown. Make sure they reach an internal temperature of at least 165°F (75°C) to ensure safety. While the patties cook, warm the marinara sauce in a saucepan over low heat. Stir it occasionally so it does not stick to the pan. Once the chicken patties are cooked, it’s time to build the sliders. Place each patty on the bottom half of a slider bun. Spoon marinara sauce over each patty. Then, add a generous amount of shredded mozzarella cheese on top. Close the sliders with the top halves of the buns. Cover the tray with aluminum foil to keep moisture and heat in while baking. Bake in the oven for 10-12 minutes. This will melt the cheese perfectly. For a nice golden-brown finish, remove the foil and bake for an extra 5 minutes. Keep a close watch to avoid over-browning. Just before serving, add fresh basil leaves for a bright touch. Enjoy your tasty Chicken Parmesan Sliders! For the full recipe, check out the details above. To make great chicken patties, start with a good mix. Combine ground chicken with breadcrumbs and spices well. Use your hands to feel the texture. This helps you know if it’s mixed enough. Make patties about 2-3 inches wide. They should be even in size. This helps them cook at the same rate. When frying, use medium heat. This keeps the outside crispy and the inside juicy. Cook each side for about 5 minutes. Check the color; they should be golden brown. Melting cheese on your sliders is key for that gooey texture. After cooking the patties, spoon marinara sauce on top. Then, pile on the shredded mozzarella cheese. Cover the tray with foil while baking. This traps heat and helps the cheese melt evenly. If you want a nice brown finish, remove the foil for the last 5 minutes. Keep an eye on them to prevent burning. You want bubbly cheese for that perfect look. Serve your sliders in a fun way to impress guests. Stack them on a large platter for a tower effect. Place a small bowl of extra marinara sauce next to the sliders. This lets everyone dip and add more sauce if they wish. You can also add fresh basil leaves on top for color and flavor. Pair them with a simple salad or crunchy veggies. This makes your meal complete and satisfying. Check out the Full Recipe for more tips! {{image_4}} You can change up the flavor of your chicken parmesan sliders by using different sauces. Instead of marinara, try pesto or Alfredo sauce. Both add a unique twist. You can also switch the cheese. Instead of mozzarella, use provolone or even goat cheese for a tangy touch. Mixing cheeses can create a creamier texture. Experiment with your favorites to find what you like best. If you want to use a different protein, ground turkey or beef works well. You can also choose meatless options. Try using lentils or chickpeas mixed with breadcrumbs and spices. These create a hearty veggie patty. You can also use store-bought veggie patties for an easy choice. Both options keep the flavor while adding variety. For those who enjoy a kick, add red pepper flakes to the chicken mix. This gives your sliders a nice heat. You can also use fresh herbs like parsley, oregano, or thyme for added flavor. Mixing in fresh basil can give your sliders a fresh taste. Adjust the spice level to suit your palate and have fun with your flavors. Store any leftover chicken Parmesan sliders in an airtight container. Keep them in the fridge for up to three days. This helps keep them fresh and tasty. Make sure to let the sliders cool down before sealing them. This avoids moisture build-up, which can make them soggy. You can freeze chicken Parmesan sliders for longer storage. First, let them cool completely. Wrap each slider in plastic wrap, then place them in a freezer bag. This helps prevent freezer burn. When you're ready to eat them, they can last for up to three months in the freezer. To reheat, take the sliders out of the fridge or freezer. If frozen, let them thaw in the fridge overnight. Preheat your oven to 350°F (175°C). Place the sliders on a baking sheet and cover with foil. Heat them for about 10-15 minutes until warm. If you want, remove the foil for the last few minutes to crisp up the buns. Enjoy your meal! For the full recipe, check it out [here](#). To make Chicken Parmesan Sliders, start by mixing ground chicken, breadcrumbs, and spices in a bowl. Form small patties and cook them in a skillet until golden brown. Next, place the patties on slider buns and top with marinara sauce and mozzarella cheese. Bake them until the cheese melts and gets bubbly. This simple process leads to a tasty meal that everyone will enjoy. For the full recipe, check out the detailed steps above. Yes, you can use different types of bread for your sliders. Slider buns work best, but feel free to try other options like ciabatta, focaccia, or even wraps. Each type of bread brings its own flavor and texture. Choose what you like best or have on hand. Chicken Parmesan Sliders pair well with many sides. You can serve them with a fresh salad or crispy fries. For a healthier option, try steamed veggies or a fruit salad. Offering a variety of sides makes the meal more enjoyable and colorful. We explored how to make tasty chicken parmesan sliders, from key ingredients to cooking steps. I shared tips for perfect patties and fun variations to keep meals exciting. Leftovers can also be stored, frozen, and reheated easily. With these insights, you can whip up sliders that are delicious and fun. Whether it's for a quick dinner or a party, you now have the skills to impress. Enjoy making these sliders and share them with friends and family!

If you’re craving a quick, tasty meal, my Chicken Parmesan Sliders are perfect. These little bites are packed with flavor and fun to make. You can easily whip them up …

Read more

Categories Dinner

Bruschetta Dip Flavorful and Simple Party Treat

May 19, 2025 by Chef Remy
- Fresh produce for flavor: Use ripe cherry tomatoes for sweetness. Fresh basil adds a fragrant touch. Garlic gives a nice kick. These fresh ingredients create a bright and vibrant taste. - Cheese selection for creaminess: Cream cheese provides a smooth base. Shredded mozzarella melts beautifully. Grated Parmesan adds depth and richness. Together, they create a creamy and rich texture. - Seasonings for enhanced taste: A splash of balsamic vinegar brings acidity. Olive oil adds richness. Salt and pepper enhance the flavors. Italian seasoning gives an extra layer of taste. - 2 cups cherry tomatoes, diced - 1 cup fresh basil leaves, chopped - 1 clove garlic, minced - 1 tablespoon balsamic vinegar - 1 tablespoon olive oil - Salt and freshly ground black pepper, to taste - 1 cup cream cheese, softened - 1 cup shredded mozzarella cheese - 1/2 cup grated Parmesan cheese - 1 teaspoon Italian seasoning - Baguette slices, toasted for serving - How to choose the best tomatoes and basil: Look for firm, bright tomatoes. They should feel heavy for their size. Choose basil with vibrant, green leaves. Avoid wilted or brown leaves for the best flavor. - Selection of cheeses for optimal results: Use full-fat cream cheese for creaminess. Fresh mozzarella offers the best melt. For Parmesan, select a block to grate yourself. Pre-grated cheese may lack flavor. To make the tomato mixture, start by dicing the cherry tomatoes. This gives a fresh and juicy bite. Next, chop the basil leaves finely. Adding garlic gives a nice kick. In a mixing bowl, combine the tomatoes, basil, and minced garlic. Pour in the balsamic vinegar and olive oil. A pinch of salt and black pepper will boost the flavor. Mix it all well. Let it marinate for about 10 minutes. This step helps the flavors blend together. You will love how they taste! Now, let’s make the cheese base. In a separate bowl, add the softened cream cheese. It should be easy to mix. Next, add the shredded mozzarella and grated Parmesan. The mix should be rich and creamy. Add one teaspoon of Italian seasoning for extra flavor. Don’t forget a pinch of salt and pepper to taste. Beat the mixture until it is smooth. This creamy base will be the heart of your dip. Preheat your oven to 350°F (175°C). This way, it is hot and ready when you need it. Spread the cheese mixture on the bottom of a medium baking dish. Make sure it is even. Then, scoop the marinated tomato mix on top. Spread it out so every bite has flavor. Bake in the oven for 20-25 minutes. Look for bubbly cheese and a golden top. Once done, take it out and let it cool for a few minutes. This helps the flavors settle before serving. Enjoy your delicious bruschetta dip with toasted baguette slices! To make your bruschetta dip shine, adjust the seasoning. Start with a pinch of salt and some black pepper. Taste it after mixing. If it needs more flavor, add more salt or pepper little by little. You can also add extra balsamic vinegar for a tangy kick. Remember, fresh basil brings a bright taste. Try to use it right before serving for the best flavor. For a creamy dip, mix the cheeses well. Use a hand mixer to beat the cream cheese until smooth. This helps it blend with the other cheeses. When baking, keep the oven at 350°F (175°C). Bake for 20-25 minutes. This gives you a bubbly top and a warm dip inside. Avoid overbaking to keep the dip creamy. Serving matters, so make it fun! Use a nice baking dish to add style. Before serving, sprinkle fresh basil on top. This adds color and freshness. You can also place toasted baguette slices around the dish. This makes it easy for guests to dip. For a creative touch, try using small bowls for individual servings. Your bruschetta dip will look as good as it tastes. For the full recipe, check the recipe section. {{image_4}} You can add different herbs or spices to change the flavor of bruschetta dip. Fresh oregano or thyme gives a nice twist. A pinch of red pepper flakes adds heat. Experiment with fresh herbs like dill or cilantro for a unique touch. You can also try smoked paprika for a hint of smokiness. These simple changes can make the dip exciting. You might want to substitute cheeses or use vegan options. If you prefer a lighter dip, try low-fat cream cheese. For a vegan twist, use cashew cheese or silken tofu. Nutritional yeast can add a cheesy flavor without dairy. Goat cheese provides a tangy alternative that pairs well with the sweet tomatoes. Each option brings a new taste to the dish. Adapting the recipe with seasonal vegetables is fun and fresh. In summer, use ripe heirloom tomatoes for more flavor. In fall, add roasted butternut squash for sweetness. You can incorporate spinach or arugula in spring for a vibrant color. Each season brings new veggies, making this dip versatile. Use what is fresh to keep the dip exciting. To keep your bruschetta dip fresh, place it in an airtight container. This helps prevent moisture loss and keeps flavors intact. Store it in the fridge for up to three days. If you notice any separation, simply stir it well before serving. When you’re ready to enjoy leftovers, reheat gently. The best method is to use an oven set to 350°F (175°C). Place the dip in an oven-safe dish and cover it with foil. Heat for about 15 minutes, or until warm. Avoid high heat to keep the cheese from becoming rubbery. You can freeze bruschetta dip, but it may change texture. To freeze, place the dip in a freezer-safe container. Make sure to leave some space at the top for expansion. It can last up to two months frozen. When ready to eat, thaw it overnight in the fridge and reheat as described. Enjoy your flavorful dip any time! Bruschetta dip can last for about 3 to 5 days in the fridge. The main ingredients, like cream cheese and tomatoes, influence this time. If you keep the dip in an airtight container, it will stay fresh longer. However, the flavor may fade as the days go by. To keep it tasting great, eat it within a few days. Yes, you can make this dip ahead of time! I recommend preparing the cream cheese layer and the tomato mixture separately. Store them in the fridge in airtight containers. When you are ready to serve, layer them and bake. This way, you can enjoy your time with guests without rushing. Just don't bake it until you're ready to eat! Bruschetta dip pairs well with toasted baguette slices, perfect for dipping. You can also offer crackers or pita chips for a crunchy option. Fresh veggies, like cucumber or bell pepper strips, add a nice touch too. For a full spread, include some sliced meats or cheeses. This makes for a delicious and colorful appetizer table! This blog post covered key ingredients and steps for a delicious Bruschetta Dip. We explored great produce choices, cheese tips, and seasoning for flavor. You learned how to mix and bake for the best texture. We also discussed variations, storage methods, and serving ideas. By focusing on quality ingredients and preparation tips, you can create a perfect dip. Enjoy your cooking journey and impress your guests!

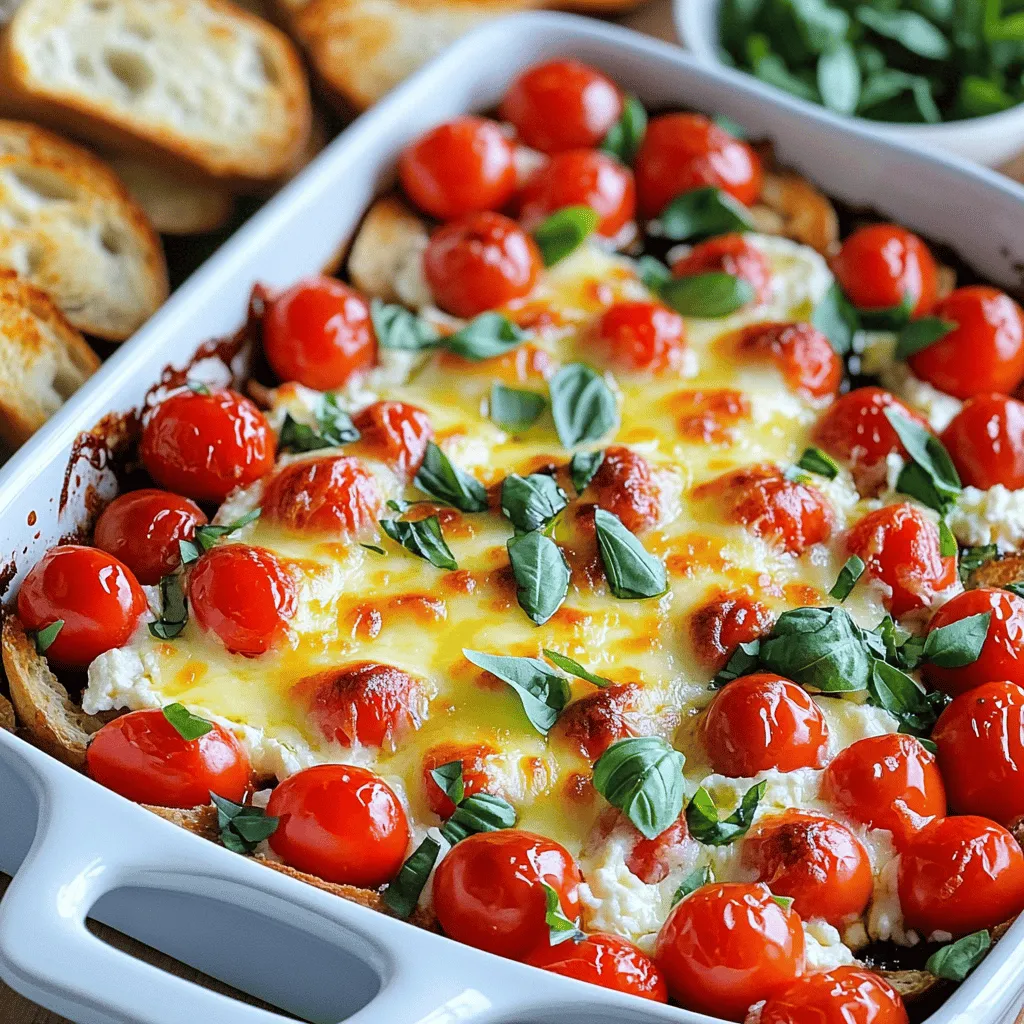
Looking for a crowd-pleasing appetizer? My Bruschetta Dip is both flavorful and simple to make. This tasty treat combines fresh tomatoes, creamy cheese, and zesty herbs, making it perfect for …

Read more

Categories Appetizers

Cinnamon Sugar French Toast Roll-Ups Simple Delight

May 18, 2025 by Chef Remy
- 6 slices of your choice of bread (white or whole grain) - 3 large eggs - 1/4 cup milk (or your preferred non-dairy alternative) - 1 teaspoon vanilla extract - 1 teaspoon ground cinnamon (plus additional for coating) To create these roll-ups, you need the right bread. White bread is soft and absorbs flavors well. Whole grain offers a nutty taste and adds some texture. Both options work great. Eggs and milk form the base of the custard. They help bind everything together and add richness. You can use non-dairy milk if you prefer. The vanilla extract adds a warm, sweet note. Ground cinnamon makes the roll-ups taste like a cozy treat. - Nutella or cream cheese - Fresh berries (e.g., strawberries, blueberries, or raspberries) Feel free to get creative with the fillings. Nutella brings a sweet, chocolatey twist. Cream cheese offers a rich and creamy contrast. You can also skip the filling if you want a simpler version. Fresh berries make a lovely side, adding color and freshness. They are perfect for balancing the sweetness of the roll-ups. - 1/2 cup granulated sugar - Additional ground cinnamon for enhanced flavor The cinnamon sugar coating is a crucial step. It adds a crunchy, sweet finish to your roll-ups. The sugar gives a delightful texture, while the extra cinnamon enhances the flavor. Mix them together in a bowl. Roll the warm roll-ups in this mixture right after cooking. This will make them extra special. For the full recipe, check the detailed instructions. To start, you need to flatten the bread slices. Use a rolling pin to gently press down on each slice. This step makes the bread easier to roll. If you want, you can trim the crusts. This gives you smooth edges for your roll-ups. Next, spread your filling on the bread. You can use Nutella or cream cheese for extra flavor. Spread it evenly on one side. Starting from one end, roll the bread tightly. Make sure it’s snug, but don't squeeze too hard. Now, let’s make the egg mixture. In a shallow bowl, whisk together the eggs, milk, vanilla extract, and ground cinnamon. Mix until smooth. This mixture will coat your roll-ups and give them a custard-like texture. In a large skillet, melt butter over medium heat. The butter should sizzle but not burn. Add 2-3 roll-ups to the skillet. Cook them for 2-3 minutes on each side until they turn golden brown. Remove them and repeat with the rest, adding more butter as needed. While the roll-ups are still warm, roll them in a cinnamon sugar mix. This adds a sweet crunch! Serve your roll-ups right away. You can add fresh berries like strawberries or blueberries on the side for a burst of color and flavor. For more detailed instructions, check the Full Recipe. To get the best French toast roll-ups, you need the right skillet heat. I find medium heat works well. It gives a nice golden color without burning. If your skillet is too hot, the outside cooks fast while the inside stays soggy. Always check if the butter is sizzling but not browning. This means it's ready for the roll-ups. Cook the roll-ups in small batches. I usually do two to three at a time. This helps keep the heat steady and prevents overcrowding. If they touch each other, they may not cook evenly. If you're looking for dairy-free options, almond or oat milk works great in this recipe. You can also use gluten-free bread if needed. Many types of bread will work, like brioche or sourdough. Each will bring its own flavor to the roll-ups. For fillings, think outside the box. Peanut butter, jam, or even fruit slices add a fun twist. You can also try flavored cream cheese for a different taste. Make your roll-ups look as good as they taste! Place them neatly on a plate, stacking them or arranging them in a fan shape. This adds a nice touch. Garnish with fresh berries or a sprinkle of powdered sugar for color. A drizzle of maple syrup on top makes it even more special. These simple ideas make your dish pop and invite everyone to dig in. For the full recipe, check out the details above! {{image_4}} You can make Cinnamon Sugar French Toast Roll-Ups even more fun! Try adding chocolate chips inside. Just sprinkle some on top of the spread before rolling. This makes each bite a sweet surprise. You can also use fresh fruit. Strawberries, blueberries, or bananas add a tasty twist. Slice the fruit thin and lay it on the spread for a fruity flavor burst. Want to change things up? You can create savory roll-ups too. Adding cheese makes them rich and creamy. Try using sharp cheddar or mozzarella. Ham also works well for a salty touch. For a unique flavor, mix in herbs. A little fresh basil or chives can really enhance the taste. You can save time by preparing ahead. Make the roll-ups and store them in the fridge until you are ready to cook. They keep well for a day. Freezing is also an option. Wrap the roll-ups in plastic wrap and place them in a freezer bag. This way, you can enjoy quick breakfasts later. Just thaw them overnight before cooking. For busy mornings, this is a huge help! To keep your roll-ups fresh in the fridge, place them in an airtight container. This helps prevent them from drying out. You can store them for up to three days. When you want to enjoy them, use a microwave to reheat. Heat for about 20-30 seconds. This warms them up without making them soggy. If you prefer a crisp texture, use a skillet instead. Heat a small amount of butter in the skillet and warm the roll-ups for a minute on each side. For long-term storage, you can freeze the leftovers. Place the cooled roll-ups in a single layer on a baking sheet. Freeze for about an hour until they are firm. Then, transfer them to a freezer bag, removing as much air as possible. You can keep them in the freezer for up to one month. When you're ready to eat, take out the roll-ups and let them thaw in the fridge overnight. To reheat, warm them in the oven at 350°F for about 10-15 minutes. This method keeps them nice and crisp. Enjoy your tasty roll-ups later! Yes, you can prepare these roll-ups in advance. Start by making the filling and rolling them up. Place them in the fridge for up to one day. When ready, dip them in the egg mixture and cook. This keeps the flavors fresh and saves time. If you need an egg substitute, try using flaxseed meal or chia seeds. Mix one tablespoon of flaxseed or chia seeds with three tablespoons of water. Let it sit for five minutes until it thickens. This gives a similar binding effect for your roll-ups. To stop sticking, use a non-stick skillet or add enough butter. Heat the skillet over medium-low heat. Make sure the butter melts and sizzles before adding the roll-ups. This helps create a barrier that stops them from sticking. Yes, baking is a great option! Preheat your oven to 375°F (190°C). Place the roll-ups on a baking sheet lined with parchment paper. Bake for 15-20 minutes, turning halfway through. This gives you a crispy outside without frying. Cinnamon Sugar French Toast Roll-Ups are a fun treat made from simple ingredients. We talked about the main items, like bread, eggs, and milk. You learned how to make, cook, and coat these roll-ups to perfection. Don’t forget the tasty fillings and the sweet cinnamon sugar coating! You can customize your roll-ups, too, with sweet or savory flavors. With a few tips on storage and prep, these roll-ups can be a quick breakfast idea. Enjoy making your own version and share it with family and friends. Happy cooking!

Welcome to a sweet delight that will transform your breakfast! Cinnamon Sugar French Toast Roll-Ups are a fun and tasty twist on a classic favorite. With simple ingredients and quick …

Read more

Categories Breakfast

Bang Bang Shrimp Tacos Flavorful and Easy Recipe

May 18, 2025 by Chef Remy
- 1 pound shrimp, peeled and deveined - 1 cup buttermilk (or dairy-free alternative) - 8 small corn tortillas - 1/2 cup mayonnaise (or vegan mayo) - 2 tablespoons sweet chili sauce - 1 tablespoon sriracha - Juice of 1 fresh lime - 1 cup shredded cabbage - 1/2 cup diced fresh tomatoes - 1/4 cup chopped fresh cilantro - Lime wedges for serving To make these tacos pop, you need the right ingredients. Start with fresh shrimp. They should be peeled and deveined for the best texture. Buttermilk gives the shrimp a tender bite. Use small corn tortillas for the perfect taco base. The Bang Bang sauce is key. Combine mayonnaise with sweet chili sauce, sriracha, and lime juice for a creamy and spicy kick. You can use vegan mayo if you prefer a plant-based option. For garnishing, fresh cabbage adds crunch. Diced tomatoes bring color and sweetness. Cilantro adds a fresh touch. Don't forget lime wedges! They add a burst of flavor when squeezed on top. This recipe is easy to follow. You can find the Full Recipe for all the steps and details you need to make these delicious tacos. Get ready to impress your friends and family! Combine the mayonnaise, sweet chili sauce, sriracha, honey, and lime juice in a bowl. Whisk until smooth. This sauce packs a punch and adds great flavor. Submerge the peeled and deveined shrimp in buttermilk. Make sure they are fully covered. Cover the bowl and refrigerate for at least 15 minutes. This step makes the shrimp tender and flavorful. In another bowl, mix the flour, cornstarch, smoked paprika, garlic powder, cayenne pepper, salt, and black pepper. Remove the shrimp from the buttermilk, letting excess drip off. Dredge the shrimp in the flour mix. Make sure they are well coated. Heat oil in a skillet over medium-high heat. Fry the shrimp in batches for 2-3 minutes on each side. They should be golden brown and crispy. Warm the corn tortillas in a skillet for about 30 seconds on each side. Layer shredded cabbage on each tortilla. Add 2-3 pieces of crispy shrimp on top. Sprinkle diced tomatoes and drizzle with the Bang Bang sauce. Finish with fresh cilantro. This creates a colorful and tasty taco that is hard to resist. For the complete recipe, check the [Full Recipe]. Make sure your oil is hot enough before frying. This step is key for getting crispy shrimp. If the oil is too cool, the shrimp will absorb oil and become soggy. I usually heat the oil until it shimmers. A good test is to drop a small piece of the batter in. If it bubbles up right away, the oil is ready. You can adjust the sriracha in the sauce to control the heat. Want it milder? Use less sriracha. If you prefer a lighter version, swap out the mayonnaise for yogurt. This change gives it a creamy texture with fewer calories. Trust me, both options taste great. For a fun twist, add avocado slices or mango salsa to your tacos. The avocado adds creaminess, while the mango brings a sweet flavor. These extras make your tacos more colorful and exciting. You can even drizzle extra Bang Bang sauce on top for a flavor boost. {{image_4}} You can switch up the taco shells for more fun. Use flour tortillas for a softer bite. If you want a low-carb choice, try lettuce wraps. They add a nice crunch and keep things fresh. Not a shrimp fan? No worries! You can swap shrimp with chicken or tofu. Chicken gives a hearty flavor, while tofu brings a nice texture. Both options work great with the Bang Bang sauce. Want to kick up the taste? Add some spices to the coating. Cumin or chili powder can add a warm touch. Just sprinkle them in the flour mix, and you’re good to go. These small changes can make your tacos truly unique. For the full recipe, check out the detailed instructions above. Store leftover tacos in an airtight container for up to 2 days. This keeps them fresh and tasty. Make sure the tacos cool down before sealing them. You can freeze fried shrimp separately from toppings. They will stay good for about 1 month. When ready, just thaw the shrimp in the fridge. To reheat shrimp, use the oven for 5-7 minutes. This helps them stay crispy. Avoid using the microwave, as it can make them soggy. Enjoy your Bang Bang Shrimp Tacos later by following these steps! Substitute all-purpose flour with a gluten-free flour blend. This swap keeps the tasty crunch and flavor. Yes, you can store the sauce in the fridge for up to 3 days before serving. This makes meal prep easier. Fresh or frozen shrimp works well; ensure they are peeled and deveined. This step is key for taste and texture. The spice level can be adjusted by varying the amount of cayenne pepper and sriracha used in the sauce. Start small and taste as you go. Use plant-based shrimp alternatives, vegan mayo, and agave syrup for the sauce. This way, everyone can enjoy these tacos! Bang Bang Shrimp Tacos are a joy to make and eat. You need just a few simple ingredients like shrimp, tortillas, and the tasty Bang Bang sauce. Remember to marinate the shrimp and fry them until golden. You can customize the sauce and toppings for your perfect taco. Store leftovers carefully, and enjoy them within a couple of days. Whether you stick to shrimp or try chicken or tofu, these tacos will satisfy your cravings. Now it's time for you to create your own delicious Bang Bang Shrimp Tacos at home!

Get ready to spice up your taco night with my easy Bang Bang Shrimp Tacos! This recipe features crispy shrimp, fresh toppings, and a zesty bang bang sauce. You’ll love …

Read more

Categories Dinner

Mini Crème Brûlée Cheesecakes Creamy Delightful Treat

May 18, 2025 by Chef Remy
Creating Mini Crème Brûlée Cheesecakes is simple with the right ingredients. Here’s what you need: - 1 cup graham cracker crumbs - 2 tablespoons granulated sugar (for crust) - 4 tablespoons unsalted butter, melted - 16 oz cream cheese, softened to room temperature - 1 cup granulated sugar (for filling) - 1 teaspoon pure vanilla extract - 2 large eggs, at room temperature - 1 cup heavy cream - Extra granulated sugar for caramelizing on top These ingredients blend to create a creamy, delightful treat. The graham cracker crumbs make a crunchy base. The cream cheese adds richness, while the heavy cream gives it a smooth texture. Each element plays a key role in achieving that classic crème brûlée taste. I find that using fresh, high-quality ingredients makes a big difference in flavor. For the full recipe, check out the detailed instructions. 1. Preheat the oven: Set your oven to 325°F (160°C). This is the perfect temperature for baking the crust. 2. Mixing the crust ingredients: In a bowl, combine 1 cup of graham cracker crumbs, 2 tablespoons of granulated sugar, and 4 tablespoons of melted unsalted butter. Stir until all crumbs are moist. 3. Baking the crusts: Line a muffin tin with cupcake liners. Press about 1 tablespoon of the mixture into the bottom of each liner. Bake for 5-7 minutes until they are firm. Let them cool. 1. Beating the cream cheese: In a clean bowl, beat 16 oz of softened cream cheese with an electric mixer. Mix until smooth and creamy. 2. Incorporating sugar and eggs: Gradually add 1 cup of granulated sugar. Mix until light and fluffy. Then, add 2 large eggs, one at a time, mixing well after each. 3. Adding heavy cream and mixing: Pour in 1 cup of heavy cream. Stir gently until the batter is smooth and fully mixed. 1. Distributing the batter: Pour the cheesecake batter over the cooled crusts. Fill each liner about three-quarters full. 2. Baking time and checking consistency: Bake for 20-25 minutes. The edges should be firm, but the centers can still jiggle slightly. 3. Cooling methods: Turn off the oven. Leave the cheesecakes inside for 1 hour. Then, move them to a wire rack until they reach room temperature. Chill them in the fridge for at least 4 hours. For the best texture, refrigerate overnight. For the full recipe, check the details above. Using room temperature ingredients makes a big difference. When cream cheese is soft, it blends smoothly. Eggs should be at room temperature too. This helps them mix well, creating a creamy cheesecake. Bake your mini cheesecakes for 20-25 minutes. The edges should be firm, but the centers still jiggle slightly. If they look too set, they can become dry. After baking, turn off the oven and let them cool inside for one hour. This gentle cooling helps prevent cracks. Refrigerate them for at least four hours. Overnight chilling is even better for texture. Using a kitchen torch is the best way to caramelize the sugar. To use it safely, hold the torch about six inches away. Move it in circles over the sugar until it melts and turns golden. Let it cool for a minute to harden. If you don’t have a torch, you can use the broiler. Place the cheesecakes under the broiler for about 2-3 minutes. Watch closely, as sugar can burn quickly. Serve your mini cheesecakes on a decorative platter. Arrange them neatly for a beautiful display. Garnish with fresh berries or mint leaves. You can also drizzle caramel or chocolate sauce on top. This adds color and flavor, making your treat even more appealing. For the full recipe, check out the steps above! {{image_4}} You can add fun twists to your mini crème brûlée cheesecakes. Try mixing in chocolate or fruit flavors. For chocolate, use cocoa powder or melted chocolate in the filling. Fruit can bring a fresh taste. Consider pureeing strawberries or raspberries and folding them into the batter. You can also incorporate liqueurs for a grown-up treat. A splash of coffee liqueur or orange liqueur can enhance the flavor. Just a tablespoon is enough to make a difference. If you need gluten-free options, use gluten-free graham cracker crumbs for the crust. You can find these at most grocery stores. They work just as well and taste great. For dairy-free substitutes, use vegan cream cheese and coconut cream. These ingredients will keep the creamy texture while meeting your dietary needs. Seasonal flavors can make these cheesecakes even more special. For fall, try a pumpkin spice version. Add pumpkin puree and spices like cinnamon and nutmeg to the filling. In summer, berry versions shine. You can use fresh blueberries, strawberries, or blackberries mixed into the batter. These flavors are bright and refreshing, perfect for warm weather. Explore these variations to make the mini crème brûlée cheesecakes your own. Check the Full Recipe for more ideas and inspiration! To keep your mini cheesecakes fresh, store them in the fridge. Place them in an airtight container. This step prevents them from absorbing any odd flavors. You can keep them in the fridge for up to five days. If you want the best taste, eat them within three days. Want to make them last longer? Freeze the mini cheesecakes. First, let them cool completely. Wrap each cheesecake tightly in plastic wrap. Then, put them in a freezer-safe bag. They can stay frozen for up to three months. When you're ready to enjoy them, take them out of the freezer. Place them in the fridge overnight to thaw. To refresh the texture after freezing, avoid the microwave. Instead, place them in the oven at 350°F (175°C) for about 10 minutes. This method helps keep the crust crispy. Serve them chilled right after thawing. Just add the caramelized sugar topping before serving. For extra flair, garnish with berries or mint. Enjoy your delightful treat! To caramelize the sugar topping, use a kitchen torch. This gives a nice, even burn. Keep the torch moving to avoid burning one spot. If you don't have a torch, you can use your oven broiler. Place the mini cheesecakes under the broiler for about 1-2 minutes. Watch closely to prevent burning. Tools needed for caramelizing: - Kitchen torch - Baking sheet (for broiler method) - Heat-resistant gloves Yes, you can make these cheesecakes a day in advance. They store well in the fridge. Just keep them in an airtight container. The flavors will deepen as they sit. Suggested storage times: - Refrigerate for up to 3 days. - Freeze for longer storage, up to 2 months. Tips for preparing in advance: - Bake and cool the cheesecakes. - Do not add the sugar topping until you are ready to serve. You’ll know the cheesecakes are done when the edges are firm. The center should still have a slight jiggle. This means they will set perfectly as they cool. Signs of perfect doneness: - Firm edges - Slight jiggle in the center Checking for texture and jiggle: - Gently shake the muffin tin. - Look for a wobbly center but firm edges. In this post, we explored the delightful process of making Mini Crème Brûlée Cheesecakes. We covered ingredients and step-by-step instructions, plus tips on texture, caramelization, and presentation. I also shared variations, storage tips, and answers to common questions. These treats are perfect for any occasion. You can experiment with flavors and dietary needs to make them your own. Enjoy creating and sharing this delicious dessert!

Craving a creamy dessert that wows your taste buds? Try these Mini Crème Brûlée Cheesecakes! They combine the rich flavor of cheesecake with a crunchy caramel topping. Perfect for parties …

Read more

Categories Desserts
Older posts
Newer posts
← Previous Page1 … Page118 Page119 Page120 … Page130 Next →

ROASTED RECIPES

Where bold flavors meet everyday meals. Warm, vibrant, and made to share. 🔥🥗🍴

PAGES

Home About Contact Privacy Policy Terms & Conditions Cookie Policy GDPR Policy Copyright Policy Disclaimer

CATEGORIES

Appetizers Desserts Salads Breakfast Dinner

Contact

  • Pinterest
  • Mail
Copyright © 2025 Roasted Flavors. All rights reserved.