Savory Chicken and Sweet Potato Bowls Recipe Guide
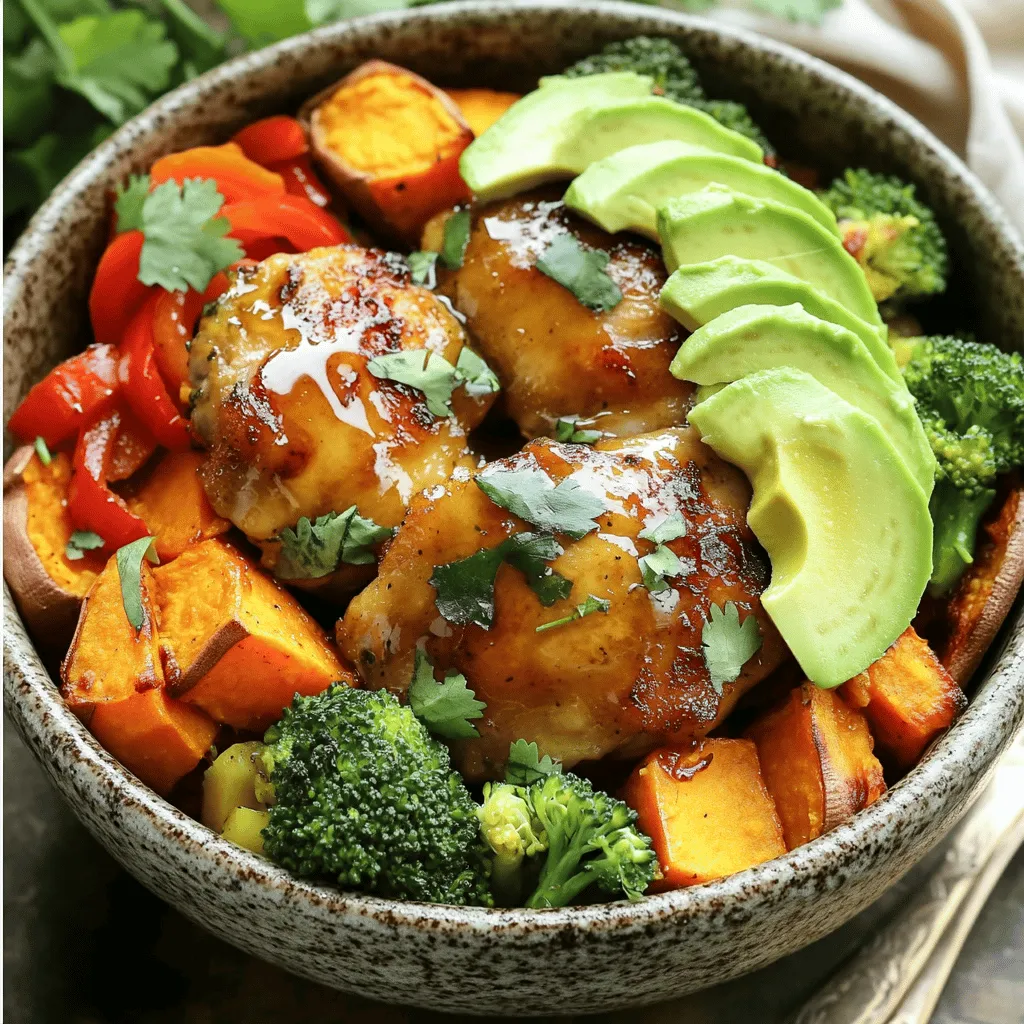
Welcome to my Savory Chicken and Sweet Potato Bowls Recipe Guide! If you’re looking for a meal that is tasty, healthy, and easy to make, you’re in the right place. …
Welcome to my Savory Chicken and Sweet Potato Bowls Recipe Guide! If you’re looking for a meal that is tasty, healthy, and easy to make, you’re in the right place. …
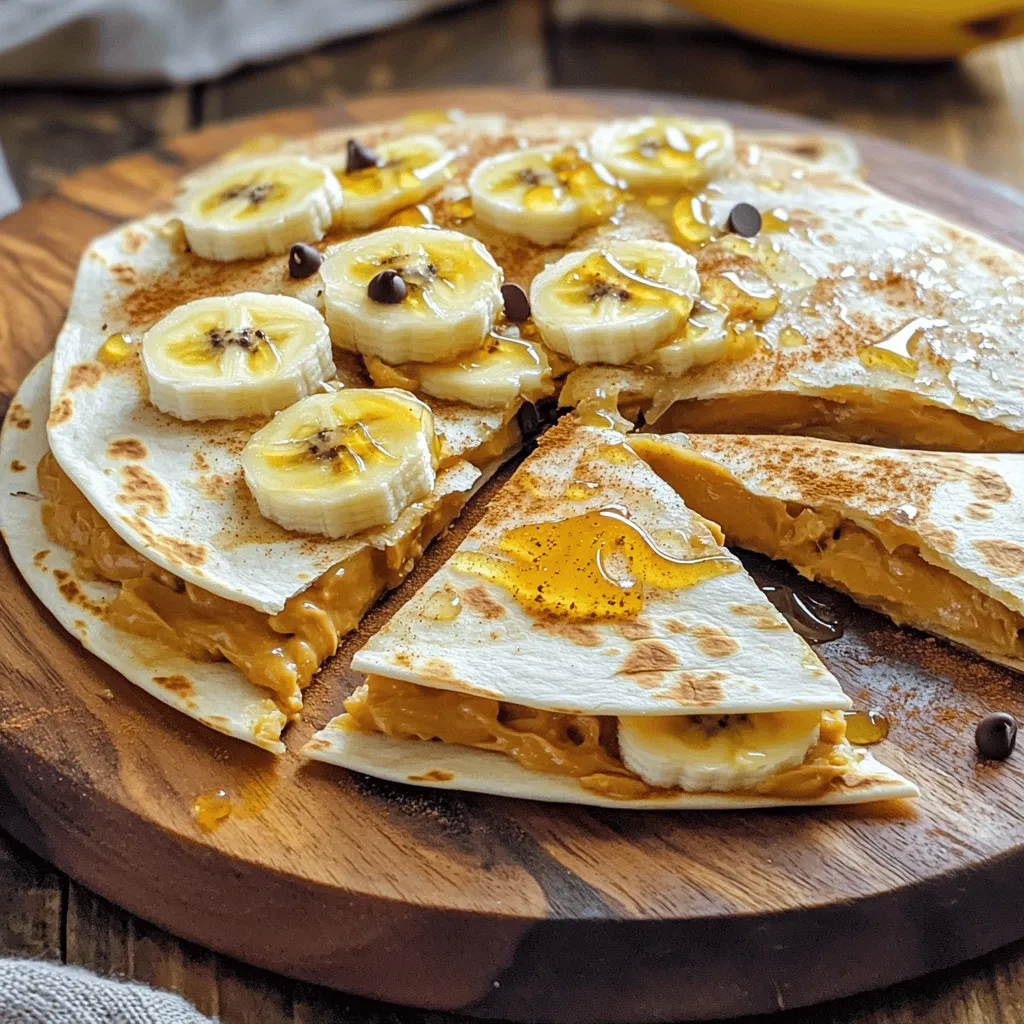
Looking for a fun and tasty treat that’s easy to make? I’ve got just the recipe for you! The Peanut Butter Quesadilla combines creamy peanut butter, sweet bananas, and melty …

Get ready to indulge in the warm, sweet bliss of Soft Cinnamon Roll Cookies! These cookies capture the comforting goodness of cinnamon rolls, but with a chewy twist. I’ll guide …
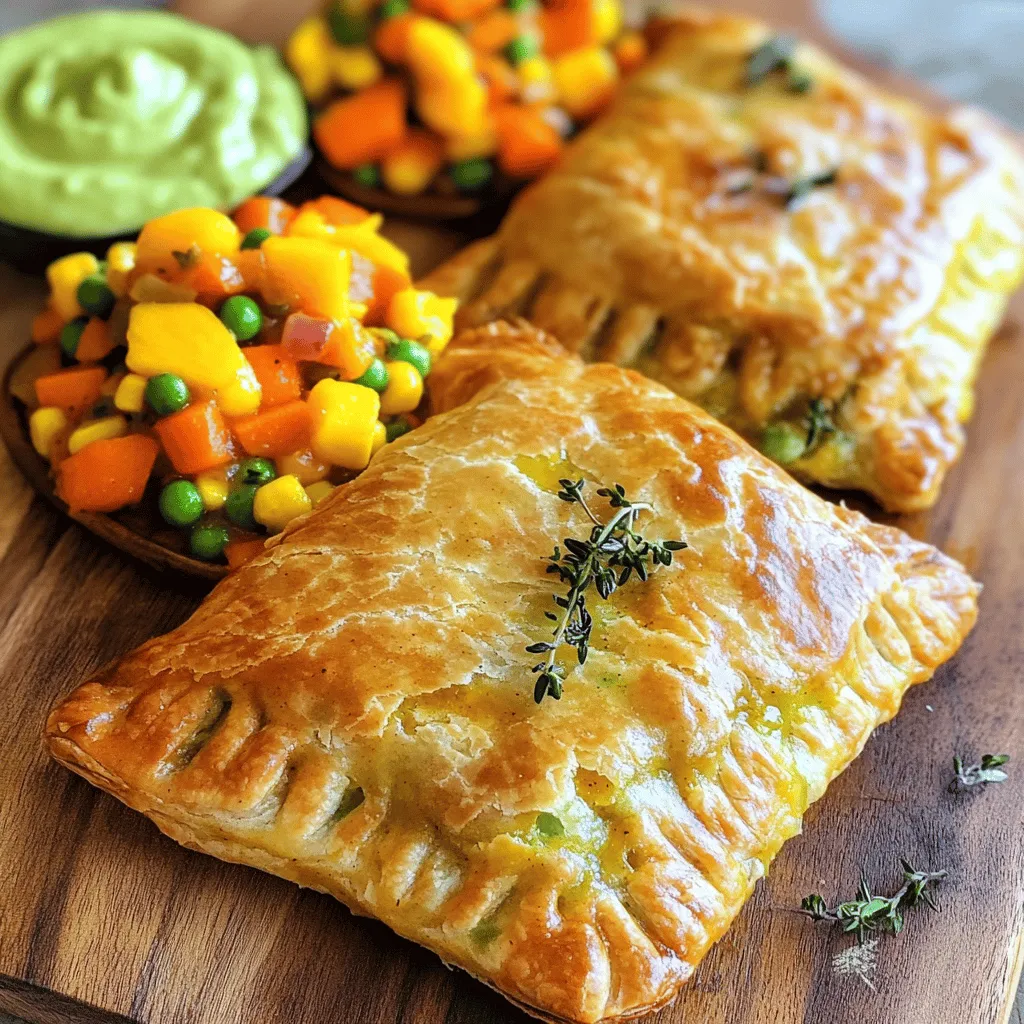
If you’re craving a tasty snack, Jamaican vegetable patties are a must-try! These flaky delights are bursting with flavor and are packed with fresh veggies. Whether you’re a vegetarian or …

Get ready to dig into a dish that’s both fun and simple! Pull-apart meatball sliders combine savory goodness with easy prep. You’ll want to make these sliders for your next …
![To make the Salted Caramel Chocolate Cookies, you need the right ingredients. Here’s what you will need: - 1 cup all-purpose flour - 1/2 cup unsweetened cocoa powder - 1/2 teaspoon baking soda - 1/4 teaspoon fine sea salt - 1/2 cup unsalted butter, softened to room temperature - 1 cup packed brown sugar - 1/4 cup granulated white sugar - 1 large egg, at room temperature - 1 teaspoon pure vanilla extract - 1 cup semi-sweet or dark chocolate chips - 1/2 cup salted caramel sauce (can be store-bought or homemade) - Flaky sea salt, for garnish These ingredients work together to create a rich, chewy cookie. The cocoa powder adds depth, while the salted caramel gives a lovely sweet and salty twist. The chocolate chips bring in that melty goodness that everyone loves. Each component plays a key role in the cookie's texture and flavor. When gathering ingredients, ensure everything is fresh. Use room temperature butter and eggs. This makes mixing easier and helps create a soft cookie. If you can, use high-quality chocolate chips for a richer taste. For the salted caramel, you can either buy it or make your own. Homemade caramel has a special touch, but store-bought saves time. Just make sure it’s thick enough to hold up in the cookie. Once you have all the ingredients ready, you are set for a delicious baking session. The sweet smell of cookies will fill your kitchen soon! For the complete recipe, you can refer to the [Full Recipe]. 1. Preheat your oven to 350°F (175°C). 2. Line a baking sheet with parchment paper. This stops cookies from sticking. 3. In a bowl, mix the dry ingredients together. Combine: - 1 cup all-purpose flour - 1/2 cup unsweetened cocoa powder - 1/2 teaspoon baking soda - 1/4 teaspoon fine sea salt Set this mix aside while you prepare the wet ingredients. 1. In a large bowl, cream together the softened butter and sugars. Use an electric mixer on medium speed. Mix for about 2-3 minutes until fluffy. 2. Add in the room temperature egg and pure vanilla extract. Mix well until everything combines. 1. Gradually add the dry ingredients to the wet mixture. Stir gently until just combined. 2. Be careful! Overmixing will make the cookies tough. 3. With a spatula, fold in the chocolate chips. This makes a thick, rich cookie dough. 1. Use a tablespoon to scoop portions of the dough. Roll them into balls. 2. Place each dough ball on the prepared baking sheet. Leave about 2 inches of space between them. 3. Create a small dent in the center of each dough ball. 4. Fill each dent with about a teaspoon of salted caramel sauce. 5. Bake in the preheated oven for 10-12 minutes. The edges should be set, but the centers feel soft. 6. Remove the cookies and sprinkle a pinch of flaky sea salt on top. 7. Let them set on the baking sheet for about 5 minutes. Then, transfer them to a wire rack to cool completely. For the full recipe, check the other sections. Enjoy your baking! For the best cookies, use room temperature ingredients. Soft butter mixes well and gives a smooth dough. Cold eggs can lead to tough cookies. Always let your butter and egg sit out for about 30 minutes before you start. Avoid overmixing your dough. Mix just until you see no dry flour. Overmixing can make cookies tough. You want them soft and chewy, not hard. Choosing the right chocolate chips makes a big difference. I love semi-sweet or dark chocolate chips for a rich taste. They pair well with the sweet caramel. Balance sweetness by using flaky sea salt. It enhances the flavor and adds a nice crunch. Sprinkle a pinch on top when they come out of the oven. It makes each bite so much better. Decorate your cookies with extra caramel drizzle. It adds a beautiful look and extra flavor. Just warm the caramel a bit, then drizzle it on top. For special occasions, serve cookies on a tiered cake stand. It looks fancy and impresses guests. You can also add some fresh fruit or flowers around the plate for color. Try these tips when making your Salted Caramel Chocolate Cookies for a delightful treat. For the full recipe, check out the Salted Caramel Chocolate Heaven Cookies. {{image_4}} You can switch up the chocolate types in this recipe. Try dark chocolate for a bold flavor. Milk chocolate adds sweetness. White chocolate offers a creamy twist. Each choice changes the cookie’s taste. For salted caramel, you can use butterscotch sauce. This gives a different flavor profile. You can also make your own caramel at home. Just melt sugar until golden brown, then add cream. Add some nuts for extra crunch. Chopped pecans or walnuts work well. You can mix in toffee bits for a fun twist. If you love spice, sprinkle in some cinnamon. Just a pinch can enhance the cookie's warmth. If you need a gluten-free option, use almond flour. This keeps the cookie soft and tasty. You can also mix in some gluten-free all-purpose flour. For vegan cookies, swap the egg for flaxseed meal. Mix 1 tablespoon of flaxseed with 2.5 tablespoons of water. Let it sit for a few minutes to thicken. Use coconut oil instead of butter for a dairy-free treat. With these variations, you can make the cookies fit any taste or diet. Don't forget to enjoy the process! For the complete recipe, check the Full Recipe section. To keep cookies fresh, store them in an airtight container. Glass or plastic containers work well. Place a piece of wax paper between layers to avoid sticking. Store at room temperature. This helps retain their soft and chewy texture. To freeze cookies, let them cool completely first. Place them in a single layer on a baking sheet. Freeze for about an hour until firm. Then, transfer the cookies to a freezer-safe bag. Remove as much air as possible. These cookies can last up to three months in the freezer. To thaw, simply take them out and let them sit at room temperature for a bit. You can also warm them up in the oven for a few minutes before serving. To reheat cookies and keep them soft, use an oven set to 300°F (150°C). Place them on a baking sheet for about 5-10 minutes. This warms them up nicely without drying them out. For a cozy touch, enjoy them warm with a scoop of ice cream. Drizzle some extra salted caramel on top for added flavor. These tips will enhance your cookie experience! These cookies last about a week when stored in an airtight container. Keep them at room temperature for the best taste. If you want them to last longer, you can freeze them. They stay fresh in the freezer for up to three months. Yes, you can make the dough ahead of time! Form the dough into balls and freeze them. When you want fresh cookies, bake them straight from the freezer. Just add a minute or two to the baking time. The best way to measure flour is to use the spoon and level method. First, fluff the flour in its container. Then, spoon it into your measuring cup without packing it down. Finally, use a knife to level off the top. This method helps you avoid using too much flour. Yes, you can use store-bought caramel sauce. It saves time and still tastes great! Just make sure to choose a high-quality sauce for the best flavor in your cookies. To keep your cookies soft, use room temperature ingredients, especially the butter and egg. Don't overmix the dough, and take the cookies out of the oven when they are just set. Let them cool on the baking sheet for a few minutes before moving them. This helps keep them soft and chewy. This blog post shared how to make delicious cookies with chocolate and salted caramel. We covered the important ingredients and detailed instructions for baking. I offered tips for texture and flavor, as well as variations and storage ideas. Cakes can be tasty and just right for any occasion. Now you’re ready to try baking them at home. Enjoy your tasty creations and impress your friends and family!](https://roastedflavors.com/wp-content/uploads/2025/05/35e01217-11f5-4c30-ad08-8efb0510c9a8.webp)
Craving something sweet and indulgent? Look no further! My Salted Caramel Chocolate Cookie Recipe combines rich chocolate and gooey caramel, topped with a sprinkle of flaky sea salt to create …

Looking for a quick, tasty meal? These Easy Chicken & Rice Bowls with Garlic Sauce are your perfect answer! With simple ingredients like juicy chicken, fluffy jasmine rice, and a …
![- 1 ¾ cups all-purpose flour - 1 ¾ cups granulated sugar - ¾ cup unsweetened cocoa powder - 1 ½ teaspoons baking powder - 1 ½ teaspoons baking soda - 1 teaspoon salt To make the best chocolate cake, gather these dry ingredients first. The flour gives structure. Sugar adds sweetness. Cocoa powder brings that rich chocolate flavor. Baking powder and baking soda help the cake rise. Salt brings balance, enhancing all the flavors. - 2 large eggs, at room temperature - 1 cup whole milk, at room temperature - ½ cup vegetable oil - 2 teaspoons pure vanilla extract - 1 cup boiling water - Optional: 1 cup dark chocolate chips Next, we need the wet ingredients. Eggs add moisture and help bind the cake. Milk gives a soft texture. Vegetable oil keeps it moist. Pure vanilla extract adds a lovely aroma. The boiling water helps the cocoa powder bloom, making the cake richer. For extra indulgence, you can add dark chocolate chips. This step makes the cake even more delightful. By preparing these ingredients, you set the stage for a simple yet delicious dessert. Follow the [Full Recipe] for a step-by-step guide to baking this cake. - Preheat oven to 350°F (175°C). - Grease and flour two 9-inch round cake pans. This helps the cake come out easily. - Combine dry ingredients in a large mixing bowl. Mix flour, sugar, cocoa powder, baking powder, baking soda, and salt. - Add wet ingredients and mix until smooth. Crack in the eggs, pour in the milk, oil, and vanilla. Use a mixer to blend until you see no lumps. - Gradually add boiling water to the batter. This step makes the cake moist. It may look thin, but that’s just right! - Divide and pour batter into prepared pans. Make sure both pans have the same amount of batter. - Bake for 30 to 35 minutes, checking for doneness. Insert a toothpick in the center. If it comes out clean or with a few crumbs, your cake is ready. Now you’re on your way to making a delightful chocolate cake! Follow the Full Recipe for more details. To make the best chocolate cake, start by ensuring all ingredients are at room temperature. This helps them mix better and create a smooth batter. Next, avoid overmixing the batter. This keeps the cake tender and fluffy. Mix just until everything combines. For frosting, I love using chocolate buttercream. It adds richness and creaminess. You can garnish your cake with melted dark chocolate or chocolate shavings. Fresh berries also add a nice color and taste contrast. I recommend using a stand mixer for easy blending. It saves time and effort. Also, use quality bakeware. Good pans help your cake bake evenly and release easily. Investing in the right tools makes all the difference in your baking journey. Enjoy making your cake! For the complete details, check the Full Recipe. {{image_4}} You can make your chocolate cake even better. Adding coffee boosts the chocolate taste. A little brewed coffee in the batter creates a rich flavor. You can also use different extracts. Almond or mint extract can give your cake a fun twist. Just a few drops can change the taste. If you want a healthier cake, try whole wheat flour. It has more nutrients than white flour. You can also cut back on oil. Use applesauce or Greek yogurt instead. This keeps the cake moist with less fat. This way, you enjoy a guilt-free treat. For those who need gluten-free options, there are easy swaps. Use almond flour or gluten-free all-purpose flour. Both work well in this recipe. Vegans can also enjoy this cake. Substitute eggs with flaxseed meal or applesauce. For dairy, use almond milk or coconut yogurt. These swaps keep the cake delicious for everyone. For the full recipe, check out the Decadent Chocolate Dream Cake. To store your chocolate cake at room temperature, wait until it cools completely. Wrap it in plastic wrap or place it in an airtight container. This keeps it moist and fresh. Store it in a cool, dry place. Your cake will stay fresh for up to three days this way. For long-term storage, you can freeze your cake and frosting. First, let the cake cool fully. Wrap each layer in plastic wrap, then in aluminum foil. This prevents freezer burn. You can freeze the frosting in a separate airtight container. Your cake can last up to three months in the freezer. To thaw a frozen cake, move it to the fridge for a few hours. Once it's soft, unwrap it. You can also leave it out at room temperature for quicker thawing. Just make sure it’s wrapped so it doesn’t dry out. After slicing your cake, keep it fresh by covering the exposed parts. Use plastic wrap or place it in a cake dome. This helps keep the cake moist. Store it in the fridge if you plan to eat it later. Enjoy your cake for up to a week this way. For more details, check the Full Recipe. To check if your cake is done, use a toothpick. Insert it into the center of the cake. If it comes out clean or with a few crumbs, your cake is ready. You can also look for a few signs of doneness. The cake will pull away from the sides of the pan. The top will feel firm to the touch. Yes, you can make this cake ahead of time. Bake the cake and let it cool completely. Wrap each layer in plastic wrap. Store them in the fridge for up to three days. You can also freeze the layers for up to three months. Just make sure to wrap them well. When ready to serve, thaw in the fridge overnight. Chocolate cake loves rich frosting. A classic choice is chocolate buttercream. Cream cheese frosting also works well, adding a tangy note. If you want a lighter touch, try whipped cream. For a twist, use peanut butter frosting. Each of these options enhances the cake's chocolate flavor. In this blog post, we explored how to make the best chocolate cake. We started with essential ingredients, then moved on to step-by-step instructions. I shared tips for perfecting your cake and offered variations for different tastes. Finally, we discussed storage methods to keep your cake fresh. With these details, you can create a chocolate cake that delights everyone. Remember, the right ingredients and care make all the difference. Enjoy baking!](https://roastedflavors.com/wp-content/uploads/2025/05/299407a2-d779-417a-a1c4-45a2288c8770.webp)
Looking to bake the perfect chocolate cake? You’ve found the right recipe! This guide breaks down every step, from mixing ingredients to storage tips. You’ll learn how to make a …
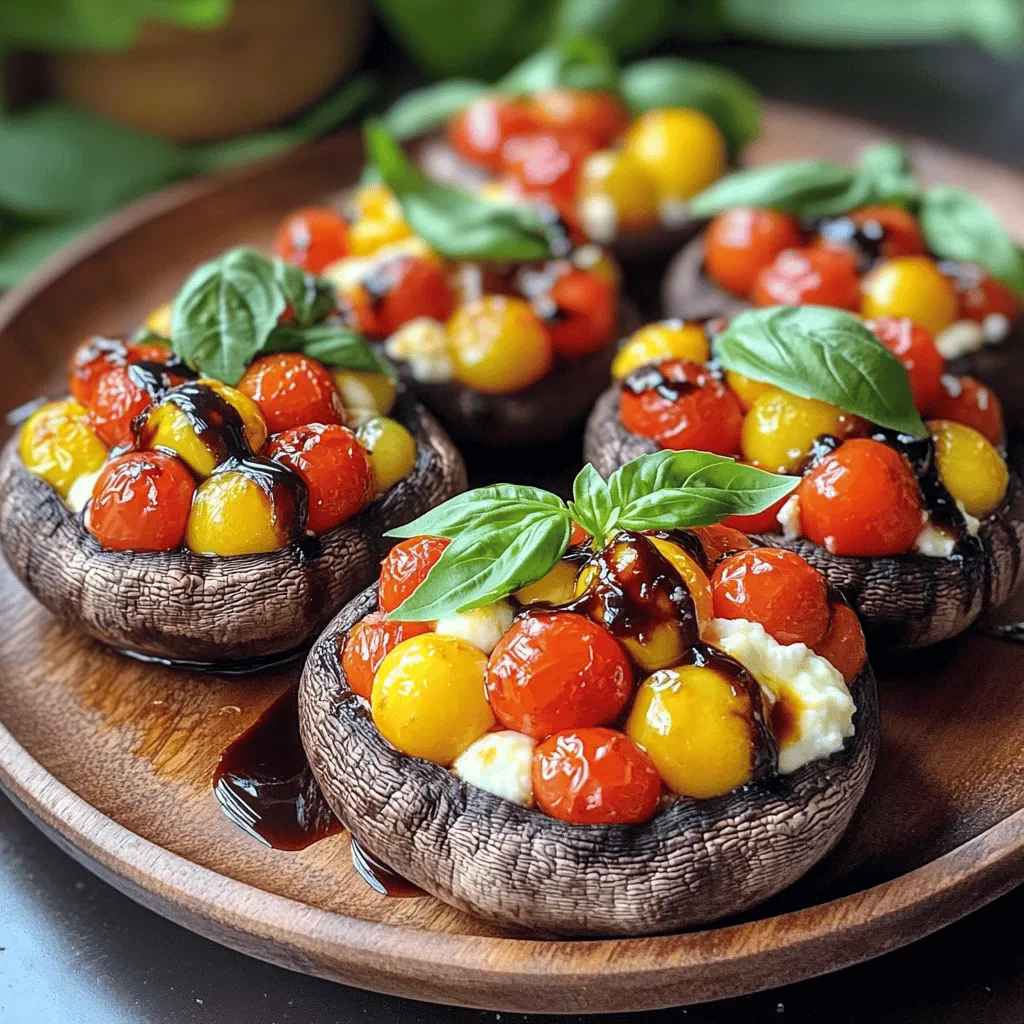
If you’re looking for a tasty and healthy dinner idea, you’ve come to the right place! Portobello mushrooms filled with Caprese delight combine fresh ingredients like cherry tomatoes, mozzarella, and …
![- 2 lbs baby potatoes - 1 packet ranch seasoning mix - 3 tablespoons olive oil - 1 cup shredded cheddar cheese The star of this dish is the baby potatoes. They cook fast and stay creamy inside. The ranch seasoning mix adds a burst of flavor. Olive oil helps make everything crispy. Finally, the cheddar cheese melts into gooey goodness. - 1 teaspoon garlic powder - 1/2 teaspoon paprika - Salt and pepper to taste Garlic powder gives a warm taste. Paprika adds a smoky note. Salt and pepper are key to balance. These small tweaks make a big difference in flavor. - 1/2 cup sour cream - 1/4 cup chopped green onions Sour cream adds creaminess and tang. Green onions give a fresh crunch. These toppings elevate your dish and make it even more tasty. To see the full recipe, check the details above. - Preheat your oven to 425°F (220°C). This step makes sure your potatoes cook well. - In a large bowl, add 2 lbs of halved baby potatoes. Pour in 3 tablespoons of olive oil. - Sprinkle in 1 packet of ranch seasoning mix, 1 teaspoon of garlic powder, and 1/2 teaspoon of paprika. - Add salt and pepper to taste. Toss the potatoes so they are well coated in the mixture. - Next, arrange the coated potatoes on a large baking sheet. Spread them out in a single layer. - Place the baking sheet in the oven. Bake for 25-30 minutes. Stir the potatoes halfway through to help them cook evenly. - After baking, take out the sheet. Sprinkle 1 cup of shredded cheddar cheese over the hot potatoes. - Put the sheet back in the oven. Bake for another 5 minutes, until the cheese melts and bubbles. - Remove from the oven. Drizzle 1/2 cup of sour cream over the cheesy potatoes. - Finally, garnish with 1/4 cup of chopped green onions for a fresh touch. Enjoy this simple and tasty dish with the full recipe to guide you! To make the best One-Pan Cheesy Ranch Potatoes, start with the right potatoes. I recommend using baby potatoes. They are small, tender, and cook evenly. Their skin adds great texture and flavor. Next, ensure even seasoning. This step is key for full flavor. When you coat the potatoes, mix them well with the ranch seasoning, olive oil, and other spices. A good toss helps every piece get that tasty blend. Now, let's talk about cooking methods. You may wonder if baking or roasting is better. Baking is great for even cooking and a soft inside. Roasting, on the other hand, can give you a crispier outside. I suggest roasting them at 425°F to get the best of both worlds. To achieve crispy potatoes, spread them out in a single layer on the baking sheet. This helps hot air circulate around each potato. Stir halfway through cooking for even browning. For a complete meal, pair these potatoes with grilled chicken or a fresh salad. The cheesy ranch flavor complements many dishes! If you're hosting a gathering, get creative with your serving. You can serve them straight from the baking sheet for a casual vibe. Alternatively, transfer them to a nice dish and top with extra green onions for a pop of color. For the full recipe, check out the earlier section. {{image_4}} You can swap cheese for variety. Try mozzarella or pepper jack for a different taste. Each cheese brings a unique flavor. You can also add protein to your dish. Cooked bacon or shredded chicken boosts protein and taste. Both options make the meal more filling. If you like spice, add jalapeños or hot sauce. This gives the dish a nice kick. You can also mix in herbs like rosemary or thyme. These herbs add fresh notes and depth. Experiment with different spices to find your favorite blend. Want to save time? Try using an air fryer. Cook the potatoes at 400°F for about 20 minutes. Shake the basket halfway through for even crisping. For a slow cooker method, combine all your ingredients in the cooker. Cook on low for 6 hours or high for 3 hours. This method makes the potatoes tender and allows flavors to meld nicely. You can find the full recipe to get started on your one-pan cheesy ranch potatoes. To store cheesy ranch potatoes, let them cool down first. Then, place them in an airtight container. This helps keep them fresh and prevents them from drying out. You can store them in the fridge for up to four days. When reheating, use the microwave. Heat them in short bursts of 30 seconds. Stir after each burst to ensure even warming. Freezing cheesy ranch potatoes is easy. Start by letting them cool completely. Then, scoop them into freezer-safe containers. Make sure to leave some space at the top since they can expand. You can also wrap them tightly in plastic wrap, then foil. Thaw them overnight in the fridge before reheating. Leftovers last about four days in the fridge. After that, they might spoil. Signs of spoilage include a sour smell, mold, or a strange texture. Always check before eating. If you're unsure, it's best to throw them out to stay safe. Can I make this recipe ahead of time? Yes, you can prepare the potatoes ahead. Just season them and store in the fridge. Bake them when you're ready. This saves you time on busy days. What if I don’t have ranch seasoning? No problem! You can mix your own. Use dried herbs like dill and parsley, plus garlic powder. You can make a tasty blend that still gives great flavor. Is this recipe gluten-free? Yes, this recipe is gluten-free! All the ingredients are safe for those who avoid gluten. Just check the ranch seasoning to be sure. How can I make it vegetarian? This dish is already vegetarian! Just skip any meat toppings. Enjoy the cheesy ranch flavors without any meat. What if my potatoes aren’t cooking evenly? If your potatoes cook unevenly, try cutting them into similar sizes. This helps them cook at the same rate. Stir them halfway through to help too. Can I use other types of potatoes instead? Absolutely! You can use regular potatoes or sweet potatoes. Just adjust the cooking time if needed. Make sure to cut them into pieces for even cooking. For the full recipe, visit [Full Recipe]. One-Pan Cheesy Ranch Potatoes are simple and delicious. We covered key ingredients and easy steps. Topping with cheese, sour cream, and green onions adds great flavor. You can swap ingredients and try different cooking methods to make this dish your own. Enjoy this dish for dinner or special events. With these tips, you’ll impress family and friends. Get ready to enjoy tasty potatoes that everyone will love!](https://roastedflavors.com/wp-content/uploads/2025/05/74cabb86-b793-46bc-9a1d-67127cfafb55.webp)
Looking for a simple, tasty dish that packs a flavor punch? You’re in the right place! One-Pan Cheesy Ranch Potatoes are easy to make and perfect for any meal. With …