Skip to content
Roasted Flavors
  • Home
  • Appetizers
  • Desserts
  • Salads
  • Breakfast
  • Dinner
  • Privacy Policy
  • Contact
  • About

Chef Remy

Sheet Pan Lemon Herb Salmon & Veggies Delight

October 13, 2025 by Chef Remy
- 4 salmon fillets (6 oz each) - 2 cups broccoli florets - 1 cup cherry tomatoes, halved - 1 red bell pepper, sliced into thin strips - 1 medium zucchini, sliced into half-moons - 3 tablespoons extra-virgin olive oil - 2 lemons (1 for zest and juice, 1 for thin slices) - 3 cloves garlic, finely minced - 2 teaspoons dried dill - 1 teaspoon dried oregano - Salt and freshly ground black pepper to taste - Fresh parsley, finely chopped The main ingredients create a colorful feast. Salmon is rich in omega-3s and pairs well with veggies. Broccoli, tomatoes, bell pepper, and zucchini add nutrition and crunch. Each vegetable offers its own flavor and texture. The marinade brings everything together. It adds zest and depth. Olive oil keeps the salmon moist. Lemon juice brightens the dish. Garlic gives a savory kick. Dill and oregano add a touch of earthiness. Salt and pepper balance the flavors. Lastly, fresh parsley adds a touch of green. It enhances the look and taste. This dish is not just healthy; it's a joy to eat. With these ingredients, you set the stage for a delightful meal. - Preheat the oven to 400°F (200°C) and prepare the sheet pan. - In a small bowl, whisk together the marinade ingredients. This includes olive oil, lemon juice, lemon zest, minced garlic, dried dill, dried oregano, salt, and pepper. This mix will give your dish a bright and fresh flavor. - Take the salmon fillets and place them on one side of the sheet pan. Use a basting brush to coat the tops with the marinade. Make sure they are well covered for the best taste. - In a large bowl, combine the broccoli, cherry tomatoes, red bell pepper, and zucchini. Drizzle the remaining marinade over the veggies. Toss gently so that all pieces are coated evenly. - Spread the salmon and veggies on the sheet pan. Make sure they are in a single layer for even cooking. - Slice the second lemon into thin rounds and place them on top of both the salmon and the veggies. The lemon adds a lovely flavor as it bakes. - Put the sheet pan in the preheated oven. Bake for about 15 to 20 minutes. The salmon should be opaque and flake easily with a fork. The veggies should be tender yet still bright in color. - To ensure even cooking, place salmon and veggies in a single layer. - Salmon’s thickness affects its cooking time. Thicker fillets need extra time. - Fresh herbs like parsley or dill boost aroma and taste. - For deeper flavor, marinate salmon for at least 30 minutes. - Pair your dish with fluffy quinoa or couscous for a hearty meal. - Complement flavors with a light salad or a citrus dressing. {{image_4}} You can switch out the broccoli and cherry tomatoes. Asparagus or green beans work well too. Feel free to use seasonal vegetables. Carrots, bell peppers, or even sweet potatoes can add new flavors. Mixing different colors of veggies makes the dish more fun and tasty. If you want a change, try using chicken or tofu instead of salmon. Chicken thighs or breasts can soak up the marinade nicely. Tofu is a great plant-based option. You can also explore using other fish like cod or trout. Each swap brings its own flavor. Get creative with your marinade! You can try different herbs or spices. Basil, thyme, or even chili flakes can add a kick. For a sweet twist, add honey or mustard. These small changes can make a big difference in taste. Experiment and find what you love! To store leftovers, let the dish cool down first. Place the salmon and veggies in an airtight container. This keeps them fresh for up to three days. Make sure to separate the salmon from the veggies to prevent sogginess. To reheat without drying out, use the oven or a skillet. Set the oven to 350°F (175°C) and warm for about 10-15 minutes. If using a skillet, heat on low for 5-7 minutes. Cover with a lid to keep moisture in. To freeze the dish, allow it to cool completely. Wrap the salmon and veggies tightly in plastic wrap, then place them in a freezer-safe bag. This keeps them safe for up to three months. When ready to eat, thaw it overnight in the fridge. Reheat as mentioned above for best results. Bake the sheet pan salmon for about 15-20 minutes. The salmon is done when it turns opaque and flakes easily with a fork. The veggies should be tender and bright. If you have thicker fillets, you might need a few extra minutes. Always check the salmon's center for doneness. Yes, you can use frozen salmon. Just make sure to thaw it first for even cooking. If you cook it from frozen, add about 5 to 10 extra minutes to the bake time. Check the salmon often to avoid overcooking. Remember, fresh salmon gives the best flavor, but frozen works in a pinch. Salmon pairs well with many sides. Here are some tasty options: - Quinoa - Couscous - Rice - A fresh green salad - Garlic bread These sides soak up the tasty lemon juices. Feel free to mix and match! This recipe combines salmon and fresh veggies for a tasty, healthy meal. By using a simple marinade, you enhance the flavors. Remember, you can swap ingredients or try new herbs for variety. Store leftovers properly to keep them fresh. With these tips and variations, you can make this dish your own. I hope you enjoy cooking and sharing it with others.

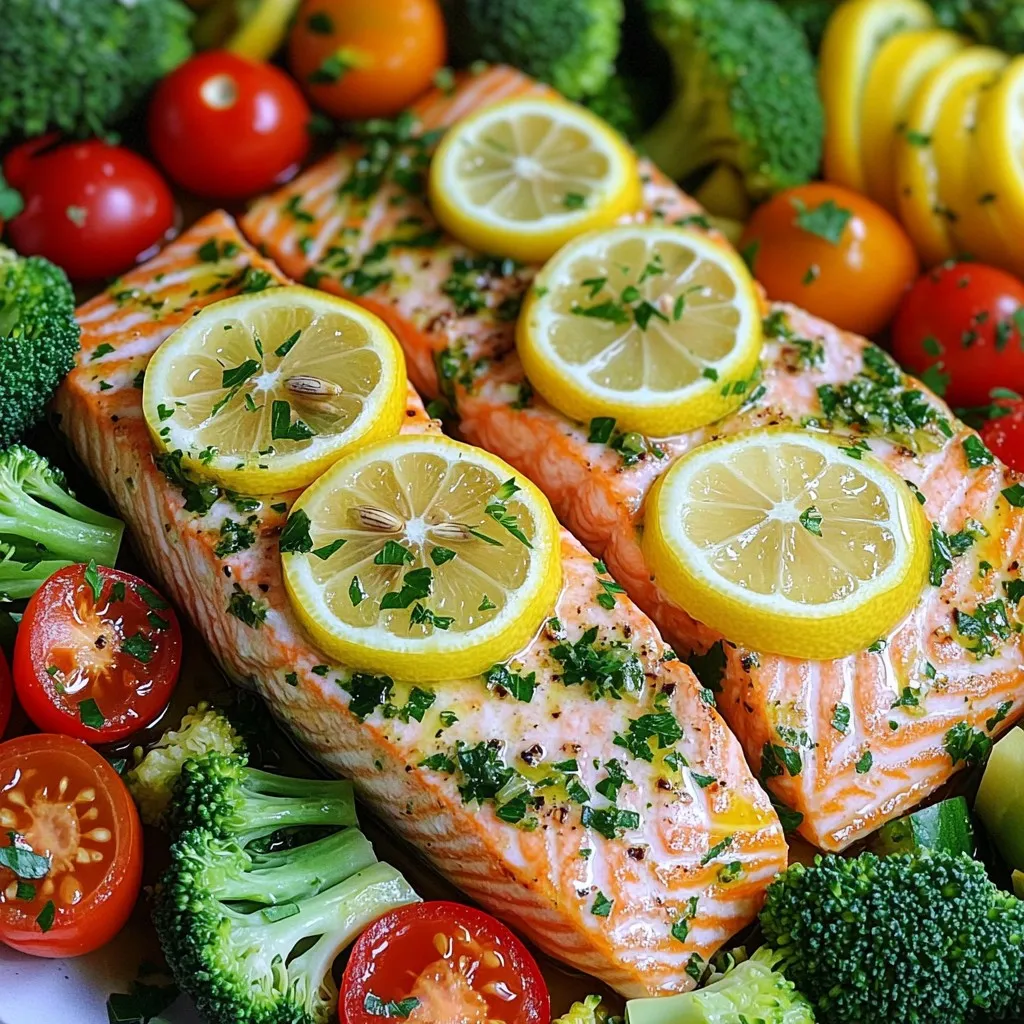
Are you looking for a simple and delicious weeknight dinner? My Sheet Pan Lemon Herb Salmon & Veggies Delight is here to save the day! This one-pan meal combines fresh …

Read more

Categories Dinner

Protein-Packed Cottage Cheese Pancakes Delight

October 13, 2025 by Chef Remy
- 1 cup cottage cheese - 3 large eggs - 1/2 cup rolled oats - 1 teaspoon baking powder - 1/2 teaspoon vanilla extract Cottage cheese forms the base of these pancakes. It adds protein and creaminess. The eggs bind the mix and give it a rich taste. Rolled oats provide fiber and texture. Baking powder helps the pancakes rise. Vanilla extract adds a warm flavor. - 1 tablespoon honey (or maple syrup) - Pinch of salt I use honey for sweetness. It blends well and adds a hint of flavor. Maple syrup can be a great swap if you prefer. A pinch of salt balances the sweetness, making the taste pop. - Butter or coconut oil for cooking - Optional toppings: fresh berries, nut butter, or yogurt I always use butter or coconut oil to cook the pancakes. It keeps them from sticking and adds flavor. Fresh berries make a beautiful topping. Nut butter or yogurt can add more protein and taste, too. You can mix and match for a fun twist! To start, mix the ingredients in a large bowl. Add 1 cup of cottage cheese, 3 large eggs, 1/2 cup of rolled oats, 1 teaspoon of baking powder, 1/2 teaspoon of vanilla extract, 1 tablespoon of honey, and a pinch of salt. This combination gives you a tasty and healthy batter. Next, you can use an immersion blender or a regular blender. Blend until the batter is smooth and creamy. A smooth batter helps the pancakes cook evenly and taste great. After blending, let the batter rest for about 5 minutes. This step is important. The rolled oats need time to absorb moisture. This makes the pancakes fluffier. A little patience here goes a long way! Now, it’s time to cook! Preheat a non-stick skillet over medium heat. Add a small amount of butter or coconut oil to the skillet. Allow it to melt and coat the skillet’s bottom. When the skillet is hot, pour about 1/4 cup of batter for each pancake. Cook until bubbles form on the surface, which takes about 2-3 minutes. The edges will look set. Using a spatula, carefully flip the pancake. Cook the other side for another 2-3 minutes until it turns golden brown. If they brown too fast, lower the heat a bit. Repeat this process with the rest of the batter. Remember to add more butter or coconut oil to the skillet each time. This prevents sticking and helps achieve that perfect pancake texture. Once cooked, serve the pancakes warm. Top them with fresh berries, yogurt, or nut butter for a delicious finish! To make your pancakes fluffy, let the batter rest for about 5 minutes. This time allows the oats to soak up moisture. The result? A lighter pancake that feels fluffy in your mouth. Adjusting the cooking temperature is also key. Use medium heat to cook your pancakes. If they brown too fast, lower the heat. A gentle heat helps the insides cook well without burning the outside. The best toppings for cottage cheese pancakes include fresh berries, nut butter, or yogurt. I love adding a handful of berries for color and flavor. They add a fresh taste that pairs well with the pancakes. For a fancy touch, stack the pancakes high on a plate. Drizzle honey or maple syrup over the top. A sprinkle of chopped nuts can enhance both flavor and texture. One common mistake is overmixing the batter. This can make your pancakes tough instead of soft. Mix just until combined for the best texture. Another mistake is cooking at too high a heat. If the skillet is too hot, the outside may burn while the inside stays raw. Stick to medium heat for perfect pancakes every time. {{image_4}} You can easily tweak the flavor of these pancakes. Adding spices like cinnamon or nutmeg makes them warm and cozy. Just mix in about a teaspoon of your chosen spice to the batter. It adds depth and a lovely aroma. You can also incorporate mashed bananas or applesauce. These fruits add natural sweetness and moisture. For bananas, use about a half cup, and for applesauce, a quarter cup works well. Both options give your pancakes a fruity twist. If you need gluten-free options, try using oat flour instead of rolled oats. Oat flour creates a nice texture and keeps the pancakes fluffy. Just replace the rolled oats with the same amount of oat flour. For those on a vegan diet, flax eggs are a great substitute. To make one flax egg, mix one tablespoon of ground flaxseed with three tablespoons of water. Let it sit for a few minutes to thicken, then add it to the batter. This keeps the protein content high while being friendly to a vegan diet. These pancakes are delicious with complementary breakfast sides. Pair them with crispy bacon or savory avocado slices for a balanced meal. You can also serve them with a side of scrambled eggs for extra protein. For beverages, I recommend a fresh fruit smoothie or a cup of herbal tea. Both drinks enhance the meal's freshness. They add a lovely contrast to the rich flavor of the pancakes. To store leftover pancakes, place them in an airtight container. Keep them in the fridge if you plan to eat them soon. They will stay fresh for about three days. If you want to save them for longer, freeze your pancakes. Just stack them with parchment paper between each pancake. This prevents them from sticking together. When reheating pancakes, the best method is using a skillet. Heat it over low to medium heat. Add a tiny bit of butter or oil to keep them moist. Cook for about one minute on each side. You can also use a microwave, but it may make them soggy. If you do, heat them for about 20 seconds, then flip and heat again. In the fridge, your pancakes last about three days. In the freezer, they can last up to three months. Just remember to seal them well to avoid freezer burn. This way, you can enjoy protein-packed cottage cheese pancakes whenever you want! You can make these pancakes dairy-free easily. Use a dairy-free cottage cheese substitute. Look for brands that use almonds, soy, or coconut. You can also try silken tofu. It will give you a creamy texture like cottage cheese. Yes, you can prepare the batter in advance. Mix all the ingredients and store it in the fridge. It’s best to use it within 24 hours. Just give it a good stir before cooking. This saves you time in the morning. Cottage cheese is a protein powerhouse. One cup has around 28 grams of protein. This helps keep you full longer. It also adds moisture to the pancakes, making them fluffy. The eggs in the recipe add even more protein. Together, they create a healthy breakfast option. Cottage cheese pancakes offer a tasty and healthy breakfast choice. We covered key ingredients like cottage cheese, eggs, and oats. You learned how to prepare, cook, and store these pancakes. I shared tips to make them fluffy and avoid common mistakes. With variations and dietary adaptations, there’s something for everyone. These pancakes are easy to make and fun to customize. Enjoy your cooking and share your delicious results!

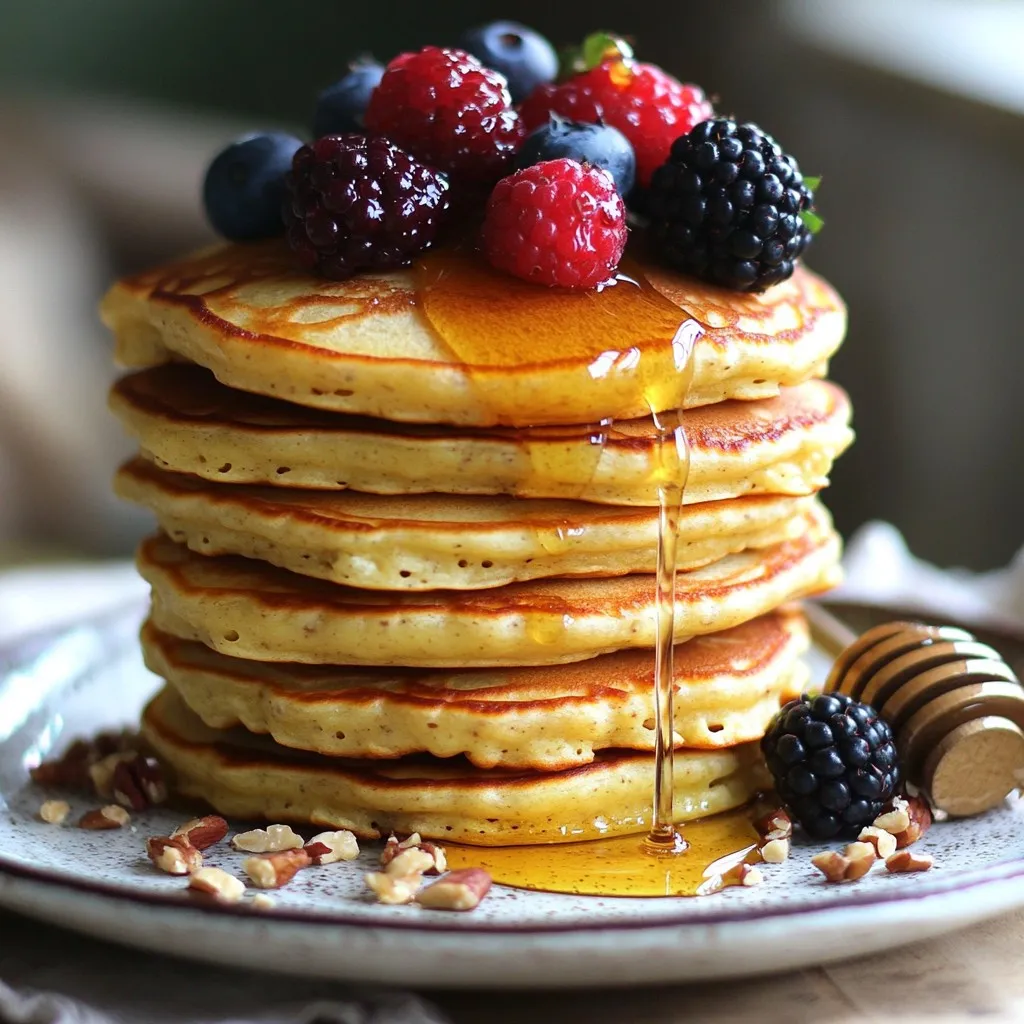
Are you ready to indulge in a guilt-free pancake delight? My Protein-Packed Cottage Cheese Pancakes combine simple ingredients like cottage cheese, eggs, and rolled oats for a fluffy, delicious treat. …

Read more

Categories Breakfast

Cozy Apple Cinnamon Oatmeal Bake Simple and Savory Dish

October 13, 2025 by Chef Remy
- 2 cups rolled oats - 2 cups almond milk (or any milk of your choice) - 2 medium apples (suggestions: Granny Smith or Honeycrisp) - 1/2 cup brown sugar or coconut sugar - 1/4 cup pure maple syrup - 1 teaspoon ground cinnamon - 1/2 teaspoon ground nutmeg - 1/2 teaspoon vanilla extract - 1/2 teaspoon baking powder - 1/4 teaspoon salt - 1/2 cup walnuts (optional) - 1/2 cup raisins or dried cranberries (optional) - 1 tablespoon coconut oil (or butter) This Cozy Apple Cinnamon Oatmeal Bake uses simple and healthy ingredients. Rolled oats form the base and give it a chewy texture. I prefer almond milk, but any milk works. Apples bring a sweet and tart taste. I suggest Granny Smith for a nice zing or Honeycrisp for sweetness. The sugars in this recipe help enhance flavor. I often choose brown sugar or coconut sugar for a warm taste. Maple syrup adds a touch of natural sweetness, which I love. Ground cinnamon and nutmeg create that cozy vibe, reminding me of autumn. Vanilla extract adds depth, while baking powder helps the bake rise. A pinch of salt balances everything nicely. If you want extra crunch, add walnuts. For a sweet burst, toss in raisins or dried cranberries. Finally, I use coconut oil or butter to grease the dish and add flavor. When you gather these ingredients, you set the stage for a comforting dish. Each bite is warm and inviting, perfect for breakfast or a snack. Set your oven temperature to 350°F (175°C). This step is key. A preheated oven helps the oatmeal bake cook evenly. Grease a 9x9 inch baking dish well. You can use coconut oil or butter. This keeps the bake from sticking. In a large bowl, combine these ingredients: - 2 cups rolled oats - 2 cups almond milk (or any milk of your choice) - 1/2 cup brown sugar or coconut sugar - 1/4 cup pure maple syrup - 1 teaspoon ground cinnamon - 1/2 teaspoon ground nutmeg - 1/2 teaspoon vanilla extract - 1/2 teaspoon baking powder - 1/4 teaspoon salt Use a spatula or whisk to mix everything well. Make sure all the ingredients blend nicely. Gently fold in the diced apples. I suggest using Granny Smith or Honeycrisp apples for a tart flavor. If you like, add: - 1/2 cup walnuts, chopped (optional) - 1/2 cup raisins or dried cranberries (optional) These add sweetness and a nice crunch. Pour the mixture into your prepared baking dish. Spread it out evenly. Drizzle some melted coconut oil on top. This helps it get crispy while baking. Place the dish in the oven and bake for 35-40 minutes. Look for a golden brown top and a set texture. Once baked, remove it from the oven. Let it cool for about 10 minutes. This helps the oatmeal bake firm up. Now, it's ready to slice and serve! You can easily change some ingredients to fit your needs. If you want a dairy-free option, use almond milk or any plant milk. For nut-free, skip the walnuts or swap them for seeds. If you're looking for a sugar-free version, try using mashed bananas or applesauce instead of brown sugar. This still keeps the bake sweet and tasty. To get a perfect bake, spread the mixture evenly in the dish. This way, each part cooks well. If you want to avoid sogginess, make sure to use rolled oats. They absorb liquid slowly and stay firm. Also, let the bake cool for a few minutes after it comes out of the oven. This helps it set and makes slicing easier. This oatmeal bake is great on its own, but you can make it even better! Serve it warm with a dollop of yogurt for creaminess. A light drizzle of maple syrup adds more sweetness. You can also sprinkle a bit of cinnamon on top for extra flavor. Adding fresh apple slices makes it look nice too! {{image_4}} You can change up the fruit in your Cozy Apple Cinnamon Oatmeal Bake. Here are some ideas: - Pears: Swap in diced pears for a softer texture. - Berries: Try blueberries or raspberries for a tart kick. - Bananas: Mashed bananas can add natural sweetness. - Nuts: Use pecans or almonds for a different crunch. Mix and match these options based on what you have. This makes each bake unique and fun! You can also change the spices to make your bake more exciting. Here are some great options: - Cardamom: A pinch adds warm, spicy notes. - Ginger: Fresh or ground ginger gives a zesty twist. - Pumpkin Spice: This mix can bring a cozy autumn vibe. - Almond Extract: Just a drop can add rich flavor. Feel free to experiment with these flavors to find your perfect blend! How you serve your oatmeal bake can make it even better. Here are some fun ideas: - Cold Servings: Let the bake cool completely and slice it for a cold treat. - Individual Portions: Bake in muffin tins for grab-and-go servings. - Toppings: Serve with yogurt, a drizzle of syrup, or fresh fruit. These serving styles can help you enjoy this dish in new ways! To store your Cozy Apple Cinnamon Oatmeal Bake, let it cool first. Once cool, cut it into squares. Place the squares in an airtight container. You can keep it in the fridge for up to five days. This helps lock in the flavors and keeps it fresh. If you want to reheat, just warm it in the microwave. You can freeze the oatmeal bake for later. Wrap each square in plastic wrap. Then, place them in a freezer-safe bag. Be sure to remove all the air. This helps prevent freezer burn. When you're ready to eat, take out a square. You can reheat it in the microwave or bake it at 350°F (175°C) until warm. When stored properly, the bake stays fresh for about five days in the fridge. If frozen, it can last for up to three months. Be sure to label your containers with the date. This way, you’ll always know when to enjoy your delicious treat! Yes, you can prepare this dish ahead of time. Mix the ingredients and store them in the fridge. Bake it fresh in the morning for a warm breakfast. If you want to reheat leftovers, just cover and warm them in the oven at 350°F for about 15 minutes. Granny Smith and Honeycrisp apples work best. They add a nice tartness and hold their shape. Other good options include Fuji and Gala, which offer sweetness and a firm texture. Yes, this recipe can be gluten-free. Use certified gluten-free oats to make sure there are no traces of gluten. Most oats are naturally gluten-free, but check the label to be safe. You can use coconut sugar or maple syrup instead of brown sugar. Coconut sugar has a lower glycemic index. Maple syrup adds a rich flavor but can make the bake a bit wetter. The bake is done when the top is golden brown and the oatmeal is set. You can also insert a fork; it should come out clean. The texture should feel firm but soft inside. This blog post covers a warm, healthy recipe for Apple Cinnamon Oatmeal Bake. You learned about the key ingredients, step-by-step cooking, and tips for success. The flexible variations and storage tips make it easy to enjoy. Remember, you can adapt this dish to suit your tastes and needs. It’s a cozy meal for anyone at any time. Enjoy your cooking and share this delightful recipe with friends and family!

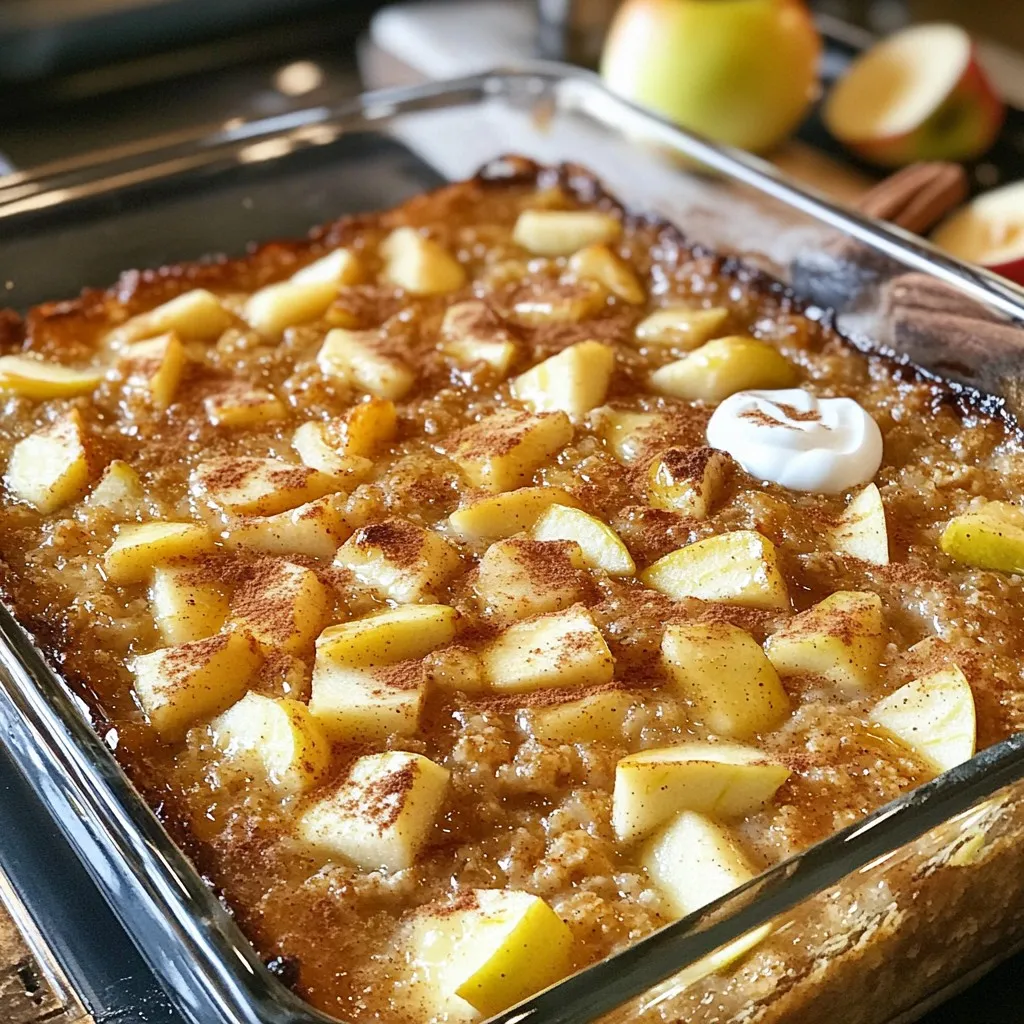
Imagine waking up to a warm, inviting dish of Cozy Apple Cinnamon Oatmeal Bake. This simple and savory recipe combines the comfort of oatmeal with the sweet crunch of apples …

Read more

Categories Breakfast

Slow Cooker Tuscan White Bean Soup Delightful Recipe

October 13, 2025 by Chef Remy
- 2 cups dried white beans (either cannellini or great northern), thoroughly rinsed and soaked overnight - 4 cups vegetable broth - 1 can (14.5 oz) diced tomatoes, including juices - 1 medium onion, finely diced - 3 cloves garlic, minced - 2 medium carrots, peeled and diced - 2 celery stalks, chopped - 2 cups kale, chopped (stems removed and discarded) - 1 tablespoon Italian seasoning blend - 1 teaspoon red pepper flakes (adjustable based on your spice preference) - Salt and freshly ground black pepper to taste - 2 tablespoons extra virgin olive oil - Fresh parsley, finely chopped (for garnish) - Lemon wedges (for brightening the flavors when serving) These ingredients create a warm, hearty soup. The beans serve as the base. They become creamy and tender in the slow cooker. Vegetable broth adds depth. It gives the soup a rich flavor. Diced tomatoes add sweetness and acidity. They brighten the dish overall. Sautéing the onion, garlic, carrots, and celery brings out their flavors. This step adds layers to the soup. Kale adds color and nutrients. Plus, it wilts down nicely, blending with the soup. Italian seasoning and red pepper flakes enhance the taste. They make every spoonful exciting. Using fresh parsley as a garnish gives a fresh touch. Lemon wedges add zest when served. This simple yet vibrant combination makes for a delightful meal. Each ingredient plays a role in creating a comforting dish. First, soak the beans overnight. This makes them soft and cuts cooking time. Rinse the beans well before you use them. This step helps to remove any dirt or debris. Next, heat olive oil in a medium skillet over medium heat. Add diced onion, carrots, and celery. Cook for about five minutes until they soften. Then, add minced garlic and cook for one more minute. You want the garlic to smell great but not burn. In your slow cooker, mix the soaked beans with the sautéed vegetables. Add the diced tomatoes with their juices, vegetable broth, Italian seasoning, and red pepper flakes. Don’t forget to season with salt and black pepper. Stir everything together until it’s well mixed. Cover the slow cooker and set it to cook on low for six to eight hours. If you're in a hurry, set it on high for three to four hours. The beans should be tender and creamy when done. About thirty minutes before serving, stir in the chopped kale. Cover the pot again. This lets the kale wilt and adds flavor to the soup. Taste it before you serve. Adjust the seasoning if needed. Ladle the soup into bowls. Garnish each bowl with fresh parsley for a pop of color. Serve with lemon wedges on the side. The lemon adds a nice zing to the soup. Enjoy your delicious creation! To make your soup perfect, start by soaking the beans. Soaking softens the beans and helps them cook better. Rinse them well and soak them overnight. This simple step makes a big difference in texture. For spice lovers, red pepper flakes can adjust the heat. Add more if you want a kick or less for a milder taste. Always taste your soup before serving to find the right balance. Fresh herbs add bright flavors. I love using parsley on top for a fresh touch. Lemon wedges are great too. Squeezing a bit of lemon juice on the soup adds zing. This little step brightens each bite and balances the flavors. This soup is hearty and pairs well with many sides. Crusty bread is my favorite. It soaks up the soup and adds a satisfying crunch. A simple green salad also complements it well. It adds freshness to your meal. Enjoy your soup with these sides for a complete dining experience. {{image_4}} You can switch the beans in this soup. Use black beans or pinto beans if you like. For the broth, chicken broth works well, too. If you want a creamier soup, add a splash of coconut milk. This soup is great for vegans and vegetarians. Just use vegetable broth, like the recipe suggests. You can also skip the optional lemon if you prefer. This soup stays tasty without it! In spring, add fresh peas or asparagus for a pop of color. Summer calls for fresh zucchini, which pairs nicely. In fall, try adding pumpkin for a cozy twist. In winter, root vegetables like parsnips can add warmth. Store any leftover soup in an airtight container. Make sure to cool it before sealing. You can keep it in the fridge for up to 4 days. When reheating, use a pot on the stove or the microwave. Stir well to heat evenly. To freeze the soup, let it cool completely. Pour it into freezer-safe bags or containers. Leave some space for expansion. Seal tightly and label with the date. You can freeze it for up to 3 months. To reheat, thaw overnight in the fridge. Warm it on the stove, stirring occasionally. This soup lasts well in the fridge for about 4 days. If frozen, it stays good for 3 months. Always check for any off smells or changes in texture before eating. Proper storage makes sure your soup stays fresh and tasty! Cooking this soup is easy and flexible. If you use the low setting, it takes about 6 to 8 hours. If you need it faster, set it to high for 3 to 4 hours. The beans will become soft and creamy in either case. Yes, you can add meat for extra flavor. Try adding diced sausage or shredded chicken. Brown the meat first and then mix it in with the other ingredients. This will give the soup a hearty twist and make it more filling. Yes, this recipe is naturally gluten-free. Just make sure your vegetable broth is labeled gluten-free. You can also check canned tomatoes for added safety. With those tips, you can enjoy a delicious, gluten-free soup. Absolutely! To make this soup in a regular pot, sauté the veggies in a large pot first. Then, add all the ingredients and bring it to a boil. Lower the heat and let it simmer for about 1 to 1.5 hours. Stir occasionally until the beans are tender. This blog post shared how to make Slow Cooker Tuscan White Bean Soup. You learned about key ingredients like dried white beans, vegetable broth, and kale. I provided step-by-step instructions to prepare, cook, and serve the soup. We also covered tips to enhance flavors and storage best practices. With simple variations, you can tailor this soup to fit your taste. Enjoy this warm meal, knowing it’s both healthy and hearty. Dive in and make it your own!

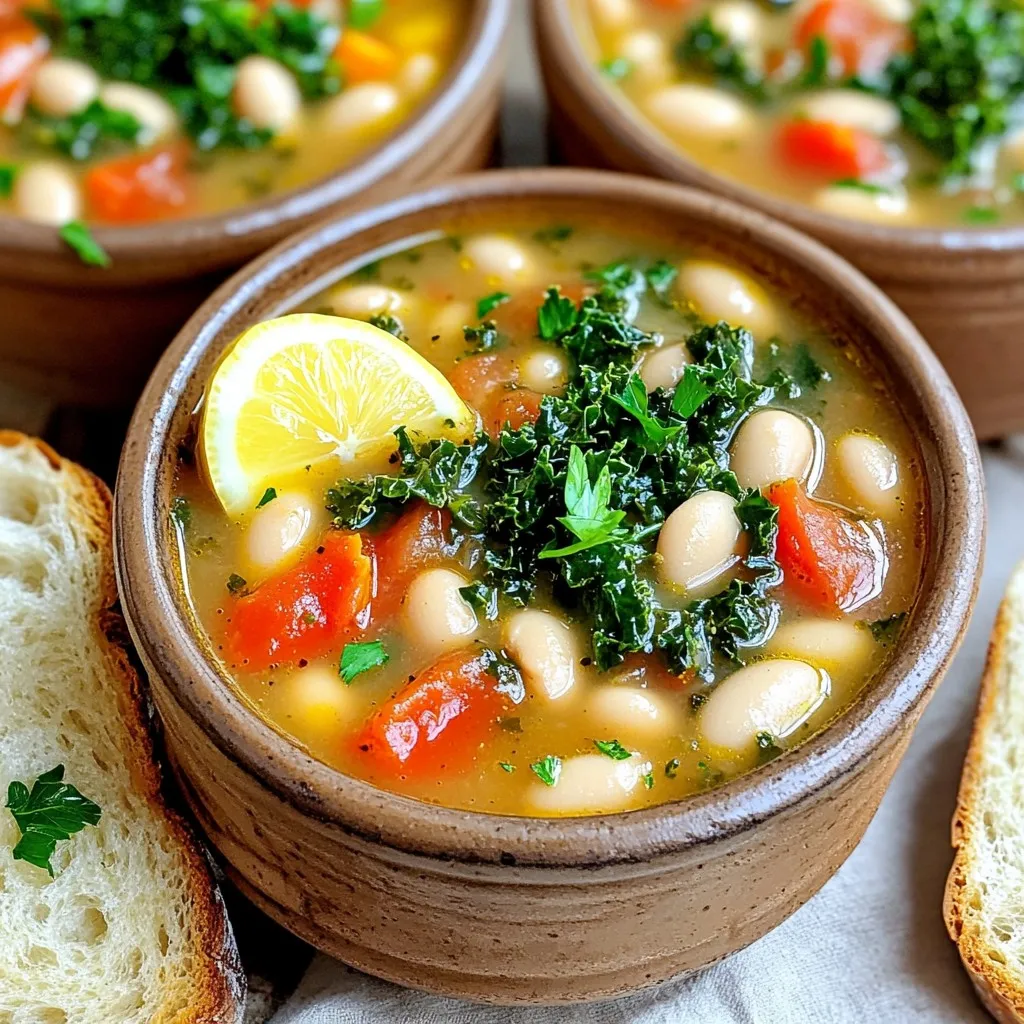
Ready to warm your soul with a delicious bowl of Slow Cooker Tuscan White Bean Soup? This easy recipe blends creamy beans, fresh veggies, and savory spices, all simmered to …

Read more

Categories Dinner

Pumpkin Cream Cold Foam Coffee Tasty and Simple Recipe

October 13, 2025 by Chef Remy
- 1 cup brewed coffee, chilled - 1/2 cup milk (or plant-based milk of your choice) - 1/4 cup heavy cream (or coconut cream for a dairy-free option) - 2 tablespoons pure pumpkin puree - 1 tablespoon pure maple syrup - 1/2 teaspoon pumpkin pie spice (plus extra for garnish) - 1/2 teaspoon pure vanilla extract - Ice cubes You can switch the milk to almond or oat milk. This makes it dairy-free. For the heavy cream, coconut cream works well. It adds a nice flavor. You can also use agave syrup instead of maple syrup if you prefer. This change keeps the sweetness while adding a different taste. Using fresh and high-quality ingredients makes a big difference. Fresh pumpkin puree gives a richer flavor than canned. Pure maple syrup adds depth that sugar cannot match. Quality coffee enhances the drink and helps it stand out. When you use good ingredients, your coffee will taste better and impress anyone who tries it. First, grab a mixing bowl. Add 1/4 cup of heavy cream or coconut cream. Next, stir in 2 tablespoons of pure pumpkin puree. Then, add 1 tablespoon of pure maple syrup. Sprinkle in 1/2 teaspoon of pumpkin pie spice and 1/2 teaspoon of vanilla extract. Whisk all these together until they blend well. If you want a fluffier cream, use an electric mixer. Beat the cream on medium speed until soft peaks form. This makes the foam light and airy. Now, take a tall glass and fill it with ice cubes. Pour in 1 cup of chilled brewed coffee. Fill the glass about three-quarters full with coffee. Next, gently spoon the pumpkin cream mixture over the coffee. Do this slowly so the cream floats on top. This will create a pretty layer. To finish, dust a little pumpkin pie spice on top for extra flavor. For the best layers, make sure your coffee is cold. Hot coffee will mix with the cream too quickly. Use a spoon to help place the cream on top gently. This keeps the beautiful layers intact. If you want to add a fun touch, try to swirl the cream slightly. This adds visual interest without fully mixing the layers. To get the best foam, start with cold cream. Use heavy cream or coconut cream for a rich texture. Whisk the cream with pumpkin puree, maple syrup, pumpkin pie spice, and vanilla. If you want it fluffier, use an electric mixer. Whisk until you see soft peaks form. This step is key for a thick and airy foam. Use a strong coffee for this drink. Brewed coffee works well, but cold brew can add smoothness. You can also try espresso for a bold flavor. Since the foam is sweet and creamy, a strong coffee balances it nicely. Choose a coffee you enjoy, as this will shine through in your drink. Feel free to change flavors to match your taste. Want it sweeter? Add more maple syrup. Prefer more spice? Increase the pumpkin pie spice. You can even add a dash of cinnamon for an extra kick. Taste the foam as you mix, and adjust until it’s just right for you. {{image_4}} You can easily swap out the heavy cream for coconut cream. This keeps the foam rich and creamy without dairy. You can also use almond milk, oat milk, or soy milk instead of regular milk. These options stay tasty and smooth. They fit well for those who want to avoid dairy. Want to change the spice level? You can add more or less pumpkin pie spice. If you like it stronger, use a full teaspoon. For a milder flavor, cut it to a quarter teaspoon. You can even add a dash of cinnamon or nutmeg for a unique twist. Sweetness is all about your taste. If you prefer a sweeter drink, add more maple syrup. You can start with two tablespoons and adjust from there. If you like it less sweet, try using just one tablespoon. You can also use honey or agave for a different sweet flavor. If you have extra pumpkin cream, store it in a sealed container. Keep it in the fridge. It stays fresh for up to three days. Make sure to stir it before using again. This helps mix the flavors back together. To keep your pumpkin cream fresh, do not leave it out too long. Always cover it well. If you notice any changes in smell or texture, it’s best to toss it out. Using fresh ingredients will also help your cream last longer. You can reuse leftover pumpkin cream in other drinks. Try it in hot coffee or blended smoothies. The pumpkin puree can also go into pancakes or oatmeal. This way, you make the most of every ingredient and avoid waste. Yes, you can! You can use any milk you like. Almond milk, oat milk, and soy milk work well. Each type adds its flavor. If you want a creamier texture, use whole milk or heavy cream. Coconut cream is a great option for a dairy-free choice. It adds a nice tropical twist too. To make more, simply multiply the recipe. For two servings, use 2 cups of coffee, 1 cup of milk, and 1/2 cup of heavy cream. Keep the other ingredients in the same ratio. This way, you can enjoy more pumpkin cream cold foam coffee with friends or family! Many coffee shops offer pumpkin cream cold foam coffee in fall. Popular chains like Starbucks often have seasonal options. You can also check local cafes for unique versions. If you want to try something new, ask about their pumpkin drinks. You may discover a new favorite! You have all the tools to make your own Pumpkin Cream Cold Foam Coffee. We covered the key ingredients, how to prepare and layer it, and tips for achieving the best texture. I shared variations to fit your taste and storage tips to keep everything fresh. Experiment and make it your own! Enjoy your coffee journey and impress others with your tasty creation.

Are you ready to elevate your coffee game with a delicious twist? This Pumpkin Cream Cold Foam Coffee recipe combines rich flavors with easy steps. You’ll learn everything about the …

Read more

Categories Breakfast

Honey Sriracha Shrimp Rice Bowls Flavorful Delight

October 13, 2025 by Chef Remy
- 1 pound large shrimp, peeled and deveined - 1 cup jasmine rice - 1 tablespoon olive oil - 3 tablespoons honey - 2 tablespoons Sriracha sauce - 2 tablespoons soy sauce - 1 teaspoon garlic powder - 1 teaspoon ground ginger - Salt and black pepper - 1 red bell pepper, thinly sliced - 1 cup snap peas, ends trimmed - 2 green onions, finely sliced - Sesame seeds for garnish The first step is gathering all your ingredients. You need large shrimp for a tasty base. Jasmine rice offers a lovely, fluffy texture. The olive oil helps cook the shrimp perfectly. Next, focus on the marinade. Honey brings sweetness, while Sriracha adds heat. Soy sauce gives a savory depth. Garlic powder and ground ginger enhance the flavor. Don't forget salt and black pepper to taste! For veggies, a red bell pepper adds color and crunch. Snap peas are crisp and fresh. Green onions add a mild onion flavor. Lastly, sesame seeds give a nice touch when garnished. This mix creates a balanced dish with vibrant flavors. Each ingredient plays a role in making this meal delightful. - Rinse rice under cold water. This helps remove any extra starch. - Combine rice with 1 ½ cups of water in a medium pot. Bring to a boil. - Reduce heat to low, cover, and simmer for about 15 minutes. The rice should be fluffy and the water absorbed. - Remove from heat and let it sit, covered, for a few minutes. - In a large mixing bowl, whisk together the honey, Sriracha sauce, soy sauce, garlic powder, ground ginger, and a pinch of salt and black pepper. - This mix creates a sweet and spicy flavor that coats the shrimp perfectly. - Add the peeled and deveined shrimp to the marinade. Toss gently to coat each shrimp well. - Let the shrimp marinate for about 15 minutes. This allows the flavors to seep in. - Heat olive oil in a large non-stick skillet over medium-high heat. - Once the oil is shimmering, add the marinated shrimp in a single layer. - Cook for 2-3 minutes on each side, until they turn pink and opaque. - In the same skillet, add the sliced red bell pepper and snap peas. - Stir frequently and sauté for about 3-4 minutes. You want them tender yet still crisp. - Return the cooked shrimp to the skillet with the sautéed vegetables. - Gently stir to combine and cook for an additional minute. This ensures everything is heated through. - To serve, divide the fluffy jasmine rice among four bowls. - Top each bowl with the honey Sriracha shrimp and vegetable mix. - Garnish with sliced green onions and a sprinkle of sesame seeds for a nice touch. To get the best flavor, adjust the Sriracha to your taste. If you love heat, add more Sriracha. If you prefer mild, use less. This balance makes the shrimp perfect for your palate. Remember, the honey will help tone down the spice, so play around with it. Shrimp cook quickly, so avoid overcooking them. Cook them just until they turn pink and opaque. Usually, this takes about 2-3 minutes per side. If you overcook them, they get rubbery, and no one likes that. Keep a close eye on them while they sizzle. Make your rice bowls look great by garnishing with lime wedges. Place them on the side for a fresh burst of flavor. For an aesthetic look, arrange the shrimp and veggies on top of the rice. Use different colors to create a vibrant dish. This makes your meal not only tasty but also beautiful. {{image_4}} You can easily switch the shrimp for other proteins. Chicken works well in this dish. Simply cut the chicken into bite-sized pieces. Marinate it just like the shrimp. Tofu is another great choice. Use firm tofu and press it to remove extra water. Cut it into cubes and marinate. Both options provide tasty flavors. If you want to lower carbs, consider using brown rice or cauliflower rice. Brown rice offers more fiber and nutrients. It adds a nutty flavor that pairs well with the dish. Cauliflower rice is a great low-calorie choice. It absorbs flavors well and keeps the meal light. Adding more veggies boosts the nutrition of your rice bowl. Broccoli is a great option. Steam or sauté it until tender. Carrots bring a nice crunch and sweetness. Slice them thin for quick cooking. Zucchini adds a fresh taste and cooks fast. Mix and match these veggies for a colorful bowl. After enjoying your Honey Sriracha Shrimp Rice Bowls, store any leftovers in an airtight container. This keeps the shrimp and rice fresh for up to three days. Make sure the container seals tightly. This prevents moisture loss and keeps flavors intact. If you want to save the dish for later, you can freeze the shrimp and rice. For best results, freeze each component separately. Place the shrimp in a freezer-safe bag, pressing out the air. Store the rice in another bag or container. This way, you can enjoy them later without losing texture. When you're ready to eat your frozen or refrigerated leftovers, reheat them carefully. For the shrimp, use a skillet over medium heat. Stir until hot, about 5 minutes. For the rice, add a splash of water and cover it in a pot on low heat. This method helps the rice stay fluffy and moist. Avoid the microwave if you can; it can dry out your food. Serve these bowls with simple sides. Here are some tasty ideas: - Steamed broccoli - Crisp cucumber salad - Fresh mango slices - Garlic bread - Edamame These sides add great colors and textures. They also balance the sweet and spicy shrimp. Yes, you can prep this dish ahead of time. Here’s how to do it: - Cook the rice and store it in the fridge. - Marinate the shrimp early and keep it in the fridge. - Chop vegetables and store them in an airtight container. When you're ready, just cook the shrimp and veggies. This makes busy nights easier! To balance the sweetness, try these tips: - Use less honey if you want less sweetness. - Add more Sriracha for extra heat. - Mix in lime juice to add tartness. Taste as you go to find the right mix for you! This blog post guides you through making tasty Honey Sriracha Shrimp Rice Bowls. You learned about the ingredients, step-by-step cooking instructions, and helpful tips. Mixing shrimp, rice, and veggies creates a healthy meal. Remember, you can switch the protein or rice for your taste. Storing leftovers is simple, and reheating keeps them fresh. Enjoy your cooking adventure!

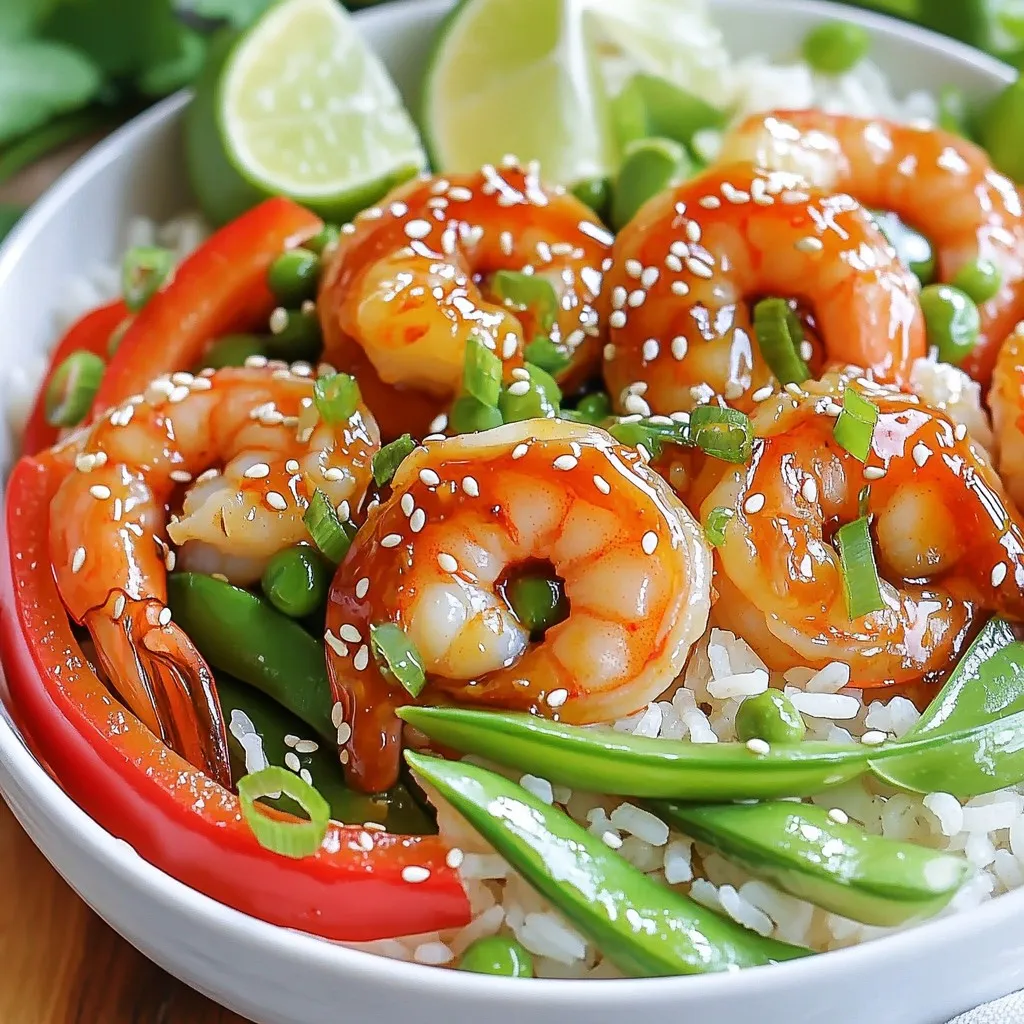
Get ready for a tasty treat with my Honey Sriracha Shrimp Rice Bowls! This easy recipe combines sweet honey and spicy Sriracha to create bold flavors that brighten your meal. …

Read more

Categories Dinner

Air Fryer Maple Dijon Brussels Sprouts Flavorful Dish

October 13, 2025 by Chef Remy
To start, you'll need 1 pound of fresh Brussels sprouts. Look for bright green ones with no blemishes. Trim the ends and cut them in half. This helps them cook evenly and become crispy. For the flavor, gather these ingredients: - 2 tablespoons high-quality olive oil - 2 tablespoons pure maple syrup - 1 tablespoon smooth Dijon mustard - 1 teaspoon garlic powder - Salt and freshly cracked black pepper, to taste Mix these in a bowl. The olive oil gives moisture, while the maple syrup and Dijon add sweet and tangy notes. Garlic powder enhances the flavor, making it rich and tasty. If you want to add some crunch and spice, consider these options: - 1/4 cup pecans, roughly chopped - 1/4 teaspoon red pepper flakes These add-ins are not necessary but can make your dish even better. Pecans offer a nice texture, while red pepper flakes add a bit of heat. You can choose to use one or both based on your preference. First, set your air fryer to 375°F (190°C). Preheat it for about 5 minutes. This step ensures even cooking and crispy Brussels sprouts. In a large bowl, mix together 2 tablespoons of olive oil, 2 tablespoons of pure maple syrup, and 1 tablespoon of Dijon mustard. Add 1 teaspoon of garlic powder, salt, and freshly cracked black pepper to taste. Whisk until the mixture is smooth and well combined. Take 1 pound of fresh Brussels sprouts, trimmed and halved. Add them to the bowl with the maple Dijon mixture. Toss them until each sprout is coated evenly. If you like a crunch, mix in 1/4 cup of roughly chopped pecans and 1/4 teaspoon of red pepper flakes for a bit of heat. Next, arrange the coated Brussels sprouts in a single layer in the air fryer basket. Avoid overcrowding to help them crisp up nicely. Air fry the Brussels sprouts for 12-15 minutes. Shake the basket halfway through to ensure even cooking. They are ready when they turn golden brown and are tender. Once cooked, let them rest for a minute. Taste and adjust the seasoning if needed. Serve them hot for a delightful side or appetizer. You can drizzle more maple syrup on top for added sweetness. To get your Brussels sprouts crispy, start with dry sprouts. Trim and cut them in half. After coating them, use only enough oil to cover each piece lightly. Overcrowding the air fryer basket can lead to steaming instead of crisping. So, arrange them in a single layer. Shake the basket halfway through cooking. This helps them brown evenly. These Brussels sprouts shine as a side dish. Pair them with roasted chicken or grilled fish for a balanced meal. They also work great as a snack. Serve them warm with a side of yogurt dip or a sprinkle of feta cheese for extra flavor. For a special touch, drizzle more maple syrup on top before serving. Feel free to adjust the seasonings to your taste. If you love heat, add more red pepper flakes. For a tangy twist, mix in a bit of lemon juice. You can also swap the Dijon mustard for a spicy brown mustard. Experiment with different spices like smoked paprika for a unique flavor. Each change can create a new favorite dish. {{image_4}} You can boost flavor by adding nuts to your Brussels sprouts. Pecans are great, but almonds or walnuts work well too. Just chop them roughly and add them to your mix. This gives a nice crunch. Nuts also add healthy fats and protein to your dish. Spices can change the taste of your Brussels sprouts. Try adding paprika for a smoky touch. You can also use cumin for a warm flavor. If you want heat, sprinkle in cayenne or chili powder. Just be careful with the amount, as a little goes a long way. Maple syrup adds sweetness, but you can try other options. Honey is a popular choice and adds a nice floral taste. Agave nectar works too if you want something plant-based. For a low-calorie option, consider using a sugar substitute like monk fruit. Just adjust the amount to taste. After cooking your Air Fryer Maple Dijon Brussels sprouts, let them cool down. Place them in an airtight container. Store them in the fridge for up to 3 days. This keeps them fresh and tasty. If you need to reheat them, the flavor still shines. To reheat, use your air fryer again. Preheat it to 350°F (175°C). Place the Brussels sprouts in the basket. Cook for about 5-7 minutes. This method helps regain their crispy texture. You can also use a microwave, but they may not be as crunchy. If you want to save leftovers, freezing is an option. Place the cooled Brussels sprouts in a freezer-safe bag. They can last up to 2 months. When you're ready to eat, thaw them in the fridge overnight. Reheat them in the air fryer for the best results. Enjoy the same great taste later! Yes, you can use frozen Brussels sprouts. Just remember to thaw them first. Drain any extra water before cooking. This helps keep them crisp. Frozen sprouts may cook faster, so check them often. To reduce bitterness, try soaking them in cold water. You can also mix them with sweet flavors, like maple syrup. Roasting or air frying with oil can help too. Adding salt and pepper enhances the taste. These Brussels sprouts pair well with many dishes. Here are some ideas: - Grilled chicken or turkey - Roast pork or beef - Quinoa or rice dishes - Salad with a light vinaigrette - A creamy dip or sauce Feel free to get creative! These sprouts can be a delightful side to many meals. You learned how to make Air Fryer Maple Dijon Brussels Sprouts. We covered fresh ingredients, flavoring options, and fun add-ins. I gave you a step-by-step guide for cooking them just right. You now have tips for crispiness and different serving ideas. Remember to store leftovers well for later enjoyment. Get creative with variations and make them your own. Enjoy these tasty sprouts as a side dish or snack. You have everything you need to impress anyone with this dish!

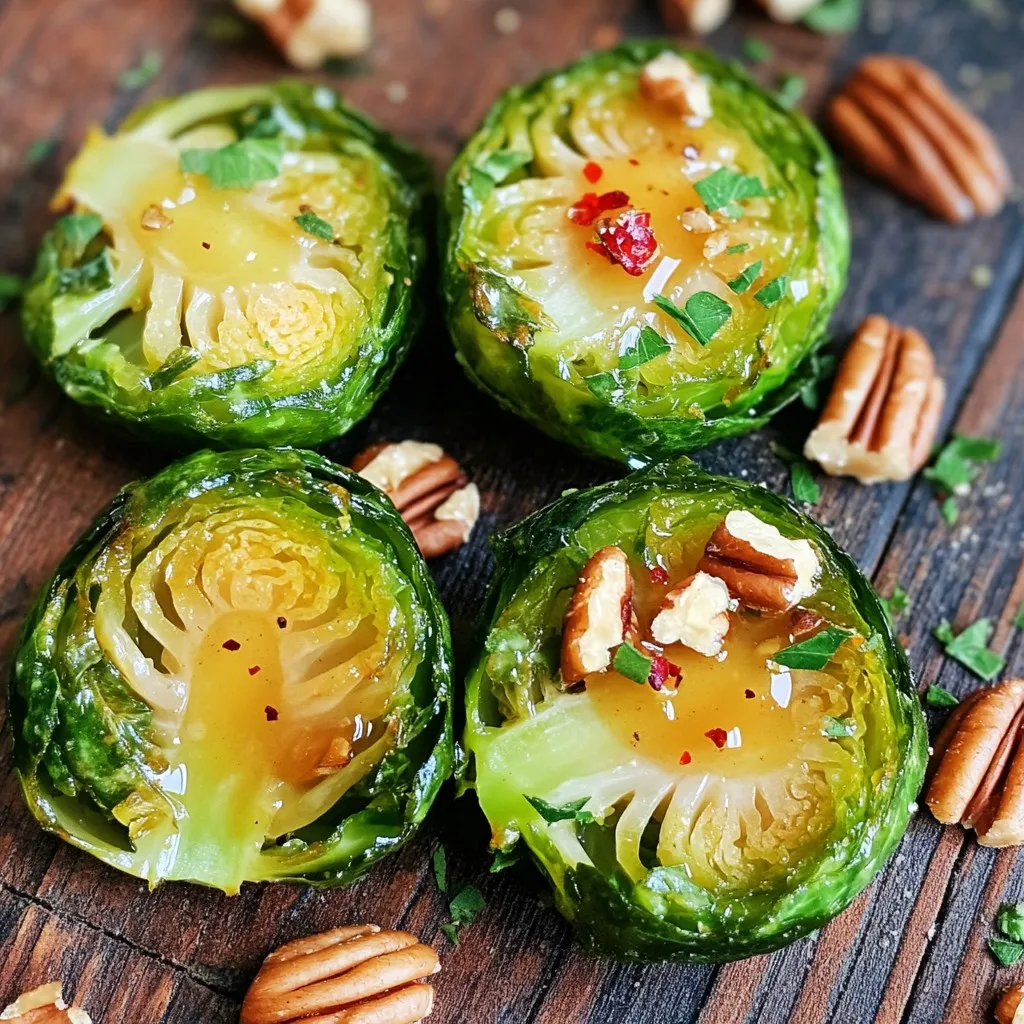
Looking to elevate your veggie game? Try my Air Fryer Maple Dijon Brussels Sprouts! This dish combines sweet maple syrup and tangy Dijon mustard for a taste explosion. It’s easy …

Read more

Categories Appetizers

Garlic Butter Chicken Orzo Skillet Flavorful Meal

October 13, 2025 by Chef Remy
- 1 pound chicken breast, cut into bite-sized pieces - 1 cup orzo pasta - 4 cloves garlic, minced - 1 small onion, finely chopped The main ingredients in Garlic Butter Chicken Orzo Skillet create a tasty base. The chicken breast adds protein and flavor. When you cut it into small pieces, it cooks evenly and absorbs all the rich garlic butter. Orzo pasta brings a nice texture and holds onto the sauce well. Garlic and onions add depth to the dish. Their flavors blend perfectly when cooked together, giving you a rich aroma that fills your kitchen. - 1 teaspoon dried oregano - 1 teaspoon smoked paprika - Salt and pepper, to taste Seasonings are key to enhancing the dish's flavor. Dried oregano adds a hint of earthiness. Smoked paprika introduces a subtle smokiness that makes each bite exciting. Salt and pepper are essential for balancing flavors. Adjust them to suit your taste, ensuring each spoonful delights your palate. - Fresh parsley, finely chopped - Parmesan cheese Garnishes take your dish from good to great. Fresh parsley adds a pop of color and freshness. It brightens up the rich flavors of the chicken and orzo. Parmesan cheese gives a salty, creamy finish, making the dish even more indulgent. You can choose one or both to make your meal shine. - First, I melt 2 tablespoons of butter in a large skillet over medium heat. I wait until it bubbles gently. - Next, I add 1 pound of chicken breast pieces to the skillet. I season them with salt, pepper, oregano, and smoked paprika. I cook the chicken for 5-7 minutes. I stir occasionally until it is browned and cooked through. Once done, I remove the chicken from the skillet and set it aside on a plate. - In the same skillet, I add the remaining 2 tablespoons of butter. I also add the finely chopped onion. I sauté the onion for about 3-4 minutes until it is translucent and soft. - Then, I stir in 4 cloves of minced garlic. I cook it for an additional minute until it smells good and turns golden. I make sure not to burn the garlic. - Now, I add 1 cup of orzo pasta into the skillet. I carefully stir to coat the orzo in the garlic butter mix. - I pour in 2 cups of chicken broth next. I raise the heat to bring it to a boil. Once it boils, I reduce the heat to low and cover the skillet. I let it simmer for about 10 minutes. I stir occasionally until the orzo is tender and has absorbed most of the broth. To ensure juicy chicken, start with fresh breast pieces. Cut them into equal sizes. This helps them cook evenly. Season them well with salt, pepper, oregano, and smoked paprika. I recommend letting the chicken rest for a few minutes after seasoning. This enhances the flavor. For browning, use medium heat. Melt the butter until it's bubbling. Then, add the chicken in a single layer. Don't crowd the pan; cook in batches if needed. This step gives the chicken a nice golden crust. Aim for about 5-7 minutes of cooking time. To boost flavor, consider adding extra spices. A pinch of red pepper flakes can add heat. Fresh thyme or rosemary can offer a different taste. You can also try adding lemon zest for brightness. Using homemade chicken broth makes a big difference. It adds richness that store-bought broth may lack. If homemade is not an option, look for low-sodium varieties. This allows you to control the salt level in your dish. Avoiding mushy orzo is key to a great texture. Cook it in the broth instead of boiling water. This helps it absorb all the flavors. Stir occasionally to prevent sticking. To check doneness, taste a piece of orzo. It should be tender but still firm, or "al dente." This usually takes around 10 minutes of simmering. If it's too firm, let it cook a bit longer, stirring gently. {{image_4}} You can switch the chicken for shrimp or tofu. Shrimp cooks fast and adds a nice touch. Just sauté it until pink. Tofu works great for a plant-based meal. Use firm tofu and pan-fry it to get some crisp. You can also use different chicken cuts. Thighs add more flavor and stay moist. Breasts are leaner but can dry out if overcooked. To make this dish even better, add more veggies. Bell peppers, zucchini, or peas can work well. They give color and extra nutrients. You can also adjust to the seasons. In fall, try adding butternut squash. In summer, fresh corn or asparagus can brighten the dish. Get creative with what you have! For a zesty kick, add lemon zest. It brightens the dish and adds freshness. You can also try different cheeses. Feta or goat cheese can melt in and add creaminess. Parmesan gives a sharp bite, which enhances the flavors. Don’t be afraid to experiment! Each twist can make the dish feel new. Store your Garlic Butter Chicken Orzo Skillet in the fridge. Use a tight container for best results. This keeps the dish fresh and safe to eat. Let the dish cool before sealing it. This helps avoid moisture build-up. You can store it for up to three days. To warm up your leftovers, use a skillet or microwave. If using a skillet, add a splash of chicken broth or water. This keeps the orzo moist. Heat over low heat, stirring often. If using a microwave, cover the dish with a lid or wrap. Heat in 30-second bursts, stirring in between. This helps keep the texture of the dish. You can freeze this dish before or after cooking. If freezing before cooking, cool the ingredients first. Place them in a freezer-safe bag or container. If you freeze after cooking, let it cool completely. Use a similar freezer-safe container. To thaw, move the dish to the fridge for a few hours or overnight. Reheat as mentioned above for best results. You can store this dish in the fridge for up to three days. Make sure to put it in an airtight container. This keeps it fresh and tasty. If you want to enjoy it later, you can freeze it for up to three months. Just remember to let it cool first before freezing. Yes, you can meal prep Garlic Butter Chicken Orzo Skillet easily. Here are some tips: - Cook in bulk: Make a larger batch on the weekend. - Divide into portions: Split the dish into single servings. - Store properly: Use airtight containers to keep each portion fresh. - Reheat wisely: When ready to eat, warm it up in the microwave or on the stove until hot. This dish pairs well with many sides. Here are some ideas: - Salads: A fresh green salad with a light vinaigrette. - Bread: Crusty bread or garlic bread for dipping. - Veggies: Steamed or roasted vegetables for extra nutrients. For drinks, try a light white wine or sparkling water with lemon. These choices balance the meal's rich flavors. This blog post shows you how to make a Garlic Butter Chicken Orzo Skillet. We reviewed the key ingredients like chicken, orzo, and spices. You learned the cooking steps, from preparing chicken to simmering orzo. I shared tips to keep the chicken juicy and the orzo al dente. You can even try protein swaps or add seasonal veggies. For storage, I explained the best ways to keep leftovers fresh. Enjoy this dish today, and remember that cooking is all about experimenting!

Looking for a simple yet delicious dinner recipe? I’ve got just the thing for you! This Garlic Butter Chicken Orzo Skillet recipe combines tender chicken, savory garlic, and perfectly cooked …

Read more

Categories Dinner

Air Fryer Maple Dijon Brussels Sprouts Delight

October 11, 2025 by Chef Remy
- 1 lb Brussels sprouts, trimmed and halved - 2 tablespoons extra virgin olive oil - 2 tablespoons pure maple syrup - 1 tablespoon smooth Dijon mustard - 1 teaspoon garlic powder - Salt and freshly ground black pepper, to taste - Optional: ¼ cup chopped pecans for a crunchy garnish You need one pound of Brussels sprouts. This amount serves about four people. The oil and syrup help to coat the sprouts well. Use two tablespoons for both olive oil and maple syrup. One tablespoon of Dijon mustard gives a nice tang. Garlic powder enhances the taste with just one teaspoon. For seasoning, add salt and black pepper as per your taste. If you want extra crunch, add ¼ cup of chopped pecans. For extra flavor, consider adding spices like smoked paprika or red pepper flakes. You can also try maple-flavored balsamic vinegar for a unique twist. If you love cheese, sprinkle some grated parmesan on top before serving. These options add fun variations to the dish. Preheat your air fryer to 375°F (190°C). This step is key. It helps cook the Brussels sprouts evenly. Let it heat for about 5 minutes. You want it nice and hot for the best results. Grab a large mixing bowl. Add 1 pound of trimmed and halved Brussels sprouts. Next, pour in 2 tablespoons of extra virgin olive oil. Add 2 tablespoons of pure maple syrup and 1 tablespoon of smooth Dijon mustard. Don’t forget the flavor! Sprinkle 1 teaspoon of garlic powder along with salt and black pepper to taste. Mix everything well. Use your hands or a spatula to coat the sprouts fully. They should look shiny and delicious. Carefully place the Brussels sprouts into the air fryer basket. Make sure they are in a single layer. This helps them cook evenly. Set the air fryer to cook for 15 minutes. Halfway through, shake the basket gently. This promotes even cooking and helps them brown nicely. After 15 minutes, check for your preferred crispiness. If you want them crunchier, air fry for an extra 3-5 minutes. Keep an eye on them to avoid burning. Once done, remove the sprouts from the air fryer. For extra flavor, sprinkle with ¼ cup of chopped pecans if you like. Serve warm and enjoy the sweet and tangy taste! To get the best crispiness, you must not overcrowd the air fryer basket. Place the Brussels sprouts in a single layer. This helps hot air flow freely around them. Also, shaking the basket halfway through cooking is key. This action ensures even browning and crisping on all sides. If you want them extra crispy, you can air fry them longer. Just keep a close watch to avoid burning. You can boost the flavor in several ways. Try adding a pinch of red pepper flakes for heat. A squeeze of fresh lemon juice adds brightness. You can also mix in some grated Parmesan cheese after cooking for a savory twist. If you like nuts, chopped pecans are a great choice. They add crunch and richness. You can even swap the maple syrup for honey for a different sweet note. Many people make the mistake of not trimming the Brussels sprouts properly. Always trim the ends and cut them in half to ensure even cooking. Another common error is skipping the preheating step. Preheating the air fryer helps achieve that crispy texture right from the start. Lastly, don’t ignore seasoning. A little salt and pepper go a long way in enhancing the flavors of your dish. {{image_4}} You can change up the taste of your Brussels sprouts easily. For a spicy kick, add red pepper flakes or cayenne pepper. For an Asian twist, try soy sauce and sesame oil instead of maple syrup. You can also use balsamic vinegar for a tangy flavor. Each option brings a new twist to this dish. If you want to swap sweeteners, honey works well in place of maple syrup. Agave syrup is another great choice. For mustards, whole grain or spicy brown mustard can add depth. Each sweetener and mustard will change the dish's flavor, so feel free to experiment. Mixing in other veggies can make your dish even better. Carrots, sweet potatoes, or bell peppers add color and taste. Just chop them to a similar size as the Brussels sprouts for even cooking. You can toss them in the same maple Dijon mix for a delicious blend of flavors. To store your Air Fryer Maple Dijon Brussels Sprouts, let them cool first. Use an airtight container. Keep them in the fridge for up to three days. This method keeps the flavors fresh. Avoid stacking them too tightly to prevent sogginess. When you're ready to enjoy leftovers, use the air fryer again. Preheat it to 350°F (175°C). Place the Brussels sprouts in the basket in a single layer. Air fry for about 5 minutes. This keeps them crispy and warm. Check if they’re heated through before serving. If you want to freeze the Brussels sprouts, do it right after cooking. Let them cool completely, then spread them out on a baking sheet. Freeze them for about one hour. Once frozen, transfer them to a freezer bag. Squeeze out the air and seal tightly. They can last for up to three months. Thaw them in the fridge before reheating for best results. Yes, you can use frozen Brussels sprouts. However, fresh sprouts give better taste and texture. If you use frozen ones, cook them for a few extra minutes. Make sure to dry them well before adding the oil and seasonings. You can use yellow mustard or whole grain mustard. These options will change the flavor a bit but still taste great. If you want a sweeter flavor, try honey mustard instead. To make this dish vegan, simply replace the honey or maple syrup with agave nectar. This swap keeps the sweetness while remaining plant-based. Always check your Dijon mustard for any non-vegan ingredients. Leftovers can last for about 3 to 5 days in the fridge. Make sure to store them in an airtight container to keep them fresh. Reheat them in the air fryer for a few minutes to regain some crispiness. Yes, you can cook a larger batch. Just be careful not to overcrowd the basket. If your air fryer is small, cook in two batches. This way, you ensure even cooking and a nice crisp on every sprout. This guide covered how to prepare and cook Brussels sprouts in an air fryer. We explored the right ingredients, detailed the cooking steps, and shared tips for perfect crispiness. You learned about enhancing flavors and avoiding common mistakes, plus how to store and reheat leftovers. Remember, cooking is fun! Experiment with flavors and adjust to your taste. Enjoy cooking and savor the delicious results of your air fryer efforts. Happy cooking!

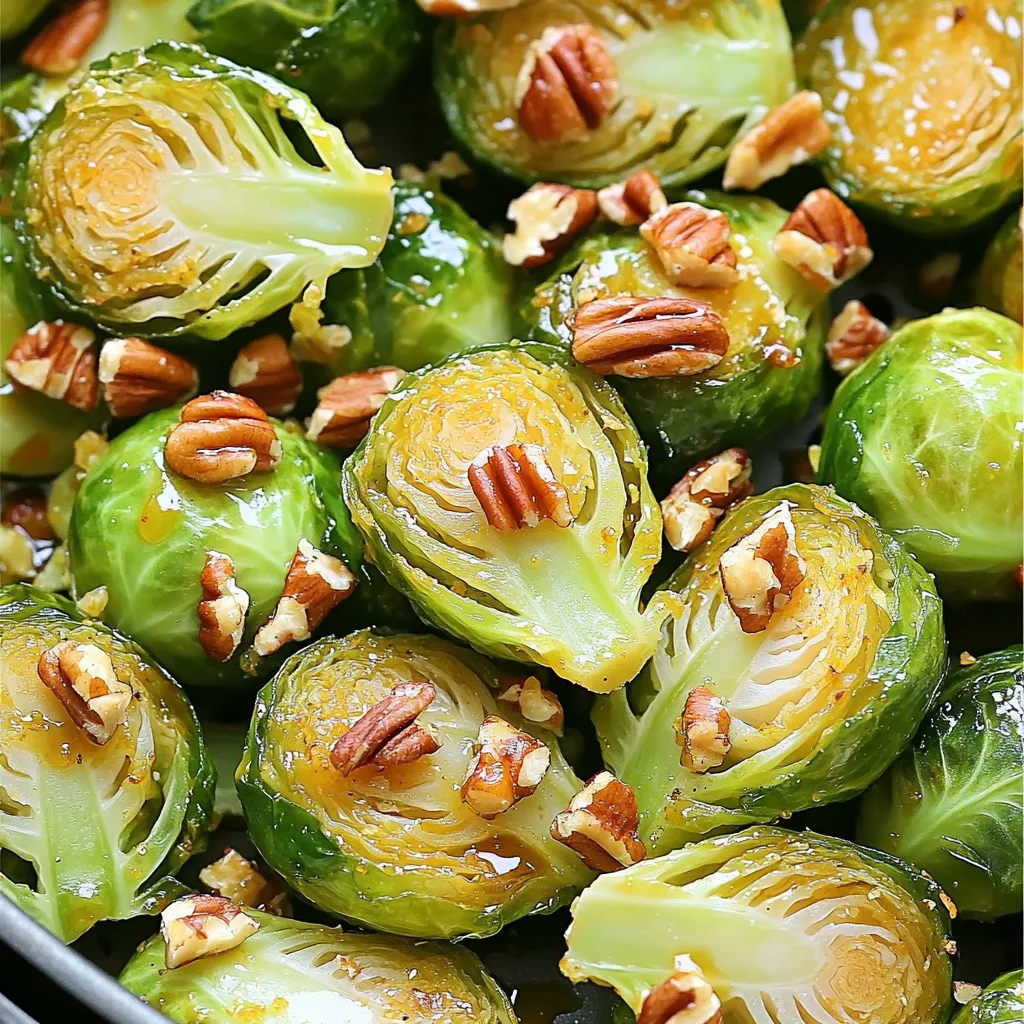
Looking for a tasty side dish that’s quick and easy? These Air Fryer Maple Dijon Brussels Sprouts offer a sweet and tangy flavor that will impress everyone. With simple ingredients …

Read more

Categories Appetizers

Pumpkin Cream Cold Brew Fantastic Seasonal Delight

October 11, 2025 by Chef Remy
Creating the perfect Pumpkin Cream Cold Brew requires simple, fresh ingredients. Here’s what you need: - 1 cup of cold brew coffee (prepared in advance) - 1/2 cup of your favorite milk (options: whole, almond, oat, or any non-dairy variant) - 1/4 cup of pure pumpkin puree (canned or fresh) - 1 tablespoon of pure maple syrup (or more, based on your sweetness preference) - 1/2 teaspoon of pumpkin pie spice (plus more for garnish) - 1/4 teaspoon of vanilla extract - Whipped cream (optional, for a sumptuous topping) - Ground cinnamon (for garnishing) - Ice cubes (as needed) These ingredients blend together to create a drink that is both creamy and flavorful, perfect for fall. The cold brew coffee serves as a strong base, while the pumpkin puree adds richness. The milk option allows for personal taste, and the sweeteners and spices bring everything to life. Each ingredient plays a part in making this drink a delightful seasonal treat. To start, brew a strong batch of cold brew coffee. Use coarsely ground coffee beans for the best taste. Let the coffee steep for at least 12 hours in cold water. After brewing, chill it in the fridge until you're ready to use it. For optimal flavor, prepare it the night before. This way, it will be nice and strong. In a medium bowl, combine the pumpkin puree and milk. You can use whole milk, almond milk, or oat milk—whatever you like best. Add the maple syrup, pumpkin pie spice, and vanilla extract. Whisk these ingredients together vigorously. This method helps create a smooth and creamy texture. You want it to blend well, so whisk until there are no lumps left. Grab a tall glass and fill it halfway with ice cubes. This keeps your drink refreshingly cold. Slowly pour the chilled cold brew coffee into the glass. Fill it until it's about three-quarters full. Now comes the fun part! Use a spoon to gently layer the pumpkin cream on top. Pour the cream slowly over the back of the spoon. This technique creates a lovely layered look. If you want to make it even more special, add whipped cream on top. A generous dollop adds richness. Then, finish with a light sprinkle of ground cinnamon. This not only looks nice but enhances the flavors too. Take a moment to appreciate your creation before enjoying it! To make the best pumpkin cream cold brew, you want to balance sweetness. Start with one tablespoon of maple syrup. Taste your drink and add more if you prefer it sweeter. Remember, you can always add, but you can't take it out. Adjusting spice levels is also key. The pumpkin pie spice gives a warm flavor. If you like it spicier, add a pinch more. If you prefer a milder taste, cut back a bit. Trust your palate to find the right mix. Choosing the right ice is important for your drink. Use larger ice cubes. They melt slower and keep your drink cold without too much water. If you want to avoid dilution, try freezing coffee into ice cubes. This keeps the flavor strong as it chills. If you want extra creaminess, consider alternatives to ice. You can freeze your pumpkin cream mixture into cubes. This way, you get a creamy texture without watering down your drink. It adds a fun twist, too! {{image_4}} You can easily switch to dairy-free options for your Pumpkin Cream Cold Brew. Coconut milk offers a rich and creamy flavor. It adds a tropical twist to your drink. Oat milk is another great choice. It has a smooth texture and a subtle sweetness. This milk pairs well with pumpkin and spices. Both alternatives keep your drink light and festive. If you want to change the sweetness, try using honey or agave. These natural sweeteners add a different flavor profile. You can adjust the amount to fit your taste. For those who prefer sugar-free options, consider using stevia or monk fruit. These sweeteners provide a guilt-free way to enjoy your cold brew. They won’t alter the delightful pumpkin flavor. There are fun ways to add seasonal twists to your drink. In the fall, add a splash of apple cider for a cozy touch. This enhances the warm spices and brings in the taste of autumn. During the holidays, think about adding peppermint or gingerbread flavors. These festive additions create a unique drink that feels special. You can easily customize your Pumpkin Cream Cold Brew for any season. To keep your cold brew coffee fresh, store it in the fridge. Use an airtight container to prevent odors from other foods. This helps maintain its great flavor. You can keep it for up to two weeks. However, for the best taste, use it within a week. For the pumpkin cream, place any leftovers in a sealed container. Store it in the fridge and try to use it within three days. If you want to keep it longer, consider freezing it. Pour the pumpkin cream into ice cube trays. Once frozen, transfer the cubes to a bag. This way, you can enjoy a taste of fall later in the year! Pumpkin Cream Cold Brew is a delicious drink made with cold brew coffee and pumpkin cream. You mix cold brew coffee with a creamy pumpkin mixture. This mixture includes pumpkin puree, milk, maple syrup, and spices. The drink is cold and creamy, perfect for fall. It gives you a cozy yet refreshing taste of autumn. You can customize your Pumpkin Cream Cold Brew in many ways: - Milk Choices: Use whole milk, almond milk, or oat milk for a different taste. - Sweetness Level: Add more maple syrup or try honey. - Spice Variations: Change the pumpkin pie spice to cinnamon or nutmeg. - Extra Toppings: Top with whipped cream or sprinkle more spices on top. These ideas help you make the drink your own. Pumpkin Cream Cold Brew is a seasonal treat. You can find it mainly in fall. Many coffee shops serve it from September to November. After that, it might not be available until the next fall. However, you can make it at home anytime with the right ingredients. The calorie count for Pumpkin Cream Cold Brew varies. Here’s a rough breakdown: - Cold Brew Coffee: About 5 calories. - Milk (1/2 cup): Around 50-100 calories, depending on the type. - Pumpkin Puree (1/4 cup): About 20 calories. - Maple Syrup (1 tbsp): Roughly 50 calories. - Pumpkin Pie Spice: Negligible calories. - Whipped Cream (optional): About 50 calories for a dollop. In total, the drink can range from 175 to 275 calories, depending on your choices. In this post, we explored how to make a delightful Pumpkin Cream Cold Brew. We discussed the essential ingredients, from cold brew coffee to spices, and provided step-by-step instructions for preparing both the coffee and pumpkin cream. Tips for perfect flavor and variations for customization were also included. Remember, you can adjust the sweetness and choose dairy-free options to suit your taste. Enjoy your seasonal drink, and feel free to experiment. You'll discover great ways to make it your own!

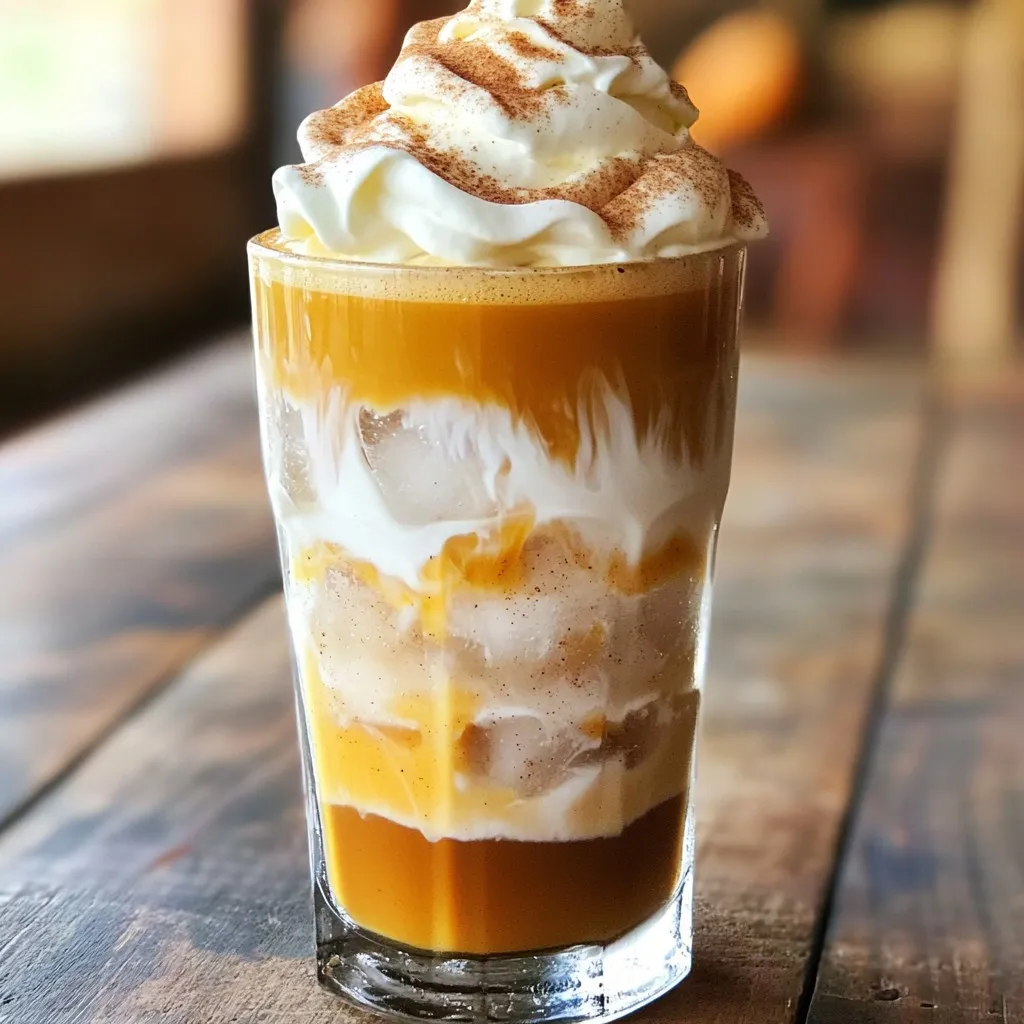
Are you ready to enjoy a drink that captures the joy of fall? The Pumpkin Cream Cold Brew is a fantastic seasonal delight that combines rich coffee with creamy pumpkin …

Read more

Categories Breakfast
Older posts
Newer posts
← Previous Page1 … Page10 Page11 Page12 … Page130 Next →

ROASTED RECIPES

Where bold flavors meet everyday meals. Warm, vibrant, and made to share. 🔥🥗🍴

PAGES

Home About Contact Privacy Policy Terms & Conditions Cookie Policy GDPR Policy Copyright Policy Disclaimer

CATEGORIES

Appetizers Desserts Salads Breakfast Dinner

Contact

  • Pinterest
  • Mail
Copyright © 2025 Roasted Flavors. All rights reserved.