Skip to content
Roasted Flavors
  • Home
  • Appetizers
  • Desserts
  • Salads
  • Breakfast
  • Dinner
  • Privacy Policy
  • Contact
  • About

Chef Remy

Mexican Street Corn Soup Hearty and Flavorful Recipe

May 29, 2025 by Chef Remy
To make a great Mexican street corn soup, gather these key ingredients: - 4 ears of fresh corn, husked with kernels removed - 1 tablespoon extra-virgin olive oil - 1 small onion, finely diced - 2 cloves garlic, minced - 1 jalapeño pepper, seeded and finely diced - 4 cups vegetable broth - 1 cup creamy coconut milk - 1 teaspoon ground cumin - 1 teaspoon smoked paprika - Salt and freshly cracked black pepper, to taste - 1/4 cup fresh cilantro, chopped (plus more for garnish) - Juice of 1 lime - 1/2 cup crumbled feta cheese (optional but recommended) - 1 ripe avocado, diced (for garnish) Each ingredient plays a vital role in building flavor. The corn brings sweetness, while the garlic and onion add depth. The spices, cumin and paprika, give warmth and richness. You can enhance the soup with these optional ingredients: - 1 teaspoon chili powder for heat - 1/2 cup black beans for protein - 1/2 cup corn chips for crunch Adding these ingredients can elevate your soup. They add new textures and flavors that make it even more delightful. If you need substitutions, try these options: - Use chicken broth instead of vegetable broth for added flavor. - Swap coconut milk with heavy cream for a richer base. - Choose queso fresco instead of feta for a milder cheese. These substitutes can help you customize the soup. Each option still leads to a hearty and flavorful dish. For the full recipe, check out the earlier sections. Start by husking the fresh corn. Remove the kernels from the ears. Use a sharp knife for this task. You need about four ears of corn. Next, finely dice one small onion. Mince two cloves of garlic. For a little heat, seed and finely dice one jalapeño pepper. Set all these veggies aside. They will add great flavor to the soup. In a large pot, heat one tablespoon of extra-virgin olive oil over medium heat. When the oil is hot, add the diced onion and minced garlic. Sauté them for about five minutes. You want the onion to be soft and translucent. Stir often to keep them from burning. Then, add the diced jalapeño and corn kernels. Cook this mix for another three to four minutes. The corn should be slightly tender and fragrant. Next, sprinkle in one teaspoon each of ground cumin and smoked paprika. Stir well, allowing the spices to cook for about one minute. Carefully pour in four cups of vegetable broth. Stir to combine and bring to a rolling boil. Once boiling, reduce the heat and let it simmer for ten minutes. This helps the flavors meld. Now, blend the soup. You can use an immersion blender for this. Blend until creamy and smooth. If you want it silkier, transfer it in batches to a countertop blender. Just be careful with hot liquid. After blending, stir in one cup of creamy coconut milk and the juice of one lime. Season with salt and freshly cracked black pepper to taste. Heat through for another five minutes. Now, it’s ready to serve! Ladle the hot soup into bowls and garnish with extra cilantro, diced avocado, and crumbled feta cheese. Enjoy your flavorful Mexican Street Corn Soup! You can find the full recipe [here](Full Recipe). To make the best Mexican street corn soup, focus on fresh ingredients. Use fresh corn for a sweet taste and a great texture. When cooking, let the spices bloom. This means giving the cumin and paprika time to release their flavors. A squeeze of lime juice adds a burst of freshness. Taste as you go. Adjust the salt and pepper to your liking. If you want more heat, add extra jalapeño. For a creamier texture, blend longer. Aim for a smooth finish and a rich flavor. Store leftover soup in an airtight container. It can last in the fridge for 3 to 4 days. To freeze, pour it into freezer bags or containers. Make sure to leave space for expansion. When reheating, do it gently. Use a pot on low heat, stirring often. You can also use a microwave but heat in short intervals. Add a splash of coconut milk if the soup thickens too much. This keeps it creamy and delicious. Serve the soup hot in colorful bowls. Garnish with fresh cilantro and diced avocado. A sprinkle of feta cheese adds a nice touch. For added zest, drizzle extra lime juice on top. You can also serve crispy tortilla chips on the side for crunch. Enjoy it as a starter or pair it with a fresh salad for a full meal. For the full recipe, check the section above. {{image_4}} You can easily make Mexican Street Corn Soup vegan. Swap out the creamy coconut milk for any plant-based milk. Omit the feta cheese or use a vegan cheese instead. This keeps the soup rich and creamy without dairy. You still get that wonderful taste of corn and spices that everyone loves. If you want a spicy kick, add more jalapeños or some diced serrano peppers. You might also try a dash of hot sauce for extra heat. For a smoky flavor, add chipotle peppers in adobo sauce. This adds depth and makes the soup really pop. To make this soup low-carb, replace the corn with zucchini or cauliflower. You can also skip the coconut milk and use a low-carb broth. Both options keep the soup tasty while cutting down on carbs. This way, you can enjoy a healthier version without losing flavor. For the full recipe, check out the detailed steps to make this hearty and flavorful dish. After you enjoy your Mexican street corn soup, let it cool. Use an airtight container to store it. Place it in the fridge. It will stay fresh for about three to four days. For best taste, eat it sooner rather than later. You can freeze this soup for later! Make sure it cools down first. Pour the soup into freezer-safe bags or containers. Leave some space at the top for expansion. It can last up to three months in the freezer. Just label the bags with the date. When you're ready to eat the soup again, thaw it in the fridge overnight. You can also use the microwave or stovetop. For the microwave, heat in a bowl for about 2-3 minutes. Stir halfway through. If using the stovetop, heat in a pot over medium heat. Stir often to avoid sticking. Add a splash of water or broth if it seems thick. Enjoy your hearty soup! For the full recipe, check out the earlier sections. You can serve Mexican Street Corn Soup with many tasty sides. A fresh salad pairs well. Try a simple green salad with lime vinaigrette. You can also enjoy it with warm tortillas or chips. They add a nice crunch. If you want something hearty, grilled chicken or shrimp works great too. For a complete meal, serve it with Mexican rice. Yes, you can make this soup in advance. It stores well in the fridge. Once cooled, put it in an airtight container. It will stay fresh for up to three days. Reheat it on the stove over medium heat. If the soup seems thick, add a bit of vegetable broth or water. This keeps it creamy and smooth. The spice level depends on how you prepare it. The jalapeño adds a nice kick. If you want it milder, remove the seeds. You can also use less jalapeño. For more spice, add a pinch of cayenne pepper or use a hotter pepper. Taste as you go, so you get the right heat for you. Enjoy the flavor without the burn! In this blog post, we explored the essential and optional ingredients for Mexican Street Corn Soup. I shared step-by-step instructions, tips for flavor, and variations to fit any diet. We also covered storage options and answered common questions to guide you. Enjoy making this soup your own. Whether you go classic or add a twist, have fun with it!

Are you ready to enjoy a bowl of vibrant Mexican Street Corn Soup? This recipe bursts with fresh flavors and hearty ingredients. I’ll show you how to use simple steps …

Read more

Categories Dinner

BLT Cauliflower Salad Fresh and Flavorful Dish

May 29, 2025 by Chef Remy
- 1 medium head of cauliflower, cut into bite-sized florets - 4 cups mixed greens - 1 cup cherry tomatoes, halved - 1 cup cooked chickpeas - 1/2 cup crispy shallots - 1/2 cup vegan mayonnaise - 2 tablespoons apple cider vinegar - 1 tablespoon Dijon mustard - Salt and pepper to taste - Fresh parsley, chopped - Avocado slices for creaminess - Bacon bits (real or vegan) for additional flavor You can try different dressings to mix things up. A lemon vinaigrette adds brightness. A tahini dressing gives a nutty taste. You can also use a balsamic glaze for a sweet twist. Each option enhances the salad's fresh flavors. I love this BLT cauliflower salad because it combines crisp textures and bright flavors. The cauliflower adds a hearty base, while the mixed greens keep it light. The roasted cauliflower brings a warm, nutty taste. Cherry tomatoes burst with sweetness, and chickpeas add protein. Crispy shallots give a wonderful crunch. For the dressing, I use vegan mayonnaise, which makes it creamy. Apple cider vinegar adds a tangy touch. Dijon mustard amps up the flavor. You can adjust the salt and pepper to your liking. If you want to change it up, don’t hesitate to add avocado slices. They bring creaminess and a smooth texture. Bacon bits can add a savory kick, whether real or plant-based. Try this recipe to explore new flavors. You can find the Full Recipe with all the details you need to create this dish. 1. First, preheat your oven to 425°F (220°C). This high heat will give your cauliflower a great roast. 2. Next, line a baking sheet with parchment paper. This will help your cauliflower not stick and make cleanup easy. 3. Take your medium head of cauliflower and cut it into bite-sized florets. This size helps them roast evenly and become tender. 1. In a mixing bowl, toss the cauliflower florets with a drizzle of olive oil. Add a pinch of salt and a dash of pepper to season them well. 2. Spread the seasoned cauliflower evenly on the prepared baking sheet. 3. Roast the cauliflower in the oven for 20-25 minutes. Turn the florets halfway through cooking to ensure they roast evenly. Look for a nice golden brown color to know they are ready. After roasting, set them aside to cool slightly. 1. While the cauliflower roasts, make the dressing. In a large bowl, whisk together the vegan mayonnaise, apple cider vinegar, and Dijon mustard. Add a sprinkle of salt and pepper to taste. Adjust the seasoning to suit your preference. 2. Add the mixed greens and chickpeas into the bowl with the dressing. Gently toss everything together until the greens are coated in the creamy dressing. 3. Carefully fold in the roasted cauliflower and halved cherry tomatoes. Be gentle so you don’t break the cauliflower florets. 4. Finally, sprinkle crispy shallots on top for texture and crunch. Garnish with freshly chopped parsley for a pop of color. This BLT Cauliflower Salad is ready to serve! You can enjoy it chilled or at room temperature. Feel free to check the Full Recipe for more details. To get the best roasted cauliflower, start by cutting it into even florets. This ensures they cook at the same rate. I recommend preheating your oven to 425°F (220°C). Line your baking sheet with parchment paper to prevent sticking. Toss the cauliflower with olive oil, salt, and pepper. Spread the florets in a single layer on the sheet. Roast them for 20-25 minutes. Flip them halfway through to get an even brown color. This simple method gives you that nice caramelization. Want to kick up the flavor? Try adding garlic powder or smoked paprika. These spices can give your salad a deeper taste. You can also mix in fresh herbs like basil or chives for extra zest. For dressings, experiment with adding a splash of lemon juice or a teaspoon of maple syrup. These small changes can make a big difference in taste. Crispy shallots add a nice crunch to your salad. You can buy them or make your own. To achieve that perfect crunch, fry them in hot oil until golden. If you want more crunch, try adding toasted nuts or seeds, like walnuts or sunflower seeds. These toppings not only enhance the texture but also boost the nutrition of your dish. For even more variety, consider adding crispy bacon bits, whether real or vegan. {{image_4}} You can boost your BLT cauliflower salad with proteins. Chicken works well. Just grill or bake it, then cut it into pieces. Tofu is another great choice. Press it to remove water, then cube and sauté it until golden. Both options add nutrition and make the dish heartier. Change the dressing to mix things up. Try ranch or balsamic vinaigrette for a different taste. You can also add herbs like basil or cilantro for fresh notes. Mixing in sliced olives or roasted peppers adds a unique twist. Get creative with your ingredient combinations! Make this salad gluten-free by checking your dressing ingredients. Most dressings are naturally gluten-free, but it’s always good to double-check. For a nut-free version, simply skip any nuts or seeds. This salad is versatile, so feel free to adjust it to meet your needs. If you want the full recipe, find it above! To keep your leftover BLT cauliflower salad fresh, store it in the fridge. Use an airtight container to prevent moisture loss. It’s best to eat the salad within three days for optimal taste. If the salad starts to look soggy, toss in some fresh greens to revive it! Can this dish be frozen? I do not recommend freezing this salad. The texture of the cauliflower and greens will change. If you freeze it, the salad may become mushy when thawed. Instead, enjoy it fresh, or prepare the components separately and store them in the fridge. Choose glass or BPA-free plastic containers for storage. These materials keep your salad fresh longer. Look for containers with tight-fitting lids to seal in the flavors. This way, you can enjoy the deliciousness of your BLT cauliflower salad! For the full recipe, check out the detailed instructions above. You can prep parts of the salad ahead of time. First, roast the cauliflower and let it cool. Store it in an airtight container in the fridge. You can also mix the greens, chickpeas, and dressing separately. Keep them in their own containers. This way, the salad stays fresh. On serving day, combine everything just before eating. This keeps the salad crisp and tasty. If you need a substitute for vegan mayonnaise, try these options: - Greek yogurt for a creamy texture. - Silken tofu blended until smooth. - Hummus for a flavorful twist. - Avocado puree for a healthy fat option. These alternatives still give you a creamy dressing but with different flavors and textures. Yes, this salad is great for meal prep. The roasted cauliflower and chickpeas hold up well in the fridge. Store the dressing separately to keep the greens fresh. It can last up to four days when stored properly. Use airtight containers to maintain quality. This salad is a quick and healthy option for packed lunches or dinner. For the full recipe, check out the main article. This blog post explored a vibrant salad recipe that uses fresh ingredients and simple steps. You learned how to roast cauliflower, combine greens, and craft delicious dressings. With tips for flavor and texture, you can customize this dish as per your taste. Remember, you can easily make this salad your own with various proteins and dressings. Enjoy creating and sharing this healthy meal with friends and family. Happy cooking!

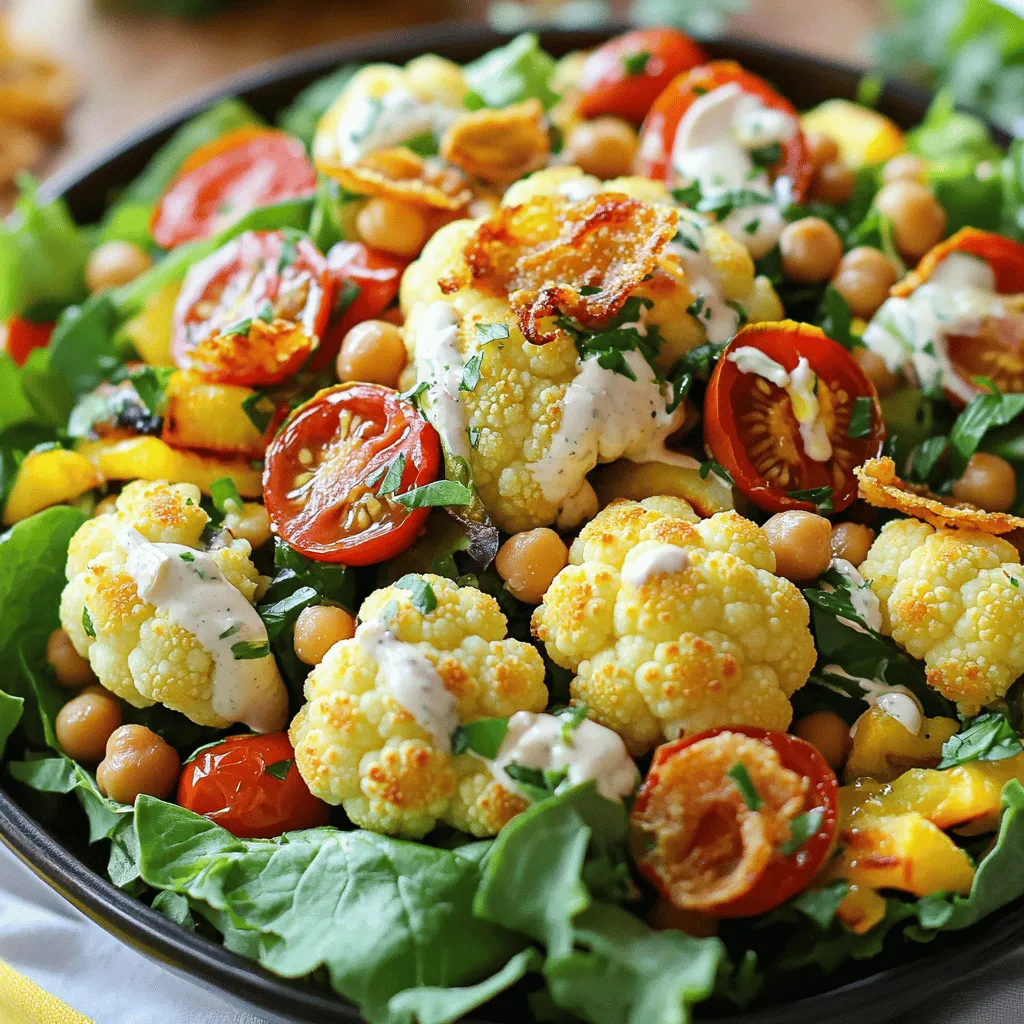
Looking for a fresh twist on a classic dish? You will love this BLT Cauliflower Salad! With crispy roasted cauliflower, vibrant greens, and a creamy dressing, this salad offers all …

Read more

Categories Salads

How to Make Chicken Taco Dip Flavorful and Simple

May 29, 2025 by Chef Remy
To make the best chicken taco dip, gather these ingredients: - 2 cups cooked chicken, shredded - 1 (8 oz) package cream cheese, softened - 1 cup sour cream - 1 cup shredded sharp cheddar cheese, divided - 1 cup medium salsa (adjust spice to preference) - 1 tablespoon taco seasoning - 1/2 cup black olives, sliced - 1/2 cup green onions, finely chopped - Tortilla chips, for serving You can switch some ingredients if needed. Use Greek yogurt instead of sour cream for a tangy twist. If you want a lighter dip, try using low-fat cream cheese. For a vegan option, use shredded jackfruit instead of chicken. You can also replace cheddar cheese with a dairy-free cheese. Adjust the salsa for your spice level. A mild salsa is great for kids, while a spicy one can kick it up. Measuring accurately makes a big difference. Use dry measuring cups for solids and liquid measuring cups for liquids. Make sure your cream cheese is soft. It blends better when it's at room temperature. Shred your chicken finely for even mixing. If you have leftover chicken, this is a great way to use it. Prepare all your ingredients before you start cooking. This makes the process smooth and fun. To start, preheat your oven to 350°F (175°C). This step gets your oven ready for baking. Next, take a large bowl and add the softened cream cheese, sour cream, and taco seasoning. I like to use a handheld mixer to blend everything until smooth. Make sure there are no lumps. This creamy base is key to a delicious dip. Then, add the shredded chicken and medium salsa to the bowl. Mix well until the chicken is coated. This helps the flavors blend together. Don’t forget to reserve half of the shredded cheddar cheese for later. Stir in the remaining cheese to create a cheesy delight. After mixing, transfer the chicken mixture into a greased baking dish. Spread it out evenly so it bakes nicely. Sprinkle the rest of the cheddar cheese on top of the dip. Next, add the sliced black olives evenly over the cheese. This adds a nice touch and flavor. Place your baking dish in the preheated oven. Bake for 20 to 25 minutes. Keep an eye on it until it's hot and bubbly. You want the cheese to melt perfectly. Once baked, take the dish out of the oven. Carefully sprinkle the chopped green onions on top. This gives the dip a fresh flavor and bright look. Let it cool for a few minutes before serving. This prevents any burns. Serve with crispy tortilla chips for a fun dipping experience. You can use the Full Recipe for even more detailed steps! For a colorful touch, consider garnishing with more green onions and a small bowl of salsa on the side. Enjoy your tasty Chicken Taco Dip! To make your chicken taco dip a hit, focus on the creaminess. Start with room temperature cream cheese. This helps it blend smoothly. Mix the cream cheese with sour cream well. Use a handheld mixer for a fluffy texture. Ensure the chicken is shredded finely. This allows for even flavor in every bite. Want to elevate the taste? Add more cheese! Try pepper jack for extra kick. Fresh cilantro can also boost flavor. Mix in some corn for sweetness. You can also use black beans for added texture. Consider a squeeze of lime juice for brightness. These little touches make a big difference. Spice level is key in chicken taco dip. If you like it mild, use mild salsa. You can add more taco seasoning for heat. For those who love spice, try spicy salsa or jalapeños. Always taste as you go. This way, you can adjust to your liking. Making this dip your own is part of the fun. For more details, check out the Full Recipe. {{image_4}} You can make a vegetarian version of chicken taco dip. Replace the chicken with 2 cups of cooked lentils or black beans. Use the same creamy base of cream cheese and sour cream. Add your favorite veggies like bell peppers, corn, and zucchini. This dip still tastes great and is full of flavor. To make your dip spicy, use hot salsa instead of regular salsa. Add diced jalapeños or chopped green chilies for an extra kick. You can also mix in some cayenne pepper or chili powder to ramp up the heat. Adjust the spice to your taste. Remember, you can always add more, but you can’t take it out! Feel free to get creative with your dip! Consider adding: - Diced tomatoes for freshness - Creamy avocado for richness - Fresh cilantro for a burst of herb flavor - A squeeze of lime juice for a zesty touch Mix and match these ingredients to find your favorite combination. This way, each dip becomes a unique dish! For the full recipe, check the details shared above. To keep your chicken taco dip fresh, store it in an airtight container. This will help prevent it from drying out. Let the dip cool down to room temperature before sealing it. If you have leftovers, place them in the fridge. This dip will stay good for about 3 to 4 days. When you're ready to enjoy the dip again, use the oven or microwave. For the oven, preheat it to 350°F (175°C) and heat the dip for about 15 minutes. Stir it halfway to ensure even heating. If using a microwave, place the dip in a microwave-safe bowl. Heat it on medium power in short bursts, stirring in between, until warm. You can freeze chicken taco dip if you want to save it for later. Use a freezer-safe container to store the dip. Make sure to leave some space at the top since the dip may expand when frozen. It will keep well for about 2 to 3 months. When ready, thaw it in the fridge overnight before reheating. This will help maintain its creamy texture. Enjoy your tasty dip anytime! Chicken taco dip can last about 3 to 5 days in the fridge. Make sure to store it in an airtight container. This keeps it fresh and tasty. If the dip smells off or looks strange, it’s best to toss it. Yes, you can make chicken taco dip ahead of time. Prepare it a day or two before your event. Just cover it well and chill it in the fridge. When you're ready to serve, bake it as the recipe states. This makes hosting easy and fun. I love serving chicken taco dip with crispy tortilla chips. You can also use veggies like carrots and celery for dipping. Other great options are pita chips or even nachos. For an extra touch, add some fresh salsa or guacamole on the side. These pair well with the dip and add more flavor. You learned how to make a tasty Chicken Taco Dip. We explored the ingredients, preparation steps, and tips for the perfect dip. Consider substitutions for your taste, and remember, you can adjust spice levels. Storing and reheating were covered to keep it fresh. Lastly, I shared ways to make variations to suit your cravings. Enjoy your dip with family and friends!

Are you ready to impress your friends at the next gathering? Making Chicken Taco Dip is easy and rewarding. With just a few simple ingredients, you can create a flavorful …

Read more

Categories Appetizers

Air Fryer Cheeseburger Wraps Delicious and Easy Meal

May 29, 2025 by Chef Remy
- Ground beef - Flour tortillas - Cheddar cheese - Garlic powder - Onion powder - Smoked paprika - Ketchup and mustard - Diced tomatoes - Diced pickles - Cooking spray or olive oil The main ingredients bring this dish to life. Ground beef is the star. I prefer 80/20 beef for juicy and flavorful patties. Flour tortillas serve as the wrap, holding everything together. Shredded cheddar cheese melts perfectly inside, adding rich flavor. Next, we have seasonings and condiments. Garlic powder gives depth to the beef. Onion powder adds a nice touch. Smoked paprika introduces a subtle smokiness. Ketchup and mustard finish the wrap with classic flavors. You can also add optional ingredients. Diced tomatoes add freshness and juiciness. Diced pickles give a tangy crunch. Lastly, cooking spray or olive oil helps the wraps crisp up nicely in the air fryer. For the full recipe, check out the detailed instructions on how to make these Air Fryer Cheeseburger Wraps. To start, you need to mix the ground beef with some seasonings. In a big bowl, add: - 1 lb ground beef - 1 teaspoon garlic powder - 1 teaspoon onion powder - 1 teaspoon smoked paprika - Salt and pepper to taste Use your hands or a spoon to blend everything well. This helps the flavors mix into the meat. Next, form small patties from the beef mixture. Aim for about 1/4 pound for each patty. Make sure they are even so they cook well. Preheat your air fryer to 400°F (200°C). This step is key for even cooking. It only takes about 5 minutes. Once it's hot, carefully place the patties in the air fryer basket. Do not stack them. Cook for 10-12 minutes. Flip them halfway through cooking. This helps them brown nicely. When they are golden and cooked through, take them out and let them cool for a bit. Now it’s time to wrap! Lay out your tortillas flat on a clean surface. On each tortilla, add one patty. Then, sprinkle on: - 1/4 cup shredded cheddar cheese - 1/2 cup diced tomatoes - 1/4 cup diced pickles - Drizzle with 1/4 cup ketchup and 1/4 cup mustard To wrap, fold the sides of the tortilla inward. Then, roll it from the bottom up. Make sure the fillings stay secure inside. Before cooking, lightly spray the outside of each wrap with cooking spray or brush with olive oil. This helps them get crispy. Place the wraps back into the air fryer in a single layer. If your air fryer is small, you might need to do this in batches. Cook at 400°F (200°C) for about 5-6 minutes. You want them to turn golden and crispy. Once done, take the wraps out. Let them rest for a minute before slicing them in half. They are now ready to enjoy! For the full recipe, check the link. - Best cooking temperatures: Set your air fryer to 400°F (200°C). This heat gives a nice, crispy finish. Preheating helps cook the wraps evenly. - Flipping patties for even cooking: Flip the patties halfway through cooking. This ensures both sides get that perfect browning. - Accompaniments to enhance flavors: Serve your wraps with extra ketchup and mustard. Pickles and diced tomatoes add freshness and crunch. - Presentation ideas for visual appeal: Plate your wraps with fresh lettuce or thin cucumber slices. This adds color and makes the meal pop. - Overcrowding the air fryer: Avoid placing too many wraps in the basket at once. This leads to uneven cooking and less crispiness. - Undercooking the patties: Always check that the beef patties are fully cooked. They should reach an internal temperature of 160°F (71°C) for safety. {{image_4}} You can switch up the protein in your wraps. Ground turkey or chicken works great. They are leaner options that still taste delicious. You can season them just like the beef. If you want a meatless option, try black bean wraps. Just mash cooked black beans and mix in your seasonings. This gives a hearty and satisfying bite. Cheese is key in these wraps. While cheddar is a classic, you can try other melting cheeses. Monterey Jack or pepper jack adds a nice twist. For those who avoid dairy, dairy-free cheese is a good choice. Look for plant-based cheese that melts well. This keeps the flavors rich without using dairy. To spice things up, think about adding some heat. A dash of hot sauce can elevate your wraps. You can also mix in spices like cumin or chili powder. For toppings, consider jalapeños for heat or avocado for creaminess. Both options add texture and taste. Customize your wraps to match your mood or taste. The possibilities are endless! To keep your cheeseburger wraps fresh, wrap them tightly. Use plastic wrap or foil. Store them in the fridge for up to three days. This helps maintain their taste and texture. For the best results, reheat wraps in the air fryer. Set it to 350°F (175°C) for about 5 minutes. This keeps them crispy. You can use a microwave too, but it may make them soggy. If you use a microwave, heat for about 30-60 seconds. To freeze cheeseburger wraps, wrap each one in plastic wrap. Then place them in a freezer bag. They can last up to three months. When ready to eat, take them out and thaw in the fridge overnight. For quick reheating, use the air fryer. You can easily make these wraps fit your diet. For a vegetarian option, swap the beef for black beans or lentils. Just mash them with the same spices. If you want low-carb wraps, use lettuce leaves instead of tortillas. This keeps the taste but cuts carbs. These wraps pair well with many sides. Try a fresh salad with tomatoes and cucumbers. French fries or sweet potato fries make a fun choice too. You can also serve them with a small bowl of coleslaw for crunch. Yes, you can use many air fryer models. Just make sure your air fryer can reach 400°F. Cooking times might change, so check the wraps often. If your air fryer is smaller, cook in batches for the best results. For the detailed instructions, check the [Full Recipe](#). You can make tasty Air Fryer Cheeseburger Wraps with simple ingredients. Start with ground beef, tortillas, and cheese. Add flavorful spices and optional toppings to make it your own. The step-by-step guide helps you cook perfect patties and assemble wraps easily. Remember to avoid common mistakes to enjoy your meal fully. Store any leftovers properly for next time. These wraps offer fun variations and pair well with many sides. Get creative and enjoy every bite of your delicious creation!

Looking for a quick meal that packs big flavor? Air Fryer Cheeseburger Wraps are the answer! They’re easy to make and perfect for busy weeknights or fun gatherings. With juicy …

Read more

Categories Dinner

Easy Air Fryer Lasagna Fritta Simple and Delicious Snack

May 29, 2025 by Chef Remy
- 8 lasagna noodles - 1 cup ricotta cheese - 1 cup shredded mozzarella cheese - 1/2 cup grated Parmesan cheese - 1 cup marinara sauce - 1 teaspoon Italian seasoning - 1/2 teaspoon garlic powder - Salt and black pepper to taste - 1 cup breadcrumbs - Cooking spray You can swap ricotta cheese with cottage cheese for a lighter option. If you want more flavor, try using goat cheese or feta. For mozzarella, you can use provolone or fontina. If you lack Italian seasoning, mix dried oregano and basil instead. Choose gluten-free noodles if you have gluten issues. I like using Barilla for lasagna noodles. It holds shape well. For cheese, I recommend Galbani or BelGioioso for ricotta and mozzarella. For Parmesan, Grana Padano is a great choice. For breadcrumbs, try Progresso. They give a nice crunch. To start, boil a large pot of water. Add a good amount of salt to it. Once the water boils, add the lasagna noodles gently. Stir them so they don’t stick. Cook the noodles as per the package until they are al dente. This usually takes about 8 to 10 minutes. When done, drain the noodles in a colander. Let them cool a bit before handling. In a mixing bowl, grab your ricotta cheese and add it in. Next, add the shredded mozzarella and grated Parmesan. Sprinkle in the Italian seasoning and garlic powder. Don’t forget a pinch of salt and black pepper! Use a spatula to mix everything well. You want a smooth and tasty filling that blends all the flavors. Take a lasagna noodle and lay it flat. Scoop a tablespoon of the cheese filling and place it on one end of the noodle. Roll the noodle tightly from that end. Do this for every noodle. Now, pour breadcrumbs into a shallow dish. Roll each lasagna bite in the breadcrumbs. Make sure they are fully coated. This step gives them that nice crispy finish! First, you need to preheat your air fryer. Set it to 380°F (190°C) and let it warm up for about 5 minutes. This step helps cook the lasagna fritta evenly and makes it crispy. Once preheated, lightly spray the air fryer basket with cooking spray. This prevents sticking. Next, place the rolled lasagna bites seam-side down in a single layer. Don't crowd the basket, as this can lead to uneven cooking. Give the tops a light spray of cooking spray for extra crispiness. Cook them for 10 to 12 minutes. Flip them halfway through to get a golden exterior on all sides. After cooking, carefully take the lasagna bites out of the air fryer. Serve them warm, paired with marinara sauce for dipping. This adds flavor and makes each bite even more enjoyable. You can also garnish the platter with fresh basil leaves for a nice touch. If you want more ideas, check out the Full Recipe for different serving options! {{image_4}} To get that crunchy outside, follow a few key steps. First, roll the lasagna bites in breadcrumbs well. Make sure each bite is fully coated. This layer is vital for that crispiness. Second, use cooking spray lightly on both the bites and the air fryer basket. This helps the heat circulate. Lastly, flip the bites halfway through cooking. This ensures even cooking and browning. If you have any bites left, store them right to keep them tasty. Place them in an airtight container. They will last about two to three days in the fridge. To reheat, use the air fryer again. Heat them at 350°F for about 5 minutes. This will help them regain their crispiness. Avoid the microwave as it can make them soggy. I see some common mistakes when making lasagna fritta. First, don’t overcrowd your air fryer. Leave space for air to flow. This promotes even cooking. Second, skip overcooking the noodles. They should be al dente before rolling. Lastly, do not skip the seasoning. Salt and pepper enhance the flavors. For a full recipe, check the detailed instructions provided above. You can easily make this dish vegetarian. Replace the meat with veggies. Spinach, mushrooms, and zucchini work great. You can also add roasted peppers. For a rich flavor, include some artichokes. Just chop them finely and mix them into your cheese filling. This changes the taste and adds color. If you like heat, add some spice to your lasagna fritta. Mix in crushed red pepper flakes to the cheese filling. You can also use spicy marinara sauce for dipping. Another idea is to add jalapeños or hot Italian sausage. These will give you the kick you crave. Adjust the spice level to suit your taste. You can make this dish gluten-free too! Use gluten-free lasagna noodles. Check your local store for options. You can also make your own with rice or corn flour. Ensure your breadcrumbs are gluten-free as well. This way, everyone can enjoy this tasty snack without worry. Explore the [Full Recipe] for more ideas and tips! This Easy Air Fryer Lasagna Fritta recipe makes about four servings. Each serving has around three bites. It's perfect for sharing with friends or serving as a snack for your family. Yes, you can prepare lasagna fritta in advance. You can roll the lasagna noodles and coat them with breadcrumbs. Store them in the fridge until you are ready to cook. Just remember to let them sit at room temperature for about 15 minutes before air frying. This helps them cook evenly. I love serving these bites with marinara sauce. It adds a nice, tangy flavor. You can also try ranch dressing or a creamy garlic dip for something different. Each sauce brings a new twist to your lasagna fritta experience. Enjoy experimenting! We covered all you need to know about making lasagna fritta. First, we explored the ingredients, including substitutions and brand recommendations. Next, I provided simple steps to prepare, assemble, and cook. You learned tips to get that perfect crisp and avoid common mistakes. We also discussed variations to suit your taste, like vegetarian options and spicy twists. With these insights, you can create delicious lasagna fritta that everyone will love. Enjoy your cooking adventure!

Are you ready to enjoy a tasty twist on a classic dish? Easy Air Fryer Lasagna Fritta is a fun and simple snack that captures all the rich flavors of …

Read more

Categories Appetizers

Honeycrisp Apple and Feta Salad Fresh and Flavorful

May 29, 2025 by Chef Remy
To make this Honeycrisp Apple and Feta Salad, gather the following items: - 2 Honeycrisp apples, cored and thinly sliced - 4 cups mixed greens (arugula and spinach work beautifully) - 1/2 cup creamy feta cheese, crumbled - 1/4 cup walnuts, roughly chopped - 1/4 cup dried cranberries - 2 tablespoons high-quality olive oil - 1 tablespoon apple cider vinegar - 1 tablespoon pure honey - Salt and freshly ground black pepper to taste When measuring ingredients, precision helps with taste. Use a kitchen scale for the walnuts and feta. For liquids, a measuring spoon ensures you don’t overdo it. If you want a sweeter salad, add a bit more honey. If you prefer it tangy, try more apple cider vinegar. Adjust as you like! For the best flavor, choose fresh Honeycrisp apples. They should be firm and crisp. A good quality feta makes a big difference. Look for creamy, crumbly feta, which adds richness. Fresh mixed greens enhance the salad's taste and crunch. Walnuts add texture, while dried cranberries bring a sweet touch. Using fresh, high-quality olive oil elevates the dish. You can find the full recipe [here](#). Start by making the dressing. In a small bowl, whisk together the olive oil, apple cider vinegar, honey, salt, and black pepper. Mix until all ingredients blend well. This simple dressing adds a nice tang and sweetness to the salad. Next, grab a large salad bowl. Create a bed of mixed greens. I like to use arugula and spinach. They give a fresh taste and nice texture. Spread the greens evenly across the bottom of the bowl. This will be the base of your salad. Now it’s time to add the fun parts. First, arrange the thinly sliced Honeycrisp apples on top of the greens. Make sure to overlap them slightly. This makes the salad look pretty. Then, sprinkle the creamy feta cheese over the apples. Each bite should have that rich flavor. Next, gently scatter the chopped walnuts and dried cranberries on top. The walnuts add crunch, while the cranberries bring sweetness. Finally, drizzle your prepared dressing over the salad. Use salad tongs to toss it gently. Be careful not to break the apple slices. Taste and adjust the seasoning if needed. For a full list of instructions, check the Full Recipe. - Use fresh Honeycrisp apples for the best taste. They are crisp, sweet, and tart. - Slice the apples just before serving. This keeps them crunchy and bright. - Crumble the feta cheese by hand. It stays creamier that way. - Mix the dressing well. This helps all flavors blend perfectly. - Toss the salad gently. You want to keep the apple slices whole. - Serve this salad as a starter or side dish. It pairs well with grilled chicken. - For a fun twist, add sliced pears. They add extra sweetness and flavor. - Drizzle balsamic glaze on top. It adds a rich, tangy layer to the salad. - Use a large, shallow bowl for a beautiful presentation. It shows off the colors. - Don't add the dressing too early. It makes greens soggy. - Avoid using old apples. They can be mealy and spoil the salad. - Don’t skip the nuts and cranberries. They add crunch and sweetness. - Be careful with salt. Too much can overpower the salad’s fresh taste. For a complete recipe, check the [Full Recipe]. {{image_4}} If you have specific dietary needs, you can easily tweak this salad. - Cheese Alternatives: For a lactose-free option, try using a vegan feta or omit cheese entirely. - Nut-Free Version: Replace walnuts with seeds like pumpkin or sunflower seeds for crunch without nuts. - Low-Carb Option: Use leafy greens like kale or romaine instead of mixed greens. Seasonal swaps keep your salad fresh and exciting all year long. - Winter Swap: In colder months, use roasted Brussels sprouts instead of raw greens. - Spring Swap: Add fresh peas or asparagus for a pop of color and taste. - Fall Swap: Incorporate roasted butternut squash for a sweet, hearty touch. Elevate your Honeycrisp apple and feta salad with fun toppings. - Fruit Additions: Try adding slices of pear or pomegranate seeds for extra flavor. - Herbs: Fresh herbs like basil or mint can bring a new layer of taste. - Croutons: Add homemade croutons for more texture and crunch. These variations give you many ways to enjoy this salad. You can find the full recipe in the earlier section. To keep your Honeycrisp apple and feta salad fresh, store it in the fridge. Use an airtight container to seal in the flavors. This method keeps the salad crisp for up to two days. If you notice any browning on the apple slices, a squeeze of lemon juice can help. Store ingredients separately for best results. Keep the apples in a cool, dry place. For the feta, wrap it in plastic or place it in a sealed container. Mixed greens should stay in their original packaging or in a breathable bag. This way, you can enjoy each component at its best. If you have leftovers, try to eat them within two days. Toss the salad gently to mix flavors, but avoid bruising the apples. If you notice the greens wilting, you can refresh them with a splash of cold water. For a quick snack, try adding leftover salad to a wrap or sandwich. For the full recipe, check out the detailed instructions above! Honeycrisp apples stand out for their sweet and tart flavor. They have a unique crunch that is pleasing to the bite. This crispness comes from their large cells filled with juice. These apples also have a balance of sweetness and acidity. This makes them perfect for salads, like the Honeycrisp Apple and Feta Salad. Their bright color adds a nice touch to your dish. You will enjoy their refreshing taste in every bite. Yes, you can use other cheeses if you want. If you prefer a milder taste, try goat cheese. It adds creaminess without overpowering the apples. For a sharper flavor, use blue cheese. This will give your salad a bold kick. You can also use a dairy-free cheese for a vegan option. Just make sure to choose one that melts well. Each cheese will change the salad's flavor, so feel free to experiment. To make this salad vegan, swap the feta cheese for a dairy-free cheese. You can also use avocado for creaminess. Instead of honey, use maple syrup or agave for sweetness. These swaps keep your salad plant-based while maintaining great taste. Fresh herbs like basil or mint can add a nice touch too. The key is to keep the balance of flavors while ensuring everything is vegan-friendly. This blog post covered how to create an amazing salad. We talked about the right ingredients, with measurement tips for accuracy. You learned step-by-step instructions on making the dressing and preparing the salad. We also explored tips for the best results and common mistakes to avoid. Don’t forget about variations for dietary needs and keeping your salad fresh. Now, you have everything you need to make a tasty salad. Enjoy creating your own delicious dishes!

Are you ready to elevate your salad game? This Honeycrisp Apple and Feta Salad is fresh, flavorful, and perfect for any occasion. With the crisp sweetness of Honeycrisp apples and …

Read more

Categories Salads

Air Fryer Buffalo Cauliflower Flavorful and Crispy Snack

May 29, 2025 by Chef Remy
To make Air Fryer Buffalo Cauliflower, you need these basic ingredients: - 1 medium head of cauliflower - 1 cup all-purpose flour - 1 teaspoon garlic powder - 1 teaspoon onion powder - ½ teaspoon paprika - ½ teaspoon salt - ½ teaspoon black pepper - 1 cup cold water or plant-based milk - ½ cup buffalo sauce - 1 tablespoon olive oil - Optional garnishes: parsley, ranch or blue cheese dressing Each ingredient plays a key role. The cauliflower gives a great base. The flour helps create a crispy coating. Garlic and onion powder add flavor. Paprika gives it a warm hue. Salt and pepper enhance the taste. Cold water or plant-based milk helps mix the batter smoothly. Buffalo sauce brings the heat and tang. Olive oil gives that nice golden finish. Optional garnishes can add a fresh touch to your dish. For the full recipe, check out the details above. This snack is not just tasty; it’s also fun to make! - Rinse and cut cauliflower into florets. - Set florets aside in a large bowl. First, rinse the cauliflower under cold water. This step helps remove dirt and bacteria. Cut the cauliflower into bite-sized florets. Make sure they are similar in size. This ensures even cooking. Once cut, place the florets in a large bowl. - Mix dry ingredients in a bowl. - Add liquid to achieve desired consistency. In another bowl, mix the all-purpose flour, garlic powder, onion powder, paprika, salt, and black pepper. Stir until well combined. Now, pour in the cold water or plant-based milk. Mix until you get a smooth batter. It should be thick enough to coat the florets but not too thick. - Dip florets into batter. - Ensure even coating and remove excess. Take each floret and dip it into the batter. Make sure it's fully coated. Let any extra batter drip off. This helps the cauliflower get crispy when cooked. Place the coated florets on a plate. - Set temperature to 400°F (200°C). - Preheat for 5 minutes. Now, it's time to preheat your air fryer. Set the temperature to 400°F (200°C). Preheating takes about 5 minutes. This step is key for getting that nice, crispy texture. - Arrange cauliflower in air fryer basket. - Air fry for 10-12 minutes, shaking halfway. Next, arrange the florets in a single layer in the air fryer basket. Make sure they have space to cook evenly. You can lightly spray or drizzle them with olive oil. Air fry for 10-12 minutes. Shake the basket halfway through. This ensures the cauliflower cooks and crisps well on all sides. - Toss cauliflower with buffalo sauce. - Air fry for an additional 3-5 minutes. Once the cauliflower is golden brown, transfer it to a mixing bowl. Drizzle the buffalo sauce over the hot florets. Toss gently until all pieces are coated. Return the cauliflower to the air fryer. Air fry for another 3-5 minutes. This step helps the sauce set and adds a nice crisp. For the full recipe, check out the earlier section. Enjoy your delicious Air Fryer Buffalo Cauliflower! To get your buffalo cauliflower super crispy, preheating is key. Set your air fryer to 400°F (200°C) and let it warm up for about 5 minutes. This step helps the batter crisp up right away. Next, using olive oil can make a big difference. Lightly spray or drizzle the oil over the florets before cooking. This adds a nice crunch and golden color. Want to kick up the flavor? Try adding spices like cayenne pepper or smoked paprika. These give the cauliflower a unique twist. If you prefer more heat, increase the buffalo sauce. You can also reduce it if you want a milder taste. Just adjust to fit your spice level preference. Pairing is important, so think about dipping sauces. Ranch or blue cheese dressings work well to cool off the heat. You can even serve the cauliflower with a side of celery sticks for a nice crunch. For a pretty presentation, garnish with freshly chopped parsley. This adds color and makes the dish feel special. For the full recipe, check out the details to create this tasty snack! {{image_4}} You can change the flavor of your Air Fryer Buffalo Cauliflower by trying new sauces. Here are some ideas: - Alternative spicy sauces: You can use sriracha, harissa, or chipotle sauce for a unique kick. - Vegan sauce options: Look for plant-based hot sauces or mix hot sauce with maple syrup for a sweet twist. If you want to mix things up, consider using different vegetables. Some good choices include: - Other vegetables to use: Try broccoli, Brussels sprouts, or even zucchini for a fun twist. - Incorporating protein with cauliflower: Add chickpeas or tofu to your batter for extra protein and texture. Switching up your breading can add new flavors and textures. Here are two great options: - Gluten-free batter options: Use almond flour or chickpea flour for a gluten-free version. - Breading with crushed nuts or seeds: Coat your cauliflower in crushed walnuts or sunflower seeds for a crunchy topping. Experimenting with these variations can make your Air Fryer Buffalo Cauliflower even more exciting. For the full recipe and step-by-step guide, check out the [Full Recipe]. To keep buffalo cauliflower fresh, store it in an airtight container. Place it in the fridge right after it cools. This way, it stays crispy longer. You can keep it stored for about 3 to 5 days. If you plan to eat it later, be sure to seal it well. This prevents moisture from making it soggy. When reheating, I suggest using an air fryer or an oven. This method helps maintain its crispy texture. Set the air fryer to 350°F (175°C) and heat for 5-7 minutes. If using an oven, place it on a baking sheet and reheat at 350°F (175°C) for about 10 minutes. This also keeps it nice and crunchy. Avoid using the microwave as it can make the cauliflower soft. Yes, you can freeze buffalo cauliflower! To freeze it, let it cool completely first. Then, place the florets in a single layer on a baking sheet. Freeze for 1-2 hours until solid. After that, transfer them to a freezer bag. You can store it for up to 3 months. To cook from frozen, just air fry them at 400°F (200°C) for around 12-15 minutes. This will help them regain their crispiness. Enjoy your tasty snack later with no fuss! To add more heat, increase the buffalo sauce. You can also add cayenne pepper to the batter. If you enjoy garlic, try adding more garlic powder. Mixing in a bit of hot sauce before coating can also give it a nice kick. Yes! Instead of flour, you can use cornstarch or almond flour. Both will help the batter stick and create a crispy texture. Another option is to use ground oats. Just blend them until fine, and they will work well too. Absolutely! To make it vegan, use plant-based milk instead of regular milk. Replace the all-purpose flour with a gluten-free blend. Make sure your buffalo sauce is vegan-friendly. Many brands offer great options without animal products. Ranch and blue cheese dressings are classic choices. If you want something different, try a creamy avocado dip or a spicy yogurt sauce. These options balance the heat of the cauliflower nicely. Cook the cauliflower for 10-12 minutes initially, then check for doneness. If you can easily pierce a floret with a fork, it's ready. If not, air fry for 2-3 more minutes. You want it tender but still firm enough to hold its shape. This blog post shows you how to make tasty Air Fryer Buffalo Cauliflower. We covered ingredients, step-by-step instructions, tips, variations, storage info, and FAQs. The process is simple and gives you a great snack or meal option. Try customizing the spices or sauces to match your taste. Enjoy experimenting with this fun dish! Cooking can be easy and enjoyable, so dive in and taste the results!

Looking for a snack that’s both tasty and healthy? My Air Fryer Buffalo Cauliflower recipe is your answer! This flavorful dish gives you that spicy kick you crave while keeping …

Read more

Categories Appetizers

Fruit Salsa with Cinnamon Sugar Chips Delightful Treat

May 29, 2025 by Chef Remy
- 1 cup strawberries, hulled and diced - 1 cup fresh pineapple, diced - 1 medium kiwi, peeled and diced - 1 ripe mango, diced - 1 small red onion, finely chopped - 1 jalapeño, seeded and minced (optional) - 2 tablespoons fresh lime juice - 1 tablespoon honey or agave syrup - 1/4 cup fresh mint leaves, chopped - 4 flour tortillas - 2 tablespoons melted butter - 3 tablespoons granulated sugar - 1 teaspoon ground cinnamon To make this fruit salsa with cinnamon sugar chips, you start with fresh, ripe fruit. I love using strawberries, pineapple, kiwi, and mango. They add color and flavor. The red onion gives a nice crunch, while the jalapeño adds a kick, but you can skip it if you want less heat. For the dressing, lime juice brightens the flavors. Honey or agave syrup adds sweetness. Mint leaves bring a refreshing note. Mix these into your fruit bowl for a zesty twist. Don't forget about the chips! You'll need flour tortillas, melted butter, sugar, and cinnamon. These turn into delicious cinnamon sugar chips. They add a sweet crunch that pairs well with the salsa. If you want the full recipe, check out the details above. Enjoy making this delightful treat! First, grab a large mixing bowl. Then, combine diced strawberries, pineapple, kiwi, mango, red onion, and jalapeño if you want some heat. Next, drizzle in fresh lime juice and honey or agave syrup. This adds great flavor! Now, gently fold in chopped mint leaves. Make sure everything gets coated well. Let the salsa sit for about 10 minutes. This allows the flavors to blend perfectly. Preheat your oven to 350°F (175°C). Take your flour tortillas and brush one side with melted butter. This will make them taste great! In a small bowl, mix granulated sugar and ground cinnamon. Sprinkle this mixture over the buttered side of each tortilla. Cut the tortillas into triangles or strips. Arrange them in a single layer on a parchment-lined baking sheet. Bake these in the oven for about 10-12 minutes. Keep an eye on them so they don’t burn. Once your chips are baked, let them cool for a minute on the baking sheet. Serve the colorful fruit salsa in a bowl next to the crunchy cinnamon sugar chips. It’s perfect for dipping! For a fun presentation, put the salsa in a decorative bowl and add extra mint leaves. Arrange the chips around the salsa in a fan shape. This makes an eye-catching centerpiece for your table. Enjoy this delightful treat with friends and family! Check out the Full Recipe for more details. To make the best fruit salsa, start by choosing ripe fruits. Ripe fruits have more flavor and juice. Look for strawberries that are bright red and firm. Pineapples should smell sweet and feel slightly soft. Kiwi and mango should yield to gentle pressure. Adjust the sweetness to your taste. Some may want more honey, while others prefer less. The lime juice adds a nice tang, balancing the sweetness. Always taste as you mix. For the cinnamon sugar chips, try different tortillas. Whole wheat tortillas add a nutty flavor. You can also use corn tortillas for a gluten-free option. Experiment with spices to jazz up the chips. Nutmeg adds warmth and a hint of spice, while ginger can bring a fresh kick. Get creative with what you have on hand! For a full recipe, check out the Fruit Fiesta Salsa. {{image_4}} Using seasonal fruits makes this salsa fresh and bright. For summer, try peaches or berries. In fall, apples and pears can add great flavor. Mixing fruits gives you more taste and color. You can also add zesty citrus like oranges or grapefruits. These fruits bring a nice tang and balance the sweetness. If you want to change the sweet taste, you can use different sweeteners. Instead of honey, try maple syrup. This adds a rich flavor. Stevia is a great choice if you want to lower calories. Each sweetener gives the salsa a unique taste, so feel free to experiment! Want to control the spice? Adjust the jalapeño to fit your taste. Use less for a milder salsa. If you like it hot, add more jalapeño or leave some seeds in. This gives you the freedom to make it just right for you and your guests. To keep your fruit salsa fresh, store it in an airtight container in the refrigerator. This helps lock in the flavors and keeps the fruits crisp. For the best taste, consume the salsa within 1-2 days. The longer it sits, the more the flavors change, and it may lose its bright appeal. For your cinnamon sugar chips, store them in a cool, dry place. An airtight container is key to keeping them crunchy. If stored properly, you can enjoy these tasty chips within a week. After that, they might become soft and lose their delightful crunch. Yes, you can prepare it a few hours in advance, but add mint just before serving. This keeps the mint fresh and vibrant. It also helps the flavors blend nicely. If you let it sit, the fruits will soak in the lime juice. This makes the salsa even tastier! To make the chips crispy, ensure they're baked at the right temperature. Preheat your oven to 350°F (175°C). Watch them closely as they bake to avoid burning. If you take them out at the right time, they will be golden and crunchy. This gives you that perfect chip for dipping! Absolutely! Feel free to alter fruits, spices, or sweeteners based on your preferences. You can swap strawberries for blueberries or mango for peach. You can even change up the spices on the chips. Try adding some nutmeg or using whole wheat tortillas. This makes your fruit salsa with cinnamon sugar chips truly yours! This blog post shared a fresh and tasty fruit salsa recipe. We explored fresh fruits, a simple dressing, and easy cinnamon sugar chips. You learned how to mix flavors and add your favorite ingredients. This dish is fun to make and share. Don't hesitate to remix the recipe with seasonal fruits or preferred sweeteners. Enjoy creating and tasting this delicious treat at your next gathering! It's all about enjoying good food and great company.

Looking for a fun snack that’s both fresh and sweet? Fruit Salsa with Cinnamon Sugar Chips is your answer! This tasty treat brings together vibrant, juicy fruits and crispy, sweet …

Read more

Categories Appetizers

Thai Chicken Salad Flavorful and Fresh Delight

May 29, 2025 by Chef Remy
- 2 boneless, skinless chicken breasts - 2 cups mixed greens (a blend of lettuce, spinach, and arugula) - 1 ripe mango, thinly sliced - 1 bell pepper, thinly sliced (choose red or yellow for vibrancy) - 1 medium carrot, julienned - 1/4 cup fresh cilantro, finely chopped - 1/4 cup peanuts or cashews, roughly chopped (for a crunchy topping) - 1 tablespoon fresh ginger, grated (adds zest) - 2 tablespoons fresh lime juice (for brightness) - 2 tablespoons fish sauce (for depth of flavor) - 1 tablespoon honey or maple syrup (for sweetness) - 1 tablespoon sesame oil (for nuttiness) - Additional cilantro - Sliced mango The main ingredients give this salad its fresh and vibrant taste. The chicken adds protein, while the mixed greens create a crisp base. Sliced mango brings sweetness, and colorful bell peppers and carrots add crunch and texture. Nuts like peanuts or cashews provide a delightful finish. The dressing is key to balancing flavors. Fresh ginger gives it a spicy kick. Lime juice brightens the salad, while fish sauce adds umami. Honey or maple syrup balances the spice, and sesame oil brings a rich, nutty flavor. Optional garnishes like more cilantro or extra mango slices will elevate the dish. You can find the full recipe [here]. To start, season the chicken breasts well with salt and pepper. This simple step boosts flavor. Cook them on a grill or in a pan over medium heat. Aim for about 6-7 minutes on each side. You want them fully cooked and golden brown. When done, let the chicken rest for about 5 minutes. This resting time helps keep it juicy. Now, slice the chicken into thin strips. While the chicken cooks, let’s prepare the dressing. In a small bowl, mix the grated ginger, lime juice, fish sauce, honey (or maple syrup), and sesame oil. Use a whisk to blend everything together. You want the dressing smooth and well mixed. The flavors should balance sweet and tangy. In a large salad bowl, combine the mixed greens, thinly sliced mango, bell pepper, julienned carrot, and chopped cilantro. Gently toss these ingredients. This helps mix them without bruising the greens. After slicing the chicken, add it to the salad bowl. Drizzle the dressing over the top. Toss everything together to coat the ingredients evenly. For a fun crunch, sprinkle the chopped peanuts or cashews on top. Taste the salad and adjust with salt or pepper if needed. Enjoy this fresh delight! For a detailed recipe, see Full Recipe. To cook chicken perfectly, I like to grill it. Start by seasoning the chicken with salt and pepper. Place it on a hot grill. Aim for about 6-7 minutes on each side. You want nice grill marks and a golden color. If you don’t have a grill, you can bake or poach the chicken. For baking, set your oven to 375°F and cook for 20-25 minutes. If poaching, simmer the chicken in water until it reaches 165°F. To save time, prepare your salad ingredients ahead of time. You can chop the veggies and store them in the fridge. Keep the chicken cooked and sliced, too. For the dressing, mix it but store it separately. This keeps the salad fresh until you are ready to serve. Presentation makes a big difference. Serve the salad in individual bowls or on a large platter. Add a few slices of fresh mango on top for color. Garnish with extra cilantro for a bright touch. This salad pairs wonderfully with rice or spring rolls. The crunch from the nuts and the freshness of the greens make it a delight. For the full recipe, check out the complete details! {{image_4}} You can switch up the protein in this Thai chicken salad. Try using shrimp for a seafood twist. Shrimp cooks quickly, so it’s a great choice. Just sauté them until pink and tender. If you prefer a plant-based option, tofu works well too. Use firm tofu, and sauté it until golden. Both options add a new flavor without losing the salad's charm. Want to spice things up? Add chili flakes to your dressing. Just a little can give your salad a nice kick. If you want a different taste, swap the fish sauce for soy sauce. This will change the flavor but still keep it tasty. You can also replace honey with agave syrup for a vegan-friendly option. Adjust your salad with seasonal fruits. In summer, ripe tomatoes can add a fresh burst. In the fall, try avocado for creaminess. You can also play with different greens. Kale or arugula can give a new texture. Mixing greens creates a fun look and keeps things interesting. Each season brings new flavors to explore. For a complete guide to making this delicious salad, check out the Full Recipe. To keep your Thai chicken salad fresh, store it right. Use airtight containers. This prevents air from getting in and helps keep the flavors intact. You can separate the salad and dressing. This way, the greens stay crisp longer. When ready to eat, just mix the dressing back in. Can you freeze the salad? It's not the best idea. The greens will lose their crunch. However, you can freeze individual parts. Cooked chicken and dressing freeze well. Place them in freezer bags, and remove all the air. This keeps flavors bright and fresh. How long does the salad stay fresh? When stored in the fridge, it lasts about 3 days. After that, it may spoil. Look for signs of spoilage. If the greens are slimy or smell off, toss it out. Always trust your senses when it comes to food safety. For a detailed recipe, check the Full Recipe for Thai Mango Ginger Chicken Salad. The key flavors in Thai Chicken Salad come from the dressing and fresh herbs. The dressing combines lime juice, fish sauce, and honey. This mix gives a bright, tangy, and sweet taste. Fresh ginger adds a warm kick. Using herbs like cilantro makes the salad fresh and aromatic. Each bite bursts with flavor, thanks to these simple yet bold ingredients. Yes, you can easily make this salad vegan! For the chicken, try using grilled tofu or tempeh. These options provide great texture and protein. For the dressing, swap fish sauce with soy sauce or tamari. Use maple syrup instead of honey for sweetness. These changes keep the salad tasty and satisfying without any animal products. Pairing side dishes enhances your meal. You can serve Thai Chicken Salad with jasmine rice for a filling option. Spring rolls or fresh vegetable rolls complement the salad well too. For a light option, try a bowl of coconut soup. These sides add variety and make your meal complete. This blog post guides you through making a delicious Thai Chicken Salad. We covered key ingredients, from chicken and mixed greens to a flavorful dressing. I shared tips for cooking the chicken, assembling the salad, and ways to store leftovers. You can customize the salad with proteins or seasonal fruits, making it a versatile choice. Enjoy this vibrant dish, and let your creativity shine with each new variation!

If you’re craving a burst of flavor, you must try Thai Chicken Salad. It’s fresh, colorful, and packed with tasty ingredients like mango and crunchy nuts. I’ll guide you through …

Read more

Categories Salads

Homemade Chicken Pot Pie Casserole Simple and Tasty

November 13, 2025May 29, 2025 by Chef Remy
For a great chicken pot pie casserole, use these key ingredients: - 2 cups cooked chicken, shredded - 1 cup carrots, diced (fresh or frozen) - 1 cup peas (fresh or frozen) - 1 cup corn kernels (fresh or frozen) - 1 cup celery, diced - 1 medium onion, finely chopped - 4 cups chicken broth (homemade or low-sodium) - 1 cup heavy cream These ingredients bring together the classic flavors of comfort food. The chicken offers protein, while the vegetables provide texture and color. Chicken broth and heavy cream create a rich and creamy base. To enhance the flavor, use these seasonings: - 1 teaspoon garlic powder - 1 teaspoon onion powder - 1 teaspoon dried thyme - 1 teaspoon salt - ½ teaspoon black pepper These spices give depth to the dish. Garlic and onion powder add savory notes, while thyme brings a hint of earthiness. Salt and pepper balance the flavors. You also need ¼ cup all-purpose flour. This helps thicken the sauce. It creates a nice, creamy texture that holds everything together. For the topping, you can choose between store-bought or homemade biscuits. Store-bought biscuits save time, while homemade ones can add a personal touch. You might also try different biscuit types, like cheddar or herb varieties. These options can elevate the casserole, giving it a unique twist. Whichever choice you make, the biscuit topping will turn golden and flaky as it bakes, creating a beautiful contrast to the creamy filling below. {{ingredient_image_2}} 1. Preheat the oven: Start by setting your oven to 400°F (200°C). This helps the casserole cook evenly. 2. Sauté the vegetables: In a large pot, melt 2 tablespoons of unsalted butter over medium heat. Add 1 medium onion, finely chopped, along with 1 cup of diced celery and 1 cup of diced carrots. Sauté these for about 5-7 minutes. You want the onions to turn soft and clear. 1. Add peas and corn: Stir in 1 cup of peas and 1 cup of corn. Cook this mix for about 2 minutes. You just want to warm them through. 2. Thicken the sauce: Sprinkle ¼ cup of all-purpose flour over the veggies. Stir well for 1-2 minutes to cook out the raw flour taste. This makes your filling nice and thick. 1. Combine chicken with sauce: Slowly pour in 4 cups of chicken broth while you stir to avoid lumps. Bring this to a gentle simmer. Next, add 1 cup of heavy cream and season with 1 teaspoon of garlic powder, 1 teaspoon of onion powder, 1 teaspoon of dried thyme, 1 teaspoon of salt, and ½ teaspoon of black pepper. Stir until thickened, about 5 minutes. Gently fold in 2 cups of shredded cooked chicken. 2. Transfer to casserole dish: Carefully pour this creamy mix into a greased 9x13 inch casserole dish. Spread it out evenly. 3. Add biscuit topping and bake: Tear 2 cups of biscuits into quarters and scatter them on top of the filling. Bake the casserole for 25-30 minutes until the biscuits are golden brown and the filling is bubbling hot. To sauté vegetables well, start with a hot pan. Melt butter until it bubbles. Add onions, celery, and carrots. Cook for 5-7 minutes. Stir often until the onions turn clear and soft. This helps bring out the sweet taste of the veggies. To thicken your filling, sprinkle flour over the cooked vegetables. Stir for 1-2 minutes to get rid of the raw flour taste. Then, add chicken broth slowly while stirring. This keeps lumps from forming. Let it simmer until thick. You can boost flavors with herbs and spices. Dried thyme adds a lovely earthy taste. Garlic and onion powders also bring depth. Feel free to add fresh herbs like parsley or rosemary for more flavor. For a heartier dish, toss in extra veggies like mushrooms or potatoes. You can also add a splash of white wine for a richer taste. This adds complexity and warmth to your casserole. Serve your casserole straight from the dish for a cozy feel. For a pop of color, sprinkle fresh parsley on top. It makes the dish look bright and inviting. Pair it with a crisp side salad to balance the richness of the casserole. Enjoy the mix of flavors and textures! Pro Tips Use Rotisserie Chicken: For added convenience and flavor, consider using store-bought rotisserie chicken. It saves time and enhances the dish's taste. Customize Your Veggies: Feel free to swap in your favorite vegetables, like green beans or mushrooms, to tailor the casserole to your taste. Make-Ahead Option: Prepare the filling in advance and store it in the fridge. Just add the biscuit topping and bake when you're ready to serve. Check Biscuit Doneness: If the biscuits are browning too quickly, cover the casserole loosely with foil to prevent burning while ensuring the filling cooks through. {{image_4}} You can make this chicken pot pie casserole even better with some easy swaps. To cut down on fat, try using low-fat cream instead of heavy cream. This change keeps the dish creamy but makes it lighter. If you need a gluten-free option, look for gluten-free biscuits at the store. They work just as well on top of the casserole. You can also make homemade gluten-free biscuits using almond flour or coconut flour. Using rotisserie chicken is a great shortcut. It saves time and adds flavor to your dish. Just shred the chicken and mix it in with the veggies. For a vegetarian twist, leave out the chicken and add more veggies. You can use mushrooms, lentils, or chickpeas. These options add protein and keep the dish hearty. Want to spice things up? Add herbs like rosemary or basil for a fresh taste. You can also use different vegetables, such as bell peppers or green beans. If you like heat, toss in some jalapeños or a few drops of hot sauce. This adds a kick to the creamy filling and makes each bite exciting. Store any leftover chicken pot pie casserole in an airtight container. Make sure it cools down to room temperature first. This helps keep the flavors fresh and prevents sogginess. Glass or plastic containers work great for this. They seal tightly and make reheating easy. To freeze the casserole, let it cool completely. Then, wrap it tightly in plastic wrap and foil. This prevents freezer burn. You can also use a freezer-safe container. When you want to eat it, thaw it in the fridge overnight. Reheat it in the oven at 350°F until hot. Cover it with foil to avoid burning the biscuits. In the fridge, the casserole lasts about 3 to 4 days. If you freeze it, it can last up to 3 months. Always check for signs of spoilage. If it smells off or has mold, it's best to throw it away. Make sure to keep track of how long it’s been stored to enjoy it at its best! Can I make this dish ahead of time? Yes, you can make this casserole ahead of time. Prepare the filling and layer it in the casserole dish. Cover it tightly and store it in the fridge. When you are ready to bake, just add the biscuit topping and bake it. It makes meal prep easy! How can I make it dairy-free? To make this dish dairy-free, swap the heavy cream for coconut milk or a dairy-free cream. Use dairy-free biscuits as your topping. This way, you keep all the tasty flavors without the dairy. What if my filling isn’t thickening? If your filling isn’t thickening, simmer it longer. This allows the flour to cook and thicken the sauce. If needed, you can mix a bit more flour with water to create a slurry. Stir this in slowly until you reach the right thickness. How to avoid soggy biscuit topping? To avoid a soggy biscuit topping, don’t add the biscuits until just before baking. Make sure your filling is hot when you add the biscuits. This helps them cook evenly and stay fluffy on top. What sides pair well with chicken pot pie casserole? Serve this casserole with a fresh side salad or steamed veggies. A light coleslaw also works well. These sides add crunch and balance to the warm, creamy casserole. Can I use leftover turkey? Absolutely! Leftover turkey is a great substitute for chicken. Just shred it up and mix it with your filling. It’s a perfect way to use up holiday leftovers while still enjoying a comforting meal. This blog post covers everything you need to create a delicious chicken pot pie casserole. We discussed key ingredients, cooking steps, and helpful tips to enhance flavor. You learned how to store leftovers and even discovered variations to suit your tastes. In conclusion, with the right ingredients and techniques, you can make this comforting dish your own. Whether it's for a family dinner or meal prep, enjoy this delicious creation that warms hearts and bellies alike.

If you’re craving a warm, comforting dish, let me introduce you to my Homemade Chicken Pot Pie Casserole. This simple, tasty recipe combines juicy chicken, vibrant veggies, and a creamy …

Read more

Categories Dinner
Older posts
Newer posts
← Previous Page1 … Page107 Page108 Page109 … Page130 Next →

ROASTED RECIPES

Where bold flavors meet everyday meals. Warm, vibrant, and made to share. 🔥🥗🍴

PAGES

Home About Contact Privacy Policy Terms & Conditions Cookie Policy GDPR Policy Copyright Policy Disclaimer

CATEGORIES

Appetizers Desserts Salads Breakfast Dinner

Contact

  • Pinterest
  • Mail
Copyright © 2025 Roasted Flavors. All rights reserved.