Skip to content
Roasted Flavors
  • Home
  • Appetizers
  • Desserts
  • Salads
  • Breakfast
  • Dinner
  • Privacy Policy
  • Contact
  • About

Chef Remy

BLT Chicken Salad Fresh and Flavorful Meal Option

May 29, 2025 by Chef Remy
- 2 cups cooked chicken, shredded or diced - 4 strips of crispy turkey bacon, chopped - 1 large ripe tomato, diced - 1 ripe avocado, diced - 1/4 cup red onion, finely chopped - 1 cup fresh romaine lettuce, chopped - 1/4 cup creamy mayonnaise - 2 tablespoons tangy Greek yogurt - 1 tablespoon smooth Dijon mustard - 1 tablespoon freshly squeezed lemon juice - Salt and black pepper, to taste - Fresh parsley, finely chopped (for garnish) The BLT Chicken Salad uses fresh and simple ingredients. You can switch up the proteins or veggies as you like. For the dressing, I blend creamy mayonnaise with Greek yogurt. This mix gives a rich taste while adding some tang. I love using ripe avocados for creaminess. They add healthy fats and flavor. The crispy turkey bacon adds crunch and a savory touch. You can use any cooked chicken, but I prefer grilled for its smoky taste. When you chop the fresh romaine lettuce, keep it crisp. This salad feels light but filling. The diced tomato adds sweetness and juiciness to the mix. You can find the full list of ingredients in the Full Recipe section. Don't forget the final touch of fresh parsley. It brightens the salad and adds a nice pop of color. - Combine mayonnaise, Greek yogurt, Dijon mustard, lemon juice, salt, and pepper. - Whisk until smooth and well-combined. Making the dressing is fun and easy. I love using creamy mayonnaise with tangy Greek yogurt. The Dijon mustard adds a nice kick. Squeeze fresh lemon juice for brightness. Season with salt and pepper to taste. Whisk it all together until you get a smooth, creamy texture. - Add cooked chicken, turkey bacon, tomato, avocado, and red onion to the dressing. - Gently fold until combined. Now, it's time to mix the salad. Take your shredded chicken and crispy turkey bacon. Toss them into the bowl with the dressing. Next, add the diced tomato, creamy avocado, and finely chopped red onion. Gently fold everything together. You want each piece to be coated without mashing the avocado. - Incorporate romaine lettuce carefully. - Adjust seasoning if necessary. - Serve immediately or chill for enhanced flavors. For the final touch, add the fresh romaine lettuce. Fold it in carefully to keep it crisp. Take a moment to taste your salad. Adjust the seasoning with more salt and pepper if needed. You can serve it right away for a fresh meal. If you chill it for about 30 minutes, the flavors will blend nicely. Enjoy this simple yet delightful dish! For the full recipe, check the full recipe section. - Try different types of mustard for a unique taste. - Add garlic for extra zing that wakes up your salad. - Chopped herbs like basil or cilantro bring freshness to each bite. - Use decorative bowls or individual cups to serve. - Garnish with fresh parsley for a pop of color and taste. - Pair your salad with whole-grain crackers for a crunch. - Serve with crusty bread for a satisfying light lunch. - This salad is also great for picnics or casual gatherings. For the full experience, check out the Full Recipe to create this delightful dish! {{image_4}} You can switch up the main protein to keep things fresh. - Use grilled shrimp or diced ham instead of chicken. - Try swapping turkey bacon with vegetarian bacon for a meat-free version. These changes can bring new flavors and textures to your salad. If you like seafood, shrimp adds a nice touch. Diced ham works well for a heartier option. And if you want a plant-based meal, vegetarian bacon gives that smoky flavor without meat. Boost the crunch factor in your salad by adding more veggies. - Incorporate diced cucumber, bell peppers, or radishes for extra crunch. - Add corn or black beans for a Southwestern twist. These additions not only add crunch but also bright colors. Diced cucumber is refreshing, while bell peppers add sweetness. Radishes give a spicy bite, and corn or black beans can enhance the flavor profile in a fun way. You can easily adapt this recipe to fit different diets. - Substitute mayonnaise with a vegan alternative for a plant-based version. - Incorporate gluten-free ingredients if needed. Using a vegan mayo keeps the salad creamy without eggs. If you're looking for gluten-free options, make sure to check labels on all ingredients. This way, everyone can enjoy the BLT Chicken Salad, no matter their diet. For the full recipe, check the earlier section! Store leftovers in an airtight container in the refrigerator. This keeps your salad fresh. If you want to save it longer, keep the dressing separate. This helps to prevent sogginess. The salad tastes best within 2-3 days. After that, it may lose flavor and crunch. Avoid freezing your salad. Freezing can change the texture, making it less enjoyable. If you need to serve it again, let the salad sit at room temperature for a bit. This helps bring back some of its original flavor and texture. Enjoy your meal as fresh as possible! You can make this salad healthier by swapping mayonnaise with Greek yogurt. This change lowers fat and adds protein. You could also try a lighter dressing. Look for options that have fewer calories and more flavor. Yes, you can make this salad ahead of time. However, keep the lettuce separate until just before serving. This way, it stays crisp and fresh. Mix everything else together and chill it for later. This salad pairs well with several sides. You can serve it with a fresh fruit salad. Crispy chips or crusty bread also make great options. These sides add variety and make the meal more filling. Absolutely! You can replace the chicken with chickpeas or tofu. For the bacon, use a vegetarian alternative. This way, you keep the flavors while making it meat-free. Enjoy the same great taste without the meat! For the full recipe, check out the BLT Chicken Salad Delight section above. This blog post covers a tasty BLT Chicken Salad. We explored the main ingredients, dressing, and step-by-step instructions. You learned tips to enhance flavors and ways to serve your meal. We also discussed helpful variations and storage advice. In conclusion, this salad is versatile and easy. Feel free to customize it to fit your tastes. Enjoy a fresh, light dish that pleases everyone. You can make it your own and serve it anytime!

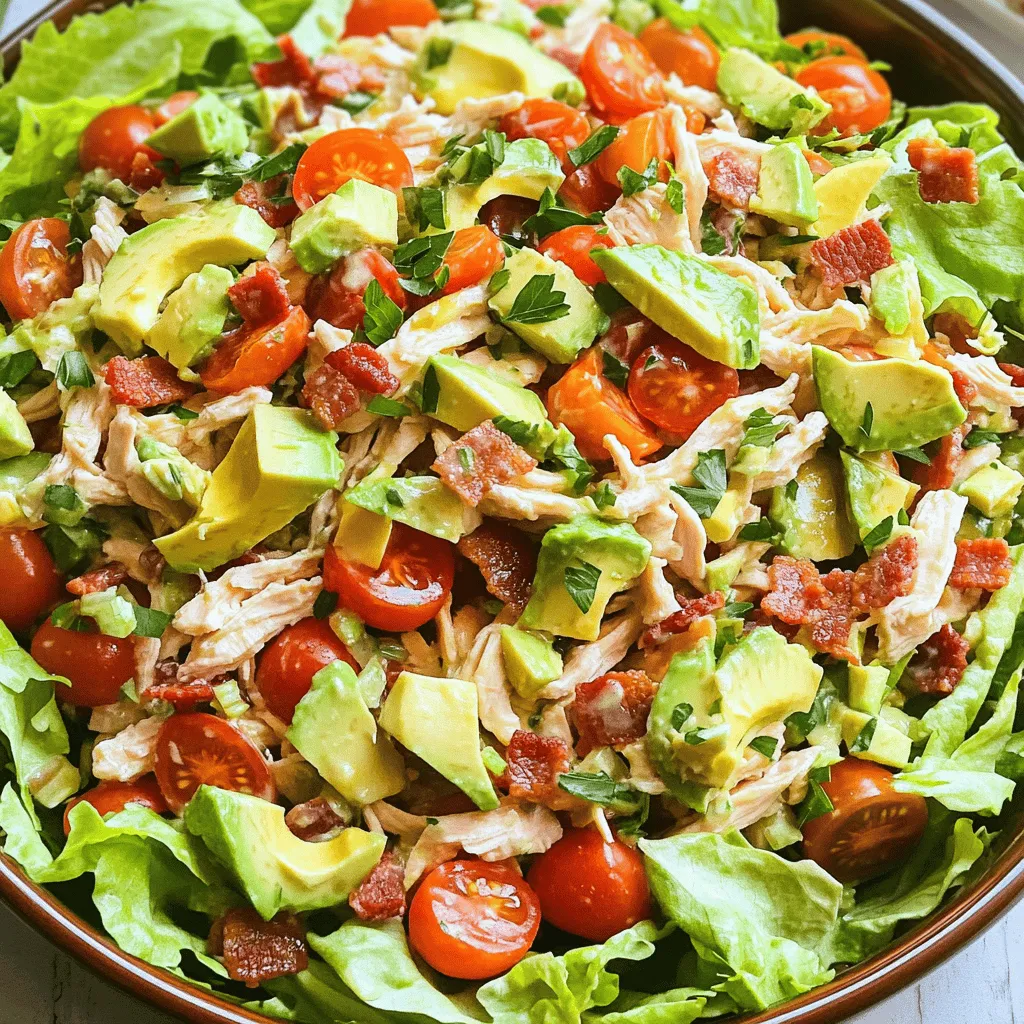
Looking for a fresh and flavorful meal option? Try this BLT Chicken Salad! It combines juicy chicken, crispy turkey bacon, and ripe tomatoes for a taste that will excite your …

Read more

Categories Salads

Banana Split Dump Cake Rich and Easy Dessert Recipe

May 29, 2025 by Chef Remy
To make a delicious Banana Split Dump Cake, you need these simple ingredients: - 3 ripe bananas, sliced - 1 cup crushed pineapple, drained - 1 cup fresh strawberries, hulled and sliced - ½ cup walnuts, coarsely chopped - 1 box yellow cake mix (approximately 15.25 ounces) - ½ cup unsalted butter, melted and slightly cooled - 1 cup chocolate syrup (for drizzling) - 1 cup whipped cream (for topping) - Maraschino cherries (for garnish) These ingredients create a sweet treat that everyone will love. The bananas add a soft texture while the strawberries and pineapple give a fruity taste. Walnuts add a nice crunch to each bite. Using a box of yellow cake mix makes this recipe quick and easy. Don't forget the melted butter; it helps create a lovely topping. The chocolate syrup and whipped cream serve as the perfect finishing touches. For the ultimate look, add a maraschino cherry on top. This recipe is fun to make and share. Check out the Full Recipe for more details on how to bring this dish to life! - Step 1: Preheat your oven to 350°F (175°C). This is key for even baking. - Step 2: Lightly grease a 9x13 inch baking dish. This helps the cake not stick. - Step 3: Layer the sliced bananas evenly across the bottom. This forms a sweet base. - Step 4: Add crushed pineapple on top of the bananas. Spread it out gently. - Step 5: Layer the sliced strawberries over the pineapple. This adds a fresh flavor. - Step 6: Sprinkle the yellow cake mix over the fruit layers. Do not stir it! - Step 7: Drizzle the melted butter evenly over the cake mix. Then, add chocolate syrup on top. Now, bake for 40-45 minutes. The top should turn golden brown and bubble around the edges. You can check if it's done by inserting a toothpick; it should come out clean. This method ensures a delicious treat every time. Don’t forget to let the cake cool for about 10 minutes before serving. You can find the full recipe above for more details. - Use ripe bananas for better flavor. They add sweetness and moisture. - Don’t stir the cake mix for the best texture. This keeps the topping light. - Adjust baking time based on oven performance. Ovens can vary, so check often. - Serve warm with a dollop of whipped cream. It adds a creamy touch. - Drizzle with additional chocolate syrup. It enhances the sweet flavor. - Garnish with chopped walnuts and maraschino cherries. This adds crunch and color. These tips help you create a perfect banana split dump cake. You can find the full recipe to follow along! Enjoy the process and share your delicious results! {{image_4}} You can mix up the flavors of your banana split dump cake. Here are some fun ideas: - Substitute mixed berries for strawberries: Try using blueberries, raspberries, or blackberries. This adds a nice tartness. - Use coconut flakes for added tropical flair: Sprinkle some coconut flakes on top. This will give your cake a beachy vibe. - Try different nuts like pecans or almonds: Swap walnuts for pecans or sliced almonds for a different crunch. Each nut adds its own unique taste. You can also tweak the recipe for different diets. Here are two easy swaps: - Gluten-free option using gluten-free cake mix: Look for a gluten-free cake mix. This way, everyone can enjoy the cake. - Dairy-free using coconut oil instead of butter: Replace butter with coconut oil. This keeps the cake moist while making it dairy-free. These variations make the banana split dump cake fun and flexible. You can share it with everyone, no matter their dietary needs! After you enjoy your banana split dump cake, store leftovers in an airtight container. This keeps the cake fresh and moist. You can keep it at room temperature for a day. If you need more time, refrigerate it. Cold storage helps it last longer. To enjoy the cake warm again, reheat it in the oven or microwave. For the oven, set it to a low temperature. This warms the cake evenly without drying it out. The microwave is faster, but be careful not to overheat. Aim to eat the cake within 2-3 days for optimal freshness. The flavors are best when the cake is fresh! A dump cake is a simple, layered dessert. You "dump" ingredients into a pan without mixing. This method gives you a soft cake with a crisp top. It is quick and easy, making it perfect for busy days. You can use fruit, cake mix, and butter. The beauty lies in its simplicity and deliciousness. Yes, you can make this banana split dump cake ahead of time. You can prepare it a day before serving. Just cover it and keep it in the fridge. When ready to eat, warm it in the oven for a few minutes. This keeps the cake fresh and tasty. You will know the cake is done when the top is golden brown. The edges should be bubbling, too. A toothpick inserted in the center should come out clean. If it has wet batter on it, bake a few more minutes. Keep an eye on it to avoid overbaking. Yes, you can freeze banana split dump cake. Let it cool completely before freezing. Wrap it well in plastic wrap or foil. This helps prevent freezer burn. You can keep it frozen for up to three months. When ready to eat, thaw it overnight in the fridge and warm it up. This recipe for banana split dump cake offers a fun and easy dessert. You just layer fruit, cake mix, and drizzle with butter and chocolate. It bakes quickly, and the flavors blend well. Remember, using ripe bananas and adjusting your baking time makes a big difference. Feel free to customize with your favorite fruits or nuts. Enjoy this treat warm, topped with whipped cream and cherries. You will love how simple and delicious it is!

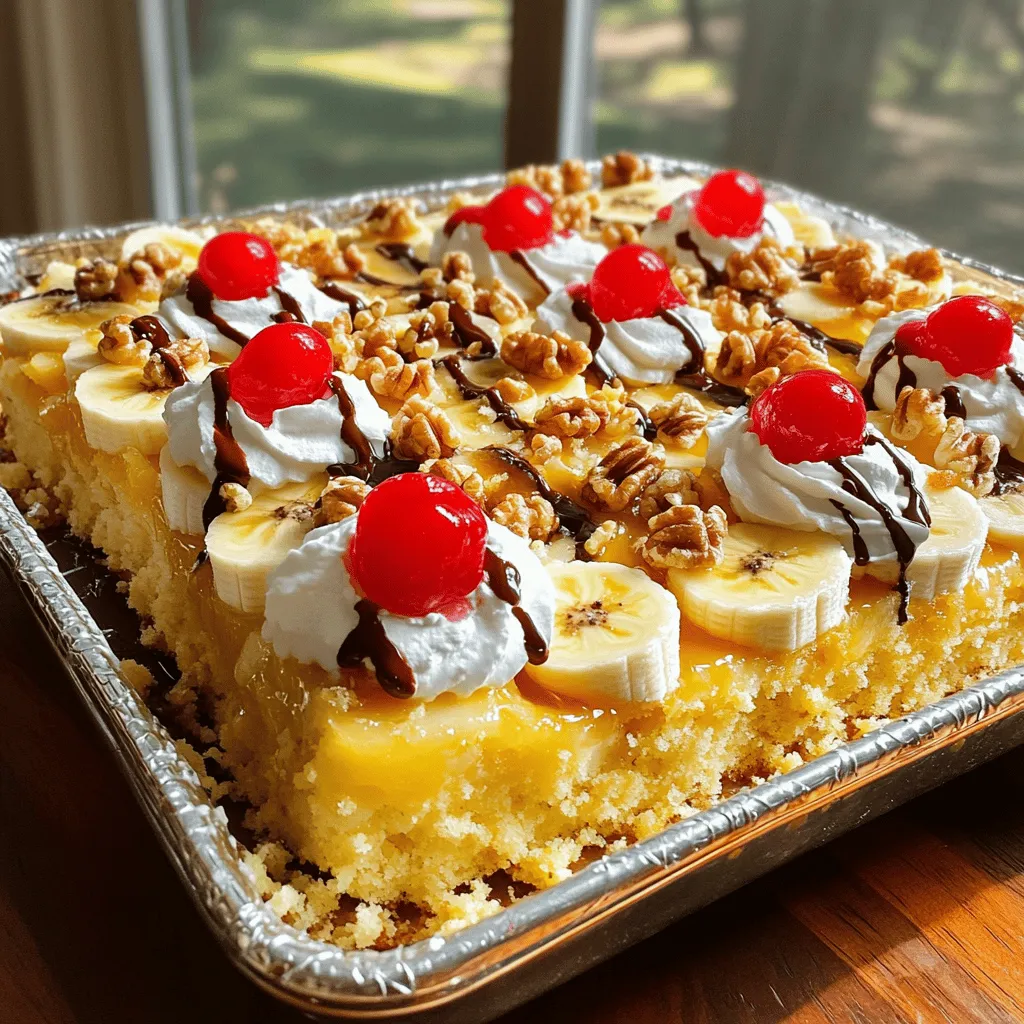
Are you craving a sweet treat that’s both rich and simple? Look no further! This Banana Split Dump Cake combines fresh fruit, cake mix, and chocolate syrup for a quick …

Read more

Categories Desserts

Chia Banana Bread Energy Bites Quick and Easy Snack

May 29, 2025 by Chef Remy
To make Chia Banana Bread Energy Bites, you need a few key ingredients: - 2 ripe bananas, thoroughly mashed - 1 cup rolled or quick oats - 1/2 cup almond butter (or your favorite nut butter) - 1/4 cup chia seeds - 1/4 cup honey or maple syrup - 1 teaspoon vanilla extract - 1/2 teaspoon ground cinnamon These ingredients work together to create a tasty and healthy snack. The ripe bananas provide natural sweetness, while oats give a great base. Almond butter adds creaminess and healthy fats. Chia seeds are tiny powerhouses full of nutrients. You can also add some optional ingredients for extra flavor and texture: - 1/4 cup walnuts, roughly chopped - 1/4 cup dark chocolate chips These add-ins allow you to make the bites your own. Walnuts add crunch and healthy omega-3s. Dark chocolate chips bring a rich sweetness that kids love. Each ingredient has its own health benefits: - Bananas are rich in potassium and fiber. They help with energy and digestion. - Oats are a great source of whole grains. They keep you full and energized. - Almond butter offers protein and healthy fats. It supports heart health. - Chia seeds are high in fiber and omega-3s. They aid digestion and boost heart health. - Honey or maple syrup provides natural sweetness with some vitamins. - Vanilla extract adds flavor without extra calories. - Cinnamon may help regulate blood sugar levels. Using these ingredients can help you feel great while enjoying a delicious treat. For the full recipe, check out the instructions in the article. Start by peeling two ripe bananas. Put them in a large bowl and mash them well. I like to use a fork for this. Make sure to get them smooth with no lumps. This step is important because it helps blend all flavors together. Now, add 1/2 cup of almond butter to the mashed bananas. You can also use any nut butter you like. Next, pour in 1/4 cup of honey or maple syrup for sweetness. Don’t forget 1 teaspoon of vanilla extract. Mix everything well until it looks creamy. Then, slowly add 1 cup of oats and 1/4 cup of chia seeds. Sprinkle in 1/2 teaspoon of ground cinnamon. If you want, toss in 1/4 cup of chopped walnuts and 1/4 cup of dark chocolate chips. Stir gently until it’s all mixed nicely. Cover the bowl with plastic wrap. Place it in the fridge for about 30 minutes. This helps the mixture firm up. After chilling, take small portions and roll them into 1-inch balls using your hands. Arrange the balls on a baking sheet lined with parchment paper. Put them back in the fridge for another 30 minutes. This makes them hold their shape better. When they are ready, store them in an airtight container. You can enjoy these bites fresh for up to a week. For the full recipe, refer to the detailed instructions above. To get the right texture for your energy bites, use ripe bananas. The riper the bananas, the sweeter and smoother the mix will be. Make sure to mash them well. This helps avoid lumps. Mixing the ingredients until they are fully blended is key. If the mixture seems too dry, add a bit more nut butter or honey. This will keep your bites soft and chewy. If you have nut allergies, you can swap almond butter for sunflower seed butter. This change keeps the flavor while making it safe. For a gluten-free option, ensure your oats are certified gluten-free. You can also substitute honey with agave syrup for a vegan option. These swaps keep the snack tasty and friendly for everyone. Want to boost the flavor? Add-ins are a great idea! You can mix in dried fruits like cranberries or raisins. Chopped nuts add crunch, too. For a fun twist, try adding shredded coconut or peanut butter chips. If you love spices, add a pinch of nutmeg or ginger. Each addition gives your energy bites a unique flavor and texture. Don't hesitate to get creative! For the full recipe, check out the detailed guide provided. {{image_4}} When making Chia Banana Bread Energy Bites, you can change the flavors easily. Try adding a spoonful of peanut butter for a nutty taste. You can also mix in diced dried fruits like apricots or cranberries for a sweet twist. Want a tropical vibe? Add coconut flakes or even a hint of orange zest. Each change gives the bites a new life! Boosting the nutrition of your energy bites is simple. Add a tablespoon of flaxseeds for extra fiber. You can also stir in protein powder for a filling snack. For a hint of crunch, consider a handful of pumpkin seeds. These options help make your bites even healthier while keeping them tasty. The sweetness of your energy bites can be tailored to your taste. If you prefer less sugar, cut back on honey or maple syrup. You can also skip the chocolate chips for a more subtle flavor. If you want more sweetness, add a bit more honey or use flavored nut butter. Always taste the mixture before forming the bites to find your perfect level of sweetness. To keep your Chia Banana Bread Energy Bites fresh, store them in an airtight container. You want to keep air out to prevent them from drying out. Place them in the fridge for the best taste and texture. They will stay fresh for about one week. You can freeze these bites for longer storage. Just place them in a single layer on a baking sheet first. Once frozen, transfer them to a freezer-safe bag. Make sure to remove as much air as possible. They can last up to three months in the freezer. When you're ready to eat, let them thaw in the fridge overnight. To keep your energy bites tasting great, avoid exposing them to moisture. Always use clean hands or utensils when handling them. If you notice any condensation in the container, wipe it out. This will help prevent spoilage. Enjoy these bites as a quick snack, packed with flavor and nutrition. For the full recipe, check out the details above. Chia Banana Bread Energy Bites last up to one week in the fridge. Store them in an airtight container to keep them fresh. If you want to keep them longer, you can freeze them. They can stay frozen for up to three months. Just remember to thaw them in the fridge before eating. Yes, you can easily make these energy bites vegan! Simply replace honey with maple syrup. Use your favorite nut butter that is vegan-friendly. All other ingredients, such as bananas and chia seeds, are already vegan. Chia seeds are tiny powerhouses of nutrition. They are rich in omega-3 fatty acids, which are good for your heart. They also have a lot of fiber, which helps digestion. Chia seeds can help keep you full longer. They are also high in protein, making them a great addition to your snack! Yes, these energy bites are perfect for kids! They are easy to make and fun to eat. The natural sweetness from bananas and honey makes them tasty. Plus, they provide energy for activities. Their chewiness is sure to make your kids happy. You can also customize them to suit your child's taste. For the full recipe, check out the recipe section. Chia Banana Bread Energy Bites are easy to make and full of nutrition. You learned about key ingredients and how to create your bites step-by-step. I shared tips for texture, flavor, and storage. You can even personalize your bites with different flavors and boosters. Enjoy making these tasty snacks! They offer energy and health benefits, making them ideal for anyone.

Looking for a tasty snack that fuels your day? Try my Chia Banana Bread Energy Bites! These quick and easy bites blend the flavor of banana bread with the goodness …

Read more

Categories Desserts

Air Fryer Cheesy Garlic Steaks Bold and Flavorful Dish

May 29, 2025 by Chef Remy
- 2 ribeye steaks (approximately 1-inch thick) - 4 tablespoons unsalted butter, softened to room temperature - 3 cloves garlic, finely minced - 1 teaspoon dried Italian herbs (a blend of oregano, basil, and thyme) - 1 cup shredded mozzarella cheese The ribeye steaks are the star of this dish. They offer rich flavor and tenderness. I love using unsalted butter mixed with garlic and herbs. This mixture elevates the steaks to a whole new level. The mozzarella cheese adds a creamy texture that makes every bite indulgent. You can find these ingredients at any grocery store. - Salt and black pepper, to taste - Fresh parsley, finely chopped (for garnish) Seasoning is key to a great steak. I recommend generous amounts of salt and black pepper. These simple seasonings enhance the meat's natural flavor. After cooking, I like to garnish with fresh parsley. This adds a nice touch of color and freshness. It makes the dish look appealing and appetizing. For the complete guide, check out the Full Recipe. First, gather your ingredients for the garlic butter. You need unsalted butter, minced garlic, and dried Italian herbs. In a small bowl, mix these three ingredients together. Make sure the butter is soft; it will blend better. You want a nice, smooth paste. This garlic butter adds a bold flavor to your steaks. Now, let’s move on to the steaks. Pat them dry with paper towels to remove excess moisture. This helps them sear better. Next, season both sides with salt and black pepper. Be generous! This step enhances the natural taste of the meat. After seasoning, take the garlic butter and spread it on both sides of the steaks. Make sure every part is coated well. Preheat your air fryer to 400°F (200°C) for about 5 minutes. This ensures even cooking. Once it’s hot, place the steaks in the basket. Make sure they are in a single layer and not touching. Cook for 8-10 minutes for medium-rare. Flip them halfway through for even cooking. For the last 2 minutes, add the shredded mozzarella cheese on top of the steaks. This allows the cheese to melt perfectly. After cooking, let the steaks rest for 5 minutes. This helps keep them juicy. Finally, garnish with fresh parsley before serving. For a complete guide, check the Full Recipe. For air frying, ribeye steaks work best. They are tender and full of flavor. Look for steaks that are about 1-inch thick. This thickness cooks evenly and stays juicy. Other good options are sirloin or filet mignon. These cuts also provide great taste and tenderness. A meat thermometer is key for perfect doneness. It helps you avoid overcooking. For medium-rare, aim for 135°F (57°C). Remember that steaks continue to cook slightly after you take them out. If your steak is thicker, adjust the cooking time. For each extra half inch, add about 2 minutes to your cooking time. You can enhance flavors with extra spices or marinades. Try adding smoked paprika or cayenne for heat. A marinade of soy sauce and honey gives a sweet and savory kick. You can also use fresh herbs like rosemary or thyme for a fresh taste. Don't be afraid to experiment to find your favorite flavor mix. This will make your air fryer cheesy garlic steaks even more enjoyable! {{image_4}} When it comes to cheese, the choices can change the whole dish. You can swap mozzarella for other cheeses like cheddar, gouda, or pepper jack. Each cheese brings its own flavor. Cheddar adds sharpness, gouda offers creaminess, and pepper jack gives a spicy kick. Feel free to mix and match for a unique taste. Herbs can also change the flavor of your steaks. You can use fresh herbs or dried ones. Fresh herbs like parsley, thyme, and rosemary provide bright flavors. Dried herbs are convenient and still tasty. If you want stronger flavors, use fresh. For a quick option, dried herbs work just fine. Both give the steaks a nice herbal aroma. Adding vegetables is a great way to enhance your meal. You can serve grilled asparagus, roasted potatoes, or sautéed mushrooms alongside your steaks. These sides not only add color but also texture and flavor. You can even top the steaks with sautéed bell peppers or onions. This makes the dish even more filling and delicious. To keep your leftover steak fresh, wrap it tightly in plastic wrap. You can also use an airtight container. Store it in the fridge for up to three days. This way, the flavors stay strong and the meat stays juicy. Make sure to let the steak cool down before you store it. This helps prevent moisture build-up. To reheat your cheesy garlic steak, the best way is using the air fryer. Set it to 350°F (175°C). Heat the steak for about 3-5 minutes. This method keeps the steak tender and the cheese melty. You can also use a skillet on medium heat. Just add a bit of butter to keep it moist. Leftover steak is great for meal prep! You can slice it thin and add it to salads or wraps. It also works well in stir-fries with veggies. You could even mix it into pasta with a creamy sauce. This gives you a new dish while using your tasty steak. For more ideas, check out the Full Recipe for Air Fryer Cheesy Garlic Steaks! Cooking steak in an air fryer is quick and easy. For a medium-rare steak, it takes about 8-10 minutes. Here is a quick guide for doneness levels: - Rare: 6-8 minutes - Medium-Rare: 8-10 minutes - Medium: 10-12 minutes - Medium-Well: 12-14 minutes - Well-Done: 14-16 minutes Always flip the steak halfway through cooking. This helps it cook evenly and develop a nice crust. Yes, you can use frozen steaks in the air fryer. However, cooking time will increase. Here are some tips: - Increase cooking time by 5-7 minutes for frozen steaks. - Do not season frozen steaks before cooking. Instead, season them after they thaw in the air fryer. - Check the internal temperature to ensure they are safe to eat. Thawed steaks cook better and have more flavor, but frozen steaks work in a pinch. Eating rare steak can be safe if cooked correctly. The USDA recommends cooking steak to a minimum of 145°F (63°C). This temperature kills harmful bacteria. Here are some key points: - Use a meat thermometer to check the internal temperature. - Let the steak rest for 3 minutes after cooking. This helps keep it juicy. - Pregnant people, young children, and those with weak immune systems should avoid rare steak. Enjoy your meal with confidence, knowing you follow safe cooking practices! For the full recipe, check out the Air Fryer Cheesy Garlic Steaks. In this blog post, we explored making delicious ribeye steaks in an air fryer. We covered essential ingredients, from ribeye and garlic butter to various cheeses. You learned step-by-step how to prepare, season, and cook the steaks while ensuring perfect doneness. Remember, choosing the right cut and using a meat thermometer are key. You can boost flavor with different cheeses and herbs. Enjoy experimenting and delighting in your air-fried steaks. With the right tips, mouth-watering meals await you!

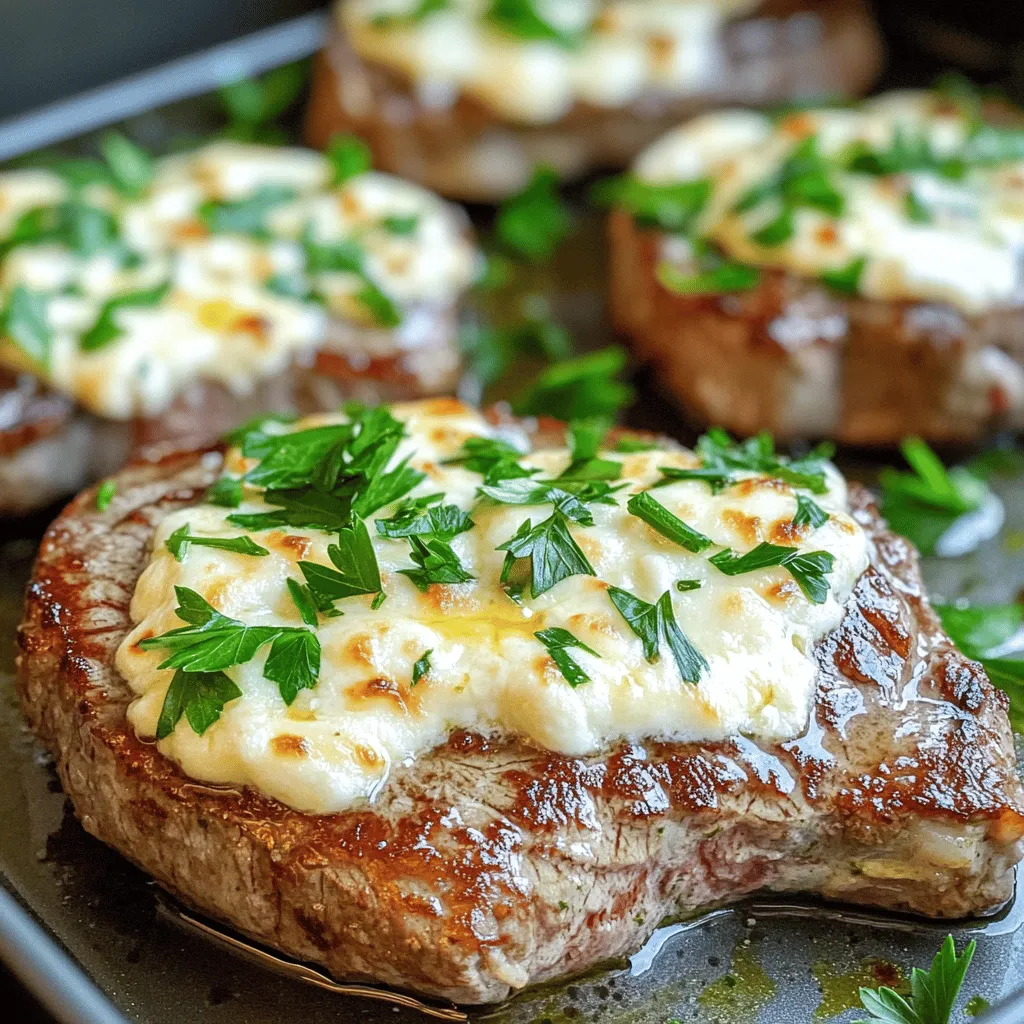
If you crave a quick, bold meal, you’ve come to the right place! My Air Fryer Cheesy Garlic Steaks are easy to make and packed with flavor. Picture tender ribeye …

Read more

Categories Dinner

White Cheddar Baked Corn Delightful and Simple Recipe

May 29, 2025 by Chef Remy
To make White Cheddar Baked Corn, gather these simple ingredients: - 4 cups fresh corn kernels (or frozen corn, thawed) - 1 cup white cheddar cheese, freshly shredded - 1/2 cup cream cheese, softened to room temperature - 1/2 cup sour cream - 1/2 cup whole milk - 1/4 cup scallions, finely chopped - 1 teaspoon garlic powder - 1/2 teaspoon smoked paprika - Salt and black pepper, to taste - 1/2 cup breadcrumbs (preferably panko for extra crunch) - 2 tablespoons fresh parsley, chopped (for garnish) You can switch things up by adding: - Jalapeños for a spicy kick - Cooked bacon bits for a smoky flavor - Diced bell peppers for added color and crunch To prepare this dish, you will need: - A 9x13 inch baking dish - A mixing bowl - A spatula or wooden spoon - An oven for baking - Measuring cups and spoons This recipe makes cooking fun and simple. Gather your tools and get ready to enjoy a creamy treat! For the full recipe, check out the instructions later in the article. Start by preheating your oven to 375°F (190°C). This step is crucial for even cooking. Next, grab a 9x13 inch baking dish. Lightly coat it with cooking spray or butter. This will stop the dish from sticking later. In a large mixing bowl, add the corn kernels. You can use fresh corn or thawed frozen corn. Then, mix in the shredded white cheddar cheese, softened cream cheese, sour cream, and whole milk. Use a spatula or wooden spoon to blend them well. Make sure there are no lumps. Now, add in the chopped scallions, garlic powder, smoked paprika, salt, and black pepper. Stir everything together until you see a nice, even mix. This is where the flavors start to come alive! Pour the creamy corn mixture into your greased baking dish. Spread it out evenly. In a small bowl, mix the breadcrumbs with a dash of olive oil and a pinch of salt and pepper. This adds crunch and flavor. Sprinkle this breadcrumb mix over the top of the corn mixture. Place the baking dish in your preheated oven. Bake for 25-30 minutes. Look for that melted cheese, bubbly goodness, and a golden brown top. When done, take it out and let it cool for about 5-10 minutes before serving. This helps it set, making it easier to scoop. Just before serving, sprinkle fresh parsley on top for a pop of color and flavor. Enjoy this creamy delight! For the complete recipe, check out the Full Recipe. To keep your baked corn from getting watery, use fresh corn or thawed frozen corn. Drain any excess liquid from frozen corn before mixing. Adding cream cheese and sour cream helps create a creamy texture without adding too much moisture. You can also bake the dish a bit longer to allow water to evaporate. While white cheddar brings a rich flavor, you can mix in other cheeses for fun. Try adding a bit of sharp cheddar for bite. Monterey Jack gives a nice melt. Gruyère adds a nutty touch. Feel free to experiment with a blend that excites your taste buds! Serve this dish straight from the oven for a cozy feel. A rustic presentation adds charm. You can also spoon it into individual bowls for a more elegant look. Top each serving with extra cheese or a dollop of sour cream. Fresh parsley not only adds color but also brightens the flavor. Enjoy this dish as a side for grilled meats or a hearty main! {{image_4}} To make your baked corn spicy, add jalapeños or hot sauce. Start with one diced jalapeño for mild heat. Mix it in with the corn and cheeses. If you love heat, add more! A few dashes of hot sauce can also do the trick. This adds a fun kick to your dish. If you want to boost the nutrition, consider adding veggies. Spinach or bell peppers work well. Chop one cup of fresh spinach and mix it in. For bell peppers, use half a cup of diced peppers. This gives color and crunch to the dish. You can also add black beans for a protein boost. To make this dish gluten-free, swap the breadcrumbs. Use crushed gluten-free crackers or cornmeal instead. You can also skip the topping and let the cheese create a crust. This keeps the dish tasty and safe for gluten-free eaters. Enjoy the creamy goodness without worry! For the full recipe, check out the Creamy White Cheddar Baked Corn . After you enjoy the White Cheddar Baked Corn, you may have some left. To store it, let it cool down first. Then, place it in an airtight container. Make sure to seal it tightly. This dish stays fresh in the fridge for up to three days. If you want to keep it longer, consider freezing it. When you’re ready to eat the leftovers, reheating is easy. Preheat your oven to 350°F (175°C). Place the corn in an oven-safe dish. Cover it with foil to keep moisture in. Heat for about 20 minutes or until hot. You can also use the microwave. Just cover the dish and heat in short bursts, stirring in between. This keeps the corn creamy and delicious. If you want to freeze White Cheddar Baked Corn, it’s simple. First, let it cool completely. Then, portion it into freezer-safe bags or containers. Remove as much air as possible before sealing. Write the date on the bag. It can stay frozen for up to three months. To enjoy, thaw it overnight in the fridge. Then follow the reheating instructions to warm it up. This way, you can savor this delightful dish anytime! Yes, you can use frozen corn. Just make sure to thaw it first. Frozen corn works well in this dish and saves some prep time. The texture stays nice, and the flavor remains sweet. You won’t lose any taste using frozen corn. This baked corn will last about three to four days in the fridge. Store it in an airtight container to keep it fresh. When you’re ready to eat it again, just reheat it. The cheese will still be creamy, and the flavor will still shine. Yes, you can prepare this dish ahead of time. You can mix the ingredients and place them in the baking dish. Cover it well and keep it in the fridge for up to one day. When you’re ready, just pop it in the oven. This makes it great for busy days or special events. For the full recipe, check out the earlier section. This blog post covered how to make a tasty White Cheddar Baked Corn. We discussed the key ingredients, optional ones for extra flavor, and what equipment you need. You learned step-by-step instructions for preparing and baking the dish. I shared tips to keep it from being watery, the best cheese pairings, and serving ideas. In the end, make this dish your own with fun variations. Store leftovers well to enjoy later. With this guide, you're set to create a delicious meal anytime!

Looking for a quick and tasty side dish? My White Cheddar Baked Corn recipe is just what you need! It combines sweet corn and rich cheddar for a dish that’s …

Read more

Categories Dinner

Ensalada Navideña Festive and Flavorful Recipe

May 29, 2025 by Chef Remy
- Diced cooked chicken (leftover or rotisserie) - Chopped fresh apples (red or green) - Diced fresh pineapple (ripe and juicy) - Pomegranate seeds (for color and flavor) - Chopped walnuts (or pecans) To make a great Ensalada Navideña, you need fresh ingredients. First, use diced cooked chicken. Leftover chicken works well, or you can grab rotisserie chicken. Next, add chopped fresh apples, either red or green. Both give a sweet crunch. For a juicy touch, include diced fresh pineapple. Pomegranate seeds add vibrant color and a burst of flavor. Finally, toss in chopped walnuts or pecans for a nutty crunch. - Creamy Greek yogurt (for tanginess) - Honey (to balance flavors) - Fresh lime juice (for brightness) - Ground cinnamon (for warmth) Now, let’s talk dressing. Use creamy Greek yogurt for a tangy base. Honey adds a nice sweetness and balances the flavors. Squeeze in fresh lime juice for brightness. A dash of ground cinnamon gives the dressing warmth and depth. - Salt and pepper to taste - Additional honey for sweetness Seasoning is key. Add salt and pepper to taste. If you prefer a sweeter salad, stir in more honey. This allows you to adjust the flavors to your liking. For the full recipe, check the link. - Combine all fresh ingredients in a large mixing bowl. - Whisk together the yogurt dressing components in a separate bowl. - Pour the dressing over the salad mixture and gently toss. Start by adding the cooked pasta, diced chicken, chopped apples, diced pineapple, pomegranate seeds, walnuts, and raisins to your bowl. Make sure everything is mixed well. This step is key to getting the flavors combined. In another bowl, whisk the Greek yogurt, honey, lime juice, and ground cinnamon. This will make a creamy dressing with great flavor. Once it's smooth, pour it over your salad mix. Toss everything gently to coat each piece well. - Cover the salad and refrigerate for flavor enhancement. - Recommended chilling time for best results (at least 30 minutes). After mixing, cover your salad with plastic wrap or a lid. Put it in the fridge for at least 30 minutes. This chilling time is important. It helps all the flavors blend together. You can even make it a day ahead for extra flavor. - How to present the salad for festive occasions. - Garnishing tips for appealing presentation. When you’re ready to serve, dish the salad into individual bowls or a large platter. To make it look festive, sprinkle extra pomegranate seeds on top. A light dusting of cinnamon can add a nice touch too. This salad is not just tasty; it’s also beautiful on the table! To get the best texture in your Ensalada Navideña, choose the right pasta. Fusilli or rotini are perfect because they hold the dressing well. This makes each bite flavorful. Make sure your pasta is cooked al dente. It will stay firm and not get mushy. Cut your fruits and veggies into small, even pieces. This helps them mix well with the pasta. Try to use a sharp knife for clean cuts. It makes a big difference in how your salad looks and tastes. You can boost the flavor with extra spices and herbs. A pinch of nutmeg or a dash of ginger can add warmth. Fresh herbs like cilantro or mint also work well. They bring a fresh taste that brightens the salad. If you like it sweeter, add more honey or use different fruits. You might try mangoes or berries for a twist. These changes can make your salad more unique and delicious. Serving your Ensalada Navideña chilled is best. The cold salad feels refreshing, especially during the holidays. Be sure to refrigerate it for at least 30 minutes before serving. This helps the flavors meld together nicely. For special occasions, elevate your dish with garnishes. Extra pomegranate seeds on top give a pop of color. A light sprinkle of cinnamon adds warmth and a festive touch. You can also use fresh mint leaves for a bright look. {{image_4}} You can switch up proteins in Ensalada Navideña to fit your needs. If you want a meatless option, try using chickpeas or tofu. Both add protein and texture. For a different taste, consider shrimp or turkey as alternatives to chicken. When it comes to fruits and nuts, feel free to get creative. Instead of apples, you could use pears for a sweet twist. Swap the pineapple for mango if you like a tropical vibe. For nuts, pecans work great instead of walnuts. Each choice brings new flavors to the salad. If you follow a vegan diet, replace the Greek yogurt with a plant-based yogurt. This keeps the dressing creamy while making it dairy-free. You can also omit the honey or use agave syrup for sweetness. For those needing gluten-free options, choose gluten-free pasta. Many brands offer great alternatives that taste fantastic. Just make sure to check the label to ensure it meets your dietary needs. Ensalada Navideña varies by region, adding unique flavors and ingredients. In some places, people use jicama for crunch or add roasted peppers for a spicy kick. You can include local fruits that are in season to make it your own. Try adding avocado for creaminess or using local nuts like almonds. These choices celebrate your area’s flavors while keeping the dish festive. You can keep the Ensalada Navideña fresh in the fridge for up to three days. To store leftovers, place the salad in an airtight container. This helps keep it cool and safe from odors. Make sure to press out as much air as possible before sealing. You want to keep all those yummy flavors intact! You can freeze some ingredients, but not the whole salad. Freezing fresh fruits like apples and pineapple changes their texture. Instead, freeze only the cooked chicken and nuts if you have leftovers. When you're ready to eat, thaw the chicken in the fridge overnight. For the best quality, avoid refreezing thawed ingredients. You don’t need to reheat this salad. It tastes best cold! If you find it a bit soggy after refrigeration, add fresh fruits right before serving. This brings back the crunch and makes it look nice. A sprinkle of fresh pomegranate seeds can also help! Ensalada Navideña is a festive salad popular in Latin American culture. It celebrates Christmas with vibrant colors and flavors. This salad often includes fruits, nuts, and a creamy dressing. Each family may have their unique twist, making it a beloved holiday dish. To make Ensalada Navideña, start by mixing your fresh ingredients. Combine cooked pasta, diced chicken, chopped apples, and pineapple in a large bowl. Add pomegranate seeds, walnuts, and raisins for extra flavor. In a separate bowl, whisk together Greek yogurt, honey, lime juice, and cinnamon. Pour the dressing over the salad and mix gently. Season with salt and pepper. Chill for 30 minutes to blend the flavors. For a full recipe, check the detailed instructions above. Yes, you can make Ensalada Navideña ahead of time. Prepare the salad a day before your event. Store it in the fridge until you're ready to serve. This chilling time helps the flavors meld beautifully. Just remember to keep it covered to maintain freshness. Ensalada Navideña pairs well with many holiday dishes. Serve it alongside roasted meats, like turkey or ham. It also complements festive rice dishes. For beverages, consider sparkling water or a light white wine. These pairings create a delightful holiday feast. This article covered the basics of Ensalada Navideña, from fresh ingredients to serving suggestions. You learned how to mix crisp fruits, savory chicken, and a creamy yogurt dressing. Remember to chill your salad for better flavor. Feel free to personalize it with your favorite fruits or nuts. With a few tweaks, you can make it fit any diet. Enjoy this festive dish at your next gathering. It's a crowd-pleaser that highlights rich flavors and vibrant colors!

Get ready for a vibrant twist on your holiday table! Ensalada Navideña is a colorful, festive salad that bursts with flavor and freshness. Perfect for family gatherings, this dish combines …

Read more

Categories Salads

Crispy Zucchini Fritters Simple and Tasty Recipe

May 29, 2025 by Chef Remy
- 2 medium zucchinis - 1 teaspoon salt - 1 cup all-purpose flour - 1/2 cup grated Parmesan cheese - 2 large eggs - 1/4 cup freshly chopped parsley - 2 green onions - 1 teaspoon garlic powder - 1/2 teaspoon black pepper - Vegetable oil for frying Fresh vs. frozen zucchini Use fresh zucchini for the best taste and texture. Frozen zucchini has more water and may make your fritters soggy. Substitutions for gluten-free options You can use gluten-free flour instead of all-purpose flour. Almond flour works well, too. Choosing the right Parmesan cheese Use fresh grated Parmesan for the best flavor. Pre-grated cheese may lack the same taste and texture. Fresh cheese melts better, adding to the fritters' crispiness. For the full recipe, check out the details above. Enjoy making these delicious crispy zucchini fritters! First, you need to prepare the zucchini. Start by grating two medium zucchinis. Place the grated zucchini in a large bowl and sprinkle it with one teaspoon of salt. Stir it well and let it sit for about ten minutes. This step draws out excess moisture from the zucchini, which is key for crispy fritters. Next, after ten minutes, take a clean kitchen towel. Use it to squeeze the zucchini mixture carefully. Remove as much liquid as you can. This step is crucial. Too much moisture will make your fritters soggy instead of crispy. Now, it’s time to mix the batter. Return the drained zucchini to the mixing bowl. Add in one cup of all-purpose flour, half a cup of grated Parmesan cheese, and two large eggs. Also, include a quarter cup of freshly chopped parsley, two finely sliced green onions, one teaspoon of garlic powder, and half a teaspoon of black pepper. Mix everything thoroughly until you have a thick batter. It should be well combined and easy to scoop. Heat a large skillet over medium heat. Pour in about two to three tablespoons of vegetable oil until it shimmers. This indicates it's hot enough for frying. Once the oil is ready, take a 1/4 cup measuring scoop. Use it to portion the batter into the skillet. Then, gently flatten each mound with the back of a spatula. Make sure not to overcrowd the skillet, as this can ruin the crispiness. Fry the fritters for about three to four minutes on each side. You want them to become golden brown and crispy. Once cooked, transfer the fritters to a plate lined with paper towels. This helps absorb any extra oil. Continue frying the remaining batter, adding more oil if needed to keep the temperature right. For the full recipe, check the complete guide. To make your crispy zucchini fritters, moisture removal is key. Start by grating the zucchinis and sprinkling them with salt. Let them rest for about 10 minutes. This step helps pull out extra water. After resting, grab a clean kitchen towel. Squeeze the zucchini mixture tightly to remove as much moisture as possible. The drier your zucchini, the crispier your fritters will be! Next, pay close attention to your frying temperature. Heat the vegetable oil in your skillet until it shimmers. A medium heat works best. If the oil is too cool, the fritters may absorb too much oil and turn soggy. If it’s too hot, they may burn on the outside before cooking through. Now, let’s talk about serving. Zucchini fritters taste great with dips! A dollop of sour cream or Greek yogurt adds a nice creaminess. You might also try a tangy tzatziki sauce for a fresh twist. For a complete meal, serve the fritters with a light salad or roasted vegetables. A mix of greens with a splash of lemon juice can balance the flavors perfectly. If you're feeling adventurous, pair them with a spicy aioli for an extra kick. For the full recipe, check the ingredients and steps earlier in this article. Enjoy your cooking! {{image_4}} You can change the taste of your crispy zucchini fritters with a few easy tweaks. Here are some fun ideas: - Adding different herbs and spices: Try adding fresh basil, dill, or oregano. A pinch of cayenne can give it a nice kick. Experiment with what you like! - Incorporating other vegetables: Mix in grated carrots or bell peppers. You can even add corn for a sweet touch. Each vegetable brings its own flavor and texture. If you want to make your fritters fit your diet, here are some ideas: - Vegan alternatives for eggs: Use flaxseed meal mixed with water. This mix works well as an egg substitute. Combine 1 tablespoon of flaxseed meal with 2.5 tablespoons of water. Let it sit for a few minutes until it thickens. - Low-carb adaptations using almond flour: Swap out the all-purpose flour for almond flour. This gives your fritters a nutty flavor and keeps them low in carbs. You may need to adjust the amount slightly, so start with less and add as needed. Explore these variations to make your crispy zucchini fritters truly your own. For the full recipe, check out the earlier sections! To store leftover fritters, first let them cool. Place them in an airtight container. Store the container in the fridge. Leftover fritters can stay fresh for up to three days. When you want to reheat them, use an oven or skillet. Reheating in these ways keeps them crispy. Avoid using a microwave, as it can make them soggy. If you want to freeze fritters, first let them cool completely. Place them in a single layer on a baking sheet. Put the sheet in the freezer for about an hour. Once frozen, transfer them to a freezer bag. This method helps prevent them from sticking together. When you're ready to eat them, reheat directly from the freezer. Bake them in the oven at 375°F (190°C) for about 15-20 minutes. This ensures they stay crispy and delicious. How do I keep my zucchini fritters from becoming soggy? To avoid soggy fritters, squeeze out as much moisture as possible from the zucchini. After grating, sprinkle the zucchini with salt and let it rest for about 10 minutes. This step helps draw out excess water. Then, use a clean kitchen towel to squeeze the zucchini dry. Can I use a different type of cheese? Yes, you can use other cheeses like feta or cheddar. Each cheese adds a unique flavor. If you want a stronger taste, try a sharp cheese. What can I serve with crispy zucchini fritters? Crispy zucchini fritters pair well with sour cream, Greek yogurt, or homemade tzatziki. You can also serve them alongside a fresh salad for a light meal. How long do zucchini fritters last in the fridge? These fritters last about 3 to 4 days in the fridge. Store them in an airtight container to keep them fresh. Can I make these fritters ahead of time? Yes, you can make the batter ahead of time. Just store it in the fridge for up to 24 hours. You can fry them fresh when you are ready to eat. How to test if the oil is hot enough? To check if the oil is ready, drop a small amount of batter into the oil. If it sizzles right away, the oil is hot enough. If not, wait a bit longer. What if my batter is too wet? If your batter seems too wet, add a little more flour. Mix it in until you reach a thick consistency. This will help the fritters hold their shape while frying. In this blog post, we explored how to make delicious zucchini fritters. We listed simple ingredients like zucchini, flour, and eggs. I shared step-by-step instructions to prep, mix, and fry your fritters perfectly. You learned tips for extra crispiness and how to serve them well. Remember, cooking can be fun and creative. Feel free to try different herbs or veggies in the recipe. Whether you're serving them fresh or storing leftovers, these fritters will impress. Now it's your turn to enjoy making and sharing these tasty bites!

Looking for a tasty treat that’s easy to make? These crispy zucchini fritters are the answer! With just a few simple ingredients, you can whip up a dish that’s packed …

Read more

Categories Appetizers

Watermelon Pineapple Salad Fresh and Fruity Delight

May 29, 2025 by Chef Remy
- 2 cups ripe watermelon, cut into 1-inch cubes - 1 cup fresh pineapple, diced into small pieces - 1/2 cup fresh mint leaves, finely chopped - 1/4 cup red onion, sliced thinly - 2 tablespoons freshly squeezed lime juice - 1 tablespoon honey (optional for added sweetness) - Salt and freshly ground black pepper, to taste - Mixing bowl - Small bowl for dressing - Whisk - Kitchen knife - Cutting board For this Watermelon Pineapple Salad, you need fresh and ripe ingredients. The watermelon shines bright with its juicy sweetness. Pineapple adds a tangy twist that complements it perfectly. The fresh mint leaves bring a burst of freshness, while red onion adds a bit of crunch and flavor. Lime juice brightens the mix, and honey can sweeten it further if you like. You will also need a few simple tools. A mixing bowl helps combine everything well. A small bowl is for mixing the dressing. A whisk makes it easy to blend the lime juice and honey. A sharp kitchen knife and a cutting board let you chop and slice the fruits and veggies safely. You can find the complete recipe in the full recipe section. Cutting watermelon and pineapple Start by cutting the watermelon. Use a sharp knife to slice it in half. Then, cut each half into thick wedges. Remove the rind and chop the fruit into 1-inch cubes. Next, take your fresh pineapple. Slice off the top and bottom. Stand it up and slice off the skin. Cut it into small pieces. Chopping mint leaves Now, grab your mint leaves. Rinse them under cold water to remove any dirt. Pat them dry with a paper towel. Stack a few leaves, roll them up, and chop them into fine pieces. This will add a fresh flavor to your salad. Slicing red onion Take a small red onion and cut off the ends. Slice it thinly. This adds a nice crunch and a bit of sharpness to the mix. Combining the fruits in a bowl In a large mixing bowl, add the watermelon and pineapple pieces. Gently toss them together. You want to keep the pieces whole and not mushy. Adding fresh herbs Next, fold in the chopped mint and sliced red onion. Be careful while mixing. You want everything to blend well without breaking the fruit. Whisking lime juice and honey In a small bowl, squeeze fresh lime juice. Add honey if you want a bit of sweetness. Use a whisk to mix them together well. This dressing will brighten up the salad. Drizzling over the salad Now, drizzle the lime-honey mixture over the salad. Toss everything gently to coat the fruit and herbs. Be sure not to crush the watermelon or pineapple. You can find the full recipe above, but remember to let the salad rest for 10 minutes before serving. This helps the flavors meld together. For a stunning look, choose a large, colorful bowl. A clear glass bowl shows off the bright colors of the salad. You can also use a wooden bowl for a rustic feel. Garnishing adds flair. Use sprigs of fresh mint to top the salad. Add lime wedges around the bowl for a fresh scent and a pop of color. Adjusting sweetness is key. Taste the salad. If it needs more sweetness, drizzle in a bit more honey. Remember, a little honey goes a long way. Seasoning matters too. A pinch of salt can bring out the flavors. Just a few cracks of black pepper can enhance the taste. Allow the flavors to meld. After mixing, let the salad sit for about 10 minutes. This rest time lets all the tastes blend together. You will enjoy a more delicious salad this way. For the full recipe, check out Tropical Watermelon Pineapple Delight. {{image_4}} You can mix in other fruits to make your salad even better. Try adding mango for a sweet twist. Strawberries and blueberries can also add color and flavor. These fruits all fit the tropical theme. They blend well with the watermelon and pineapple. You can create a fruit fiesta in your bowl! If you want a vegan option, you can swap honey for maple syrup. This keeps it sweet and plant-based. Also, this salad is naturally gluten-free. So, you can enjoy it without worry. Just make sure all your other ingredients are gluten-free too. This way, everyone can join the fun! To keep your watermelon pineapple salad fresh in the fridge, use a sealed container. Make sure it is airtight. This helps prevent the salad from absorbing odors from other foods. The salad will stay fresh for up to two days. Before serving again, check the fruit for any signs of spoilage. If it looks good, give it a gentle toss to mix flavors. Freezing fruit salad can change its texture. Watermelon and pineapple can get mushy when thawed. If you still want to freeze it, use a freezer-safe container. Store the salad for up to three months. To enjoy it later, let it thaw in the fridge overnight. You can use the thawed salad in smoothies or as a topping for yogurt. Got leftovers? Here are some fun ideas to repurpose your salad! Blend it into a refreshing smoothie. The flavors mix well with yogurt or a splash of coconut milk. You can also use it as a topping for pancakes or waffles. Alternatively, fold it into a simple green salad for added sweetness and color. Enjoy your creativity with these tasty options! You can add protein or grains to your salad. Here are some ideas: - Chickpeas: Add 1 cup of canned chickpeas for a nice boost. - Grilled chicken: Dice up 1 cup of grilled chicken for a hearty touch. - Quinoa: Mix in 1 cup of cooked quinoa for a chewy texture. - Feta cheese: Crumble 1/2 cup of feta cheese for creaminess and flavor. These additions make your salad more satisfying and nutritious. Plus, they blend well with the fresh fruits. Yes, you can make this salad ahead of time! Here are some best practices: - Chop fruits: Prepare your watermelon and pineapple up to 4 hours ahead. - Mint and onion: Add chopped mint and onion just before serving. - Dressing: Keep the dressing separate until you are ready to serve. - Storage: Store in an airtight container in the fridge. This way, your salad stays fresh and tasty, ready for your guests! Many dressings pair nicely with this salad. Here are some options: - Balsamic vinaigrette: Adds a sweet and tangy flavor. - Honey-lime dressing: Use more honey and lime for a sweeter kick. - Greek yogurt dressing: Mix yogurt with lime juice for a creamy option. These dressings can enhance the fruit flavors and make your salad pop. This salad pairs well with many dishes. Here are some ideas: - Grilled fish: Salmon or shrimp complements the fruity taste. - Tacos: Serve with fish or chicken tacos for a fun meal. - Rice dishes: Fluffy rice or a grain bowl can balance the meal. These options create a colorful and delicious dining experience for you and your guests. Enjoy the full recipe for Tropical Watermelon Pineapple Delight to bring this salad to your table! This blog post covered how to make a delicious watermelon and pineapple salad. We explored all the ingredients, tools, and steps needed. With simple tips for flavor and presentation, your salad will stand out. You can customize it with various fruits and enjoy it anytime. Remember to store any leftovers properly, so they stay fresh. This refreshing salad is perfect for warm days and social gatherings. Enjoy creating tasty meals that bring joy and nourishment!

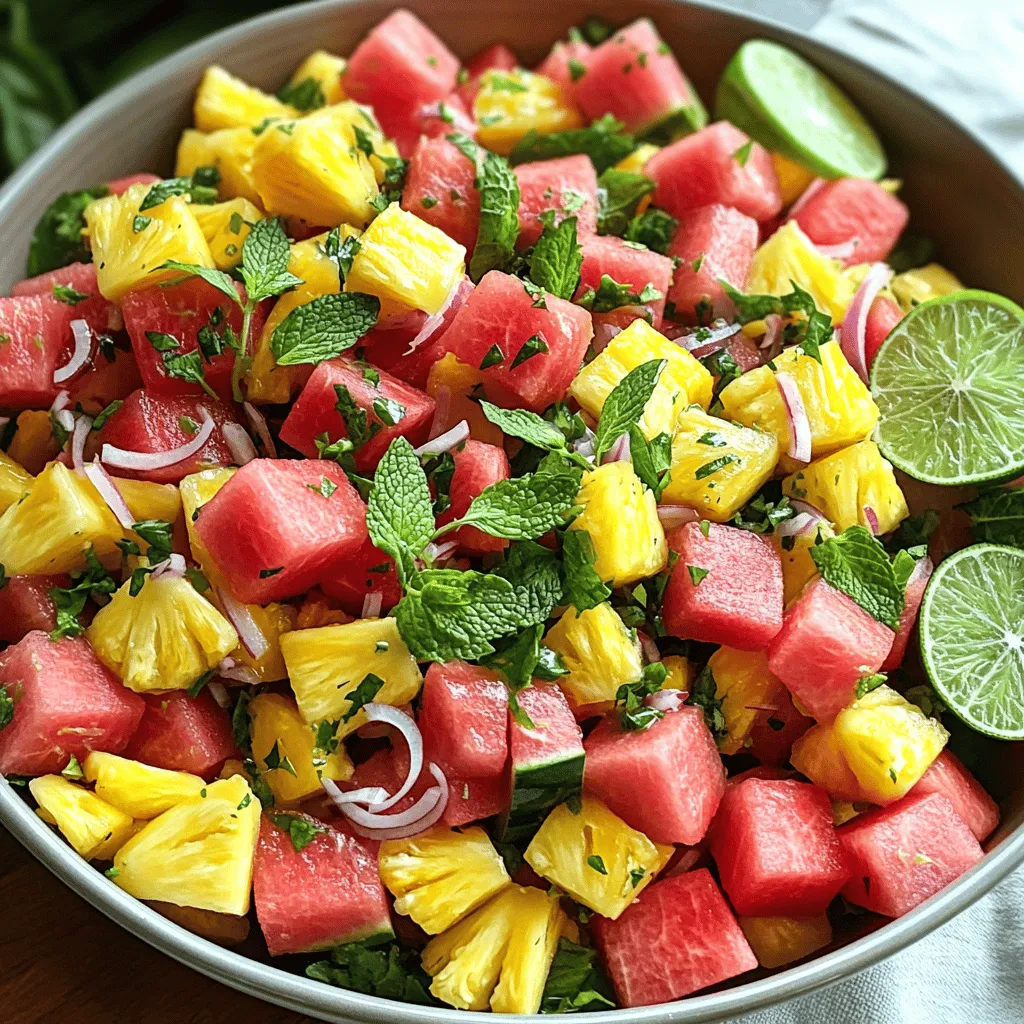
Looking for a quick, tasty treat? This Watermelon Pineapple Salad offers a fresh burst of flavor that’s perfect for any occasion. With juicy watermelon, sweet pineapple, and a hint of …

Read more

Categories Salads

Shrimp Boil Foil Packs Flavorful and Easy Meal Prep

May 29, 2025 by Chef Remy
To create the best shrimp boil foil packs, you need fresh and tasty ingredients. Here’s what you will need: - 1 lb large shrimp, peeled and deveined - 2 cups baby potatoes, halved - 2 ears of corn, cut into 1-inch chunks - 4 cloves garlic, minced - 1 lemon, juiced and zested - 3 tablespoons Old Bay seasoning - 2 tablespoons olive oil - Salt and pepper to taste - Fresh parsley, chopped (for garnish) - Lemon wedges (for serving) These ingredients come together to make a meal that pops with flavor. The shrimp is the star, while the potatoes and corn add nice texture. The garlic and lemon zest brighten the dish. Old Bay seasoning gives it that classic shrimp boil taste. When you pick your ingredients, go for fresh shrimp and vibrant veggies. This will make a big difference in taste. If you want to see the full recipe, check it out [here](#). Using these ingredients, you can whip up a delightful meal that is both easy and fun to prepare. - Preheat your grill to medium-high heat. - If using an oven, set it to 400°F (200°C). - Cut four large pieces of aluminum foil, each about 12x12 inches. - In a large bowl, combine halved baby potatoes, corn chunks, and minced garlic. - Add lemon juice, lemon zest, Old Bay seasoning, olive oil, salt, and pepper. - Toss everything together until well coated. - Distribute the veggie mix in the center of each foil piece. - Top each portion with a handful of shrimp. - Fold the sides of the foil over the mix. - Crimp the edges tightly to seal each pack. - Place the packs on the grill or in the oven. - Cook for 15-20 minutes until shrimp are pink and potatoes are tender. - Carefully remove the packs and let them cool for a couple of minutes. - Open with caution to avoid steam. - Sprinkle with parsley and serve with lemon wedges for added zest. For a detailed guide, refer to the Full Recipe. Grilling gives a smoky flavor. It also cooks shrimp fast. Baking offers a more even cook. It works well for those who prefer indoor cooking. Adjust cooking time if using larger shrimp. Bigger shrimp may need a few extra minutes. Always check for doneness. You can mix up the seasonings. Try Cajun spice for a kick. Lemon pepper also adds a nice taste. If you love heat, add more cayenne pepper or hot sauce. Adjust to your own taste for best results. Shrimp is delicious, but you can swap it out. Try chicken or firm fish instead. For veggies, use asparagus or bell peppers. Just remember to adjust cooking time for different ingredients. Enjoy experimenting with what you have on hand! {{image_4}} To make a spicy shrimp boil foil pack, add some spicy sausage to the mix. This will give your meal a nice kick. You can also sprinkle cayenne pepper for extra heat. Adjust the amount based on your taste. This spicy twist makes the dish more exciting and flavorful. If you want a veggie-only option, skip the shrimp. Instead, add more veggies like bell peppers, zucchini, or carrots. You should also adjust the cooking time for veggie packs. They might cook a bit faster than shrimp. Keep an eye on them to ensure they stay crisp and fresh. For a seafood mix pack, you can include fish and scallops. This adds a variety of flavors to your meal. Just remember to adjust the recipe for different seafood. Fish cooks faster than shrimp, so you may need to check them sooner. This mix keeps things interesting while enjoying a seafood feast. After you enjoy your Shrimp Boil Foil Packs, store any leftovers safely. First, let the packs cool down. Then, carefully open the foil and transfer the food to an airtight container. You can keep it in the fridge for up to three days. If you have a lot left, consider freezing them. Place the cooled food in freezer-safe bags or containers. It can last for up to three months in the freezer. When you’re ready to eat the leftovers, reheating is simple. The best method is using the oven. Preheat it to 350°F (175°C). Transfer the food to an oven-safe dish and cover it with foil. Heat for about 10-15 minutes or until warm. You can also use a microwave for quick reheating. Just place the food in a microwave-safe bowl, cover it, and heat for 1-2 minutes. Be careful not to overcook it. This keeps the shrimp tender and juicy. Enjoy your meal again! Cook shrimp in foil packs for about 15 to 20 minutes. This timing works well on a medium-high grill or in an oven set to 400°F (200°C). The steam inside the foil packs helps cook the shrimp evenly. Check the shrimp around the 15-minute mark to avoid overcooking. Yes, you can use frozen shrimp. Just make sure to thaw them before cooking. Place the shrimp in a bowl of cold water for about 15 minutes. This method works well without cooking the shrimp. Also, be aware that frozen shrimp may need a minute or two more cooking time than fresh ones. Perfectly cooked shrimp have a pink color and look opaque. They also curl into a C shape. Use a fork to check if they are firm and not translucent. If they are still a bit see-through, give them another minute in the foil pack. Enjoy your shrimp boil foil packs with confidence! This blog post covered a simple shrimp foil pack recipe. You learned about key ingredients, step-by-step instructions, and useful tips. Try different seasonings or veggies to make it your own. This dish is easy, fun, and perfect for gatherings. Enjoy the fresh flavors and share with friends. Creating foil packs is a great way to cook. Happy cooking!

Are you ready to tackle a flavorful and easy meal that everyone will love? Shrimp boil foil packs are the ultimate solution for a quick dinner without the mess. With …

Read more

Categories Dinner

Air Fryer Egg and Cheese Toast Simple and Tasty Meal

May 29, 2025 by Chef Remy
- 4 slices of whole grain bread - 4 large eggs - 1 cup shredded cheddar cheese - 1 tablespoon softened butter - 1/2 teaspoon garlic powder - 1/2 teaspoon onion powder - Salt and pepper to taste - Fresh chives, finely chopped (optional) To make Air Fryer Egg and Cheese Toast, you need a few key ingredients. Whole grain bread is great for this dish, as it adds texture and flavor. Large eggs are essential since they create a rich, tasty topping. Shredded cheddar cheese melts beautifully, adding a creamy finish to each bite. A little softened butter helps the bread crisp up nicely in the air fryer. For seasonings, garlic powder and onion powder boost the taste of the eggs. Salt and pepper are a must to enhance all the flavors. If you want a pop of freshness, add fresh chives as a garnish. This simple mix of ingredients makes a satisfying meal that you can enjoy at any time of day. For the complete recipe, check out the Full Recipe. - Preheat the air fryer to 350°F (175°C). - Butter one side of each slice of bread. - Place the buttered bread in the air fryer basket, butter side down. - Crack one egg onto each slice of bread. Be gentle with the yolks. - Sprinkle garlic powder, onion powder, salt, and pepper on the eggs. - Top each egg with shredded cheddar cheese for that melty goodness. - Air fry the toast for about 8-10 minutes. - Check at 8 minutes to see how runny you like the yolks. - Use tongs to carefully take the toast out when it's done. - For extra flavor, add finely chopped chives as a garnish. This meal is quick, simple, and oh-so-delicious! For the full recipe, click here: [Full Recipe]. To get that ideal crispiness, start by buttering your bread right. Use softened butter, and spread it evenly. This ensures every bite is golden. Set your air fryer to 350°F (175°C). This temperature works best for toasting bread while cooking the eggs. Cracking eggs may seem easy, but it can be tricky. Tap the egg on the edge of a bowl, then gently pull it apart. This helps keep the yolk intact. For flavor, sprinkle salt and pepper on the eggs. You can also mix in garlic and onion powder for extra taste. For a complete meal, serve your Egg and Cheese Toast with fruit or a simple salad. A glass of fresh juice or coffee pairs well, too. If you want to spice things up, add hot sauce or avocado on the side. Enjoy your creation! {{image_4}} You can switch up the cheese for more flavor. Here are some great options: - Mozzarella - Pepper jack - Feta - Gouda You can also add toppings for extra taste and texture. Some tasty ideas include: - Crispy bacon - Sautéed spinach - Diced tomatoes - Avocado slices If you need a gluten-free option, use gluten-free bread. This keeps the meal tasty and safe for all. Other bread types to try are: - Sourdough - Rye - Bagels - English muffins Want to spice things up? Add hot sauce or jalapeños for a kick. You can also use fresh herbs to enhance the flavor. Try: - Basil - Thyme - Oregano These changes make your Air Fryer Egg and Cheese Toast even more exciting. Each bite can be a new experience! For more ideas, check out the Full Recipe. To store leftover Air Fryer Egg and Cheese Toast, let it cool. Place the toast in an airtight container. Keep it in the fridge. It stays fresh for about 2-3 days. If you want to keep it longer, consider freezing it. The best way to reheat this toast is in the air fryer. Set the air fryer to 350°F (175°C). Heat for about 3-5 minutes. This keeps the toast crispy and the egg warm. You can also use a microwave, but it may make the toast soggy. If you want to freeze your toast, do it after cooking. Cool the toast completely first. Wrap each piece tightly in plastic wrap, then in foil. This prevents freezer burn. To thaw, remove it from the freezer the night before. Let it sit in the fridge overnight before reheating. Cooking Air Fryer Egg and Cheese Toast takes about 8 to 10 minutes. Set your air fryer to 350°F (175°C). After 8 minutes, check how firm the egg yolks are. Adjust the time based on your taste. Some like runny yolks, while others prefer them firm. Yes, you can use many types of cheese! Cheddar is a great choice, but feel free to try mozzarella, gouda, or pepper jack. Each cheese brings its own unique flavor. Mix and match to find your favorite combo. Absolutely! This dish is already vegetarian. Use the listed ingredients, and you can enjoy it without meat. You can even add veggies like spinach, tomatoes, or mushrooms for more flavor and nutrition. If your air fryer lacks a preheat function, no worries! Just set it to 350°F (175°C) and run it for about 3-5 minutes before adding your toast. This step helps achieve that crispy texture you want. For the full recipe, check the Egg-cellent Air Fryer Egg and Cheese Toast! Air Fryer Egg and Cheese Toast combines simple ingredients and easy steps. Start with whole grain bread, eggs, and cheese for a tasty meal. Use seasonings, butter the bread, and cook in the air fryer to get that crisp perfection. Remember, you can make this dish your own with variations, like adding different cheeses or spices. Store leftovers properly and reheat for the best taste. Experimenting with flavors keeps it fun and rewarding every time you make it. Enjoy your cooking!

Looking for a quick, tasty meal? Air Fryer Egg and Cheese Toast is the answer! This dish combines creamy eggs and melted cheese on crispy toast, delivering a delightful breakfast …

Read more

Categories Breakfast
Older posts
Newer posts
← Previous Page1 … Page105 Page106 Page107 … Page130 Next →

ROASTED RECIPES

Where bold flavors meet everyday meals. Warm, vibrant, and made to share. 🔥🥗🍴

PAGES

Home About Contact Privacy Policy Terms & Conditions Cookie Policy GDPR Policy Copyright Policy Disclaimer

CATEGORIES

Appetizers Desserts Salads Breakfast Dinner

Contact

  • Pinterest
  • Mail
Copyright © 2025 Roasted Flavors. All rights reserved.