Skip to content
Roasted Flavors
  • Home
  • Appetizers
  • Desserts
  • Salads
  • Breakfast
  • Dinner
  • Privacy Policy
  • Contact
  • About

Chef Remy

Creamy Garlic Parmesan Spinach Orzo Delightful Meal

October 15, 2025 by Chef Remy
- 1 cup orzo pasta - 2 cups fresh spinach, roughly chopped - 4 cloves garlic, minced - 1 cup vegetable broth - 1/2 cup heavy cream - 1 cup finely grated Parmesan cheese - 2 tablespoons extra-virgin olive oil - Salt and freshly cracked black pepper to taste - 1/2 teaspoon red pepper flakes (optional for a spicy kick) - Fresh parsley, chopped for garnish You can add some protein to this dish. Grilled chicken or shrimp works well. For a vegetarian option, toss in some chickpeas for added protein. Sun-dried tomatoes add a nice flavor too. If you don’t have orzo, use any small pasta like couscous or ditalini. You can replace heavy cream with coconut milk for a lighter dish. For cheese, any grated cheese will work, but Parmesan gives the best taste. If you want a dairy-free option, try cashew cream instead. Start by boiling a large pot of salted water. Add 1 cup of orzo pasta. Cook it for 8 to 10 minutes until tender but firm. Drain the orzo and set it aside. This will be the base for your creamy dish. In the same pot, heat 2 tablespoons of extra-virgin olive oil over medium heat. Add 4 minced garlic cloves and sauté for 1 to 2 minutes. Stir often to keep the garlic from burning. It should smell great! Next, add 2 cups of roughly chopped spinach. Sauté for another 2 minutes until the spinach wilts down. Pour in 1 cup of vegetable broth and bring it to a gentle simmer. This mixes the flavors well. Now add 1/2 cup of heavy cream. Let it simmer for 2 to 3 minutes until it thickens a bit. Stir in the drained orzo and 1 cup of finely grated Parmesan cheese. Mix until the cheese melts and everything blends. Season with salt, black pepper, and optional red pepper flakes. Let the dish rest for a minute before serving. It allows the flavors to deepen. Serve hot, garnished with fresh parsley. Enjoy your creamy garlic Parmesan spinach orzo! To get a creamy texture in your orzo, use heavy cream. This rich cream blends well with cheese. Stir the mixture often as it simmers. This helps the cheese melt evenly. If the sauce seems too thick, add a splash of vegetable broth. This way, you keep the smooth creaminess. Sauté garlic over medium heat. This prevents burning and keeps it sweet. Mince the garlic finely for even cooking. Cook it for only 1-2 minutes. You want it fragrant, not brown. Stir it often to avoid any browning. Brown garlic can taste bitter, which we don’t want in our dish. Season your orzo with salt and black pepper to taste. Freshly cracked pepper adds great flavor. For a spicy kick, add red pepper flakes. Start with a small amount. You can always add more later. Taste as you go to find your perfect balance. Fresh parsley adds a nice touch and color. {{image_4}} You can easily boost this dish with protein. Chicken or shrimp works well. Cook the protein separately and add it to the orzo before serving. For a plant-based option, consider chickpeas or lentils. They add great texture and protein without meat. This creamy garlic Parmesan spinach orzo is already vegetarian friendly. But, you can add more veggies. Try mushrooms, bell peppers, or zucchini. Sauté these before adding spinach. They add flavor and color to your meal. Want to change the flavor? Use different herbs like basil or thyme. They add freshness and depth. For a tangy twist, squeeze lemon juice over the dish before serving. You can also swap the Parmesan for feta cheese. This gives a salty and creamy touch. Once you have made the creamy garlic Parmesan spinach orzo, let it cool. Place it in an airtight container. Store it in the fridge for up to 3 days. When you want to eat it again, check for any off smells or changes in texture. If it looks and smells good, it’s ready! You can freeze this dish too! First, let the orzo cool completely. Then, use a freezer-safe container. It will stay good in the freezer for about a month. To avoid freezer burn, press out any air before sealing. When ready to eat, thaw it in the fridge overnight before reheating. To reheat, use a pot over low heat. Add a splash of vegetable broth or cream to keep it creamy. Stir often until it warms up. You can also use the microwave, but add some liquid to avoid dryness. Heat it in short bursts, stirring in between. Enjoy your creamy orzo just like fresh! Yes, you can use other pasta types. Try using small shapes like penne or shells. Just adjust the cooking time as needed. I love orzo for its bite-sized shape, but variety keeps it fun! Absolutely! You can replace the heavy cream with coconut milk or cashew cream. For cheese, try nutritional yeast or a plant-based Parmesan. These swaps still give you a rich flavor without dairy. This dish pairs well with grilled chicken or shrimp. You can also serve it alongside a fresh salad. A crusty bread is great for soaking up the creamy sauce too! This blog post covered everything you need for Creamy Garlic Parmesan Spinach Orzo. We discussed essential ingredients, optional add-ins, and substitutes. I shared step-by-step cooking instructions to ensure great results. Tips helped you achieve a creamy texture and perfect seasoning. Variations let you tailor the dish to your taste. Lastly, I provided storage tips for leftover orzo. Enjoy making this dish, knowing you can adjust it to your liking and store it for later!

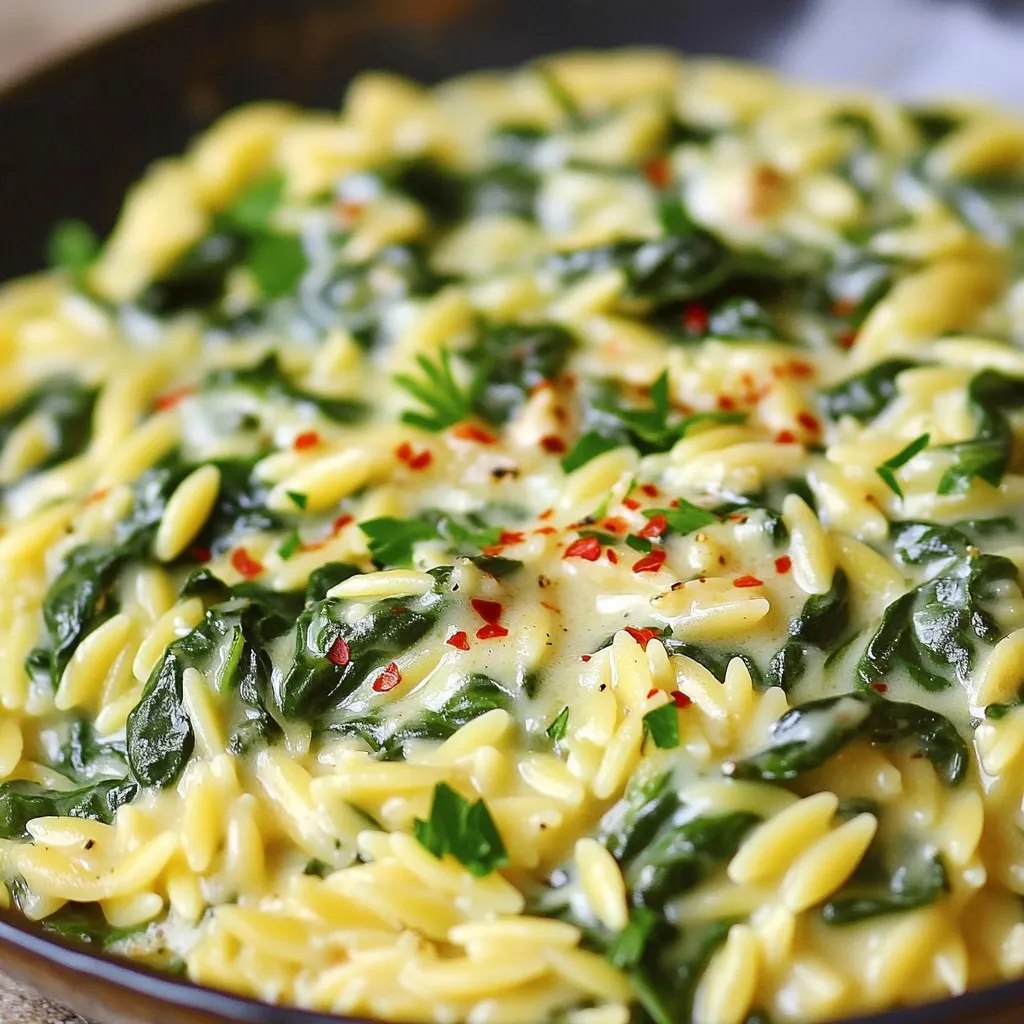
Welcome to my kitchen, where we whip up a winning dish you’ll love—Creamy Garlic Parmesan Spinach Orzo! This meal combines tender orzo pasta with rich garlic, fresh spinach, and creamy …

Read more

Categories Dinner

No-Bake Cookie Dough Bars Tasty and Simple Treat

October 14, 2025 by Chef Remy
To make these no-bake cookie dough bars, you will need: - 1 cup almond flour - 1/2 cup rolled oats - 1/2 cup almond butter (or your preferred nut butter) - 1/4 cup pure maple syrup - 1 teaspoon vanilla extract - 1/4 teaspoon salt - 1/2 cup mini chocolate chips - 1/4 cup chopped nuts (optional, such as walnuts or pecans) You can easily swap out some ingredients: - Use peanut butter instead of almond butter for a different taste. - Substitute honey for maple syrup if you prefer a sweeter flavor. - For a gluten-free option, use certified gluten-free oats. - If you don’t have almond flour, try using oat flour or coconut flour. Want to customize your bars? Here are some fun add-ins: - Add 1/4 cup of dried fruit like cranberries or raisins for extra sweetness. - Mix in 1/4 cup of shredded coconut for a tropical twist. - Toss in some chia seeds or flaxseeds for a healthy boost. - Try different types of chocolate chips, like dark or white chocolate, for a new flavor. These ingredients and options help you create a tasty treat that fits your taste! Making these no-bake cookie dough bars is fun and easy. You’ll need just a few bowls and a spatula. This recipe takes only about 10 minutes to prep. First, take a medium mixing bowl. Add 1 cup of almond flour and 1/2 cup of rolled oats. Use a spatula or whisk to mix them well. Make sure they blend evenly, so every bite is tasty. In a separate bowl, measure 1/2 cup of almond butter. Then, add 1/4 cup of pure maple syrup. Next, include 1 teaspoon of vanilla extract and 1/4 teaspoon of salt. Whisk these wet ingredients until they form a smooth mix. This creamy base adds flavor and richness. Now, pour the wet mix into the dry ingredients. Stir well with a spatula. Ensure no dry patches remain. If you like a crunch, gently fold in 1/2 cup of mini chocolate chips and 1/4 cup of chopped nuts. This step adds sweetness and texture. Next, line an 8x8-inch baking dish with parchment paper. Leave some paper hanging over the sides. This makes it easy to lift out the bars later. Transfer the cookie dough mix into the dish. Use the back of a spatula or your hands to press it down evenly. Smooth the top for a nice finish. Finally, place your dish in the refrigerator. Let it chill for about 30 minutes. This helps the bars firm up. Once set, lift the bars out using the parchment paper. Slice them into squares, and they’re ready to enjoy! To get the best texture for your no-bake cookie dough bars, use almond flour. It gives a nice soft feel. Make sure your almond butter is creamy and smooth. This helps blend well with the dry ingredients. Mixing the dry and wet ingredients should be done gently. You want to avoid over-mixing. This keeps the mixture light and fluffy. For a beautiful presentation, use a nice plate. After cutting the bars, arrange them neatly. You can sprinkle some extra mini chocolate chips on top. This adds a pop of color. Consider adding a few fresh berries on the side. They add freshness and look lovely. Serve these cookie dough bars chilled for the best taste. They pair well with a cold glass of milk. If you want something different, try a plant-based drink. These bars are great for dessert or as a snack. They also make a great treat for parties or gatherings. Enjoy sharing them with friends and family! {{image_4}} You can change the taste of your no-bake cookie dough bars easily. For a rich flavor, try using peanut butter instead of almond butter. This gives a nutty twist. You can also add shredded coconut for a tropical vibe. Just fold it in with the chocolate chips. Another fun option is to use flavored protein powder. Choose chocolate or vanilla to boost nutrition and taste. If you're looking for a healthier version, swap out the maple syrup for a sugar-free syrup. This keeps the sweetness without extra sugar. You can also use unsweetened almond butter or sunflower seed butter. These options cut down on sugar while adding flavor. For a fiber boost, add ground flaxseed or chia seeds. They are great for health and work well in this recipe. Making these bars vegan is simple. Use a plant-based protein powder if you want extra protein. Ensure that the chocolate chips are dairy-free. You can also replace maple syrup with agave syrup. This keeps it sweet and vegan-friendly. Lastly, swap almond flour for oat flour if you want a nut-free option. This keeps everyone happy, even those with nut allergies. To keep your no-bake cookie dough bars fresh, store them in an airtight container. This method keeps moisture out and flavors in. Place parchment paper between layers to avoid sticking. For best taste, eat them within one week. You can freeze the cookie dough bars for longer storage. First, cut the bars into squares. Wrap each square tightly in plastic wrap. Then, place them in a freezer bag or container. They will last up to three months in the freezer. Thaw the bars by moving them to the fridge overnight. If you need them fast, let them sit at room temperature for about 30 minutes. Once thawed, enjoy them cold or warm them slightly in the microwave for a soft treat. Yes, you can use any nut butter you like. Almond, peanut, or cashew butter all work well. Each will change the flavor a bit, so pick your favorite. If you have a nut allergy, sunflower butter is a great swap. These bars will last about one week in the fridge. Make sure to store them in an airtight container. If you freeze them, they can last for up to three months. Just remember to thaw them in the fridge for a few hours before eating. Yes, these bars are naturally gluten-free! The almond flour and rolled oats do not contain gluten. Just make sure your oats are certified gluten-free to avoid cross-contamination. If you don't have maple syrup, honey or agave syrup can work too. Both will add sweetness but will slightly change the flavor. You can also use a sugar-free syrup for a low-calorie option. This blog post shared how to make delicious cookie dough bars. You learned about the ingredients and substitutions, plus optional add-ins like nuts and fruit. I explained step-by-step instructions for mixing, pressing, and setting your bars. We also explored tips for texture, presentation, and serving. Variations for flavors and healthier choices were discussed. Finally, I covered storage methods to keep your bars fresh. Enjoy making these tasty treats, and feel free to be creative with your choices!

If you crave sweets but want a quick fix, these No-Bake Cookie Dough Bars are perfect for you! They are tasty, simple, and require no oven time. With just a …

Read more

Categories Desserts

Sheet Pan BBQ Chicken & Sweet Potatoes Delight

October 14, 2025 by Chef Remy
- 4 chicken thighs (bone-in and skin-on for optimal flavor) - 2 large sweet potatoes (peeled and cut into 1-inch cubes) - 1 tablespoon extra-virgin olive oil The main ingredients bring great taste and texture to this dish. Chicken thighs have rich flavor and stay juicy during cooking. Sweet potatoes add sweetness and nutrients. Olive oil helps with cooking and adds a nice finish. - 1 teaspoon smoked paprika - 1 teaspoon garlic powder - 1 teaspoon onion powder - 1 teaspoon coarse sea salt - ½ teaspoon freshly cracked black pepper These seasonings are key to making the dish pop. Smoked paprika adds a warm, smoky flavor. Garlic and onion powders provide savory depth. Salt and pepper enhance all these flavors, bringing everything together. - 1 cup of your favorite barbecue sauce - 1 tablespoon apple cider vinegar - Fresh parsley, chopped (for garnish) The barbecue sauce gives the chicken a sweet and tangy glaze. Apple cider vinegar brightens the dish and balances the sweetness. Fresh parsley adds a splash of color and freshness when you serve the meal. 1. Preheat your oven to 400°F (200°C). This step helps cook everything evenly. 2. Line a large sheet pan with parchment paper. This makes cleanup easy and stops sticking. 1. In a big bowl, add 2 large sweet potatoes cut into 1-inch cubes. 2. Drizzle with 1 tablespoon of extra-virgin olive oil. 3. Sprinkle in 1 teaspoon of smoked paprika, 1 teaspoon of garlic powder, 1 teaspoon of onion powder, 1 teaspoon of coarse sea salt, and ½ teaspoon of freshly cracked black pepper. 4. Toss the sweet potatoes with your hands. Make sure they are well coated. 5. Spread the sweet potatoes in a single layer on one half of the sheet pan. This helps them cook and caramelize nicely. 1. In the same bowl, place 4 chicken thighs. 2. Pour in 1 cup of your favorite barbecue sauce and 1 tablespoon of apple cider vinegar. 3. Mix gently until all the chicken is covered in sauce. 4. Place the coated chicken on the other half of the sheet pan. Make sure they do not touch. This allows hot air to move around for even cooking. 5. Bake for about 35-40 minutes. Check that the chicken reaches an internal temperature of 165°F (75°C). The sweet potatoes should be fork-tender. 6. For a shiny finish, brush on more barbecue sauce during the last 5 minutes of baking. 7. After cooking, let the dish rest for a few minutes. This makes the chicken juicier. 8. Garnish with fresh chopped parsley just before serving. This adds color and freshness. Best barbecue sauce options I love using a sweet and tangy barbecue sauce. Look for a sauce with a good balance of sweetness and spice. Some people prefer a smoky flavor, while others enjoy a classic vinegar-based sauce. Experiment to find your favorite! Importance of marinating chicken Marinating chicken adds depth and flavor. A simple mix of barbecue sauce and apple cider vinegar works well. Aim to marinate the chicken for at least 30 minutes. This infuses flavors and makes the chicken juicy. How to achieve crispy skin on chicken To get crispy skin, start with bone-in, skin-on chicken. Pat the skin dry with a paper towel before seasoning. A high oven temperature helps, too. Bake the chicken at 400°F for a lovely golden color. Brush on extra barbecue sauce in the last few minutes for added crunch. Tips for perfect sweet potatoes For sweet potatoes, cutting them into even cubes ensures they cook evenly. Toss them well with olive oil and spices to coat every piece. Spread them out in a single layer on the pan. This helps them caramelize nicely and get crispy edges. Presentation ideas Serving from the sheet pan looks rustic and fun. You can also plate individual portions. Place a scoop of sweet potatoes next to the chicken for a colorful dish. Garnish with fresh parsley for a pop of color. Pairing side dishes This meal pairs well with a fresh green salad or coleslaw. You can also serve corn on the cob or baked beans for a hearty touch. These sides complement the flavors of the chicken and sweet potatoes perfectly. {{image_4}} You can switch out the chicken thighs for chicken breasts. Chicken breasts cook faster and are leaner. For a twist, try using turkey thighs or even pork chops. If you want to change up the veggies, sweet potatoes work great. You can also use carrots, broccoli, or bell peppers. Each adds its own flavor and texture. Mix up the taste by trying different spice blends. A Cajun mix can add a nice kick. You can also use Italian herbs for a fresh twist. If you like heat, add some hot sauce to the barbecue sauce. This simple change can take your dish to a whole new level. For gluten-free options, choose a gluten-free barbecue sauce. Always check labels to be sure. If you're looking for a vegan or vegetarian version, replace chicken with firm tofu or tempeh. Marinate the tofu in the barbecue sauce for extra flavor. This way, everyone can enjoy the meal! To store leftovers, let the dish cool down first. Then, place the chicken and sweet potatoes in airtight containers. Make sure to keep them in the fridge. They will stay fresh for up to three days. For the best taste, reheat in the oven. Set the oven to 350°F (175°C). Place the chicken and sweet potatoes on a baking sheet. Heat for about 15 minutes, or until warm. You can also use the microwave. Just cover the dish to keep it moist. This helps maintain the texture. If you want to freeze portions, cool the dish completely. Then, place servings in freezer-safe bags or containers. Remove as much air as possible. It can last for up to three months in the freezer. When you’re ready to eat, thaw it overnight in the fridge. Then, reheat it in the oven or microwave. This will keep the flavors and texture intact. It takes about 35-40 minutes to cook BBQ chicken thighs on a sheet pan. Chicken thighs cook well at this time and temperature. If you use chicken breasts, check them after 25-30 minutes. Always ensure the chicken reaches an internal temperature of 165°F (75°C) for safety. Yes, you can prep this dish ahead. Cut the sweet potatoes and season them. Coat the chicken with BBQ sauce and store both in the fridge. You can prepare them up to a day early. This helps save time on busy nights. Just remember to let them sit at room temperature for about 20 minutes before baking. There are many great sides you can serve. Here are a few ideas: - A fresh green salad for crunch. - Steamed broccoli for a healthy touch. - Corn on the cob for a sweet flavor. - Coleslaw for a creamy contrast. These sides will add color and balance to your meal, making it even more delightful. This blog post covered a simple and tasty way to make BBQ chicken and sweet potatoes. You learned about the main ingredients, seasonings, and cooking steps. The tips shared will help enhance flavor and improve cooking techniques. Don’t forget to try the variations for added fun. With proper storage and reheating, you can enjoy this meal for days. Now, you’re ready to create a delicious dish that impresses family and friends. Enjoy your cooking adventure!

Looking for a simple and tasty dinner? You’re in the right place! This Sheet Pan BBQ Chicken & Sweet Potatoes Delight is packed with flavor and easy to make. Using …

Read more

Categories Dinner

Protein Peanut Butter Yogurt Mousse Creamy Delight

October 14, 2025 by Chef Remy
- 1 cup Greek yogurt (plain or vanilla) - 1/2 cup natural peanut butter - 1/4 cup honey or maple syrup (adjust to taste) - 1 scoop vanilla protein powder - 1 teaspoon vanilla extract - 1/4 teaspoon salt - 1/4 cup whipped cream (optional, for a lighter texture) - Chopped peanuts and dark chocolate shavings (for garnish) The stars of this mousse are Greek yogurt and peanut butter. Greek yogurt gives a creamy base and packs protein. Peanut butter adds rich flavor and healthy fats. Honey or maple syrup sweetens it just right. You can get creative with add-ins. Try mixing in: - A pinch of cinnamon for warmth. - A dash of cocoa powder for a chocolate twist. - A handful of crushed cookies for crunch. These add-ins can make the mousse more fun and tasty. Feel free to explore and find your favorite combo! Each ingredient brings something good for you: - Greek yogurt: High in protein and calcium, it helps build muscle and supports bones. - Natural peanut butter: Offers healthy fats and protein. It keeps you full longer. - Honey or maple syrup: Natural sweeteners that provide quick energy without refined sugar. - Vanilla protein powder: Boosts protein intake, helping with muscle repair and growth. - Whipped cream (optional): Adds lightness and creaminess, making it feel special. - Chopped peanuts and dark chocolate: Provide crunch and antioxidants, adding extra flavor and health benefits. This mousse is not just a treat; it’s also a smart choice for your body! To start, grab a large mixing bowl. Add 1 cup of Greek yogurt and 1/2 cup of natural peanut butter. Drizzle in 1/4 cup of honey or maple syrup. Then, add 1 scoop of vanilla protein powder, 1 teaspoon of vanilla extract, and 1/4 teaspoon of salt. Mix these ingredients with an electric mixer on medium speed. Beat until the mixture is smooth and creamy. Don’t forget to scrape the sides of the bowl. This step helps remove lumps from the peanut butter. If you want a lighter mousse, fold in 1/4 cup of whipped cream. Use a spatula for this. Be gentle to keep the air in the mousse. This creates a fluffy texture that feels great in your mouth. The whipped cream adds a nice touch, making each bite enjoyable. Spoon the mousse into serving cups or decorative bowls. Cover them and refrigerate for at least 30 minutes. This step helps the mousse set and blend flavors. Just before serving, sprinkle chopped peanuts and dark chocolate shavings on top. This adds a crunchy texture and a burst of flavor. Enjoy your Protein Peanut Butter Yogurt Mousse as a snack or dessert! To get the best texture, use full-fat Greek yogurt. It gives a rich taste. When mixing, beat the ingredients until smooth and creamy. Scrape the bowl often. This helps avoid lumps from the peanut butter. If you want a lighter mousse, fold in whipped cream gently. This adds air and makes it fluffy. Taste your mousse before serving. You can add more honey or maple syrup if needed. One common mistake is not mixing long enough. If you rush, your mousse may be grainy. Another mistake is using cold ingredients. Let your yogurt and peanut butter sit out for a bit. This makes them easier to blend. Also, be careful not to overfold the whipped cream. This can deflate your mousse and ruin the texture. Lastly, don't skip the salt. It boosts the flavors in your mousse. You can make this mousse your own with easy changes. Try different nut butters like almond or cashew. For a chocolate twist, add cocoa powder or chocolate chips. Want extra crunch? Toss in some granola or crushed cookies. You can also switch the sweetener. Agave or coconut sugar works well too. Use flavored protein powder for a fun change. These simple tweaks can create a unique mousse just for you. {{image_4}} You can switch honey or maple syrup for other sweeteners. Stevia or agave syrup works well. These options can change the flavor and sweetness level. Stevia is often much sweeter, so use less. Agave has a mild taste and blends nicely. Each sweetener can give your mousse a unique twist. This gives you flexibility to fit your taste. To make this mousse dairy-free or vegan, use plant-based yogurt. Almond or coconut yogurt can work great. Replace the honey with maple syrup for a vegan option. Use a vegan protein powder too. This way, everyone can enjoy this creamy delight without dairy. Even without milk, you still get a rich flavor. Want to jazz up your mousse? Add cocoa powder for a chocolate version. A teaspoon of cinnamon or nutmeg can add warmth. You can also try adding a splash of coffee for a mocha flavor. For a fruity twist, blend in some berries. Each flavor addition can create a new dessert experience. Just remember to adjust the sweetness to balance the flavors. To keep your Protein Peanut Butter Yogurt Mousse fresh, store it in an airtight container. This way, the mousse stays smooth and tasty. If you use a bowl, tightly cover it with plastic wrap. Label the container with the date you made it. This helps you know when to enjoy it. When stored properly, the mousse lasts about 3 to 5 days in the fridge. The flavor will stay great during this time. However, for the best taste and texture, try to eat it within 3 days. After that, the mousse may start to lose its creaminess. Do not heat the mousse. It is best served cold. If it seems too thick after storage, gently stir in a little milk or yogurt. This helps make it smooth again. Taste it and adjust sweetness if needed. Enjoy your mousse as a cool treat! Yes, you can use non-fat yogurt. However, Greek yogurt adds creaminess and protein. Non-fat yogurt may make the mousse less rich and thick. The best protein powder is one that you enjoy. I like vanilla whey or plant-based options. Both add flavor and protein without being too overpowering. To lower calories, use less peanut butter or honey. You can also skip the whipped cream. Consider using a low-calorie sweetener if you want more sweetness. Yes, you can freeze the mousse. Store it in an airtight container. It will last about one month, but the texture may change when thawed. Yes, this recipe is great for meal prep. You can make it ahead and store it in the fridge. It keeps well for up to three days, making it a quick snack or dessert. You now have a solid understanding of making protein peanut butter yogurt mousse. We explored key ingredients, their benefits, and how to prepare and serve the dish. I shared tips to enhance texture and flavor, along with common mistakes to avoid. We discussed fun variations, storage tips, and answered important questions. You can easily customize the mousse to fit your taste. Enjoy this tasty treat guilt-free, knowing it fuels your body, too.

Are you ready for a treat that’s both delicious and nutritious? My Protein Peanut Butter Yogurt Mousse is the perfect blend of creamy goodness and protein power. Imagine indulging in …

Read more

Categories Desserts

Apple Butter Swirl Coffee Cake Delightful and Simple

October 14, 2025 by Chef Remy
The ingredients for Apple Butter Swirl Coffee Cake are simple yet effective. Each one plays a vital role in making this cake both tasty and moist. Here’s what you need: - 2 cups all-purpose flour - 1 cup granulated sugar - 1/2 cup unsalted butter, softened - 2 large eggs - 1 cup whole milk - 2 teaspoons baking powder - 1 teaspoon pure vanilla extract - 1/2 teaspoon ground cinnamon - 1 cup apple butter - 1/2 cup chopped walnuts (optional) - A pinch of salt Using fresh, quality ingredients makes a big difference. The apple butter adds sweetness and moisture, creating a rich flavor. Walnuts give a nice crunch, but they are optional. If you prefer a nut-free cake, feel free to skip them. Each ingredient works together to create a delightful treat that everyone will love. - Preheat the oven to 350°F (175°C). - Grease or line the baking pan. This helps the cake not stick. - In a large bowl, cream the softened butter and sugar. Use a hand mixer or stand mixer. Beat until light and fluffy. This takes about 3-4 minutes. - Add the eggs one at a time. Beat well after each egg. Then, stir in the vanilla extract until mixed well. - In a separate bowl, sift together the flour, baking powder, ground cinnamon, and a pinch of salt. This makes the flour light and helps the cake rise. - Gradually mix the dry ingredients into the wet ones. Alternate with the milk. Start and end with the flour. Mix gently until just combined. Do not overmix, or your cake may be dense. - Pour half of the batter into the greased pan. Spread it evenly with a spatula. - Spread the apple butter over the batter. Make sure it covers the whole layer. If you like, sprinkle chopped walnuts on top for added crunch. - Drop dollops of the remaining batter on the apple butter. Use a knife or skewer to swirl through the batter. Create a marbled effect, but don’t mix it completely. - Place the baking pan in the oven and bake for 30-35 minutes. Check for doneness by inserting a toothpick in the center. It should come out clean or with a few moist crumbs. - After baking, let the cake cool in the pan for about 10 minutes. Then, transfer it to a wire rack to cool completely. To get a light and fluffy coffee cake, avoid overmixing your batter. When you mix the wet and dry ingredients, do it gently. Stop as soon as you see no dry flour. Overmixing leads to a dense cake. To ensure a fluffy crumb, use room temperature butter and eggs. This helps create a nice rise when baking. Make your coffee cake look extra special by dusting it with powdered sugar. This adds a sweet touch and a beautiful finish. For a delightful treat, serve slices with whipped cream or vanilla ice cream. The cool cream pairs perfectly with the warm cake. If you want to try different sweeteners, use honey or maple syrup instead of sugar. Just remember to adjust the liquid in your recipe to keep the right texture. For a dairy-free option, swap whole milk with almond or oat milk. This way, everyone can enjoy this tasty cake! {{image_4}} You can make this cake even more fun! Adding spices like nutmeg or allspice gives it warmth. Just a pinch can change the whole cake. If you love nuts, try using different ones. Pecans add a nice crunch. Almonds bring a sweet touch. Experiment with what you have on hand! Want a gluten-free cake? Swap all-purpose flour for a gluten-free blend. Many brands work well in baking. For a vegan version, use plant-based butter and eggs. You can replace eggs with applesauce or flaxseed meal. Just mix one tablespoon of flaxseed with three tablespoons of water, and let it sit until it thickens. Seasonal fruits can add a fresh twist. Try mixing in some chopped pears or cranberries. They bring a great flavor that's perfect for fall or winter. For the holidays, think about adding spices like ginger or cloves. You can even drizzle a simple glaze made from powdered sugar and apple cider on top for a festive look. To keep your coffee cake fresh, you have a couple of easy options. - Room temperature storage: You can store the cake at room temperature for up to three days. Place it in an airtight container. This keeps it moist and tasty. - Refrigeration tips: If you want to store it longer, move it to the fridge. Wrap it well in plastic wrap or keep it in a sealed container. This helps it last for about a week. If you make more than you can eat, freezing is a great choice. - How to freeze leftovers: Let the coffee cake cool completely before freezing. Cut it into squares, then wrap each piece in plastic wrap. Place the wrapped pieces in a freezer-safe bag or container. This helps prevent freezer burn. - Thawing and serving after freezing: To enjoy your cake later, take out a piece and let it thaw in the fridge overnight. You can also warm it in the microwave for a few seconds. This makes the cake soft and ready to eat again. Yes, you can use homemade apple butter. It adds a personal touch and often tastes better. Just make sure it's smooth and not too watery. This will keep your cake moist and flavorful. You can check if the cake is done by inserting a toothpick into the center. If it comes out clean or with a few moist crumbs, your cake is ready. The top should also be lightly golden. You can use applesauce or mashed bananas as a substitute for eggs. Use 1/4 cup of either for each egg. This keeps your cake moist and adds a hint of sweetness. Yes, you can prepare this cake a day in advance. Just cover it well with plastic wrap or foil. This allows the flavors to blend nicely and makes it easy for serving. The coffee cake lasts about 3 days at room temperature. If you keep it in the fridge, it can last up to a week. For longer storage, consider freezing it, which can extend its life to about three months. This blog post covered a simple and tasty apple butter swirl coffee cake. We discussed the ingredients, from flour to walnuts, and shared step-by-step instructions for baking. I provided tips for the best texture and ways to customize the recipe. You also learned how to store and freeze leftovers. In conclusion, making this coffee cake can bring joy to your kitchen. It’s easy, fun, and perfect for any occasion. Enjoy your baking adventure!

Enjoy the rich flavors of fall with my Apple Butter Swirl Coffee Cake. This delightful treat combines warm spices and sweet apple butter, making it perfect for any occasion. With …

Read more

Categories Desserts

Slow Cooker Chicken Gnocchi Soup Comfort in a Bowl

October 14, 2025 by Chef Remy
- 1 lb boneless, skinless chicken breasts, cut into bite-sized pieces - 2 cups fresh spinach, roughly chopped - 1 cup carrots, diced into small pieces - 1 cup celery, diced The chicken is the star here. It adds protein and flavor. I like using boneless, skinless chicken breasts. They cook well and shred easily. Fresh spinach adds a nice color and boosts nutrition. Carrots and celery give a sweet crunch to the soup. - 1 teaspoon garlic powder - 1 teaspoon onion powder - 1 teaspoon dried thyme - 4 cups low-sodium chicken broth - 1 cup heavy cream (or coconut cream for a dairy-free alternative) Garlic powder and onion powder bring warmth to the dish. Dried thyme adds a lovely herbal note. Low-sodium chicken broth keeps the soup balanced. You can use heavy cream for richness or coconut cream if you want it dairy-free. - Fresh parsley, chopped - Salt and pepper Fresh parsley adds a bright touch at the end. I always use salt and pepper to enhance the flavors. Adjust them to your taste for the best result. This soup is all about simple, fresh ingredients. Each one plays a key role in making your bowl of soup comforting and full of flavor. Seasoning the chicken Start by cutting the chicken breasts into small pieces. Season these pieces with salt and black pepper. Make sure each piece gets a good coat of seasoning. This step is key to bringing out the chicken's flavor. Correctly layering the ingredients Next, take your slow cooker. Lay the diced carrots and celery evenly at the bottom. These veggies add sweetness and texture. Then, add the chopped spinach on top. Sprinkle in the garlic powder, onion powder, and thyme next. Finally, place the seasoned chicken on top of the veggies. This layering helps the flavors meld well during cooking. Adding broth and slow cooking Now, gently pour the chicken broth over the layers. Make sure it covers everything but does not disturb the chicken too much. Secure the lid on your slow cooker. Set it to cook on low for 6 hours or high for 3 hours. The chicken will be tender and juicy when it's done. Shredding the chicken after cooking Once the cooking time is up, carefully take the chicken out. Use two forks to shred it into bite-sized pieces. This makes it easy to eat. Return the shredded chicken to the soup, mixing it well with the broth and veggies. Incorporating gnocchi Stir in the gnocchi gently. This step is vital for making the soup hearty. Cook on high for another 30 minutes. The gnocchi will become soft and plump, soaking up all the tasty flavors. Finishing with cream and serving Pour in the heavy cream or coconut cream. Stir this in well to blend. Let the soup heat through for another 10 to 15 minutes. Taste it and add salt if needed. Finally, ladle the soup into warm bowls. Garnish with fresh parsley for a nice touch. Enjoy your cozy bowl of goodness! For the best taste, season your chicken well. Use salt and freshly ground black pepper. This ensures flavor in every bite. You can also try adding more herbs if you like. Dried thyme works great here. To keep the chicken tender, avoid overcooking. Cooking on low for 6 hours is ideal. If you are short on time, you can use the high setting for 3 hours. Always check the chicken for tenderness before serving. The slow cooker has two main settings: low and high. Low is perfect for a long, slow cook. High cooks faster but can dry out the chicken if not monitored. Look for signs that the chicken is done. It should shred easily with a fork. For gnocchi, they are ready when they float to the top. This usually takes about 30 minutes on high. This soup pairs well with crusty bread or a fresh salad. A simple green salad adds a nice crunch. For sides, consider garlic bread for extra flavor. When serving, use warm bowls to keep the soup hot. A generous scoop ensures everyone enjoys a hearty meal. Aim for about 1.5 cups per serving. Garnish each bowl with fresh chopped parsley for that final touch. {{image_4}} For those who need gluten-free options, you can use gluten-free gnocchi. Many brands offer this kind. Check labels to ensure they fit your needs. If you want a dairy-free soup, use coconut cream instead of heavy cream. It adds a nice flavor and keeps it creamy. Feel free to add other veggies. Zucchini, peas, or bell peppers can work well. You can also change the protein. Try using turkey or even tofu if you want a vegetarian twist. Each swap can change the flavor and texture of your soup. To boost flavor, add fresh herbs like basil or thyme. Dried herbs also work but fresh gives more depth. You can also switch up the broth. Try using vegetable broth for a lighter version, or add a splash of white wine for extra richness. These changes can make your soup unique every time. To store leftovers, let the soup cool down first. Then, place it in an airtight container. Make sure to cover it well to keep out air. You can keep it in the fridge for up to three days. After that, the flavors may fade and the texture can change. If you want to freeze the soup, use freezer-safe containers. Leave some space at the top as the soup will expand when frozen. It stays fresh for about three months in the freezer. When it's time to eat, thaw it in the fridge overnight or use the microwave on a low setting. You can reheat the soup on the stovetop or in the microwave. For stovetop, heat it gently in a pot. Stir often to keep the soup from sticking. If using the microwave, heat in short bursts of one minute. Check and stir in between. You may need to add a little water or broth to keep the texture creamy. Enjoy the warmth of this soup again! Cooking this soup takes about 6 hours on low and 3 hours on high. Both methods will yield tender chicken and soft veggies. The low setting is best for flavors to blend well. Yes, you can use frozen chicken. Just add about 30 minutes to the cooking time. Frozen chicken may change the soup's texture slightly. It might be a bit less tender than fresh chicken. Yes, this recipe is great for kids. You can adjust it by cutting the veggies smaller. You can also leave out the black pepper for picky eaters. Most kids love gnocchi, so they will enjoy this soup! This blog post outlined a simple and tasty Slow Cooker Chicken Gnocchi Soup. I shared the main ingredients, cooking steps, and tips for perfecting the recipe. You learned how to modify ingredients for different diets and how to store leftovers safely. In the end, this dish is easy to make and great for all ages. Enjoy trying new flavors and ingredients to make it your own. Happy cooking!

Do you crave a warm, hearty soup that’s as easy to make as it is delicious? Look no further! My Slow Cooker Chicken Gnocchi Soup is the ultimate comfort food. …

Read more

Categories Dinner

Maple Pecan Oatmeal Cups Tasty and Nutritious Recipe

October 14, 2025 by Chef Remy
- 2 cups rolled oats - 1/2 cup chopped pecans - 1/4 cup maple syrup - 1/2 cup almond milk (or milk of choice) - 1 ripe banana (mashed) - 1 teaspoon vanilla extract - 1 teaspoon ground cinnamon - 1/2 teaspoon baking powder - 1/4 teaspoon salt The main ingredients create a tasty and healthy base for the oatmeal cups. Rolled oats give a hearty texture. Chopped pecans add a nice crunch and nutty flavor. Maple syrup brings sweetness, making them delightful. Almond milk keeps the recipe creamy and dairy-free. The ripe banana adds moisture and natural sweetness. Vanilla extract and ground cinnamon enhance the flavors. Baking powder helps the cups rise, while salt balances the taste. - Fresh berries - Additional chopped pecans - Extra maple syrup Optional toppings can make your oatmeal cups even better. Fresh berries add color and a burst of freshness. More chopped pecans give extra crunch and flavor. A drizzle of extra maple syrup can make each bite sweeter. Feel free to mix and match toppings to suit your taste! 1. Preheat the oven and prepare muffin pan First, heat your oven to 350°F (175°C). While it warms up, prepare your muffin pan. You can line it with paper cups or grease each cup well. 2. Mix dry ingredients In a large bowl, combine the rolled oats, chopped pecans, ground cinnamon, baking powder, and salt. Stir them together well. This step makes sure the flavors blend nicely. 3. Combine wet ingredients In another bowl, mash a ripe banana. Add almond milk, maple syrup, and vanilla extract to the banana. Whisk them until smooth. This mix will give your cups moisture and sweetness. 4. Mix wet and dry ingredients Pour the wet mixture into the dry ingredients. Stir everything together until the oats are fully coated. You want a nice, even mix for the best flavor. 1. Portion mixture into muffin pan Spoon the mixture into your muffin pan. Fill each cup about three-quarters full. This will allow them to rise without spilling over. 2. Bake until golden brown Place the muffin pan in the preheated oven. Bake for 20 to 25 minutes. Look for a golden top and firm texture. This means they're ready! 3. Cooling tips After baking, take the muffin pan out of the oven. Let the cups cool in the pan for about five minutes. Then, transfer them to a wire rack to cool completely. Enjoy them warm or at room temperature! - Alternative nut options: You can switch pecans for walnuts or almonds. Both add a nice crunch. - Dairy-free milk substitutes: Use oat milk or coconut milk instead of almond milk. They work well in this recipe. - Sweetness adjustments: If you prefer less sugar, cut the maple syrup in half. You can also use honey or agave syrup. - Key cooking notes: Make sure to mash the banana well. This helps blend the flavors. Mix dry and wet ingredients until just combined to keep them fluffy. - Baking time variations based on oven type: Ovens can vary, so check your cups at 20 minutes. If they look soft, give them a few more minutes. {{image_4}} You can change the taste of your Maple Pecan Oatmeal Cups easily. Here are two fun ideas: - Adding chocolate chips: Stir in a half cup of chocolate chips. This adds a sweet twist. You can use dark, milk, or even white chocolate chips. I love using dark chocolate for a rich flavor. - Incorporating dried fruits: Dried fruits like cranberries or raisins work well here. Add half a cup to the mix for a burst of sweetness. They also add texture and chewiness to the cups. You can adapt this recipe to fit your diet needs. Here are some simple changes: - Gluten-free options: Use gluten-free rolled oats instead of regular oats. This keeps the recipe safe for those with gluten sensitivities. Make sure to check for gluten-free labels. - Vegan adaptations: To make it vegan, swap almond milk for any plant-based milk. Use maple syrup as your sweetener, and the ripe banana helps bind it all together. This means no eggs or dairy are needed! - Room temperature storage: You can keep the oatmeal cups at room temperature for up to two days. Place them in an airtight container. This keeps them fresh and tasty. - Refrigeration tips: If you want to store them longer, put them in the fridge. They will last up to a week. Just make sure they are in a sealed container. This prevents them from drying out. - Freezing options: For longer storage, freeze the oatmeal cups. Wrap each cup in plastic wrap, then place them in a freezer bag. They will stay good for about three months. When ready to eat, just thaw them in the fridge overnight. - Best methods for reheating: To reheat, use the microwave. Heat each cup for about 30 seconds to 1 minute. Check if they are warm enough. You can also reheat them in the oven. Set the oven to 350°F (175°C) and heat for about 10 minutes. - Serving suggestions after storage: Serve the oatmeal cups warm. Top them with fresh berries or an extra drizzle of maple syrup. This adds a nice touch and enhances the flavor. Enjoy them as a quick breakfast or snack! To make these tasty oatmeal cups, follow these steps: 1. Preheat your oven to 350°F (175°C). 2. Prepare a muffin pan by lining it with paper liners or greasing it. 3. In a large bowl, mix rolled oats, chopped pecans, cinnamon, baking powder, and salt. 4. In another bowl, whisk together almond milk, mashed banana, maple syrup, and vanilla extract. 5. Pour the wet mix into the dry mix and stir until combined. 6. Spoon the mixture into the muffin pan, filling each cup about three-quarters full. 7. Bake for 20-25 minutes until golden brown and set. 8. Let cool for five minutes before transferring to a wire rack. These steps are simple and quick, making it easy to enjoy delicious oatmeal cups. Yes, you can prepare these oatmeal cups ahead of time. Here are the benefits: - You can save time on busy mornings. - Store them in the fridge for up to five days. - They are perfect for meal prep, allowing you to grab a quick snack or breakfast. - You can freeze them for longer storage. Just thaw them overnight before eating. Making these cups ahead gives you tasty meals ready when you need them. These oatmeal cups are not just tasty; they are also nutritious. Each cup contains: - Approximately 150 calories - Good fiber from oats and pecans - Healthy fats from pecans - Natural sweetness from banana and maple syrup These ingredients provide energy and nutrients, making them a healthy choice for breakfast or snacks. This blog post covers how to make delicious Maple Pecan Oatmeal Cups. We discussed the key ingredients and the simple steps to mix and bake. I shared tips for substitutes and variations to fit your taste. You can also learn how to store and reheat these delicious treats. In the end, making these oatmeal cups is easy and rewarding. Enjoy them as breakfast or a snack. With a few tweaks, they become your new favorite!

If you’re looking for a tasty and healthy snack, you’ve come to the right place! My Maple Pecan Oatmeal Cups are both delicious and easy to make. Packed with wholesome …

Read more

Categories Breakfast

Minute Spicy Garlic Ramen Quick and Flavorful Meal

October 14, 2025 by Chef Remy
- 2 packs of instant ramen noodles (discard flavor packets) - 4 cups vegetable broth - 4 cloves of garlic, finely minced - 1 tablespoon fresh ginger, freshly grated - 2 tablespoons soy sauce - 1 tablespoon chili paste (adjust quantity based on preferred spice level) - 1 tablespoon sesame oil - 1 cup baby spinach, washed and drained - 1 cup sliced mushrooms (shiitake or button work well) - 1 green onion, finely chopped (for garnish) - Sesame seeds (optional, for garnish) To make Minute Spicy Garlic Ramen, you need simple yet flavorful ingredients. Start with two packs of instant ramen noodles. Discard the flavor packets that come with them. You will want a good base for your broth. For this, use four cups of vegetable broth. It adds depth and richness. Next, add aromatics to boost flavor. Use four cloves of garlic, minced finely, and one tablespoon of freshly grated ginger. These add a great kick. For seasoning, grab two tablespoons of soy sauce and one tablespoon of chili paste. Adjust the chili paste to make it spicier or milder, depending on your taste. You’ll also need one tablespoon of sesame oil for cooking. It gives a nice nutty flavor. For fresh veggies, add one cup of baby spinach and one cup of sliced mushrooms. Shiitake or button mushrooms work well. Finally, for garnishing, use one green onion, chopped finely, and sesame seeds, if you like. These will add a nice touch to your finished dish. This collection of ingredients creates a quick, tasty meal that you can make in just 15 minutes. Let's get cooking! Start by heating 1 tablespoon of sesame oil in a large pot over medium heat. Once the oil is hot, add 4 cloves of minced garlic and 1 tablespoon of freshly grated ginger. Sauté these aromatics for about 1 minute. You want them fragrant and golden, not burnt. This step builds a strong flavor base for your ramen. Next, add 1 cup of sliced mushrooms to the pot. Shiitake or button mushrooms work well here. Stir the mushrooms in with the garlic and ginger. Cook them for about 3 to 4 minutes. This softens the mushrooms and helps them release their moisture. You will notice how the aroma deepens at this stage. Now, pour in 4 cups of vegetable broth. Turn the heat up to bring the mixture to a vigorous boil. Once boiling, add 2 packs of instant ramen noodles. Discard the flavor packets that come with the noodles. Cook the noodles for 3 to 4 minutes. Stir occasionally to help them separate and cook evenly. They should be tender but not mushy. Once the noodles are cooked, stir in 2 tablespoons of soy sauce and 1 tablespoon of chili paste. Taste the broth and adjust the chili paste if you want more heat. Finally, add 1 cup of washed and drained baby spinach. Stir gently until the spinach is just wilted, about 1 minute. Remove the pot from the heat and ladle the ramen into bowls. For a nice finish, garnish each bowl with chopped green onions and sprinkle with sesame seeds if you like. Enjoy your Minute Spicy Garlic Ramen hot! To make your ramen even tastier, you can adjust the spice levels. If you like it hot, add more chili paste. Start with one tablespoon, then taste and add more if needed. You can also add extras like a splash of lime juice or a sprinkle of fresh herbs. These will brighten up the dish. Try adding cooked chicken or tofu for protein. This will make your meal more filling. This ramen is quick to make! You can prep and cook it all in under one minute. Start by heating the sesame oil. While it heats, mince the garlic and grate the ginger. Once the oil is hot, add the garlic and ginger. Stir them for about one minute until they smell great. Then, add the mushrooms. They need about three to four minutes to cook. After that, pour in the broth and boil it. Add the noodles when it’s boiling and cook for three to four minutes. Each step is fast, so keep an eye on the time! A beautiful bowl makes your ramen even more enjoyable. Serve it hot in a nice bowl. For a fresh look, add a wedge of lime on the side. You can use chopsticks for a fun touch. Garnish your ramen with chopped green onions and a sprinkle of sesame seeds. This adds color and a nice crunch. Enjoy your tasty creation! {{image_4}} You can easily swap out the spinach and mushrooms. Try using kale instead of spinach. Kale adds a nice crunch. For mushrooms, you can use bell peppers or zucchini. Both will give your ramen a fresh taste. Just chop them into small pieces. Cook them with the garlic and ginger until soft. This change adds color and nutrients to your dish. The broth you use can change the flavor of your ramen. While the recipe uses vegetable broth, you can use chicken or beef broth. This makes your ramen heartier and adds depth. If you love rich flavors, chicken broth is an excellent choice. Beef broth brings a savory taste that many enjoy. Choose a broth that fits your taste or what you have on hand. The spice level can make or break your ramen. If you love heat, add more chili paste. Start with a small amount and taste as you go. You can also try adding new spices like cayenne pepper or crushed red pepper. These spices can boost the heat without changing the flavor too much. If you prefer milder dishes, cut back on the chili paste. Adjust it to fit your taste buds. To keep your Minute Spicy Garlic Ramen fresh, store it in an airtight container. This will help prevent any air from spoiling the taste. Place the cooled ramen in the fridge. It can last for about 3 days in the refrigerator. Make sure to separate the noodles from the broth if possible. This keeps the noodles from getting too soft. When you're ready to enjoy your leftovers, reheat them carefully. You can use a pot on the stove or a microwave. If using a pot, add a splash of water or broth to keep it moist. Heat on medium until it's hot. If using a microwave, cover the bowl and heat in short bursts. Stir in between to ensure even heating. This keeps the flavors bright and fresh. You can freeze ramen, but it’s best to freeze the broth and noodles separately. Cool them down first, then place them in freezer-safe bags or containers. They can last for about 2 months in the freezer. When you’re ready to eat, thaw them in the fridge overnight. Reheat the broth and cook the noodles fresh for the best taste. Yes, you can use other types of noodles. If you want a different texture, try udon or soba noodles. Rice noodles are also a great choice for a gluten-free option. Just cook them according to their package directions. Keep in mind that cooking times may vary. If you don’t have chili paste, use sriracha or red pepper flakes. You can also add hot sauce for a kick. If you prefer less spice, try using sweet chili sauce. Adjust the amount to suit your taste. To make this dish vegetarian, use vegetable broth and skip any meat-based toppings. You can add tofu for protein and texture. Other great additions include bok choy or bell peppers. These will keep your ramen hearty and plant-based. This blog post covered how to make a tasty bowl of ramen. We explored ingredients and steps, from sautéing garlic and ginger to boiling noodles. I shared tips to enhance flavor and manage cooking time. We also discussed fun variations and clever storage ideas. In the end, this easy recipe lets you enjoy ramen your way. Experiment with new ingredients to make it yours. Happy cooking!

Are you craving a quick yet flavorful meal? Look no further than Minute Spicy Garlic Ramen! In just one minute, you can whip up a delicious bowl packed with garlic, …

Read more

Categories Dinner

Savory Honey Lime Chicken Thighs in Air Fryer Recipe

October 14, 2025 by Chef Remy
To make this dish, you need these main ingredients: - 4 bone-in, skin-on chicken thighs - Salt and pepper to taste The marinade gives the chicken its tasty flavor. You will need: - 3 tablespoons honey - 2 tablespoons freshly squeezed lime juice - 1 tablespoon lime zest (from about 1 lime) - 2 cloves of garlic, finely minced - 1 teaspoon ground cumin - 1 teaspoon smoked paprika Garnishes add a wonderful touch. Consider using: - Fresh cilantro, chopped To start, gather your ingredients for the marinade. You need honey, lime juice, lime zest, minced garlic, ground cumin, smoked paprika, salt, and pepper. In a medium bowl, mix these items together. Whisk them until smooth. This mixture will coat the chicken and add great flavor. Next, take your chicken thighs. Place them in a large resealable bag or a shallow dish. Pour the marinade over the chicken. Make sure each piece is well coated with the mixture. Seal the bag or cover the dish tightly. Refrigerate the chicken for at least 30 minutes. For the best taste, let it marinate for up to 2 hours. While your chicken marinates, preheat the air fryer to 380°F (193°C). Once the chicken is ready, take it out of the marinade. Let the excess marinade drip off. Discard any leftover marinade for safety. Place the chicken thighs in the air fryer basket, skin-side up. Make sure they are spaced out. Air fry the thighs for 25 to 30 minutes. Flip them halfway through. The chicken should reach an internal temperature of 165°F (74°C) and have crispy skin. When done, let the chicken rest for about 5 minutes. This keeps it juicy. Before serving, sprinkle fresh chopped cilantro on top for color and flavor. To get the best flavor, always marinate your chicken. Use a resealable bag or shallow dish. Mix honey, lime juice, lime zest, minced garlic, cumin, and paprika well. Coat the chicken thoroughly with the marinade. Let it sit for at least 30 minutes, but aim for 2 hours if you can. This time allows the flavors to seep into the meat, making it taste amazing. Preheat your air fryer to 380°F (193°C) before cooking. This step helps the chicken cook evenly. Place the marinated chicken thighs in the basket with the skin side up. Avoid stacking them; give each piece space to cook. Air fry for 25-30 minutes. Flip the chicken halfway to ensure even cooking. Always check the internal temperature; it should reach 165°F (74°C). For crispy skin, make sure the chicken is dry before cooking. Pat it down gently with paper towels after marinating. The dry skin crisps up better in the air fryer. Also, avoid overcrowding the basket. This keeps air flowing around the chicken, allowing the skin to get that perfect crunch. After cooking, let it rest for 5 minutes before serving. This step locks in the juiciness while keeping the skin crispy. {{image_4}} If you want to mix things up, try different flavors. You can use maple syrup instead of honey for a richer taste. Soy sauce adds a savory punch. Try adding fresh herbs like thyme or rosemary for a fragrant twist. For heat, include some chili flakes or hot sauce. These changes keep the dish exciting. While the air fryer gives a great crispy skin, you can also use an oven or grill. For the oven, preheat to 400°F (204°C). Place the thighs on a baking sheet and cook for 35-40 minutes. Flip halfway for even cooking. On the grill, cook over medium heat for about 6-7 minutes per side. Always check the temperature for safety. Honey Lime Chicken Thighs pair well with many sides. Serve with rice or quinoa for a filling meal. A fresh salad adds a nice crunch. You can also serve it with roasted veggies for added flavor. Garnish with more cilantro for a pop of color. These choices make your meal both tasty and beautiful. After enjoying your honey lime chicken thighs, let them cool. Place the leftover chicken in an airtight container. Store it in the fridge for up to 3 days. This keeps the chicken fresh and tasty for your next meal. For reheating, the air fryer works best. Preheat the air fryer to 350°F (175°C). Place the chicken thighs in the basket and heat for 8-10 minutes. This method keeps the skin crispy while warming the meat. You can also use a microwave, but the skin may lose its crunch. If you want to store the chicken for longer, freezing is a great option. Wrap each thigh tightly in plastic wrap. Then, place them in a freezer-safe bag. They can stay in the freezer for up to 3 months. When you are ready to eat, thaw the chicken in the fridge overnight. Then, reheat as mentioned above. You can tell chicken thighs are done when they reach an internal temperature of 165°F (74°C). Use a meat thermometer to check. Insert it into the thickest part of the thigh, avoiding the bone. When the temperature hits 165°F, the chicken is safe to eat. The juices should run clear, not pink. Let the chicken rest for about 5 minutes before serving. This helps keep it juicy. Yes, you can use boneless chicken thighs! They will cook faster than bone-in thighs, so adjust the cooking time. Boneless thighs take about 20-25 minutes in the air fryer. Check their temperature to ensure they reach 165°F (74°C). The honey lime flavor will still shine through with boneless thighs. Honey lime chicken thighs pair well with many sides. Here are a few ideas: - Rice: Fluffy white or brown rice complements the chicken well. - Quinoa: A healthy option that absorbs the honey lime flavor. - Vegetables: Roasted or steamed veggies add color and nutrition. - Salad: A fresh salad can balance the rich flavors of the chicken. - Tortillas: Use them to make tacos with the chicken and toppings. Feel free to mix and match these sides to create a complete meal! You learned how to make Honey Lime Chicken Thighs with a simple marinade. I shared tips for marinating and cooking in an air fryer. You also explored variations and storage options. Enjoy the tasty results, whether you stick to the recipe or try new flavors. Remember, the key is marination for great taste. Keep experimenting and serving this dish in fun ways!

Are you ready to take your dinner game to the next level? This Savory Honey Lime Chicken Thighs in Air Fryer recipe is simple, delicious, and packed with flavor. By …

Read more

Categories Dinner

Sun-Dried Tomato Tortellini Skillet Flavor Boost

October 14, 2025 by Chef Remy
- Cheese tortellini (fresh or frozen) - Sun-dried tomatoes in oil - Fresh spinach - Bell pepper - Garlic - Vegetable broth - Heavy cream - Dried Italian herbs - Red pepper flakes - Olive oil - Salt and black pepper - Fresh basil leaves and grated Parmesan cheese for serving The main ingredients set the stage for rich flavor. Cheese tortellini brings a soft, creamy texture. You can use fresh or frozen tortellini, making it easy for anyone. Sun-dried tomatoes add a sweet and tangy punch. They give the dish depth. Fresh spinach adds color and nutrition. Next, we have the additional ingredients. Bell pepper offers a slight crunch and sweetness. Use red or yellow peppers for the best taste. Garlic is a must. It gives the dish a warm, fragrant note. Vegetable broth adds richness while keeping it light. For seasonings, heavy cream gives a luscious finish. It makes the sauce creamy and dreamy. Dried Italian herbs bring the classic taste of Italy. Red pepper flakes can kick up the heat. Adjust them to your taste. Olive oil adds a smooth touch and helps sauté the veggies. Finally, don’t forget salt and black pepper. They enhance all the flavors. Fresh basil leaves and grated Parmesan cheese are perfect garnishes. They make the dish look beautiful and add fresh notes. With these ingredients, your Sun-Dried Tomato Tortellini Skillet will shine. The mix of flavors and textures makes it a winner! 1. Heat 2 tablespoons of extra virgin olive oil in a large skillet over medium heat. Wait until it shimmers. 2. Add 3 finely minced garlic cloves. Sauté for 1-2 minutes. Watch closely to keep it from browning. 3. Next, toss in 1 thinly sliced bell pepper and 1 cup of coarsely chopped sun-dried tomatoes. Sauté for 3-4 minutes until the bell pepper softens. 1. Pour in 1 cup of vegetable broth. Increase the heat slightly and bring it to a gentle simmer. 2. Stir in 12 oz of cheese tortellini. Cook according to the package instructions, usually 5-7 minutes. They will float when tender. 1. Reduce the heat. Gently mix in ½ cup of heavy cream. Let it simmer for 2-3 minutes to thicken. 2. Add 2 cups of fresh spinach, 1 teaspoon of mixed dried Italian herbs, and ¼ teaspoon of red pepper flakes if you like heat. Stir until the spinach wilts. 3. Season with salt and freshly ground black pepper. If the sauce is too thick, add more vegetable broth until you like the consistency. 4. Remove from heat. Garnish with fresh basil leaves and sprinkle with grated Parmesan cheese before serving. - Ensuring the garlic doesn’t burn: Start by heating olive oil over medium heat. When the oil shimmers, add minced garlic. Stir it for only 1-2 minutes. Watch it closely. If it turns brown, it gets bitter. - Achieving the right tortellini texture: Cook the tortellini in the broth until they float. This usually takes about 5-7 minutes. They should feel tender but not mushy. If you overcook them, they can fall apart in the sauce. - Ideal presentation methods: Serve the tortellini in shallow bowls. Add extra Parmesan on top for a nice touch. Drizzle with olive oil for a glossy finish. A few fresh basil leaves make it look even better. - Best sides to serve with: A crisp green salad works great with this dish. You can also serve garlic bread on the side. It’s perfect for dipping into the creamy sauce. - Suggested additional herbs and spices: To boost flavor, try adding fresh parsley or thyme. A pinch of smoked paprika can add depth. You can also sprinkle some Italian seasoning for extra zest. - Options for adjusting heat levels: If you want more heat, add more red pepper flakes. You can also use a dash of hot sauce. For less heat, skip the flakes altogether or use mild pepper instead. {{image_4}} You can switch up the vegetables to suit your taste. Here are some options: - Zucchini: Adds a nice crunch and absorbs flavors well. - Mushrooms: Offer a rich, earthy taste that pairs nicely with the tortellini. - Cherry tomatoes: They provide a burst of sweetness and color. For protein options, consider: - Grilled chicken: Adds a hearty texture and is packed with protein. - Shrimp: Cooks quickly and brings a fresh ocean flavor. - Chickpeas: A great plant-based protein that adds a nutty note. If you need this dish to be gluten-free, choose gluten-free tortellini. Many brands offer tasty options. You can also use zucchini noodles for a low-carb choice. For vegan or dairy-free modifications, swap the heavy cream for coconut milk or a cashew cream. Use a vegan tortellini or skip it altogether and add more veggies. Nutritional yeast can replace Parmesan, adding a cheesy flavor without the dairy. To change the taste, try different cheeses. Here are some ideas: - Feta cheese: Adds a tangy kick that complements the sun-dried tomatoes. - Goat cheese: Offers a creamy, rich flavor that melts beautifully. - Mozzarella: Provides a mild taste and gooey texture. Using sun-dried tomato pesto can also enhance the flavor. Mix it in with the cream for a deeper tomato taste. It brings extra herbs and spices, making the dish more vibrant. Store any leftovers in an airtight container. This keeps the dish fresh. Place it in the fridge right after it cools. It will stay good for about 3 to 4 days. When you want to enjoy it again, just reheat it on the stove. To freeze leftovers, let the dish cool completely. Then, place it in a freezer-safe container. Make sure to leave some space for expansion. It can last up to 3 months in the freezer. When you're ready to eat it, thaw it in the fridge overnight. Reheat gently on the stove, adding a splash of broth if needed. You can make this dish ahead of time. Prepare it fully and store it in the fridge for quick meals. Portion it into individual servings for easy access. This way, you can grab a meal anytime. Just reheat and enjoy! It takes about 10 minutes to prep and 25 minutes total. This makes it a quick meal for busy days. You can have it ready in just under half an hour. Yes, you can use frozen tortellini. Just adjust your cooking time. Frozen tortellini may take a few minutes longer to cook. Make sure to check the package for exact times. Yes, you can make it vegan! Use plant-based tortellini and swap heavy cream for coconut cream. You can also use vegetable broth instead of regular broth. The sun-dried tomatoes add a lot of flavor, so it will still taste great. This dish pairs well with a simple green salad. You can also serve it with garlic bread for a nice crunch. Another option is steamed vegetables for extra color and health. This blog post covered a tasty Sun-Dried Tomato Tortellini Skillet. We explored the main and additional ingredients, like cheese tortellini, sun-dried tomatoes, and spinach. You learned key steps to cook this dish, along with helpful tips and fun flavor variations. Remember to store leftovers well for later meals. Enjoy making this dish your own with unique twists. With simple methods and easy swaps, you can create a meal that’s quick, delicious, and satisfying. Now, it's time to get cooking!

Looking for a quick, delicious meal? Try this Sun-Dried Tomato Tortellini Skillet! It’s packed with flavor and takes just minutes to prepare. Using easy ingredients like cheese tortellini, sun-dried tomatoes, …

Read more

Categories Dinner
Older posts
Newer posts
← Previous Page1 … Page9 Page10 Page11 … Page130 Next →

ROASTED RECIPES

Where bold flavors meet everyday meals. Warm, vibrant, and made to share. 🔥🥗🍴

PAGES

Home About Contact Privacy Policy Terms & Conditions Cookie Policy GDPR Policy Copyright Policy Disclaimer

CATEGORIES

Appetizers Desserts Salads Breakfast Dinner

Contact

  • Pinterest
  • Mail
Copyright © 2025 Roasted Flavors. All rights reserved.