No-Bake Oreo Pumpkin Cheesecake Bars Delightful Treat

WANT TO SAVE THIS RECIPE?

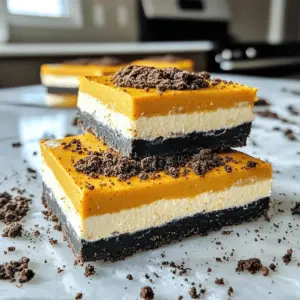
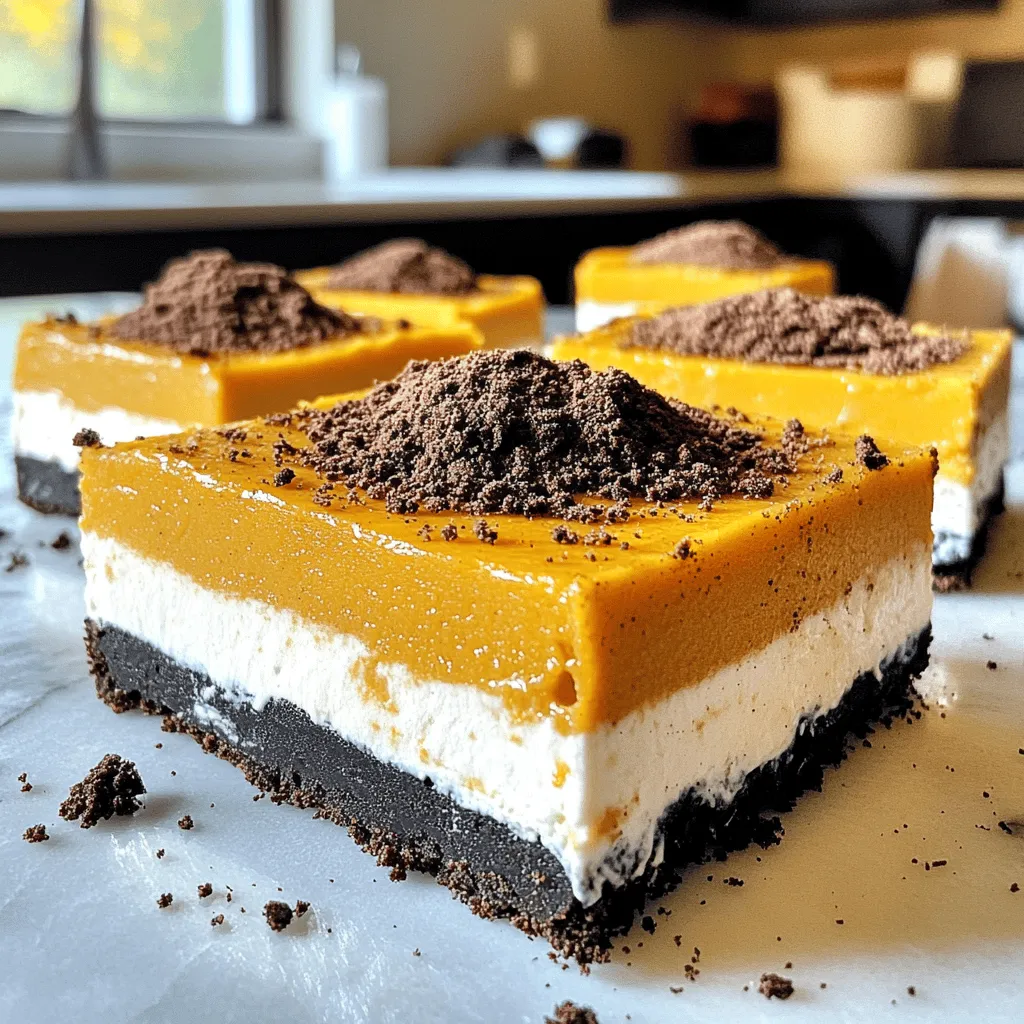
Looking for a fun fall treat? These No-Bake Oreo Pumpkin Cheesecake Bars are perfect for you! With a rich, creamy filling and a crunchy cookie crust, they combine the flavors of pumpkin spice and chocolate in every bite. They’re easy to make, and you don’t even need to turn on your oven. Ready to impress your friends and family? Let’s dive into the delicious details!

Ingredients

Essential Ingredients

– 24 Oreo cookies, finely crushed

– 4 tablespoons unsalted butter, melted

– 1 cup pumpkin puree (canned or fresh)

– 1 cup cream cheese, softened to room temperature

– ½ cup powdered sugar

– 1 teaspoon vanilla extract

– 1 teaspoon pumpkin pie spice

– 1 cup whipped cream (store-bought or homemade)

The main flavors in these bars come from the filling. The cream cheese and pumpkin puree create a smooth and creamy texture. The pumpkin puree adds richness and a slight sweetness. The vanilla extract gives a nice aroma, while pumpkin pie spice adds warm notes of cinnamon and nutmeg. The crust, made from Oreo cookies, brings a chocolatey crunch that perfectly balances the creamy filling.

Optional Ingredients

– Extra Oreo crumbs for garnish

You can add extra Oreo crumbs on top for a fun and crunchy finish. This simple touch makes the bars look even more appealing. If you want to take it a step further, consider using homemade whipped cream. It’s lighter and fresher than store-bought. However, store-bought whipped cream is just as tasty and saves time.

Step-by-Step Instructions

Preparing the Crust

To start, take 24 Oreo cookies and finely crush them. You can use a food processor or put them in a bag and crush them with a rolling pin. Once crushed, add 4 tablespoons of melted butter to the cookies. Stir until the mixture looks like wet sand. This is the base for our bars.

Next, lightly grease an 8×8-inch baking pan with cooking spray or butter. Press the Oreo mixture into the bottom of the pan. Use the back of a measuring cup or your fingers to flatten it. Make sure it’s even. After that, place the pan in the refrigerator for about 10-15 minutes to let the crust set.

Making the Pumpkin Cheesecake Filling

Now, let’s make the filling. In a large bowl, beat 1 cup of softened cream cheese with an electric mixer. Mix until it’s smooth and creamy. Then, add 1 cup of pumpkin puree, ½ cup of powdered sugar, 1 teaspoon of vanilla extract, and 1 teaspoon of pumpkin pie spice. Blend everything until it is completely smooth.

Next, you’ll want to incorporate 1 cup of whipped cream. Take a spatula and gently fold it into the pumpkin mixture. Be careful not to stir too hard, or you might lose that light, airy feel.

Assembling the Bars

Now, it’s time to put it all together. Carefully pour the pumpkin cheesecake filling over the chilled Oreo crust. Use a spatula to spread it evenly so you have a smooth top. This step is key for a great finish.

Chilling the Bars

To finish, cover the pan with plastic wrap or foil. Place it in the refrigerator for at least 4-6 hours. For the best results, chill it overnight. This allows the flavors to blend and the cheesecake to set just right.

Tips & Tricks

Perfecting the Crust

To make a strong crust, mix the crushed Oreo cookies with melted butter well. The butter helps the crust hold together. If you want a twist, try using chocolate or vanilla sandwich cookies instead of Oreos. You can also use graham crackers for a different flavor.

Whipped Cream Incorporation

When you fold in whipped cream, do it gently. This keeps the light and airy texture of the cream. Use a spatula and lift the mixture from the bottom. Be careful not to overmix, or the cream will lose its fluffiness.

Serving Suggestions

For a lovely plate presentation, cut the bars into neat squares. You can sprinkle extra Oreo crumbs on top for a fun touch. These bars pair well with coffee or a warm spiced cider. Serve them alongside a scoop of vanilla ice cream for added delight.

Variations

Flavor Variations

You can switch up the cookie type for the crust. Instead of Oreo cookies, try using graham crackers. They give a nice crunch and a different flavor. You can also use chocolate chip cookies for a sweeter base. This change adds depth to your bars.

Another fun option is to mix in different spices. Swap pumpkin pie spice for cinnamon or ginger for a unique twist. You can even add a pinch of nutmeg for a little extra warmth. Each spice brings its own flair.

Dietary Modifications

For a gluten-free version, use gluten-free cookies for the crust. Many brands offer tasty options that work well. You can also use almond flour mixed with melted butter for a nutty base.

If you want a dairy-free filling, use vegan cream cheese. Pair it with coconut whipped cream for a creamy texture. You won’t miss the dairy at all with these swaps.

Seasonal Twists

Holiday-themed variations can make your bars festive. Try adding crushed peppermint for a winter treat. You can also swirl in cranberry sauce for a tart contrast during Thanksgiving.

For summer, mix in fresh berries like strawberries or blueberries. They add a burst of freshness and color. You can also top your bars with seasonal fruits for added flair.

Storage Information

How to Store

Store your No-Bake Oreo Pumpkin Cheesecake Bars in the fridge. This keeps them fresh and tasty. Use an airtight container for the best results. You can also cover the pan with plastic wrap or aluminum foil. This helps prevent any strong smells from mixing in.

Freezing Instructions

You can freeze these bars for later use. Cut them into squares before freezing for easy serving. Wrap each piece in plastic wrap, then place them in a freezer-safe bag. To thaw, leave them in the fridge overnight. Serve them cold for a refreshing treat.

Shelf Life

These bars stay fresh in the fridge for about five days. Check for changes in smell or texture. If they look dry or have an off smell, it’s best to toss them. Enjoy them while they are still creamy and delicious!

FAQs

Can I use homemade whipped cream?

Yes, you can use homemade whipped cream. It adds a fresh taste. To make your own, beat heavy cream in a bowl until soft peaks form. Add a bit of sugar and vanilla for flavor. Keep it cool until ready to fold into your filling.

How long do these bars need to chill?

These bars need at least 4-6 hours to chill. For best results, chill them overnight. This helps the flavors mix well and the cheesecake sets properly.

Can I use light cream cheese?

You can use light cream cheese. It will change the flavor and texture slightly. The bars may be less rich but still tasty.

What can I serve with these bars?

These bars pair well with coffee or hot chocolate. You can also serve them with a scoop of vanilla ice cream. Fresh whipped cream on the side is a great touch too!

These pumpkin cheesecake bars blend simple ingredients for a tasty treat. You start with a crust of crushed Oreos, add a creamy filling, and finish with whipped cream. You can make it your own with different flavors or dietary swaps.

Storing these bars properly keeps them fresh longer. With this guide, you’re ready to impress friends and family with a delightful dessert. Enjoy your baking and make memories with every slice!

- 24 Oreo cookies, finely crushed - 4 tablespoons unsalted butter, melted - 1 cup pumpkin puree (canned or fresh) - 1 cup cream cheese, softened to room temperature - ½ cup powdered sugar - 1 teaspoon vanilla extract - 1 teaspoon pumpkin pie spice - 1 cup whipped cream (store-bought or homemade) The main flavors in these bars come from the filling. The cream cheese and pumpkin puree create a smooth and creamy texture. The pumpkin puree adds richness and a slight sweetness. The vanilla extract gives a nice aroma, while pumpkin pie spice adds warm notes of cinnamon and nutmeg. The crust, made from Oreo cookies, brings a chocolatey crunch that perfectly balances the creamy filling. - Extra Oreo crumbs for garnish You can add extra Oreo crumbs on top for a fun and crunchy finish. This simple touch makes the bars look even more appealing. If you want to take it a step further, consider using homemade whipped cream. It’s lighter and fresher than store-bought. However, store-bought whipped cream is just as tasty and saves time. To start, take 24 Oreo cookies and finely crush them. You can use a food processor or put them in a bag and crush them with a rolling pin. Once crushed, add 4 tablespoons of melted butter to the cookies. Stir until the mixture looks like wet sand. This is the base for our bars. Next, lightly grease an 8x8-inch baking pan with cooking spray or butter. Press the Oreo mixture into the bottom of the pan. Use the back of a measuring cup or your fingers to flatten it. Make sure it’s even. After that, place the pan in the refrigerator for about 10-15 minutes to let the crust set. Now, let’s make the filling. In a large bowl, beat 1 cup of softened cream cheese with an electric mixer. Mix until it’s smooth and creamy. Then, add 1 cup of pumpkin puree, ½ cup of powdered sugar, 1 teaspoon of vanilla extract, and 1 teaspoon of pumpkin pie spice. Blend everything until it is completely smooth. Next, you’ll want to incorporate 1 cup of whipped cream. Take a spatula and gently fold it into the pumpkin mixture. Be careful not to stir too hard, or you might lose that light, airy feel. Now, it’s time to put it all together. Carefully pour the pumpkin cheesecake filling over the chilled Oreo crust. Use a spatula to spread it evenly so you have a smooth top. This step is key for a great finish. To finish, cover the pan with plastic wrap or foil. Place it in the refrigerator for at least 4-6 hours. For the best results, chill it overnight. This allows the flavors to blend and the cheesecake to set just right. To make a strong crust, mix the crushed Oreo cookies with melted butter well. The butter helps the crust hold together. If you want a twist, try using chocolate or vanilla sandwich cookies instead of Oreos. You can also use graham crackers for a different flavor. When you fold in whipped cream, do it gently. This keeps the light and airy texture of the cream. Use a spatula and lift the mixture from the bottom. Be careful not to overmix, or the cream will lose its fluffiness. For a lovely plate presentation, cut the bars into neat squares. You can sprinkle extra Oreo crumbs on top for a fun touch. These bars pair well with coffee or a warm spiced cider. Serve them alongside a scoop of vanilla ice cream for added delight. {{image_4}} You can switch up the cookie type for the crust. Instead of Oreo cookies, try using graham crackers. They give a nice crunch and a different flavor. You can also use chocolate chip cookies for a sweeter base. This change adds depth to your bars. Another fun option is to mix in different spices. Swap pumpkin pie spice for cinnamon or ginger for a unique twist. You can even add a pinch of nutmeg for a little extra warmth. Each spice brings its own flair. For a gluten-free version, use gluten-free cookies for the crust. Many brands offer tasty options that work well. You can also use almond flour mixed with melted butter for a nutty base. If you want a dairy-free filling, use vegan cream cheese. Pair it with coconut whipped cream for a creamy texture. You won't miss the dairy at all with these swaps. Holiday-themed variations can make your bars festive. Try adding crushed peppermint for a winter treat. You can also swirl in cranberry sauce for a tart contrast during Thanksgiving. For summer, mix in fresh berries like strawberries or blueberries. They add a burst of freshness and color. You can also top your bars with seasonal fruits for added flair. Store your No-Bake Oreo Pumpkin Cheesecake Bars in the fridge. This keeps them fresh and tasty. Use an airtight container for the best results. You can also cover the pan with plastic wrap or aluminum foil. This helps prevent any strong smells from mixing in. You can freeze these bars for later use. Cut them into squares before freezing for easy serving. Wrap each piece in plastic wrap, then place them in a freezer-safe bag. To thaw, leave them in the fridge overnight. Serve them cold for a refreshing treat. These bars stay fresh in the fridge for about five days. Check for changes in smell or texture. If they look dry or have an off smell, it’s best to toss them. Enjoy them while they are still creamy and delicious! Yes, you can use homemade whipped cream. It adds a fresh taste. To make your own, beat heavy cream in a bowl until soft peaks form. Add a bit of sugar and vanilla for flavor. Keep it cool until ready to fold into your filling. These bars need at least 4-6 hours to chill. For best results, chill them overnight. This helps the flavors mix well and the cheesecake sets properly. You can use light cream cheese. It will change the flavor and texture slightly. The bars may be less rich but still tasty. These bars pair well with coffee or hot chocolate. You can also serve them with a scoop of vanilla ice cream. Fresh whipped cream on the side is a great touch too! These pumpkin cheesecake bars blend simple ingredients for a tasty treat. You start with a crust of crushed Oreos, add a creamy filling, and finish with whipped cream. You can make it your own with different flavors or dietary swaps. Storing these bars properly keeps them fresh longer. With this guide, you’re ready to impress friends and family with a delightful dessert. Enjoy your baking and make memories with every slice!

No-Bake Oreo Pumpkin Cheesecake Bars

Indulge in the fall flavors with these delicious No-Bake Oreo Pumpkin Cheesecake Bars. This easy recipe combines a creamy pumpkin filling with a crunchy Oreo crust for a delightful dessert that requires no baking. Perfect for any gathering or cozy night in, these bars are simple to make and even easier to enjoy. Click through to discover the full recipe and treat yourself to the ultimate autumn dessert!

Ingredients
  

24 Oreo cookies, finely crushed

4 tablespoons unsalted butter, melted

1 cup pumpkin puree (canned or fresh)

1 cup cream cheese, softened to room temperature

½ cup powdered sugar

1 teaspoon vanilla extract

1 teaspoon pumpkin pie spice

1 cup whipped cream (store-bought or homemade)

Optional: extra Oreo crumbs for garnish

Instructions
 

Prepare the Crust: In a medium mixing bowl, combine the finely crushed Oreo cookies with melted butter. Stir until the mixture is well combined and has a consistency similar to wet sand.

    Form the Crust: Lightly grease an 8x8-inch baking pan with cooking spray or butter. Press the Oreo mixture firmly into the bottom of the pan, using the back of a measuring cup or your fingers to create an even layer. Transfer the pan to the refrigerator and allow the crust to chill and set for 10-15 minutes.

      Make the Filling: In a large mixing bowl, use an electric mixer to beat the softened cream cheese until creamy and smooth. Add the pumpkin puree, powdered sugar, vanilla extract, and pumpkin pie spice to the bowl. Blend until the mixture is completely smooth and well combined.

        Incorporate Whipped Cream: Carefully fold in the whipped cream into the pumpkin mixture using a spatula. Gently mix until the whipped cream is fully incorporated, ensuring to maintain the light and airy texture.

          Assemble the Bars: Carefully pour the creamy pumpkin cheesecake mixture over the chilled Oreo crust, spreading it evenly with a spatula to ensure a smooth, flat top.

            Chill to Set: Cover the pan with plastic wrap or aluminum foil and refrigerate the bars for a minimum of 4-6 hours, or for best results, overnight. This allows the flavors to meld and the cheesecake to set properly.

              Serve: Once set, remove the bars from the refrigerator and cut into squares. If desired, sprinkle a generous amount of extra Oreo crumbs on top before serving to add a delightful crunch.

                - Prep Time: 20 minutes

                  - Total Time: 4-6 hours (including chilling)

                    - Servings: 9 bars

                      Enjoy these delightful No-Bake Oreo Pumpkin Cheesecake Bars as a perfect fall treat that combines creamy, spiced pumpkin goodness with a crunchy chocolate crust!

                        WANT TO SAVE THIS RECIPE?