![- 1 ½ cups graham cracker crumbs - ½ cup unsalted butter, melted - 2 tablespoons granulated sugar - 12 oz white chocolate, coarsely chopped - 1 cup heavy cream - 1 teaspoon pure vanilla extract - 3 large eggs, separated - Pinch of sea salt - Zest of 1 lemon - Assorted fresh berries - Fresh mint leaves - 9-inch tart pan - Mixing bowls - Electric mixer - Spatula - Double boiler or heatproof bowl Gather all the ingredients before you start. Fresh berries and mint leaves give a nice touch on top. The equipment is simple, but make sure you have a good mixer. A 9-inch tart pan works best for this recipe. A double boiler helps melt the chocolate without burning it. Mixing bowls of different sizes will help keep things organized. 1. Oven Preheating: Start by preheating your oven to 350°F (175°C). This step is key for a perfect crust. 2. Mixing and Pressing Crust Ingredients: In a large bowl, mix 1 ½ cups graham cracker crumbs, ½ cup melted unsalted butter, and 2 tablespoons granulated sugar. Stir until the mix looks like wet sand. Press the mixture firmly into a 9-inch tart pan. Make sure it covers the bottom and sides well. 3. Baking and Cooling the Crust: Bake the crust for 10 minutes until it turns lightly golden. Once baked, take it out and let it cool completely on a wire rack. 1. Melting the White Chocolate: For this, set a heatproof bowl over a pot of simmering water. Add 12 ounces of coarsely chopped white chocolate. Stir until it melts smoothly. Remove from the heat and let it cool just a bit. 2. Whipping the Cream and Vanilla: In a medium bowl, whip 1 cup of heavy cream with 1 teaspoon pure vanilla extract. Whip until soft peaks form. 3. Preparing the Egg Yolks: In another bowl, whisk 3 large egg yolks with a pinch of sea salt until they are pale and creamy. 1. Folding in Whipped Cream: Gently fold the whipped cream into the cooled chocolate mixture. Use a spatula and be careful to keep it light. 2. Whipping Egg Whites: In a clean bowl, beat the egg whites until stiff peaks form. This will make your mousse airy and light. 3. Incorporating Egg Whites into Mousse: Gradually fold the whipped egg whites into the mousse mixture. Do this in two batches to keep it fluffy. 1. Filling the Cooled Tart Shell: Spoon the mousse into the cooled tart shell. Spread it evenly with a spatula. 2. Tapping to Remove Air Bubbles: Gently tap the tart pan on your countertop. This will help remove any air bubbles trapped in the mousse. 3. Chilling the Tart: Cover the tart with plastic wrap or foil. Chill in the fridge for at least 3 hours, or until the mousse sets firm. For the full recipe, check out the [Full Recipe]. To get the best mousse, use room temperature ingredients. Cold eggs and cream do not mix well. They will not whip up light and fluffy. When you fold the whipped cream into the chocolate mix, do it gently. Use a spatula to lift and fold. This keeps the air in the mousse, making it light. Pay close attention to the timing when you whip the egg whites. You want stiff peaks, but not too dry. Whip until the egg whites look shiny and hold their shape. This is key for a perfect texture. Garnish your tart with fresh berries. Strawberries, raspberries, or blueberries add color and taste. They make the tart look even more inviting. You can serve each slice with a dollop of whipped cream. This adds creaminess and balances the sweetness of the mousse. For a touch of brightness, use lemon zest on top. It enhances the flavor and makes the dish pop. You can also sprinkle some zest on your whipped cream. For the full recipe, check out the complete instructions and enjoy this rich white chocolate mousse tart! {{image_4}} You can change the flavor of your tart to keep things fun. Here are some ideas: - Citrus Zest: Add zest from an orange or lime. This will give a bright twist. - Liqueurs: Mix in a splash of Grand Marnier or amaretto. These will add depth and warmth. - Chocolate Mix: Blend white chocolate with dark chocolate. This creates a rich, layered flavor. Making this tart fit your needs is easy! Here are some options: - Gluten-Free Crust: Use almond flour or gluten-free cookies for the crust. This keeps it tasty and safe for gluten-free eaters. - Vegan Mousse: Replace eggs with aquafaba, the liquid from canned chickpeas. Use coconut cream instead of heavy cream for a vegan touch. These variations and modifications help you make this dessert yours. You can explore the Full Recipe for more details and inspiration! To keep your Rich White Chocolate Mousse Tart fresh, store it in the fridge. Use an airtight container or cover it tightly with plastic wrap. This helps prevent the tart from absorbing any other odors in the fridge. The tart will stay good for up to 3 days. Make sure you enjoy it within this time for the best taste. You can freeze the mousse tart if you need to keep it longer. First, wrap it well in plastic wrap and then place it in a freezer-safe container. This prevents freezer burn and keeps the mousse safe. When you’re ready to enjoy, thaw it in the fridge overnight. Keep in mind that freezing might change the texture a bit. The mousse may become less creamy after thawing. However, the flavor will still be delightful! If you want the best taste and texture, it's best to consume the tart fresh. White chocolate mousse needs at least 3 hours to set. This time allows it to firm up well. If you can wait longer, it will taste even better. I often chill mine overnight for the best texture. Yes, you can make the tart crust ahead of time. Just cool it completely and store it in an airtight container. This way, you can save time when making the mousse later. I usually prepare my crust a day in advance for ease. You can use coconut cream as a dairy-free option. It adds a lovely flavor and texture. If you prefer a lower-fat option, try whole milk, but the mousse may be less rich and creamy. Yes, you can make this dessert without eggs. Replace the egg whites with aquafaba, the liquid from canned chickpeas. Whip it until it's fluffy, just like egg whites. This keeps the mousse airy without using eggs. The mousse is fully set when it feels firm to the touch. If you gently press on it, it should not jiggle. You can also insert a toothpick; if it comes out clean, your mousse is ready. Enjoy the rich texture of this mousse tart! For the detailed process, check the Full Recipe. This blog post shared a simple guide to making white chocolate mousse tart. We covered ingredients, step-by-step instructions, and handy tips. The right tools help you create this delightful dessert. Remember to customize flavors and adapt for dietary needs. With practice, your mousse tart will impress. Enjoy the sweet satisfaction of your creation and share it with loved ones. Happy baking!](https://roastedflavors.com/wp-content/uploads/2025/05/1df884e9-05de-4a90-b807-b8d65cfe69a0.webp)
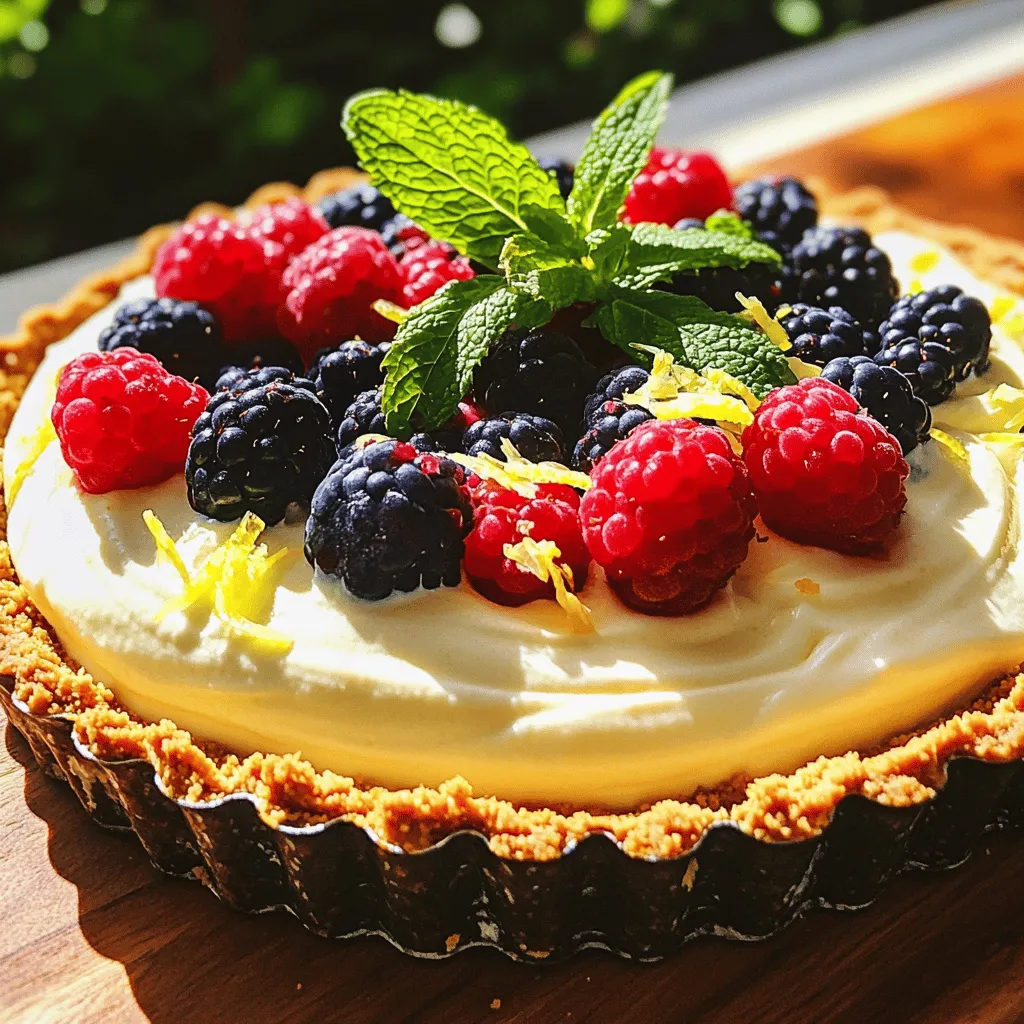
Indulge your senses with this Rich White Chocolate Mousse Tart! This dessert blends creamy white chocolate with a crisp crust for a dreamy treat. Whether you’re a beginner or an expert, I’ll guide you step by step to create this stunning tart. Get ready to impress your friends and family with a dessert they won’t forget! Let’s dive into the key ingredients and tools you’ll need for this recipe.
Ingredients
Main Ingredients for Rich White Chocolate Mousse Tart
– 1 ½ cups graham cracker crumbs
– ½ cup unsalted butter, melted
– 2 tablespoons granulated sugar
– 12 oz white chocolate, coarsely chopped
– 1 cup heavy cream
– 1 teaspoon pure vanilla extract
– 3 large eggs, separated
– Pinch of sea salt
– Zest of 1 lemon
– Assorted fresh berries
– Fresh mint leaves
Equipment Needed
– 9-inch tart pan
– Mixing bowls
– Electric mixer
– Spatula
– Double boiler or heatproof bowl
Gather all the ingredients before you start. Fresh berries and mint leaves give a nice touch on top. The equipment is simple, but make sure you have a good mixer. A 9-inch tart pan works best for this recipe. A double boiler helps melt the chocolate without burning it. Mixing bowls of different sizes will help keep things organized.
Step-by-Step Instructions
Prepping the Tart Crust
1. Oven Preheating: Start by preheating your oven to 350°F (175°C). This step is key for a perfect crust.
2. Mixing and Pressing Crust Ingredients: In a large bowl, mix 1 ½ cups graham cracker crumbs, ½ cup melted unsalted butter, and 2 tablespoons granulated sugar. Stir until the mix looks like wet sand. Press the mixture firmly into a 9-inch tart pan. Make sure it covers the bottom and sides well.
3. Baking and Cooling the Crust: Bake the crust for 10 minutes until it turns lightly golden. Once baked, take it out and let it cool completely on a wire rack.
Making the White Chocolate Mousse
1. Melting the White Chocolate: For this, set a heatproof bowl over a pot of simmering water. Add 12 ounces of coarsely chopped white chocolate. Stir until it melts smoothly. Remove from the heat and let it cool just a bit.
2. Whipping the Cream and Vanilla: In a medium bowl, whip 1 cup of heavy cream with 1 teaspoon pure vanilla extract. Whip until soft peaks form.
3. Preparing the Egg Yolks: In another bowl, whisk 3 large egg yolks with a pinch of sea salt until they are pale and creamy.
Combining the Mixtures
1. Folding in Whipped Cream: Gently fold the whipped cream into the cooled chocolate mixture. Use a spatula and be careful to keep it light.
2. Whipping Egg Whites: In a clean bowl, beat the egg whites until stiff peaks form. This will make your mousse airy and light.
3. Incorporating Egg Whites into Mousse: Gradually fold the whipped egg whites into the mousse mixture. Do this in two batches to keep it fluffy.
Assembling the Tart
1. Filling the Cooled Tart Shell: Spoon the mousse into the cooled tart shell. Spread it evenly with a spatula.
2. Tapping to Remove Air Bubbles: Gently tap the tart pan on your countertop. This will help remove any air bubbles trapped in the mousse.
3. Chilling the Tart: Cover the tart with plastic wrap or foil. Chill in the fridge for at least 3 hours, or until the mousse sets firm.
For the full recipe, check out the [Full Recipe].
Tips & Tricks
Achieving the Perfect Mousse Texture
To get the best mousse, use room temperature ingredients. Cold eggs and cream do not mix well. They will not whip up light and fluffy.
When you fold the whipped cream into the chocolate mix, do it gently. Use a spatula to lift and fold. This keeps the air in the mousse, making it light.
Pay close attention to the timing when you whip the egg whites. You want stiff peaks, but not too dry. Whip until the egg whites look shiny and hold their shape. This is key for a perfect texture.
Presentation Ideas
Garnish your tart with fresh berries. Strawberries, raspberries, or blueberries add color and taste. They make the tart look even more inviting.
You can serve each slice with a dollop of whipped cream. This adds creaminess and balances the sweetness of the mousse.
For a touch of brightness, use lemon zest on top. It enhances the flavor and makes the dish pop. You can also sprinkle some zest on your whipped cream.
For the full recipe, check out the complete instructions and enjoy this rich white chocolate mousse tart!
Variations
Flavored Options
You can change the flavor of your tart to keep things fun. Here are some ideas:
– Citrus Zest: Add zest from an orange or lime. This will give a bright twist.
– Liqueurs: Mix in a splash of Grand Marnier or amaretto. These will add depth and warmth.
– Chocolate Mix: Blend white chocolate with dark chocolate. This creates a rich, layered flavor.
Dietary Modifications
Making this tart fit your needs is easy! Here are some options:
– Gluten-Free Crust: Use almond flour or gluten-free cookies for the crust. This keeps it tasty and safe for gluten-free eaters.
– Vegan Mousse: Replace eggs with aquafaba, the liquid from canned chickpeas. Use coconut cream instead of heavy cream for a vegan touch.
These variations and modifications help you make this dessert yours. You can explore the Full Recipe for more details and inspiration!
Storage Info
Refrigeration Guidelines
To keep your Rich White Chocolate Mousse Tart fresh, store it in the fridge. Use an airtight container or cover it tightly with plastic wrap. This helps prevent the tart from absorbing any other odors in the fridge. The tart will stay good for up to 3 days. Make sure you enjoy it within this time for the best taste.
Freezing Instructions
You can freeze the mousse tart if you need to keep it longer. First, wrap it well in plastic wrap and then place it in a freezer-safe container. This prevents freezer burn and keeps the mousse safe. When you’re ready to enjoy, thaw it in the fridge overnight.
Keep in mind that freezing might change the texture a bit. The mousse may become less creamy after thawing. However, the flavor will still be delightful! If you want the best taste and texture, it’s best to consume the tart fresh.
FAQs
How long does white chocolate mousse need to set?
White chocolate mousse needs at least 3 hours to set. This time allows it to firm up well. If you can wait longer, it will taste even better. I often chill mine overnight for the best texture.
Can I make the tart crust in advance?
Yes, you can make the tart crust ahead of time. Just cool it completely and store it in an airtight container. This way, you can save time when making the mousse later. I usually prepare my crust a day in advance for ease.
What can I substitute for heavy cream?
You can use coconut cream as a dairy-free option. It adds a lovely flavor and texture. If you prefer a lower-fat option, try whole milk, but the mousse may be less rich and creamy.
Is it possible to make this dessert without eggs?
Yes, you can make this dessert without eggs. Replace the egg whites with aquafaba, the liquid from canned chickpeas. Whip it until it’s fluffy, just like egg whites. This keeps the mousse airy without using eggs.
How can I tell when the mousse is fully set?
The mousse is fully set when it feels firm to the touch. If you gently press on it, it should not jiggle. You can also insert a toothpick; if it comes out clean, your mousse is ready. Enjoy the rich texture of this mousse tart! For the detailed process, check the Full Recipe.
This blog post shared a simple guide to making white chocolate mousse tart. We covered ingredients, step-by-step instructions, and handy tips. The right tools help you create this delightful dessert. Remember to customize flavors and adapt for dietary needs. With practice, your mousse tart will impress. Enjoy the sweet satisfaction of your creation and share it with loved ones. Happy baking!
![- 1 ½ cups graham cracker crumbs - ½ cup unsalted butter, melted - 2 tablespoons granulated sugar - 12 oz white chocolate, coarsely chopped - 1 cup heavy cream - 1 teaspoon pure vanilla extract - 3 large eggs, separated - Pinch of sea salt - Zest of 1 lemon - Assorted fresh berries - Fresh mint leaves - 9-inch tart pan - Mixing bowls - Electric mixer - Spatula - Double boiler or heatproof bowl Gather all the ingredients before you start. Fresh berries and mint leaves give a nice touch on top. The equipment is simple, but make sure you have a good mixer. A 9-inch tart pan works best for this recipe. A double boiler helps melt the chocolate without burning it. Mixing bowls of different sizes will help keep things organized. 1. Oven Preheating: Start by preheating your oven to 350°F (175°C). This step is key for a perfect crust. 2. Mixing and Pressing Crust Ingredients: In a large bowl, mix 1 ½ cups graham cracker crumbs, ½ cup melted unsalted butter, and 2 tablespoons granulated sugar. Stir until the mix looks like wet sand. Press the mixture firmly into a 9-inch tart pan. Make sure it covers the bottom and sides well. 3. Baking and Cooling the Crust: Bake the crust for 10 minutes until it turns lightly golden. Once baked, take it out and let it cool completely on a wire rack. 1. Melting the White Chocolate: For this, set a heatproof bowl over a pot of simmering water. Add 12 ounces of coarsely chopped white chocolate. Stir until it melts smoothly. Remove from the heat and let it cool just a bit. 2. Whipping the Cream and Vanilla: In a medium bowl, whip 1 cup of heavy cream with 1 teaspoon pure vanilla extract. Whip until soft peaks form. 3. Preparing the Egg Yolks: In another bowl, whisk 3 large egg yolks with a pinch of sea salt until they are pale and creamy. 1. Folding in Whipped Cream: Gently fold the whipped cream into the cooled chocolate mixture. Use a spatula and be careful to keep it light. 2. Whipping Egg Whites: In a clean bowl, beat the egg whites until stiff peaks form. This will make your mousse airy and light. 3. Incorporating Egg Whites into Mousse: Gradually fold the whipped egg whites into the mousse mixture. Do this in two batches to keep it fluffy. 1. Filling the Cooled Tart Shell: Spoon the mousse into the cooled tart shell. Spread it evenly with a spatula. 2. Tapping to Remove Air Bubbles: Gently tap the tart pan on your countertop. This will help remove any air bubbles trapped in the mousse. 3. Chilling the Tart: Cover the tart with plastic wrap or foil. Chill in the fridge for at least 3 hours, or until the mousse sets firm. For the full recipe, check out the [Full Recipe]. To get the best mousse, use room temperature ingredients. Cold eggs and cream do not mix well. They will not whip up light and fluffy. When you fold the whipped cream into the chocolate mix, do it gently. Use a spatula to lift and fold. This keeps the air in the mousse, making it light. Pay close attention to the timing when you whip the egg whites. You want stiff peaks, but not too dry. Whip until the egg whites look shiny and hold their shape. This is key for a perfect texture. Garnish your tart with fresh berries. Strawberries, raspberries, or blueberries add color and taste. They make the tart look even more inviting. You can serve each slice with a dollop of whipped cream. This adds creaminess and balances the sweetness of the mousse. For a touch of brightness, use lemon zest on top. It enhances the flavor and makes the dish pop. You can also sprinkle some zest on your whipped cream. For the full recipe, check out the complete instructions and enjoy this rich white chocolate mousse tart! {{image_4}} You can change the flavor of your tart to keep things fun. Here are some ideas: - Citrus Zest: Add zest from an orange or lime. This will give a bright twist. - Liqueurs: Mix in a splash of Grand Marnier or amaretto. These will add depth and warmth. - Chocolate Mix: Blend white chocolate with dark chocolate. This creates a rich, layered flavor. Making this tart fit your needs is easy! Here are some options: - Gluten-Free Crust: Use almond flour or gluten-free cookies for the crust. This keeps it tasty and safe for gluten-free eaters. - Vegan Mousse: Replace eggs with aquafaba, the liquid from canned chickpeas. Use coconut cream instead of heavy cream for a vegan touch. These variations and modifications help you make this dessert yours. You can explore the Full Recipe for more details and inspiration! To keep your Rich White Chocolate Mousse Tart fresh, store it in the fridge. Use an airtight container or cover it tightly with plastic wrap. This helps prevent the tart from absorbing any other odors in the fridge. The tart will stay good for up to 3 days. Make sure you enjoy it within this time for the best taste. You can freeze the mousse tart if you need to keep it longer. First, wrap it well in plastic wrap and then place it in a freezer-safe container. This prevents freezer burn and keeps the mousse safe. When you’re ready to enjoy, thaw it in the fridge overnight. Keep in mind that freezing might change the texture a bit. The mousse may become less creamy after thawing. However, the flavor will still be delightful! If you want the best taste and texture, it's best to consume the tart fresh. White chocolate mousse needs at least 3 hours to set. This time allows it to firm up well. If you can wait longer, it will taste even better. I often chill mine overnight for the best texture. Yes, you can make the tart crust ahead of time. Just cool it completely and store it in an airtight container. This way, you can save time when making the mousse later. I usually prepare my crust a day in advance for ease. You can use coconut cream as a dairy-free option. It adds a lovely flavor and texture. If you prefer a lower-fat option, try whole milk, but the mousse may be less rich and creamy. Yes, you can make this dessert without eggs. Replace the egg whites with aquafaba, the liquid from canned chickpeas. Whip it until it's fluffy, just like egg whites. This keeps the mousse airy without using eggs. The mousse is fully set when it feels firm to the touch. If you gently press on it, it should not jiggle. You can also insert a toothpick; if it comes out clean, your mousse is ready. Enjoy the rich texture of this mousse tart! For the detailed process, check the Full Recipe. This blog post shared a simple guide to making white chocolate mousse tart. We covered ingredients, step-by-step instructions, and handy tips. The right tools help you create this delightful dessert. Remember to customize flavors and adapt for dietary needs. With practice, your mousse tart will impress. Enjoy the sweet satisfaction of your creation and share it with loved ones. Happy baking!](https://roastedflavors.com/wp-content/uploads/2025/05/1df884e9-05de-4a90-b807-b8d65cfe69a0-300x300.webp)